AUX DODGE CARAVAN 2008 5.G Owners Manual
[x] Cancel search | Manufacturer: DODGE, Model Year: 2008, Model line: CARAVAN, Model: DODGE CARAVAN 2008 5.GPages: 531, PDF Size: 7.72 MB
Page 222 of 531
mSales Code REQ Ð AM/FM Stereo Radio And
6±Disc CD/DVD Changer
(MP3/WMA AUX Jack)..................252
NOperating Instructions - Radio Mode.......252
NOperation Instructions - (Disc Mode For CD
And MP3/WMA Audio Play, DVD-Video)....260
NNotes On Playing MP3/WMA Files........262
NList Button
(Disc Mode For MP3/WMA Play)..........265
NInfo Button
(Disc Mode For MP3/WMA Play)..........265
mSales Code RES Ð AM/FM Stereo Radio With
CD Player (MP3 AUX Jack)................268
NOperating Instructions - Radio Mode.......268NOperation Instructions - CD Mode For CD
And MP3 Audio Play..................274
NNotes On Playing MP3 Files.............276
NList Button (CD Mode For MP3 Play).......279
NInfo Button (CD Mode For MP3 Play).......279
mSales Code REN Ð Multimedia System Ð
If Equipped...........................280
NOperating Instructions Ð Satellite Radio
(If Equipped)........................281
NOperating Instructions Ð Voice Recognition
System (VR) (If Equipped)...............281
NOperating Instructions Ð Hands-Free
Communication (UConnectt) (If Equipped) . . . 281
NClock Setting Procedure.................281
220 UNDERSTANDING YOUR INSTRUMENT PANEL
Page 254 of 531
FM Reception
Because FM transmission is based on frequency varia-
tions, interference that consists of amplitude variations
can be filtered out, leaving the reception relatively clear,
which is the major feature of FM radio.
NOTE:The radio, steering wheel radio controls (if
equipped), and six-disc CD/DVD changer (if equipped)
will remain active for up to 90 seconds after the ignition
switch has been turned OFF, depending upon the EVIC,
Accessory Delay setting. Opening a vehicle front door
will cancel this feature.
Electrical Disturbances
Radio waves may pick up electrical disturbances during
transmission. They mainly affect the wave amplitude,
and thus remain a part of the AM reception. They
interfere very little with the frequency variations that
carry the FM signal.
SALES CODE REQ Ð AM/FM STEREO RADIO
AND 6±DISC CD/DVD CHANGER (MP3/WMA AUX
JACK)
NOTE:The radio sales code is located on the lower right
side of your radio faceplate.
Operating Instructions - Radio Mode
NOTE:The ignition switch must be in the ON or ACC
position to operate the radio.
Power Switch/Volume Control (Rotary)
Push the On/Volume control knob to turn on the radio.
Press the control knob a second time to turn off the radio.
Electronic Volume Control
The electronic volume control turns continuously (360
degrees) in either direction without stopping. Turning the
On/Volume control knob to the right increases the vol-
ume and to the left decreases it.
252 UNDERSTANDING YOUR INSTRUMENT PANEL
Page 268 of 531
Press and hold the INFO button again for three seconds
to return to9elapsed time9display.
Operation Instructions - Auxiliary Mode
The auxiliary (AUX) jack is an audio input jack, which
allows the user to plug in a portable device such as an
MP3/WMA player, cassette player, or microphone and
utilize the vehicle's audio system to amplify the source
and play through the vehicle speakers.
Pressing the AUX button will change the mode to auxil-
iary device if the AUX jack is connected.
NOTE:The AUX device must be turned on and the
device's volume set to the proper level. If the AUX audio
is not loud enough, turn the device's volume up. If the
AUX audio sounds distorted, turn the device's volume
down.
SEEK Button (Auxiliary Mode)
No function.
SCAN Button (Auxiliary Mode)
No function.
EJECT Button (Auxiliary Mode)
No function.
TIME Button (Auxiliary Mode)
Press the TIME button to change the display from
elapsed playing time to time of day. The time of day will
display for five seconds.
RW/FF (Auxiliary Mode)
No function.
SET Button (Auxiliary Mode)
No function.
266 UNDERSTANDING YOUR INSTRUMENT PANEL
Page 270 of 531
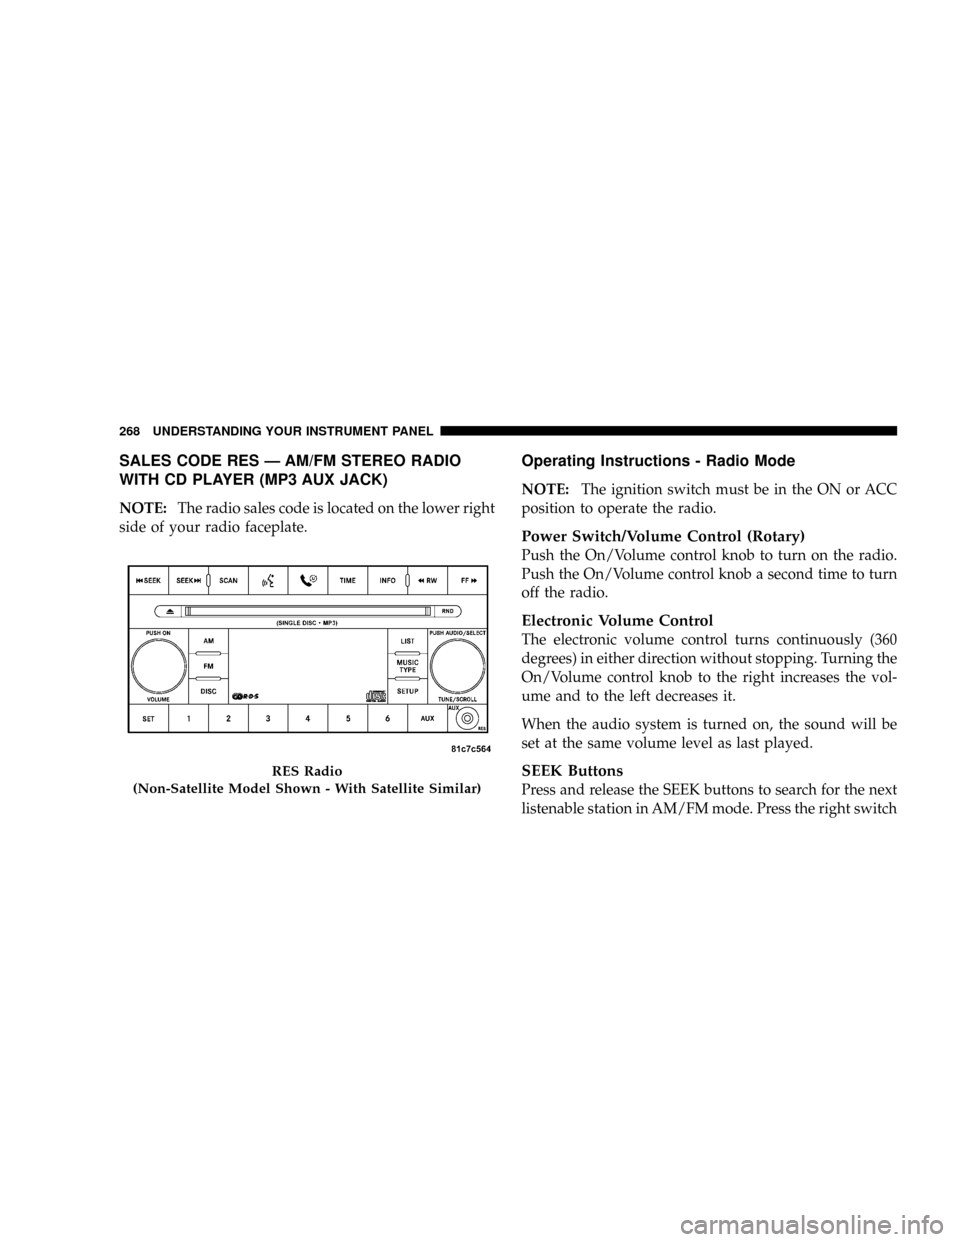
SALES CODE RES Ð AM/FM STEREO RADIO
WITH CD PLAYER (MP3 AUX JACK)
NOTE:The radio sales code is located on the lower right
side of your radio faceplate.
Operating Instructions - Radio Mode
NOTE:The ignition switch must be in the ON or ACC
position to operate the radio.
Power Switch/Volume Control (Rotary)
Push the On/Volume control knob to turn on the radio.
Push the On/Volume control knob a second time to turn
off the radio.
Electronic Volume Control
The electronic volume control turns continuously (360
degrees) in either direction without stopping. Turning the
On/Volume control knob to the right increases the vol-
ume and to the left decreases it.
When the audio system is turned on, the sound will be
set at the same volume level as last played.
SEEK Buttons
Press and release the SEEK buttons to search for the next
listenable station in AM/FM mode. Press the right switch
RES Radio
(Non-Satellite Model Shown - With Satellite Similar)
268 UNDERSTANDING YOUR INSTRUMENT PANEL
Page 281 of 531
LIST Button (CD Mode for MP3 Play)
Pressing the LIST button will bring up a list of all folders
on the disc. Scrolling up or down the list is done by
turning the Tune/Scroll control knob. Selecting a folder
by pressing the Tune/Scroll control knob will begin
playing the files contained in that folder (or the next
folder in sequence if the selection does not contain
playable files).
The folder list will time out after five seconds.
INFO Button (CD Mode for MP3 Play)
Pressing the INFO button repeatedly will scroll through
the following TAG information: Song Title, Artist, File
Name, and Folder Name (if available).
Press the INFO button once more to return to9elapsed
time9priority mode.
Press and hold the INFO button for three seconds or
more and the radio will display song titles for each file.Press and hold the INFO button again for three seconds
to return to9elapsed time9display.
Operation Instructions - Auxiliary Mode
The auxiliary (AUX) jack is an audio input jack, which
allows the user to plug in a portable device such as an
MP3 player, or cassette player, and utilize the vehicle's
audio system to amplify the source and play through the
vehicle speakers.
Pressing the AUX button will change the mode to auxil-
iary device if the AUX jack is connected.
NOTE:The AUX device must be turned on and the
device's volume set to proper level. If the AUX audio is
not loud enough, turn the device's volume up. If the AUX
audio sounds distorted, turn the device's volume down.
UNDERSTANDING YOUR INSTRUMENT PANEL 279
4
Page 282 of 531
TIME Button (Auxiliary Mode)
Press this button to change the display to time of day. The
time of day will display for five seconds (when ignition is
OFF).
Operating Instructions - Hands-Free Phone
(UConnectt) (If Equipped)
Refer to ªHands-Free Communication (UConnectt)º in
Section 3.
Operating Instructions - Satellite Radio Mode (If
Equipped)
Refer to ªSatellite Radioº in this section.
Operating Instructions - Video Entertainment
System (VES)t(If Equipped)
Refer to separate ªVideo Entertainment System (VES)t
Guide.º
SALES CODE REN Ð MULTIMEDIA SYSTEM Ð IF
EQUIPPED
NOTE:The sales code is located on the lower right side
of the unit's faceplate.
The REN Multimedia system contains a radio, CD/DVD
player, USB port, a 20-gigabyte hard drive (HDD), and a
ªJukeBoxº (virtual CD changer). Sirius Satellite Radio is
optional. The 6.5 in (16.5 cm) touch screen allows for easy
menu selection.
A 20-gigabyte HDD allows uploads of music and photos
from CDs or through the USB port. The Gracenote
database finds the artist, track, and title for the music.
An auxiliary input jack permits passengers to listen to a
portable MP3 player through the vehicle's speakers. For
vehicles equipped with the Vehicle Entertainment System
(VES)t, separate audio outputs allow passengers to listen
to the vehicle speakers while different audio tracks play
280 UNDERSTANDING YOUR INSTRUMENT PANEL
Page 286 of 531
The satellite navigation capability combines a Global-
Positioning System (GPS)-based navigation system with
an integrated color screen to provide maps, turn identi-
fication, selection menus, and instructions for selecting a
variety of destinations and routes.
A shared HDD for the navigation system, the database,
and other radio features allows uploads of music and
photos from CDs or through the USB port. The Gracenote
database finds the artist, track, and title for the music.
An auxiliary input jack permits passengers to listen to a
portable MP3 player through the vehicle's speakers. For
vehicles equipped with the Vehicle Entertainment System
(VES)t, separate audio outputs allow passengers to listen
to the vehicle speakers while different audio tracks play
through the system's wireless headphones. This means
rear-seat passengers can watch a DVD on the optional
rear-seat entertainment system while the driver and
front-seat passenger listen to the radio.Other special features include direct tune, music type
selections, traffic messaging (optional), easy store presets,
parental lockout for VESt(if equipped), backup camera
display for vehicles equipped with a backup camera, and
on some models, a dual display screen operation. Refer to
your ªNavigation User's Manualº for detailed operating
instructions.
Operating Instructions Ð Satellite Radio
Refer to your ªNavigation User's Manualº for detailed
operating instructions.
Operating Instructions Ð Hands-Free
Communication (UConnectT) (If Equipped)
Refer to your ªNavigation User's Manualº for detailed
operating instructions.
284 UNDERSTANDING YOUR INSTRUMENT PANEL
Page 295 of 531
Connecting The iPodTDevice
Use the optional connection cable to connect an iPodtto
the vehicle's UCI connector (which is located in the glove
box or center console on some vehicles. This location may
vary with vehicle). Once the iPodtis connected and
synchronized to the vehicle system (this may take a few
seconds to connect), the vehicle brand logo appears on
the iPodtdisplay, and it starts charging and is ready for
use by pressing radio switches as described below.
Controlling The iPodTUsing Radio Buttons
To get into the UCI (iPodt) mode and access a connected
iPodt, press the AUX button on the radio faceplate. Once
in the UCI (iPodt) mode, the iPodtaudio track (if
available from iPodt) will start playing over the vehicle
audio system.
Play Mode
When switched to UCI mode the iPodtwill be in Play
mode. In Play mode, you may use the following buttons
on the radio faceplate to control the iPodtand display
data:
Tune/Scroll Knob
Use the Tune/Scroll knob to go to the next or previous
track.
The Tune/Scroll knob functions similar to the scroll
wheel on the iPodtmobile digital device.
Turning it clockwise (forward) by one click while playing
a track skips to the next track.
Turning it counterclockwise (backward) by one click
during the first two seconds of the track will jump to the
previous track in the list and turning this button at any
other time in the track will jump to the beginning of the
current track.
UNDERSTANDING YOUR INSTRUMENT PANEL 293
4
Page 300 of 531
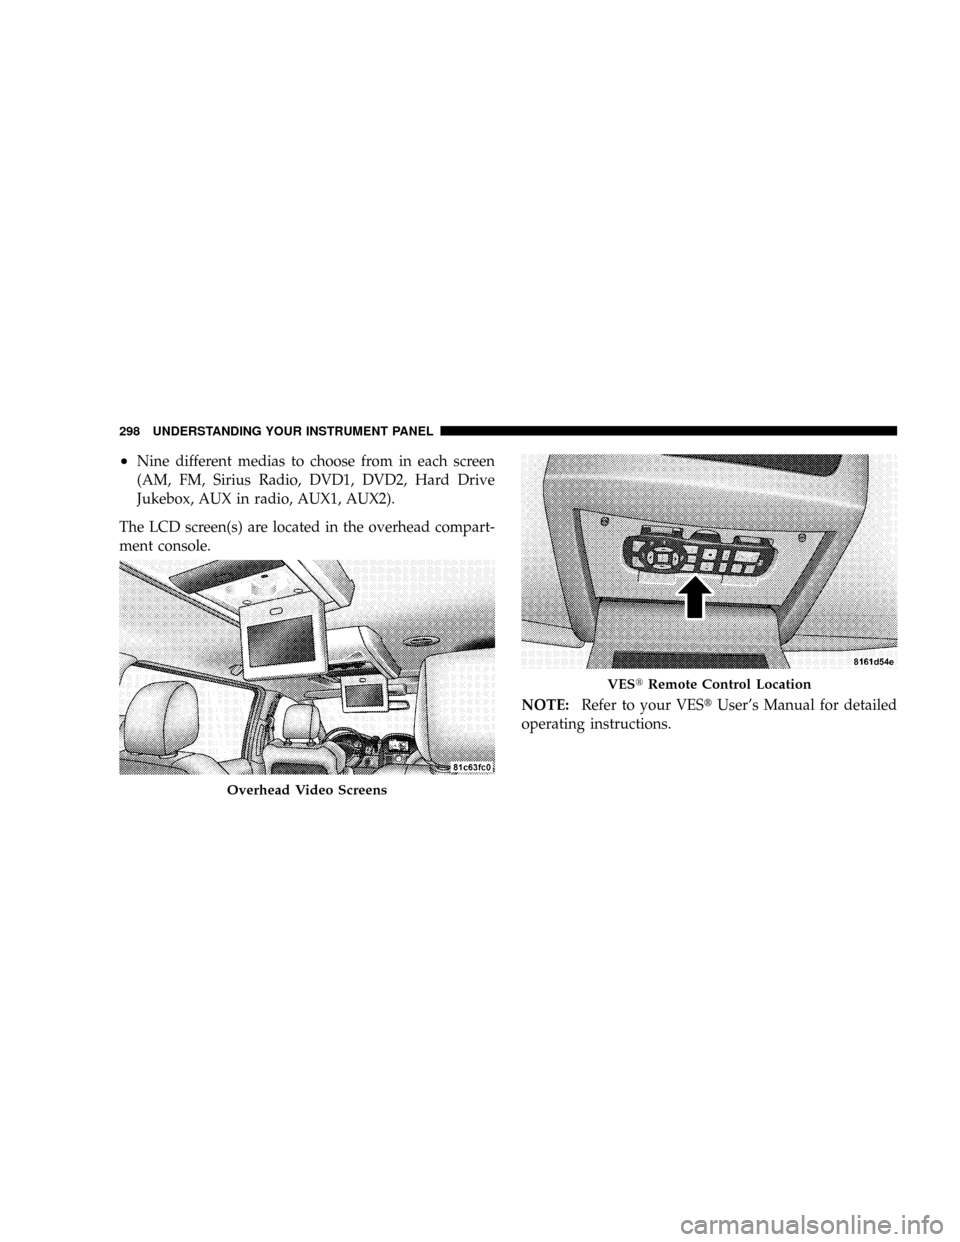
²Nine different medias to choose from in each screen
(AM, FM, Sirius Radio, DVD1, DVD2, Hard Drive
Jukebox, AUX in radio, AUX1, AUX2).
The LCD screen(s) are located in the overhead compart-
ment console.
NOTE:Refer to your VEStUser's Manual for detailed
operating instructions.
Overhead Video Screens
VEStRemote Control Location
298 UNDERSTANDING YOUR INSTRUMENT PANEL
Page 522 of 531
Outside Rearview Mirrors...............100,102
Overdrive............................. 332
Overhead Console....................... 182
Overhead Travel Information Center.......... 182
Overheating, Engine...................226,410
Owner's Manual (Operator Manual).......... 504
Panic Alarm............................ 24
Park Sense System, Rear................... 171
Parking Brake.......................... 335
Parking On Hill......................... 335
Passing Light........................... 170
Pedals, Adjustable....................... 177
Personal Settings........................ 248
Pets, Transporting........................ 89
Phone, Cellular....................104,283,284
Phone, Hands-Free (UConnectŸ).......104,283,284
Placard, Tire and Loading Information......... 353Port
Universal Serial Bus (USB).............280,283
USB .............................280,283
Power
Brakes.............................. 337
Distribution Center (Fuses)............... 474
Door Locks........................... 32
Lift Gate............................. 49
Mirrors..........................102,103
Outlet (Auxiliary Electrical Outlet).......... 195
Seats............................... 133
Sliding Door.......................... 42
Steering............................. 344
Steering, Checking..................... 452
Sunroof............................. 192
Windows............................. 37
Power Steering Fluid..................... 488
Pregnant Women and Seat Belts.............. 65
Preparation for Jacking.................... 415
520 INDEX