remote control DODGE CARAVAN 2008 5.G Owners Manual
[x] Cancel search | Manufacturer: DODGE, Model Year: 2008, Model line: CARAVAN, Model: DODGE CARAVAN 2008 5.GPages: 531, PDF Size: 7.72 MB
Page 22 of 531
previously described arming sequences has occurred, the
system will arm regardless of whether you are in the
vehicle or not. If you remain in the vehicle and open a
door, the alarm will sound. If this occurs, disarm the
system.
If the Security Alarm System is armed and the battery
becomes disconnected, the system will remain armed
when the battery is reconnected; the exterior lights will
flash, the horn will sound, and the ignition will not start
the vehicle. If this occurs, disarm the system.
Tamper Alert
If something has triggered the system in your absence,
the horn will sound three times when you unlock the
doors and the security telltale light will flash for 30
seconds. Check the vehicle for tampering.
Security System Manual Override
The system will not arm if you lock the doors using the
manual door lock plunger.
ILLUMINATED ENTRY SYSTEM Ð IF EQUIPPED
The courtesy lights will turn on when you use the
Remote Keyless Entry (RKE) transmitter or open the
doors. This feature is only available if you have RKE.
The lights will fade to off after approximately 10 seconds
or they will immediately fade to off once the ignition
switch is turned ON.
NOTE:
²The front courtesy overhead console, door courtesy
and liftgate lights do not turn on if the dimmer control
is in the interior lights ON position (extreme top
position).
²The Illuminated Entry System will not operate if the
dimmer control is in the extreme downward position.
20 THINGS TO KNOW BEFORE STARTING YOUR VEHICLE
Page 49 of 531
NOTE:
²After engaging the Child Protection Door Lock, al-
ways test the door from the inside to make certain it is
in the desired position.
²When the Child Protection Door Lock system is en-
gaged, (even if the inside door lock is in the unlocked
position) the door can be opened only by using the
outside door handle, the Remote Keyless Entry (RKE)
transmitter, the switches on the overhead console, or
the switches located on the trim panel just in front of
the power sliding door.
²The power sliding side door will operate from the
switches located on the trim panel just in front of the
power sliding door, regardless of the Child Protection
Door Lock lever position.To avoid unintentional
operation of the power sliding door from the rear
seats, press the Master Lock Out Switch located in
the front overhead console to the ON position.
WARNING!
Avoid trapping anyone in the vehicle in a collision.
Remember that the sliding doors can only be opened
from the outside door handle or the switches located
on the trim panel just in front of the power sliding
door when the child protection locks are engaged.
To Disengage The Child Protection Door Lock
1. Open the sliding side door.
2. Slide the child lock control outward (away from the
vehicle) to disengage the Child Protection Door Lock.
3. Repeat Steps 1 and 2 on the opposite sliding door (if
equipped).
THINGS TO KNOW BEFORE STARTING YOUR VEHICLE 47
2
Page 185 of 531
Courtesy/Interior Lighting
At the forward end of the console are two courtesy lights
(standard dome light has two buttons). The lights turn on
when a front door, a sliding door or the liftgate is opened.
If your vehicle is equipped with Remote Keyless Entry,
the lights will also turn on when the unlock button on the
transmitter is pressed.
The courtesy lights also function as reading lights. Press
in on each lens to turn these lights on while inside the
vehicle. Press a second time to turn the each light off. You
may adjust the direction of these lights by pressing the
outside ring which is identified with four directional
arrows.The area around the instrument panel cupholders is also
illuminated from a light in the overhead console. This
light is turned on when the headlight switch is on and
will adjust in brightness when the dimmer control is
rotated up or down.
Sunglass Storage
At the rear of the front overhead console, a compartment
is provided for the storage of two pairs of sunglasses.
Press the door latch to open the compartment. The door
will slowly rotate to an open position.
NOTE:The front overhead console used with factory
sunroof incorporates a sunroof switch.
UNDERSTANDING THE FEATURES OF YOUR VEHICLE 183
3
Page 187 of 531
Rear Courtesy/Reading Lights Ð If Equipped
The overhead console had two sets of courtesy lights. The
lights turn on when a front door, a sliding door or the
liftgate is opened. If your vehicle is equipped with
Remote Keyless Entry, the lights will also turn on when
the unlock button on the transmitter is pressed.
The courtesy lights also function as reading lights. Press
in on each lens to turn these lights on while inside the
vehicle. Press a second time to turn the each light off. You
may adjust the direction of these lights by pressing the
outside ring which is identified with four directional
arrows.
Rear Console Halo Lighting Ð If Equipped
The rear overhead console features recessed halo lighting
around the perimeter of the console base. This feature
provides additional lighting options while traveling and
is controlled by the headlight switch. Refer to ªHalo
Lighting - If Equippedº under ªLightingº in ªUnder-
standing The Features Of Your Vehicleº in Section 3.
GARAGE DOOR OPENER Ð IF EQUIPPED
HomeLinktreplaces up to three remote controls (hand-
held transmitters) that operate devices such as garage
door openers, motorized gates, lighting, or home security
systems. The HomeLinktunit operates off your vehicle's
battery.
UNDERSTANDING THE FEATURES OF YOUR VEHICLE 185
3
Page 224 of 531
mRadio Operation And Cellular Phones........299
mRemote Sound System Controls Ð If Equipped . . 299
NRadio Operation......................299
NCD Player..........................300
mCD/DVD Maintenance...................300
mClimate Controls.......................301
NManual Heating, Ventilation And Air
Conditioning (HVAC) System.............301
NRear Manual Climate Control Zone Ð
If Equipped.........................307
NAutomatic Temperature Control (ATC) Ð
If Equipped.........................309NSummer Operation....................318
NWinter Operation.....................318
NVacation/Storage.....................318
NWindow Fogging.....................318
NOutside Air Intake....................319
NOperating Tips.......................319
NA/C Air Filter Ð If Equipped............320
mElectric Rear Window Defroster Ð
If Equipped...........................320
222 UNDERSTANDING YOUR INSTRUMENT PANEL
Page 259 of 531
station with the same selected Music Type name. The
Music Type function only operates when in the FM
mode.
If a preset button is activated while in the Music Type
(Program Type) mode, the Music Type mode will be
exited and the radio will tune to the preset station.
SETUP Button
Pressing the SETUP button allows you to select between
the following items:
NOTE:Turn the Tune/Scroll control knob to scroll
through the entries. Push the AUDIO/SELECT button to
select an entry and make changes.
²DVD Enter -When the disc is in DVD Menu mode,
selecting DVD Enter will allow you to play the current
highlighted selection. Use the remote control to scroll
up and down the menu (if equipped).
²DISC Play/Pause -You can toggle between
playing the DVD and pausing the DVD by
pushing the SELECT button (if equipped).
²DVD Play Options -Selecting the DVD Play Options
will display the following:
²Subtitle ± Repeatedly pressing SELECT will switch
subtitles to different subtitle languages that are
available on the disc (if equipped).
²Audio Stream ± Repeatedly pressing SELECT will
switch to different audio languages (if supported on
the disc) (if equipped).
²Angle ± Repeatedly pressing SELECT will change
the viewing angle if supported by the DVD disc (if
equipped).
NOTE:The available selections for each of the above
entries varies depending upon the disc.
UNDERSTANDING YOUR INSTRUMENT PANEL 257
4
Page 260 of 531
NOTE:These selections can only be made while playing
a DVD.
²VEStPower -Allows you to turn VESton and off (if
equipped).
²VEStLock -Locks out rear VEStremote controls (if
equipped).
²VEStCH1/CH2 -Allows the user to change the mode
of either the IR1 or IR2, wireless headphones by
pressing the AUDIO/SELECT button (if equipped).
²Set Home Clock -Pressing the SELECT button allows
you to set the clock. Turn the Tune/Scroll control knob
to adjust the hours and then press and turn the
Tune/Scroll control knob to adjust the minutes. Press
the Tune/Scroll control knob again to save changes.
²Player Defaults -Selecting this item will allow the
user to scroll through the following items, and set
defaults according to customer preference.Menu Language Ð If Equipped
Selecting this item will allow the user to choose the
default startup DVD menu language (effective only if
language supported by disc). If you want to select a
language not listed, then scroll down and select9other.9
Enter the four-digit country code using the Tune/Scroll
control knob to scroll up and down to select the number
and then push to select.
Audio Language Ð If Equipped
Selecting this item allows you to choose a default audio
language (effective only if the language is supported by
the disc). You can select a language not listed by scrolling
down and selecting9other.9Enter the country code using
the Tune/Scroll control knob to scroll up and down to
select the number and then push to select.
258 UNDERSTANDING YOUR INSTRUMENT PANEL
Page 261 of 531
Subtitle Language Ð If Equipped
Selecting this item allows you to choose a default subtitle
language (effective only if the language is supported by
the disc). You can select a language not listed by scrolling
down and selecting9other.9Enter the country code using
the Tune/Scroll control knob to scroll up and down to
select the number and then push to select.
Subtitles Ð If Equipped
Selecting this item allows you to choose between subtitle
Off or On.
Audio DRC Ð If Equipped
Selecting this item allows you to limit maximum audio
dynamic range. The default is set to9High,9and under
this setting, dialogues will play at 11 db higher than if the
setting is9Normal.9Aspect Ratio Ð If Equipped
Selecting this item allows you to choose between wide
screen, pan scan, and letter box.
AutoPlay Ð If Equipped
When this is set to On and a DVD video is inserted, it will
bypass the DVD menu screen and automatically play the
movie. In some rare cases, the DVD player may not
auto-play the main title. In such cases, use the MENU
button on the remote control to select desired title to play.
NOTE:The user will have to set these defaults before
loading a disc. If changes are made to these settings after
a disc is loaded, changes will not be effective. Also, the
defaults are effective only if the disc supports the
customer-preferred settings.
AM and FM Buttons
Press the buttons to select AM or FM Modes.
UNDERSTANDING YOUR INSTRUMENT PANEL 259
4
Page 299 of 531
SIRIUS BACKSEAT TVŸ Ð IF EQUIPPED
Satellite video uses direct satellite receiver broadcasting
technology to provide streaming video coast to coast. The
subscription service provider is SIRIUS Satellite Radio.
SIRIUS Backseat TVŸ offers three video channels for
family entertainment, directly from its satellites and
broadcasting studios.
NOTE:SIRIUS service is not available in Hawaii and
has limited coverage in Alaska.
Refer to your Video Entertainment System (VES)t, RER
Navigation or REN Multimedia User Manuals for de-
tailed operating instructions.
VIDEO ENTERTAINMENT SYSTEM (VEST)ÐIF
EQUIPPED
The optional VESt(Video Entertainment System) is
available with:
²One or two video screens
²Additional single-disc DVD player with twoÐscreen
system
²Battery-powered two channel remote control
²Two remote headphones
²Integrated remote storage in either screen location
²Three different medias can be played simultaneously
(Cabin speakers and Headphone Channels 1 and 2)
²Easy menu driven functions on touch screen radios
²Video and audio input jacks available in rear seating
area
UNDERSTANDING YOUR INSTRUMENT PANEL 297
4
Page 300 of 531
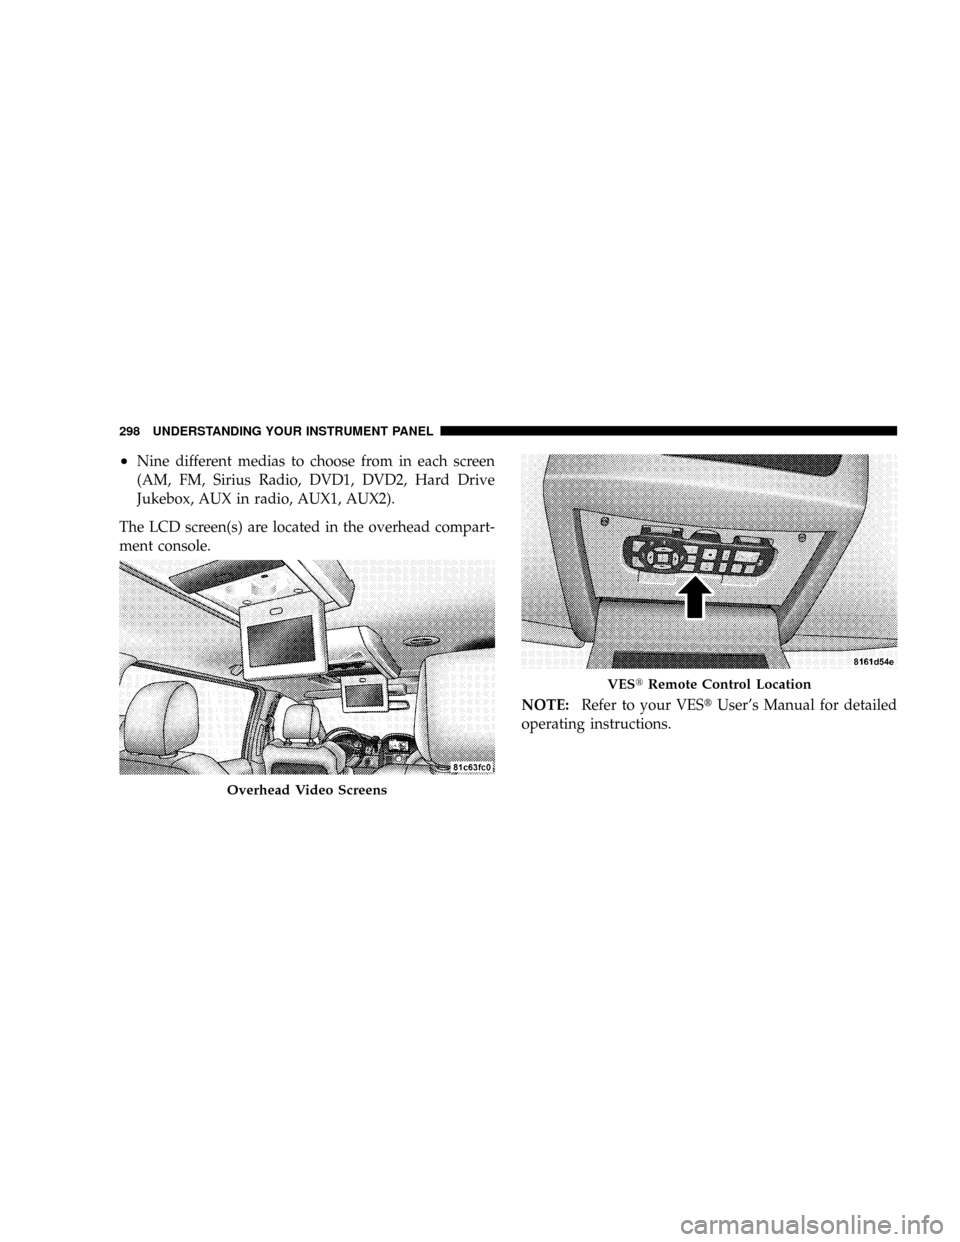
²Nine different medias to choose from in each screen
(AM, FM, Sirius Radio, DVD1, DVD2, Hard Drive
Jukebox, AUX in radio, AUX1, AUX2).
The LCD screen(s) are located in the overhead compart-
ment console.
NOTE:Refer to your VEStUser's Manual for detailed
operating instructions.
Overhead Video Screens
VEStRemote Control Location
298 UNDERSTANDING YOUR INSTRUMENT PANEL