key DODGE CHALLENGER 2011 3.G Owner's Manual
[x] Cancel search | Manufacturer: DODGE, Model Year: 2011, Model line: CHALLENGER, Model: DODGE CHALLENGER 2011 3.GPages: 88, PDF Size: 4.02 MB
Page 37 of 88
USB Port
• The USB Port on the radio allows you to copy songs from a connected USB drive orsupported media device onto your Media Center hard drive. You can also playback
music from your USB device through the USB Port on the radio. The USB Port on
a Media Center 730N allows you to support iPod
®devices or USB drives for music
playback, charging, control through radio or steering wheel buttons.
• The USB port located in the center console also offers the ability to play songs from connected USB drives, or supported media devices. Supported devices may
be controlled through the vehicles steering wheel or radio controls and may be
charged through the USB port.
Navigation – Media Center 730N (Sales Code RHR) Only
• Navigation radios require digital data from a navigation database. The data in thenavigation database is licensed from Navigation Technologies®. Not all roads are
digitized.
• For software updates, visit http://www.navteq.com website, or contact your authorized dealer for the latest available software.
NOTE: Many features of this radio are speed dependent. For your own safety, it is not
possible to use the touch-screen keyboard to enter a name (e.g., street name) while the
vehicle is in motion. Pull over at a safe location to complete your task or use Voice
Command.
• The Navigation system receives GPS signals from satellites to display the positionof your vehicle.
Map • Press the NAV hard-key to access the Navigation Main Menu.
• Touch the MAP soft-key to display a map of your current position.
New Destination • Press the NAV hard-key to access the Navigation Main Menu.
• Touch the NEW DESTINATION soft-key to program a destination, then select the destination soft-key of your choice.
• Media Center 730N allows destinations to be input by voice while in motion. Press the Voice Command button on the radio to begin.
Program/Storing Home Address • Press the NAV hard-key to access the Navigation Main Menu.
• Touch the GUIDE ME HOME soft-key, then touch the STREET ADDRESS soft-key.
• Touch the STATE soft-key, then enter your state name into the speller; select your state from the list and press the CHANGE soft-key.
• Touch the INPUT STREET NAME soft-key and enter your street name into the speller.
• Touch the CONTINUE soft-key and enter your address into the speller; touch the CONTINUE soft-key again.
• Touch the city name and touch the SAVE soft-key to complete programming.
ELECTRONICS
35
Page 38 of 88
Change Stored Home Address• Press the MENU hard-key, then touch the MY FILES soft-key.
• Touch the MY ADDRESS BOOK soft-key, then touch the HOME soft-key.
• In the Home Address Information screen, touch the EDIT CONTACT soft-key, then touch the CHANGE ADDRESS soft-key in the next screen.
• Touch the INPUT STREET NAME soft-key and enter your street name into the speller.
• Touch the CONTINUE soft-key and enter your address into the speller; touch the CONTINUE soft-key again.
• Touch the city name and touch the SAVE soft-key to complete programming.
Guide Me Home • Press the NAV hard-key to access the Navigation Main Menu.
• Touch the GUIDE ME HOME soft-key to route you back to your home destination from your current location. Touch the GO soft-key to start your trip.
Local Address Book Features • Your navigation-equipped radio can store destinations into its local address book so that you can recall them later.
• To save your current location to the local address book, touch the cursor on the screen, next touch SELECT, then touch CURSOR POINT, next touch OPTIONS,
then touch SAVE DESTINATION, and lastly touch ADDRESS BOOK.
• To add or delete destinations from your local address book stored on the radio, press the MENU hard key, then touch MY FILES, next touch ADDRESS BOOK, and
last touch DEFAULT FOLDER (or any added folder).
• To route to a destination that is saved in your local address book, press the MENU hard key, then touch MY FILES, next touch ADDRESS BOOK, and last touch
DEFAULT FOLDER and select the contact you want to route to.
Navigation – Media Center 430N (Sales Code RHB) Only
• For software updates, visit http://www.garmin.com/chrysler website, or contact yourauthorized dealer for the latest available software.
• The Navigation system receives GPS signals from satellites to display the position of your vehicle. You may experience interruptions or delays in receiving navigation
information in garages, tunnels, large cities, or other situations where the vehicle
does not have a direct line of sight to the sky.
• Voice Command is not available for navigation commands on this radio (although Voice Command functions for all other radio functions).
Map • Touch the NAV soft-key in the upper-right corner of your radio screen, to access the Navigation system.
• Touch the View Mapsoft-key to display a map of your current position.
ELECTRONICS
36
Page 39 of 88
Entering a Destination/Finding a Point of Interest• Touch the NAV soft-key in the upper-right corner of your radio screen, to access the Navigation system.
• Touch the Where To?soft-key to program a destination.
• Next touch one of the subcategories to search for your destination. Address, Points of Interest, Recently Found, Favorites and Intersection are a few of the options.
• After touching one of the subcategories, follow the on-screen steps to complete the process and be routed to your destination.
Setting a Home Location • Touch the NAV soft-key in the upper-right corner of your radio screen, to access the Navigation system.
• Touch the Where To?soft-key, then touch Go Home.
• Next, select from: • Enter My Address – enter an address for the location using the on-screenkeyboard.
• Use my current location – sets your current location as your Home Location.
• Choose from Recently Found – select a location from your recently found locations.
• After you set your Home Location, touch Where To?, then touch Go Home.
Editing Home Location • Touch the NAV soft-key in the upper-right corner of your radio screen, to access the Navigation system.
• Touch the Where To?soft-key, then touch Favorites.
• Touch the location you want to edit.
• Next, touch Press for More.
• Touch Edit.
• Follow the on-screen steps for editing the Home Location.
Go Home • Touch the NAV soft-key in the upper-right corner of your radio screen, to access the Navigation system.
• Touch Where To? , then touch Go Home.
SIRIUS Travel Link – Media Center 730N (RHR) & Media Center 430N (RHB) Only
• To access SIRIUS Travel Link, press the MENU hard-key, then touch the Travel
Link soft-key.
NOTE: SIRIUS Travel Link requires a subscription, sold separately after trial
subscription included with vehicle purchase.
ELECTRONICS
37
Page 42 of 88
Receiving A Call – Accept (And End)
• When an incoming call rings/is announced on Uconnect™, press the Phonebutton
.
• To end a call, press the Phone button
.
Mute (Or Unmute) Microphone During Call
• During a call, press the Voice Command button.
• (After the BEEP), say “mute” (or “mute off”).
Transfer Ongoing Call Between Handset And Vehicle
• During a call, press the Voice Command button.
• (After the BEEP), say “transfer call”.
Changing The Volume
• Start a dialogue by pressing the Phone button, then adjust the volume during
a normal call.
• Use the radio ON/OFF VOLUME rotary knob to adjust the volume to a comfortable level while the Uconnect™ system is speaking. Please note the volume setting for
Uconnect™ is different than the audio system.
NOTE: To access the tutorial, press the Uconnect™ hard-key. After the BEEP, say
“tutorial”. Press any hard-key/button or touch the display (Touch-Screen radio) to
cancel the tutorial.
WARNING!
• Any voice commanded system should be used only in safe driving conditions following local laws and phone use. All attention should be kept on the
roadway ahead. Failure to do so may result in a collision causing you and
others to be severely injured or killed.
• In an emergency, to use Uconnect™ Phone, your mobile phone must be: • turned on,
• paired to Uconnect™ Phone,
• and have network coverage.
Uconnect™ VOICE COMMAND
• The Uconnect™ Voice Command system allows you to control your AM, FM radio,satellite radio, disc player, HDD, Uconnect™ Phone, a memo recorder, and
supported portable media devices.
• When you press the Voice Command button
located on the radio faceplate
or steering wheel, you will hear a beep. The beep is your signal to give a command.
If you do not say a command within a few seconds, the system will present you
with a list of options. If you ever wish to interrupt the system while it lists options,
press the Voice Command button
, listen for the BEEP, and say your
command.
ELECTRONICS
40
Page 43 of 88
Voice Command for Text Messaging
• If equipped with Uconnect™ Voice Command, your Media Center 430N radio maybe able to play incoming SMS messages through the vehicle sound system.
• It also allows you to respond by selecting from various pre-defined phrases.
• Not all phones are compatible with this feature. Refer to the phone compatibility list at www.dodge.com/uconnect. Connected mobile phones must be
bluetooth-compatible, and paired with your radio.
Changing The Volume
• Start a dialogue by pressing the Voice Command button, then say a
command (for example, “tutorial”).
• Use the radio ON/OFF VOLUME rotary knob to adjust the volume to a comfortable level while the Voice Command system is speaking. The volume setting for Voice
Command is different than the audio system.
• For vehicles equipped with Video Entertainment System (VES)™, refer to the Uconnect™ Voice Command section of the Uconnect™ User's Manual on the DVD
for further details.
• For vehicles not equipped with VES™, refer to your vehicle Owner's Manual on the DVD for Uconnect™ Voice Command information.
NOTE: To access the tutorial, press the Voice Command button
. After the
BEEP, say “tutorial”. Press any hard-key/button or touch the display (Touch-Screen
radio) to cancel the tutorial.
WARNING!
Any voice commanded system should be used only in safe driving conditions
following local laws and phone use. All attention should be kept on the roadway
ahead. Failure to do so may result in a collision causing you and others to be
severely injured or killed.
iPod®/USB/MP3 CONTROL
• There are many ways to play music from iPod®players or other portable devices
through your vehicle's speakers. Your choices depend on what radio your vehicle is
equipped with.
• The radio sales code is located on the lower right side of the radio faceplate.
ELECTRONICS
41
Page 44 of 88
If Equipped with Media Center 130 with Satellite Radio (Sales Code RES + RSC) or
Media Center 430/430N (Sales Code RBZ/RHB)
• The USB port located within the centerconsole, allows you to plug an iPod®or
external device into the vehicle's sound
system.
• To hear audio from devices connected to this port from a non-touch-screen
radio, press the AUX button on the
radio faceplate. From a touch-screen
radio, press the MEDIA hard-key, then
touch the AUX or iPod
®soft-key.
• When connected to this feature: • The iPod
®audio can be played on the vehicle’s sound system.
• The iPod®can be controlled using the radio buttons to Play, Browse, and List
the iPod®or external devices contents. Refer to the Owner's Manual on the DVD
for details.
• The iPod
®battery charges when plugged into the USB port (if supported by the
specific audio device).
• Refer to the Owner's Manual on the DVD for details.
NOTE:
• The USB port supports certain Mini, Classic, Nano, Touch, and iPhone
®devices. The
USB port also supports playing music from compatible external USB Mass Storage
Class memory devices. For supported audio file formats, refer to the USB Port
section on the Owner's Manual on the DVD. Refer to www.dodge.com/uconnect
website for a list of tested iPod
®s. Some iPod®software versions may not fully
support the USB port features. Please visit Apple’s website for iPod®software
updates.
Bluetooth®Streaming Audio
• If equipped with Uconnect™ Voice Command, your Bluetooth-equipped iPod®
devices, cell phones or other media players, may also be able to stream music to
your vehicle's speakers. Your connected device must be Bluetooth-compatible, and
paired with your Media Center radio (see Uconnect™ Phone for pairing
instructions). Press the AUX button on the radio faceplate until "BT" is displayed
on the radio screen.
WARNING!
Do not plug in or remove the iPod®or external device while driving. Failure to
follow this warning could result in a collision.
ELECTRONICS
42
Page 46 of 88
PROGRAMMABLE FEATURES
Electronic Vehicle Information Center (EVIC) – If Equipped
• The EVIC can be used to program the following Personal Settings. Press andrelease the MENUbutton until Personal Settings displays, then press the
UP
or DOWNbuttons to scroll through the settings. Press the
SELECT
button to change the setting.
• Language • Hill Start Assist (HSA)
• Unlock Doors Automatically on Exit • Turn Headlights On with Remote Key Unlock
• Lock Door Automatically at 15 MPH (24 km/h) • Delay Power Off to Accessories Until
Exit
• Remote Key Unlock • Turn-by-Turn Navigation
• Sound Horn with Remote Key Lock • Display ECO
• Flash Lights with Remote Key Lock • Keyless Enter-N-Go
• Headlamps On with Wipers (Available with Auto Headlamps Only) • Display Units of Measure In
• Delay Turning Headlights Off
Key Fob Programmable Features
• The following features may also be programmed by using the Key Fob transmitter or the ignition switch and driver's door lock switch.
NOTE: Pressing the LOCK button while you are inside the vehicle will activate the
Vehicle Security Alarm. Opening a door with the Vehicle Security Alarm activated will
cause the alarm to sound. Press the UNLOCK button to deactivate the Vehicle Security
Alarm.
Unlock On First Press• To unlock either the driver's side, or all doors, on the first press of the UNLOCK button:
• Press and hold the LOCK button for at least 4 seconds, but no longer than
10 seconds. Then, press and hold the UNLOCK button while still holding the
LOCK button.
• Release both buttons at the same time.
Auto Unlock Doors On Exit • To have all of the vehicle doors unlock when any door is opened: • Enter your vehicle and close all the doors.
• Cycle the ignition switch between LOCK and ON and then back to LOCK fourtimes, ending up in the LOCK position (do not start the engine).
• Press the power door UNLOCK switch to unlock the doors. A single chime will indicate that programming is complete.
ELECTRONICS
44
Page 55 of 88
- Electronic Throttle Control (ETC) Light
• This light informs you of a problem with the Electronic Throttle Control (ETC)system.
• If a problem is detected, the light will come on while the engine is running. Cycle the ignition when the vehicle has completely stopped and the shift lever is placed
in the PARK position; the light should turn off.
• If the light remains lit with the engine running, your vehicle will usually be drivable; however, see an authorized service center immediately. If the light is
flashing when the engine is running, immediate service is required and you may
experience reduced performance, an elevated/rough idle or engine stall and your
vehicle may require towing.
- Air Bag Warning Light
• If the light is not on during starting, stays on, or turns on while driving, have thevehicle serviced by an authorized service center immediately.
Fuel Cap/Loose Gas Cap Message
• If a “gas cap” message (shown as gASCAP) appears, tighten the gas cap until a“clicking” sound is heard.
• Press the odometer reset button to turn the message off.
• If the message continues to appear for more than three days after tightening the gas cap, see your authorized service center.
Oil Change Indicator
Message
• If an “oil change” message (shown as Oil Change Required) appears and a single chime sounds, it is time for your next required oil change.
Vehicles Equipped With Keyless Enter-N-Go
• Without pressing the brake pedal, push the ENGINE START/STOP button and cycle the ignition to the ON/RUN position (Do not start the engine.)
• Fully depress the accelerator pedal, slowly, three times within 10 seconds.
• Without pressing the brake pedal, push the ENGINE START/STOP button once to return the ignition to the OFF/LOCK position.
Vehicles Not Equipped With Keyless Enter-N-Go
• Turn the ignition switch to the ON/RUN position (Do not start the engine.)
• Fully depress the accelerator pedal, slowly, three times within 10 seconds.
• Turn the ignition switch to the OFF/LOCK position.
WHAT TO DO IN EMERGENCIES
53
Page 63 of 88
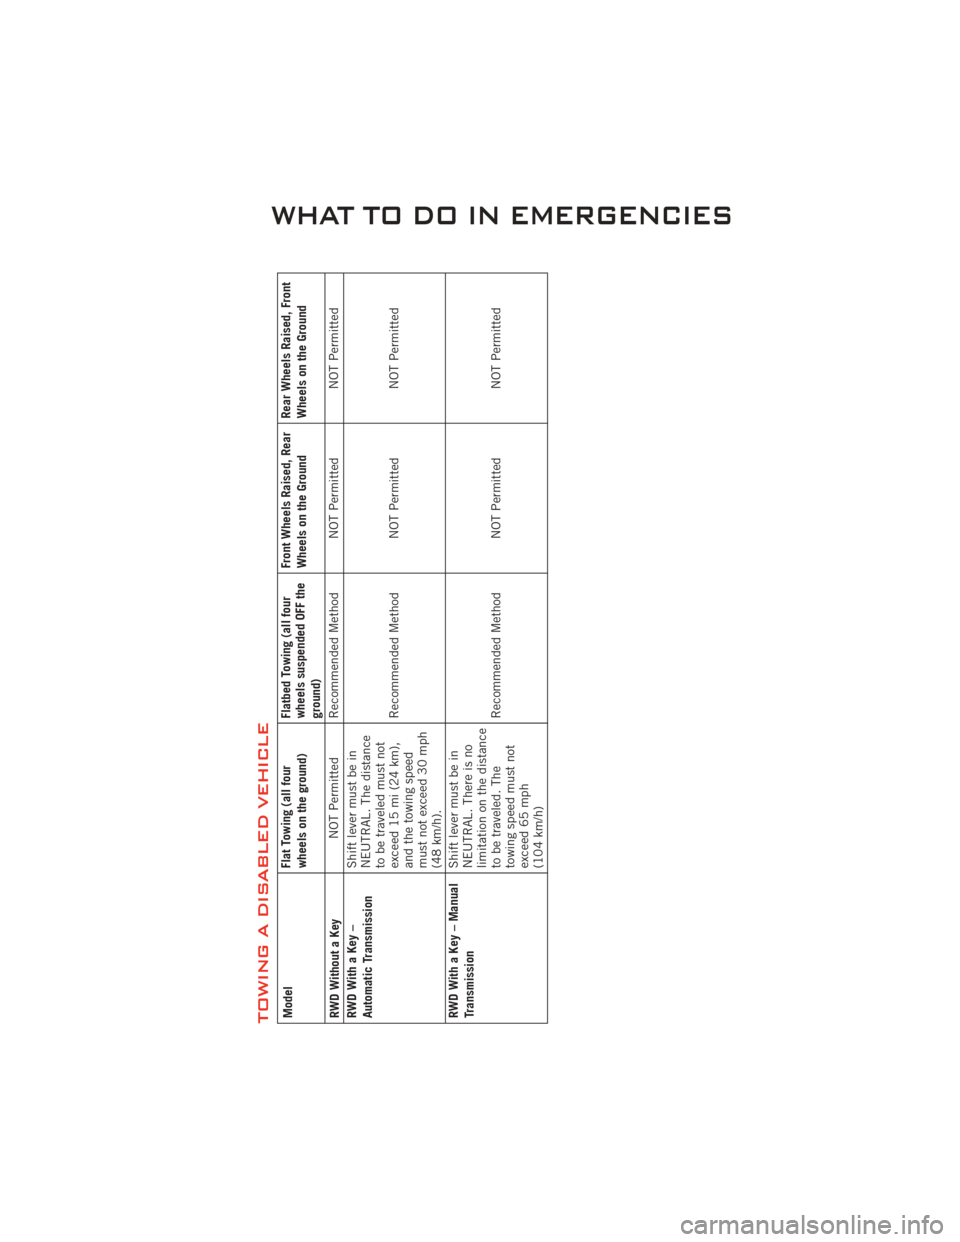
TOWING A DISABLED VEHICLEModelFlat Towing (all four
wheels on the ground)Flatbed Towing (all four
wheels suspended OFF the
ground)Front Wheels Raised, Rear
Wheels on the Ground
Rear Wheels Raised, Front
Wheels on the Ground
RWD Without a Key NOT Permitted Recommended Method NOT Permitted
NOT Permitted
RWD With a Key –
Automatic Transmission Shift lever must be in
NEUTRAL. The distance
to be traveled must not
exceed 15 mi (24 km),
and the towing speed
must not exceed 30 mph
(48 km/h).Recommended Method NOT Permitted
NOT Permitted
RWD With a Key – Manual
Transmission Shift lever must be in
NEUTRAL. There is no
limitation on the distance
to be traveled. The
towing speed must not
exceed 65 mph
(104 km/h)Recommended Method NOT Permitted
NOT Permitted
WHAT TO DO IN EMERGENCIES
61
Page 78 of 88
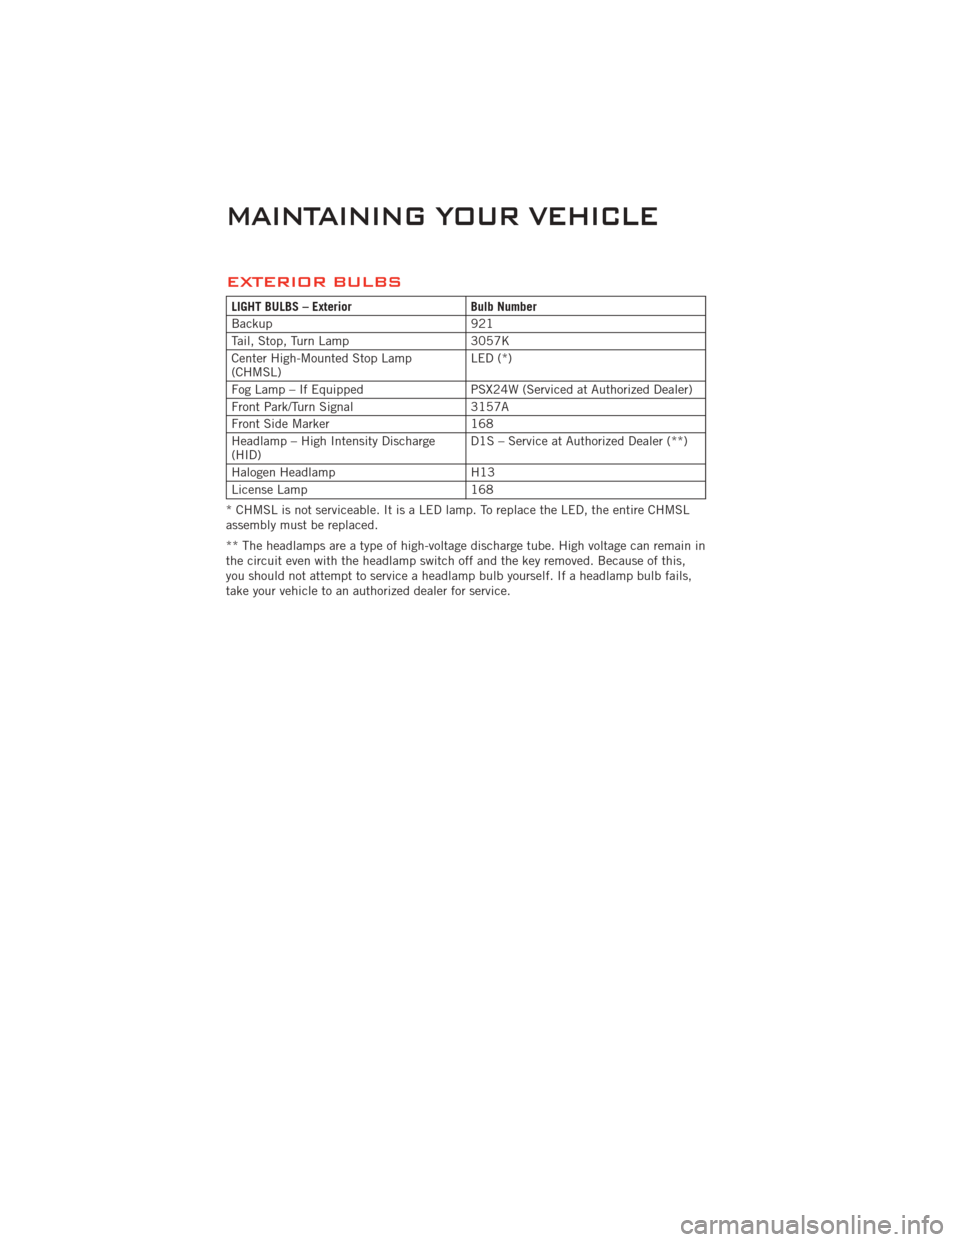
EXTERIOR BULBS
LIGHT BULBS – ExteriorBulb Number
Backup 921
Tail, Stop, Turn Lamp 3057K
Center High-Mounted Stop Lamp
(CHMSL) LED (*)
Fog Lamp – If Equipped PSX24W (Serviced at Authorized Dealer)
Front Park/Turn Signal 3157A
Front Side Marker 168
Headlamp – High Intensity Discharge
(HID) D1S – Service at Authorized Dealer (**)
Halogen Headlamp H13
License Lamp 168
* CHMSL is not serviceable. It is a LED lamp. To replace the LED, the entire CHMSL
assembly must be replaced.
** The headlamps are a type of high-voltage discharge tube. High voltage can remain in
the circuit even with the headlamp switch off and the key removed. Because of this,
you should not attempt to service a headlamp bulb yourself. If a headlamp bulb fails,
take your vehicle to an authorized dealer for service.
MAINTAINING YOUR VEHICLE
76