ECO mode DODGE CHALLENGER 2013 3.G Owner's Manual
[x] Cancel search | Manufacturer: DODGE, Model Year: 2013, Model line: CHALLENGER, Model: DODGE CHALLENGER 2013 3.GPages: 140, PDF Size: 5.35 MB
Page 65 of 140
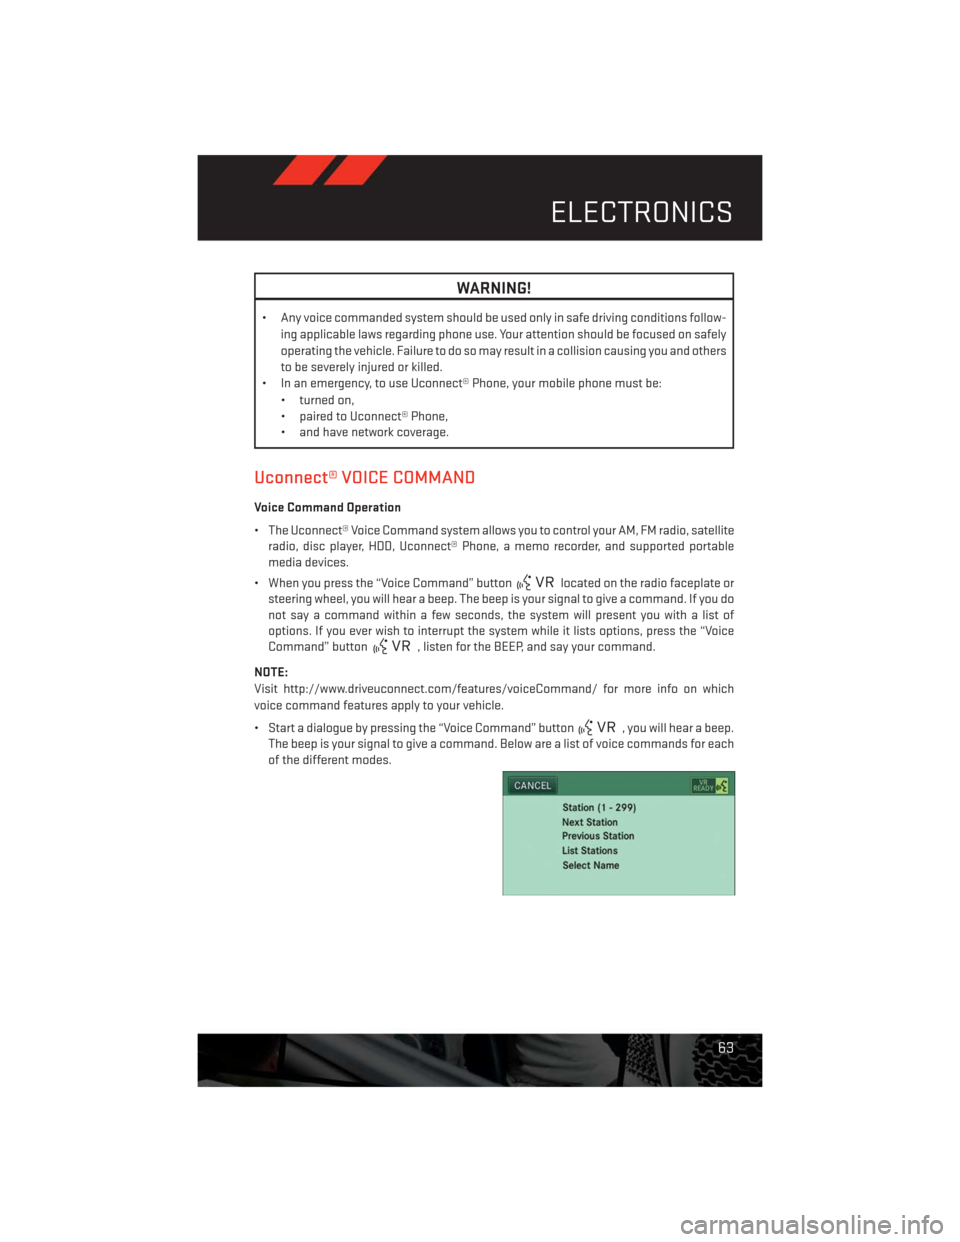
WARNING!
• Any voice commanded system should be used only in safe driving conditions follow-
ing applicable laws regarding phone use. Your attention should be focused on safely
operating the vehicle. Failure to do so may result in a collision causing you and others
to be severely injured or killed.
• In an emergency, to use Uconnect® Phone, your mobile phone must be:
• turned on,
• paired to Uconnect® Phone,
• and have network coverage.
Uconnect® VOICE COMMAND
Voice Command Operation
• The Uconnect® Voice Command system allows you to control your AM, FM radio, satellite
radio, disc player, HDD, Uconnect® Phone, a memo recorder, and supported portable
media devices.
• When you press the “Voice Command” button
located on the radio faceplate or
steering wheel, you will hear a beep. The beep is your signal to give a command. If you do
not say a command within a few seconds, the system will present you with a list of
options. If you ever wish to interrupt the system while it lists options, press the “Voice
Command” button
, listen for the BEEP, and say your command.
NOTE:
Visit http://www.driveuconnect.com/features/voiceCommand/ for more info on which
voice command features apply to your vehicle.
• Start a dialogue by pressing the “Voice Command” button
, you will hear a beep.
The beep is your signal to give a command. Below are a list of voice commands for each
of the different modes.
ELECTRONICS
63
Page 66 of 140
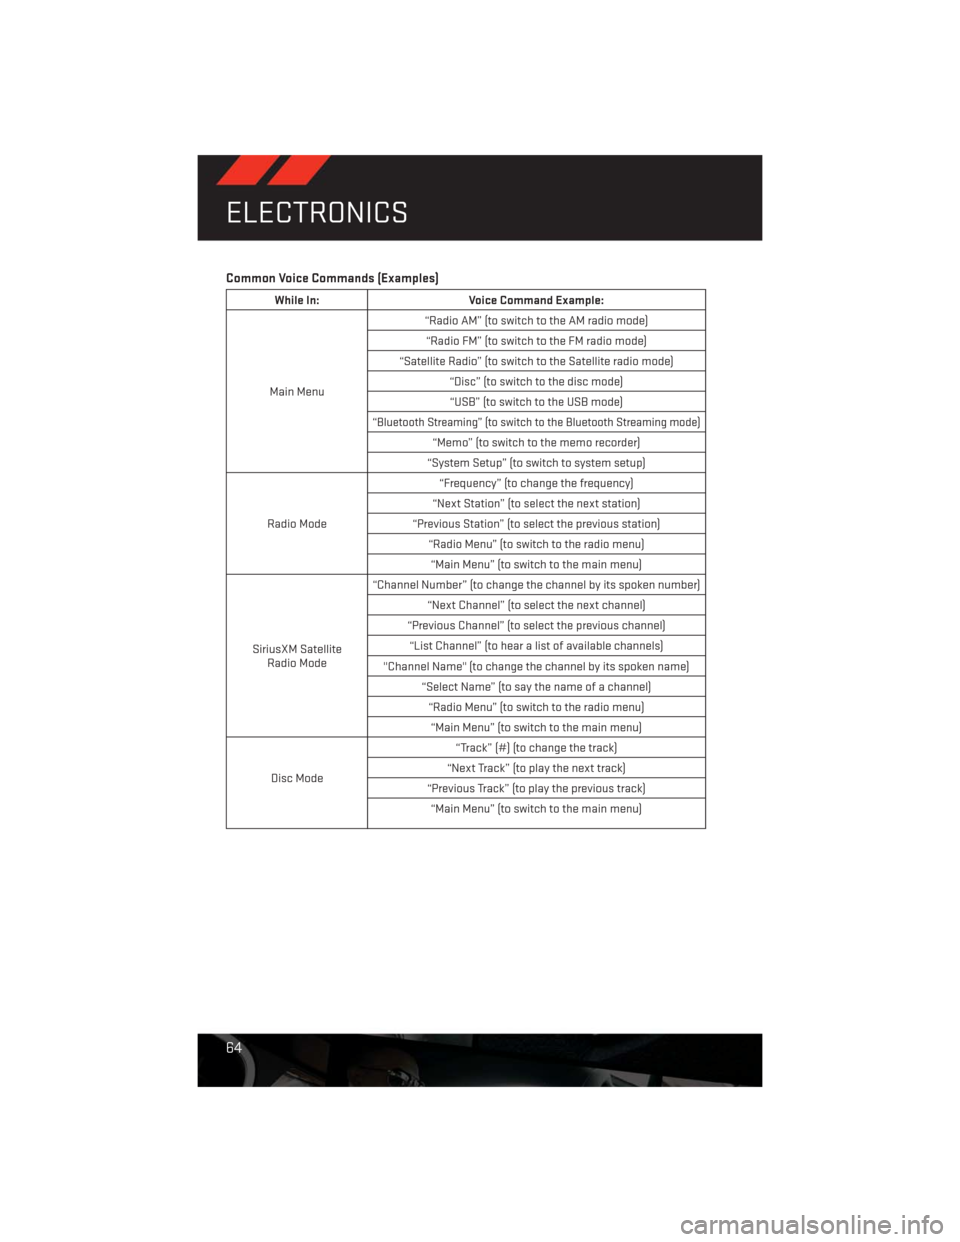
Common Voice Commands (Examples)
While In: Voice Command Example:
Main Menu“Radio AM” (to switch to the AM radio mode)
“Radio FM” (to switch to the FM radio mode)
“Satellite Radio” (to switch to the Satellite radio mode)
“Disc” (to switch to the disc mode)
“USB” (to switch to the USB mode)
“Bluetooth Streaming” (to switch to the Bluetooth Streaming mode)
“Memo” (to switch to the memo recorder)
“System Setup” (to switch to system setup)
Radio Mode“Frequency” (to change the frequency)
“Next Station” (to select the next station)
“Previous Station” (to select the previous station)
“Radio Menu” (to switch to the radio menu)
“Main Menu” (to switch to the main menu)
SiriusXM Satellite
Radio Mode“Channel Number” (to change the channel by its spoken number)
“Next Channel” (to select the next channel)
“Previous Channel” (to select the previous channel)
“List Channel” (to hear a list of available channels)
"Channel Name" (to change the channel by its spoken name)
“Select Name” (to say the name of a channel)
“Radio Menu” (to switch to the radio menu)
“Main Menu” (to switch to the main menu)
Disc Mode“Track” (#) (to change the track)
“Next Track” (to play the next track)
“Previous Track” (to play the previous track)
“Main Menu” (to switch to the main menu)
ELECTRONICS
64
Page 67 of 140
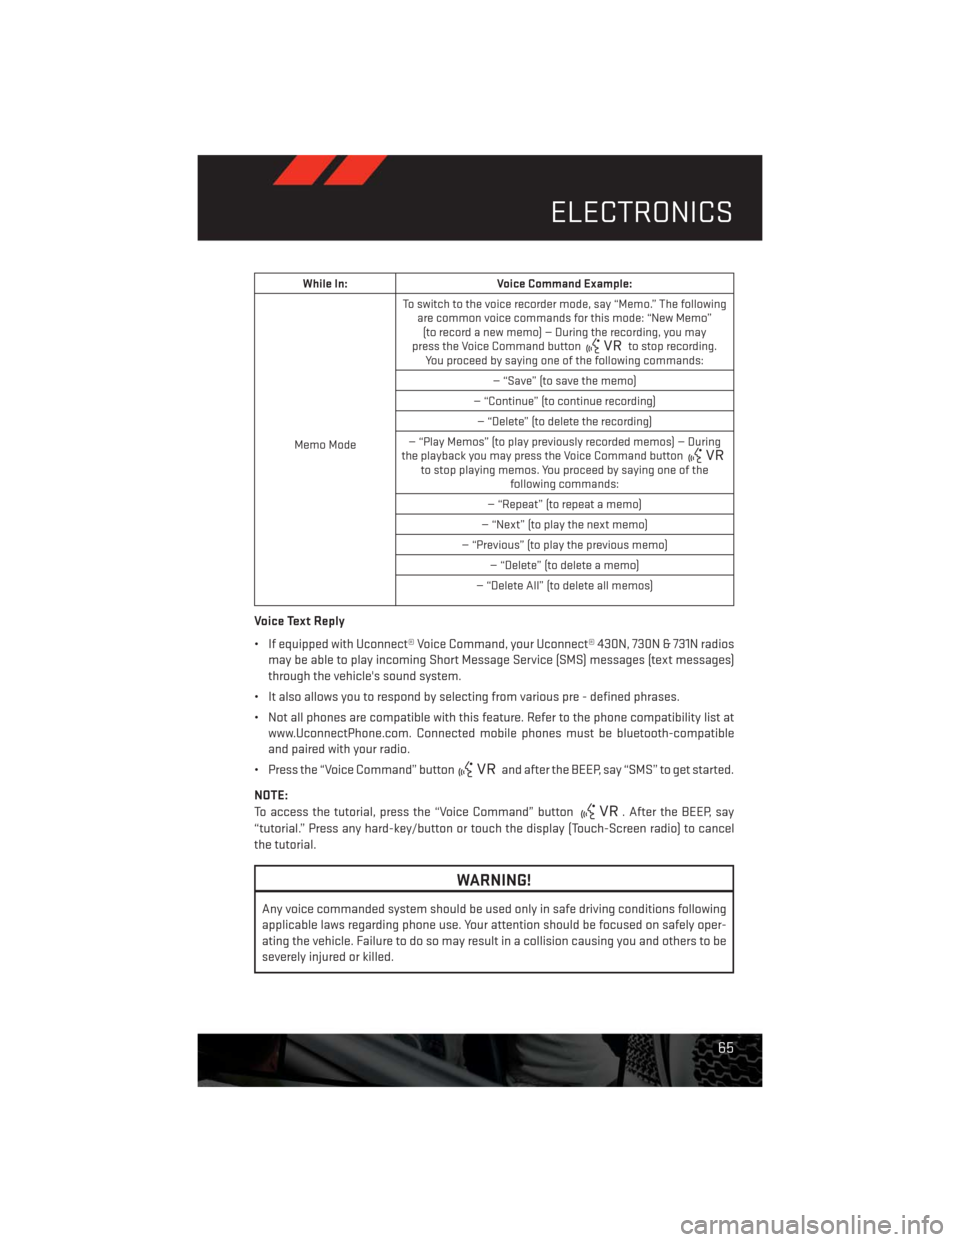
While In: Voice Command Example:
Memo ModeTo switch to the voice recorder mode, say “Memo.” The following
are common voice commands for this mode: “New Memo”
(to record a new memo) — During the recording, you may
press the Voice Command button
to stop recording.
You proceed by saying one of the following commands:
— “Save” (to save the memo)
— “Continue” (to continue recording)
— “Delete” (to delete the recording)
— “Play Memos” (to play previously recorded memos) — During
the playback you may press the Voice Command button
to stop playing memos. You proceed by saying one of the
following commands:
— “Repeat” (to repeat a memo)
— “Next” (to play the next memo)
— “Previous” (to play the previous memo)
— “Delete” (to delete a memo)
— “Delete All” (to delete all memos)
Voice Text Reply
• If equipped with Uconnect® Voice Command, your Uconnect® 430N, 730N & 731N radios
may be able to play incoming Short Message Service (SMS) messages (text messages)
through the vehicle's sound system.
• It also allows you to respond by selecting from various pre - defined phrases.
• Not all phones are compatible with this feature. Refer to the phone compatibility list at
www.UconnectPhone.com. Connected mobile phones must be bluetooth-compatible
and paired with your radio.
• Press the “Voice Command” button
and after the BEEP, say “SMS” to get started.
NOTE:
To access the tutorial, press the “Voice Command” button
. After the BEEP, say
“tutorial.” Press any hard-key/button or touch the display (Touch-Screen radio) to cancel
the tutorial.
WARNING!
Any voice commanded system should be used only in safe driving conditions following
applicable laws regarding phone use. Your attention should be focused on safely oper-
ating the vehicle. Failure to do so may result in a collision causing you and others to be
severely injured or killed.
ELECTRONICS
65
Page 70 of 140
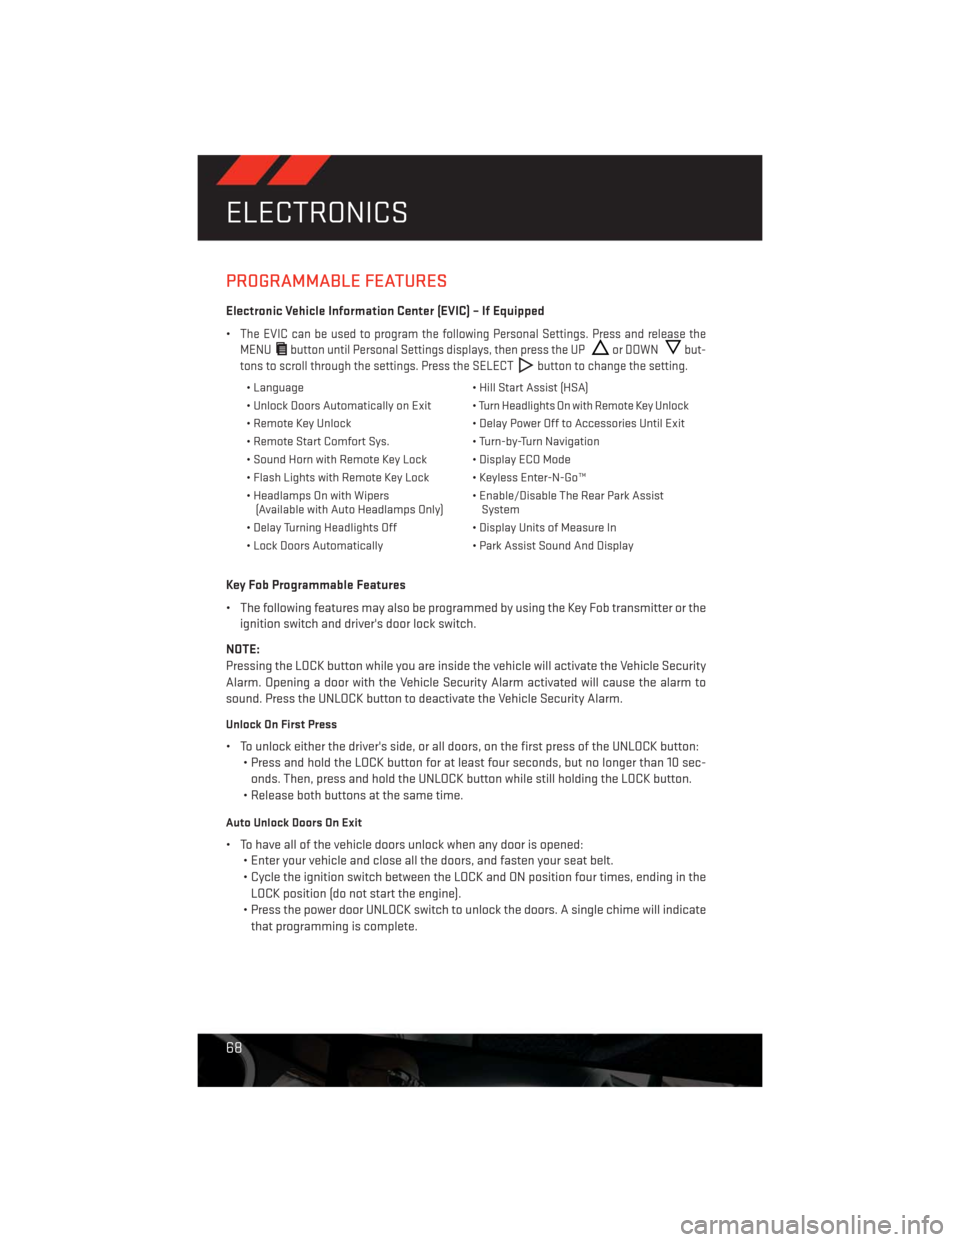
PROGRAMMABLE FEATURES
Electronic Vehicle Information Center (EVIC) – If Equipped
•
The EVIC can be used to program the following Personal Settings. Press and release the
MENU
button until Personal Settings displays, then press the UPor DOWNbut-
tons to scroll through the settings. Press the SELECT
button to change the setting.
• Language • Hill Start Assist (HSA)
• Unlock Doors Automatically on Exit •
Turn Headlights On with Remote Key Unlock
• Remote Key Unlock • Delay Power Off to Accessories Until Exit
• Remote Start Comfort Sys. • Turn-by-Turn Navigation
• Sound Horn with Remote Key Lock • Display ECO Mode
• Flash Lights with Remote Key Lock • Keyless Enter-N-Go™
• Headlamps On with Wipers
(Available with Auto Headlamps Only)• Enable/Disable The Rear Park Assist
System
• Delay Turning Headlights Off • Display Units of Measure In
• Lock Doors Automatically • Park Assist Sound And Display
Key Fob Programmable Features
• The following features may also be programmed by using the Key Fob transmitter or the
ignition switch and driver's door lock switch.
NOTE:
Pressing the LOCK button while you are inside the vehicle will activate the Vehicle Security
Alarm. Opening a door with the Vehicle Security Alarm activated will cause the alarm to
sound. Press the UNLOCK button to deactivate the Vehicle Security Alarm.
Unlock On First Press
• To unlock either the driver's side, or all doors, on the first press of the UNLOCK button:
• Press and hold the LOCK button for at least four seconds, but no longer than 10 sec-
onds. Then, press and hold the UNLOCK button while still holding the LOCK button.
• Release both buttons at the same time.
Auto Unlock Doors On Exit
• To have all of the vehicle doors unlock when any door is opened:
• Enter your vehicle and close all the doors, and fasten your seat belt.
• Cycle the ignition switch between the LOCK and ON position four times, ending in the
LOCK position (do not start the engine).
• Press the power door UNLOCK switch to unlock the doors. A single chime will indicate
that programming is complete.
ELECTRONICS
68
Page 76 of 140
AUTOSTICK®
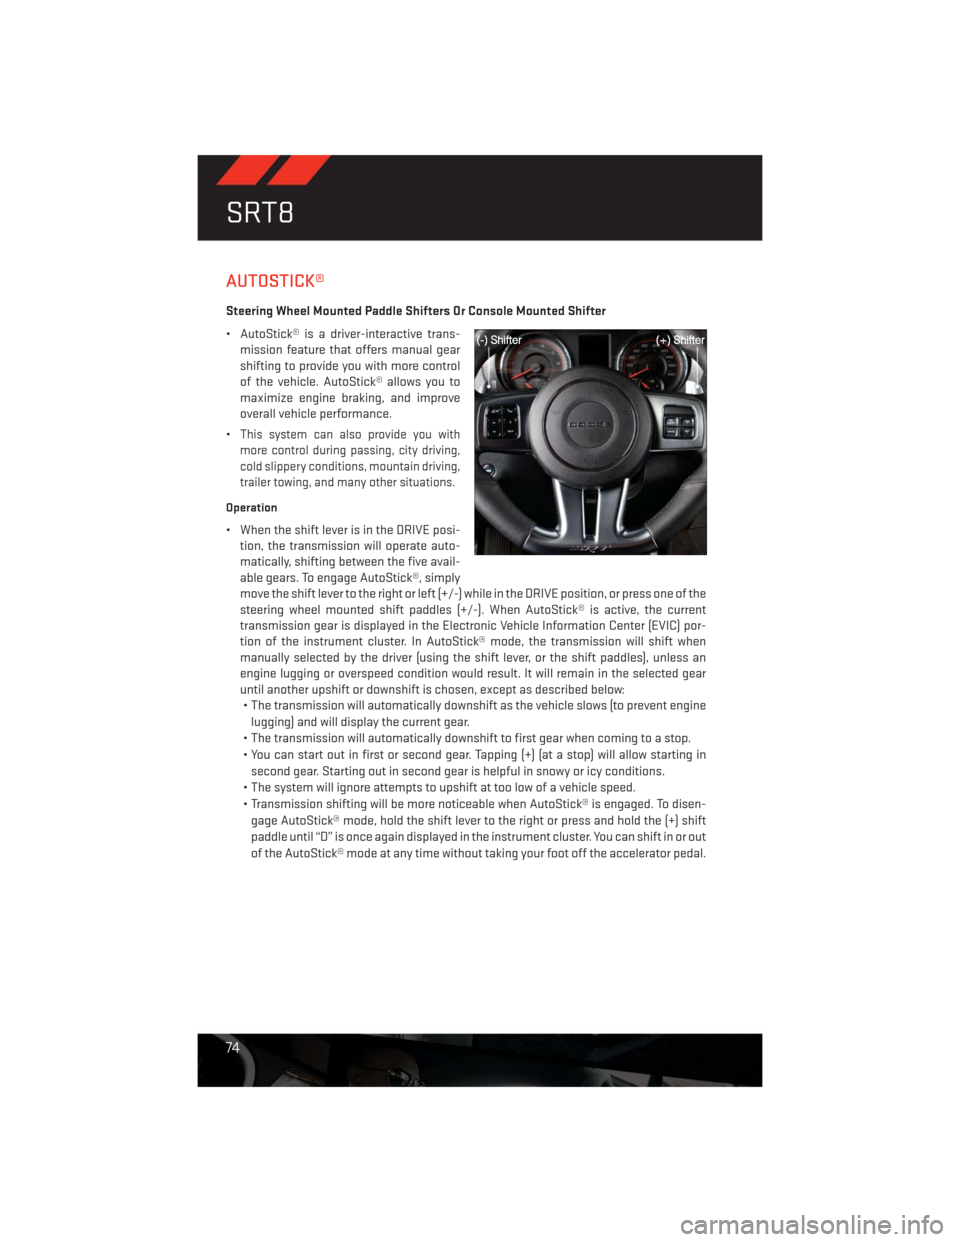
Steering Wheel Mounted Paddle Shifters Or Console Mounted Shifter
• AutoStick® is a driver-interactive trans-
mission feature that offers manual gear
shifting to provide you with more control
of the vehicle. AutoStick® allows you to
maximize engine braking, and improve
overall vehicle performance.
•
This system can also provide you with
more control during passing, city driving,
cold slippery conditions, mountain driving,
trailer towing, and many other situations.
Operation
• When the shift lever is in the DRIVE posi-
tion, the transmission will operate auto-
matically, shifting between the five avail-
able gears. To engage AutoStick®, simply
move the shift lever to the right or left (+/-) while in the DRIVE position, or press one of the
steering wheel mounted shift paddles (+/-). When AutoStick® is active, the current
transmission gear is displayed in the Electronic Vehicle Information Center (EVIC) por-
tion of the instrument cluster. In AutoStick® mode, the transmission will shift when
manually selected by the driver (using the shift lever, or the shift paddles), unless an
engine lugging or overspeed condition would result. It will remain in the selected gear
until another upshift or downshift is chosen, except as described below:
• The transmission will automatically downshift as the vehicle slows (to prevent engine
lugging) and will display the current gear.
• The transmission will automatically downshift to first gear when coming to a stop.
• You can start out in first or second gear. Tapping (+) (at a stop) will allow starting in
second gear. Starting out in second gear is helpful in snowy or icy conditions.
• The system will ignore attempts to upshift at too low of a vehicle speed.
• Transmission shifting will be more noticeable when AutoStick® is engaged. To disen-
gage AutoStick® mode, hold the shift lever to the right or press and hold the (+) shift
paddle until “D” is once again displayed in the instrument cluster. You can shift in or out
of the AutoStick® mode at any time without taking your foot off the accelerator pedal.
SRT8
74
Page 77 of 140
ELECTRONIC CONTROL DAMPING SYSTEM
•This vehicle may be equipped with an electronic controlled dampening system. This system
reduces body roll and pitch in many driving situations including cornering, acceleration and
braking. There are three modes of operation:
Automatic (Auto) Mode
•
This is the default position when vehicle ignition is first turned on. Auto mode will give a
sporty, but comfortable ride. Within this mode, the suspension will adapt to the vehicle
inputs, including road surfaces, vehicle speed, steering inputs, braking, and acceleration.
• If AutoStick® is engaged while in “Auto” mode, the transmission will automatically shift
up if maximum engine speed is reached.
• Heavily pressing the accelerator pedal may generate an automatic downshift for im-
proved acceleration.
• This mode should be used for most driving situations.
Sport Mode
SPORT
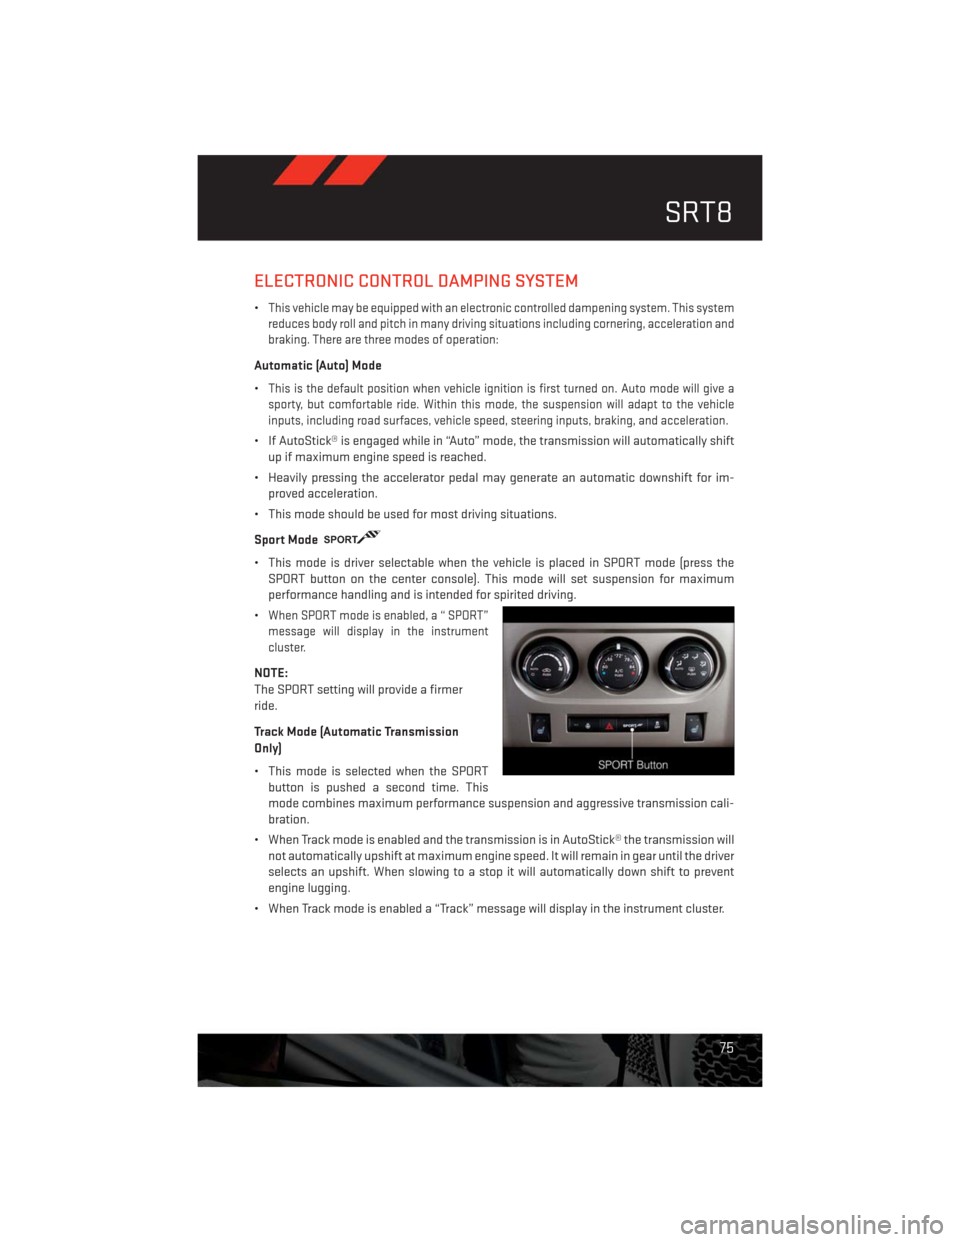
• This mode is driver selectable when the vehicle is placed in SPORT mode (press the
SPORT button on the center console). This mode will set suspension for maximum
performance handling and is intended for spirited driving.
•
When SPORT mode is enabled, a “ SPORT”
message will display in the instrument
cluster.
NOTE:
The SPORT setting will provide a firmer
ride.
Track Mode (Automatic Transmission
Only)
• This mode is selected when the SPORT
button is pushed a second time. This
mode combines maximum performance suspension and aggressive transmission cali-
bration.
• When Track mode is enabled and the transmission is in AutoStick® the transmission will
not automatically upshift at maximum engine speed. It will remain in gear until the driver
selects an upshift. When slowing to a stop it will automatically down shift to prevent
engine lugging.
• When Track mode is enabled a “Track” message will display in the instrument cluster.
SRT8
75
Page 82 of 140
BRAKE- Brake Warning Light
• The Brake Warning light illuminates when there is either a system malfunction or the
parking brake is applied. If the light is on and the parking brake is not applied, it indicates
a possible brake hydraulic malfunction, brake booster problem or an Anti-Lock Brake
System problem.
• Please have your vehicle serviced immediately.
WARNING!
Driving a vehicle with the red brake light on is dangerous. Part of the brake system may
have failed. It will take longer to stop the vehicle. You could have a collision. Have the
vehicle checked immediately.
- Malfunction Indicator Light (MIL)
• Certain conditions, such as a loose or missing gas cap, poor fuel quality, etc., may
illuminate the MIL after engine start. The vehicle should be serviced if the light stays on
through several typical driving cycles. In most situations, the vehicle will drive normally
and not require towing.
• If the MIL flashes when the engine is running, serious conditions may exist that could
lead to immediate loss of power or severe catalytic converter damage. We recommend
you do not operate the vehicle. Have the vehicle serviced immediately.
- Electronic Stability Control (ESC) OFF Indicator Light
• This light indicates the Electronic Stability Control (ESC) is off.
– Sport Shifting
• This light will illuminate when Track mode is selected. This mode provides performance
based transmission shifting in either Auto or Manual mode.
- Charging System Light
• This light shows the status of the electrical charging system. If the charging system light
remains on, it means that the vehicle is experiencing a problem with the charging
system.
• We recommend you do not continue driving if the charging system light is on. Have the
vehicle serviced immediately.
- Oil Pressure Warning Light
• This light indicates low engine oil pressure. If the light turns on while driving, stop the
vehicle and shut off the engine as soon as possible. A chime will sound when this light
turns on.
• We recommend you do not operate the vehicle or engine damage will occur. Have the
vehicle serviced immediately.
WHAT TO DO IN EMERGENCIES
80
Page 93 of 140
Using The Power Button
• Push and release the Power Button (4) once to turn On the TIREFIT kit. Push and release
the Power Button (4) again to turn Off the TIREFIT kit.
Using The Deflation Button
• Press the Deflation Button (2) to reduce the air pressure in the tire if it becomes
over-inflated.
TIREFIT Usage Precautions
• Replace the TIREFIT Sealant Bottle (1) and Sealant Hose (6) prior to the expiration date
(printed on the bottle label) to assure optimum operation of the system. Refer to “Sealing
a Tire with TIREFIT” section (F) “Sealant Bottle and Hose Replacement”.
• The Sealant Bottle (1) and Sealant Hose (6) are a one tire application use. After each use,
always replace these components immediately at an authorized dealer.
• When the TIREFIT sealant is in a liquid form, clean water, and a damp cloth will remove
the material from the vehicle or tire and wheel components. Once the sealant dries, it can
easily be peeled off and properly discarded.
• For optimum performance, make sure the valve stem on the wheel is free of debris before
connecting the TIREFIT kit.
• You can use the TIREFIT air pump to inflate bicycle tires. The kit also comes with two
needles, located in the Accessory Storage Compartment (on the bottom of the air pump)
for inflating sport balls, rafts, or similar inflatable items. However, use only the Air Pump
Hose (7) and make sure the Mode Select Knob (5) is in the Air Mode when inflating such
items to avoid injecting sealant into them. The TIREFIT Sealant is only intended to seal
punctures less than 1/4 in (6 mm) diameter in the tread of your vehicle.
• Do not lift or carry the TIREFIT kit by the hoses.
Sealing A Tire With TIREFIT
(A) Whenever You Stop To Use TIREFIT:
1. Pull over to a safe location and turn on the vehicle’s Hazard Warning flashers.
2. Verify that the valve stem (on the wheel with the deflated tire) is in a position that is near
to the ground. This will allow the TIREFIT Hoses (6) and (7) to reach the valve stem and
keep the TIREFIT kit flat on the ground. This will provide the best positioning of the kit
when injecting the sealant into the deflated tire and running the air pump. Move the
vehicle as necessary to place the valve stem in this position before proceeding.
3. Place the transmission in PARK (auto transmission) or in Gear (manual transmission)
and cycle the ignition to the OFF position.
4. Set the parking brake.
WHAT TO DO IN EMERGENCIES
91
Page 94 of 140
(B) Setting Up To Use TIREFIT:
1. Turn the Mode Select Knob (5) to the Sealant Mode position.
2. Uncoil the Sealant Hose (6) and then remove the cap from the fitting at the end of the
hose.
3. Place the TIREFIT kit flat on the ground next to the deflated tire.
4. Remove the cap from the valve stem and then screw the fitting at the end of the Sealant
Hose (6) onto the valve stem.
5. Uncoil the Power Plug (8) and insert the plug into the vehicle’s 12 Volt power outlet.
6. Do not remove foreign objects (e.g., screws or nails) from the tire.
(C) Injecting TIREFIT Sealant Into The Deflated Tire:
• Always start the engine before turning ON the TIREFIT kit.
NOTE:
Manual transmission vehicles must have the parking brake engaged and the shift lever in
NEUTRAL.
• After pressing the Power Button (4), the sealant (white fluid) will flow from the Sealant
Bottle (1) through the Sealant Hose (6) and into the tire.
NOTE:
Sealant may leak out through the puncture in the tire.
•If the sealant (white fluid) does not flow within 0 – 10 seconds through the Sealant
Hose (6):
1. Press the Power Button (4) to turn Off the TIREFIT kit. Disconnect the Sealant Hose (6)
from the valve stem. Make sure the valve stem is free of debris. Reconnect the Sealant
Hose (6) to the valve stem. Check that the Mode Select Knob (5) is in the Sealant Mode
position and not Air Mode. Press the Power Button (4) to turn On the TIREFIT kit.
2. Connect the Power Plug (8) to a different 12 Volt power outlet in your vehicle or another
vehicle, if available. Make sure the engine is running before turning ON the TIREFIT kit.
3. The Sealant Bottle (1) may be empty due to previous use. Call for assistance.
NOTE:
If the Mode Select Knob (5) is on Air Mode and the pump is operating, air will dispense from
the Air Pump Hose (7) only, not the Sealant Hose (6).
•If the sealant (white fluid) does flow through the Sealant Hose (6):
1. Continue to operate the pump until sealant is no longer flowing through the hose
(typically takes 30 - 70 seconds). As the sealant flows through the Sealant Hose (6), the
Pressure Gauge (3) can read as high as 70 psi (5 kPa). The Pressure Gauge (3) will
decrease quickly from approximately 70 psi (5 kPa) to the actual tire pressure when the
Sealant Bottle (1) is empty.
WHAT TO DO IN EMERGENCIES
92
Page 95 of 140
2. The pump will start to inject air into the tire immediately after the Sealant Bottle (1) is
empty. Continue to operate the pump and inflate the tire to the pressure indicated on the
tire pressure label on the driver-side latch pillar (recommended pressure). Check the tire
pressure by looking at the Pressure Gauge (3).
•If the tire does not inflate to at least 26 psi (1.8 kPa) pressure within 15 minutes:
• The tire is too badly damaged. Do not attempt to drive the vehicle further. Call for
assistance.
NOTE:
If the tire becomes over-inflated, press the Deflation Button to reduce the tire pressure to
the recommended inflation pressure before continuing.
•If the tire inflates to the recommended pressure or is at least 26 psi (1.8 Bar) pressure
within 15 minutes:
1. Press the Power Button (4) to turn off the TIREFIT kit.
2. Remove the Speed Limit sticker from the top of the Sealant Bottle (1) and place the
sticker on the instrument panel.
3. Immediately disconnect the Sealant Hose (6) from the valve stem, reinstall the cap on
the fitting at the end of the hose, and place the TIREFIT kit in the vehicle storage
location. Quickly proceed to (D) “Drive Vehicle”.
(D) Drive Vehicle:
• Immediately after injecting sealant and inflating the tire, drive the vehicle 5 miles (8 km)
or 10 minutes to ensure distribution of the TIREFIT Sealant within the tire. Do not exceed
55 mph (88 km/h).
(E) After Driving:
•Pull over to a safe location. Refer to “Whenever You Stop to Use TIREFIT” before continuing.
1. Turn the Mode Select Knob (5) to the Air Mode position.
2. Uncoil the Air Pump Hose (7) (black in color) and screw the fitting at the end of hose (7)
onto the valve stem.
3. Uncoil the power plug and insert the plug into the vehicles 12 Volt power outlet.
4. Check the pressure in the tire by reading the Pressure Gauge (3).
•If tire pressure is less than 19 psi (1.3 kPa), the tire is too badly damaged. Do not
attempt to drive the vehicle further. Call for assistance.
If the tire pressure is 19 psi (1.3 kPa) or higher:
1. Press the Power Button (4) to turn on TIREFIT and inflate the tire to the pressure indicated
on the tire and loading information label on the driver-side door opening.
2. Disconnect the TIREFIT kit from the valve stem, reinstall the cap on the valve stem and
unplug from 12 Volt outlet.
WHAT TO DO IN EMERGENCIES
93