warning DODGE CHALLENGER 2013 3.G Owner's Manual
[x] Cancel search | Manufacturer: DODGE, Model Year: 2013, Model line: CHALLENGER, Model: DODGE CHALLENGER 2013 3.GPages: 140, PDF Size: 5.35 MB
Page 83 of 140
- Anti-Lock Brake (ABS) Light
• This light monitors the Anti-Lock Brake System (ABS).
• If the light is not on during starting, stays on, or turns on while driving, we recommend you
drive to the nearest authorized dealer immediately and have the vehicle serviced
immediately.
- Electronic Throttle Control (ETC) Indicator Light
• This light informs you of a problem with the system.
• If a problem is detected, the light will come on while the engine is running. Cycle the
ignition when the vehicle has completely stopped and the shift lever is placed in the
PARK position; the light should turn off.
• If the light remains lit with the engine running, your vehicle will usually be drivable;
however, see an authorized dealer immediately. If the light is flashing when the engine is
running, immediate service is required and you may experience reduced performance,
an elevated/rough idle or engine stall and your vehicle may require towing.
- Air Bag Warning Light
• If the light is not on during starting, stays on, or turns on while driving, have the vehicle
serviced by an authorized dealer immediately.
Fuel Cap/Loose Gas Cap Message
• If a “gas cap” message (shown as gASCAP) appears, tighten the gas cap until a “clicking”
sound is heard.
• Press the odometer reset button to turn the message off.
• If the message continues to appear for more than three days after tightening the gas
cap, see your authorized service center.
Oil Change Indicator
• Your vehicle is equipped with an engine oil change indicator system. The “Oil Change
Due” message will flash in the EVIC display for approximately 10 seconds after a single
chime has sounded, to indicate the next scheduled oil change interval. The engine oil
change indicator system is duty cycle based, which means the engine oil change interval
may fluctuate, dependent upon your personal driving style
• Unless reset, this message will continue to display each time you turn the ignition switch
to the ON/RUN position or cycle the ignition to the ON/RUN position if equipped with
Keyless Enter-N-Go™. To turn off the message temporarily, press and release the MENU
button. To reset the oil change indicator system (after performing the scheduled main-
tenance) refer to the following procedure.
WHAT TO DO IN EMERGENCIES
81
Page 85 of 140
IF YOUR ENGINE OVERHEATS
• In any of the following situations, you can reduce the potential for overheating by taking
the appropriate action.
• On the highways — slow down.
• In city traffic — while stopped, place the transmission in NEUTRAL, but do not increase
engine idle speed.
NOTE:
There are steps that you can take to slow down an impending overheat condition:
• If your air conditioner (A/C) is on, turn it off. The A/C system adds heat to the engine
cooling system and turning the A/C off can help remove this heat.
• You can also turn the temperature control to maximum heat, the mode control to floor
and the blower control to high. This allows the heater core to act as a supplement to the
radiator and aids in removing heat from the engine cooling system.
CAUTION!
Driving with a hot cooling system could damage your vehicle. If the temperature gauge
reads HOT (H), pull over and stop the vehicle. Idle the vehicle with the air conditioner
turned off until the pointer drops back into the normal range. If the pointer remains on
HOT (H), and you hear continuous chimes, turn the engine off immediately, and call for
service.
WARNING!
You or others can be badly burned by hot engine coolant (antifreeze) or steam from your
radiator. If you see or hear steam coming from under the hood, do not open the hood until
the radiator has had time to cool. Never try to open a cooling system pressure cap when
the radiator or coolant bottle is hot.
WHAT TO DO IN EMERGENCIES
83
Page 88 of 140
Preparations For Jacking
1. Park the vehicle on a firm, level surface as far from the edge of the roadway as possible.
Avoid icy or slippery areas.
2. Turn on the Hazard Warning flasher.
3. Set the parking brake.
4. Place the shift lever into PARK.
5. Turn OFF the ignition.
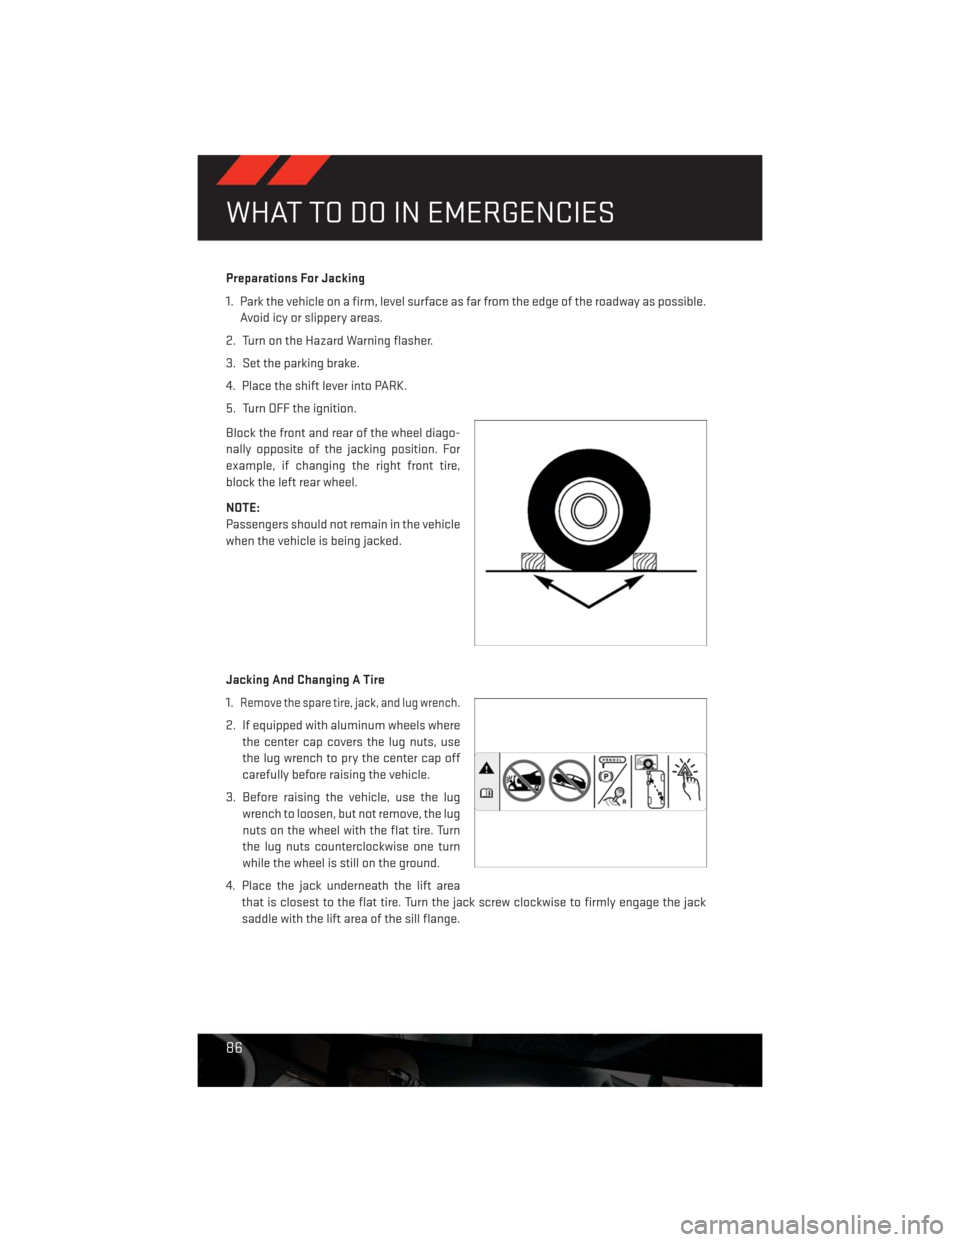
Block the front and rear of the wheel diago-
nally opposite of the jacking position. For
example, if changing the right front tire,
block the left rear wheel.
NOTE:
Passengers should not remain in the vehicle
when the vehicle is being jacked.
Jacking And Changing A Tire
1.
Remove the spare tire, jack, and lug wrench.
2. If equipped with aluminum wheels where
the center cap covers the lug nuts, use
the lug wrench to pry the center cap off
carefully before raising the vehicle.
3. Before raising the vehicle, use the lug
wrench to loosen, but not remove, the lug
nuts on the wheel with the flat tire. Turn
the lug nuts counterclockwise one turn
while the wheel is still on the ground.
4. Place the jack underneath the lift area
that is closest to the flat tire. Turn the jack screw clockwise to firmly engage the jack
saddle with the lift area of the sill flange.
WHAT TO DO IN EMERGENCIES
86
Page 89 of 140
NOTE:
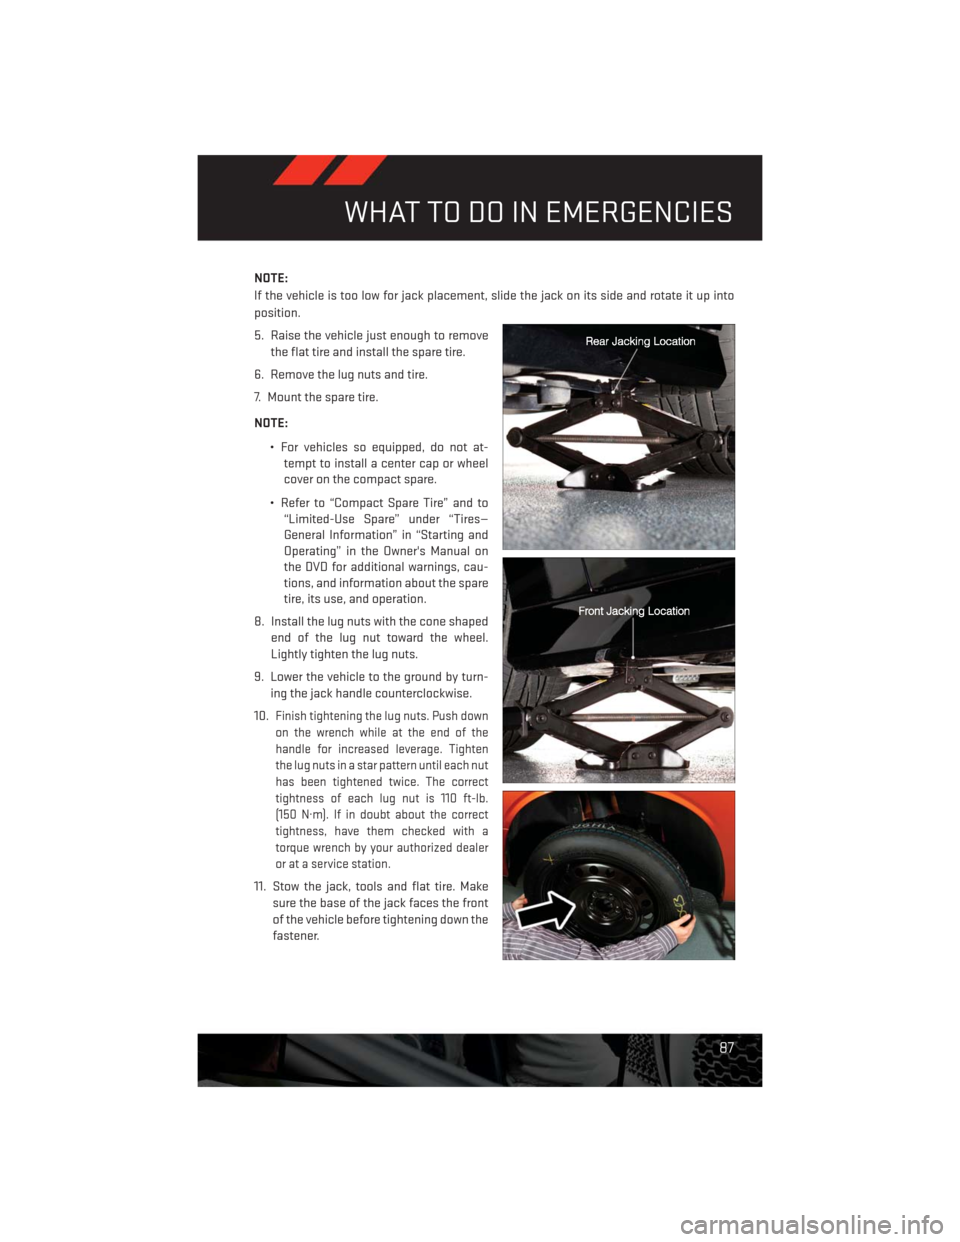
If the vehicle is too low for jack placement, slide the jack on its side and rotate it up into
position.
5. Raise the vehicle just enough to remove
the flat tire and install the spare tire.
6. Remove the lug nuts and tire.
7. Mount the spare tire.
NOTE:
• For vehicles so equipped, do not at-
tempt to install a center cap or wheel
cover on the compact spare.
• Refer to “Compact Spare Tire” and to
“Limited-Use Spare” under “Tires—
General Information” in “Starting and
Operating” in the Owner's Manual on
the DVD for additional warnings, cau-
tions, and information about the spare
tire, its use, and operation.
8. Install the lug nuts with the cone shaped
end of the lug nut toward the wheel.
Lightly tighten the lug nuts.
9. Lower the vehicle to the ground by turn-
ing the jack handle counterclockwise.
10.
Finish tightening the lug nuts. Push down
on the wrench while at the end of the
handle for increased leverage. Tighten
the lug nuts in a star pattern until each nut
has been tightened twice. The correct
tightness of each lug nut is 110 ft-lb.
(150 N·m). If in doubt about the correct
tightness, have them checked with a
torque wrench by your authorized dealer
or at a service station.
11. Stow the jack, tools and flat tire. Make
sure the base of the jack faces the front
of the vehicle before tightening down the
fastener.
WHAT TO DO IN EMERGENCIES
87
Page 91 of 140
WARNING!
• Do not attempt to change a tire on the side of the vehicle close to moving traffic. Pull
far enough off the road to avoid the danger of being hit when operating the jack or
changing the wheel.
• Being under a jacked-up vehicle is dangerous. The vehicle could slip off the jack and
fall on you. You could be crushed. Never put any part of your body under a vehicle that
is on a jack.
• Never start or run the engine while the vehicle is on a jack. If you need to get under a
raised vehicle, take it to a service center where it can be raised on a lift.
• The jack is designed to be used as a tool for changing tires only. The jack should not
be used to lift the vehicle for service purposes. The vehicle should be jacked on a firm
level surface only. Avoid ice or slippery areas.
• A loose tire or jack thrown forward in a collision or hard stop could endanger the
occupants of the vehicle. Always stow the jack parts and the spare tire in the places
provided.
• Carefully follow these tire changing warnings to help prevent personal injury or
damage to your vehicle:
• Always park on a firm, level surface as far from the edge of the roadway as possible
before raising the vehicle.
• Turn on the Hazard Warning flasher.
• Block the wheel diagonally opposite the wheel to be raised.
• Set the parking brake firmly and set an automatic transmission in PARK; a manual
transmission in REVERSE.
• Do not let anyone sit in the vehicle when it is on a jack.
• Do not get under the vehicle when it is on a jack.
• Only use the jack in the positions indicated and for lifting this vehicle during a tire
change.
• If working on or near a roadway, be extremely careful of motor traffic.
• Raising the vehicle higher than necessary can make the vehicle less stable. It could
slip off the jack and hurt someone near it. Raise the vehicle only enough to remove
the tire.
• To avoid the risk of forcing the vehicle off the jack, do not fully tighten the wheel nuts
until the vehicle has been lowered. Failure to follow this warning may result in
personal injury.
• A loose tire or jack thrown forward in a collision or hard stop could endanger the
occupants of the vehicle. Always stow the jack parts and the spare tire in the places
provided.
• The limited-use spare tires are for emergency use only. Installation of this limited-
use spare tire affects vehicle handling. With this tire, do not drive more than 60 mph
(100 km/h). Keep inflated to the cold tire inflation pressure listed on either your tire
placard or limited-use spare tire and wheel assembly. Replace (or repair) the original
tire at the first opportunity and reinstall it on your vehicle. Failure to do so could result
in loss of vehicle control.
WHAT TO DO IN EMERGENCIES
89
Page 93 of 140
Using The Power Button
• Push and release the Power Button (4) once to turn On the TIREFIT kit. Push and release
the Power Button (4) again to turn Off the TIREFIT kit.
Using The Deflation Button
• Press the Deflation Button (2) to reduce the air pressure in the tire if it becomes
over-inflated.
TIREFIT Usage Precautions
• Replace the TIREFIT Sealant Bottle (1) and Sealant Hose (6) prior to the expiration date
(printed on the bottle label) to assure optimum operation of the system. Refer to “Sealing
a Tire with TIREFIT” section (F) “Sealant Bottle and Hose Replacement”.
• The Sealant Bottle (1) and Sealant Hose (6) are a one tire application use. After each use,
always replace these components immediately at an authorized dealer.
• When the TIREFIT sealant is in a liquid form, clean water, and a damp cloth will remove
the material from the vehicle or tire and wheel components. Once the sealant dries, it can
easily be peeled off and properly discarded.
• For optimum performance, make sure the valve stem on the wheel is free of debris before
connecting the TIREFIT kit.
• You can use the TIREFIT air pump to inflate bicycle tires. The kit also comes with two
needles, located in the Accessory Storage Compartment (on the bottom of the air pump)
for inflating sport balls, rafts, or similar inflatable items. However, use only the Air Pump
Hose (7) and make sure the Mode Select Knob (5) is in the Air Mode when inflating such
items to avoid injecting sealant into them. The TIREFIT Sealant is only intended to seal
punctures less than 1/4 in (6 mm) diameter in the tread of your vehicle.
• Do not lift or carry the TIREFIT kit by the hoses.
Sealing A Tire With TIREFIT
(A) Whenever You Stop To Use TIREFIT:
1. Pull over to a safe location and turn on the vehicle’s Hazard Warning flashers.
2. Verify that the valve stem (on the wheel with the deflated tire) is in a position that is near
to the ground. This will allow the TIREFIT Hoses (6) and (7) to reach the valve stem and
keep the TIREFIT kit flat on the ground. This will provide the best positioning of the kit
when injecting the sealant into the deflated tire and running the air pump. Move the
vehicle as necessary to place the valve stem in this position before proceeding.
3. Place the transmission in PARK (auto transmission) or in Gear (manual transmission)
and cycle the ignition to the OFF position.
4. Set the parking brake.
WHAT TO DO IN EMERGENCIES
91
Page 97 of 140
WARNING!
• Do not attempt to seal a tire on the side of the vehicle closest to traffic. Pull far
enough off the road to avoid the danger of being hit when using the TIREFIT kit.
• Do not use TIREFIT or drive the vehicle under the following circumstances:
• If the puncture in the tire tread is approximately 1/4 in. (6 mm) or larger.
• If the tire has any sidewall damage.
• If the tire has any damage from driving with extremely low tire pressure.
• If the tire has any damage from driving on a flat tire.
• If the wheel has any damage.
• If you are unsure of the condition of the tire or the wheel.
• Keep TIREFIT away from open flames or heat source.
• A loose TIREFIT kit thrown forward in a collision or hard stop could endanger the
occupants of the vehicle. Always stow the TIREFIT kit in the place provided. Failure to
follow these warnings can result in injuries that are serious or fatal to you, your
passengers, and others around you.
• Take care not to allow the contents of TIREFIT to come in contact with hair, eyes, or
clothing. TIREFIT is harmful if inhaled, swallowed, or absorbed through the skin.
It causes skin, eye, and respiratory irritation. Flush immediately with plenty of water
if there is any contact with eyes or skin. Change clothing as soon as possible, if there
is any contact with clothing.
• TIREFIT Sealant solution contains latex. In case of an allergic reaction or rash,
consult a physician immediately. Keep TIREFIT out of reach of children. If swallowed,
rinse mouth immediately with plenty of water and drink plenty of water. Do not induce
vomiting! Consult a physician immediately.
• TIREFIT is not a permanent flat tire repair. Have the tire inspected and repaired or
replaced after using TIREFIT. Do not exceed 55 mph (88 km/h) until the tire is
repaired or replaced. Failure to follow this warning can result in injuries that are
serious or fatal to you, your passengers, and others around you.
WHAT TO DO IN EMERGENCIES
95
Page 99 of 140
• Disconnect the opposite end of the positive (+) jumper cable from the positive (+) post of
the booster battery.
• Disconnect the positive (+) end of the jumper cable from the remote positive (+) post of
the discharged vehicle.
• If frequent jump-starting is required to start your vehicle you should have the battery and
charging system inspected at your authorized dealer.
CAUTION!
• Do not use a portable battery booster pack or any other booster source with a system
voltage greater than 12 Volts or damage to the battery, starter motor, alternator or
electrical system may occur.
• Failure to follow these procedures could result in damage to the charging system of
the booster vehicle or the discharged vehicle.
• Accessories that can be plugged into the vehicle power outlets draw power from the
vehicle’s battery, even when not in use (i.e., cellular phones, etc.). Eventually, if
plugged in long enough, the vehicle’s battery will discharge sufficiently to degrade
battery life and/or prevent the engine from starting.
WARNING!
• When temperatures are below the freezing point, electrolyte in a discharged battery
may freeze. Do not attempt jump-starting because the battery could rupture or
explode and cause personal injury. Battery temperature must be brought above
freezing point before attempting a jump-start.
• Take care to avoid the radiator cooling fan whenever the hood is raised. It can start
anytime the ignition switch is on. You can be injured by moving fan blades.
• Remove any metal jewelry, such as watch bands or bracelets, that might make an
inadvertent electrical contact. You could be severely injured.
• Batteries contain sulfuric acid that can burn your skin or eyes and generate hydrogen
gas which is flammable and explosive. Keep open flames or sparks away from the
battery.
• Do not allow vehicles to touch each other as this could establish a ground connection
and personal injury could result.
• Failure to follow this procedure could result in personal injury or property damage
due to battery explosion.
• Do not connect the cable to the negative post(-)of the discharged battery. The
resulting electrical spark could cause the battery to explode and could result in
personal injury.
WHAT TO DO IN EMERGENCIES
97
Page 104 of 140
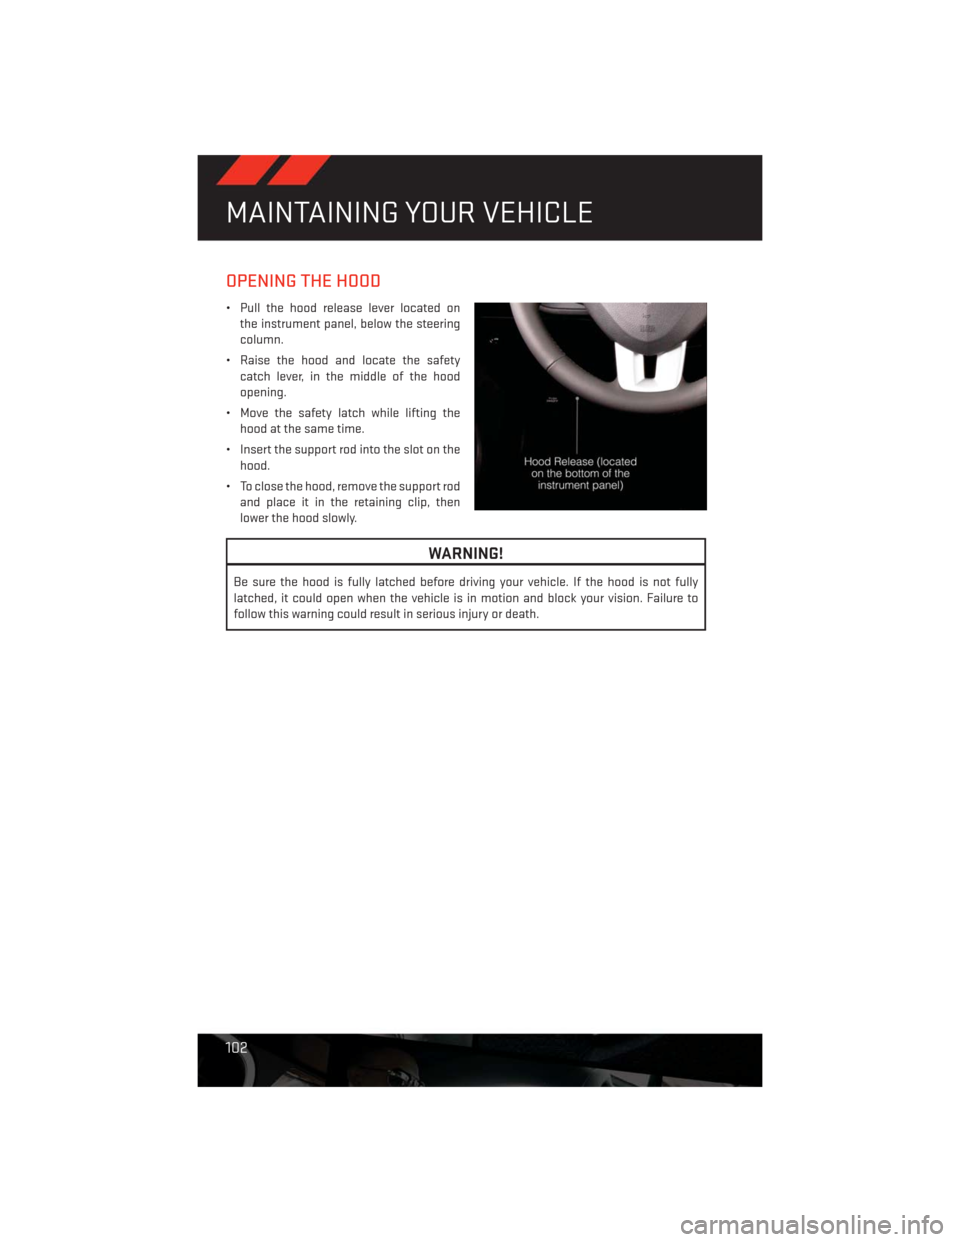
OPENING THE HOOD
• Pull the hood release lever located on
the instrument panel, below the steering
column.
• Raise the hood and locate the safety
catch lever, in the middle of the hood
opening.
• Move the safety latch while lifting the
hood at the same time.
• Insert the support rod into the slot on the
hood.
• To close the hood, remove the support rod
and place it in the retaining clip, then
lower the hood slowly.
WARNING!
Be sure the hood is fully latched before driving your vehicle. If the hood is not fully
latched, it could open when the vehicle is in motion and block your vision. Failure to
follow this warning could result in serious injury or death.
MAINTAINING YOUR VEHICLE
102
Page 115 of 140
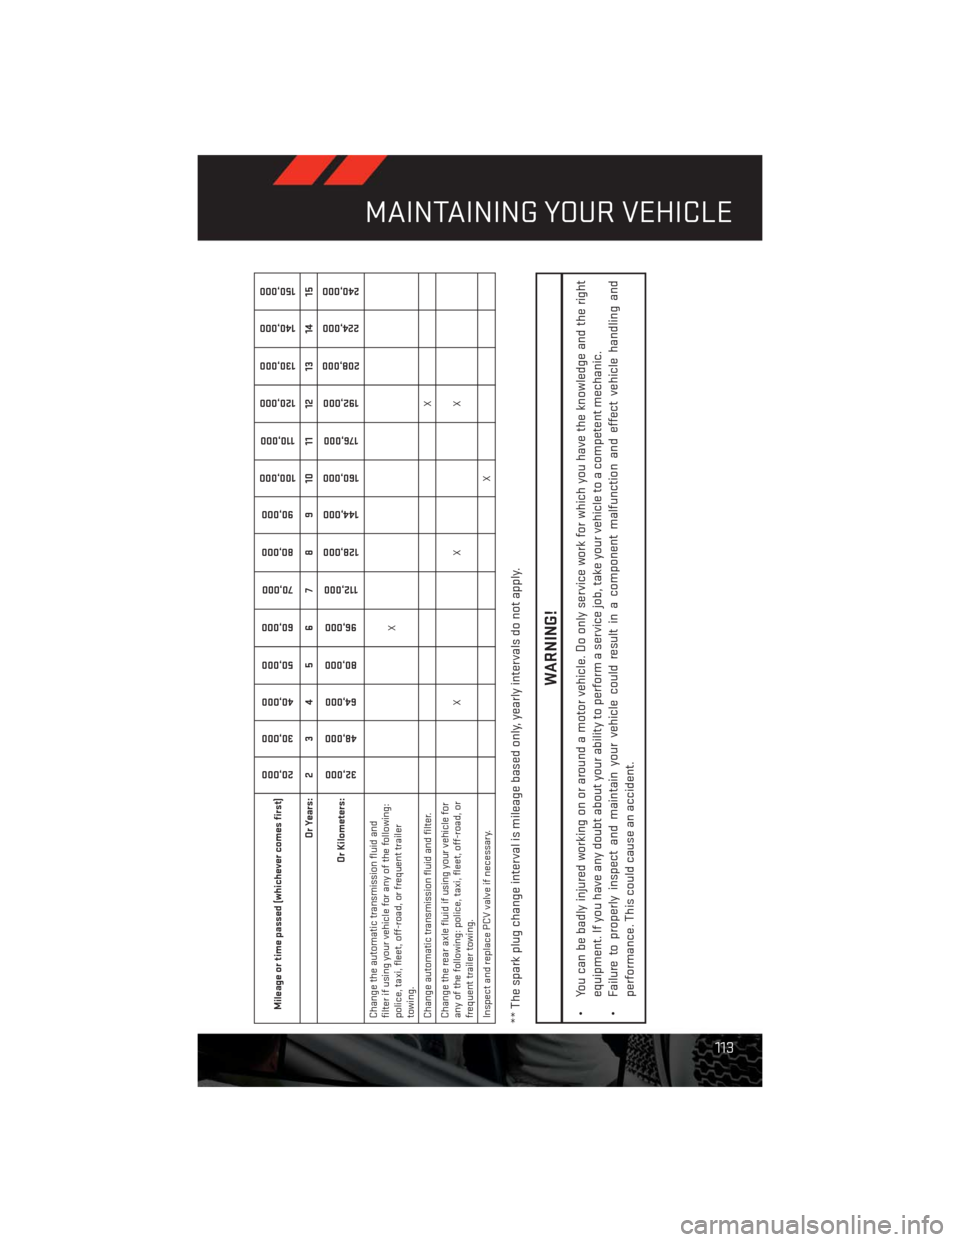
Mileage or time passed (whichever comes first)
20,000
30,000
40,000
50,000
60,000
70,000
80,000
90,000
100,000
110,000
120,000
130,000
140,000
150,000
Or Years: 2 3 4 5 6 7 8 9 10 11 12 13 14 15
Or Kilometers:
32,000
48,000
64,000
80,000
96,000
112,000
128,000
144,000
160,000
176,000
192,000
208,000
224,000
240,000
Change the automatic transmission fluid and
filter if using your vehicle for any of the following:
police, taxi, fleet, off-road, or frequent trailer
towing.X
Change automatic transmission fluid and filter.X
Change the rear axle fluid if using your vehicle for
any of the following: police, taxi, fleet, off-road, or
frequent trailer towing.XXX
Inspect and replace PCV valve if necessary.X** The spark plug change interval is mileage based only, yearly intervals do not apply.
WARNING!
• You can be badly injured working on or around a motor vehicle. Do only service work for which you have the knowledge and the right
equipment. If you have any doubt about your ability to perform a service job, take your vehicle to a competent mechanic.
• Failure to properly inspect and maintain your vehicle could result in a component malfunction and effect vehicle handling and
performance. This could cause an accident.
MAINTAINING YOUR VEHICLE
113