steering DODGE CHALLENGER 2014 3.G Owner's Manual
[x] Cancel search | Manufacturer: DODGE, Model Year: 2014, Model line: CHALLENGER, Model: DODGE CHALLENGER 2014 3.GPages: 148, PDF Size: 3.71 MB
Page 74 of 148
• When connected to this feature:• The iPod® can be controlled using the radio buttons to Play, Browse, and List the iPod®or external devices contents.
• The iPod® battery charges when plugged into the USB port (if supported by the specific audio device).
• Compatible iPod® devices may also be controllable using voice commands. Refer to the Owner's Manual on the DVD for details.
NOTE:
The USB port supports certain Mini, Classic, Nano, Touch, and iPhone® devices. The USB
port also supports playing music from compatible external USB Mass Storage Class
memory devices. For supported audio file formats, refer to the USB Port section in the
Owner's Manual on the DVD. Refer to www.UconnectPhone.com for a list of tested iPod®s.
Some iPod® software versions may not fully support the USB port features. Please visit
Apple’s website for iPod® software updates.
WARNING!
Do not plug in or remove the iPod® or external device while driving. Failure to follow this
warning could result in a collision.
ELECTRONIC VEHICLE INFORMATION CENTER (EVIC)
• The EVIC features a driver interactive dis- play that is located in the instrument
cluster. Pressing the controls on the left
side of the steering wheel allows the
driver to select vehicle information and
Personal Settings. For additional infor-
mation, refer to Programmable Features
in this guide.
• Press and release the MENU
button to
access the main menu, or to return to the
main menu from the sub menus.
• Press and release the UP
button to
scroll upward through the main menus
and sub menus.
• Press and release the DOWN
button
to scroll downward through the main
menus and sub menus.
• Press and release the SELECT
button for access to main menus, sub menus or to
select a personal setting in the setup menu. Press and hold the SELECT button for two
seconds to reset features.
1 — EVIC Controls
ELECTRONICS
72
Page 82 of 148
AUTOSTICK®
Steering Wheel Mounted Paddle Shifters Or Console Mounted Shifter
• AutoStick® is a driver-interactive trans-
mission feature that offers manual gear
shifting to provide you with more control
of the vehicle. AutoStick® allows you to
maximize engine braking, and improve
overall vehicle performance.
• This system can also provide you with more control during passing, city driving,
cold slippery conditions, mountain driv-
ing, trailer towing, and many other
situations.
Operation
• When the shift lever is in the DRIVE posi-tion, the transmission will operate auto-
matically, shifting between the five avail-
able gears. To engage AutoStick®, simply move the shift lever to the right or left (+/-)
while in the DRIVE position, or press one of the steering wheel mounted shift paddles
(+/-). When AutoStick® is active, the current transmission gear is displayed in the
Electronic Vehicle Information Center (EVIC) portion of the instrument cluster. In
AutoStick® mode, the transmission will shift when manually selected by the driver (using
the shift lever, or the shift paddles), unless an engine lugging or overspeed condition
would result. It will remain in the selected gear until another upshift or downshift is
chosen, except as described below:• The transmission will automatically downshift as the vehicle slows (to prevent engine
lugging) and will display the current gear.
• The transmission will automatically downshift to first gear when coming to a stop.
• You can start out in first or second gear. Tapping (+) (at a stop) will allow starting in second gear. Starting out in second gear is helpful in snowy or icy conditions.
• The system will ignore attempts to upshift at too low of a vehicle speed.
• Transmission shifting will be more noticeable when AutoStick® is engaged. To disen- gage AutoStick® mode, hold the shift lever to the right or press and hold the (+) shift
paddle until “D” is once again displayed in the instrument cluster. You can shift in or
out of the AutoStick® mode at any time without taking your foot off the accelerator
pedal.
SRT
80
Page 83 of 148
ELECTRONIC CONTROL DAMPING SYSTEM
• This vehicle may be equipped with an electronic controlled dampening system. Thissystem reduces body roll and pitch in many driving situations including cornering,
acceleration and braking. There are three modes of operation:
Automatic (Auto) Mode
• This is the default position when vehicle ignition is first turned on. Auto mode will give asporty, but comfortable ride. Within this mode, the suspension will adapt to the vehicle
inputs, including road surfaces, vehicle speed, steering inputs, braking, and accelera-
tion.
• If AutoStick® is engaged while in “Auto” mode, the transmission will automatically shift up if maximum engine speed is reached.
• Heavily pressing the accelerator pedal may generate an automatic downshift for im- proved acceleration.
• This mode should be used for most driving situations.
Sport ModeSPORT
• This mode is driver selectable when the vehicle is placed in SPORT mode (press the SPORT button on the center console). This mode will set suspension for maximum
performance handling and is intended for spirited driving.
• When SPORT mode is enabled, a “ SPORT” message will display in the in-
strument cluster.
NOTE:
The SPORT setting will provide a firmer ride.
Track Mode (Automatic Transmission Only)
• This mode is selected when the SPORT button is pushed a second time. This mode combines maximum performance suspension and aggressive transmission calibration.
• When Track mode is enabled and the transmission is in AutoStick® the transmission will not automatically upshift at maximum engine speed. It will remain in gear until the driver
selects an upshift. When slowing to a stop it will automatically down shift to prevent
engine lugging.
• When Track mode is enabled a “Track” message will display in the instrument cluster.
SRT
81
Page 108 of 148
FREEING A STUCK VEHICLE
• If your vehicle becomes stuck in mud, sand or snow, it can often be moved using arocking motion. Turn your steering wheel right and left to clear the area around the front
wheels. Then shift back and forth between DRIVE and REVERSE (with automatic trans-
mission) or 2nd gear and REVERSE (with manual transmission) while gently pressing the
accelerator. Use the least amount of accelerator pedal pressure that will maintain the
rocking motion, without spinning the wheels or racing the engine.
NOTE:
Press the "ESC Off" switch, to place the Electronic Stability Control (ESC) system in "Partial
Off" mode before rocking the vehicle. Once the vehicle has been freed, press the "ESC Off"
switch again to restore "ESC On" mode.
CAUTION!
• Racing the engine or spinning the wheels may lead to transmission overheating and failure. Allow the engine to idle with the shift lever in NEUTRAL for at least one minute
after every five rocking-motion cycles. This will minimize overheating and reduce the
risk of transmission failure during prolonged efforts to free a stuck vehicle.
• When “rocking” a stuck vehicle by moving between DRIVE/2nd and REVERSE, do not
spin the wheels faster than 15 mph (24 km/h), or drivetrain damage may result.
• Revving the engine or spinning the wheels too fast may lead to transmission over-
heating and failure. It can also damage the tires. Do not spin the wheels above
30 mph (48 km/h) while in gear (no transmission shifting occurring).
WHAT TO DO IN EMERGENCIES
106
Page 110 of 148
OPENING THE HOOD
• Pull the hood release lever located on theinstrument panel, below the steering col-
umn.
• Raise the hood and locate the safety catch lever, in the middle of the hood
opening.
• Move the safety latch while lifting the hood at the same time.
• Insert the support rod into the slot on the hood.
• To close the hood, remove the support rod and place it in the retaining clip, then
lower the hood slowly.
WARNING!
Be sure the hood is fully latched before driving your vehicle. If the hood is not fully
latched, it could open when the vehicle is in motion and block your vision. Failure to
follow this warning could result in serious injury or death.
1 — Hood Release
MAINTAINING YOUR VEHICLE
108
Page 115 of 148
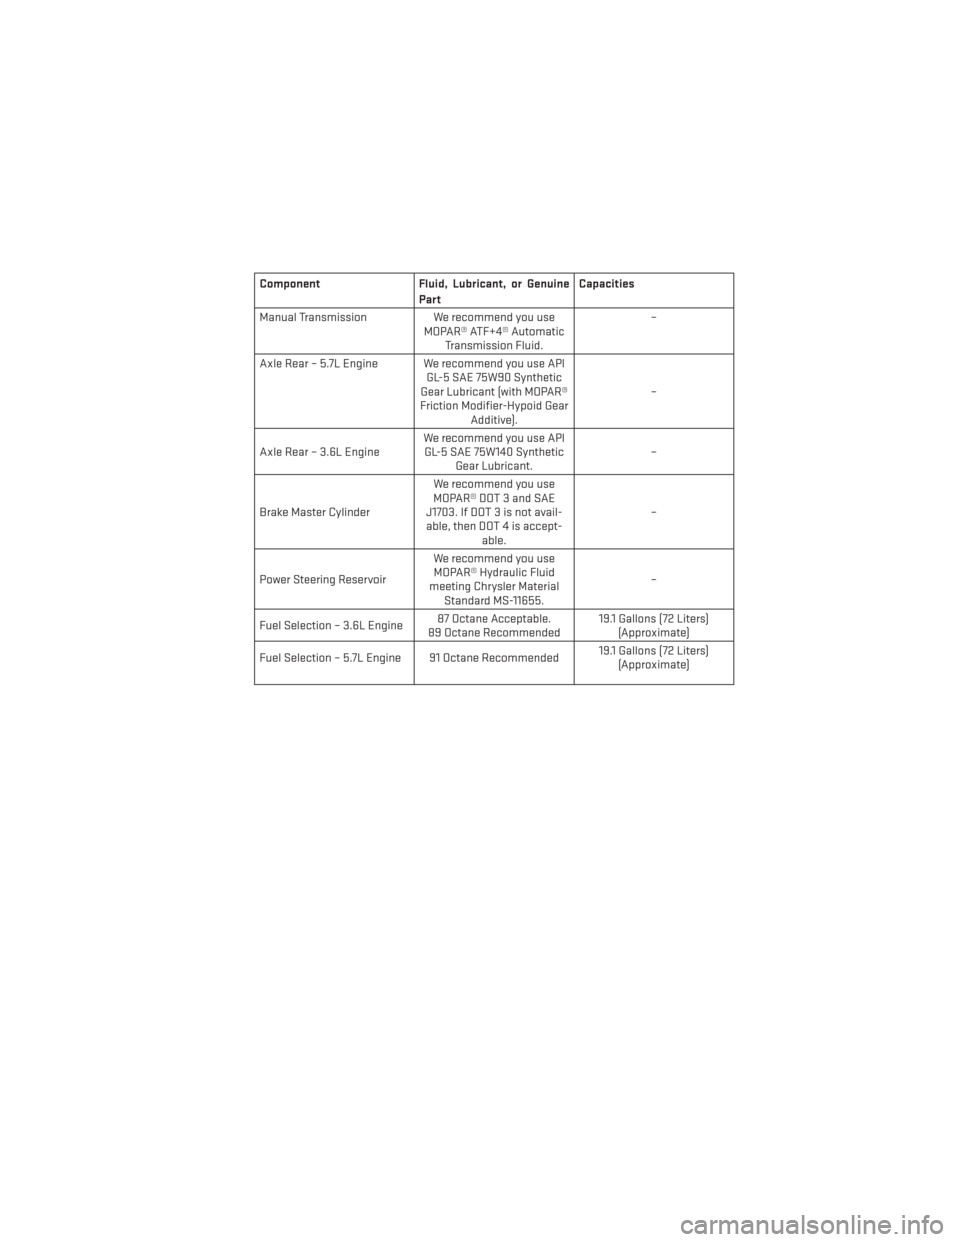
ComponentFluid, Lubricant, or Genuine
Part Capacities
Manual Transmission We recommend you use
MOPAR® ATF+4® Automatic Transmission Fluid. –
Axle Rear – 5.7L Engine We recommend you use API GL-5 SAE 75W90 Synthetic
Gear Lubricant (with MOPAR®
Friction Modifier-Hypoid Gear Additive). –
Axle Rear – 3.6L Engine We recommend you use API
GL-5 SAE 75W140 Synthetic Gear Lubricant. –
Brake Master Cylinder We recommend you use
MOPAR® DOT 3 and SAE
J1703. If DOT 3 is not avail- able, then DOT 4 is accept- able. –
Power Steering Reservoir We recommend you use
MOPAR® Hydraulic Fluid
meeting Chrysler Material Standard MS-11655. –
Fuel Selection – 3.6L Engine 87 Octane Acceptable.
89 Octane Recommended 19.1 Gallons (72 Liters)
(Approximate)
Fuel Selection – 5.7L Engine 91 Octane Recommended 19.1 Gallons (72 Liters)
(Approximate)
MAINTAINING YOUR VEHICLE
113
Page 116 of 148
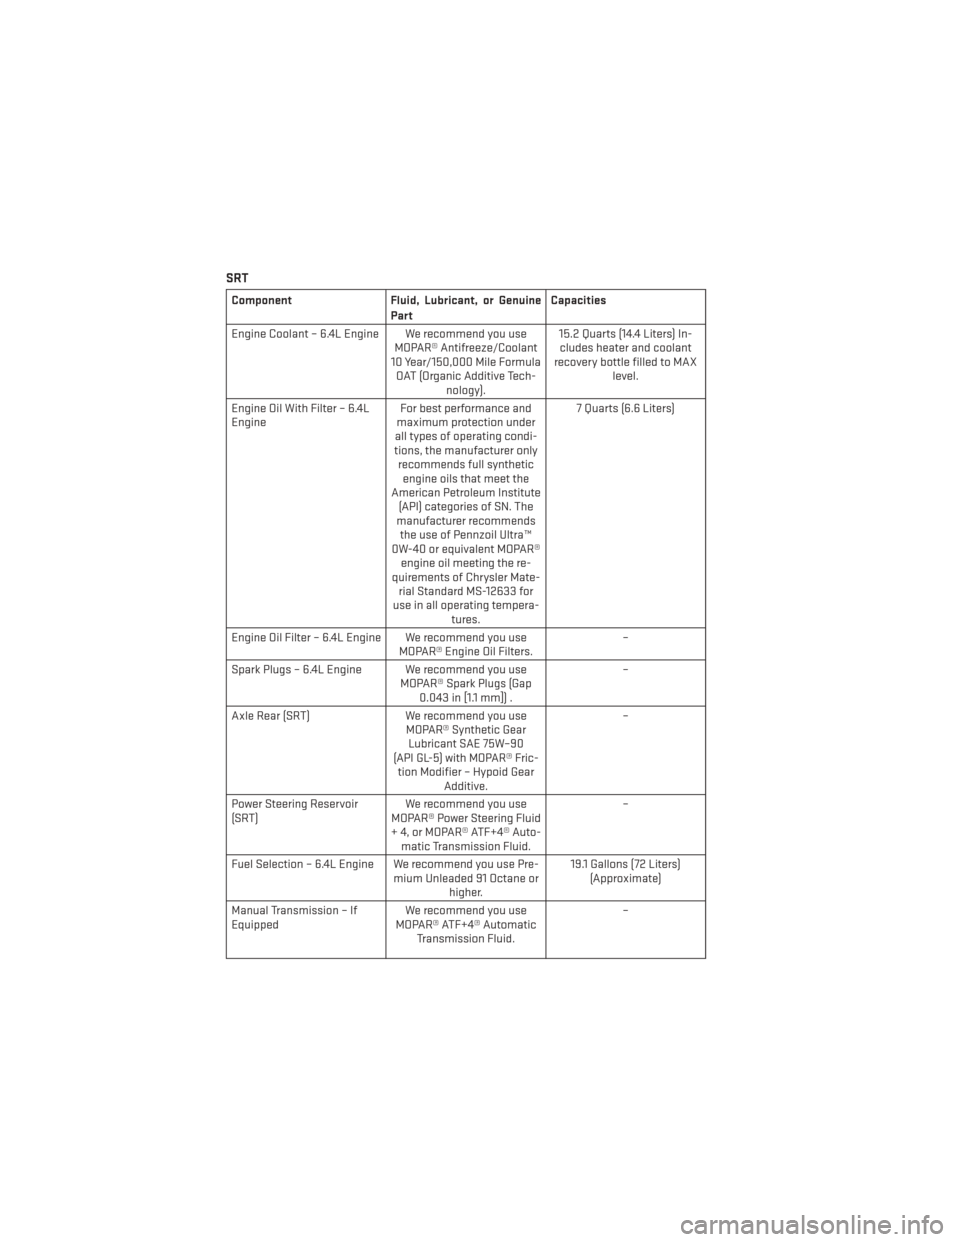
SRT
ComponentFluid, Lubricant, or Genuine
Part Capacities
Engine Coolant – 6.4L Engine We recommend you use MOPAR® Antifreeze/Coolant
10 Year/150,000 Mile Formula OAT (Organic Additive Tech- nology). 15.2 Quarts (14.4 Liters) In-
cludes heater and coolant
recovery bottle filled to MAX level.
Engine Oil With Filter – 6.4L
Engine For best performance and
maximum protection under
all types of operating condi-
tions, the manufacturer only recommends full synthetic engine oils that meet the
American Petroleum Institute (API) categories of SN. The
manufacturer recommends the use of Pennzoil Ultra™
0W-40 or equivalent MOPAR® engine oil meeting the re-
quirements of Chrysler Mate- rial Standard MS-12633 for
use in all operating tempera- tures. 7 Quarts (6.6 Liters)
Engine Oil Filter – 6.4L Engine We recommend you use MOPAR® Engine Oil Filters. –
Spark Plugs – 6.4L Engine We recommend you use MOPAR® Spark Plugs (Gap0.043 in [1.1 mm]) . –
Axle Rear (SRT) We recommend you use
MOPAR® Synthetic Gear Lubricant SAE 75W–90
(API GL-5) with MOPAR® Fric- tion Modifier – Hypoid Gear Additive. –
Power Steering Reservoir
(SRT) We recommend you use
MOPAR® Power Steering Fluid
+ 4, or MOPAR® ATF+4® Auto- matic Transmission Fluid. –
Fuel Selection – 6.4L Engine We recommend you use Pre- mium Unleaded 91 Octane orhigher. 19.1 Gallons (72 Liters)
(Approximate)
Manual Transmission – If
Equipped We recommend you use
MOPAR® ATF+4® Automatic Transmission Fluid. –
MAINTAINING YOUR VEHICLE
114
Page 118 of 148
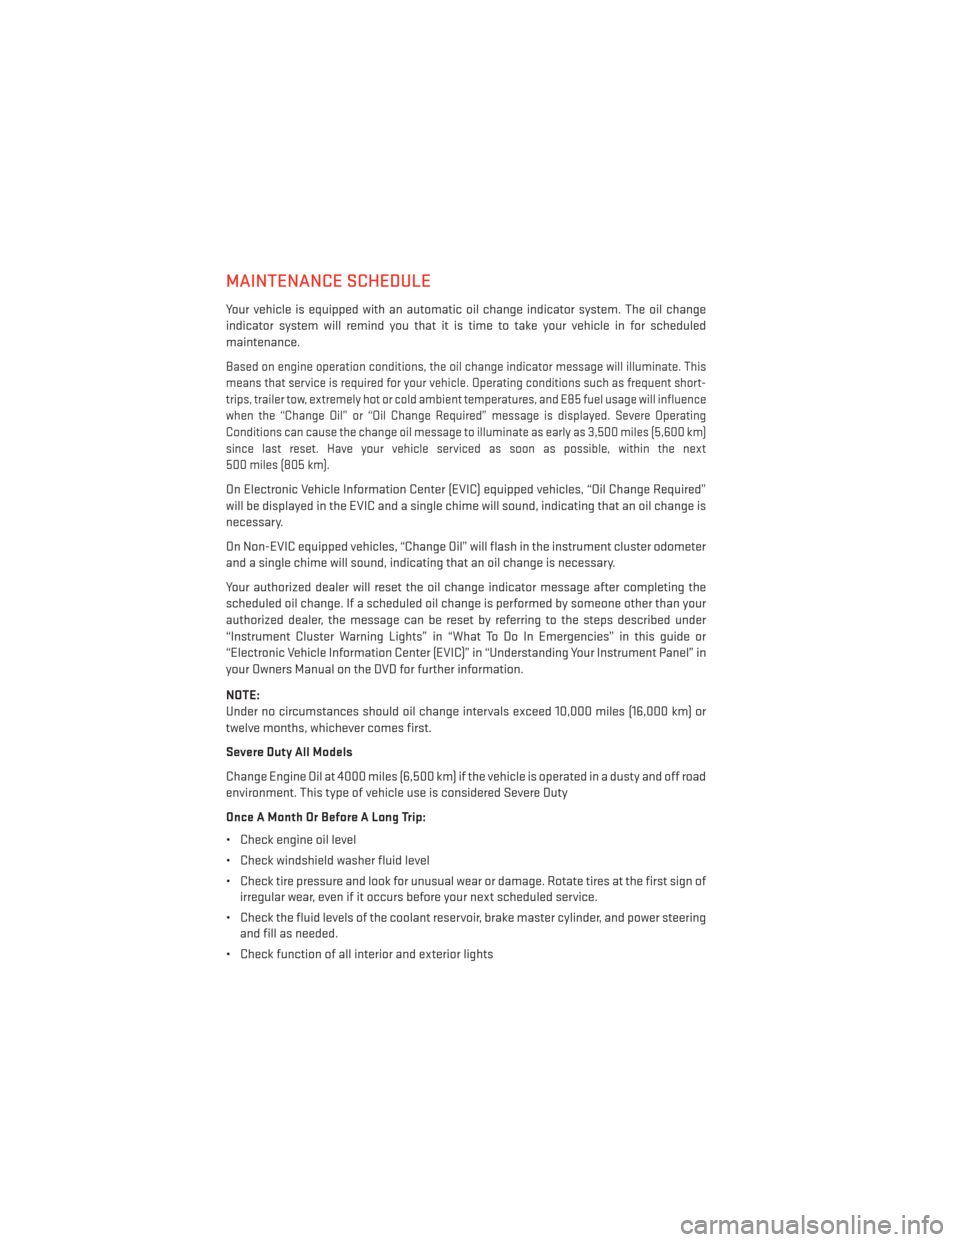
MAINTENANCE SCHEDULE
Your vehicle is equipped with an automatic oil change indicator system. The oil change
indicator system will remind you that it is time to take your vehicle in for scheduled
maintenance.
Based on engine operation conditions, the oil change indicator message will illuminate. This
means that service is required for your vehicle. Operating conditions such as frequent short-
trips, trailer tow, extremely hot or cold ambient temperatures, and E85 fuel usage will influence
when the “Change Oil” or “Oil Change Required” message is displayed. Severe Operating
Conditions can cause the change oil message to illuminate as early as 3,500 miles (5,600 km)
since last reset. Have your vehicle serviced as soon as possible, within the next
500 miles (805 km).
On Electronic Vehicle Information Center (EVIC) equipped vehicles, “Oil Change Required”
will be displayed in the EVIC and a single chime will sound, indicating that an oil change is
necessary.
On Non-EVIC equipped vehicles, “Change Oil” will flash in the instrument cluster odometer
and a single chime will sound, indicating that an oil change is necessary.
Your authorized dealer will reset the oil change indicator message after completing the
scheduled oil change. If a scheduled oil change is performed by someone other than your
authorized dealer, the message can be reset by referring to the steps described under
“Instrument Cluster Warning Lights” in “What To Do In Emergencies” in this guide or
“Electronic Vehicle Information Center (EVIC)” in “Understanding Your Instrument Panel” in
your Owners Manual on the DVD for further information.
NOTE:
Under no circumstances should oil change intervals exceed 10,000 miles (16,000 km) or
twelve months, whichever comes first.
Severe Duty All Models
Change Engine Oil at 4000 miles (6,500 km) if the vehicle is operated in a dusty and off road
environment. This type of vehicle use is considered Severe Duty
Once A Month Or Before A Long Trip:
• Check engine oil level
• Check windshield washer fluid level
• Check tire pressure and look for unusual wear or damage. Rotate tires at the first sign ofirregular wear, even if it occurs before your next scheduled service.
• Check the fluid levels of the coolant reservoir, brake master cylinder, and power steering and fill as needed.
• Check function of all interior and exterior lights
MAINTAINING YOUR VEHICLE
116
Page 124 of 148
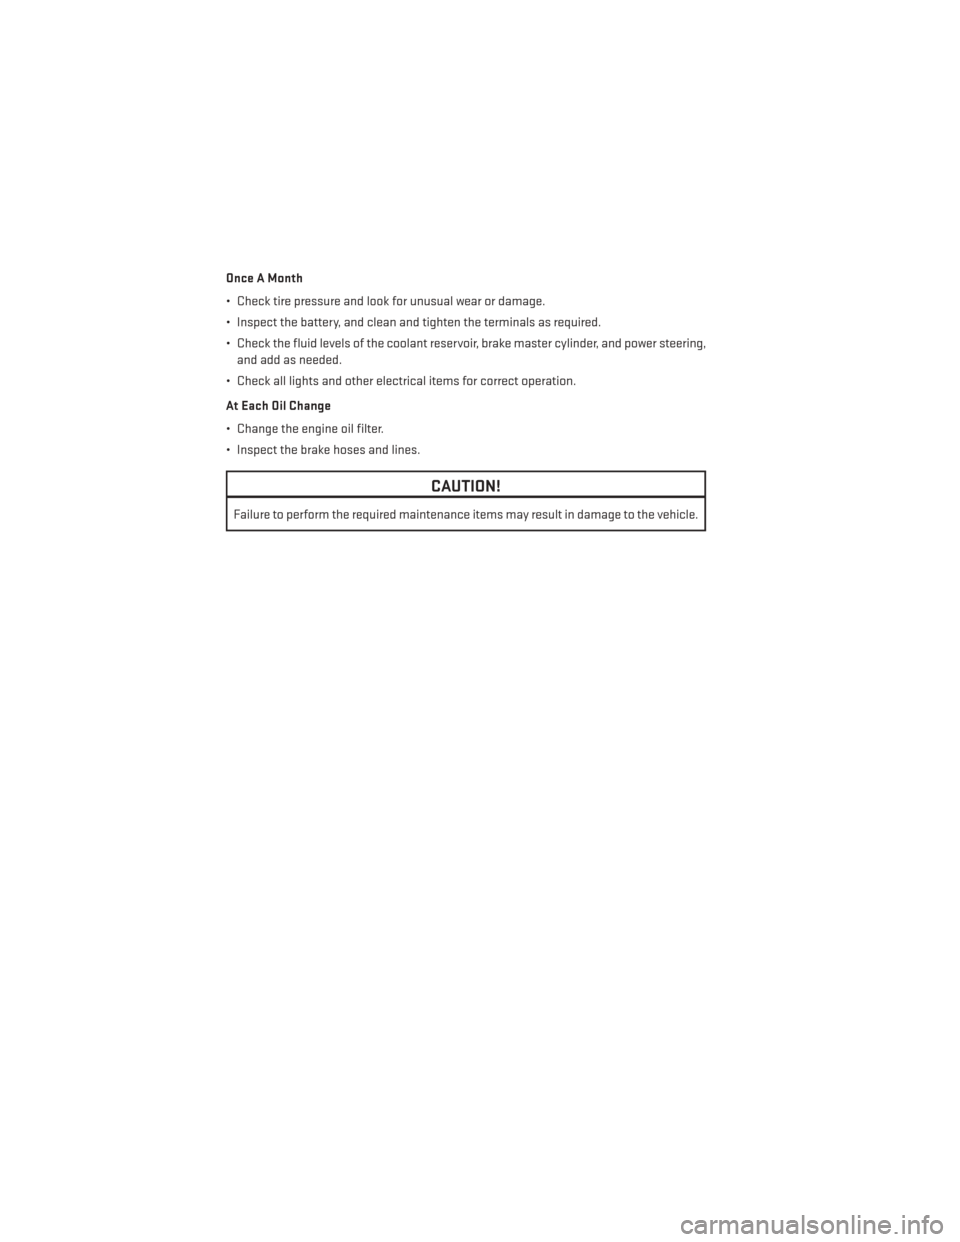
Once A Month
• Check tire pressure and look for unusual wear or damage.
• Inspect the battery, and clean and tighten the terminals as required.
• Check the fluid levels of the coolant reservoir, brake master cylinder, and power steering,and add as needed.
• Check all lights and other electrical items for correct operation.
At Each Oil Change
• Change the engine oil filter.
• Inspect the brake hoses and lines.
CAUTION!
Failure to perform the required maintenance items may result in damage to the vehicle.
MAINTAINING YOUR VEHICLE
122
Page 130 of 148
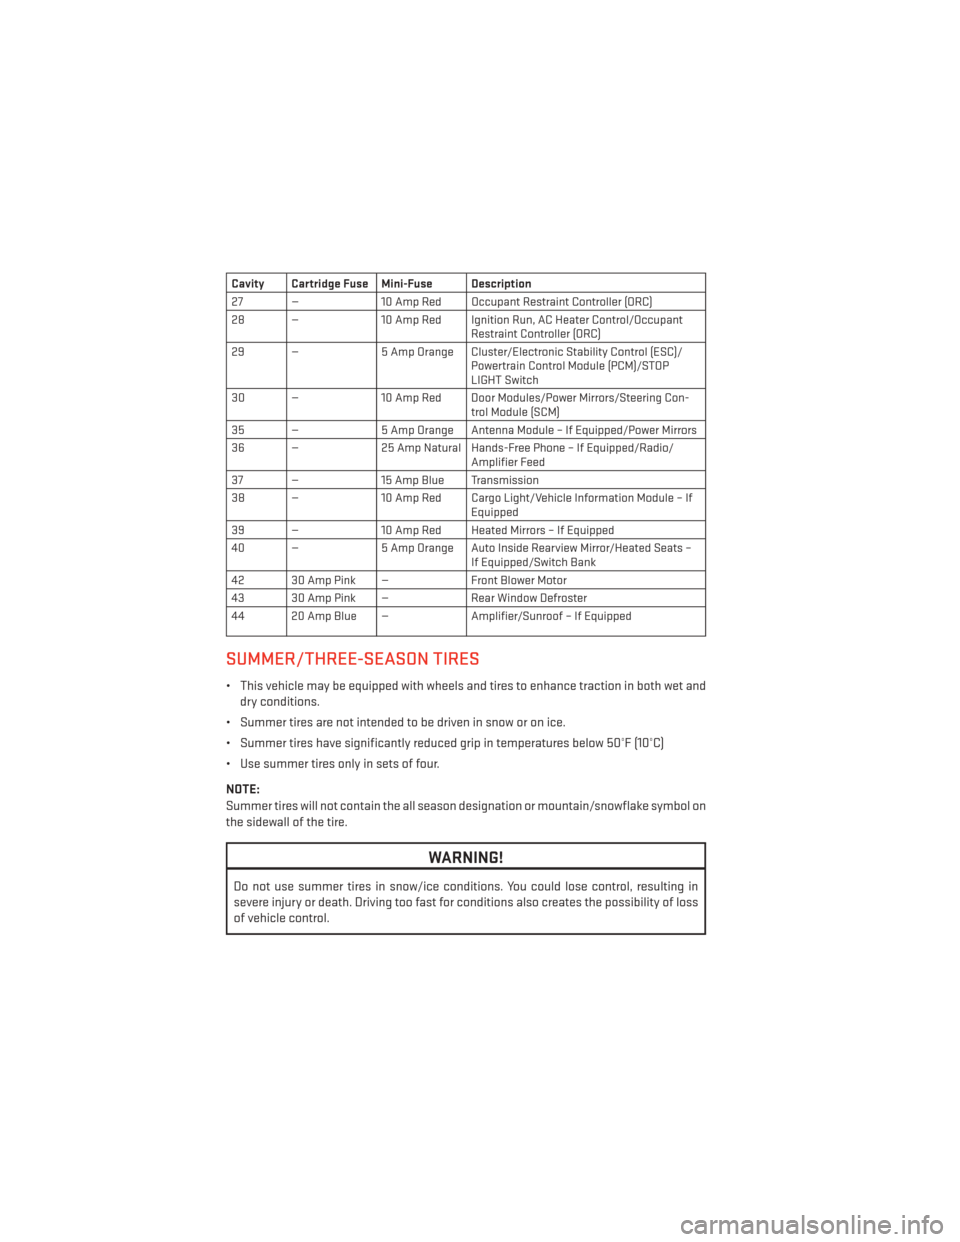
Cavity Cartridge Fuse Mini-Fuse Description
27 —10 Amp Red Occupant Restraint Controller (ORC)
28 — 10 Amp Red Ignition Run, AC Heater Control/Occupant
Restraint Controller (ORC)
29 — 5 Amp Orange Cluster/Electronic Stability Control (ESC)/
Powertrain Control Module (PCM)/STOP
LIGHT Switch
30 — 10 Amp Red Door Modules/Power Mirrors/Steering Con-
trol Module (SCM)
35 — 5 Amp Orange Antenna Module – If Equipped/Power Mirrors
36 — 25 Amp Natural Hands-Free Phone – If Equipped/Radio/
Amplifier Feed
37 — 15 Amp Blue Transmission
38 — 10 Amp Red Cargo Light/Vehicle Information Module – If
Equipped
39 — 10 Amp Red Heated Mirrors – If Equipped
40 — 5 Amp Orange Auto Inside Rearview Mirror/Heated Seats –
If Equipped/Switch Bank
42 30 Amp Pink — Front Blower Motor
43 30 Amp Pink — Rear Window Defroster
44 20 Amp Blue — Amplifier/Sunroof – If Equipped
SUMMER/THREE-SEASON TIRES
• This vehicle may be equipped with wheels and tires to enhance traction in both wet and
dry conditions.
• Summer tires are not intended to be driven in snow or on ice.
• Summer tires have significantly reduced grip in temperatures below 50°F (10°C)
• Use summer tires only in sets of four.
NOTE:
Summer tires will not contain the all season designation or mountain/snowflake symbol on
the sidewall of the tire.
WARNING!
Do not use summer tires in snow/ice conditions. You could lose control, resulting in
severe injury or death. Driving too fast for conditions also creates the possibility of loss
of vehicle control.
MAINTAINING YOUR VEHICLE
128