transmission fluid DODGE CHALLENGER 2015 3.G Owners Manual
[x] Cancel search | Manufacturer: DODGE, Model Year: 2015, Model line: CHALLENGER, Model: DODGE CHALLENGER 2015 3.GPages: 603, PDF Size: 14.97 MB
Page 93 of 603
While cruising, brief full-throttle acceleration within the
limits of local traffic laws contributes to a good break-in.
However, wide-open throttle acceleration in low gear can
be detrimental and should be avoided.
The engine oil, transmission fluid, and axle lubricant
installed at the factory is high-quality and energy-
conserving. Oil, fluid, and lubricant changes should be
consistent with anticipated climate and conditions under
which vehicle operations will occur. For the recom-
mended viscosity and quality grades, refer to “Mainte-
nance Procedures” in “Maintaining Your Vehicle”.
CAUTION!
Never use Non-Detergent Oil or Straight Mineral Oil
in the engine or damage may result.
NOTE:A new engine may consume some oil during its
first few thousand miles (kilometers) of operation. This
should be considered a normal part of the break-in and
not interpreted as an indication of difficulty. Please check
your oil level with the engine oil indicator often during
the break in period. Add oil as required.
For vehicles equipped with the 6.4L use the following
engine break-in recommendations:
Despite modern technology and World Class manufac-
turing methods, the moving parts of the vehicle must still
wear in with each other. This wearing in occurs mainly
during the first 500 miles (805 km) and continues through
the first oil change interval.
2
THINGS TO KNOW BEFORE STARTING YOUR VEHICLE 91
Page 229 of 603
7. Gear Status Indicator — Automatic Transmission
Only
The Gear Status Indicator is self-contained within the
instrument cluster. It displays the gear position of the
automatic transmission.
8. Seat Belt Reminder Light
This light will turn on for four to eight seconds as
a bulb check when the ignition switch is first
placed in ON/RUN. A chime will sound if the
driver’s seat belt is unbuckled during the bulb check. The
Seat Belt Warning Light will flash or remain on continu-
ously if the driver’s seat belt remains unbuckled after the
bulb check or when driving. Refer to “Occupant Re-
straints” in “Things To Know Before Starting Your Ve-
hicle” for further information.
9. Brake Warning Light
This light monitors various brake functions,
including brake fluid level and parking brake
application. If the brake light turns on it may
indicate that the parking brake is applied, that
the brake fluid level is low, or that there is a problem with
the anti-lock brake system reservoir.
If the light remains on when the parking brake has been
disengaged, and the fluid level is at the full mark on the
master cylinder reservoir, it indicates a possible brake
hydraulic system malfunction. In this case, the light will
remain on until the condition has been corrected.
The dual brake system provides a reserve braking capac-
ity in the event of a failure to a portion of the hydraulic
system. A leak in either half of the dual brake system is
indicated by the Brake Warning Light which will turn on
when the brake fluid level in the master cylinder has
dropped below a specified level.
4
UNDERSTANDING YOUR INSTRUMENT PANEL 227
Page 358 of 603
NOTE:During cold weather, you may experience in-
creased effort in shifting until the transmission fluid
warms up. This is normal.
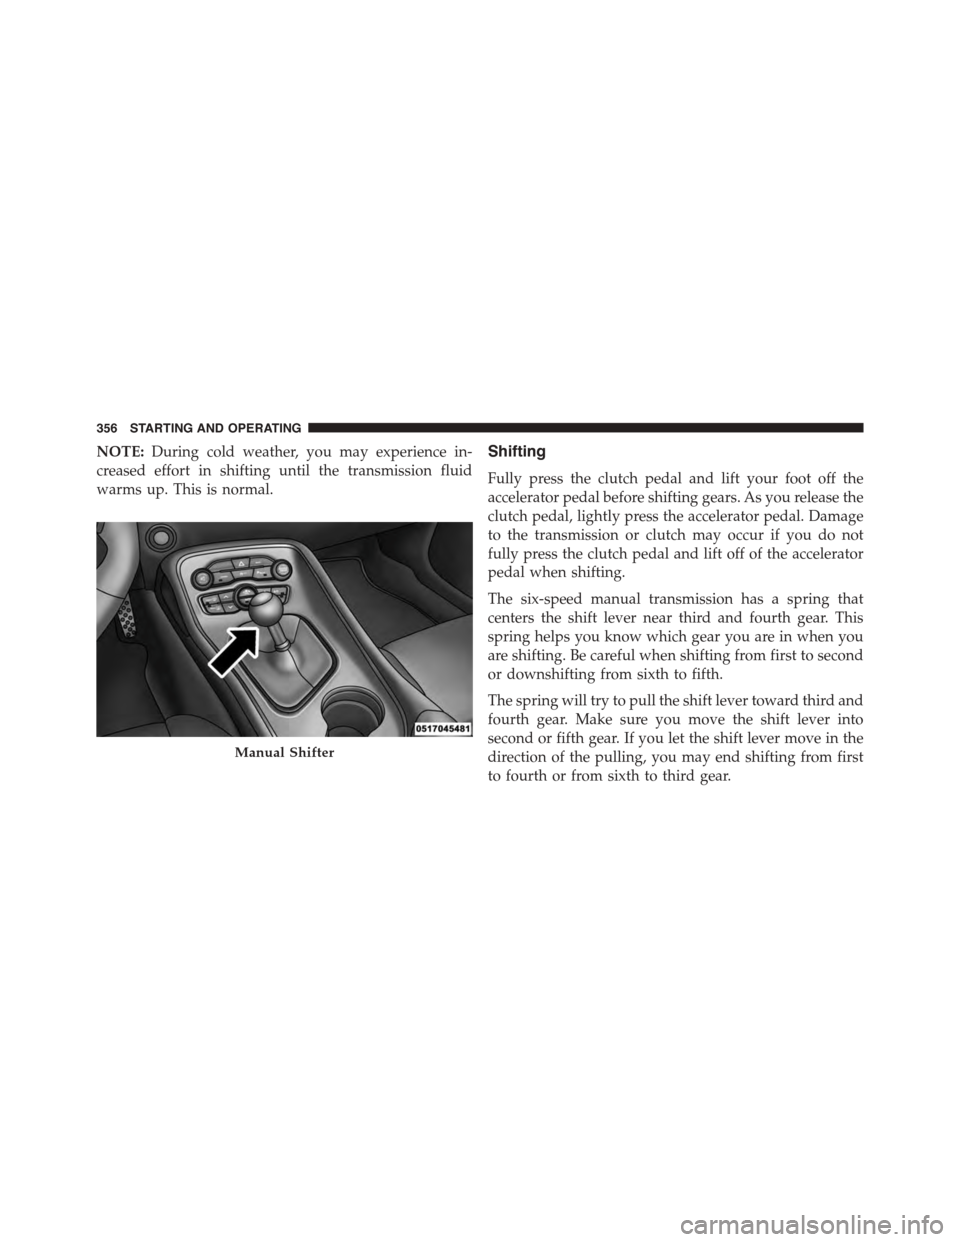
Shifting
Fully press the clutch pedal and lift your foot off the
accelerator pedal before shifting gears. As you release the
clutch pedal, lightly press the accelerator pedal. Damage
to the transmission or clutch may occur if you do not
fully press the clutch pedal and lift off of the accelerator
pedal when shifting.
The six-speed manual transmission has a spring that
centers the shift lever near third and fourth gear. This
spring helps you know which gear you are in when you
are shifting. Be careful when shifting from first to second
or downshifting from sixth to fifth.
The spring will try to pull the shift lever toward third and
fourth gear. Make sure you move the shift lever into
second or fifth gear. If you let the shift lever move in the
direction of the pulling, you may end shifting from first
to fourth or from sixth to third gear.
Manual Shifter
356 STARTING AND OPERATING
Page 462 of 603
4. Remove the cap from the valve stem and then screw
the fitting at the end of the Sealant Hose (6) onto the
valve stem.
5. Uncoil the Power Plug (8) and insert the plug into the
vehicle’s 12 Volt power outlet.
NOTE:Do not remove foreign objects (e.g., screws or
nails) from the tire.
(C) Injecting Tire Service Kit Sealant Into The
Deflated Tire:
•Always start the engine before turning ON the Tire
Service Kit.
NOTE:Manual transmission vehicles must have the
parking brake engaged and the shift lever in NEUTRAL.
•After pressing the Power Button (4), the sealant (white
fluid) will flow from the Sealant Bottle (1) through the
Sealant Hose (6) and into the tire.
NOTE:Sealant may leak out through the puncture in the
tire.
If the sealant (white fluid) does not flow within0–10
seconds through the Sealant Hose (6):
1. Press the Power Button (4) to turn Off the Tire Service
Kit. Disconnect the Sealant Hose (6) from the valve
stem. Make sure the valve stem is free of debris.
Reconnect the Sealant Hose (6) to the valve stem.
Check that the Mode Select Knob (5) is in the Sealant
Mode position and not Air Mode. Press the Power
Button (4) to turn On the Tire Service Kit.
2. Connect the Power Plug (8) to a different 12 Volt
power outlet in your vehicle or another vehicle, if
available. Make sure the engine is running before
turning ON the Tire Service Kit.
3. The Sealant Bottle (1) may be empty due to previous
use. Call for assistance.
460 WHAT TO DO IN EMERGENCIES
Page 490 of 603
▫Brake System........................517
▫Clutch Hydraulic System — Manual Transmission
(If Equipped).........................520
▫Manual Transmission — If Equipped.......520
▫Automatic Transmission — If Equipped.....521
▫Rear Axle...........................522
▫Appearance Care And Protection From
Corrosion...........................523
!FUSES..............................529
▫Front Power Distribution Center (Fuses).....530
▫Rear Power Distribution Center (Fuses).....535
!VEHICLE STORAGE....................542
!REPLACEMENT BULBS.................543
!BULB REPLACEMENT..................545
▫Low Beam Headlamp, High Beam Headlamp,
Park/Turn Lamp — Models with Halogen
Headlamps — If Equipped...............545
▫Low Beam Headlamp, High Beam Headlamp, and
Park/Turn Lamp — Models with High Intensity
Discharge (HID) Headlamps — If Equipped . . .546
▫Front/Rear Side Marker Lamp............547
▫Tail/Turn And Stop Lamp...............547
▫Center Tail/Backup Lamp...............547
▫Center High-Mounted Stop Lamp (CHMSL) . .547
▫License Lamp........................547
!FLUID CAPACITIES....................548
!FLUIDS, LUBRICANTS AND GENUINE PARTS . .549
▫Engine.............................549
▫Chassis............................552
488 MAINTAINING YOUR VEHICLE
Page 498 of 603
CAUTION!(Continued)
•Your vehicle has been built with improved fluids
that protect the performance and durability of your
vehicle and also allow extended maintenance inter-
vals. Do not use chemical flushes in these compo-
nents as the chemicals can damage your engine,
transmission, power steering or air conditioning.
Such damage is not covered by the New Vehicle
Limited Warranty. If a flush is needed because of
component malfunction, use only the specified
fluid for the flushing procedure.
Engine Oil
Checking Oil Level — 3.6L Engine
To assure proper engine lubrication, the engine oil must
be maintained at the correct level. Check the oil level at
regular intervals, such as every fuel stop. The best time to
check the engine oil level is about five minutes after a
fully warmed engine is shut off.
Checking the oil while the vehicle is on level ground will
improve the accuracy of the oil level readings. Maintain
the oil level between the MIN and MAX markings on the
dipstick. Adding 1.0 qt (1.0 L) of oil when the reading is
at the MIN mark will result in a MAX reading on these
engines.
CAUTION!
Overfilling or underfilling will cause oil aeration or
loss of oil pressure. This could damage your engine.
Checking Oil Level — 5.7L and 6.4L Engine
To assure proper engine lubrication, the engine oil must
be maintained at the correct level. Check the oil level at
496 MAINTAINING YOUR VEHICLE
Page 522 of 603
Clutch Hydraulic System — Manual Transmission
(If Equipped)
The clutch hydraulic system is fed by a segregated
volume of fluid within the brake system master cylinder
reservoir. In the event of leakage or wear, use only the
manufacturer’s recommended brake fluid. Refer to “Flu-
ids, Lubricants, and Genuine Parts” in “Maintaining Your
Vehicle” for further information.
Manual Transmission — If Equipped
Fluid Level Check
Check the fluid level by removing the fill plug on the left
side of the transmission. The fluid level should be 1/4
inch (6.4mm) below the bottom of the fill hole. Add fluid,
if necessary, to maintain the proper level. Refer to “Flu-
ids, Lubricants, and Genuine Parts” in “Maintaining Your
Vehicle” for further information.
CAUTION!
Using a transmission fluid other than the manufac-
turer’s recommended fluid may cause deterioration
in transmission shift quality and/or damage to the
transmission. Refer to “Fluids, Lubricants, and
Genuine Parts” in this section for fluid specifica-
tions.
Change Transmission Fluid
If contaminated with water, change the fluid immedi-
ately. See your authorized dealer for service.
Refer to the “Maintenance Schedule” for the proper
maintenance intervals.
520 MAINTAINING YOUR VEHICLE
Page 523 of 603
Automatic Transmission — If Equipped
Selection Of Lubricant
It is important to use the proper transmission fluid to
ensure optimum transmission performance and life. Use
only the manufacturer ’s specified transmission fluid.
Refer to “Fluids, Lubricants, and Genuine Parts” in this
section for fluid specifications. It is important to maintain
the transmission fluid at the correct level using the
recommended fluid. No chemical flushes should be used
in any transmission; only the approved lubricant should
be used.
CAUTION!
Using a transmission fluid other than the manufac-
turer ’s recommended fluid may cause deterioration
in transmission shift quality and/or torque converter
shudder. Refer to “Fluids, Lubricants, and Genuine
Parts” in this section for fluid specifications.
Special Additives
The manufacturer strongly recommends against using
any special additives in the transmission.
Automatic Transmission Fluid (ATF) is an engineered
product and its performance may be impaired by supple-
mental additives. Therefore, do not add any fluid addi-
tives to the transmission. The only exception to this
policy is the use of special dyes for diagnosing fluid
leaks. Avoid using transmission sealers as they may
adversely affect seals.
CAUTION!
Do not use chemical flushes in your transmission as
the chemicals can damage your transmission compo-
nents. Such damage is not covered by the New
Vehicle Limited Warranty.
7
MAINTAINING YOUR VEHICLE 521
Page 524 of 603
Fluid Level Check
The fluid level is preset at the factory and does not require
adjustment under normal operating conditions. Routine
fluid level checks are not required, therefore the transmis-
sion has no dipstick. Your authorized dealer can check your
transmission fluid level using special service tools.
If you notice fluid leakage or transmission malfunction,
visit your authorized dealer immediately to have the
transmission fluid level checked. Operating the vehicle
with an improper fluid level can cause severe transmis-
sion damage.
CAUTION!
If a transmission fluid leak occurs, visit your autho-
rized dealer immediately. Severe transmission dam-
age may occur. Your authorized dealer has the proper
tools to adjust the fluid level accurately.
Fluid And Filter Changes
Under normal operating conditions, the fluid installed at
the factory will provide satisfactory lubrication for the
life of the vehicle.
Routine fluid and filter changes are not required. How-
ever, change the fluid and filter if the fluid becomes
contaminated (with water, etc.), or if the transmission is
disassembled for any reason.
Rear Axle
Fluid Level Check
Checking the fluid level while the vehicle is on level
ground will improve the accuracy of the fluid level
reading.
Check the fluid level by removing the fill plug on the
axle. The fluid level should be at the bottom of the fill
hole. Add fluid, if necessary, to maintain the proper level.
522 MAINTAINING YOUR VEHICLE
Page 552 of 603
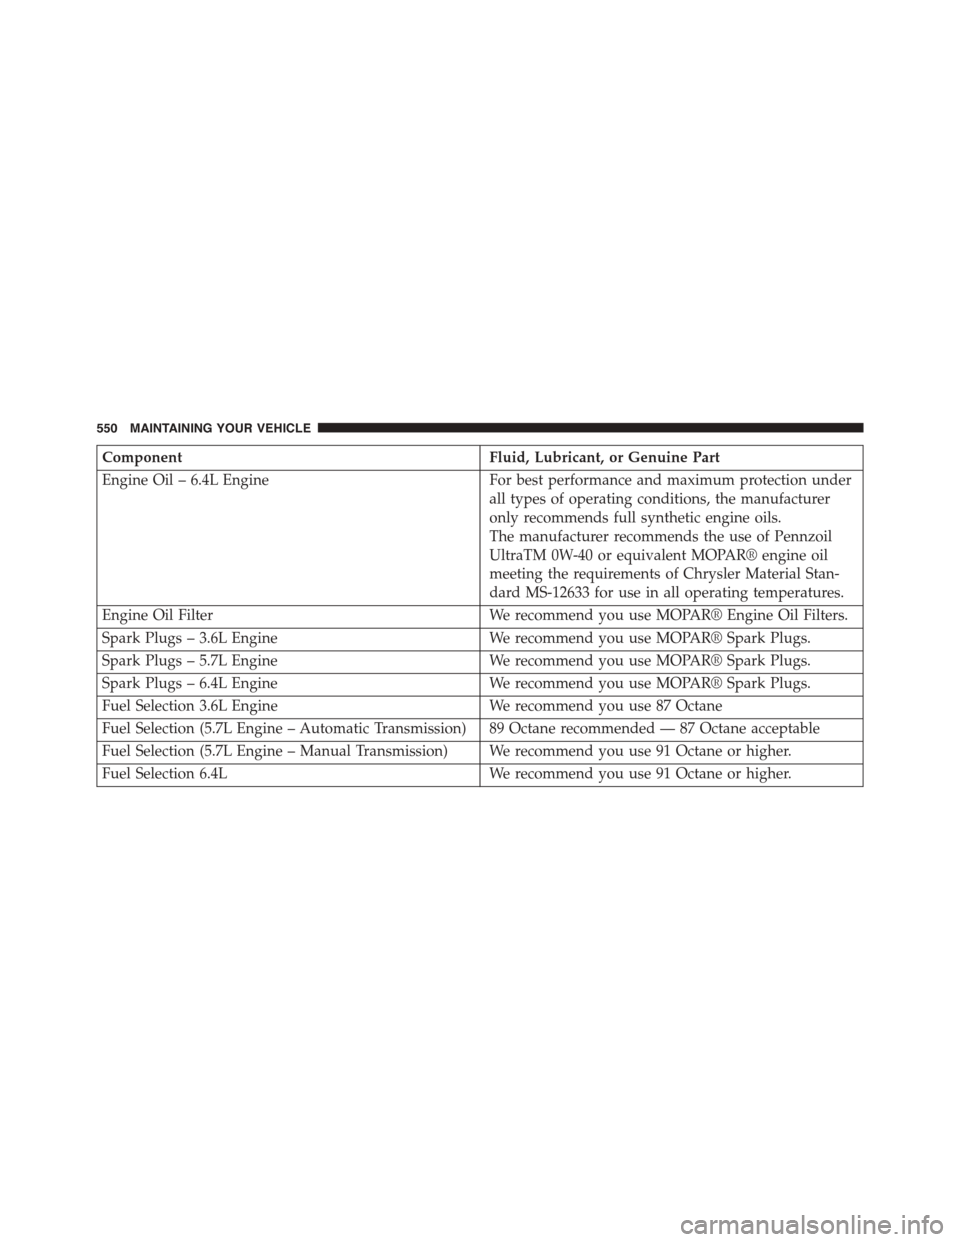
ComponentFluid, Lubricant, or Genuine Part
Engine Oil – 6.4L EngineFor best performance and maximum protection under
all types of operating conditions, the manufacturer
only recommends full synthetic engine oils.
The manufacturer recommends the use of Pennzoil
UltraTM 0W-40 or equivalent MOPAR® engine oil
meeting the requirements of Chrysler Material Stan-
dard MS-12633 for use in all operating temperatures.
Engine Oil FilterWe recommend you use MOPAR® Engine Oil Filters.
Spark Plugs – 3.6L EngineWe recommend you use MOPAR® Spark Plugs.
Spark Plugs – 5.7L EngineWe recommend you use MOPAR® Spark Plugs.
Spark Plugs – 6.4L EngineWe recommend you use MOPAR® Spark Plugs.
Fuel Selection 3.6L EngineWe recommend you use 87 Octane
Fuel Selection (5.7L Engine – Automatic Transmission) 89 Octane recommended — 87 Octane acceptable
Fuel Selection (5.7L Engine – Manual Transmission) We recommend you use 91 Octane or higher.
Fuel Selection 6.4LWe recommend you use 91 Octane or higher.
550 MAINTAINING YOUR VEHICLE