buttons DODGE CHALLENGER 2015 3.G Owner's Manual
[x] Cancel search | Manufacturer: DODGE, Model Year: 2015, Model line: CHALLENGER, Model: DODGE CHALLENGER 2015 3.GPages: 220, PDF Size: 30.96 MB
Page 77 of 220
NOTE:
Voice texting reply and voice texting features require a compatible mobile device enabled
with Bluetooth®Message Access Profile (MAP). iPhone®and some other smartphones do
not currently support Bluetooth®MAP. Visit UconnectPhone.com for system and device
compatibility.
•Wanttodictateapersonalmessage?YoumustfirstregisterwithUconnect®Access
(U.S. residents only) to take advantage of a new, cloud-based Voice Texting service, an
enhancement to Voice Text Reply.
Uconnect® 5.0 VOICE RECOGNITION QUICK TIPS
Introducing Uconnect®
Start using Uconnect®Voice Recognition with these helpful quick tips. It provides the key
Voice Commands and tips you need to know to control your Uconnect®5.0 system.
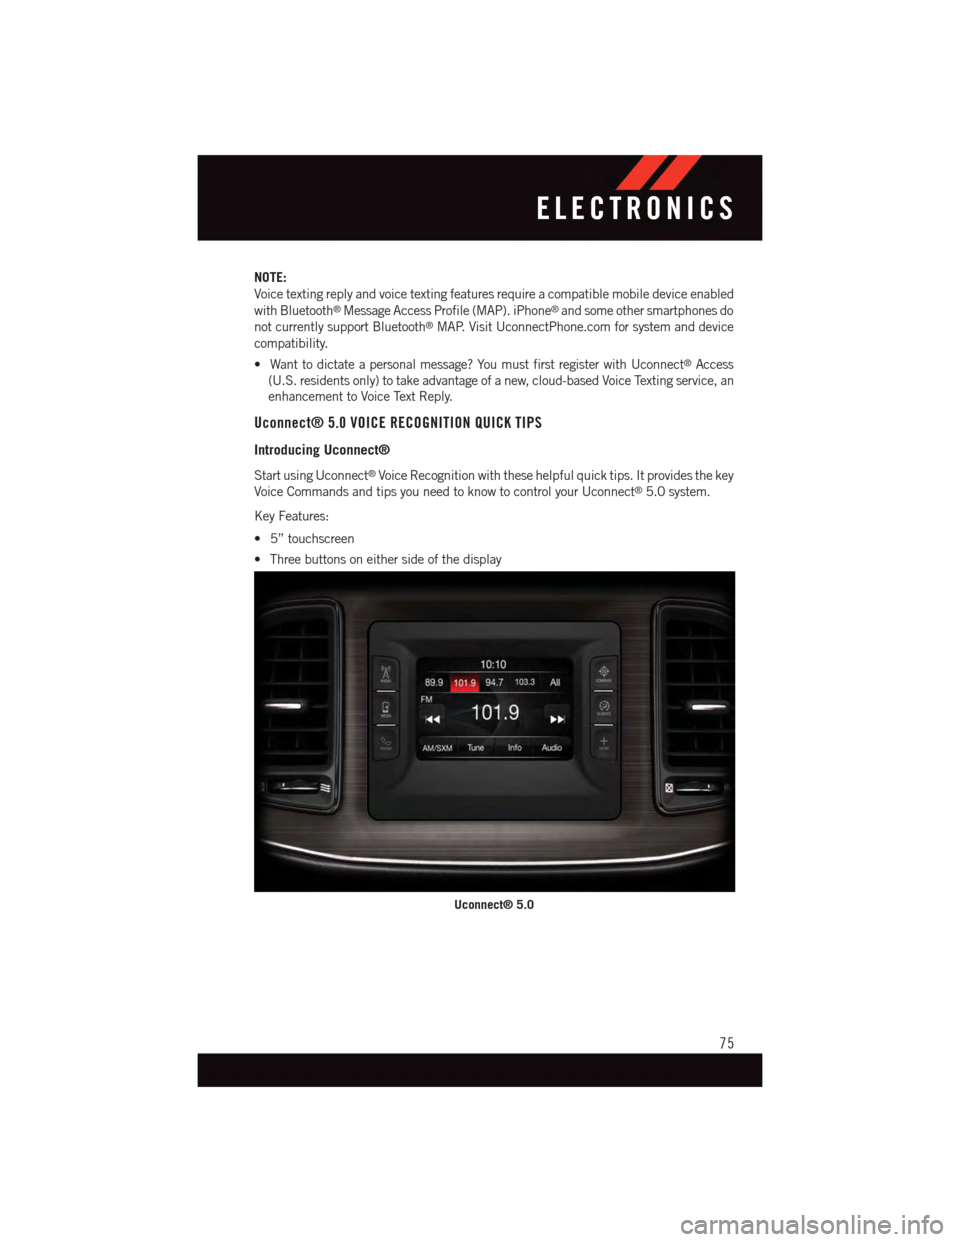
Key Features:
•5”touchscreen
•Threebuttonsoneithersideofthedisplay
Uconnect® 5.0
ELECTRONICS
75
Page 78 of 220
Get Started
1. VisitUconnectPhone.comto check mobile device and feature compatibility and to find
phone pairing instructions.
2. Reduce background noise. Wind and passenger conversations are examples of noise
that may impact recognition.
3. Speak clearly at a normal pace and volume while facing straight ahead. The micro-
phone is positioned on the rearview mirror and aimed at the driver.
4. Each time you give a Voice Command, you must first push either the VR or Phone
button, wait untilafterthe beep, then say your Voice Command.
5. You can interrupt the help message or system prompts by pushing the VR or Phone
button and saying a Voice Command from current category.
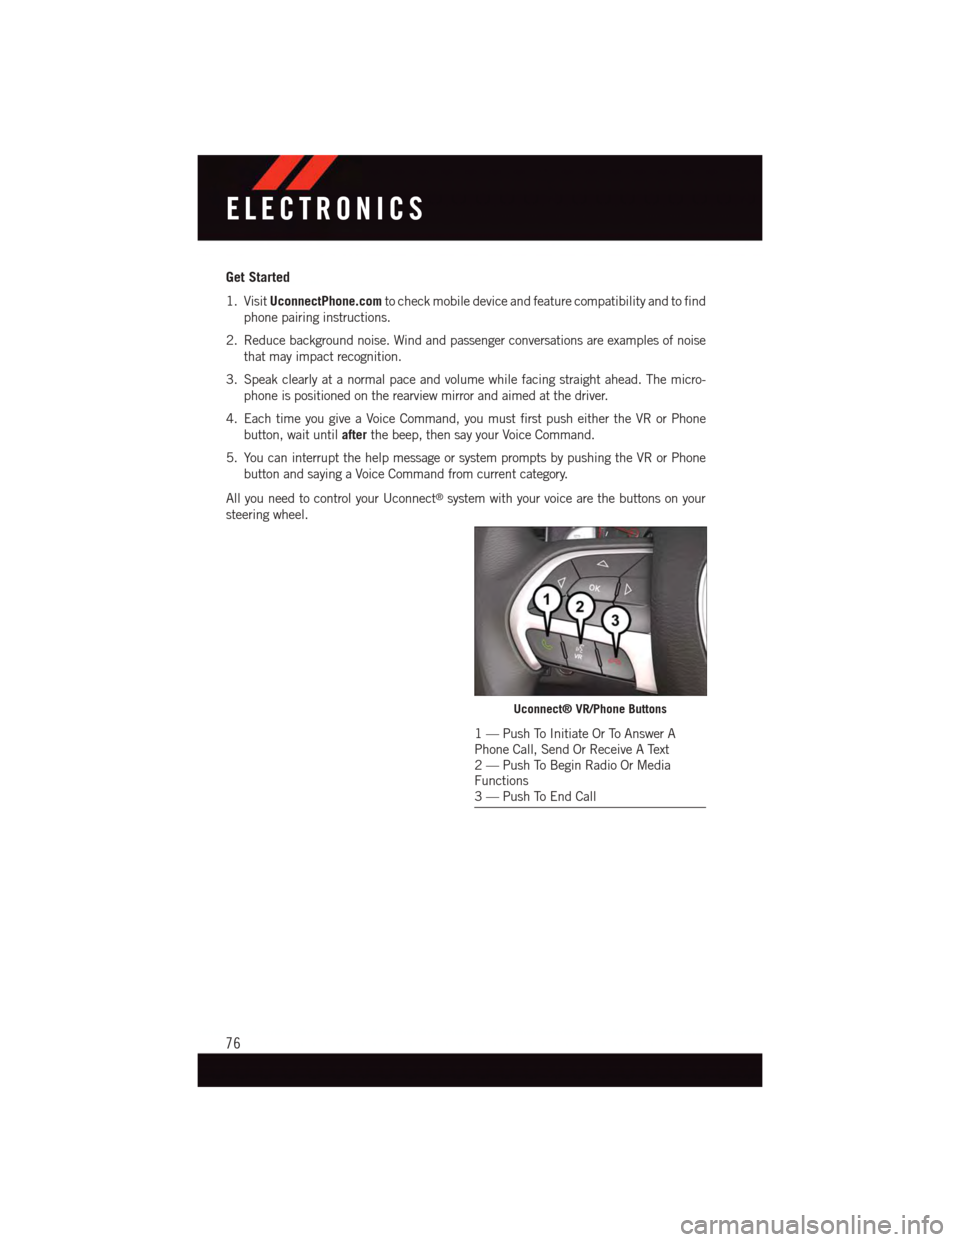
All you need to control your Uconnect®system with your voice are the buttons on your
steering wheel.
Uconnect® VR/Phone Buttons
1—PushToInitiateOrToAnswerAPhone Call, Send Or Receive A Text2—PushToBeginRadioOrMediaFunctions3—PushToEndCall
ELECTRONICS
76
Page 90 of 220
There are also two USB “Charge Only” ports located on the back of the center console for
rear passengers.
To r o u t e t h e U S B / i P o d®cable out of the center console, use the access cut out.
NOTE:
•WhenconnectingyouriPod®device for the first time, the system may take several
minutes to read your music, depending on the number of files. For example, the system
will take approximately five minutes for every 1,000 songs loaded on the device. Also
during the reading process, the Shuffle and Browse functions will be disabled. This
process is needed to ensure the full use of your iPod®features and only happens the
first time it is connected. After the first time, the reading process of your iPod®will take
considerably less time unless changes are made or new songs are added to the playlist.
•TheUSBportsupportscertainMini,Classic,Nano,Touch,andiPhone®devices. The
USB port also supports playing music from compatible external USB Mass Storage
Class memory devices. Some iPod®software versions may not fully support the USB
port features. Please visit Apple’s website for iPod®software updates.
Audio Jack (AUX)
The AUX allows a portable device, such as an MP3 player or an iPod®,tobepluggedinto
the radio and utilize the vehicle’s sound system, using a 3.5 mm audio cable, to amplify
the source and play through the vehicle speakers.
•Pressingthe“AUX”buttononthetouchscreenwillchangethemodetoauxiliarydevice
if the audio jack is connected, allowing the music from your portable device to be heard
through the vehicle's speakers. In order to activate the AUX, plug in the audio jack.
•Thefunctionsoftheportabledevicearecontrolledusingthedevicebuttons.The
volume may be controlled using the radio or portable device.
•Toroutetheaudiocableoutofthecenterconsole,usetheaccesscutoutinthefront
of the console.
Bluetooth® Streaming Audio
If using a Bluetooth®-equippeddevice,youmayalsobeabletostreammusictoyour
vehicle's sound system. Your connected device must be Bluetooth-compatible, and paired
with your system (see Uconnect®Phone for pairing instructions).
•YoucanaccessthemusicfromyourconnectedBluetooth®device by Pressing the
“Bluetooth®”buttononthetouchscreenwhileinMediamode.
SD Card
SD Card Mode allows you to play music that has been saved to your SD Card through your
vehicle’s sound system.
•YoucanenterSDCardModeisbyeitherinsertingaSDCardintotheSDCardslotor
press the “SD Card” button on the left side of the display while media mode.
For further information refer to your Radio Supplement.
ELECTRONICS
88
Page 100 of 220
Get Started
1. VisitUconnectPhone.comto check mobile device and feature compatibility and to find
phone pairing instructions.
2. Reduce background noise. Wind and passenger conversations are examples of noise
that may impact recognition.
3. Speak clearly at a normal pace and volume while facing straight ahead. The micro-
phone is positioned on the rearview mirror and aimed at the driver.
4. Each time you give a Voice Command, you must first push either the VR or Phone
button, wait untilafterthe beep, then say your Voice Command.
5. You can interrupt the help message or system prompts by pushing the VR or Phone
button and saying a Voice Command from current category.
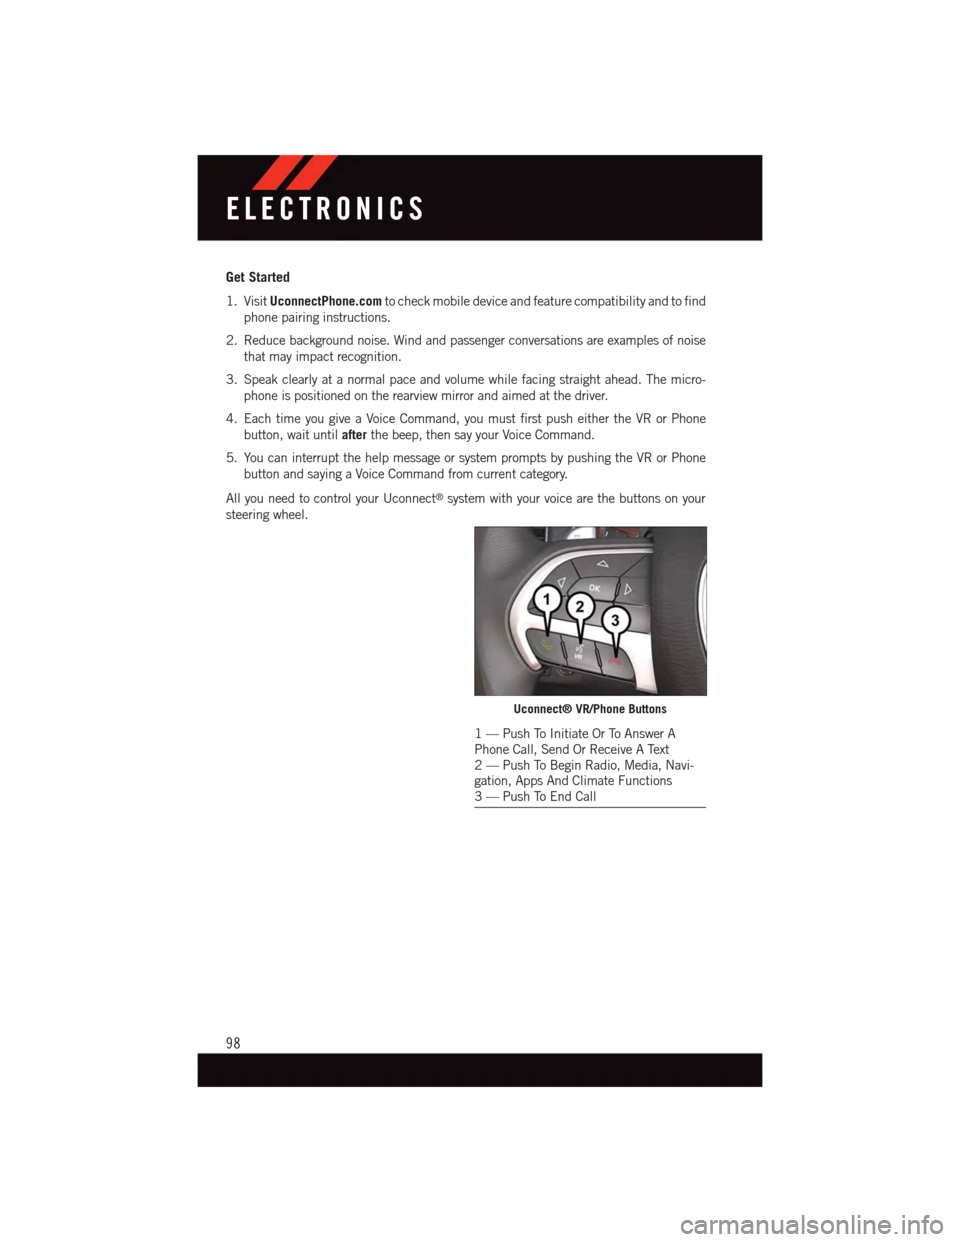
All you need to control your Uconnect®system with your voice are the buttons on your
steering wheel.
Uconnect® VR/Phone Buttons
1—PushToInitiateOrToAnswerAPhone Call, Send Or Receive A Text2—PushToBeginRadio,Media,Navi-gation, Apps And Climate Functions3—PushToEndCall
ELECTRONICS
98
Page 118 of 220
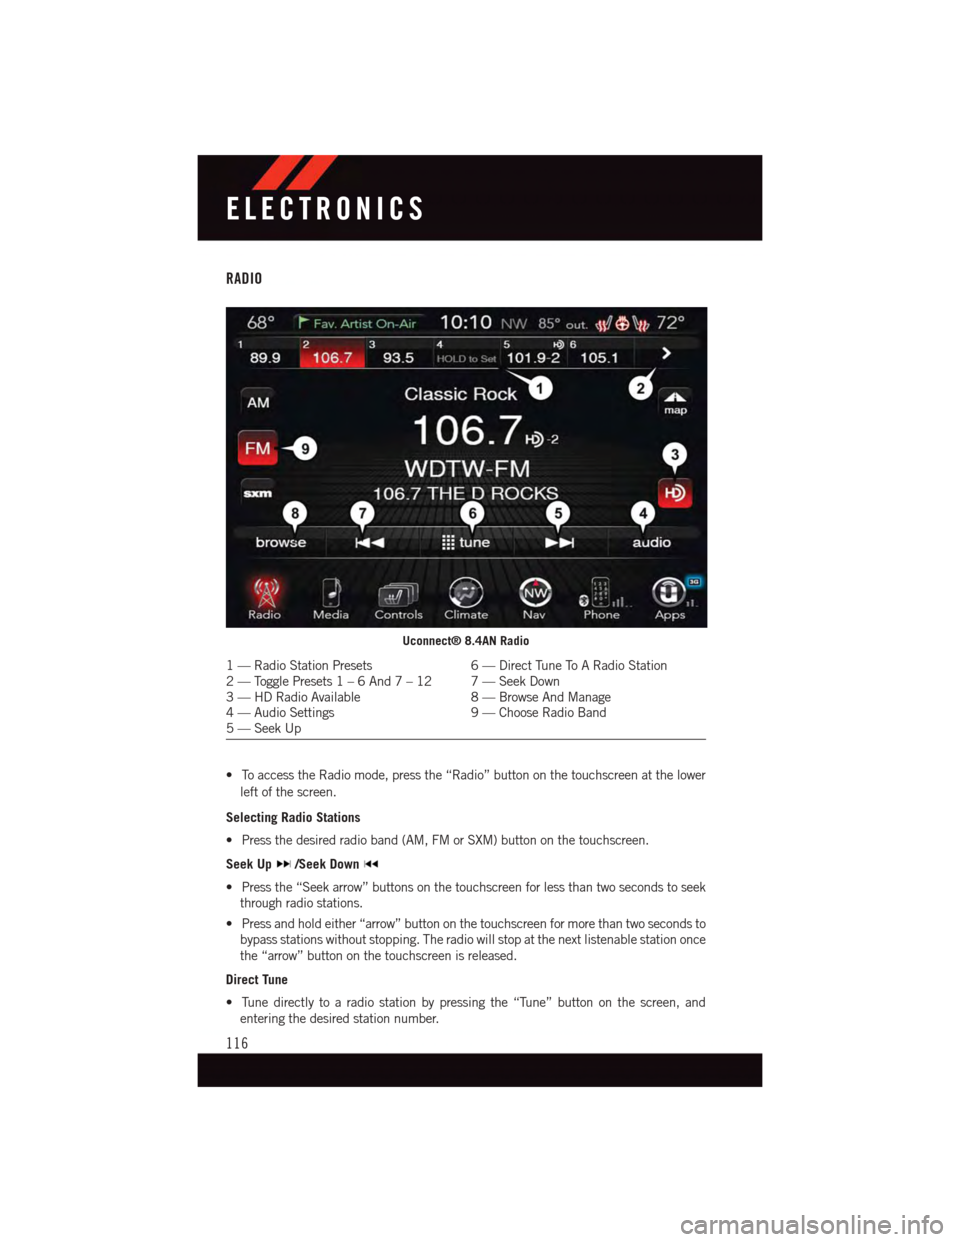
RADIO
•ToaccesstheRadiomode,pressthe“Radio”buttononthetouchscreenatthelower
left of the screen.
Selecting Radio Stations
•Pressthedesiredradioband(AM,FMorSXM)buttononthetouchscreen.
Seek Up/Seek Down
•Pressthe“Seekarrow”buttonsonthetouchscreenforlessthantwosecondstoseek
through radio stations.
•Pressandholdeither“arrow”buttononthetouchscreenformorethantwosecondsto
bypass stations without stopping. The radio will stop at the next listenable station once
the “arrow” button on the touchscreen is released.
Direct Tune
•Tunedirectlytoaradiostationbypressingthe“Tune”buttononthescreen,and
entering the desired station number.
Uconnect® 8.4AN Radio
1—RadioStationPresets6—DirectTuneToARadioStation2—TogglePresets1–6And7–12 7—Seek Down3—HDRadioAvailable8—BrowseAndManage4—AudioSettings9—ChooseRadioBand5—SeekUp
ELECTRONICS
116
Page 122 of 220
The iPod®battery charges when plugged into the USB port (if supported by the specific
device).
To r o u t e t h e U S B / i P o d®cable out of the center console, use the access cut out.
NOTE:
•WhenconnectingyouriPod®device for the first time, the system may take several
minutes to read your music, depending on the number of files. For example, the system
will take approximately five minutes for every 1000 songs loaded on the device. Also
during the reading process, the Shuffle and Browse functions will be disabled. This
process is needed to ensure the full use of your iPod®features and only happens the
first time it is connected. After the first time, the reading process of your iPod®will take
considerably less time unless changes are made or new songs are added to the playlist.
•TheUSBportsupportscertainMini,Classic,Nano,Touch,andiPhone®devices. The
USB port also supports playing music from compatible external USB Mass Storage
Class memory devices. Some iPod®software versions may not fully support the USB
port features. Please visit Apple’s website for iPod®software updates.
Audio Jack (AUX)
The AUX allows a portable device, such as an MP3 player or an iPod®,tobepluggedinto
the radio and utilize the vehicle’s sound system, using a 3.5 mm audio cable, to amplify
the source and play through the vehicle speakers.
•Pressingthe“AUX”buttononthetouchscreenwillchangethemodetoauxiliarydevice
if the audio jack is connected, allowing the music from your portable device to be heard
through the vehicle's speakers. In order to activate the AUX, plug in the audio jack.
•Thefunctionsoftheportabledevicearecontrolledusingthedevicebuttons.The
volume may be controlled using the radio or portable device.
•Toroutetheaudiocableoutofthecenterconsole,usetheaccesscutoutinthefront
of the console.
Bluetooth® Streaming Audio
If using a Bluetooth®-equippeddevice,youmayalsobeabletostreammusictoyour
vehicle's sound system. Your connected device must be Bluetooth-compatible, and paired
with your system (see Uconnect®Phone for pairing instructions).
•YoucanaccessthemusicfromyourconnectedBluetooth®device by pressing the
“Bluetooth®”buttononthetouchscreenwhileinMediamode.
SD Card
SD Card Mode allows you to play music that has been saved to your SD Card through your
vehicle’s sound system.
•YoucanenterSDCardModeisbyeitherinsertingaSDCardintotheSDCardslotor
press the “SD Card” button on the left side of the display while media mode.
For further information refer to your Radio Supplement.
ELECTRONICS
120
Page 124 of 220
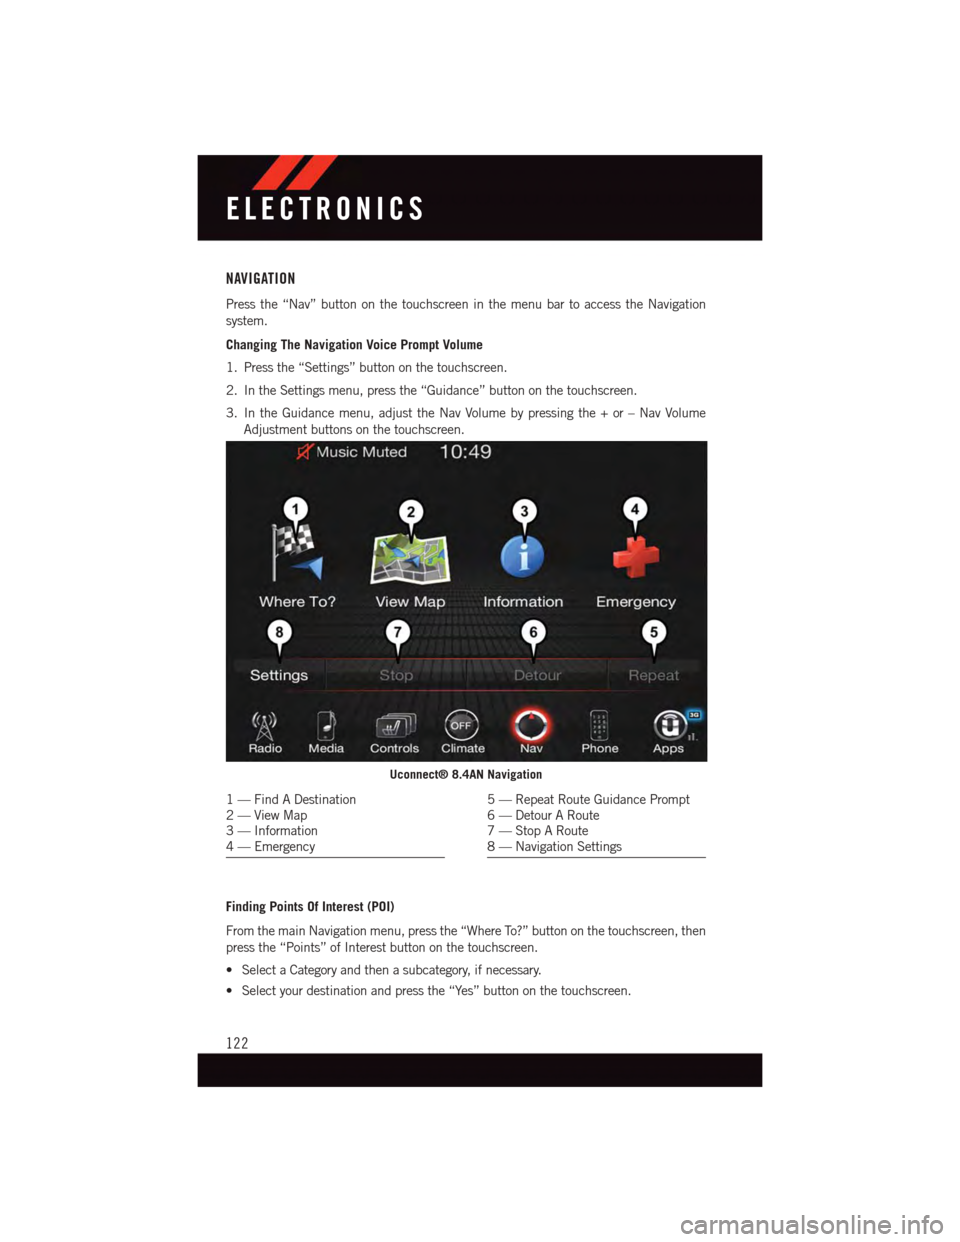
NAVIGATION
Press the “Nav” button on the touchscreen in the menu bar to access the Navigation
system.
Changing The Navigation Voice Prompt Volume
1. Press the “Settings” button on the touchscreen.
2. In the Settings menu, press the “Guidance” button on the touchscreen.
3. In the Guidance menu, adjust the Nav Volume by pressing the + or – Nav Volume
Adjustment buttons on the touchscreen.
Finding Points Of Interest (POI)
From the main Navigation menu, press the “Where To?” button on the touchscreen, then
press the “Points” of Interest button on the touchscreen.
•SelectaCategoryandthenasubcategory,ifnecessary.
•Selectyourdestinationandpressthe“Yes”buttononthetouchscreen.
Uconnect® 8.4AN Navigation
1—FindADestination2—ViewMap3—Information4—Emergency
5—RepeatRouteGuidancePrompt6—DetourARoute7—StopARoute8—NavigationSettings
ELECTRONICS
122
Page 133 of 220
PROGRAMMABLE FEATURES
Uconnect® Customer Programmable Features
The Uconnect®system allows you to access Customer Programmable feature settings
such as Display, Clock, Safety/Assistance, Lights, Doors & Locks, Auto-On Comfort &
Remote Start, Engine Off Operation, Compass Settings, Audio, Trailer Brake,
Phone/Bluetooth®,SuspensionandSiriusXMSetupandSystemInformationthrough
buttons on the touchscreen.
NOTE:
If equipped with the Super Track Pak option please refer to the “Drive Mode Supplement”
within your Owners Information Kit for further descriptions of these modes.
•Pushthe“Controls”buttonlocatednearthebottomofthetouchscreen,thenpushthe
“Settings” button on the touchscreen to access the Settings screen. When making a
selection, scroll up or down until the preferred setting is highlighted, then press and
release the preferred setting until a check-mark appears next to the setting, showing
that setting has been selected. The following feature settings are available:
•Display•EngineOffOptions
•Units•Audio
•Voice•Phone/Bluetooth®
•Clock•SiriusXMSetup
•Safety&DrivingAssistance•RestoreSettings
•Lights•ClearPersonalData
•Doors&Locks•SystemInformation
•Auto-OnComfort&RemoteStart •Compass(5.0RadioOnly)
Refer to “Uconnect Settings/Customer Programmable Features” found within “Under-
standing Your Instrument Panel” located in your Owner's Manual on the DVD for further
information.
ELECTRONICS
131
Page 134 of 220
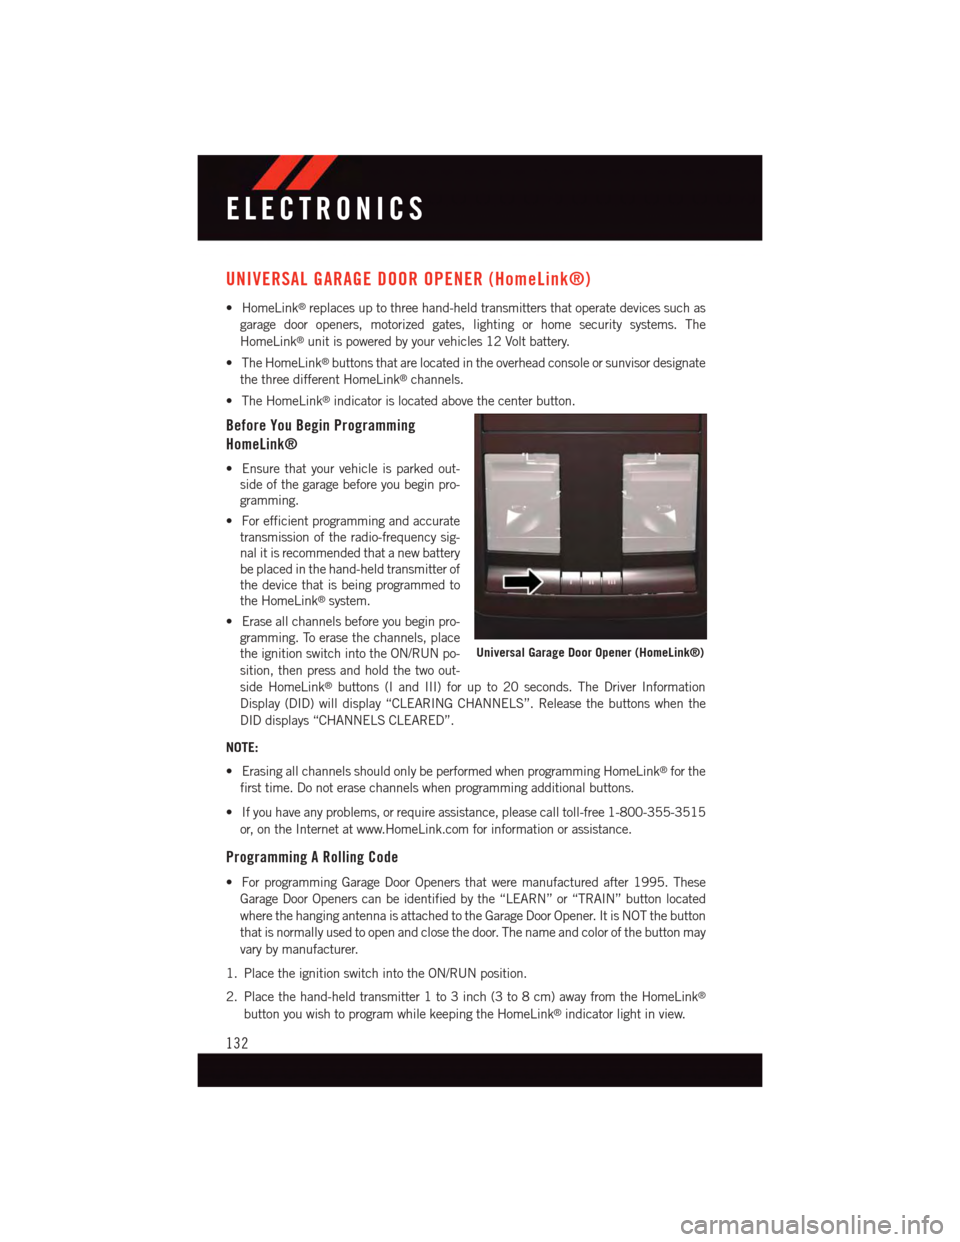
UNIVERSAL GARAGE DOOR OPENER (HomeLink®)
•HomeLink®replaces up to three hand-held transmitters that operate devices such as
garage door openers, motorized gates, lighting or home security systems. The
HomeLink®unit is powered by your vehicles 12 Volt battery.
•TheHomeLink®buttons that are located in the overhead console or sunvisor designate
the three different HomeLink®channels.
•TheHomeLink®indicator is located above the center button.
Before You Begin Programming
HomeLink®
•Ensurethatyourvehicleisparkedout-
side of the garage before you begin pro-
gramming.
•Forefficientprogrammingandaccurate
transmission of the radio-frequency sig-
nal it is recommended that a new battery
be placed in the hand-held transmitter of
the device that is being programmed to
the HomeLink®system.
•Eraseallchannelsbeforeyoubeginpro-
gramming. To erase the channels, place
the ignition switch into the ON/RUN po-
sition, then press and hold the two out-
side HomeLink®buttons (I and III) for up to 20 seconds. The Driver Information
Display (DID) will display “CLEARING CHANNELS”. Release the buttons when the
DID displays “CHANNELS CLEARED”.
NOTE:
•ErasingallchannelsshouldonlybeperformedwhenprogrammingHomeLink®for the
first time. Do not erase channels when programming additional buttons.
•Ifyouhaveanyproblems,orrequireassistance,pleasecalltoll-free1-800-355-3515
or, on the Internet at www.HomeLink.com for information or assistance.
Programming A Rolling Code
•ForprogrammingGarageDoorOpenersthatweremanufacturedafter1995.These
Garage Door Openers can be identified by the “LEARN” or “TRAIN” button located
where the hanging antenna is attached to the Garage Door Opener. It is NOT the button
that is normally used to open and close the door. The name and color of the button may
vary by manufacturer.
1. Place the ignition switch into the ON/RUN position.
2. Place the hand-held transmitter 1 to 3 inch (3 to 8 cm) away from the HomeLink®
button you wish to program while keeping the HomeLink®indicator light in view.
Universal Garage Door Opener (HomeLink®)
ELECTRONICS
132
Page 135 of 220
3. Simultaneously push and hold both the Homelink®button you want to program and
the hand-held transmitter button.
4. Continue to hold buttons until the DID display changes from “CHANNEL # TRAIN-
ING” to “CHANNEL # TRAINED”, then release both buttons.
NOTE:
If the DID displays “DID NOT TRAIN” repeat from Step 2.
5. At the garage door opener motor (in the garage), locate the “LEARN” or “TRAINING”
button. This can usually be found where the hanging antenna wire is attached to the
garage door opener motor. Firmly push and release the “LEARN” or “TRAINING”
button.
NOTE:
Yo u h a v e 3 0 s e c o n d s i n w h i c h t o i n i t i a t e t h e n e x t s t e p a f t e r t h e L E A R N b u t t o n h a s b e e n
pushed.
6. Return to the vehicle and push the programmed HomeLink®button twice (holding the
button for two seconds each time). The DID will display “CHANNEL # TRANSMIT”. If
the garage door opener/device activates, programming is complete.
NOTE:
If the device does not activate, push the button a third time (for two seconds) to complete
the training.
7. To program the remaining two HomeLink®buttons, repeat each step for each
remaining button. DO NOT erase the channels.
Programming A Non-Rolling Code
•ForprogrammingGarageDoorOpenersmanufacturedbefore1995.
1. Turn the ignition switch to the ON/RUN position.
2. Place the hand-held transmitter 1 to 3 inch (3 to 8 cm) away from the HomeLink®
button you wish to program while keeping the HomeLink®indicator light in view.
3. Simultaneously push and hold both the HomeLink®button you want to program and
the hand-held transmitter button.
4. Continue to hold buttons until the DID display changes from “CHANNEL # TRAIN-
ING” to “CHANNEL # TRAINED”, then release both buttons.
5. Push and hold the programmed HomeLink®button and observe the indicator light.
NOTE:
•IftheDIDdisplays“DIDNOTTRAIN”repeatfromStep2.
•ToprogramthetworemainingHomeLink®buttons, repeat each step for each remain-
ing button. DO NOT erase the channels.
ELECTRONICS
133