turn signal DODGE CHALLENGER 2015 3.G User Guide
[x] Cancel search | Manufacturer: DODGE, Model Year: 2015, Model line: CHALLENGER, Model: DODGE CHALLENGER 2015 3.GPages: 220, PDF Size: 30.96 MB
Page 3 of 220
INTRODUCTION/WELCOME
WELCOME FROM CHRYSLERGROUP LLC..................3
CONTROLS AT A GLANCE
DRIVER COCKPIT...............6INSTRUMENT CLUSTER...........8
GETTING STARTED
KEY FOB . . . . . . . . . . . . . . . . . . . 10REMOTE START . . . . . . . . . . . . . . . 12KEYLESS ENTER-N-GO™.........12VEHICLE SECURITY ALARM........16SEAT BELT SYSTEMS............17SUPPLEMENTAL RESTRAINT SYSTEM(SRS) — AIR BAGS.............18CHILD RESTRAINTS............20HEAD RESTRAINTS.............24FRONT SEATS................25REAR SEAT..................28HEATED/VENTILATED SEATS........29HEATED STEERING WHEEL........30TILT/TELESCOPING STEERINGCOLUMN...................31
OPERATING YOUR VEHICLE
ENGINE BREAK-INRECOMMENDATIONS............33TURN SIGNAL/WIPER/WASHER/HIGHBEAM LEVER.................36HEADLIGHT SWITCH............37ELECTRONIC SPEED CONTROL......38ADAPTIVE CRUISE CONTROL (ACC)....40PA R K S E N S E®REAR PARK ASSIST....43AUTOSTICK..................43SPORT MODE — WITHOUT PERFORMANCECONTROL...................45MANUAL TRANSMISSION 1 TO 4 SKIPSHIFT.....................45AUTOMATIC TEMPERATURE CONTROLS(ATC) . . . . . . . . . . . . . . . . . . . . . . 46PA R K V I E W®REAR BACK-UP CAMERA . . 49BLIND SPOT MONITORING.........50POWER SUNROOF..............50WIND BUFFETING..............51
ELECTRONICS
YOUR VEHICLE'S SOUND SYSTEM....52IDENTIFYING YOUR RADIO.........54Uconnect®ACCESS.............55Uconnect®5.0 . . . . . . . . . . . . . . . . 71Uconnect®8.4A...............82Uconnect®8.4AN.............113STEERING WHEEL AUDIO CONTROLS..130DRIVER INFORMATION DISPLAY (DID)..130
PROGRAMMABLE FEATURES.......131UNIVERSAL GARAGE DOOR OPENER(HomeLink®)................132POWER OUTLETS.............134
UTILITY
TRAILER TOWING WEIGHTS (MAXIMUMTRAILER WEIGHT RATINGS).......136RECREATIONAL TOWING (BEHINDMOTORHOME, ETC.)............136
SRT
AUTOSTICK.................137DRIVE MODES................138SRT PERFORMANCE FEATURES.....139Uconnect®SRT PERFORMANCE PAGES . . 142SUMMER/THREE-SEASON TIRES....144
WHAT TO DO IN EMERGENCIES
ROADSIDE ASSISTANCE..........145INSTRUMENT CLUSTER WARNINGLIGHTS....................145INSTRUMENT CLUSTER INDICATORLIGHTS...................150IF YOUR ENGINE OVERHEATS......151JACKING AND TIRE CHANGING.....152TIRE SERVICE KIT.............158BATTERY LOCATION............164JUMP-STARTING..............164FREEING A STUCK VEHICLE.......167MANUAL PARK RELEASE — 8 SPEEDTRANSMISSION..............168TOWING A DISABLED VEHICLE.....169EVENT DATA RECORDER (EDR).....171
MAINTAINING YOUR VEHICLE
OPENING THE HOOD...........172ENGINE COMPARTMENT.........174DODGE FLUID CAPACITIES........182FLUIDS, LUBRICANTS AND GENUINEPA RT S — D O D G E.............182FLUID CAPACITIES — SRT........184FLUIDS, LUBRICANTS AND GENUINEPA RT S — S RT . . . . . . . . . . . . . . . 1 8 5MAINTENANCE PROCEDURES......186MAINTENANCE SCHEDULE —3.6L AND 5.7L...............186MAINTENANCE SCHEDULE —6.2L SUPERCHARGED AND 6.4L....191FUSES....................198SUMMER/THREE-SEASON TIRES....203TIRE PRESSURES.............203SPARE TIRES — IF EQUIPPED......204WHEEL AND WHEEL TRIM CARE....205REPLACEMENT BULBS..........206
TABLE OF CONTENTS
Page 12 of 220
KEY FOB
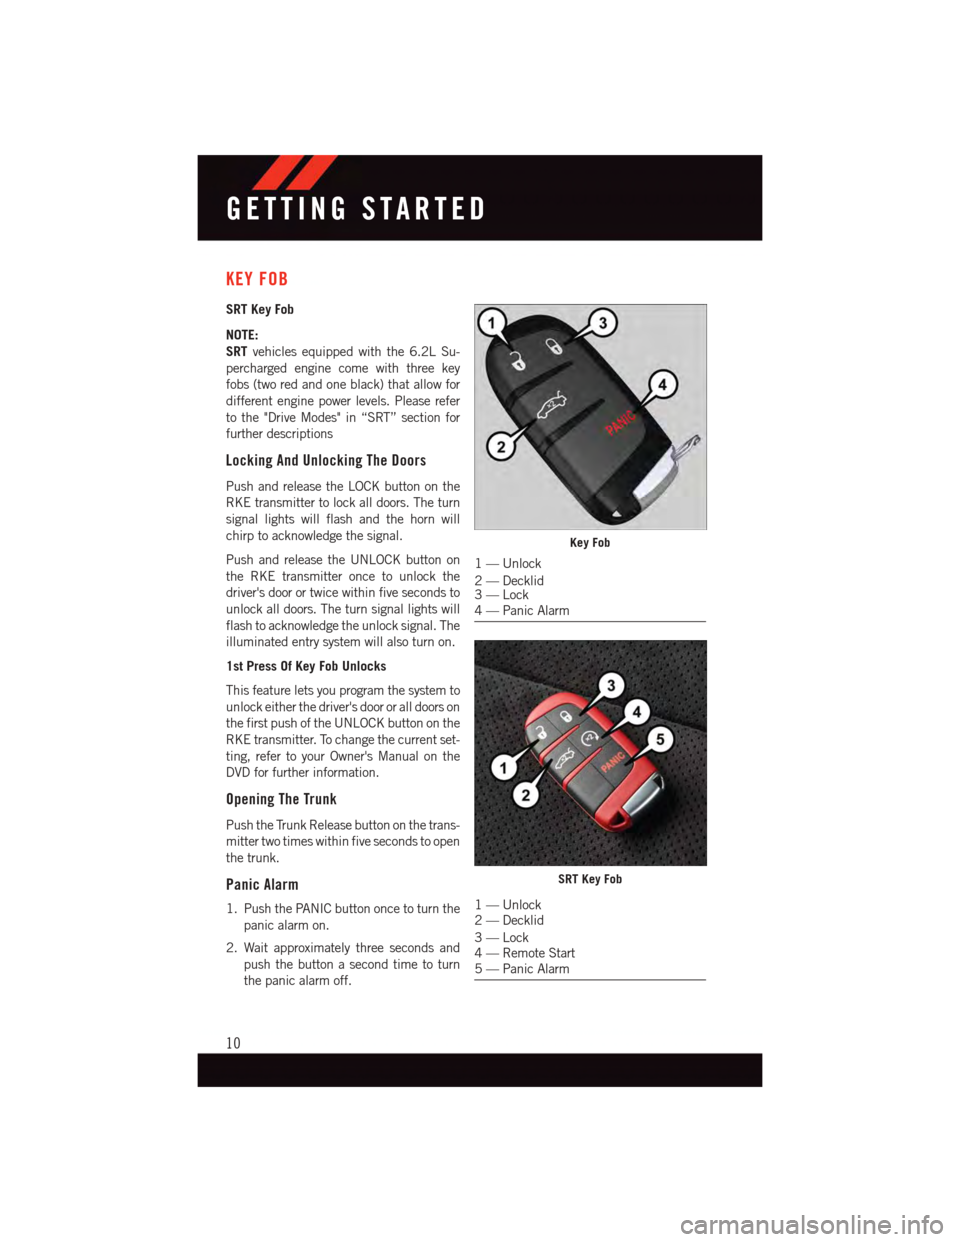
SRT Key Fob
NOTE:
SRTvehicles equipped with the 6.2L Su-
percharged engine come with three key
fobs (two red and one black) that allow for
different engine power levels. Please refer
to the "Drive Modes" in “SRT” section for
further descriptions
Locking And Unlocking The Doors
Push and release the LOCK button on the
RKE transmitter to lock all doors. The turn
signal lights will flash and the horn will
chirp to acknowledge the signal.
Push and release the UNLOCK button on
the RKE transmitter once to unlock the
driver's door or twice within five seconds to
unlock all doors. The turn signal lights will
flash to acknowledge the unlock signal. The
illuminated entry system will also turn on.
1st Press Of Key Fob Unlocks
This feature lets you program the system to
unlock either the driver's door or all doors on
the first push of the UNLOCK button on the
RKE transmitter. To change the current set-
ting, refer to your Owner's Manual on the
DVD for further information.
Opening The Trunk
Push the Trunk Release button on the trans-
mitter two times within five seconds to open
the trunk.
Panic Alarm
1. Push the PANIC button once to turn the
panic alarm on.
2. Wait approximately three seconds and
push the button a second time to turn
the panic alarm off.
Key Fob
1—Unlock
2—Decklid3—Lock4—PanicAlarm
SRT Key Fob
1—Unlock2—Decklid
3—Lock4—RemoteStart5—PanicAlarm
GETTING STARTED
10
Page 18 of 220
VEHICLE SECURITY ALARM
The Vehicle Security Alarm monitors the vehicle doors for unauthorized entry and the
Keyless Enter-N-Go™ START/STOP button for unauthorized operation. While the Vehicle
Security Alarm is armed, interior switches for door locks and decklid release are disabled.
If something triggers the alarm, the Vehicle Security Alarm will provide the following
audible and visible signals: the horn will pulse, the park lamps and/or turn signals will
flash, and the Vehicle Security Light in the instrument cluster will flash.
To Arm
•Keyless Enter-N-Go™ button installed:Push the Keyless Enter-N-Go™ START/STOP
button until the Driver Information Display (DID) indicates that the vehicle ignition is
“OFF”. Push the power door LOCK switch while the door is open, Push the Key Fob
LOCK button, or with one of the Key Fobs located outside the vehicle and within 5 ft
(1.5 m) of the driver's and passenger front door handles, push the Keyless Enter-N-
Go™ LOCK button located on the door handle.
•Keyless Enter-N-Go™ button not installed:Tu r n t h e i g n i t i o n s w i t c h t o t h e “ O F F ”
position. Push the power door lock switch while the door is open, push the Key Fob
LOCK button, or with one of the Key Fobs located outside the vehicle and within 5 ft
(1.5 m) of the driver's and passenger front door handles, push the Keyless Enter-N-
Go™ LOCK button located on the door handle.
NOTE:
After pushing the Keyless Enter-N-Go™ LOCK button, you must wait two seconds before
you can lock or unlock the vehicle via the door handle.
To Disarm
•Keyless Enter-N-Go™ button installed:Push the Key Fob UNLOCK button or with one
of the Key Fobs located outside the vehicle and within 5 ft (1.5 m) of the driver's and
passenger front door handles, grab the Keyless Enter-N-Go™ door handle and enter the
vehicle, then push the Keyless Enter-N-Go™ START/STOP button (requires at least one
valid Key Fob in the vehicle).
•Keyless Enter-N-Go™ button not installed:Push the Key Fob UNLOCK button or with
one of the Key Fobs located outside the vehicle and within 5 ft (1.5 m) of the driver's
and passenger front door handles, grab the Keyless Enter-N-Go™ door handle and
enter the vehicle, then turn the ignition to the ON/RUN position.
GETTING STARTED
16
Page 34 of 220
Power Tilt/Telescoping Steering Column
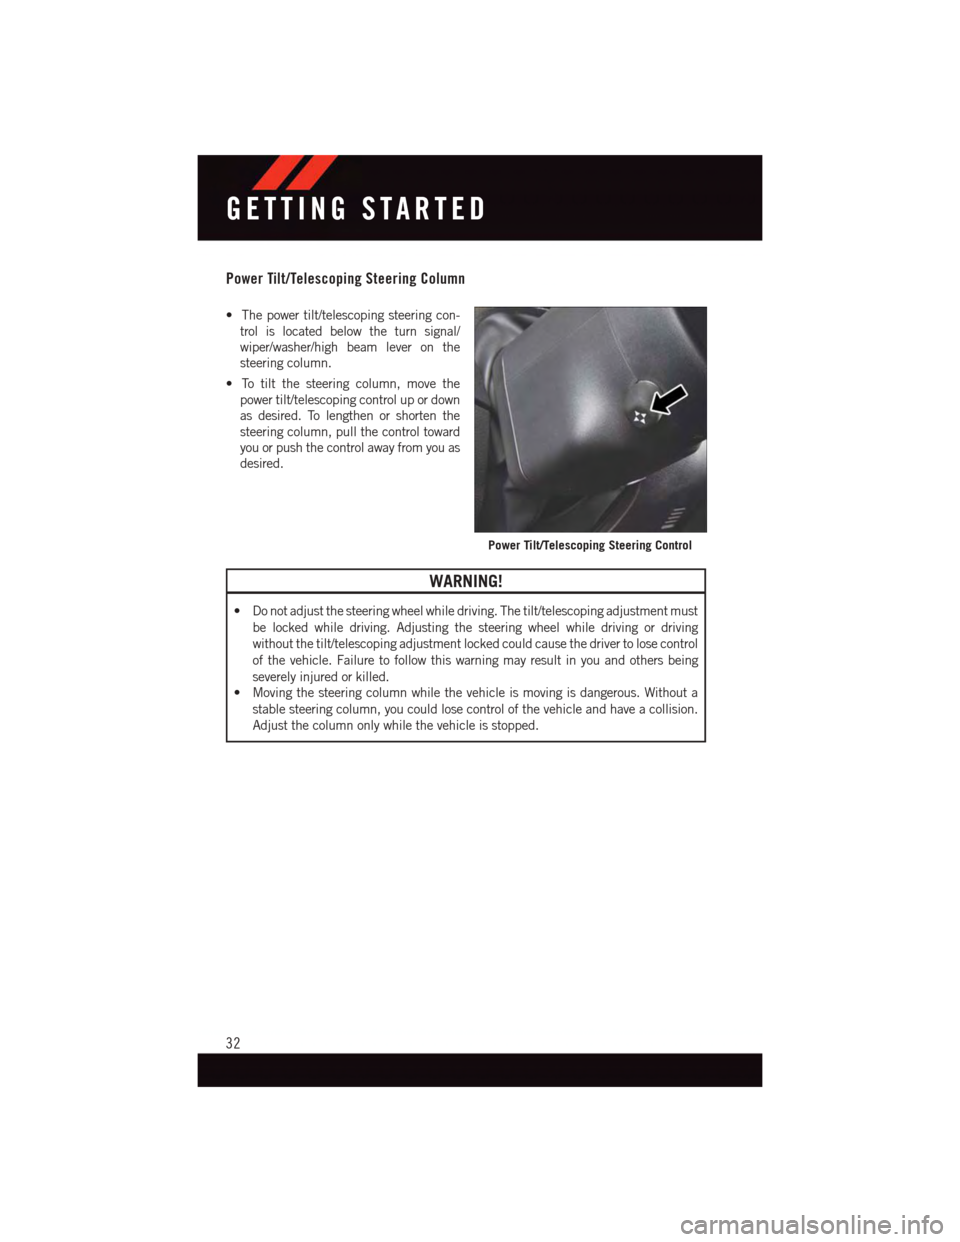
•Thepowertilt/telescopingsteeringcon-
trol is located below the turn signal/
wiper/washer/high beam lever on the
steering column.
•Totiltthesteeringcolumn,movethe
power tilt/telescoping control up or down
as desired. To lengthen or shorten the
steering column, pull the control toward
you or push the control away from you as
desired.
WARNING!
•Donotadjustthesteeringwheelwhiledriving.Thetilt/telescopingadjustmentmust
be locked while driving. Adjusting the steering wheel while driving or driving
without the tilt/telescoping adjustment locked could cause the driver to lose control
of the vehicle. Failure to follow this warning may result in you and others being
severely injured or killed.
•Movingthesteeringcolumnwhilethevehicleismovingisdangerous.Withouta
stable steering column, you could lose control of the vehicle and have a collision.
Adjust the column only while the vehicle is stopped.
Power Tilt/Telescoping Steering Control
GETTING STARTED
32
Page 38 of 220
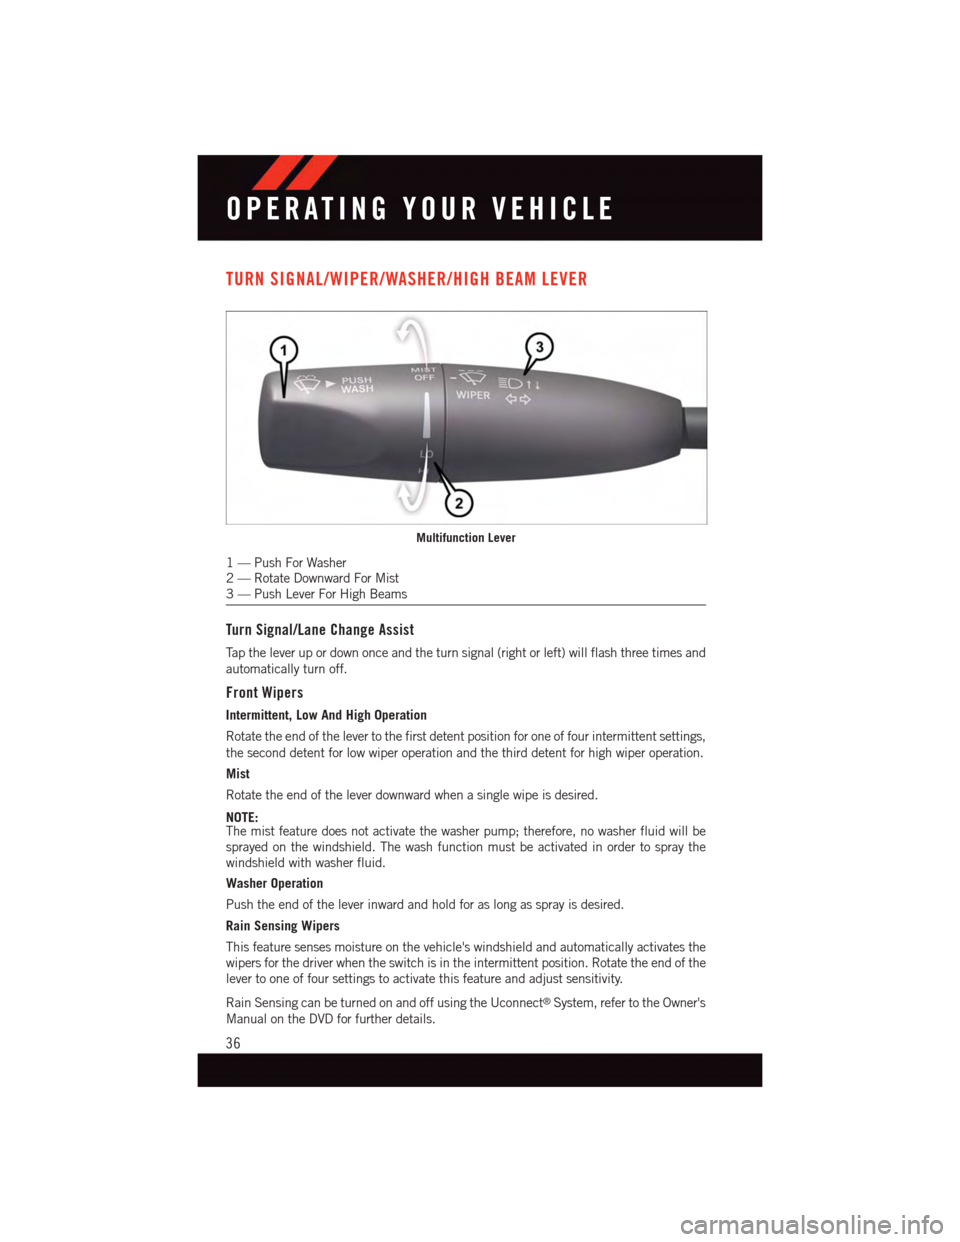
TURN SIGNAL/WIPER/WASHER/HIGH BEAM LEVER
Turn Signal/Lane Change Assist
Ta p t h e l e v e r u p o r d o w n o n c e a n d t h e t u r n s i g n a l ( r i g h t o r l e f t ) w i l l f l a s h t h r e e t i m e s a n d
automatically turn off.
Front Wipers
Intermittent, Low And High Operation
Rotate the end of the lever to the first detent position for one of four intermittent settings,
the second detent for low wiper operation and the third detent for high wiper operation.
Mist
Rotate the end of the lever downward when a single wipe is desired.
NOTE:The mist feature does not activate the washer pump; therefore, no washer fluid will be
sprayed on the windshield. The wash function must be activated in order to spray the
windshield with washer fluid.
Washer Operation
Push the end of the lever inward and hold for as long as spray is desired.
Rain Sensing Wipers
This feature senses moisture on the vehicle's windshield and automatically activates the
wipers for the driver when the switch is in the intermittent position. Rotate the end of the
lever to one of four settings to activate this feature and adjust sensitivity.
Rain Sensing can be turned on and off using the Uconnect®System, refer to the Owner's
Manual on the DVD for further details.
Multifunction Lever
1—PushForWasher2—RotateDownwardForMist3—PushLeverForHighBeams
OPERATING YOUR VEHICLE
36
Page 64 of 220
Built-In Features (Uconnect® 8.4A/8.4AN)
CAUTION!
•Ignoringtherearviewmirrorlightcouldmeanyoumaynothave9-1-1Callservice
if needed. If the rearview mirror light is illuminated, have an authorized dealer
service the 9-1-1 Call system immediately.
•TheOccupantRestraintController(ORC)turnsontheAirBagWarningLightonthe
instrument panel if a malfunction is detected in any part of the air bag system. If the
Air Bag Warning Light is illuminated, the air bag system may not be working
properly and the 9-1-1 system may not be able to send a signal to a 9-1-1 operator.
If the Air Bag Warning Light is illuminated, have an authorized dealer service your
vehicle immediately.
•Ifanyoneinthevehiclecouldbeindanger(e.g.,fireorsmokeisvisible,dangerous
road conditions or location), do not wait for voice contact from a 9-1-1 operator. All
occupants should exit the vehicle immediately and move to a safe location.
•Donotaddanyaftermarketelectricalequipmenttothevehicle’selectricalsystem.
This may prevent your vehicle from sending a signal to initiate an emergency call.
To a v o i d i n t e r f e r e n c e t h a t c a n c a u s e t h e 9 - 1 - 1 C a l l s y s t e m t o f a i l , n e v e r a d d
aftermarket equipment (e.g., two-way mobile radio, CB radio, data recorder, etc.) to
your vehicle’s electrical system or modify the antennas on your vehicle. IF YOUR
VEHICLE LOSES BATTERY POWER FOR ANY REASON (INCLUDING DURING OR
AFTER AN ACCIDENT), THE UCONNECT®FEATURES, APPS AND SERVICES,
AMONG OTHERS, WILL NOT OPERATE.
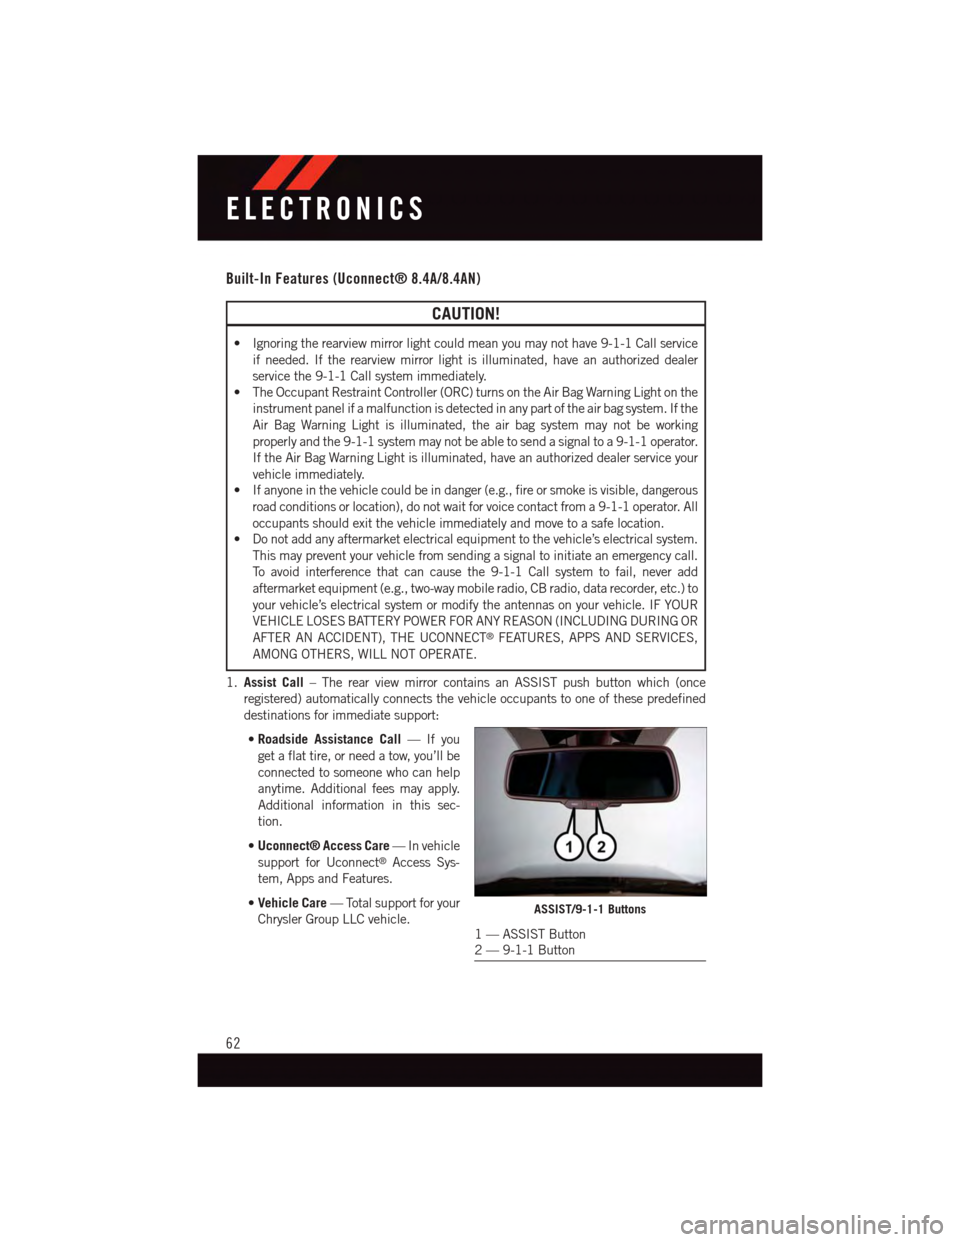
1.Assist Call–TherearviewmirrorcontainsanASSISTpushbuttonwhich(once
registered) automatically connects the vehicle occupants to one of these predefined
destinations for immediate support:
•Roadside Assistance Call—Ifyou
get a flat tire, or need a tow, you’ll be
connected to someone who can help
anytime. Additional fees may apply.
Additional information in this sec-
tion.
•Uconnect® Access Care—Invehicle
support for Uconnect®Access Sys-
tem, Apps and Features.
•Vehicle Care—Totalsupportforyour
Chrysler Group LLC vehicle.ASSIST/9-1-1 Buttons
1—ASSISTButton2—9-1-1Button
ELECTRONICS
62
Page 66 of 220
and the built-in wireless connection within your vehicle, the Uconnect®Care agent will
be able to locate the stolen vehicle and work with law enforcement to help recover it.
(Vehicle must be within the United States, have network coverage and must be
registered with Uconnect®Access with an active subscription that includes the
applicable feature).
7.WiFi Hotspot—WiFiHotspotison-demandWiFi3Gconnectivitythat'sbuilt-inand
ready to go whenever you are. Once your vehicle is registered for Uconnect®Access,
you can purchase a Wifi Hotspot subscription at the Uconnect®Store. After you've
made your purchase, turn on your signal and connect your passengers devices. It's
never been easier to bring your home or office with you.
NOTE:
Yo u r v e h i c l e m u s t h a v e a w o r k i n g e l e c t r i c a l s y s t e m f o r a n y o f t h e i n v e h i c l e U c o n n e c t®
features to operate.
Uconnect® Access Remote Features
If you own a compatible iPhone®or Android®powered device, the Uconnect®Access App
allows you to remotely lock or unlock your doors, start your engine or activate your horn and
lights from virtually anywhere (Vehicle must be within the United States and have network
coverage). You can download the App from Mopar Owner Connect or from the App Store
(iPhone) or Google Play store. Visit UconnectPhone.com to determine if your device is
compatible. For Uconnect®Phone customer support and to determine if your device is
compatible.
U.S. residents - visit UconnectPhone.com or call 1-877-855-8400
Remote Start—Thisfeatureprovidestheabilitytostarttheengineonyourvehicle,
without the keys and from virtually any distance. You can send a request to your vehicle in
one of two ways:
1. Using the Uconnect®Access App from a compatible smartphone.
2. From the Mopar Owner Connect website.
•After15minutesifyouhavenotenteredyourvehiclewiththekey,theenginewill
shut off automatically.
•Youcanalsosendacommandtoturn-offanenginethathasbeenremotestarted.
•Thisremotefunctionrequiresyourvehicletobeequippedwithafactory-installed
Remote Start system. To utilize this feature after the Uconnect®Access App is
downloaded, login with your user name and password.
NOTE:
Yo u r f o u r d i g i t U c o n n e c t®Security PIN is required to confirm the request.
•You can set-up notifications for your account to receive an email or text (SMS)
message every time a command is sent. Login to Mopar Owner Connect
(moparownerconnect.com) and click on Edit Profile to manage Uconnect®
Notifications.
ELECTRONICS
64
Page 69 of 220
Uconnect® Access Via Mobile — If Equipped (Available On Uconnect®
8.4A/8.4AN)
Via Mobile uses the Uconnect®Access app and your smartphone's data plan to access
your personal Pandora®,iHeartRadio,Aha™byHARMANandSlackerRadioaccounts
from the vehicle and control them using the vehicle touchscreen. Customer’s data plan
charges will apply.
To g e t s t a r t e d u s i n g V i a M o b i l e a p p s , f i r s t r e g i s t e r y o u r U c o n n e c t®Access system where
you'll be guided through the setup of your Via Mobile (requires a compatible Android or
iPhone®smartphone). Please refer to “Uconnect®Access Registration” for more infor-
mation.
The Uconnect®Access app is compatible with select iPhone®and Android smartphones.
Visit UconnectPhone.com to confirm that your smartphone is compatible with
Uconnect®.Onceyou’veconfirmedyoursmartphoneiscompatible,pairittothevehicle
touchscreen via Bluetooth®to use Via Mobile apps. If using an iPhone®,aUSBcableis
also supported for the data connection.
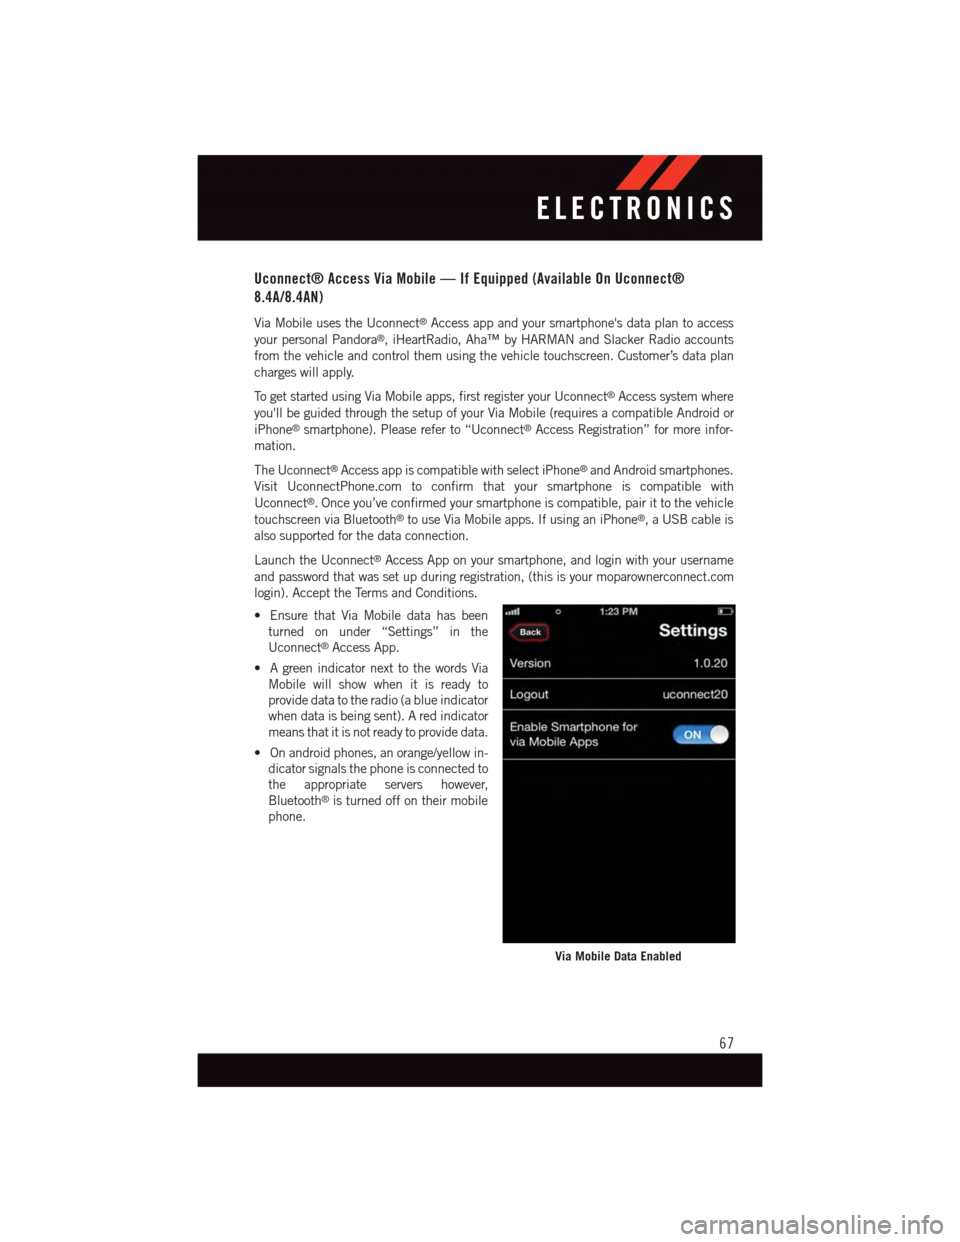
Launch the Uconnect®Access App on your smartphone, and login with your username
and password that was set up during registration, (this is your moparownerconnect.com
login). Accept the Terms and Conditions.
•EnsurethatViaMobiledatahasbeen
turned on under “Settings” in the
Uconnect®Access App.
•AgreenindicatornexttothewordsVia
Mobile will show when it is ready to
provide data to the radio (a blue indicator
when data is being sent). A red indicator
means that it is not ready to provide data.
•Onandroidphones,anorange/yellowin-
dicator signals the phone is connected to
the appropriate servers however,
Bluetooth®is turned off on their mobile
phone.
Via Mobile Data Enabled
ELECTRONICS
67
Page 119 of 220
Store Radio Presets
Yo u r r a d i o c a n s t o r e 3 6 t o t a l p r e s e t s t a t i o n s , 1 2 p r e s e t s p e r b a n d ( A M , F M a n d S X M ) .
They are shown at the top of your radio screen.
•Toseethe12presetstationsperband,pressthe“arrow”buttononthetouchscreenat
the top right of the screen to toggle between the two sets of six presets.
•Tosetastationintomemorypressandholdthedesirednumberedbuttononthe
touchscreen for more than two seconds or until you hear a confirmation beep.
HD Radio
HD Radio technology (available on Uconnect®8.4AN) allows broadcasters to transmit a
high-quality digital signal.
With an HD radio receiver, the listener is provided with a clear sound that enhances the
listening experience. HD radio can also transmit data such as song title or artist.
SiriusXM Premier Over 160 Channels
Get every channel available on your satellite radio, and enjoy all you want, all in one place.
Hear commercial-free music plus sports, news, talk and entertainment. Get all the
premium programming, including Howard Stern, every NFL game, Oprah Radio®,every
MLB®and NHL®game, every NASCAR®race and more. And get 20+ Xtra channels,
including SiriusXM Latino, a selection of channels dedicated to Spanish language
programming.
•ToaccessSiriusXMSatelliteRadio,pressthe“SXM”buttononthetouchscreenonthe
main Radio screen.
The following describes features that are available when in SiriusXM Satellite Radio
mode.
Seek Up/Seek Down
•Pressthe“Seekarrow”buttononthetouchscreenforlessthantwosecondstoseek
through channels in SXM mode.
•Pressandholdeither“arrow”buttononthetouchscreenformorethantwosecondsto
bypass channels without stopping. The radio will stop at the next listenable channel
once the arrow button on the touchscreen is released.
Direct Tune
•TunedirectlytoaSXMchannelbypressingthe“Tune”buttononthetouchscreenon
the screen, and entering the desired station number.
Jump
Automatically tells you when Traffic & Weather for a favorite city is available, and gives you
the option to switch to that channel.
•Press“Jump”toactivatethefeature.AfterlisteningtoTrafficandWeather,press
“Jump” again to return to the previous channel.
ELECTRONICS
117
Page 148 of 220
IF THE LIGHT STARTS FLASHING INDICATING A LOW TIRE PRESSURE, ADJUST THE AIR
PRESSURE IN THE LOW TIRE TO THE AIR PRESSURE SHOWN ON THE VEHICLE PLACARD OR
TIRE INFLATION PRESSURE LABEL LOCATED ON THE DRIVER'S DOOR.
NOTE:
AFTER INFLATION, THE VEHICLE MAY NEED TO BE DRIVEN FOR 20 MINUTES
BEFORE THE FLASHING LIGHT WILL TURN OFF.
Please note that the TPMS is not a substitute for proper tire maintenance, and it is the
driver’s responsibility to maintain correct tire pressure, even if under-inflation has not
reached the level to trigger illumination of the TPMS low tire pressure telltale.
Yo u r v e h i c l e h a s a l s o b e e n e q u i p p e d w i t h a T P M S m a l f u n c t i o n i n d i c a t o r t o i n d i c a t e w h e n
the system is not operating properly. The TPMS malfunction indicator is combined with
the low tire pressure telltale.
When the system detects a malfunction, the telltale will flash for approximately one
minute and then remain continuously illuminated. This sequence will continue upon
subsequent vehicle start-ups as long as the malfunction exists. When the malfunction
indicator is illuminated, the system may not be able to detect or signal low tire pressure
as intended. TPMS malfunctions may occur for a variety of reasons, including the
installation of replacement or alternate tires or wheels on the vehicle that prevent the
TPMS from functioning properly. Always check the TPMS malfunction telltale after
replacing one or more tires or wheels on your vehicle to ensure that the replacement or
alternate tires and wheels allow the TPMS to continue to function properly.
NOTE:
Ti r e p r e s s u r e s c h a n g e b y a p p r o x i m a t e l y 1 p s i ( 7 k P a ) p e r 1 2 ° F ( 7 ° C ) o f a i r t e m p e r a t u r e
change. Keep this in mind when checking tire pressure inside a garage, especially in the
Winter. Example: If garage temperature is 68°F (20°C) and the outside temperature is
32°F (0°C), then the cold tire inflation pressure should be increased by 3 psi (21 kPa),
which equals 1 psi (7 kPa) for every 12°F (7°C) for this outside temperature condition.
CAUTION!
The TPMS has been optimized for the original equipment tires and wheels. TPMS
pressures and warning have been established for the tire size equipped on your vehicle.
Undesirable system operation or sensor damage may result when using replacement
equipment that is not of the same size, type, and/or style. Aftermarket wheels can
cause sensor damage. Do not use tire sealant from a can, or balance beads if your
vehicle is equipped with a TPMS, as damage to the sensors may result.
WHAT TO DO IN EMERGENCIES
146