sensor DODGE CHALLENGER 2019 Owner's Guide
[x] Cancel search | Manufacturer: DODGE, Model Year: 2019, Model line: CHALLENGER, Model: DODGE CHALLENGER 2019Pages: 532, PDF Size: 5.01 MB
Page 387 of 532
pressure should be increased by 3 psi (21 kPa), which
equals 1 psi (7 kPa) for every 12°F (7°C) for this outside
temperature condition.
Tire pressure may increase from 2 to 6 psi (13 to 40 kPa)
during operation. DO NOT reduce this normal pressure
build up or your tire pressure will be too low.
Tire Pressures For High Speed Operation
The manufacturer advocates driving at safe speeds and
within posted speed limits. Where speed limits or condi-
tions are such that the vehicle can be driven at high speeds,
maintaining correct tire inflation pressure is very impor-
tant. Increased tire pressure and reduced vehicle loading
may be required for high-speed vehicle operation. Refer to
an authorized tire dealer or original equipment vehicle
dealer for recommended safe operating speeds, loading
and cold tire inflation pressures.
WARNING!
High speed driving with your vehicle under maximum
load is dangerous. The added strain on your tires could
cause them to fail. You could have a serious collision.
Do not drive a vehicle loaded to the maximum capacity
at continuous speeds above 75 mph (120 km/h).
Radial Ply Tires
WARNING!
Combining radial ply tires with other types of tires on
your vehicle will cause your vehicle to handle poorly.
The instability could cause a collision. Always use
radial ply tires in sets of four. Never combine them
with other types of tires.
Tire Repair
If your tire becomes damaged, it may be repaired if it meets
the following criteria:
• The tire has not been driven on when flat.
• The damage is only on the tread section of your tire
(sidewall damage is not repairable).
• The puncture is no greater thana¼ofaninch (6 mm).
Consult an authorized tire dealer for tire repairs and
additional information.
Damaged Run Flat tires, or Run Flat tires that have experi-
enced a loss of pressure should be replaced immediately with
another Run Flat tire of identical size and service description
(Load Index and Speed Symbol). Replace the tire pressure
sensor as well as it is not designed to be reused.
8
SERVICING AND MAINTENANCE 385
Page 388 of 532
Run Flat Tires — If Equipped
Run Flat tires allow you the capability to drive 50 miles
(80 km) at 50 mph (80 km/h) after a rapid loss of inflation
pressure. This rapid loss of inflation is referred to as the
Run Flat mode. A Run Flat mode occurs when the tire
inflation pressure is of/or below 14 psi (96 kPa). Once a
Run Flat tire reaches the run flat mode it has limited
driving capabilities and needs to be replaced immediately.
A Run Flat tire is not repairable. When a run flat tire is
changed after driving with underinflated tire condition,
please replace the TPM sensor as it is not designed to be
reused when driven under run flat mode (14 psi (96 kPa))
condition.
NOTE:TPM Sensor must be replaced after driving the
vehicle on a flat tire condition.
It is not recommended driving a vehicle loaded at full
capacity or to tow a trailer while a tire is in the run flat
mode.
See the tire pressure monitoring section for more informa-
tion.
Tire Spinning
When stuck in mud, sand, snow, or ice conditions, do not
spin your vehicle’s wheels above 30 mph (48 km/h) or for
longer than 30 seconds continuously without stopping.
Refer to “Freeing A Stuck Vehicle” in “In Case Of Emer-
gency” for further information.
WARNING!
Fast spinning tires can be dangerous. Forces generated
by excessive wheel speeds may cause tire damage or
failure. A tire could explode and injure someone. Do
not spin your vehicle’s wheels faster than 30 mph
(48 km/h) for more than 30 seconds continuously when
you are stuck, and do not let anyone near a spinning
wheel, no matter what the speed.
Tread Wear Indicators
Tread wear indicators are in the original equipment tires to
help you in determining when your tires should be re-
placed.
386 SERVICING AND MAINTENANCE
Page 432 of 532
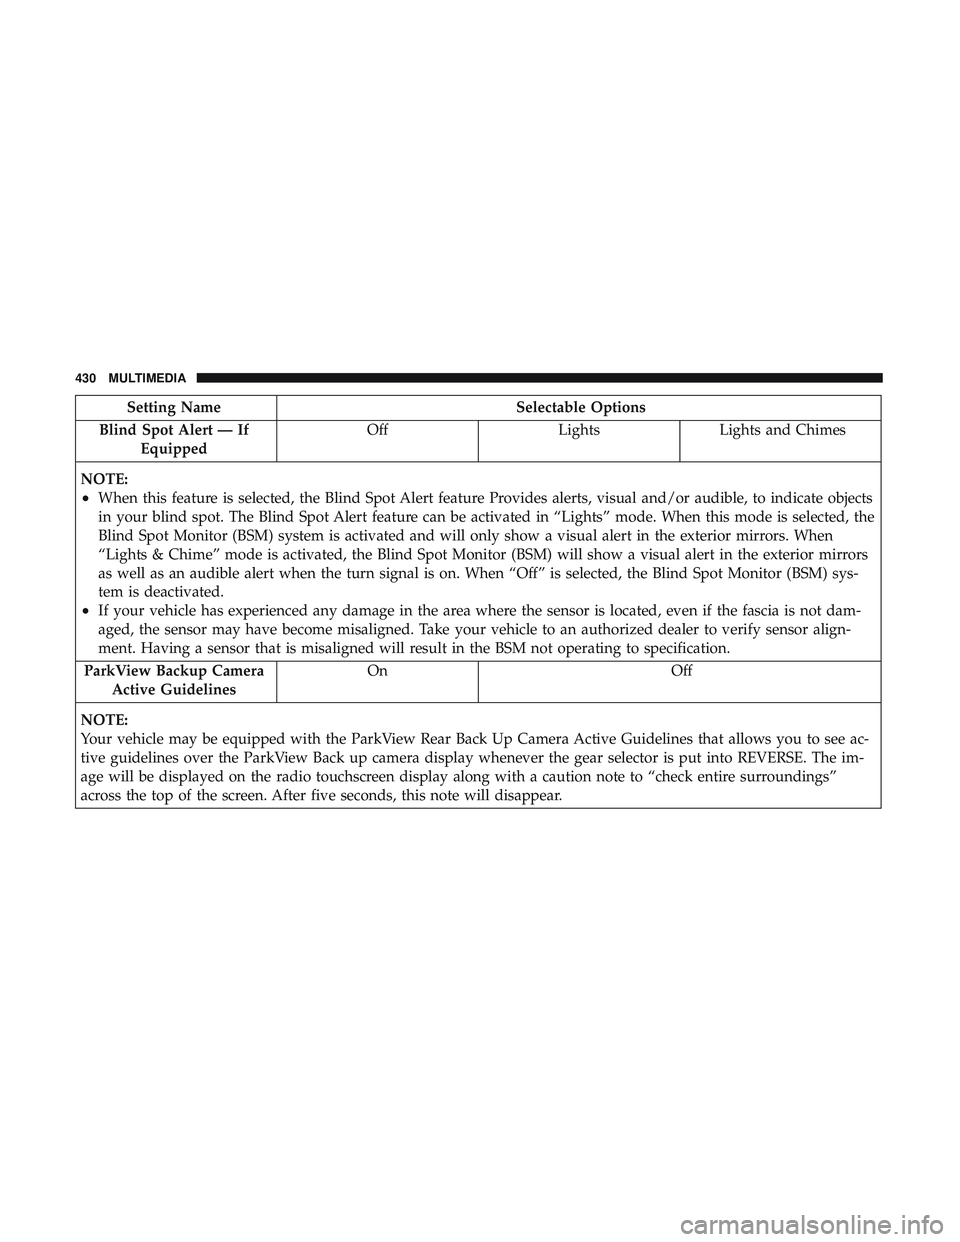
Setting NameSelectable Options
Blind Spot Alert — If Equipped Off
LightsLights and Chimes
NOTE:
•When this feature is selected, the Blind Spot Alert feature Provides alerts, visual and/or audible, to indicate objects
in your blind spot. The Blind Spot Alert feature can be activated in “Lights” mode. When this mode is selected, the
Blind Spot Monitor (BSM) system is activated and will only show a visual alert in the exterior mirrors. When
“Lights & Chime” mode is activated, the Blind Spot Monitor (BSM) will show a visual alert in the exterior mirrors
as well as an audible alert when the turn signal is on. When “Off” is selected, the Blind Spot Monitor (BSM) sys-
tem is deactivated.
•If your vehicle has experienced any damage in the area where the sensor is located, even if the fascia is not dam-
aged, the sensor may have become misaligned. Take your vehicle to an authorized dealer to verify sensor align-
ment. Having a sensor that is misaligned will result in the BSM not operating to specification.
ParkView Backup Camera Active Guidelines On
Off
NOTE:
Your vehicle may be equipped with the ParkView Rear Back Up Camera Active Guidelines that allows you to see ac-
tive guidelines over the ParkView Back up camera display whenever the gear selector is put into REVERSE. The im-
age will be displayed on the radio touchscreen display along with a caution note to “check entire surroundings”
across the top of the screen. After five seconds, this note will disappear.
430 MULTIMEDIA
Page 439 of 532
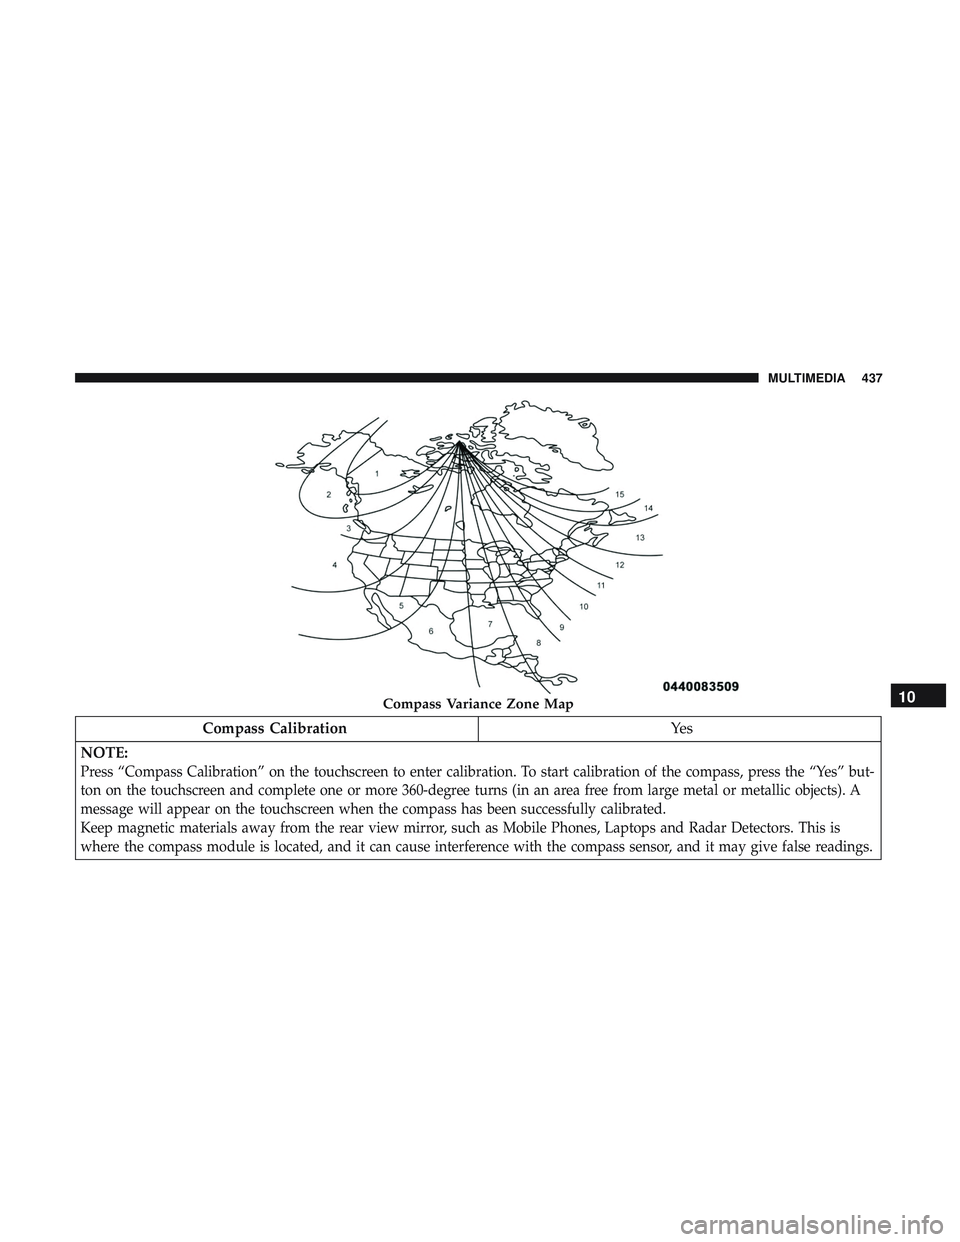
Compass CalibrationYe s
NOTE:
Press “Compass Calibration” on the touchscreen to enter calibration. To start calibration of the compass, press the “Yes” but-
ton on the touchscreen and complete one or more 360-degree turns (in an area free from large metal or metallic objects). A
message will appear on the touchscreen when the compass has been successfully calibrated.
Keep magnetic materials away from the rear view mirror, such as Mobile Phones, Laptops and Radar Detectors. This is
where the compass module is located, and it can cause interference with the compass sensor, and it may give false readings.
Compass Variance Zone Map10
MULTIMEDIA 437
Page 453 of 532
Setting NameSelectable Options
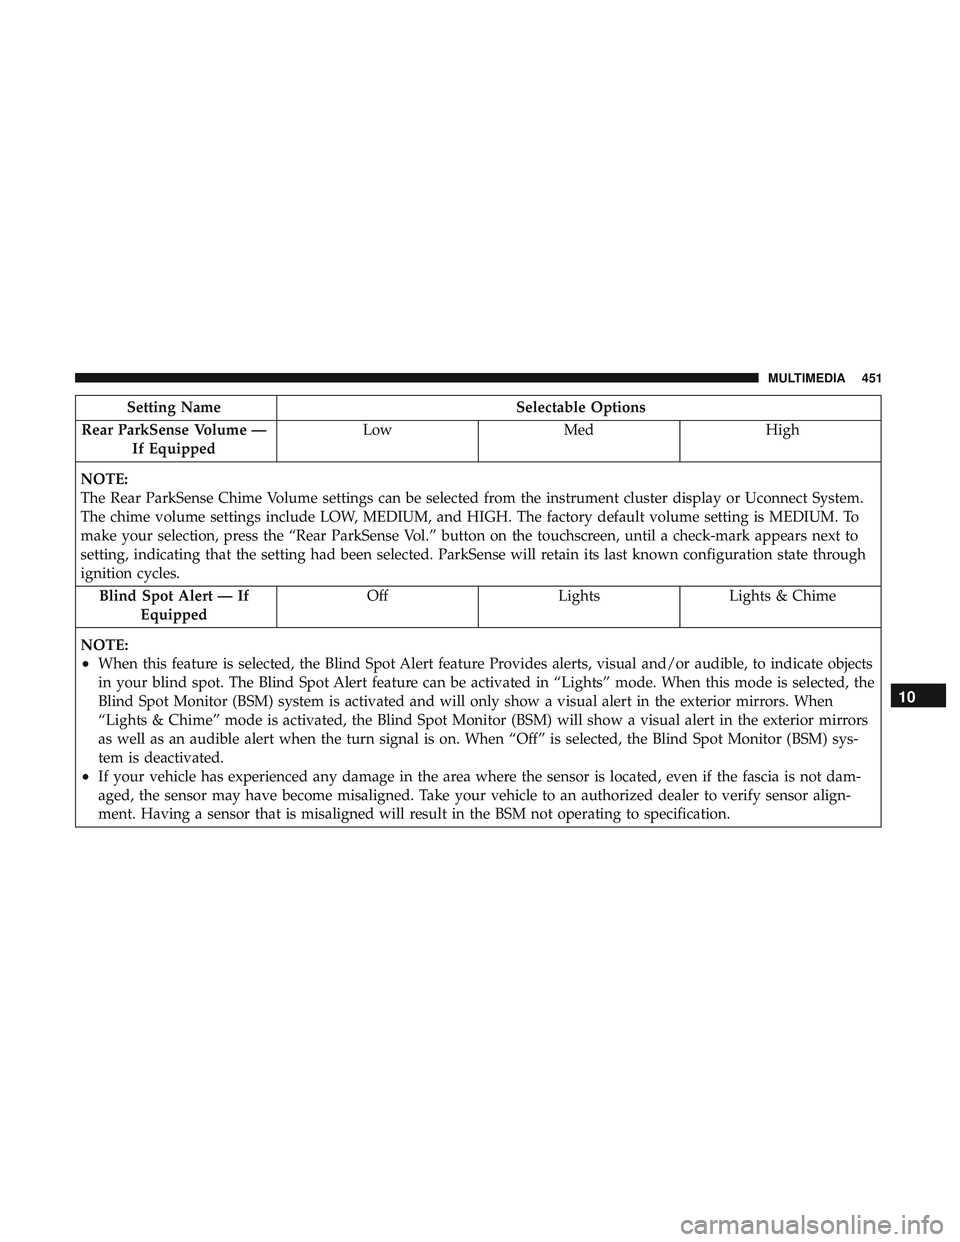
Rear ParkSense Volume — If Equipped Low
Med High
NOTE:
The Rear ParkSense Chime Volume settings can be selected from the instrument cluster display or Uconnect System.
The chime volume settings include LOW, MEDIUM, and HIGH. The factory default volume setting is MEDIUM. To
make your selection, press the “Rear ParkSense Vol.” button on the touchscreen, until a check-mark appears next to
setting, indicating that the setting had been selected. ParkSense will retain its last known configuration state through
ignition cycles. Blind Spot Alert — If Equipped Off
LightsLights & Chime
NOTE:
•When this feature is selected, the Blind Spot Alert feature Provides alerts, visual and/or audible, to indicate objects
in your blind spot. The Blind Spot Alert feature can be activated in “Lights” mode. When this mode is selected, the
Blind Spot Monitor (BSM) system is activated and will only show a visual alert in the exterior mirrors. When
“Lights & Chime” mode is activated, the Blind Spot Monitor (BSM) will show a visual alert in the exterior mirrors
as well as an audible alert when the turn signal is on. When “Off” is selected, the Blind Spot Monitor (BSM) sys-
tem is deactivated.
•If your vehicle has experienced any damage in the area where the sensor is located, even if the fascia is not dam-
aged, the sensor may have become misaligned. Take your vehicle to an authorized dealer to verify sensor align-
ment. Having a sensor that is misaligned will result in the BSM not operating to specification.
10
MULTIMEDIA 451
Page 473 of 532
•Steering Wheel Angle:
Steering Wheel Angle utilizes the steering angle sensor to
measure the degree of the steering wheel relative to zero.
The zero degree measurement indicates a steering wheel
straight ahead position. When the steering angle value is
negative, this indicates a turn to the left, and when the
steering angle value is positive, a turn to the right.
The friction circle display shows instantaneous G-Force as
a highlight and previous G-Force as dots within the circle.
The system records previous G-Force for three minutes. If
there are multiple samples at a given point, the color of the
dot will darken from blue to red. Vectors more frequent
will show in red; infrequent vectors will show in blue.Engine
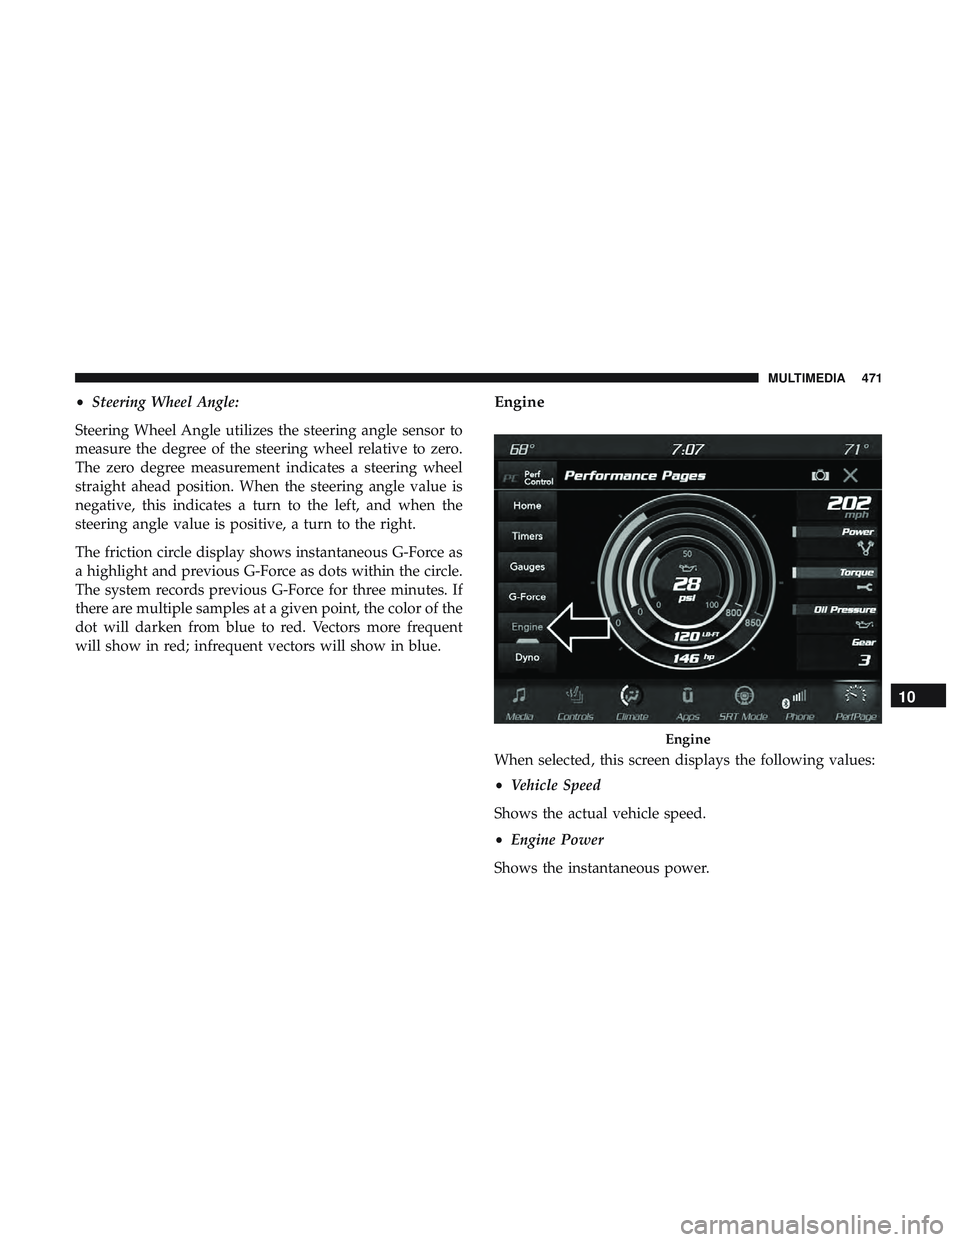
When selected, this screen displays the following values:
• Vehicle Speed
Shows the actual vehicle speed.
• Engine Power
Shows the instantaneous power.
Engine
10
MULTIMEDIA 471
Page 521 of 532
AirBag .........................115,168, 202
Automatic Headlights ......................61
Brake Assist Warning ..................... .136
Brake Warning .......................115,404
Bulb Replacement ....................... .286
Courtesy/Reading .........................64
Cruise ............................ .124, 125
Daytime Running .........................60
Dimmer Switch, Headlight ................60, 61
Electronic Stability Program(ESP) Indicator ......117
Exterior ............................ .60, 204
Fog ...................................63
Headlights .......................... .60, 62
Headlights On With Wipers ..................62
Headlight Switch .........................60
High Beam ..............................61
High Beam/Low Beam Select .................61
Instrument Cluster ........................60
Intensity Control ..........................65
Interior ................................64
License ............................... .290
Lights On Reminder .......................62
Malfunction Indicator (Check Engine) ..........119
Map ..................................64
Park .............................. .62, 123Passing
................................61
Reading ................................64
Seat Belt Reminder .......................115
Security Alarm ..........................117
Service ............................... .286
Traction Control ........................ .136
Turn Signals ....................60, 63, 123, 204
Vanity Mirror ............................59
Warning Instrument Cluster Descriptions ....117,123
Loading Vehicle ....................... .265, 266
Capacities ............................. .266
Tires................................. .379
Load Shed Battery Saver On ...................113
Load Shed Electrical Load Reduction .............113
Load Shed Intelligent Battery Sensor .............113
Locks Automatic Door ..........................41
Auto Unlock .............................41
Power Door .............................36
Low Tire Pressure System .....................149
Lubrication, Body ......................... .360
Lug
Nuts/Bolts ........................... .405
Maintenance ...............................82
Maintenance Free Battery .....................349
12
INDEX 519