parking DODGE CHALLENGER 2019 Service Manual
[x] Cancel search | Manufacturer: DODGE, Model Year: 2019, Model line: CHALLENGER, Model: DODGE CHALLENGER 2019Pages: 532, PDF Size: 5.01 MB
Page 314 of 532
WARNING!(Continued)
in injuries that are serious or fatal to you, your
passengers, and others around you.
• Take care not to allow the contents of Tire Service Kit
to come in contact with hair, eyes, or clothing. Tire
Service Kit sealant is harmful if inhaled, swallowed,
or absorbed through the skin. It causes skin, eye, and
respiratory irritation. Flush immediately with plenty
of water if there is any contact with eyes or skin.
Change clothing as soon as possible, if there is any
contact with clothing.
• Tire Service Kit Sealant solution contains latex. In
case of an allergic reaction or rash, consult a physi-
cian immediately. Keep Tire Service Kit out of reach
of children. If swallowed, rinse mouth immediately
with plenty of water and drink plenty of water. Do
not induce vomiting! Consult a physician immedi-
ately.
Sealing A Tire With Tire Service Kit
(A) Whenever You Stop To Use Tire Service Kit:
1. Pull over to a safe location and turn on the vehicle’s Hazard Warning flashers. 2. Verify that the valve stem (on the wheel with the
deflated tire) is in a position that is near to the ground.
This will allow the Tire Service Kit Hoses (6) and (7) to
reach the valve stem and keep the Tire Service Kit flat on
the ground. This will provide the best positioning of the
kit when injecting the sealant into the deflated tire and
running the air pump. Move the vehicle as necessary to
place the valve stem in this position before proceeding.
3. Place the transmission in PARK (auto transmission) or in Gear (manual transmission) and place the ignition in the
OFF position.
4. Apply the parking brake.
(B) Setting Up To Use Tire Service Kit:
1. Push in the Mode Select Knob (5) and turn to the Sealant Mode position.
2. Uncoil the Sealant Hose (6) and then remove the cap from the fitting at the end of the hose.
3. Place the Tire Service Kit flat on the ground next to the deflated tire.
4. Remove the cap from the valve stem and then screw the fitting at the end of the Sealant Hose (6) onto the valve
stem.
312 IN CASE OF EMERGENCY
Page 322 of 532
WARNING!(Continued)
in injuries that are serious or fatal to you, your
passengers, and others around you.
• Take care not to allow the contents of Tire Service Kit
to come in contact with hair, eyes, or clothing. Tire
Service Kit sealant is harmful if inhaled, swallowed,
or absorbed through the skin. It causes skin, eye, and
respiratory irritation. Flush immediately with plenty
of water if there is any contact with eyes or skin.
Change clothing as soon as possible, if there is any
contact with clothing.
• Tire Service Kit Sealant solution contains latex. In
case of an allergic reaction or rash, consult a physi-
cian immediately. Keep Tire Service Kit out of reach
of children. If swallowed, rinse mouth immediately
with plenty of water and drink plenty of water. Do
not induce vomiting! Consult a physician immedi-
ately.
Sealing A Tire With Tire Service Kit
(A) Whenever You Stop To Use Tire Service Kit:
1. Pull over to a safe location and turn on the vehicle’s Hazard Warning flashers. 2. Verify that the valve stem (on the wheel with the
deflated tire) is in a position that is near to the ground.
This will allow the Tire Service Kit Hoses (3) and (5) to
reach the valve stem and keep the Tire Service Kit flat on
the ground. This will provide the best positioning of the
kit when injecting the sealant into the deflated tire and
running the air pump. Move the vehicle as necessary to
place the valve stem in this position before proceeding.
3. Place the transmission in PARK (auto transmission) or in Gear (manual transmission) and place the ignition in the
OFF position.
4. Apply the parking brake.
(B) Setting Up To Use Tire Service Kit:
1. Push in the Mode Select Knob (2) and turn to the Sealant Mode position.
2. Uncoil the Sealant Hose (3) and then remove the cap from the fitting at the end of the hose.
3. Place the Tire Service Kit flat on the ground next to the deflated tire.
4. Remove the cap from the valve stem and then screw the fitting at the end of the Sealant Hose (3) onto the valve
stem.
320 IN CASE OF EMERGENCY
Page 327 of 532
NOTE:When using a portable battery booster pack, follow
the manufacturer’s operating instructions and precautions.
Preparations For Jump Start
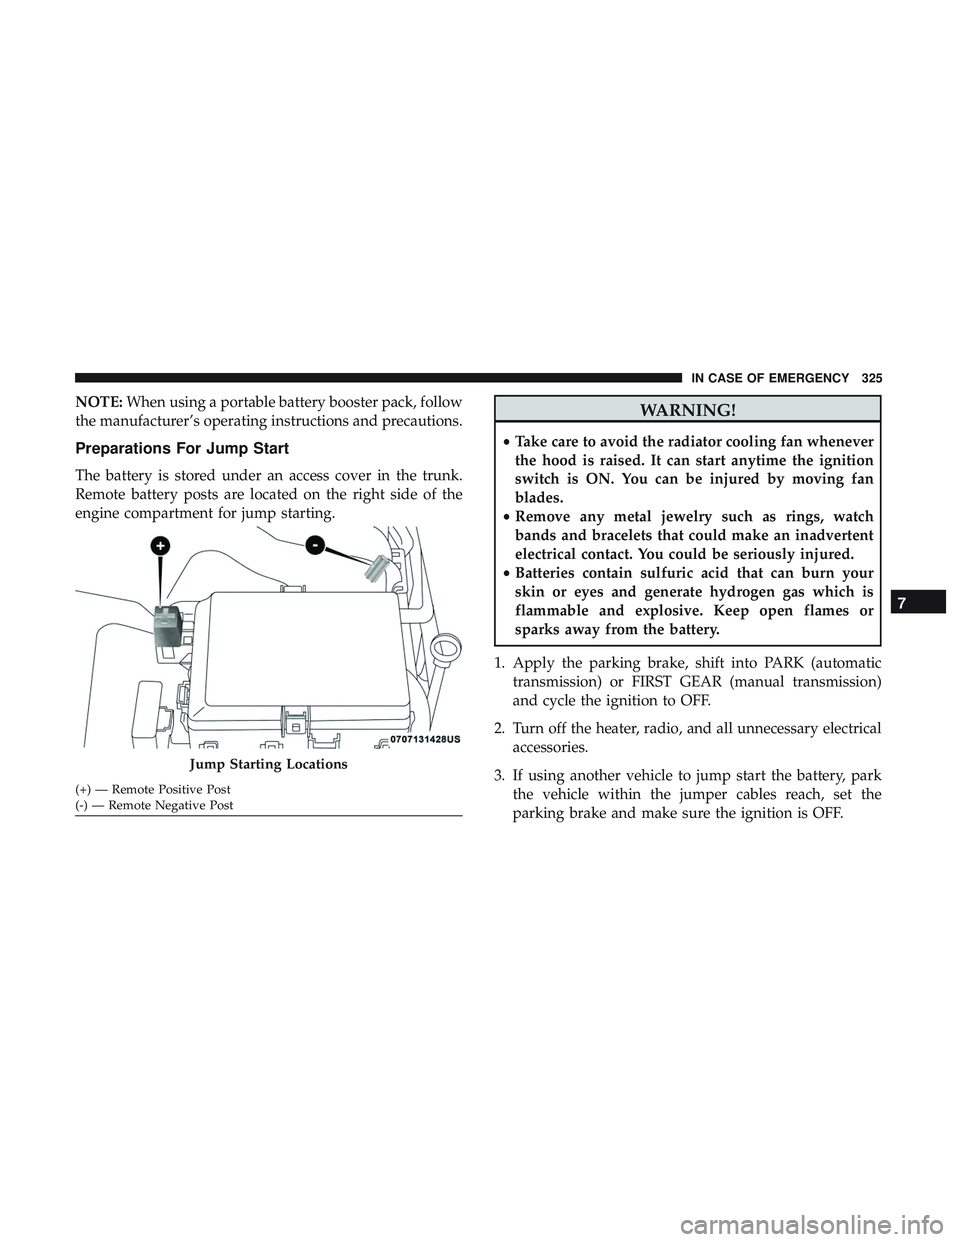
The battery is stored under an access cover in the trunk.
Remote battery posts are located on the right side of the
engine compartment for jump starting.
WARNING!
• Take care to avoid the radiator cooling fan whenever
the hood is raised. It can start anytime the ignition
switch is ON. You can be injured by moving fan
blades.
• Remove any metal jewelry such as rings, watch
bands and bracelets that could make an inadvertent
electrical contact. You could be seriously injured.
• Batteries contain sulfuric acid that can burn your
skin or eyes and generate hydrogen gas which is
flammable and explosive. Keep open flames or
sparks away from the battery.
1. Apply the parking brake, shift into PARK (automatic transmission) or FIRST GEAR (manual transmission)
and cycle the ignition to OFF.
2. Turn off the heater, radio, and all unnecessary electrical accessories.
3. If using another vehicle to jump start the battery, park the vehicle within the jumper cables reach, set the
parking brake and make sure the ignition is OFF.
Jump Starting Locations
(+) — Remote Positive Post
(-) — Remote Negative Post
7
IN CASE OF EMERGENCY 325
Page 330 of 532
to the radiator and aids in removing heat from the
engine cooling system.
WARNING!
You or others can be badly burned by hot engine
coolant (antifreeze) or steam from your radiator. If you
see or hear steam coming from under the hood, do not
open the hood until the radiator has had time to cool.
Never try to open a cooling system pressure cap when
the radiator or coolant bottle is hot.
CAUTION!
Driving with a hot cooling system could damage your
vehicle. If the temperature gauge reads HOT (H), pull
over and stop the vehicle. Idle the vehicle with the air
conditioner turned off until the pointer drops back
into the normal range. If the pointer remains on HOT
(H), and you hear continuous chimes, turn the engine
off immediately and call for service.
MANUAL PARK RELEASE — 8–SPEED
TRANSMISSION
WARNING!
Always secure your vehicle by fully applying the
parking brake before activating the Manual Park Re-
lease. In addition, you should be seated in the driver’s
seat with your foot firmly on the brake pedal when
activating the Manual Park Release. Activating the
Manual Park Release will allow your vehicle to roll
away if it is not secured by the parking brake, or by
proper connection to a tow vehicle. Activating the
Manual Park Release on an unsecured vehicle could
lead to serious injury or death for those in or around
the vehicle.
In order to move the vehicle in cases where the transmis-
sion will not shift out of PARK (such as a dead battery), a
Manual Park Release is available.
328 IN CASE OF EMERGENCY
Page 331 of 532
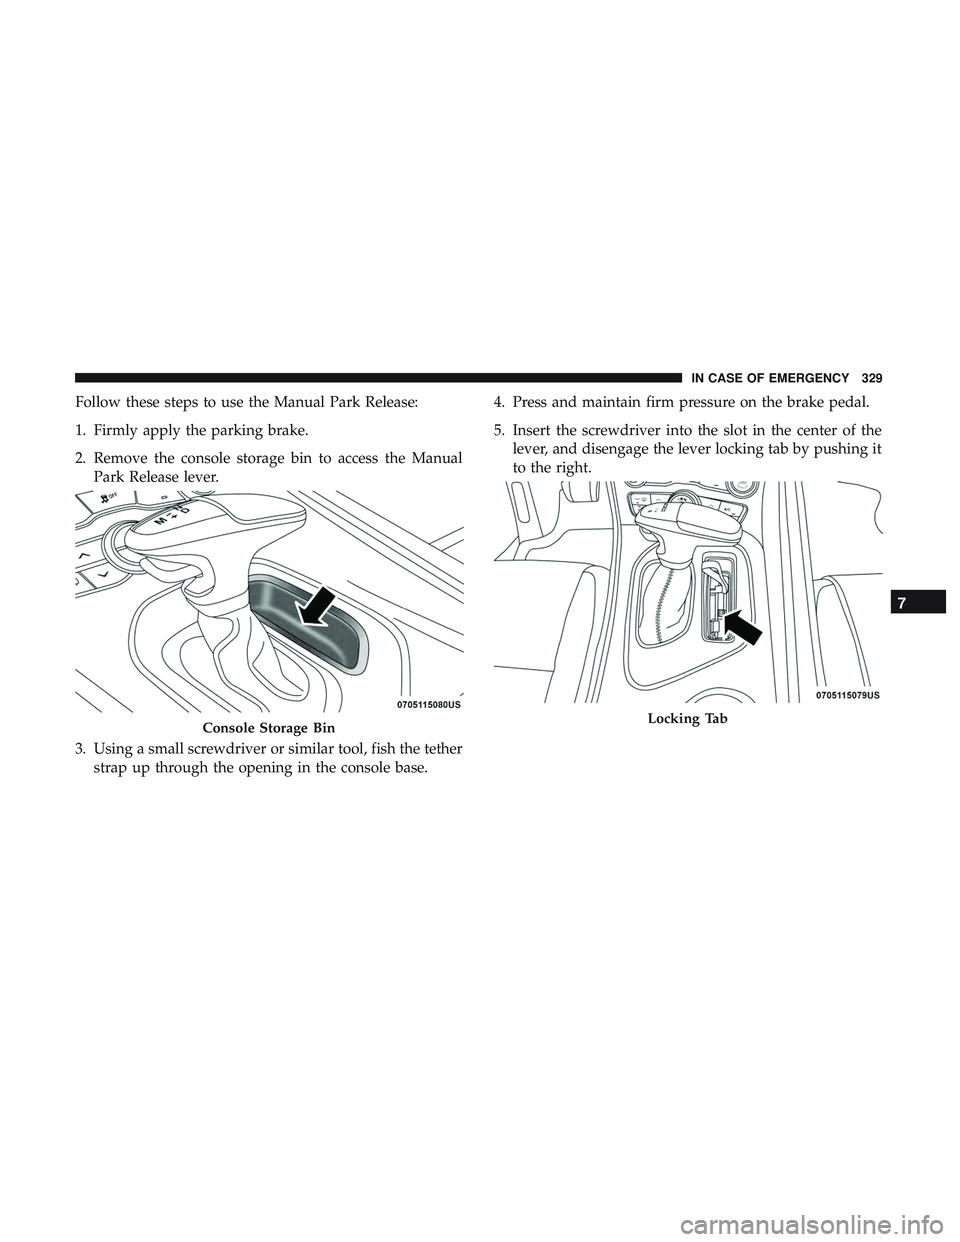
Follow these steps to use the Manual Park Release:
1. Firmly apply the parking brake.
2. Remove the console storage bin to access the ManualPark Release lever.
3. Using a small screwdriver or similar tool, fish the tether strap up through the opening in the console base. 4. Press and maintain firm pressure on the brake pedal.
5. Insert the screwdriver into the slot in the center of the
lever, and disengage the lever locking tab by pushing it
to the right.
Console Storage BinLocking Tab
7
IN CASE OF EMERGENCY 329
Page 332 of 532
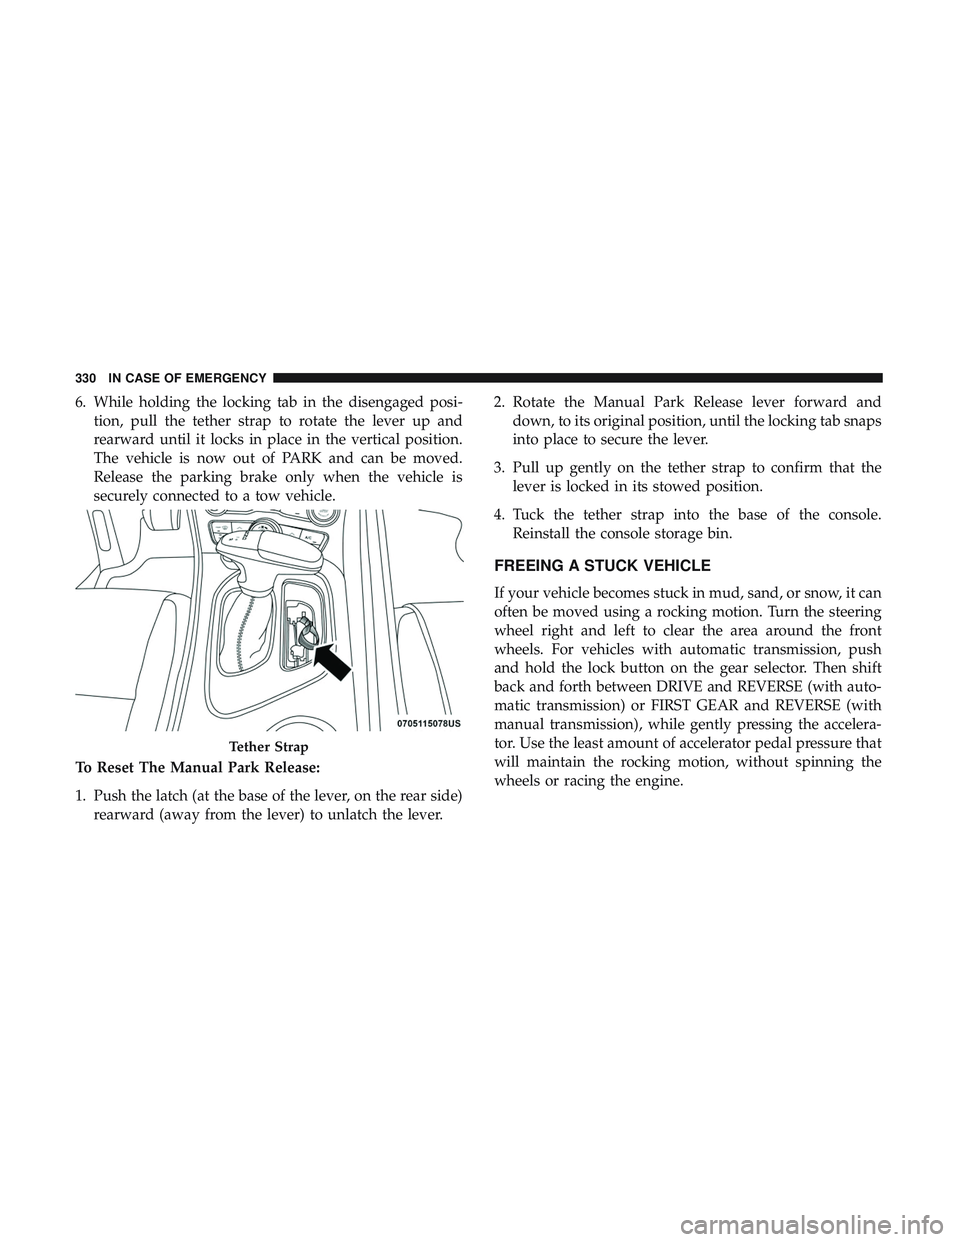
6. While holding the locking tab in the disengaged posi-tion, pull the tether strap to rotate the lever up and
rearward until it locks in place in the vertical position.
The vehicle is now out of PARK and can be moved.
Release the parking brake only when the vehicle is
securely connected to a tow vehicle.
To Reset The Manual Park Release:
1. Push the latch (at the base of the lever, on the rear side) rearward (away from the lever) to unlatch the lever. 2. Rotate the Manual Park Release lever forward and
down, to its original position, until the locking tab snaps
into place to secure the lever.
3. Pull up gently on the tether strap to confirm that the lever is locked in its stowed position.
4. Tuck the tether strap into the base of the console. Reinstall the console storage bin.
FREEING A STUCK VEHICLE
If your vehicle becomes stuck in mud, sand, or snow, it can
often be moved using a rocking motion. Turn the steering
wheel right and left to clear the area around the front
wheels. For vehicles with automatic transmission, push
and hold the lock button on the gear selector. Then shift
back and forth between DRIVE and REVERSE (with auto-
matic transmission) or FIRST GEAR and REVERSE (with
manual transmission), while gently pressing the accelera-
tor. Use the least amount of accelerator pedal pressure that
will maintain the rocking motion, without spinning the
wheels or racing the engine.
Tether Strap
330 IN CASE OF EMERGENCY
Page 345 of 532
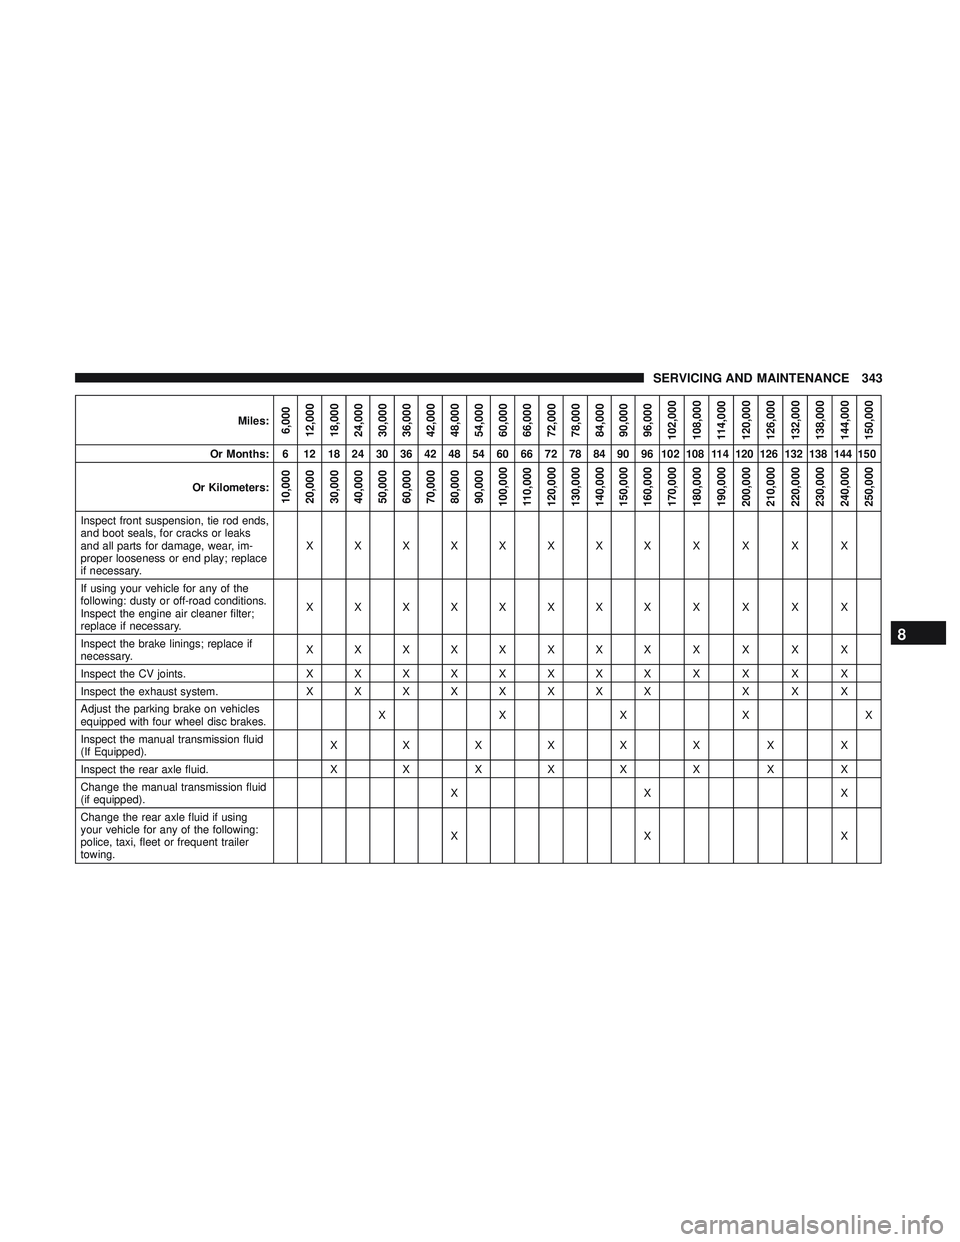
Miles:6,000
12,000
18,000
24,000
30,000
36,000
42,000
48,000
54,000
60,000
66,000
72,000
78,000
84,000
90,000
96,000
102,000
108,000
114,000
120,000
126,000
132,000
138,000
144,000
150,000
Or Months: 6 12 18 24 30 36 42 48 54 60 66 72 78 84 90 96 102 108 114 120 126 132 138 144 150
Or Kilometers:
10,000
20,000
30,000
40,000
50,000
60,000
70,000
80,000
90,000
100,000
110,000
120,000
130,000
140,000
150,000
160,000
170,000
180,000
190,000
200,000
210,000
220,000
230,000
240,000
250,000
Inspect front suspension, tie rod ends,
and boot seals, for cracks or leaks
and all parts for damage, wear, im-
proper looseness or end play; replace
if necessary. XXXXXXXX
XXXX
If using your vehicle for any of the
following: dusty or off-road conditions.
Inspect the engine air cleaner filter;
replace if necessary. XXXXXXXX
XXXX
Inspect the brake linings; replace if
necessary. XXXXXXXX
XXXX
Inspect the CV joints. XXXXXXXX XXXX
Inspect the exhaust system. XXXXXXXX X X X
Adjust the parking brake on vehicles
equipped with four wheel disc brakes. XXX X X
Inspect the manual transmission fluid
(If Equipped). XXXXX X X X
Inspect the rear axle fluid. XXX XX X XX
Change the manual transmission fluid
(if equipped). XX X
Change the rear axle fluid if using
your vehicle for any of the following:
police, taxi, fleet or frequent trailer
towing. XX X
8
SERVICING AND MAINTENANCE 343
Page 395 of 532
Wheel And Wheel Trim Care
All wheels and wheel trim, especially aluminum and chrome
plated wheels, should be cleaned regularly using mild (neu-
tral Ph) soap and water to maintain their luster and to
prevent corrosion. Wash wheels with the same soap solution
recommended for the body of the vehicle and remember to
always wash when the surfaces are not hot to the touch.
Your wheels are susceptible to deterioration caused by salt,
sodium chloride, magnesium chloride, calcium chloride,
etc., and other road chemicals used to melt ice or control
dust on dirt roads. Use a soft cloth or sponge and mild soap
to wipe away promptly. Do not use harsh chemicals or a
stiff brush. They can damage the wheel’s protective coating
that helps keep them from corroding and tarnishing.
CAUTION!
Avoid products or automatic car washes that use acidic
solutions or strong alkaline additives or harsh brushes.
Many aftermarket wheel cleaners and automatic car
washes may damage the wheel’s protective finish.
Such damage is not covered by the New Vehicle
Limited Warranty. Only car wash soap, Mopar Wheel
Cleaner or equivalent is recommended.When cleaning extremely dirty wheels including excessive
brake dust, care must be taken in the selection of tire and
wheel cleaning chemicals and equipment to prevent dam-
age to the wheels. Mopar Wheel Treatment or Mopar
Chrome Cleaner or their equivalent is recommended or
select a non-abrasive, non-acidic cleaner for aluminum or
chrome wheels.
CAUTION!
Do not use scouring pads, steel wool, a bristle brush,
metal polishes or oven cleaner. These products may
damage the wheel’s protective finish. Such damage is
not covered by the New Vehicle Limited Warranty.
Only car wash soap, Mopar Wheel Cleaner or equiva-
lent is recommended.
NOTE: If you intend parking or storing your vehicle for an
extended period after cleaning the wheels with wheel
cleaner, drive your vehicle and apply the brakes to remove
the water droplets from the brake components. This activ-
ity will remove the red rust on the brake rotors and prevent
vehicle vibration when braking.
8
SERVICING AND MAINTENANCE 393
Page 399 of 532
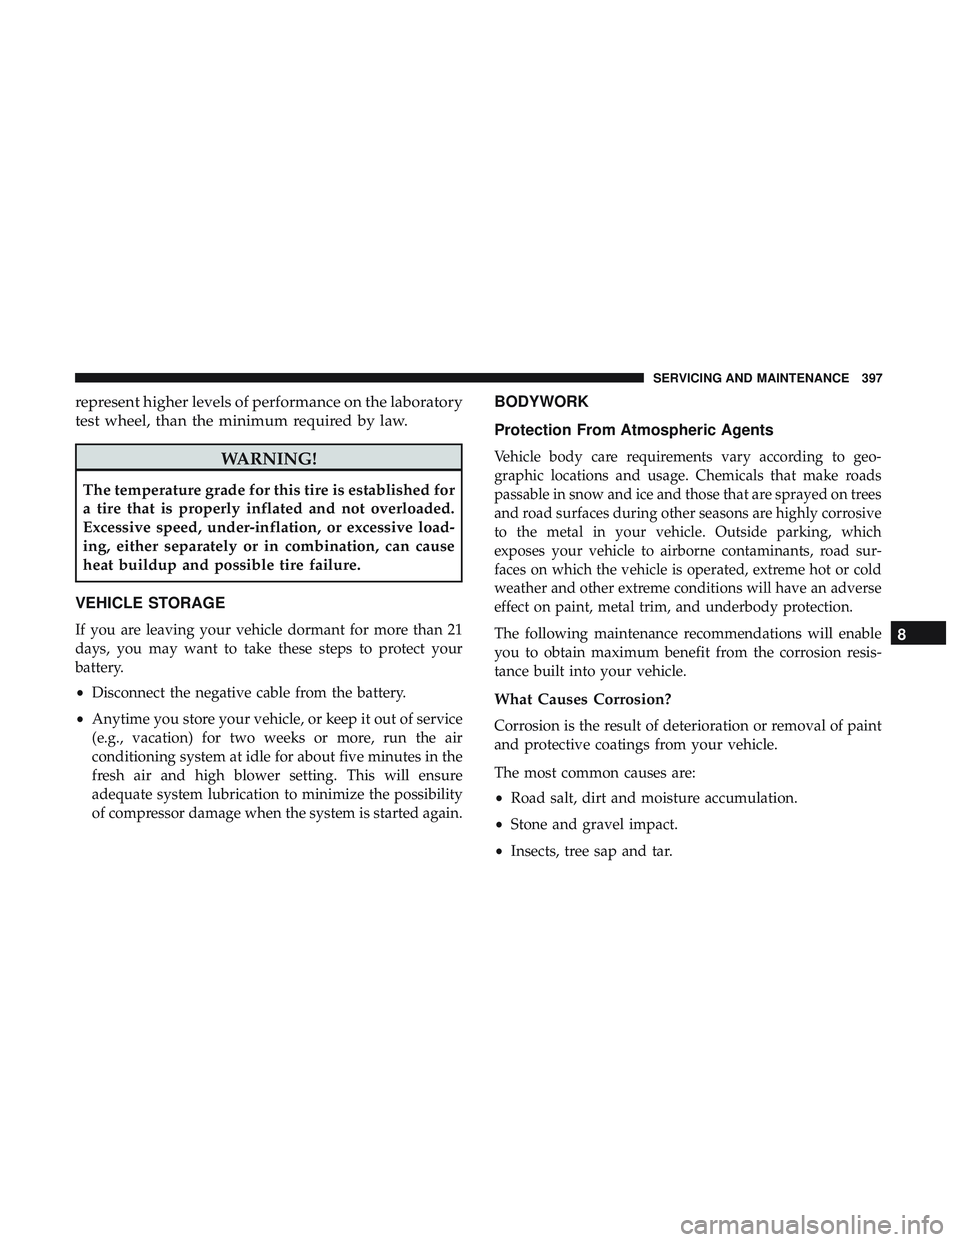
represent higher levels of performance on the laboratory
test wheel, than the minimum required by law.
WARNING!
The temperature grade for this tire is established for
a tire that is properly inflated and not overloaded.
Excessive speed, under-inflation, or excessive load-
ing, either separately or in combination, can cause
heat buildup and possible tire failure.
VEHICLE STORAGE
If you are leaving your vehicle dormant for more than 21
days, you may want to take these steps to protect your
battery.
• Disconnect the negative cable from the battery.
• Anytime you store your vehicle, or keep it out of service
(e.g., vacation) for two weeks or more, run the air
conditioning system at idle for about five minutes in the
fresh air and high blower setting. This will ensure
adequate system lubrication to minimize the possibility
of compressor damage when the system is started again.
BODYWORK
Protection From Atmospheric Agents
Vehicle body care requirements vary according to geo-
graphic locations and usage. Chemicals that make roads
passable in snow and ice and those that are sprayed on trees
and road surfaces during other seasons are highly corrosive
to the metal in your vehicle. Outside parking, which
exposes your vehicle to airborne contaminants, road sur-
faces on which the vehicle is operated, extreme hot or cold
weather and other extreme conditions will have an adverse
effect on paint, metal trim, and underbody protection.
The following maintenance recommendations will enable
you to obtain maximum benefit from the corrosion resis-
tance built into your vehicle.
What Causes Corrosion?
Corrosion is the result of deterioration or removal of paint
and protective coatings from your vehicle.
The most common causes are:
• Road salt, dirt and moisture accumulation.
• Stone and gravel impact.
• Insects, tree sap and tar.
8
SERVICING AND MAINTENANCE 397
Page 429 of 532
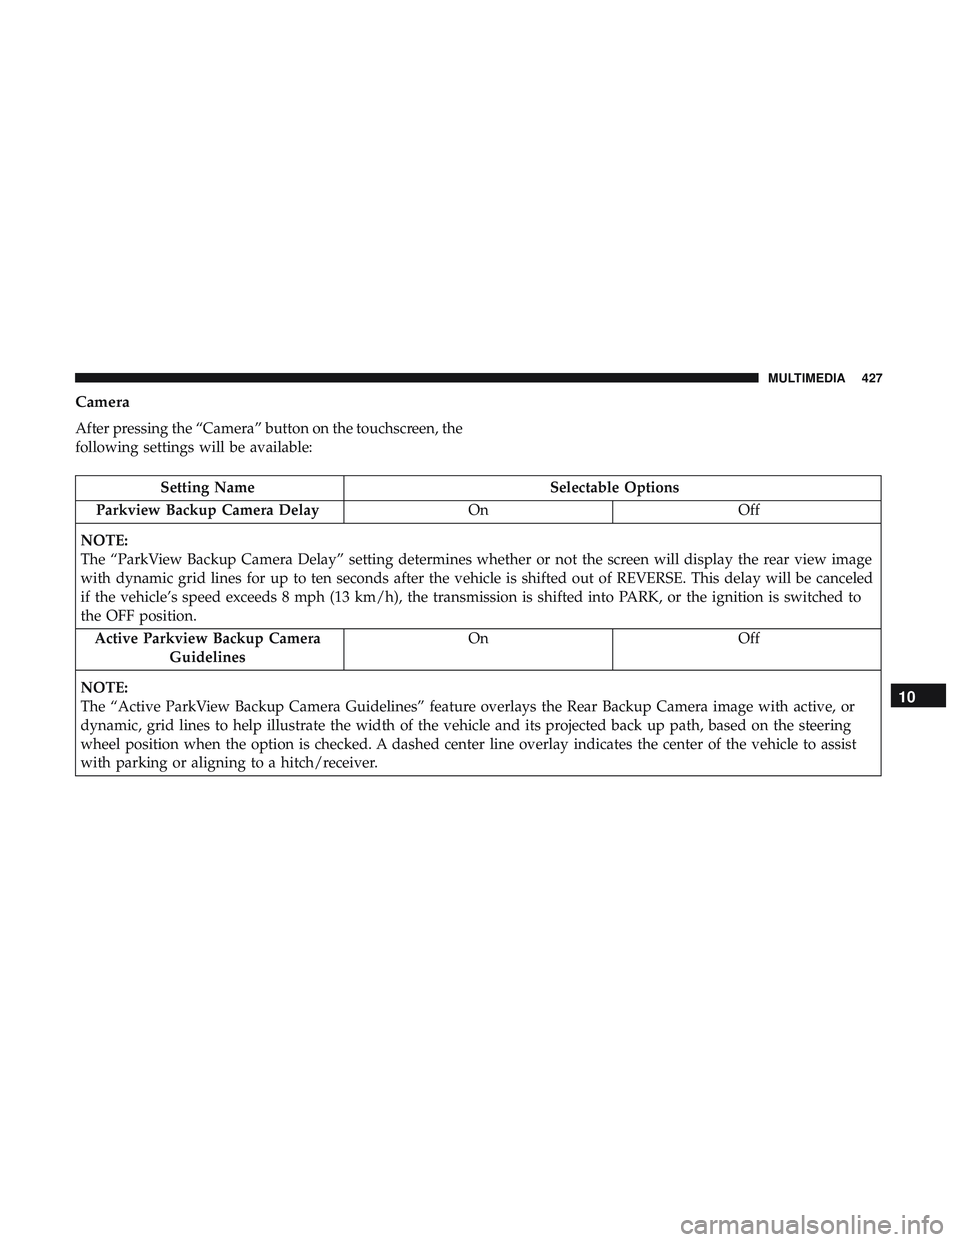
Camera
After pressing the “Camera” button on the touchscreen, the
following settings will be available:
Setting NameSelectable Options
Parkview Backup Camera Delay OnOff
NOTE:
The “ParkView Backup Camera Delay” setting determines whether or not the screen will display the rear view image
with dynamic grid lines for up to ten seconds after the vehicle is shifted out of REVERSE. This delay will be canceled
if the vehicle’s speed exceeds 8 mph (13 km/h), the transmission is shifted into PARK, or the ignition is switched to
the OFF position. Active Parkview Backup Camera Guidelines On
Off
NOTE:
The “Active ParkView Backup Camera Guidelines” feature overlays the Rear Backup Camera image with active, or
dynamic, grid lines to help illustrate the width of the vehicle and its projected back up path, based on the steering
wheel position when the option is checked. A dashed center line overlay indicates the center of the vehicle to assist
with parking or aligning to a hitch/receiver.
10
MULTIMEDIA 427