language DODGE CHALLENGER 2020 Owners Manual
[x] Cancel search | Manufacturer: DODGE, Model Year: 2020, Model line: CHALLENGER, Model: DODGE CHALLENGER 2020Pages: 396, PDF Size: 16.64 MB
Page 310 of 396
308MULTIMEDIA
Language
After pressing the Language button on the touchscreen, the following setting will be available:
Display
After pressing the Display button on the touchscreen, the following settings will be available:
Setting Name Selectable Options
LanguageEnglishFrançais Español
Setting Name Selectable Options
Display ModeManual Auto
Display Brightness With Headlights ON +
–
NOTE:
When in the “Display Brightness With Headlights ON” display, you may select the brightness with the headlights on. Adjust the brightness from
(1–10) with the + and – buttons on the touchscreen.
To make changes to the "Display Brightness With Headlights ON" setting, the headlights must be on and the interior dimmer switch must not be in
the "party" or "parade" position.
Display Brightness With Headlights OFF +
–
NOTE:
When in the “Display Brightness With Headlights OFF” display, you may select the brightness with the headlights off. Adjust the brightness from
(1–10) with the + and – buttons on the touchscreen.
To make changes to the "Display Brightness With Headlights OFF" setting, the headlights must be off and the interior dimmer switch must not be
in the "party" or "parade" position.
20_LA_OM_EN_USC_t.book Page 308
Page 325 of 396
MULTIMEDIA323
CUSTOMER PROGRAMMABLE FEATURES
— U
CONNECT 4C/4C NAV SETTINGS
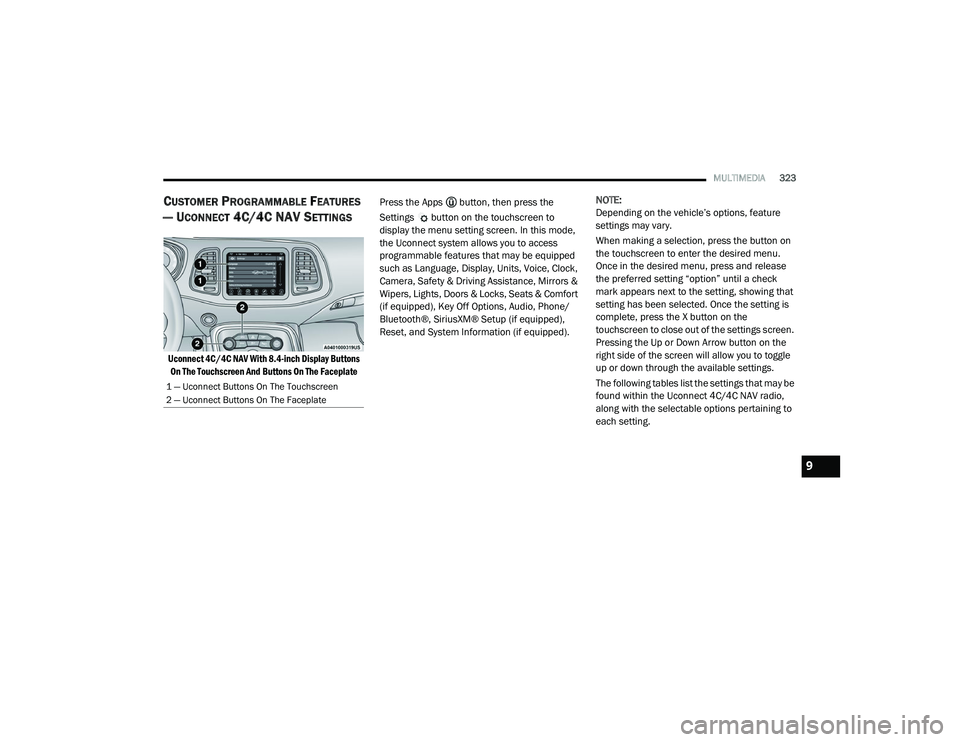
Uconnect 4C/4C NAV With 8.4-inch Display Buttons
On The Touchscreen And Buttons On The Faceplate
Press the Apps button, then press the
Settings button on the touchscreen to
display the menu setting screen. In this mode,
the Uconnect system allows you to access
programmable features that may be equipped
such as Language, Display, Units, Voice, Clock,
Camera, Safety & Driving Assistance, Mirrors &
Wipers, Lights, Doors & Locks, Seats & Comfort
(if equipped), Key Off Options, Audio, Phone/
Bluetooth®, SiriusXM® Setup (if equipped),
Reset, and System Information (if equipped).
NOTE:
Depending on the vehicle’s options, feature
settings may vary.
When making a selection, press the button on
the touchscreen to enter the desired menu.
Once in the desired menu, press and release
the preferred setting “option” until a check
mark appears next to the setting, showing that
setting has been selected. Once the setting is
complete, press the X button on the
touchscreen to close out of the settings screen.
Pressing the Up or Down Arrow button on the
right side of the screen will allow you to toggle
up or down through the available settings.
The following tables list the settings that may be
found within the Uconnect 4C/4C NAV radio,
along with the selectable options pertaining to
each setting.
1 — Uconnect Buttons On The Touchscreen
2 — Uconnect Buttons On The Faceplate
9
20_LA_OM_EN_USC_t.book Page 323
Page 326 of 396
324MULTIMEDIA
Language
After pressing the Language button on the touchscreen, the following setting will be available:
Display
After pressing the Display button on the touchscreen, the following settings will be available:
Setting Name Selectable Options
LanguageEnglishFrançais Español
Setting Name Selectable Options
Display ModeAutoManual
Display Brightness With Headlights On +–
NOTE:
When in the “Display Brightness With Headlights On” display, you may select the brightness with the headlights on.
To make changes to the "Display Brightness With Headlights On" setting, the headlights must be on and the interior dimmer switch must not be in
the "party" or "parade" position. Display Brightness With Headlights Off +–
NOTE:
When in the “Display Brightness With Headlights Off” display, you may select the brightness with the headlights off. Adjust the brightness from
(1–10) with the + and – buttons on the touchscreen.
To make changes to the "Display Brightness With Headlights Off" setting, the headlights must be off and the interior dimmer switch must not be in
the "party" or "parade" position.
20_LA_OM_EN_USC_t.book Page 324
Page 345 of 396
MULTIMEDIA343
Setting Presets
The Presets are available for all Radio Modes,
and are activated by pressing any of the six
Preset buttons on the touchscreen, located at
the top of the screen.
When you are receiving a station that you wish
to commit into memory, press and hold the
desired numbered button on the touchscreen
for more than two seconds or until you hear a
confirmation beep.
The Radio stores up to 12 presets in each of the
Radio modes. A set of six presets are visible at
the top of the radio screen.
You can switch between the two radio presets
by pressing the Arrow button located in the
upper right of the radio touchscreen.
Browse In AM/FM
When in either AM or FM, the Browse Screen
provides a means to edit the Presets List and is
entered by pushing the ENTER/BROWSE
button.
Scrolling Preset List
Once in the Browse Presets screen, you can
scroll the preset list by rotation of the TUNE/
SCROLL knob, or by pressing the Up and Down
arrow keys, located on the right of the screen. Preset Selection From List
A Preset can be selected by pressing any of the
listed Presets or by pushing the ENTER/
BROWSE button on the TUNE/SCROLL knob to
select the currently highlighted Preset.
When selected, the radio tunes to the station
stored in the Preset and returns to the main
radio screen.
Deleting Presets
A Preset can be deleted in the Presets Browse
screen by pressing the Trash Can icon for the
corresponding Preset.
Return To Main Radio Screen
You can return to the Main Radio Screen, by
pressing the X button on the touchscreen when
in the Browse Presets screen.
SiriusXM® Satellite Radio Mode — If
Equipped
SiriusXM® Satellite Radio uses direct
satellite-to-receiver broadcasting technology to
provide clear, coast-to-coast radio content.
SiriusXM® is a subscription based service.
SiriusXM® All Access Package
All satellite radio-equipped vehicles come with a
one-year trial to the SiriusXM® All Access
package, providing over 160 channels of the
best programming for all the places life takes
you.
In your vehicle — You’ll get every channel
available on your radio, including all the
premium programming like Howard Stern,
every NFL® game, every MLB® game, every
NASCAR® race, Oprah Radio, and more.
On the go — With a SiriusXM® Internet Radio
subscription included with the All Access trial,
you’ll get SiriusXM® on your computer,
smartphone, or tablet. Including:
A huge On Demand catalog
Xtra Channels featuring SiriusXM®
Latino – a collection of Spanish-language
channels
MySXM – allowing you to personalize
your favorite music channels
Go to siriusxm.com/getallaccess for more
information9
20_LA_OM_EN_USC_t.book Page 343
Page 353 of 396
MULTIMEDIA351
NOTE:
The radio unit is acting as the amplifier for audio
output from the Auxiliary device. Therefore, if
the volume control on the Auxiliary device is set
too low, there will be insufficient audio signal for
the radio unit to play the music on the device.
Media Mode
Press the Media button on the touchscreen to
select the desired audio source: AUX.
Audio
Refer to “Radio Mode” for adjusting the audio
settings.
Bluetooth® Mode
Overview
Bluetooth® Streaming Audio (BTSA) or
Bluetooth® Mode is entered by pairing a
Bluetooth® device, containing music, to the
Uconnect System.
Before proceeding, the Bluetooth® device must
be paired to the Uconnect Phone to
communicate with the Uconnect System.
NOTE:
See the pairing procedure in the Uconnect
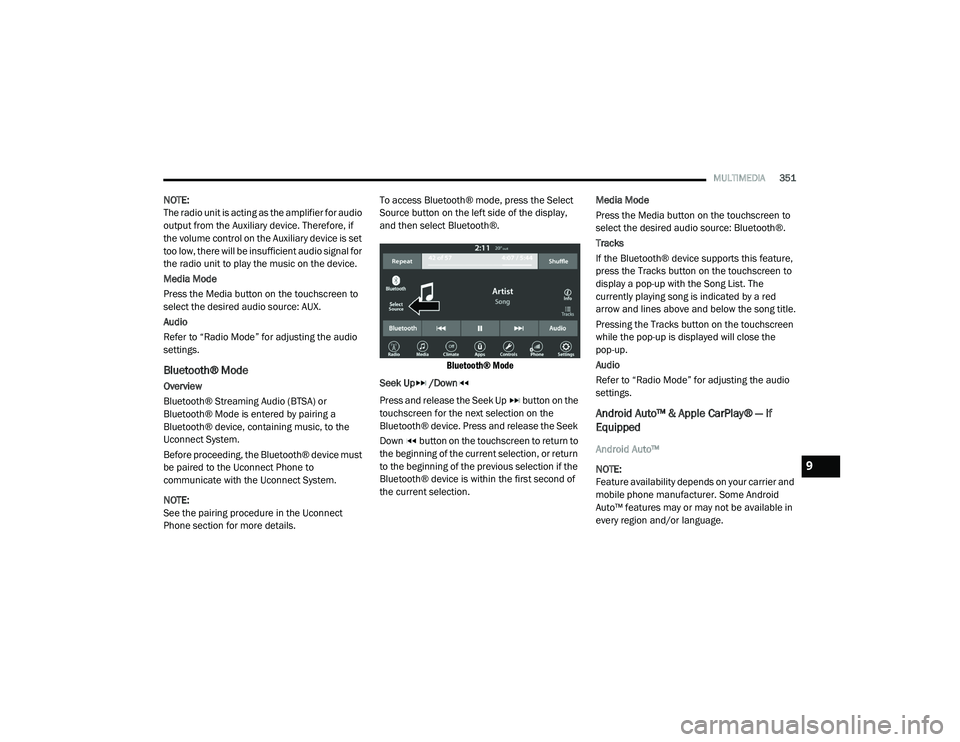
Phone section for more details. To access Bluetooth® mode, press the Select
Source button on the left side of the display,
and then select Bluetooth®.
Bluetooth® Mode
Seek Up /Down
Press and release the Seek Up button on the
touchscreen for the next selection on the
Bluetooth® device. Press and release the Seek
Down button on the touchscreen to return to
the beginning of the current selection, or return
to the beginning of the previous selection if the
Bluetooth® device is within the first second of
the current selection. Media Mode
Press the Media button on the touchscreen to
select the desired audio source: Bluetooth®.
Tracks
If the Bluetooth® device supports this feature,
press the Tracks button on the touchscreen to
display a pop-up with the Song List. The
currently playing song is indicated by a red
arrow and lines above and below the song title.
Pressing the Tracks button on the touchscreen
while the pop-up is displayed will close the
pop-up.
Audio
Refer to “Radio Mode” for adjusting the audio
settings.
Android Auto™ & Apple CarPlay® — If
Equipped
Android Auto™
NOTE:
Feature availability depends on your carrier and
mobile phone manufacturer. Some Android
Auto™ features may or may not be available in
every region and/or language.
9
20_LA_OM_EN_USC_t.book Page 351
Page 355 of 396
MULTIMEDIA353
Android Auto™ Maps
Push and hold the VR button on the
steering wheel or tap the microphone
icon to ask Google to take you to a
desired destination by voice. You can
also touch the Navigation icon in Android Auto™
to access Google Maps™.
NOTE:
If the VR button is not held, and is only pushed,
the built-in Uconnect VR prompts you and any
navigation command said launches the built-in
Uconnect navigation system.
While using Android Auto™, Google Maps™
provides voice-guided:
Navigation
Live traffic information
Lane guidance
For further information, refer to
www.android.com/auto/ (US Residents) https:/
/www.android.com/intl/en_ca/auto (Canadian
Residents).
For further information on the navigation
function, please refer to https://
support.google.com/android or https:// support.google.com/androidauto/. Android Auto™ Music
Android Auto™ allows you to access
and stream your favorite music with
apps like Google Play Music,
iHeartRadio, and Spotify. Using your
smartphone’s data plan, you can stream
endless music on the road.
NOTE:
Music apps, playlists, and stations must be set
up on your smartphone prior to using Android
Auto™, for them to work with Android Auto™.
NOTE:
To see the metadata for the music playing
through Android Auto™, select the Uconnect
System’s media screen.
For further information refer to https://
support.google.com/androidauto.
Android Auto™ Communication
With Android Auto™ connected, push
and hold the VR button on the
steering wheel to activate voice
recognition specific to the Android
Auto™. This will allow you to send and reply to
text messages, have incoming text messages
read out loud, and place and receive hands-free
calls. Android Auto™ Apps
The Android Auto™ App will display all the
compatible apps that are available to use with
Android Auto™, every time it is launched. You
must have the compatible app downloaded,
and you must be signed in to the app for it to
work with Android Auto™.
Refer to https://play.google.com/store/apps/
to see the latest list of available apps for
Android Auto™.
Apple CarPlay® Integration
NOTE:
Feature availability depends on your carrier and
mobile phone manufacturer. Some Apple
CarPlay® features may or may not be available
in every region and/or language.
Uconnect works seamlessly with Apple
CarPlay®, the smarter, more secure way to use
your iPhone® in the car, and stay focused on
the road. Use your Uconnect Touchscreen
display, the vehicle's knobs and controls, and
your voice with Siri to get access to Apple
Music®, Maps, Messages, and more.
9
20_LA_OM_EN_USC_t.book Page 353
Page 361 of 396
MULTIMEDIA359
Natural Speech
Your Uconnect Phone Voice system uses a
Natural Language Voice Recognition (VR)
engine.
Natural speech allows the user to speak
commands in phrases or complete sentences.
The system filters out certain non-word
utterances and sounds such as “ah” and “eh.”
The system handles fill-in words such as “I
would like to.”
The system handles multiple inputs in the same
phrase or sentence such as “make a phone
call” and “to Kelly Smith”. For multiple inputs in
the same phrase or sentence, the system
identifies the topic or context and provides the
associated follow-up prompt such as “Who do
you want to call?” in the case where a phone
call was requested but the specific name was
not recognized.
The system utilizes continuous dialog; when the
system requires more information from the user
it will ask a question to which the user can
respond without pushing the Voice Command
button on your steering wheel. Help Command
If you need assistance at any prompt, or if you
want to know your options at any prompt, say
“Help” following the beep.
To activate the Uconnect Phone from idle,
simply push the Phone button (if active) on your
steering wheel and say a command or say
“Help.” All Uconnect Phone sessions begin with
a push of the VR button or the Phone button (if
active) on the radio control head.
Cancel Command
At any prompt, after the beep, you can say
“Cancel” and you will be returned to the main
menu.
You can also push the VR button or Phone
button (if active) on your steering wheel when
the system is listening for a command and be
returned to the main or previous menu.
Pair (Link) Uconnect Phone To A Mobile Phone
To begin using your Uconnect Phone, you must
pair your compatible Bluetooth®-enabled
mobile phone. Mobile phone pairing is the
process of establishing a wireless connection
between a cellular phone and the Uconnect
system.
To complete the pairing process, you need to
reference your mobile phone Owner's Manual.
Please visit UconnectPhone.com for complete
mobile phone compatibility information.
NOTE:
You must have Bluetooth® enabled on your
phone to complete this procedure.
The vehicle must be in PARK.
1. Place the ignition in the ACC or ON/RUN position.
2. Press the Phone button in the Menu Bar on the touchscreen.
NOTE:
If there are no phones currently connected with
the system, a pop-up will appear asking if you
would like to pair a mobile phone.
3. Select “Yes” to begin the pairing process.
9
20_LA_OM_EN_USC_t.book Page 359
Page 369 of 396
MULTIMEDIA367
Even though the system is designed for many
languages and accents, the system may not
always work for some.
NOTE:
It is recommended that you do not store names
in your favorites phonebook while the vehicle is
in motion.
Phonebook (Mobile and Favorites) name
recognition rate is optimized when the entries
are not similar. You can say “O” (letter “O”) for
“0” (zero).
Even though international dialing for most
number combinations is supported, some
shortcut dialing number combinations may not
be supported.
Far End Audio Performance
Audio quality is maximized under:
Low-To-Medium Blower Setting
Low-To-Medium Vehicle Speed
Low Road Noise
Smooth Road Surface
Fully Closed Windows
Dry Weather Conditions
Operation From The Driver's Seat Performance such as audio clarity, echo, and
loudness to a large degree rely on the phone
and network, and not the Uconnect Phone.
Echo at the far end can sometimes be reduced
by lowering the in-vehicle audio volume.
Bluetooth® Communication Link
Mobile phones have been found to lose
connection to the Uconnect Phone. When this
happens, the connection can generally be
re-established by switching the mobile phone
OFF/ON. Your mobile phone is recommended to
remain in Bluetooth® ON mode.
Power-Up
After switching the ignition key from OFF to
either the ON/RUN or ACC position, or after a
language change, you must wait at least 15
seconds prior to using the system.
STEERING WHEEL AUDIO CONTROLS — IF
EQUIPPED
The remote sound system controls are located
on the rear surface of the steering wheel. Reach
behind the wheel to access the switches.
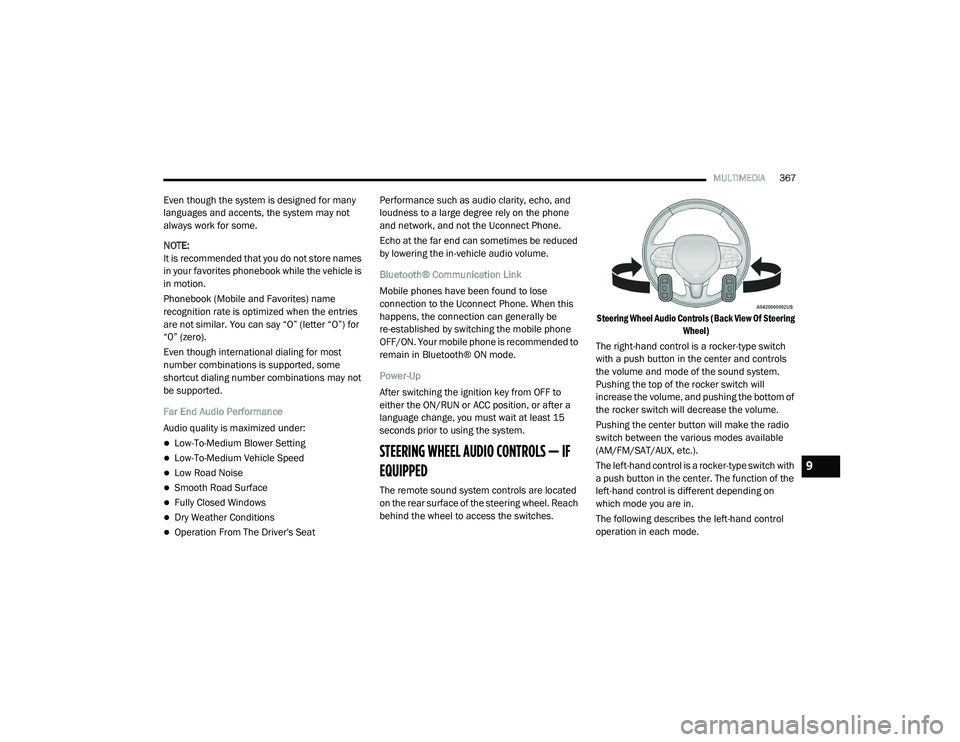
Steering Wheel Audio Controls (Back View Of Steering
Wheel)
The right-hand control is a rocker-type switch
with a push button in the center and controls
the volume and mode of the sound system.
Pushing the top of the rocker switch will
increase the volume, and pushing the bottom of
the rocker switch will decrease the volume.
Pushing the center button will make the radio
switch between the various modes available
(AM/FM/SAT/AUX, etc.).
The left-hand control is a rocker-type switch with
a push button in the center. The function of the
left-hand control is different depending on
which mode you are in.
The following describes the left-hand control
operation in each mode.
9
20_LA_OM_EN_USC_t.book Page 367
Page 375 of 396
MULTIMEDIA373
CLIMATE
Adjust vehicle temperatures hands-free and
keep everyone comfortable while you keep
moving ahead. (If vehicle is equipped with
climate control.)
Push the VR button . After the beep, say one of
the following commands:
“Set driver temperature to 70 degrees ”
“Set passenger temperature to 70 degrees ”
TIP:
Voice Command for Climate may only be used
to adjust the interior temperature of your
vehicle. Voice Command will not work to adjust
the heated seats or steering wheel if equipped.
NAVIGATION (4C NAV)
The Uconnect navigation feature helps you save
time and become more productive when you
know exactly how to get to where you want to go.
1. To enter a destination, push the VR button
. After the beep, say: “ Find address
800
Chrysler Drive Auburn Hills, Michigan.”
2. Then follow the system prompts. TIP:
To start a POI search, push the VR button .
After the beep, say: “
Find nearest coffee shop.”
SIRI® EYES FREE — IF EQUIPPED
Siri lets you use your voice to send text
messages, select media, place phone calls and
much more. Siri uses your natural language to
understand what you mean and responds back
to confirm your requests. The system is
designed to keep your eyes on the road and
your hands on the wheel by letting Siri help you
perform useful tasks.
To enable Siri, push and hold, then release the
Uconnect Voice Recognition (VR) button on the
steering wheel. After you hear a double beep
you can ask Siri to play podcasts and music, get
directions, read text messages, and many other
useful requests.
DO NOT DISTURB
With Do Not Disturb, you can disable
notifications from incoming calls and texts,
allowing you to keep your eyes on the road and
hands on the wheel. For your convenience,
there is a counter display to keep track of your missed calls and text messages while you were
using Do Not Disturb.
Do Not Disturb can automatically reply with a
text message, a call or both, when declining an
incoming call and send it to voicemail.
Automatic reply messages can be:
“I am driving right now, I will get back to you
shortly”.
Create a custom auto reply message up to
160 characters.
NOTE:
Only the first 25 characters can be seen on the
touchscreen while typing a custom message.
While in Do Not Disturb, Conference Call can be
selected so you can still place a second call
without being interrupted by incoming calls.
NOTE:
Reply with text message is not compatible
with iPhones®.
Auto reply with text message is only available
on phones that support Bluetooth® MAP.9
20_LA_OM_EN_USC_t.book Page 373
Page 376 of 396
374MULTIMEDIA
ANDROID AUTO™ — IF EQUIPPED
NOTE:
Feature availability depends on your carrier and
mobile phone manufacturer. Some Android
Auto™ features may or may not be available in
every region and/or language.
Android Auto™ allows you to use your voice to
interact with Android’s™ best-in-class speech
technology through your vehicle’s voice
recognition system, and use your smartphone’s
data plan to project your Android™-powered
smartphone and a number of its apps onto your
Uconnect touchscreen. Connect your Android™
5.0 or higher to one of the media USB ports,
using the factory-provided USB cable, and press
the new Android Auto™ icon that replaces your
“Phone” icon on the main menu bar to begin
Android Auto™. Push and hold the VR button on
the steering wheel, or press and hold the
Microphone icon within Android Auto™, to
activate Android’s™ VR, which recognizes
natural voice commands, to use a list of your
smartphone’s features:
Maps
Music
Phone
Text Messages
Additional Apps
Refer to your Uconnect Owner’s Manual
Supplement for further information.
NOTE:
Requires compatible smartphone running
Android™ 5.0 or higher and download app on
Google Play. Android™, Android Auto™, and
Google Play are trademarks of Google Inc.
APPLE CARPLAY® — IF EQUIPPED
NOTE:
Feature availability depends on your carrier and
mobile phone manufacturer. Some Apple
CarPlay® features may or may not be available
in every region and/or language.
Apple CarPlay® allows you to use your voice to
interact with Siri through your vehicle’s voice
recognition system, and use your smartphone’s
data plan to project your iPhone® and a
number of its apps onto your Uconnect
touchscreen. Connect your iPhone® 5 or higher
to one of the media USB ports, using the
factory-provided Lightning cable, and press the
new Apple CarPlay® icon that replaces your
Phone icon on the main menu bar to begin Apple CarPlay®. Push and hold the VR button
on the steering wheel, or press and hold the
Home button within Apple CarPlay®, to activate
Siri, which recognizes natural voice commands
to use a list of your iPhone’s® features:
Phone
Music
Messages
Maps (if equipped)
Additional Apps (if equipped)
Refer to your Uconnect Owner’s Manual
Supplement for further information.
NOTE:
Requires compatible iPhone®. See dealer for
phone compatibility. Data plan rates apply.
Vehicle user interface is a product of Apple®.
Apple CarPlay® is a trademark of Apple® Inc.
iPhone® is a trademark of Apple® Inc., regis -
tered in the US and other countries. Apple®
terms of use and privacy statements apply.
20_LA_OM_EN_USC_t.book Page 374