start stop button DODGE CHALLENGER 2021 User Guide
[x] Cancel search | Manufacturer: DODGE, Model Year: 2021, Model line: CHALLENGER, Model: DODGE CHALLENGER 2021Pages: 328, PDF Size: 15 MB
Page 89 of 328
STARTING AND OPERATING87
IGNITION PARK INTERLOCK
This vehicle is equipped with an Ignition Park
Interlock which requires the transmission to be in
PARK before the ignition can be turned to the OFF
mode. This helps the driver avoid inadvertently
leaving the vehicle without placing the
transmission in PARK. This system also locks the
transmission in PARK whenever the ignition is in
the OFF mode.
NOTE:The transmission is NOT locked in PARK when the
ignition is in the ACC mode (even though the
engine will be off). Ensure that the transmission is
in PARK, and the ignition is OFF (not in ACC mode)
before exiting the vehicle.
BRAKE TRANSMISSION SHIFT
I
NTERLOCK (BTSI) SYSTEM
This vehicle is equipped with a BTSI system that
holds the transmission gear selector in PARK
unless the brakes are applied. To shift the
transmission out of PARK, the engine must be
running and the brake pedal must be pressed. The
brake pedal must also be pressed to shift from
NEUTRAL into DRIVE or REVERSE when the vehicle
is stopped or moving at low speeds.
EIGHT-SPEED AUTOMATIC
T
RANSMISSION
The transmission gear range is displayed both on
the gear selector and in the instrument cluster. To
select a gear range, push the lock button on the
gear selector and move the selector rearward or
forward. To shift the transmission out of PARK, the
engine must be running and the brake pedal must
be pressed. You must also press the brake pedal to
shift from NEUTRAL into DRIVE or REVERSE when
the vehicle is stopped or moving at low speeds.
Select the DRIVE range for normal driving.
Unintended movement of a vehicle could
injure those in or near the vehicle. As with all
vehicles, you should never exit a vehicle while
the engine is running. Before exiting a vehicle,
always come to a complete stop, then apply
the parking brake, shift the transmission into
PARK, and turn the ignition OFF. When the
ignition is in the OFF mode, the transmission
is locked in PARK, securing the vehicle against
unwanted movement.
When exiting the vehicle, always make sure
the ignition is in the OFF mode, remove the
key fob from the vehicle, and lock the vehicle.
Never leave children alone in a vehicle, or with
access to an unlocked vehicle. Allowing chil -
dren to be in a vehicle unattended is
dangerous for a number of reasons. A child or
others could be seriously or fatally injured.
Children should be warned not to touch the
parking brake, brake pedal or the transmis -
sion gear selector.
Do not leave the key fob in or near the vehicle
(or in a location accessible to children), and do
not leave the ignition in the ACC or ON/RUN
mode. A child could operate power windows,
other controls, or move the vehicle.
WARNING!CAUTION!
Shift into or out of PARK or REVERSE only after
the vehicle has come to a complete stop.
Do not shift between PARK, REVERSE,
NEUTRAL, or DRIVE when the engine is above
idle speed.
Before shifting into any gear, make sure your
foot is firmly pressing the brake pedal.
4
21_LA_OM_EN_USC_t.book Page 87
Page 91 of 328
STARTING AND OPERATING89
(Continued) The following indicators should be used to ensure
that you have properly engaged the transmission
into the PARK position:
When shifting into PARK, push the lock button
on the gear selector and firmly move the
selector all the way forward until it stops and is
fully seated.
Look at the transmission gear position display
and verify that it indicates the PARK position (P),
and is not blinking.
With the brake pedal released, verify that the
gear selector will not move out of PARK.
Your vehicle could move and injure you and
others if it is not in PARK. Check by trying to
move the transmission gear selector out of
PARK with the brake pedal released. Make
sure the transmission is in PARK before
exiting the vehicle.
The transmission may not engage PARK if the
vehicle is moving. Always bring the vehicle to a
complete stop before shifting to PARK, and
verify that the transmission gear position indi
-
cator solidly indicates PARK (P) without
blinking. Ensure that the vehicle is completely
stopped, and the PARK position is properly
indicated, before exiting the vehicle.
It is dangerous to shift out of PARK or
NEUTRAL if the engine speed is higher than
idle speed. If your foot is not firmly pressing
the brake pedal, the vehicle could accelerate
quickly forward or in reverse. You could lose
control of the vehicle and hit someone or
something. Only shift into gear when the
engine is idling normally and your foot is firmly
pressing the brake pedal.
WARNING!
Unintended movement of a vehicle could
injure those in or near the vehicle. As with all
vehicles, you should never exit a vehicle while
the engine is running. Before exiting a vehicle,
always come to a complete stop, then apply
the parking brake, shift the transmission into
PARK, and turn the ignition OFF. When the
ignition is in the OFF mode, the transmission
is locked in PARK, securing the vehicle against
unwanted movement.
When exiting the vehicle, always make sure
the ignition is in the OFF mode, remove the
key fob from the vehicle, and lock the vehicle.
Never leave children alone in a vehicle, or with
access to an unlocked vehicle. Allowing chil -
dren to be in a vehicle unattended is
dangerous for a number of reasons. A child or
others could be seriously or fatally injured.
Children should be warned not to touch the
parking brake, brake pedal or the transmis -
sion gear selector.
Do not leave the key fob in or near the vehicle
(or in a location accessible to children), and do
not leave the ignition in the ACC or ON/RUN
mode. A child could operate power windows,
other controls, or move the vehicle.
WARNING!CAUTION!
Before moving the transmission gear selector
out of PARK, you must start the engine, and
also press the brake pedal. Otherwise,
damage to the gear selector could result.
DO NOT race the engine when shifting from
PARK or NEUTRAL into another gear range, as
this can damage the drivetrain.
4
21_LA_OM_EN_USC_t.book Page 89
Page 94 of 328
92STARTING AND OPERATING
In some models, the shift paddles may be
disabled (or re-enabled, as desired) using Drive
Mode Set-Up, accessed by selecting Perfor -
mance Control.
In AutoStick mode, the transmission will shift up or
down when (+/-) is manually selected by the driver
(using the gear selector, or the shift paddles [if
equipped]), unless an engine lugging or overspeed
condition would result. It will remain in the selected
gear until another upshift or downshift is chosen,
except as described below.
In temporary AutoStick mode (gear selector in
DRIVE), the transmission will automatically shift
up when maximum engine speed is reached. If
the accelerator is fully pressed, the transmis -
sion will downshift when possible. Lack of accel -
erator pedal activity will cause the transmission
to revert to automatic operation.
If normal AutoStick mode is engaged (gear
selector in MANUAL position), manual gear
selection will be maintained until the gear
selector is returned to DRIVE, or as described
below. The transmission will not upshift auto -
matically at redline in this mode, nor will down -
shifts be obtained if the accelerator pedal is
pressed to the floor.
The transmission will automatically downshift
as the vehicle slows (to prevent engine lugging)
and will display the current gear.
The transmission will automatically downshift to
FIRST gear when coming to a stop. After a stop,
the driver should manually upshift (+) the trans -
mission as the vehicle is accelerated.
You can start out, from a stop, in FIRST or
SECOND gear. Tapping (+) (at a stop) will allow
starting in SECOND gear. Starting out in
SECOND gear can be helpful in snowy or icy
conditions.
If a requested downshift would cause the
engine to over-speed, that shift will not occur
and an indication will display.
The system will ignore attempts to upshift at too
low of a vehicle speed and an indication will
display.
Holding the (-) paddle pressed (if equipped), or
holding the gear selector in the (-) position, will
downshift the transmission to the lowest gear
possible at the current speed.
Transmission shifting will be more noticeable
when AutoStick is enabled.
The system may revert to automatic shift mode
if a fault or overheat condition is detected. To disengage AutoStick mode, return the gear
selector to the DRIVE position, or press and hold
the (+) shift paddle (if equipped, and the gear
selector is already in DRIVE) until “D” is once again
indicated in the instrument cluster. You can shift in
or out of the AutoStick mode at any time without
taking your foot off the accelerator pedal.
SPORT MODE — WITHOUT PERFORMANCE
CONTROL
Your vehicle is equipped with a SPORT Mode
feature. This mode is a configuration set up for
typical enthusiast driving. The engine,
transmission (when equipped with automatic
transmission), and steering systems are all set to
their SPORT settings. SPORT Mode will provide
improved throttle response and modified shifting
for an enhanced driving experience, as well the
greatest amount of steering feel. This mode may
be activated and deactivated by pushing the
SPORT button on the instrument panel switch
bank.
WARNING!
Do not downshift for additional engine braking
on a slippery surface. The drive wheels could
lose their grip and the vehicle could skid,
causing a collision or personal injury.
21_LA_OM_EN_USC_t.book Page 92
Page 98 of 328
96STARTING AND OPERATING
(Continued)
NOTE:
If the ACC sensor detects a vehicle ahead, ACC
will apply limited braking or accelerate (not to
exceed the original set speed) automatically to
maintain a preset following distance, while
matching the speed of the vehicle ahead.
Any chassis/suspension or tire size modifica -
tions to the vehicle will affect the performance
of the Adaptive Cruise Control and Forward Colli -
sion Warning system.
Fixed Speed Cruise Control (ACC not enabled)
will not detect vehicles directly ahead of you.
Always be aware of the feature selected
Ú page 311.
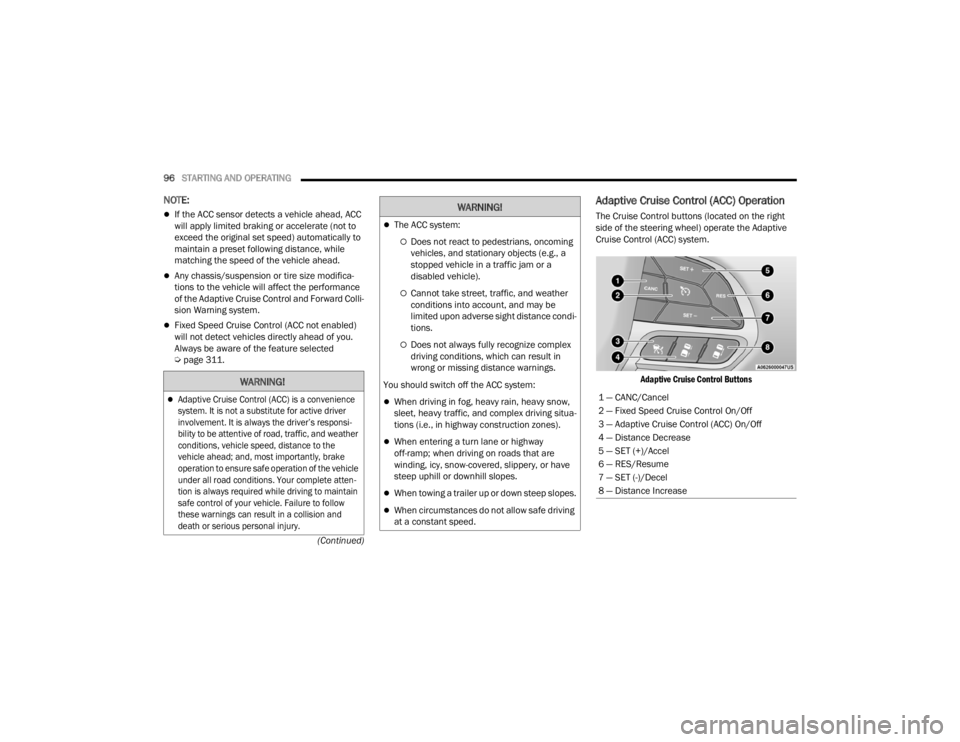
Adaptive Cruise Control (ACC) Operation
The Cruise Control buttons (located on the right
side of the steering wheel) operate the Adaptive
Cruise Control (ACC) system.
Adaptive Cruise Control Buttons
WARNING!
Adaptive Cruise Control (ACC) is a convenience
system. It is not a substitute for active driver
involvement. It is always the driver’s responsi -
bility to be attentive of road, traffic, and weather
conditions, vehicle speed, distance to the
vehicle ahead; and, most importantly, brake
operation to ensure safe operation of the vehicle
under all road conditions. Your complete atten -
tion is always required while driving to maintain
safe control of your vehicle. Failure to follow
these warnings can result in a collision and
death or serious personal injury.
The ACC system:
Does not react to pedestrians, oncoming
vehicles, and stationary objects (e.g., a
stopped vehicle in a traffic jam or a
disabled vehicle).
Cannot take street, traffic, and weather
conditions into account, and may be
limited upon adverse sight distance condi -
tions.
Does not always fully recognize complex
driving conditions, which can result in
wrong or missing distance warnings.
You should switch off the ACC system:
When driving in fog, heavy rain, heavy snow,
sleet, heavy traffic, and complex driving situa -
tions (i.e., in highway construction zones).
When entering a turn lane or highway
off-ramp; when driving on roads that are
winding, icy, snow-covered, slippery, or have
steep uphill or downhill slopes.
When towing a trailer up or down steep slopes.
When circumstances do not allow safe driving
at a constant speed.
WARNING!
1 — CANC/Cancel
2 — Fixed Speed Cruise Control On/Off
3 — Adaptive Cruise Control (ACC) On/Off
4 — Distance Decrease
5 — SET (+)/Accel
6 — RES/Resume
7 — SET (-)/Decel
8 — Distance Increase
21_LA_OM_EN_USC_t.book Page 96
Page 110 of 328
108STARTING AND OPERATING
ParkSense will reduce the volume of the radio
when it is sounding an audio tone.
Clean the ParkSense sensors regularly, taking
care not to scratch or damage them. The
sensors must not be covered with ice, snow,
slush, mud, dirt or debris. Failure to do so can
result in the system not working properly. The
ParkSense system might not detect an obstacle
behind the fascia/bumper, or it could provide a
false indication that an obstacle is behind the
fascia/bumper.
Ensure the ParkSense system is off if objects
such as bicycle carriers, trailer hitches, etc., are
placed within 12 inches (30 cm) from the rear
fascia/bumper. Failure to do so can result in the
system misinterpreting a close object as a
sensor problem, causing the “PARKSENSE
UNAVAILABLE SERVICE REQUIRED” message to
be shown in the instrument cluster display.
PARKVIEW REAR BACK UP CAMERA
The ParkView Rear Back Up Camera allows you to
see an on-screen image of the rear surroundings of
your vehicle whenever the gear selector is put into
REVERSE. The ParkView camera is located on the
rear of the vehicle above the rear license plate. The
image will be displayed in the touchscreen display
along with a caution note to “Check Entire
Surroundings” across the top of the screen. After
five seconds, this note will disappear.
NOTE:The ParkView Rear Back Up Camera has program -
mable modes of operation that may be selected
through the Uconnect system Ú page 120.If your vehicle is equipped with the Camera Delay
feature and it is turned on, the rear camera image
will be displayed for up to 10 seconds when the
vehicle is shifted out of REVERSE. However, this
feature is canceled if the forward vehicle speed
exceeds 8 mph (13 km/h), the transmission is
shifted into PARK, the vehicle's ignition is placed in
the OFF position, or by pressing the image defeat X
button.
When the vehicle is shifted out of REVERSE with
Camera Delay turned off, the rear camera mode is
exited and the last touchscreen appears again.
When enabled, active guidelines are overlaid on
the image to illustrate the width of the vehicle and
its projected backup path based on the steering
wheel position. The active guidelines will show
separate zones that will help indicate the distance
to the rear of the vehicle.
If the vehicle speed remains below 8 mph (13 km/
h), the rear view camera image will continue to be
displayed until the transmission is shifted into
PARK, the vehicle’s ignition is placed in the OFF
position, or the image defeat X button is pressed.
Different colored zones indicate the distance to
the rear of the vehicle.
WARNING!
Drivers must be careful when backing up even
when using the Rear Park Assist system. Always
check carefully behind your vehicle, and be sure
to check for pedestrians, animals, other
vehicles, obstructions, or blind spots before
backing up. You are responsible for the safety of
your surroundings and must continue to pay
attention while backing up. Failure to do so can
result in serious injury or death.
CAUTION!
ParkSense is only a parking aid and it is
unable to recognize every obstacle, including
small obstacles. Parking curbs might be
temporarily detected or not detected at all.
Obstacles located above or below the sensors
will not be detected when they are in close
proximity.
The vehicle must be driven slowly when using
ParkSense in order to be able to stop in time
when an obstacle is detected. It is recom
-
mended that the driver looks over his/her
shoulder when using ParkSense.
21_LA_OM_EN_USC_t.book Page 108
Page 142 of 328
140MULTIMEDIA
RADIO MODE
Radio Controls
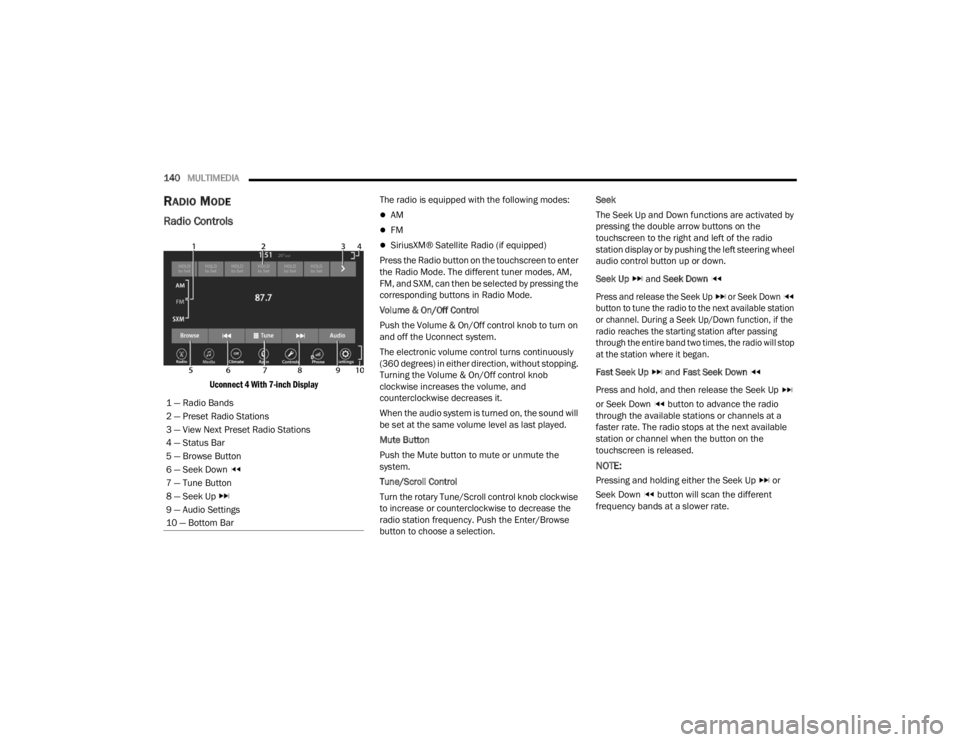
Uconnect 4 With 7-inch Display
The radio is equipped with the following modes:
AM
FM
SiriusXM® Satellite Radio (if equipped)
Press the Radio button on the touchscreen to enter
the Radio Mode. The different tuner modes, AM,
FM, and SXM, can then be selected by pressing the
corresponding buttons in Radio Mode.
Volume & On/Off Control
Push the Volume & On/Off control knob to turn on
and off the Uconnect system.
The electronic volume control turns continuously
(360 degrees) in either direction, without stopping.
Turning the Volume & On/Off control knob
clockwise increases the volume, and
counterclockwise decreases it.
When the audio system is turned on, the sound will
be set at the same volume level as last played.
Mute Button
Push the Mute button to mute or unmute the
system.
Tune/Scroll Control
Turn the rotary Tune/Scroll control knob clockwise
to increase or counterclockwise to decrease the
radio station frequency. Push the Enter/Browse
button to choose a selection. Seek
The Seek Up and Down functions are activated by
pressing the double arrow buttons on the
touchscreen to the right and left of the radio
station display or by pushing the left steering wheel
audio control button up or down.
Seek Up
and Seek Down
Press and release the Seek Up or Seek Down
button to tune the radio to the next available station
or channel. During a Seek Up/Down function, if the
radio reaches the starting station after passing
through the entire band two times, the radio will stop
at the station where it began.
Fast Seek Up and Fast Seek Down
Press and hold, and then release the Seek Up
or Seek Down button to advance the radio
through the available stations or channels at a
faster rate. The radio stops at the next available
station or channel when the button on the
touchscreen is released.
NOTE:
Pressing and holding either the Seek Up or
Seek Down button will scan the different
frequency bands at a slower rate.
1 — Radio Bands
2 — Preset Radio Stations
3 — View Next Preset Radio Stations
4 — Status Bar
5 — Browse Button
6 — Seek Down
7 — Tune Button
8 — Seek Up
9 — Audio Settings
10 — Bottom Bar
21_LA_OM_EN_USC_t.book Page 140
Page 174 of 328
172MULTIMEDIA
ENGINE
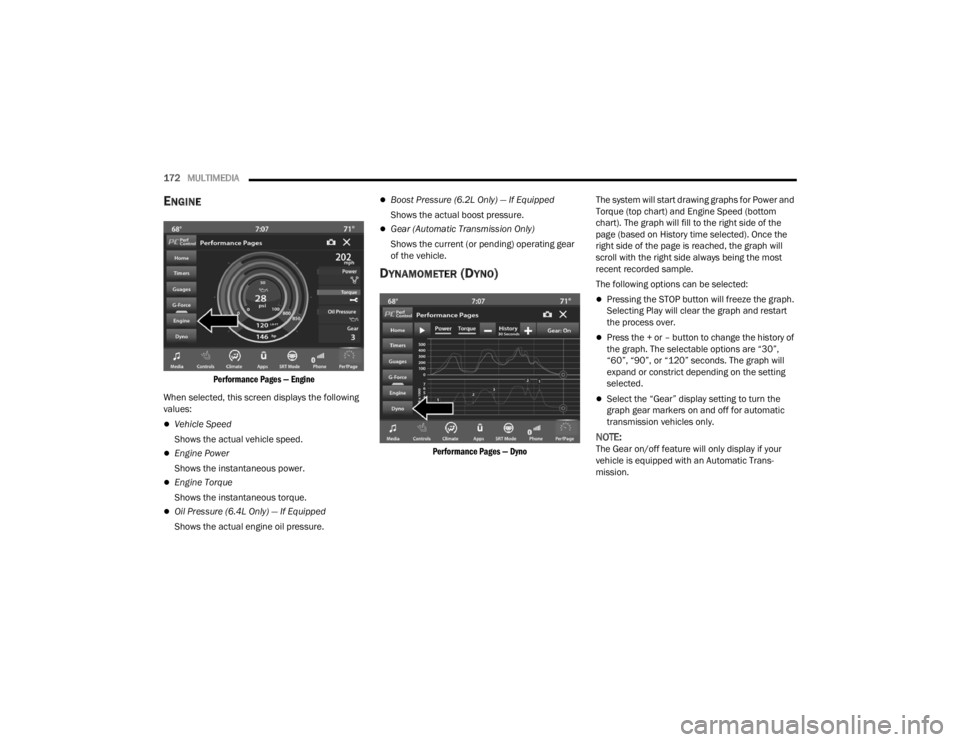
Performance Pages — Engine
When selected, this screen displays the following
values:
Vehicle Speed
Shows the actual vehicle speed.
Engine Power
Shows the instantaneous power.
Engine Torque
Shows the instantaneous torque.
Oil Pressure (6.4L Only) — If Equipped
Shows the actual engine oil pressure.
Boost Pressure (6.2L Only) — If Equipped
Shows the actual boost pressure.
Gear (Automatic Transmission Only)
Shows the current (or pending) operating gear
of the vehicle.
DYNAMOMETER (DYNO)
Performance Pages — Dyno
The system will start drawing graphs for Power and
Torque (top chart) and Engine Speed (bottom
chart). The graph will fill to the right side of the
page (based on History time selected). Once the
right side of the page is reached, the graph will
scroll with the right side always being the most
recent recorded sample.
The following options can be selected:
Pressing the STOP button will freeze the graph.
Selecting Play will clear the graph and restart
the process over.
Press the + or – button to change the history of
the graph. The selectable options are “30”,
“60”, “90”, or “120” seconds. The graph will
expand or constrict depending on the setting
selected.
Select the “Gear” display setting to turn the
graph gear markers on and off for automatic
transmission vehicles only.
NOTE:The Gear on/off feature will only display if your
vehicle is equipped with an Automatic Trans
-
mission.
21_LA_OM_EN_USC_t.book Page 172
Page 238 of 328

236IN CASE OF EMERGENCY
SEALING A TIRE WITH TIRE SERVICE KIT
(A) Whenever You Stop To Use Tire Service
Kit:
1. Pull over to a safe location and turn on the
vehicle’s Hazard Warning Flashers.
2. Verify that the valve stem (on the wheel with the deflated tire) is in a position that is near to
the ground. This will allow the Tire Service Kit
Hoses (4) and (8) to reach the valve stem and keep the Tire Service Kit flat on the ground.
This will provide the best positioning of the kit
when injecting the sealant into the deflated
tire and running the air pump. Move the
vehicle as necessary to place the valve stem in
this position before proceeding.
3. Place the transmission in PARK (auto transmission) or in Gear (manual
transmission) and place the ignition in the OFF
position.
4. Apply the parking brake.
(B) Setting Up To Use Tire Service Kit:
1. Push in the Mode Select Knob (6) and turn to the Sealant Mode position.
2. Uncoil the Sealant Hose (4) and then remove the cap from the fitting at the end of the hose.
3. Place the Tire Service Kit flat on the ground next to the deflated tire.
4. Remove the cap from the valve stem and then screw the fitting at the end of the Sealant Hose
(4) onto the valve stem.
5. Uncoil the Power Plug (7) and insert the plug into the vehicle’s 12 Volt power outlet.
NOTE:Do not remove foreign objects (e.g., screws or
nails) from the tire.
(C) Injecting Tire Service Kit Sealant Into
The Deflated Tire:
Always start the engine before turning ON the
Tire Service Kit.
NOTE:Manual transmission vehicles must have the
parking brake engaged and the gear selector in
NEUTRAL.
After pushing the Power Button (3), the sealant
(white fluid) will flow from the Sealant Bottle (1)
through the Sealant Hose (4) and into the tire.
NOTE:Sealant may leak out through the puncture in the
tire.
If the sealant (white fluid) does not flow within
0 – 10 seconds through the Sealant Hose :
1. Push the Power Button (3) to turn Off the Tire Service Kit. Disconnect the Sealant Hose (4)
from the valve stem. Make sure the valve
stem is free of debris. Reconnect the Sealant
Hose (4) to the valve stem. Check that the
Mode Select Knob (6) is in the Sealant Mode
position and not Air Mode. Push the Power
Button (3) to turn On the Tire Service Kit.
2. Connect the Power Plug (7) to a different 12 Volt power outlet in your vehicle or another
vehicle, if available. Make sure the engine is
running before turning ON the Tire Service Kit.
Take care not to allow the contents of Tire
Service Kit to come in contact with hair, eyes,
or clothing. Tire Service Kit sealant is harmful
if inhaled, swallowed, or absorbed through the
skin. It causes skin, eye, and respiratory irrita -
tion. Flush immediately with plenty of water if
there is any contact with eyes or skin. Change
clothing as soon as possible, if there is any
contact with clothing.
Tire Service Kit Sealant solution contains
latex. In case of an allergic reaction or rash,
consult a physician immediately. Keep Tire
Service Kit out of reach of children. If swal -
lowed, rinse mouth immediately with plenty of
water and drink plenty of water. Do not induce
vomiting! Consult a physician immediately.
WARNING!
21_LA_OM_EN_USC_t.book Page 236