USB DODGE CHALLENGER 2021 Owners Manual
[x] Cancel search | Manufacturer: DODGE, Model Year: 2021, Model line: CHALLENGER, Model: DODGE CHALLENGER 2021Pages: 328, PDF Size: 15 MB
Page 5 of 328
3
Programming HomeLink® To A Garage Door
Opener ..............................................................39
Programming HomeLink® To A Miscellaneous
Device ...............................................................40
Reprogramming A Single HomeLink® Button .. 40
Canadian/Gate Operator Programming .........40
EXTERIOR LIGHTS.................................................. 41
Headlight Switch...............................................41
Multifunction Lever ..........................................42
Daytime Running Lights (DRLs) —
If Equipped........................................................42
High/Low Beam Switch....................................42
Automatic High Beam Headlamp Control —
If Equipped .......................................................42
Flash-To-Pass....................................................43
Automatic Headlights ......................................43
Parking Lights ..................................................43
Automatic Headlights With Wipers..................43
Headlight Time Delay ......................................43
Lights-On Reminder .........................................43
Fog Lights — If Equipped ..................................44
Turn Signals .....................................................44
Lane Change Assist — If Equipped ..................44
INTERIOR LIGHTS ................................................. 44
Front Map/Reading Lights ..............................45
Ambient Light — If Equipped ............................45
Dimmer Control ................................................45 WINDSHIELD WIPERS AND WASHERS............... 46
Windshield Wiper Operation ............................46
Rain Sensing Wipers — If Equipped ................47
CLIMATE CONTROLS .............................................48
Automatic Climate Control Descriptions
And Functions ..................................................48
Automatic Temperature Control (ATC) ...........51
Climate — Voice Recognition ...........................51
Operating Tips .................................................51
INTERIOR STORAGE AND EQUIPMENT ............... 53
Storage..............................................................53
Illuminated Cupholders — If Equipped............53
USB/AUX Control ..............................................54
Power Outlets ...................................................54
WINDOWS ..............................................................56
Power Window Controls ...................................56
Wind Buffeting ..................................................56
POWER SUNROOF — IF EQUIPPED ...................... 56
Opening And Closing The Sunroof...................57
Pinch Protect Feature — If Equipped ..............57
Venting Sunroof................................................57
Sunshade Operation ........................................57
Sunroof Maintenance ......................................58
Ignition Off Operation.......................................58 HOOD....................................................................... 58
Opening The Hood ..........................................58
Closing The Hood ............................................. 58
TRUNK ..................................................................... 59
Opening The Trunk ........................................... 59
Closing The Trunk............................................. 59
Trunk Safety ..................................................... 60
GETTING TO KNOW YOUR
INSTRUMENT PANEL
INSTRUMENT CLUSTER ........................................ 61Instrument Cluster Descriptions ..................... 62
INSTRUMENT CLUSTER DISPLAY ........................ 62
Location And Controls...................................... 63
Engine Oil Life Reset ........................................ 64
Performance Shift Indicator (PSI) —
If Equipped .......................................................64
Instrument Cluster Display Selectable
Menu Items ...................................................... 64
Battery Saver On/Battery Saver Mode
Message — Electrical Load Reduction
Actions — If Equipped ..................................... 68
21_LA_OM_EN_USC_t.book Page 3
Page 55 of 328
GETTING TO KNOW YOUR VEHICLE53
INTERIOR STORAGE AND EQUIPMENT
STORAGE
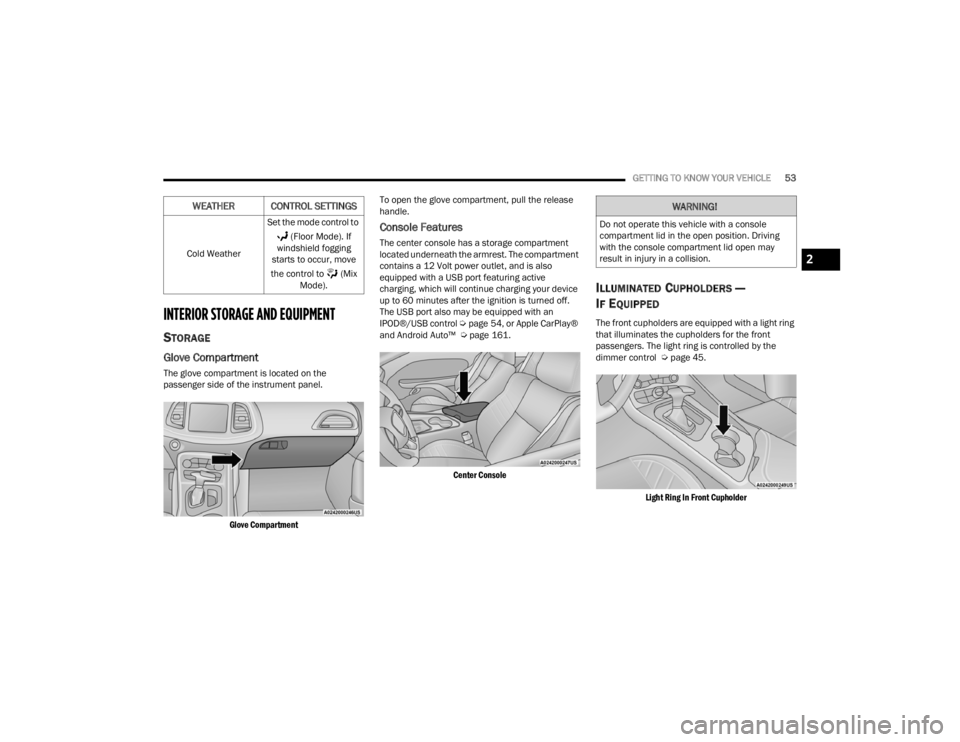
Glove Compartment
The glove compartment is located on the
passenger side of the instrument panel.
Glove Compartment
To open the glove compartment, pull the release
handle.
Console Features
The center console has a storage compartment
located underneath the armrest. The compartment
contains a 12 Volt power outlet, and is also
equipped with a USB port featuring active
charging, which will continue charging your device
up to 60 minutes after the ignition is turned off.
The USB port also may be equipped with an
IPOD®/USB control
Úpage 54, or Apple CarPlay®
and Android Auto™ Ú page 161.
Center Console
ILLUMINATED CUPHOLDERS —
I
F EQUIPPED
The front cupholders are equipped with a light ring
that illuminates the cupholders for the front
passengers. The light ring is controlled by the
dimmer control Ú page 45.
Light Ring In Front Cupholder
Cold Weather
Set the mode control to
(Floor Mode). If
windshield fogging
starts to occur, move
the control to (Mix Mode).
WEATHER CONTROL SETTINGSWARNING!
Do not operate this vehicle with a console
compartment lid in the open position. Driving
with the console compartment lid open may
result in injury in a collision.
2
21_LA_OM_EN_USC_t.book Page 53
Page 56 of 328
54GETTING TO KNOW YOUR VEHICLE
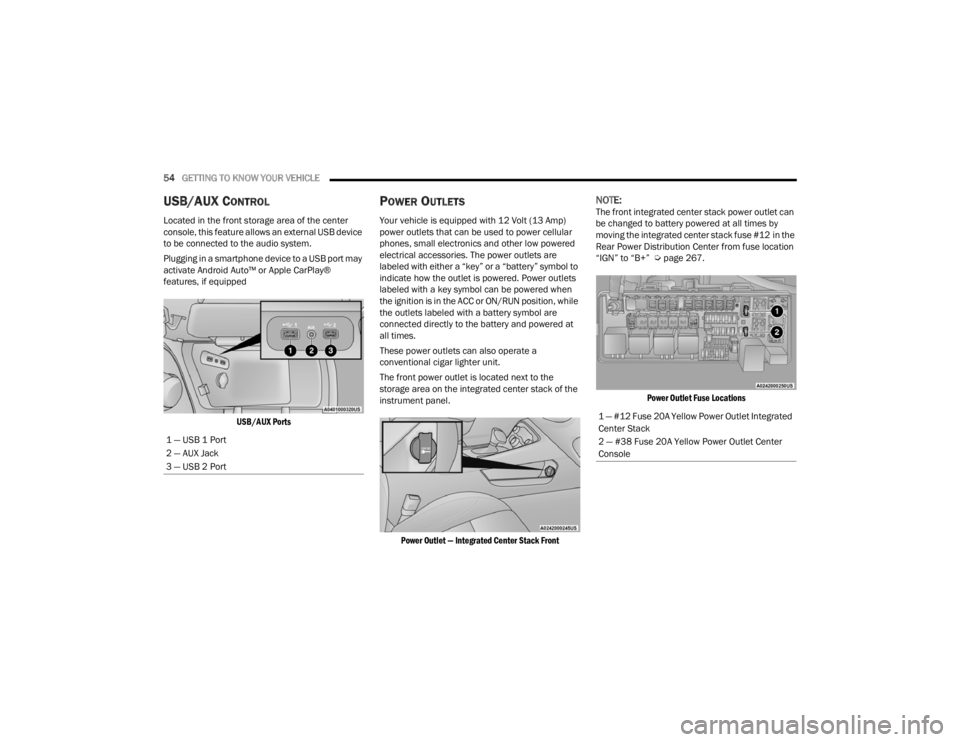
USB/AUX CONTROL
Located in the front storage area of the center
console, this feature allows an external USB device
to be connected to the audio system.
Plugging in a smartphone device to a USB port may
activate Android Auto™ or Apple CarPlay®
features, if equipped
USB/AUX Ports
POWER OUTLETS
Your vehicle is equipped with 12 Volt (13 Amp)
power outlets that can be used to power cellular
phones, small electronics and other low powered
electrical accessories. The power outlets are
labeled with either a “key” or a “battery” symbol to
indicate how the outlet is powered. Power outlets
labeled with a key symbol can be powered when
the ignition is in the ACC or ON/RUN position, while
the outlets labeled with a battery symbol are
connected directly to the battery and powered at
all times.
These power outlets can also operate a
conventional cigar lighter unit.
The front power outlet is located next to the
storage area on the integrated center stack of the
instrument panel.
Power Outlet — Integrated Center Stack Front
NOTE:The front integrated center stack power outlet can
be changed to battery powered at all times by
moving the integrated center stack fuse #12 in the
Rear Power Distribution Center from fuse location
“IGN” to “B+” Ú page 267.
Power Outlet Fuse Locations
1 — USB 1 Port
2 — AUX Jack
3 — USB 2 Port
1 — #12 Fuse 20A Yellow Power Outlet Integrated
Center Stack
2 — #38 Fuse 20A Yellow Power Outlet Center
Console
21_LA_OM_EN_USC_t.book Page 54
Page 71 of 328
GETTING TO KNOW YOUR INSTRUMENT PANEL69
Turning on all possible vehicle electrical loads
(e.g. HVAC to max settings, exterior and interior
lights, overloaded power outlets +12 Volts,
115 Volts AC, USB ports) during certain driving
conditions (city driving, towing, frequent stop-
ping).
Installing options like additional lights, upfitter
electrical accessories, audio systems, alarms
and similar devices.
Unusual driving cycles (short trips separated by
long parking periods).
The vehicle was parked for an extended period
of time (weeks, months).
The battery was recently replaced and was not
charged completely.
The battery was discharged by an electrical load
left on when the vehicle was parked.
The battery was used for an extended period
with the engine not running to supply radio,
lights, chargers, +12 Volts portable appliances
like vacuum cleaners, game consoles and
similar devices. What to do when an electrical load reduction
action message is present (“Battery Saver On” or
“Battery Saver Mode”)
During a trip:
Reduce power to unnecessary loads if possible:
Turn off redundant lights (interior or exterior)
Check what may be plugged in to power
outlets +12 Volts, 115 Volts AC, USB ports
Check HVAC settings (blower, temperature)
Check the audio settings (volume)
After a trip:
Check if any aftermarket equipment was
installed (additional lights, upfitter electrical
accessories, audio systems, alarms) and review
specifications if any (load and Ignition Off Draw
currents).
Evaluate the latest driving cycles (distance,
driving time and parking time).
The vehicle should have service performed if
the message is still present during consecutive
trips and the evaluation of the vehicle and
driving pattern did not help to identify the cause.
WARNING LIGHTS AND MESSAGES
The warning/indicator lights will illuminate in the
instrument panel together with a dedicated
message and/or acoustic signal when applicable.
These indications are indicative and precautionary
and as such must not be considered as exhaustive
and/or alternative to the information contained in
the Owner’s Manual, which you are advised to read
carefully in all cases. Always refer to the
information in this chapter in the event of a failure
indication. All active telltales will display first if
applicable. The system check menu may appear
different based upon equipment options and
current vehicle status. Some telltales are optional
and may not appear.
RED WARNING LIGHTS
Air Bag Warning Light
This warning light will illuminate to
indicate a fault with the air bag, and will
turn on for four to eight seconds as a
bulb check when the ignition is placed in
the ON/RUN or ACC/ON/RUN position. This light
will illuminate with a single chime when a fault with
the air bag has been detected, it will stay on until
the fault is cleared. If the light is either not on
during startup, stays on, or turns on while driving,
have the system inspected at an authorized dealer
as soon as possible.
3
21_LA_OM_EN_USC_t.book Page 69
Page 121 of 328

119
MULTIMEDIA
UCONNECT SYSTEMS
For detailed information about your Uconnect 4/
4C/4C NAV With 8.4-inch Display system, refer to
your Uconnect Owner’s Manual Supplement.
NOTE:Uconnect screen images are for illustration
purposes only and may not reflect exact software
for your vehicle.
CYBERSECURITY
Your vehicle may be a connected vehicle and may
be equipped with both wired and wireless
networks. These networks allow your vehicle to
send and receive information. This information
allows systems and features in your vehicle to
function properly.
Your vehicle may be equipped with certain security
features to reduce the risk of unauthorized and
unlawful access to vehicle systems and wireless
communications. Vehicle software technology
continues to evolve over time and FCA US LLC,
working with its suppliers, evaluates and takes
appropriate steps as needed. Similar to a
computer or other devices, your vehicle may
require software updates to improve the usability and performance of your systems or to reduce the
potential risk of unauthorized and unlawful access
to your vehicle systems.
The risk of unauthorized and unlawful access to
your vehicle systems may still exist, even if the
most recent version of vehicle software (such as
Uconnect software) is installed.
NOTE:
FCA US LLC or an authorized dealer may contact
you directly regarding software updates.
To help further improve vehicle security and
minimize the potential risk of a security breach,
vehicle owners should:
Routinely check www.driveuconnect.com
(US Residents) or www.driveuconnect.ca
(Canadian Residents) to learn about avail -
able Uconnect software updates.
Only connect and use trusted media
devices (e.g. personal mobile phones,
USBs, CDs).
Privacy of any wireless and wired communications
cannot be assured. Third parties may unlawfully
intercept information and private communications
without your consent. For further information, refer
to “Data Collection & Privacy” in your Uconnect
Owner’s Manual Supplement or “Onboard
Diagnostic System (OBD II) Cybersecurity”
Ú page 76.
WARNING!
It is not possible to know or to predict all of the
possible outcomes if your vehicle’s systems
are breached. It may be possible that vehicle
systems, including safety related systems,
could be impaired or a loss of vehicle control
could occur that may result in an accident
involving serious injury or death.
ONLY insert media (e.g., USB or CD) into your
vehicle if it came from a trusted source. Media
of unknown origin could possibly contain mali -
cious software, and if installed in your vehicle,
it may increase the possibility for vehicle
systems to be breached.
As always, if you experience unusual vehicle
behavior, take your vehicle to your nearest
authorized dealer immediately.
5
21_LA_OM_EN_USC_t.book Page 119
Page 141 of 328
MULTIMEDIA139
Care And Maintenance
Do not press the touchscreen with any hard or
sharp objects (pen, USB stick, jewelry, etc.),
which could scratch the surface.
Do not spray any liquid or chemicals directly on
the screen! Use a clean and dry microfiber lens
cleaning cloth in order to clean the touchscreen.
If necessary, use a lint-free cloth dampened
with a cleaning solution, such as isopropyl
alcohol or an isopropyl alcohol and water solu -
tion ratio of 50:50. Be sure to follow the solvent
manufacturer's precautions and directions
Ú page 311.
UCONNECT MODES
STEERING WHEEL AUDIO CONTROLS
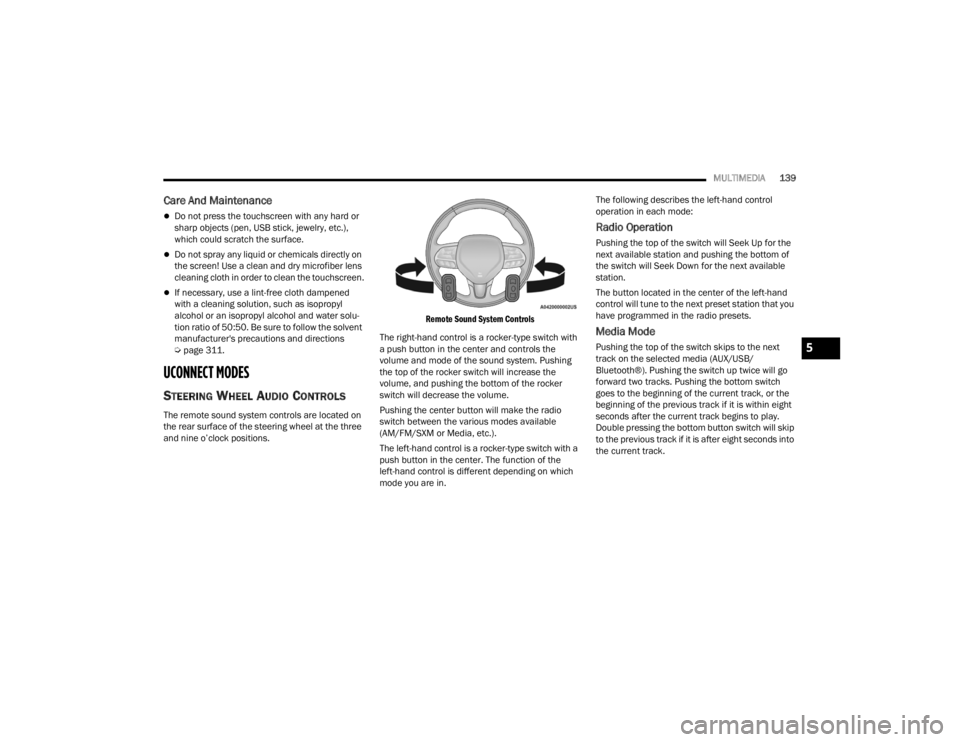
The remote sound system controls are located on
the rear surface of the steering wheel at the three
and nine o’clock positions.
Remote Sound System Controls
The right-hand control is a rocker-type switch with
a push button in the center and controls the
volume and mode of the sound system. Pushing
the top of the rocker switch will increase the
volume, and pushing the bottom of the rocker
switch will decrease the volume.
Pushing the center button will make the radio
switch between the various modes available
(AM/FM/SXM or Media, etc.).
The left-hand control is a rocker-type switch with a
push button in the center. The function of the
left-hand control is different depending on which
mode you are in. The following describes the left-hand control
operation in each mode:
Radio Operation
Pushing the top of the switch will Seek Up for the
next available station and pushing the bottom of
the switch will Seek Down for the next available
station.
The button located in the center of the left-hand
control will tune to the next preset station that you
have programmed in the radio presets.
Media Mode
Pushing the top of the switch skips to the next
track on the selected media (AUX/USB/
Bluetooth®). Pushing the switch up twice will go
forward two tracks. Pushing the bottom switch
goes to the beginning of the current track, or the
beginning of the previous track if it is within eight
seconds after the current track begins to play.
Double pressing the bottom button switch will skip
to the previous track if it is after eight seconds into
the current track.5
21_LA_OM_EN_USC_t.book Page 139
Page 149 of 328
MULTIMEDIA147
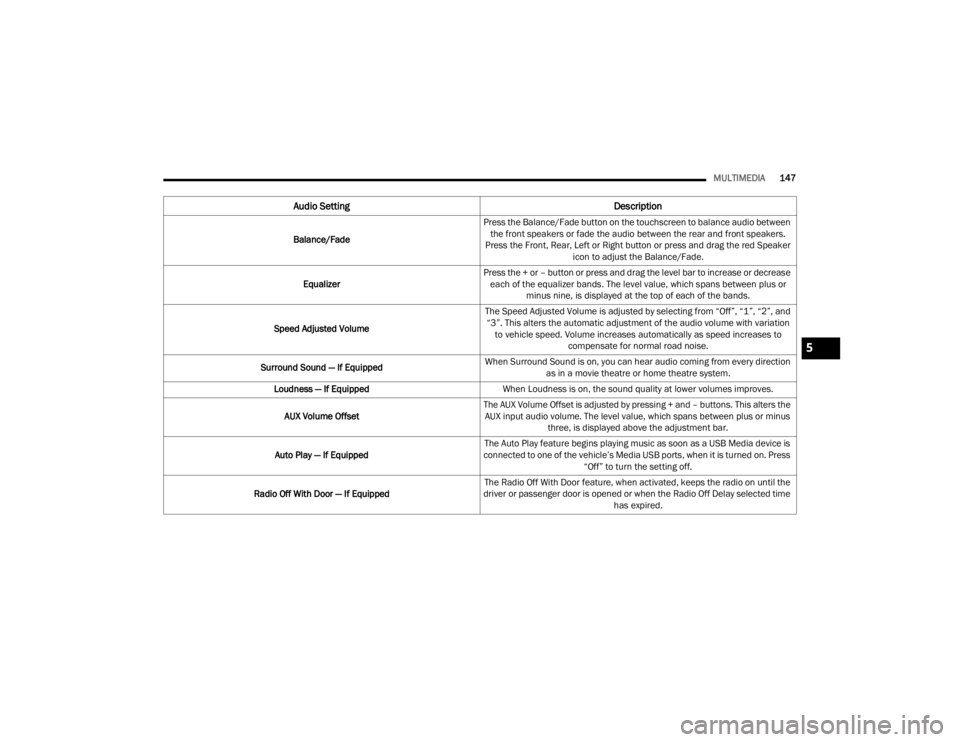
Audio Setting Description
Balance/FadePress the Balance/Fade button on the touchscreen to balance audio between
the front speakers or fade the audio between the rear and front speakers.
Press the Front, Rear, Left or Right button or press and drag the red Speaker icon to adjust the Balance/Fade.
Equalizer Press the + or – button or press and drag the level bar to increase or decrease
each of the equalizer bands. The level value, which spans between plus or minus nine, is displayed at the top of each of the bands.
Speed Adjusted Volume The Speed Adjusted Volume is adjusted by selecting from “Off”, “1”, “2”, and
“3”. This alters the automatic adjustment of the audio volume with variation to vehicle speed. Volume increases automatically as speed increases to compensate for normal road noise.
Surround Sound — If Equipped When Surround Sound is on, you can hear audio coming from every direction
as in a movie theatre or home theatre system.
Loudness — If Equipped When Loudness is on, the sound quality at lower volumes improves.
AUX Volume Offset The AUX Volume Offset is adjusted by pressing + and – buttons. This alters the
AUX input audio volume. The level value, which spans between plus or minus three, is displayed above the adjustment bar.
Auto Play — If Equipped The Auto Play feature begins playing music as soon as a USB Media device is
connected to one of the vehicle’s Media USB ports, when it is turned on. Press “Off” to turn the setting off.
Radio Off With Door — If Equipped The Radio Off With Door feature, when activated, keeps the radio on until the
driver or passenger door is opened or when the Radio Off Delay selected time has expired.
5
21_LA_OM_EN_USC_t.book Page 147
Page 150 of 328
148MULTIMEDIA
MEDIA MODE
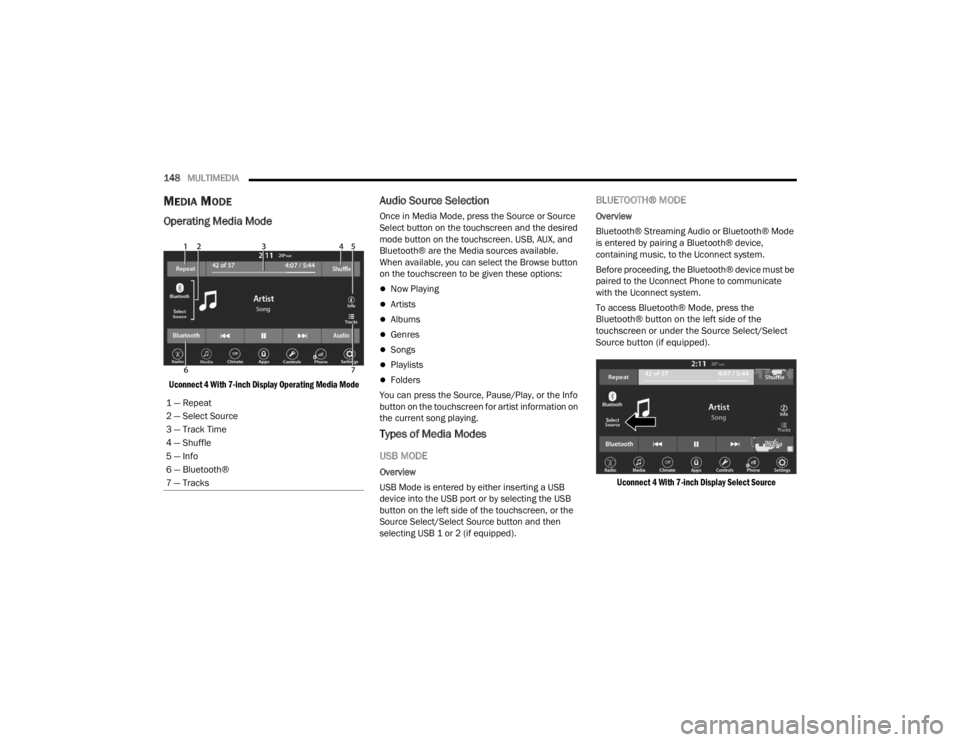
Operating Media Mode
Uconnect 4 With 7-inch Display Operating Media Mode
Audio Source Selection
Once in Media Mode, press the Source or Source
Select button on the touchscreen and the desired
mode button on the touchscreen. USB, AUX, and
Bluetooth® are the Media sources available.
When available, you can select the Browse button
on the touchscreen to be given these options:
Now Playing
Artists
Albums
Genres
Songs
Playlists
Folders
You can press the Source, Pause/Play, or the Info
button on the touchscreen for artist information on
the current song playing.
Types of Media Modes
USB MODE
Overview
USB Mode is entered by either inserting a USB
device into the USB port or by selecting the USB
button on the left side of the touchscreen, or the
Source Select/Select Source button and then
selecting USB 1 or 2 (if equipped).
BLUETOOTH® MODE
Overview
Bluetooth® Streaming Audio or Bluetooth® Mode
is entered by pairing a Bluetooth® device,
containing music, to the Uconnect system.
Before proceeding, the Bluetooth® device must be
paired to the Uconnect Phone to communicate
with the Uconnect system.
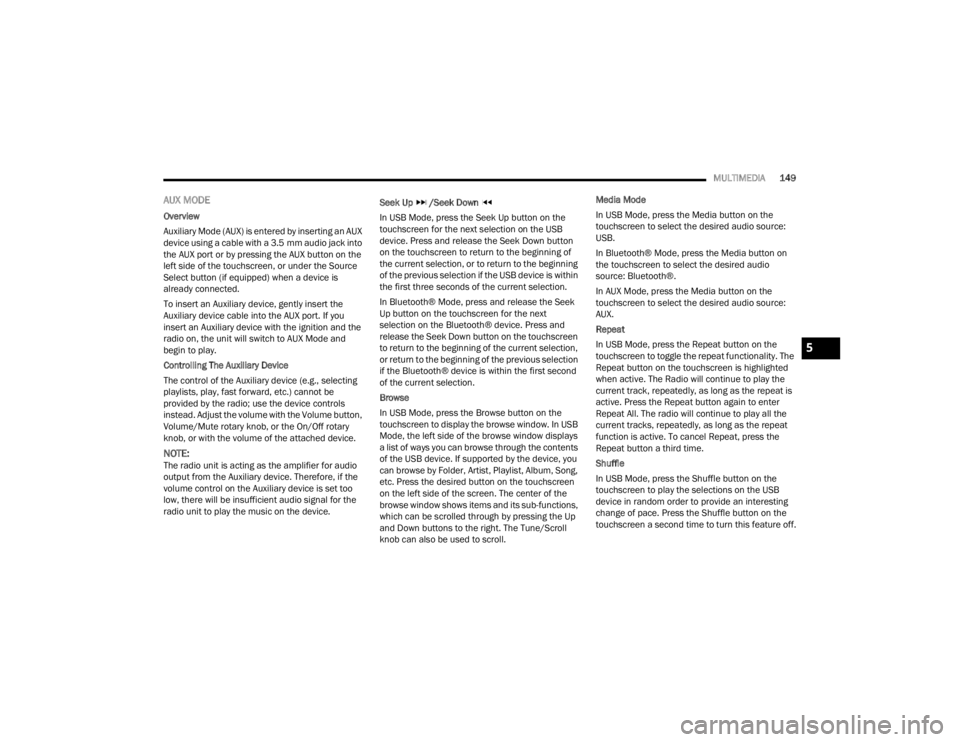
To access Bluetooth® Mode, press the
Bluetooth® button on the left side of the
touchscreen or under the Source Select/Select
Source button (if equipped).
Uconnect 4 With 7-inch Display Select Source
1 — Repeat
2 — Select Source
3 — Track Time
4 — Shuffle
5 — Info
6 — Bluetooth®
7 — Tracks
21_LA_OM_EN_USC_t.book Page 148
Page 151 of 328
MULTIMEDIA149
AUX MODE
Overview
Auxiliary Mode (AUX) is entered by inserting an AUX
device using a cable with a 3.5 mm audio jack into
the AUX port or by pressing the AUX button on the
left side of the touchscreen, or under the Source
Select button (if equipped) when a device is
already connected.
To insert an Auxiliary device, gently insert the
Auxiliary device cable into the AUX port. If you
insert an Auxiliary device with the ignition and the
radio on, the unit will switch to AUX Mode and
begin to play.
Controlling The Auxiliary Device
The control of the Auxiliary device (e.g., selecting
playlists, play, fast forward, etc.) cannot be
provided by the radio; use the device controls
instead. Adjust the volume with the Volume button,
Volume/Mute rotary knob, or the On/Off rotary
knob, or with the volume of the attached device.
NOTE:The radio unit is acting as the amplifier for audio
output from the Auxiliary device. Therefore, if the
volume control on the Auxiliary device is set too
low, there will be insufficient audio signal for the
radio unit to play the music on the device. Seek Up
/Seek Down
In USB Mode, press the Seek Up button on the
touchscreen for the next selection on the USB
device. Press and release the Seek Down button
on the touchscreen to return to the beginning of
the current selection, or to return to the beginning
of the previous selection if the USB device is within
the first three seconds of the current selection.
In Bluetooth® Mode, press and release the Seek
Up button on the touchscreen for the next
selection on the Bluetooth® device. Press and
release the Seek Down button on the touchscreen
to return to the beginning of the current selection,
or return to the beginning of the previous selection
if the Bluetooth® device is within the first second
of the current selection.
Browse
In USB Mode, press the Browse button on the
touchscreen to display the browse window. In USB
Mode, the left side of the browse window displays
a list of ways you can browse through the contents
of the USB device. If supported by the device, you
can browse by Folder, Artist, Playlist, Album, Song,
etc. Press the desired button on the touchscreen
on the left side of the screen. The center of the
browse window shows items and its sub-functions,
which can be scrolled through by pressing the Up
and Down buttons to the right. The Tune/Scroll
knob can also be used to scroll. Media Mode
In USB Mode, press the Media button on the
touchscreen to select the desired audio source:
USB.
In Bluetooth® Mode, press the Media button on
the touchscreen to select the desired audio
source: Bluetooth®.
In AUX Mode, press the Media button on the
touchscreen to select the desired audio source:
AUX.
Repeat
In USB Mode, press the Repeat button on the
touchscreen to toggle the repeat functionality. The
Repeat button on the touchscreen is highlighted
when active. The Radio will continue to play the
current track, repeatedly, as long as the repeat is
active. Press the Repeat button again to enter
Repeat All. The radio will continue to play all the
current tracks, repeatedly, as long as the repeat
function is active. To cancel Repeat, press the
Repeat button a third time.
Shuffle
In USB Mode, press the Shuffle button on the
touchscreen to play the selections on the USB
device in random order to provide an interesting
change of pace. Press the Shuffle button on the
touchscreen a second time to turn this feature off.
5
21_LA_OM_EN_USC_t.book Page 149
Page 152 of 328
150MULTIMEDIA
Audio
Audio settings can be accessed by pressing the
Audio button Ú page 140.
Info
In both Disc and USB Modes, press the Info button
on the touchscreen to display the current track
information. Press the Info or X button on the
touchscreen a second time to cancel this feature.
Tracks
In both Disc and USB Modes, press the Tracks button on the touchscreen to display a pop-up with
the Song List. The song currently playing is
indicated by an arrow and lines above and below
the song title. When in the Tracks List screen you
can rotate the Tune/Scroll knob to highlight a track
(indicated by the line above and below the track
name) and then push the Enter/Browse knob to
start playing that track.
In Bluetooth® Mode, if the Bluetooth® device
supports this feature, press the Tracks button on
the touchscreen to display a pop-up with the Song
List. The currently playing song is indicated by a red
arrow and lines above and below the song title.
Pressing the Tracks button on the touchscreen
while the pop-up is displayed will close the pop-up.
MEDIA VOICE COMMANDS
Uconnect offers connections via USB, Bluetooth®,
and auxiliary (AUX) ports. Voice operation is only
available for connected USB and AUX devices.
Push the VR button located on the steering
wheel. After the beep, say one of the following
commands and follow the prompts to switch your
media source or choose an artist:
“ Change source to Bluetooth®”
“Change source to AUX”
“Change source to USB”
“Play artist Beethoven”; “ Play album Greatest
Hits”; “ Play song Moonlight Sonata”; “ Play genre
Classical”
Did You Know: Press the Browse button on the
touchscreen to see all of the music on your USB
device. Your Voice Command must match exactly
how the artist, album, song, and genre information
is displayed.
PHONE MODE
Overview
Uconnect Phone is a voice-activated, hands-free,
in-vehicle communications system. It allows you to
dial a phone number with your mobile phone. The feature supports the following:
Voice Activated Features
Hands-Free dialing via Voice (“Call John Smith
Mobile” or “Dial 248-555-1212”).
Hands-Free text-to-speech listening of your
incoming SMS messages.
Hands-Free Text Message Replying: Forward
one of 18 predefined SMS messages to
incoming calls/text messages.
Redialing last dialed numbers (“Redial”).
Calling Back the last incoming call number
(“Call Back”).
Viewing call logs on screen (“Show Incoming
Calls,” “Show Outgoing Calls,” “Show Missed
Calls,” or “Show Recent Calls”).
Searching Contacts phone number (“Search for
John Smith Mobile”).
Screen Activated Features
Dialing via Keypad using touchscreen.
Viewing and Calling contacts from Phonebooks
displayed on the touchscreen.
Setting Favorite Contact phone numbers so they
are easily accessible on the Main Phone screen.
21_LA_OM_EN_USC_t.book Page 150