air conditioning DODGE CHALLENGER 2021 Owners Manual
[x] Cancel search | Manufacturer: DODGE, Model Year: 2021, Model line: CHALLENGER, Model: DODGE CHALLENGER 2021Pages: 328, PDF Size: 15 MB
Page 50 of 328
48GETTING TO KNOW YOUR VEHICLE
The Rain Sensing system has protection features
for the wiper blades and arms, and will not operate
under the following conditions:
Low Ambient Temperature — When the ignition
is first placed in the ON position, the Rain
Sensing system will not operate until the wiper
switch is moved, vehicle speed is greater than
0 mph (0 km/h), or the outside temperature is
greater than 32°F (0°C).
Transmission In NEUTRAL Position — When the
ignition is ON, and the transmission is in the
NEUTRAL position, the Rain Sensing system will
not operate until the wiper switch is moved,
vehicle speed is greater than 3 mph (5 km/h),
or the gear selector is moved out of the
NEUTRAL position.
Remote Start Mode Inhibit — On vehicles
equipped with Remote Start system, Rain
Sensing wipers are not operational when the
vehicle is in the Remote Start mode.
CLIMATE CONTROLS
The Climate Control system allows you to regulate
the temperature, air flow, and direction of air
circulating throughout the vehicle. The controls are
located on the touchscreen (if equipped) and on
the instrument panel below the radio.
AUTOMATIC CLIMATE CONTROL
D
ESCRIPTIONS AND FUNCTIONS
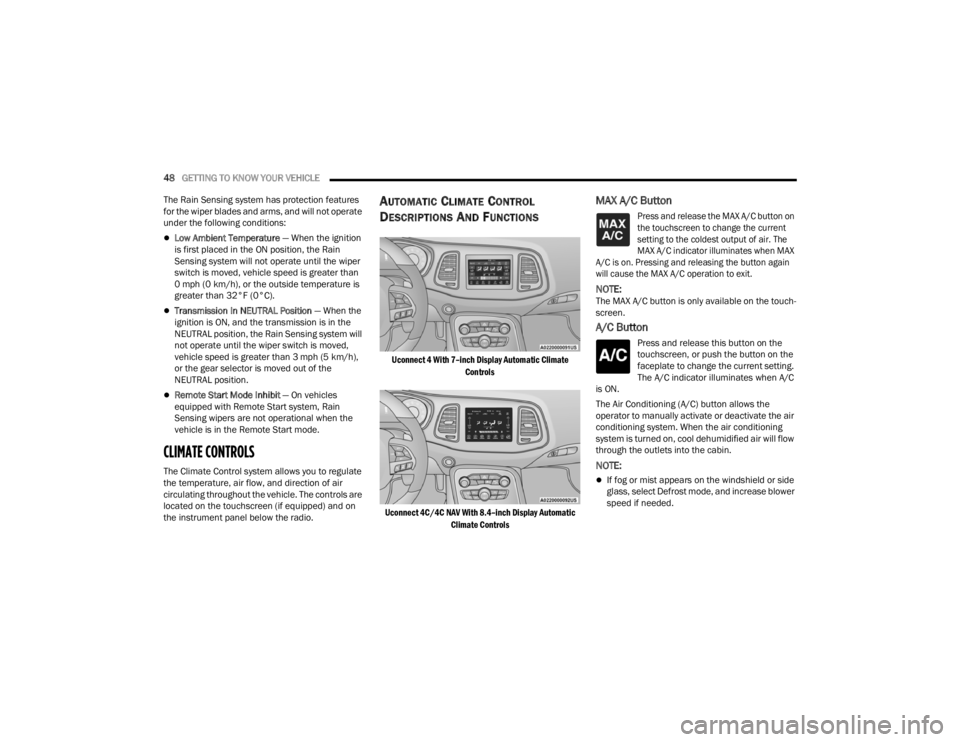
Uconnect 4 With 7–inch Display Automatic Climate
Controls
Uconnect 4C/4C NAV With 8.4–inch Display Automatic Climate Controls
MAX A/C Button
Press and release the MAX A/C button on
the touchscreen to change the current
setting to the coldest output of air. The
MAX A/C indicator illuminates when MAX
A/C is on. Pressing and releasing the button again
will cause the MAX A/C operation to exit.
NOTE:The MAX A/C button is only available on the touch -
screen.
A/C Button
Press and release this button on the
touchscreen, or push the button on the
faceplate to change the current setting.
The A/C indicator illuminates when A/C
is ON.
The Air Conditioning (A/C) button allows the
operator to manually activate or deactivate the air
conditioning system. When the air conditioning
system is turned on, cool dehumidified air will flow
through the outlets into the cabin.
NOTE:
If fog or mist appears on the windshield or side
glass, select Defrost mode, and increase blower
speed if needed.
21_LA_OM_EN_USC_t.book Page 48
Page 51 of 328
GETTING TO KNOW YOUR VEHICLE49
If your air conditioning performance seems
lower than expected, check the front of the A/C
condenser (located in front of the radiator), for
an accumulation of dirt or insects. Clean with a
gentle water spray from the front of the radiator
and through the condenser.
Recirculation Button
Press and release this button on the
touchscreen, or push the button on the
faceplate to change the system between
recirculation mode and outside air
mode. The Recirculation indicator and the A/C
indicator illuminate when the Recirculation button
is pressed. Recirculation can be used when
outside conditions such as smoke, odors, dust, or
high humidity are present. Recirculation can be
used in all modes. Recirculation may be
unavailable (button on the touchscreen greyed
out) if conditions exist that could create fogging on
the inside of the windshield. The A/C can be
deselected manually without disturbing the mode
control selection. Continuous use of the
Recirculation mode may make the inside air stuffy
and window fogging may occur. Extended use of
this mode is not recommended.
In cold weather, use of Recirculation mode may
lead to excessive window fogging. The
Recirculation feature may be unavailable if
conditions exist that could create fogging on the
inside of the windshield.
AUTO Button
Set your desired temperature and press
AUTO. AUTO will achieve and maintain
your desired temperature by
automatically adjusting the blower
speed and air distribution. AUTO mode is highly
recommended for efficiency. You can press and
release this button on the touchscreen, or push the
button on the faceplate, to turn AUTO on. The AUTO
indicator illuminates when AUTO is on. Toggling
this function will cause the system to switch
between manual mode and automatic modes
Ú page 51.
Front Defrost Button
Press and release the Front Defrost
button on the touchscreen, or push and
release the button on the faceplate, to
change the current airflow setting to
Defrost mode. The Front Defrost indicator
illuminates when Front Defrost is on. Air comes
from the windshield and side window demist
outlets. When the defrost button is selected, the
blower level may increase. Use Defrost mode with
maximum temperature settings for best
windshield and side window defrosting and
defogging. When toggling the front defrost mode
button, the climate system will return to the
previous setting.
Rear Defrost Button
Press and release the Rear Defrost
button on the touchscreen, or push and
release the button on the faceplate, to
turn on the rear window defroster and
the heated outside mirrors (if equipped). The Rear
Defrost indicator illuminates when the rear window
defroster is on. The rear window defroster
automatically turns off after 10 minutes.
CAUTION!
Failure to follow these cautions can cause
damage to the heating elements:
Use care when washing the inside of the rear
window. Do not use abrasive window cleaners
on the interior surface of the window. Use a
soft cloth and a mild washing solution, wiping
parallel to the heating elements. Labels can
be peeled off after soaking with warm water.
Do not use scrapers, sharp instruments, or
abrasive window cleaners on the interior
surface of the window.
Keep all objects a safe distance from the
window.
2
21_LA_OM_EN_USC_t.book Page 49
Page 73 of 328
GETTING TO KNOW YOUR INSTRUMENT PANEL71
Door Open Warning Light
This indicator will illuminate when a
door is ajar/open and not fully closed.
NOTE:If the vehicle is moving, there will also be a single
chime.
Electric Power Steering (EPS) Fault
Warning Light
This warning light will turn on when
there's a fault with the EPS system
Úpage 93.
Electronic Throttle Control (ETC) Warning
Light
This warning light will illuminate to
indicate a problem with the ETC system.
If a problem is detected while the
vehicle is running, the light will either
stay on or flash depending on the nature of the
problem. Cycle the ignition when the vehicle is
safely and completely stopped and the transmission is placed in the PARK position. The
light should turn off. If the light remains on with the
vehicle running, your vehicle will usually be
drivable; however, see an authorized dealer for
service as soon as possible.
NOTE:This light may turn on if the accelerator and brake
pedals are pressed at the same time.
If the light continues to flash when the vehicle is
running, immediate service is required and you
may experience reduced performance, an
elevated/rough idle, or engine stall and your
vehicle may require towing. The light will come on
when the ignition is placed in the ON/RUN or ACC/
ON/RUN position and remain on briefly as a bulb
check. If the light does not come on during starting,
have the system checked by an authorized dealer.
Engine Coolant Temperature Warning
Light
This warning light warns of an
overheated engine condition. If the
engine coolant temperature is too high,
this indicator will illuminate and a single
chime will sound. If the temperature reaches the
upper limit, a continuous chime will sound for four
minutes or until the engine is able to cool,
whichever comes first. If the light turns on while driving, safely pull over
and stop the vehicle. If the Air Conditioning (A/C)
system is on, turn it off. Also, shift the transmission
into NEUTRAL and idle the vehicle. If the
temperature reading does not return to normal,
turn the engine off immediately and call for service
Ú
page 241.
Trunk Open Warning Light
This indicator will illuminate when the
trunk is open and not fully closed.
NOTE:If the vehicle is moving, there will also be a single
chime.
Oil Pressure Warning Light
This warning light will illuminate to
indicate low engine oil pressure. If the
light turns on while driving, stop the
vehicle, shut off the engine as soon as
possible, and contact an authorized dealer. A
chime will sound when this light turns on.
Do not operate the vehicle until the cause is
corrected. This light does not indicate how much oil
is in the engine. The engine oil level must be
checked under the hood.
WARNING!
Continued operation with reduced assist could
pose a safety risk to yourself and others. Service
should be obtained as soon as possible.
3
21_LA_OM_EN_USC_t.book Page 71
Page 259 of 328
SERVICING AND MAINTENANCE257
T/A Air Filter Maintenance — If Equipped
Clean Engine Air Filter
The scheduled air filter cleaning interval is
30,000 miles (48,280 km), or if in a dusty
environment the engine air filter should be
checked periodically to ensure optimal air flow.
Cleaning your engine air filter with the
recommended Mopar® Performance Air Filter
Service Kit is not required if you can still see any
part the wire screen on the entire air filter
regardless of how dirty it may appear. When any
part of the wire screen is no longer visible on the air
filter, that is an indication it is time to clean the air
filter.
1. Spray the air filter with the recommended
Mopar® air filter cleaner and let sit for at
least 10 minutes to loosen dirt, before
rinsing.
NOTE:Never use strong detergents, high pressure, or
gasoline on air filter.
2. Rinse the air filter with cool low-pressure water applied from the inside (clean side) out in
order to flush the dirt out of the filter. Continue
to rinse the filter until all traces of the cleaner
have been removed.
NOTE:It may be necessary to repeat steps 1 and 2 if the
air filter is not completely clean.
3. After rinsing the air filter, gently shake off the excess water and allow air filter to dry
naturally. Do not apply oil until air filter is
completely dry.
NOTE:Do not use forced air pressure as it may damage
the filtering capabilities of the filter’s microfibers
and also void its warranty.
4. Using the Mopar® Performance Air Filter Service Kit, spray oil evenly along the crown of
each filter pleat holding the nozzle about
3 inches (76 mm) away from the air filter. One
spray per 2 square inches (1,290 square mm)
of air filter. With one complete coat of oil, let it
wick (saturate) for about 20 minutes, and if
required touch up any light areas on either
side of the filter.
AIR CONDITIONER MAINTENANCE
For best possible performance, your air conditioner
should be checked and serviced by an authorized
dealer at the start of each warm season. This
service should include cleaning of the condenser
fins and a performance test. Drive belt tension
should also be checked at this time.
WARNING!
Use only refrigerants and compressor lubri -
cants approved by the manufacturer for your
air conditioning system. Some unapproved
refrigerants are flammable and can explode,
injuring you. Other unapproved refrigerants or
lubricants can cause the system to fail,
requiring costly repairs. Refer to Warranty
Information Book, for further warranty infor -
mation.
The air conditioning system contains refrig -
erant under high pressure. To avoid risk of
personal injury or damage to the system,
adding refrigerant or any repair requiring lines
to be disconnected should be done by an
experienced technician.
CAUTION!
Do not use chemical flushes in your air
conditioning system as the chemicals can
damage your air conditioning components. Such
damage is not covered by the New Vehicle
Limited Warranty.8
21_LA_OM_EN_USC_t.book Page 257
Page 260 of 328
258SERVICING AND MAINTENANCE
Refrigerant Recovery And Recycling
R-134a — If Equipped
R-134a Air Conditioning Refrigerant is a hydrofluo -
rocarbon (HFC) that is an ozone-friendly
substance. The manufacturer recommends that
air conditioning service be performed by an
authorized dealer or other service facilities using
recovery and recycling equipment.
NOTE:Use only manufacturer approved A/C system PAG
compressor oil and refrigerants.
Refrigerant Recovery And Recycling
R-1234yf — If Equipped
R–1234yf Air Conditioning Refrigerant is a
hydrofluoroolefin (HFO) that is endorsed by the
Environmental Protection Agency and is an
ozone-friendly substance with a low
global-warming potential. The manufacturer
recommends that air conditioning service be
performed by an authorized dealer using recovery
and recycling equipment.
NOTE:Use only manufacturer approved A/C system PAG
compressor oil, and refrigerants.
Cabin Air Filter
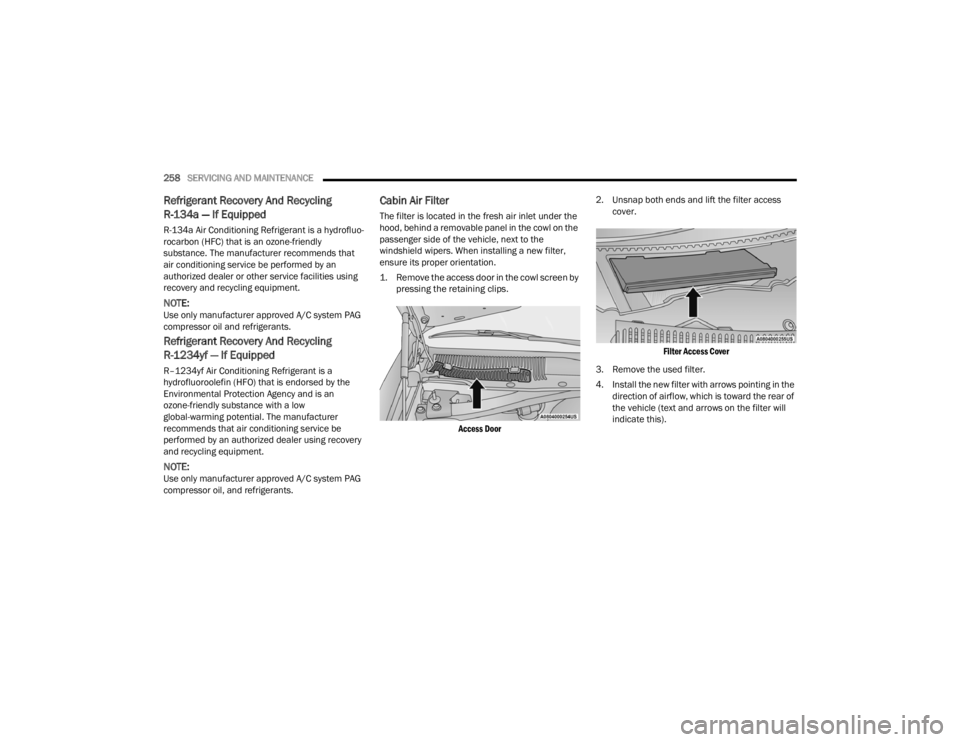
The filter is located in the fresh air inlet under the
hood, behind a removable panel in the cowl on the
passenger side of the vehicle, next to the
windshield wipers. When installing a new filter,
ensure its proper orientation.
1. Remove the access door in the cowl screen by pressing the retaining clips.
Access Door
2. Unsnap both ends and lift the filter access
cover.
Filter Access Cover
3. Remove the used filter.
4. Install the new filter with arrows pointing in the direction of airflow, which is toward the rear of
the vehicle (text and arrows on the filter will
indicate this).
21_LA_OM_EN_USC_t.book Page 258
Page 267 of 328
SERVICING AND MAINTENANCE265
(Continued)
Make sure that the coolant expansion bottle
overflow hoses are not kinked or obstructed.
Keep the front of the radiator clean. If your
vehicle is equipped with air conditioning, keep
the front of the condenser clean.
Do not change the thermostat for Summer or
Winter operation. If replacement is ever neces -
sary, install ONLY the correct type thermostat.
Other designs may result in unsatisfactory
engine cooling performance, poor gas mileage,
and increased emissions.
BRAKE SYSTEM
In order to ensure brake system performance, all
brake system components should be inspected
periodically Ú page 247.
Fluid Level Check — Brake Master Cylinder
Check the fluid level in the master cylinder
immediately if the Brake System Warning Light
indicates system failure.
Check the fluid level in the master cylinder when
performing underhood services.
Clean the top of the master cylinder area before
removing the cap. Add fluid to bring the level up to
the top of the “FULL” mark on the side of the
master cylinder reservoir.
Overfilling of fluid is not recommended because it
may cause leaking in the system.
Add enough fluid to bring the level up to the
requirements described on the brake fluid
reservoir. With disc brakes, fluid level can be
expected to fall as the brake pads wear. However,
low fluid level may be caused by a leak and a
checkup may be needed.
Use only brake fluid that has been recommended
by the manufacturer, and has been kept in a tightly
closed container to avoid contamination from
foreign matter or moisture Ú page 306.
WARNING!
Riding the brakes can lead to brake failure and
possibly a collision. Driving with your foot resting
or riding on the brake pedal can result in
abnormally high brake temperatures, excessive
lining wear, and possible brake damage. You
would not have your full braking capacity in an
emergency.
WARNING!
Use only manufacturer's recommended brake
fluid Úpage 306. Using the wrong type of
brake fluid can severely damage your brake
system and/or impair its performance. The
proper type of brake fluid for your vehicle is
also identified on the original factory installed
hydraulic master cylinder reservoir.
To avoid contamination from foreign matter or
moisture, use only new brake fluid or fluid that
has been in a tightly closed container. Keep
the master cylinder reservoir cap secured at
all times. Brake fluid in a open container
absorbs moisture from the air resulting in a
lower boiling point. This may cause it to boil
unexpectedly during hard or prolonged
braking, resulting in sudden brake failure. This
could result in a collision.
Overfilling the brake fluid reservoir can result
in spilling brake fluid on hot engine parts,
causing the brake fluid to catch fire. Brake
fluid can also damage painted and vinyl
surfaces, care should be taken to avoid its
contact with these surfaces.8
21_LA_OM_EN_USC_t.book Page 265
Page 271 of 328
SERVICING AND MAINTENANCE269
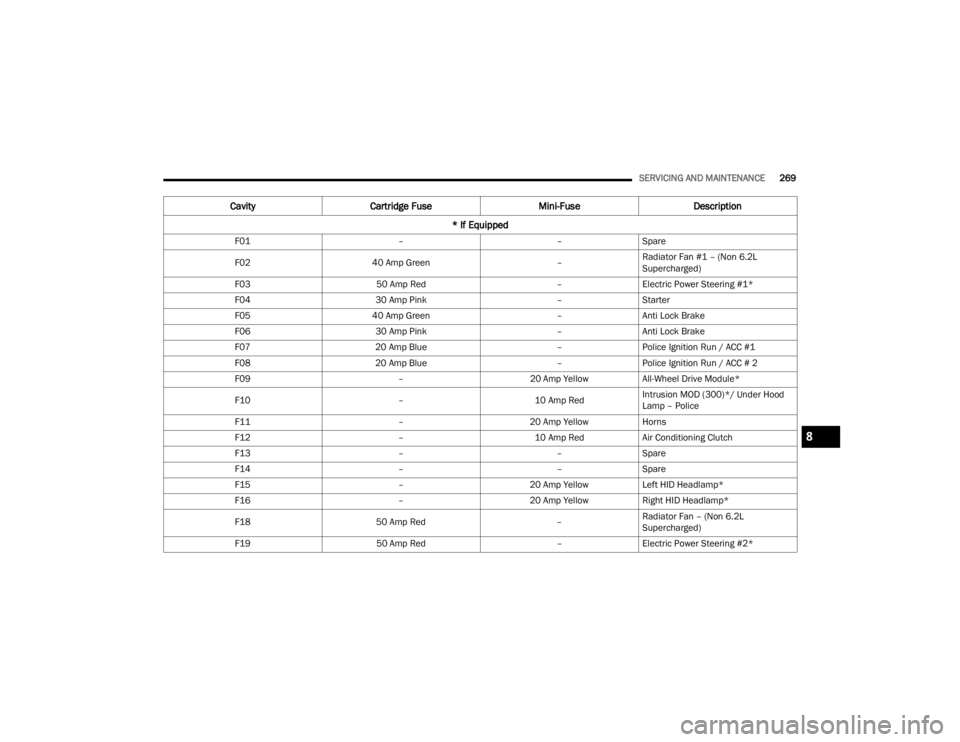
CavityCartridge Fuse Mini-FuseDescription
* If Equipped
F01 ––Spare
F02 40 Amp Green –Radiator Fan #1 – (Non 6.2L
Supercharged)
F03 50 Amp Red –Electric Power Steering #1*
F04 30 Amp Pink –Starter
F05 40 Amp Green –Anti Lock Brake
F06 30 Amp Pink –Anti Lock Brake
F07 20 Amp Blue –Police Ignition Run / ACC #1
F08 20 Amp Blue –Police Ignition Run / ACC # 2
F09 –20 Amp YellowAll-Wheel Drive Module*
F10 –10 Amp RedIntrusion MOD (300)*/ Under Hood
Lamp – Police
F11 –20 Amp YellowHorns
F12 –10 Amp RedAir Conditioning Clutch
F13 ––Spare
F14 ––Spare
F15 –20 Amp YellowLeft HID Headlamp*
F16 –20 Amp YellowRight HID Headlamp*
F18 50 Amp Red –Radiator Fan – (Non 6.2L
Supercharged)
F19 50 Amp Red –Electric Power Steering #2*
8
21_LA_OM_EN_USC_t.book Page 269
Page 300 of 328
298SERVICING AND MAINTENANCE
VEHICLE STORAGE
If you are leaving your vehicle dormant for more
than 3 weeks, you may want to take these steps to
protect your battery.
Disconnect the negative cable from the battery.
Anytime you store your vehicle, or keep it out of
service (e.g., vacation) for two weeks or more,
run the air conditioning system at idle for about
five minutes in the fresh air and high blower
setting. This will ensure adequate system lubri-
cation to minimize the possibility of compressor
damage when the system is started again.
BODYWORK
PROTECTION FROM ATMOSPHERIC
A
GENTS
Vehicle body care requirements vary according to
geographic locations and usage. Chemicals that
make roads passable in snow and ice and those
that are sprayed on trees and road surfaces during
other seasons are highly corrosive to the metal in
your vehicle. Outside parking, which exposes your
vehicle to airborne contaminants, road surfaces on
which the vehicle is operated, extreme hot or cold
weather and other extreme conditions will have an
adverse effect on paint, metal trim, and underbody
protection. The following maintenance recommendations will
enable you to obtain maximum benefit from the
corrosion resistance built into your vehicle.
What Causes Corrosion?
Corrosion is the result of deterioration or removal
of paint and protective coatings from your vehicle.
The most common causes are:
Road salt, dirt and moisture accumulation.
Stone and gravel impact.
Insects, tree sap and tar.
Salt in the air near seacoast localities.
Atmospheric fallout/industrial pollutants.
BODY AND UNDERBODY MAINTENANCE
Cleaning Headlights
Your vehicle is equipped with plastic headlights
and fog lights that are lighter and less susceptible
to stone breakage than glass headlights.
Plastic is not as scratch resistant as glass and
therefore different lens cleaning procedures must
be followed.
To minimize the possibility of scratching the lenses
and reducing light output, avoid wiping with a dry
cloth. To remove road dirt, wash with a mild soap
solution followed by rinsing.
Do not use abrasive cleaning components,
solvents, steel wool or other aggressive material to
clean the lenses.
PRESERVING THE BODYWORK
Washing
Wash your vehicle regularly. Always wash your
vehicle in the shade using Mopar® Car Wash, or
a mild car wash soap, and rinse the panels
completely with water.
If insects, tar, or other similar deposits have
accumulated on your vehicle, use Mopar®
Super Kleen Bug and Tar Remover to remove.
Use a high quality cleaner wax, such as Mopar®
Cleaner Wax to remove road film, stains and to
protect your paint finish. Use precautions to not
scratch the paint.
Avoid using abrasive compounds and power
buffing that may diminish the gloss or thin out
the paint finish.
CAUTION!
Do not use abrasive or strong cleaning mate
-
rials such as steel wool or scouring powder
that will scratch metal and painted surfaces.
Use of power washers exceeding 1,200 psi
(8,274 kPa) can result in damage or removal
of paint and decals.
21_LA_OM_EN_USC_t.book Page 298
Page 314 of 328
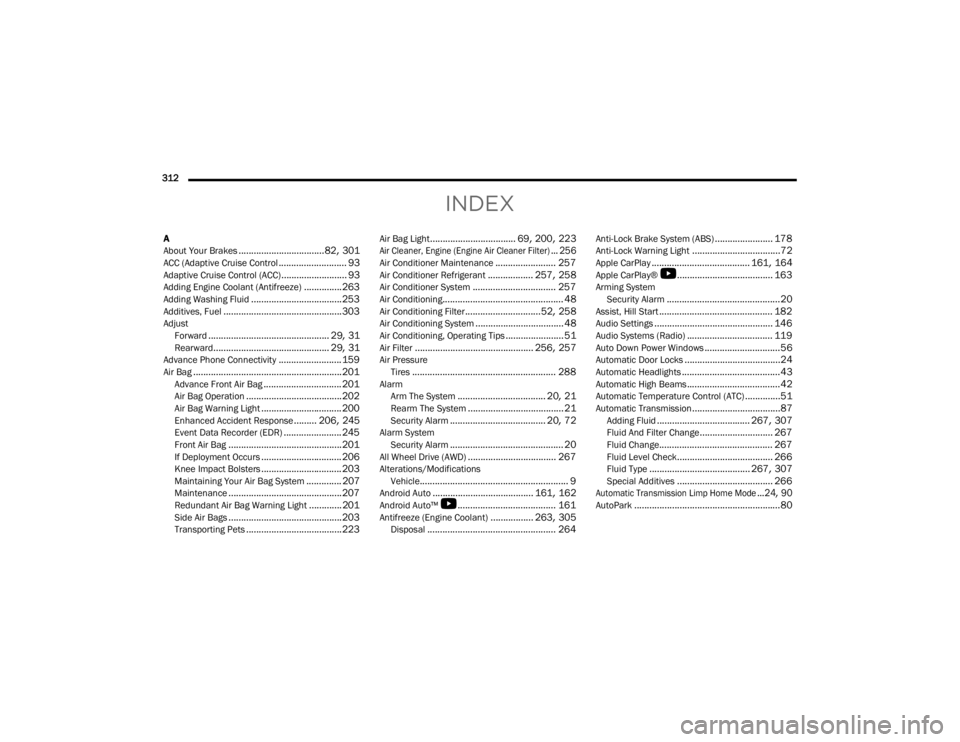
312
INDEX
A
About Your Brakes.................................. 82, 301ACC (Adaptive Cruise Control........................... 93Adaptive Cruise Control (ACC).......................... 93Adding Engine Coolant (Antifreeze)............... 263Adding Washing Fluid.................................... 253Additives, Fuel............................................... 303AdjustForward................................................ 29, 31Rearward.............................................. 29, 31Advance Phone Connectivity......................... 159Air Bag........................................................... 201Advance Front Air Bag............................... 201Air Bag Operation...................................... 202Air Bag Warning Light................................ 200Enhanced Accident Response......... 206, 245Event Data Recorder (EDR)....................... 245Front Air Bag............................................. 201If Deployment Occurs................................ 206Knee Impact Bolsters................................ 203Maintaining Your Air Bag System.............. 207Maintenance............................................. 207Redundant Air Bag Warning Light.............201Side Air Bags............................................. 203Transporting Pets...................................... 223
Air Bag Light.................................. 69, 200, 223
Air Cleaner, Engine (Engine Air Cleaner Filter)... 256
Air Conditioner Maintenance........................ 257Air Conditioner Refrigerant.................. 257, 258Air Conditioner System................................. 257Air Conditioning................................................ 48Air Conditioning Filter..............................52, 258Air Conditioning System................................... 48Air Conditioning, Operating Tips....................... 51Air Filter............................................... 256, 257Air PressureTires......................................................... 288AlarmArm The System................................... 20, 21Rearm The System...................................... 21Security Alarm...................................... 20, 72Alarm SystemSecurity Alarm............................................. 20All Wheel Drive (AWD)................................... 267Alterations/ModificationsVehicle........................................................... 9Android Auto........................................ 161, 162Android Auto™
b
....................................... 161Antifreeze (Engine Coolant)................. 263, 305Disposal................................................... 264
Anti-Lock Brake System (ABS)....................... 178Anti-Lock Warning Light...................................72Apple CarPlay....................................... 161, 164Apple CarPlay®
b
...................................... 163Arming SystemSecurity Alarm.............................................20Assist, Hill Start............................................. 182Audio Settings............................................... 146Audio Systems (Radio).................................. 119Auto Down Power Windows..............................56Automatic Door Locks......................................24Automatic Headlights.......................................43Automatic High Beams.....................................42Automatic Temperature Control (ATC)..............51Automatic Transmission...................................87Adding Fluid..................................... 267, 307Fluid And Filter Change............................. 267Fluid Change............................................. 267Fluid Level Check...................................... 266Fluid Type........................................ 267, 307Special Additives...................................... 266
Automatic Transmission Limp Home Mode...24, 90
AutoPark..........................................................80
21_LA_OM_EN_USC_t.book Page 312
Page 317 of 328

315
F
Filler Location Fuel
........................................ 109Filters Air Cleaner................................................. 256Air Conditioning.................................. 52, 258Engine Oil........................................ 256, 306Engine Oil Disposal................................... 256Flashers......................................................... 226Hazard Warning......................................... 226Turn Signals................................ 44, 75, 225Flash-To-Pass.................................................. 43Flooded Engine Starting.................................. 81Fluid Capacities............................................. 305Fluid Leaks.................................................... 225Fluid Level ChecksBrake........................................................ 265Cooling System.......................................... 262Engine Oil.................................................. 253Transfer Case............................................ 267Fluid, Brake................................................... 307Fog Lights........................................................ 44Fold-Flat Seats.......................................... 29, 30Forward Collision Warning............................. 187Freeing A Stuck Vehicle................................. 243
Fuel............................................................... 302Additives................................................... 303Clean Air................................................... 303Ethanol..................................................... 303Filler Cap (Gas Cap).................................. 109Gasoline................................................... 302Materials Added....................................... 303Methanol.................................................. 303Octane Rating.................................. 302, 306Requirements........................................... 302Specifications........................................... 306Tank Capacity........................................... 305Fueling.......................................................... 109Fuses............................................................ 267
G
Garage Door Opener (HomeLink)..................... 38Gas Cap (Fuel Filler Cap).............................. 109Gasoline, Clean Air........................................ 303Gasoline, Reformulated................................ 303Gear Ranges.................................................... 88Glass Cleaning.............................................. 300Gross Axle Weight Rating..................... 111, 112Gross Vehicle Weight Rating................ 110, 111GVWR............................................................ 110
H
HazardDriving Through Flowing, Rising, Or Shallow Standing Water
.................................... 118Hazard Warning Flashers.............................. 226Head Restraints........................................34, 35Head Rests............................................... 34, 35HeadlightsAutomatic....................................................43Cleaning.................................................... 298High Beam/Low Beam Select Switch..........42Lights On Reminder.....................................43On With Wipers............................................43Passing........................................................43Switch..........................................................41Time Delay...................................................43Washers.................................................... 253Heated Mirrors.................................................38Heated Seats...................................................32Heater..............................................................48Heater, Engine Block........................................81
High Beam/Low Beam Select (Dimmer) Switch.. 42
Hill Start Assist.............................................. 182HitchesTrailer Towing........................................... 113HomeLink (Garage Door Opener).....................38Hood Prop........................................................58Hood Release...................................................5811
21_LA_OM_EN_USC_t.book Page 315