remove seats DODGE CHALLENGER 2022 Owners Manual
[x] Cancel search | Manufacturer: DODGE, Model Year: 2022, Model line: CHALLENGER, Model: DODGE CHALLENGER 2022Pages: 336, PDF Size: 16.47 MB
Page 38 of 336
36GETTING TO KNOW YOUR VEHICLE
(Continued)
FRONT VENTILATED SEATS —
I
F EQUIPPED
The ventilated seats are equipped with
fans that can be controlled through the
climate and control screen in the
Uconnect system. The fans operate at
two speeds, HI and LO.
Press the ventilated seat button once to
choose HI.
Press the ventilated seat button a second time
to choose LO.
Press the ventilated seat button a third time to
turn the ventilated seat off.
NOTE:The engine must be running for the ventilated
seats to operate.
For information on use with the Remote Start
system, see Ú page 20.
VEHICLES WITHOUT PASSENGER
S
EATING INSTALLED
All passenger occupants within the vehicle must be
in a seat equipped with a Seat Belt System and
Head Restraint for the safety of the passenger. If
the passenger and/or rear seats have been
removed, do not ride in those areas. This vehicle has been designed to maximize total
performance. In doing so, the deletion of
passenger seats and/or rear seat may affect the
Noise, Vibration, and Harshness (NVH)
characteristics. As a result, the interior will be
louder overall.
WARNING!
If the passenger and/or rear seats have been
removed, do not ride in those areas. In a colli
-
sion, people riding in these areas are more
likely to be seriously injured or killed.
If this vehicle was not factory equipped with a
passenger seat, NEVER attempt to install a
passenger seat because the safety systems,
including the air bags and seat belt, may not
properly protect you.
It is dangerous to ride in a cargo area, inside
or outside of a vehicle. In a collision, people
riding in this area are more likely to be seri -
ously injured or killed.
Only ride in available seating positions
equipped with seat belt systems. Always prop -
erly wear your seat belt. Failure to do so could
result in an increased risk of serious injury or
death in the event of an accident.
Be sure everyone in your vehicle is in a seat
and using a seat belt properly. Occupants,
including the driver, should always wear their
seat belts whether or not an air bag is also
provided at their seating positions to minimize
the risk of severe injury or death in the event
of a crash.
All occupants, including the driver, should not
operate a vehicle or sit in a vehicle’s seat if the
head restraints are not in place of their proper
positions in order to minimize the risk of neck
injury in the event of a crash.
Head restraints should never be adjusted
while the vehicle is in motion. Driving a vehicle
with the head restraints improperly adjusted
or removed could cause serious injury or
death in the event of a collision.
WARNING!
22_LA_OM_EN_USC_t.book Page 36
Page 39 of 336
GETTING TO KNOW YOUR VEHICLE37
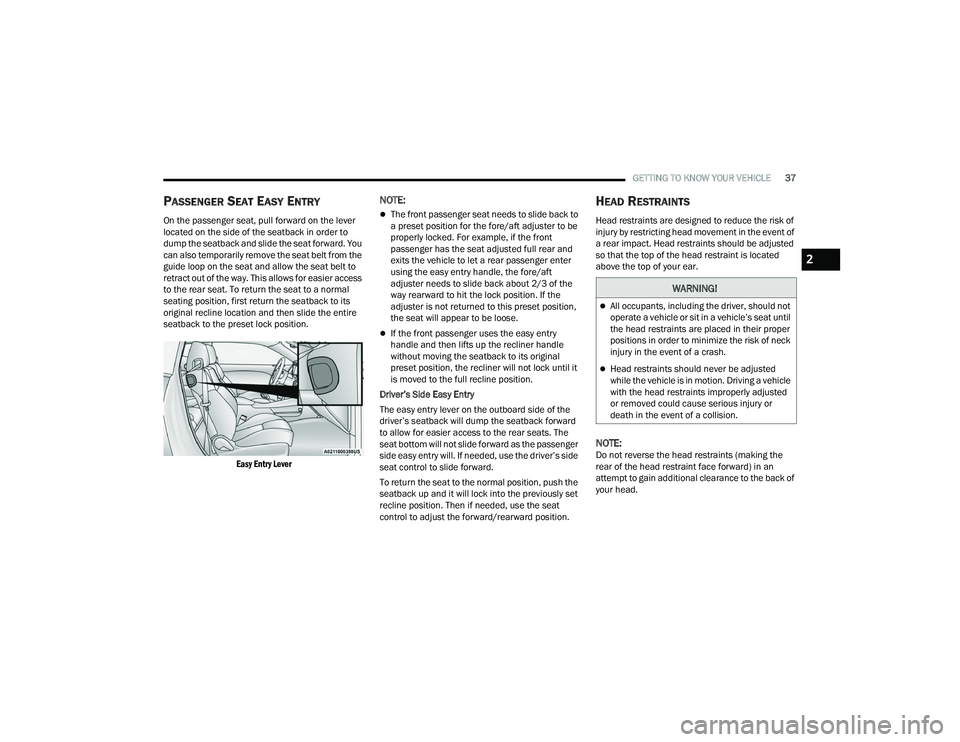
PASSENGER SEAT EASY ENTRY
On the passenger seat, pull forward on the lever
located on the side of the seatback in order to
dump the seatback and slide the seat forward. You
can also temporarily remove the seat belt from the
guide loop on the seat and allow the seat belt to
retract out of the way. This allows for easier access
to the rear seat. To return the seat to a normal
seating position, first return the seatback to its
original recline location and then slide the entire
seatback to the preset lock position.
Easy Entry Lever
NOTE:
The front passenger seat needs to slide back to
a preset position for the fore/aft adjuster to be
properly locked. For example, if the front
passenger has the seat adjusted full rear and
exits the vehicle to let a rear passenger enter
using the easy entry handle, the fore/aft
adjuster needs to slide back about 2/3 of the
way rearward to hit the lock position. If the
adjuster is not returned to this preset position,
the seat will appear to be loose.
If the front passenger uses the easy entry
handle and then lifts up the recliner handle
without moving the seatback to its original
preset position, the recliner will not lock until it
is moved to the full recline position.
Driver’s Side Easy Entry
The easy entry lever on the outboard side of the
driver’s seatback will dump the seatback forward
to allow for easier access to the rear seats. The
seat bottom will not slide forward as the passenger
side easy entry will. If needed, use the driver’s side
seat control to slide forward.
To return the seat to the normal position, push the
seatback up and it will lock into the previously set
recline position. Then if needed, use the seat
control to adjust the forward/rearward position.
HEAD RESTRAINTS
Head restraints are designed to reduce the risk of
injury by restricting head movement in the event of
a rear impact. Head restraints should be adjusted
so that the top of the head restraint is located
above the top of your ear.
NOTE:Do not reverse the head restraints (making the
rear of the head restraint face forward) in an
attempt to gain additional clearance to the back of
your head.
WARNING!
All occupants, including the driver, should not
operate a vehicle or sit in a vehicle’s seat until
the head restraints are placed in their proper
positions in order to minimize the risk of neck
injury in the event of a crash.
Head restraints should never be adjusted
while the vehicle is in motion. Driving a vehicle
with the head restraints improperly adjusted
or removed could cause serious injury or
death in the event of a collision.
2
22_LA_OM_EN_USC_t.book Page 37
Page 40 of 336
38GETTING TO KNOW YOUR VEHICLE
(Continued)
Reactive Head Restraints — Front Seats
The front driver and passenger seats are equipped
with Reactive Head Restraints (RHR). In the event
of a rear impact, the RHR will automatically extend
forward minimizing the gap between the back of
the occupants head and the RHR.
The RHR will automatically return to their normal
position following a rear impact. If the RHR do not
return to their normal position, see an authorized
dealer immediately.
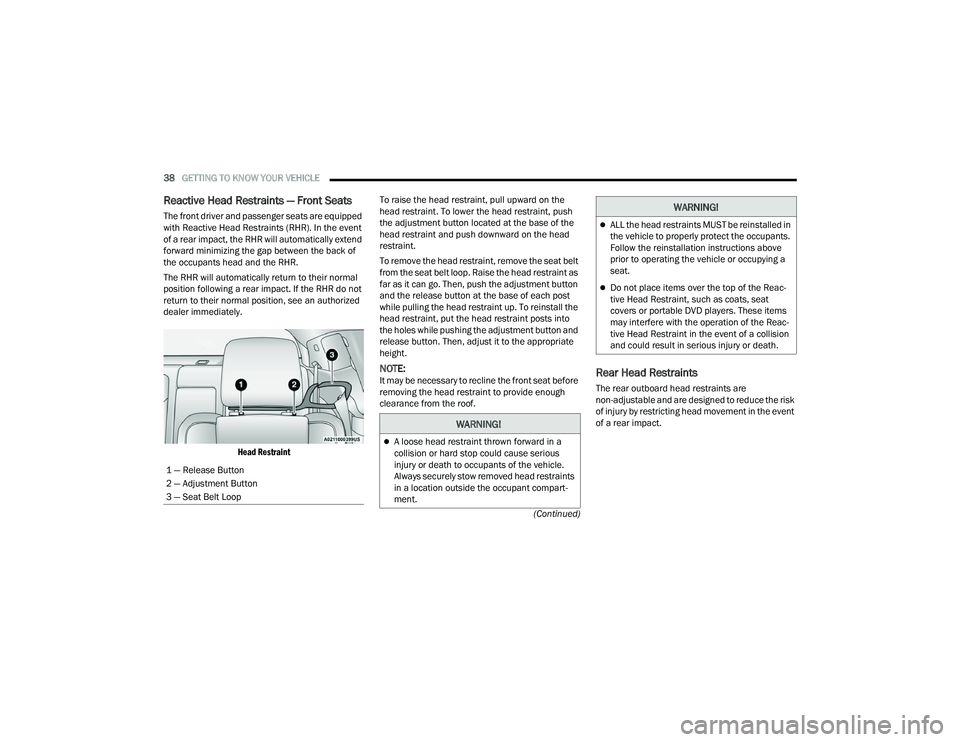
Head Restraint
To raise the head restraint, pull upward on the
head restraint. To lower the head restraint, push
the adjustment button located at the base of the
head restraint and push downward on the head
restraint.
To remove the head restraint, remove the seat belt
from the seat belt loop. Raise the head restraint as
far as it can go. Then, push the adjustment button
and the release button at the base of each post
while pulling the head restraint up. To reinstall the
head restraint, put the head restraint posts into
the holes while pushing the adjustment button and
release button. Then, adjust it to the appropriate
height.
NOTE:It may be necessary to recline the front seat before
removing the head restraint to provide enough
clearance from the roof.Rear Head Restraints
The rear outboard head restraints are
non-adjustable and are designed to reduce the risk
of injury by restricting head movement in the event
of a rear impact.
1 — Release Button
2 — Adjustment Button
3 — Seat Belt Loop
WARNING!
A loose head restraint thrown forward in a
collision or hard stop could cause serious
injury or death to occupants of the vehicle.
Always securely stow removed head restraints
in a location outside the occupant compart -
ment.
ALL the head restraints MUST be reinstalled in
the vehicle to properly protect the occupants.
Follow the reinstallation instructions above
prior to operating the vehicle or occupying a
seat.
Do not place items over the top of the Reac -
tive Head Restraint, such as coats, seat
covers or portable DVD players. These items
may interfere with the operation of the Reac -
tive Head Restraint in the event of a collision
and could result in serious injury or death.
WARNING!
22_LA_OM_EN_USC_t.book Page 38
Page 203 of 336
SAFETY201
(Continued)
SEAT BELT SYSTEMS
Buckle up even though you are an excellent driver,
even on short trips. Someone on the road may be
a poor driver and could cause a collision that
includes you. This can happen far away from home
or on your own street.
Research has shown that seat belts save lives, and
they can reduce the seriousness of injuries in a
collision. Some of the worst injuries happen when
people are thrown from the vehicle. Seat belts
reduce the possibility of ejection and the risk of
injury caused by striking the inside of the vehicle.
Everyone in a motor vehicle should be belted at all
times.
Vehicles Without Passenger Seating
Installed
If your vehicle does not have a factory installed
front passenger seat and/or rear passenger seats,
the features described in this section may not be
available in your vehicle.
This vehicle has been designed to maximize total
performance. The passenger seats may be
deleted, which may affect the NVH (Noise,
Vibration, and Harshness) characteristics. As a
result, the vehicle may be louder overall.
Furthermore, the passenger seats and seat belts
systems are deleted.
Enhanced Seat Belt Use Reminder System
(BeltAlert)
Driver And Passenger BeltAlert — If Equipped BeltAlert is a feature intended to remind
the driver and outboard front seat
passenger (if equipped with outboard
front passenger seat BeltAlert) to buckle
their seat belts. The BeltAlert feature is active
whenever the ignition switch is in the START or
ON/RUN position.
WARNING!
If the passenger and/or rear seats have been
removed, do not ride in those areas. In a colli -
sion, people riding in these areas are more
likely to be seriously injured or killed.
If this vehicle was not factory equipped with a
passenger seat, NEVER attempt to install a
passenger seat because the safety systems,
including the air bags and seat belt, may not
properly protect you.
It is dangerous to ride in a cargo area, inside
or outside of a vehicle. In a collision, people
riding in this area are more likely to be seri -
ously injured or killed.
Only ride in available seating positions
equipped with seat belt systems. Always prop -
erly wear your seat belt. Failure to do so could
result in an increased risk of serious injury or
death in the event of an accident.
Be sure everyone in your vehicle is in a seat
and using a seat belt properly. Occupants,
including the driver, should always wear their
seat belts whether or not an air bag is also
provided at their seating positions to minimize
the risk of severe injury or death in the event
of a crash.
All occupants, including the driver, should not
operate a vehicle or sit in a vehicle’s seat if the
head restraints are not in place of their proper
positions in order to minimize the risk of neck
injury in the event of a crash.
Head restraints should never be adjusted
while the vehicle is in motion. Driving a vehicle
with the head restraints improperly adjusted
or removed could cause serious injury or
death in the event of a collision.
WARNING!
6
22_LA_OM_EN_USC_t.book Page 201
Page 209 of 336
SAFETY207
(Continued)
How To Engage The Automatic Locking Mode
1. Buckle the combination lap and shoulder
belt.
2. Grab the shoulder portion and pull downward until the entire seat belt is extracted.
3. Allow the seat belt to retract. As the seat belt retracts, you will hear a clicking sound. This
indicates the seat belt is now in the Automatic
Locking Mode.
How To Disengage The Automatic Locking Mode
Unbuckle the combination lap/shoulder belt and
allow it to retract completely to disengage the
Automatic Locking Mode and activate the vehicle
sensitive (emergency) locking mode.
SUPPLEMENTAL RESTRAINT SYSTEMS
(SRS)
All passenger occupants within the vehicle must be
in a seat equipped with a Seat Belt System and
Head Restraint for the safety of the passenger.
If the front passenger and/or rear seats have been
removed do not ride in those areas.
Some of the safety features described in this
section may be standard equipment on some
models, or may be optional equipment on others. If
you are not sure, ask an authorized dealer.
The air bag system must be ready to protect you in
a collision. The Occupant Restraint Controller
(ORC) monitors the internal circuits and
interconnecting wiring associated with the
electrical Air Bag System Components. Your
vehicle may be equipped with the following Air Bag
System Components:
Air Bag System Components
Occupant Restraint Controller (ORC)
Air Bag Warning Light
Steering Wheel and Column
Instrument Panel
Knee Impact Bolsters
Driver and Front Passenger Air Bags
Seat Belt Buckle Switch
Supplemental Side Air Bags
Front and Side Impact Sensors
Seat Belt Pretensioners
Seat Track Position Sensors
NOTE:Vehicles with front passenger seat deleted will not
be equipped with the Seat Belt Buckle Switch, Seat
Belt Pretensioner, Supplemental Seat Mounted
Side Airbag, and Seat Track Position Sensors for
the front passenger.
All passenger occupants within the vehicle must be
in a seat equipped with a Seat Belt System and
Head Restraint for the safety of the passenger.
If the front passenger and/or rear seats have been
removed do not ride in those areas.WARNING!
The seat belt assembly must be replaced if the
switchable Automatic Locking Retractor (ALR)
feature or any other seat belt function is not
working properly when checked according to
the procedures in the Service Manual.
Failure to replace the seat belt assembly
could increase the risk of injury in collisions.
Do not use the Automatic Locking Mode to
restrain occupants who are wearing the seat
belt or children who are using booster seats.
The locked mode is only used to install
rear-facing or forward-facing child restraints
that have a harness for restraining the child.
WARNING!
6
22_LA_OM_EN_USC_t.book Page 207
Page 220 of 336
218SAFETY
Older Children And Child Restraints
NOTE:If your vehicle is not equipped with a rear seat, FCA
US LLC recommends that you do not allow children
12 years old and under to ride in your vehicle. If the
rear seats are not present in your vehicle, NEVER
install a child restraint in these positions. If you
must install a forward facing child restraint in the
front passenger seat, then you must use the seat
belt system to secure the restraint. A top tether
strap extension may be needed to reach the tether
anchor on the rear shelf directly behind the
passenger seat. Children who are two years old or who have
outgrown their rear-facing convertible child seat
can ride forward-facing in the vehicle.
Forward-facing child seats and convertible child
seats used in the forward-facing direction are for
children who are over two years old or who have
outgrown the rear-facing weight or height limit of
their rear-facing convertible child seat. Children
should remain in a forward-facing child seat with a
harness for as long as possible, up to the highest
weight or height allowed by the child seat.
All children whose weight or height is above the
forward-facing limit for the child seat should use a
belt-positioning booster seat until the vehicle’s
seat belts fit properly. If the child cannot sit with
knees bent over the vehicle’s seat cushion while
the child’s back is against the seatback, they
should use a belt-positioning booster seat. The
child and belt-positioning booster seat are held in
the vehicle by the seat belt.
WARNING!
Never place a rear-facing child restraint in
front of an air bag. A deploying passenger
front air bag can cause death or serious injury
to a child 12 years or younger, including a
child in a rear-facing child restraint.
Never install a rear-facing child restraint in the
front seat of a vehicle. Only use a rear-facing
child restraint in the rear seat. If the vehicle
does not have a rear seat, do not transport a
rear-facing child restraint in that vehicle.
WARNING!
Improper installation can lead to failure of an
infant or child restraint. It could come loose in
a collision. The child could be badly injured or
killed. Follow the child restraint manufac
-
turer’s directions exactly when installing an
infant or child restraint.
After a child restraint is installed in the
vehicle, do not move the vehicle seat forward
or rearward because it can loosen the child
restraint attachments. Remove the child
restraint before adjusting the vehicle seat
position. When the vehicle seat has been
adjusted, reinstall the child restraint.
When your child restraint is not in use, secure
it in the vehicle with the seat belt or LATCH
anchorages, or remove it from the vehicle. Do
not leave it loose in the vehicle. In a sudden
stop or accident, it could strike the occupants
or seatbacks and cause serious personal
injury.
22_LA_OM_EN_USC_t.book Page 218
Page 225 of 336
SAFETY223
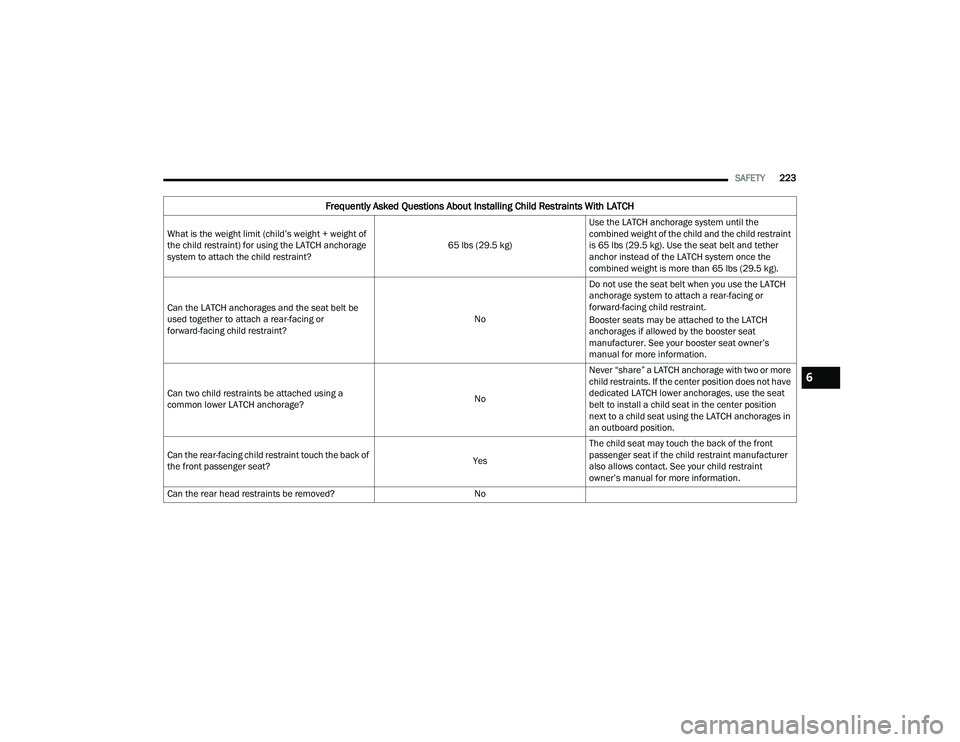
Frequently Asked Questions About Installing Child Restraints With LATCH
What is the weight limit (child’s weight + weight of
the child restraint) for using the LATCH anchorage
system to attach the child restraint? 65 lbs (29.5 kg)Use the LATCH anchorage system until the
combined weight of the child and the child restraint
is 65 lbs (29.5 kg). Use the seat belt and tether
anchor instead of the LATCH system once the
combined weight is more than 65 lbs (29.5 kg).
Can the LATCH anchorages and the seat belt be
used together to attach a rear-facing or
forward-facing child restraint? NoDo not use the seat belt when you use the LATCH
anchorage system to attach a rear-facing or
forward-facing child restraint.
Booster seats may be attached to the LATCH
anchorages if allowed by the booster seat
manufacturer. See your booster seat owner’s
manual for more information.
Can two child restraints be attached using a
common lower LATCH anchorage? NoNever “share” a LATCH anchorage with two or more
child restraints. If the center position does not have
dedicated LATCH lower anchorages, use the seat
belt to install a child seat in the center position
next to a child seat using the LATCH anchorages in
an outboard position.
Can the rear-facing child restraint touch the back of
the front passenger seat? YesThe child seat may touch the back of the front
passenger seat if the child restraint manufacturer
also allows contact. See your child restraint
owner’s manual for more information.
Can the rear head restraints be removed? No
6
22_LA_OM_EN_USC_t.book Page 223
Page 231 of 336
SAFETY229
1. Look behind the seating position where you plan to install the child restraint to find the
tether anchorage. You may need to move the
seat forward to provide better access to the
tether anchorage. If there is no top tether
anchorage for that seating position, move the
child restraint to another position in the
vehicle if one is available.
2. Rotate or lift the cover to access the anchor directly behind the seat where you are placing
the child restraint. 3. Route the tether strap to provide the most
direct path for the strap between the anchor
and the child seat. If your vehicle is equipped
with adjustable rear head restraints, raise the
head restraint, and where possible, route the
tether strap under the head restraint and
between the two posts. If not possible, lower
the head restraint and pass the tether strap
around the outboard side of the head restraint.
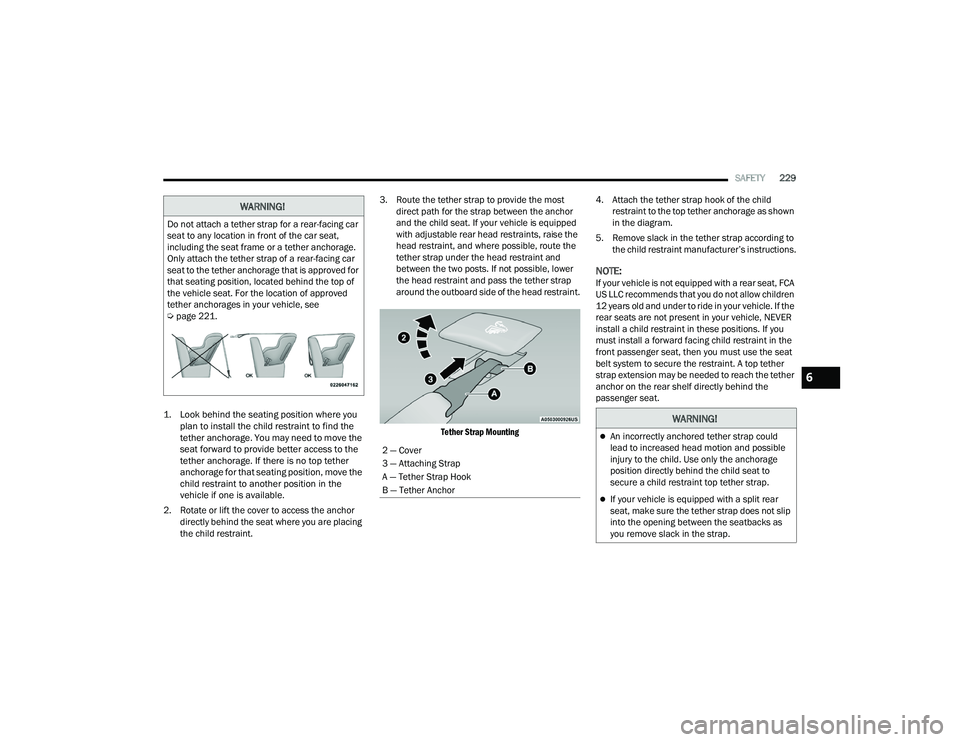
Tether Strap Mounting
4. Attach the tether strap hook of the child
restraint to the top tether anchorage as shown
in the diagram.
5. Remove slack in the tether strap according to the child restraint manufacturer’s instructions.
NOTE:If your vehicle is not equipped with a rear seat, FCA
US LLC recommends that you do not allow children
12 years old and under to ride in your vehicle. If the
rear seats are not present in your vehicle, NEVER
install a child restraint in these positions. If you
must install a forward facing child restraint in the
front passenger seat, then you must use the seat
belt system to secure the restraint. A top tether
strap extension may be needed to reach the tether
anchor on the rear shelf directly behind the
passenger seat.
WARNING!
Do not attach a tether strap for a rear-facing car
seat to any location in front of the car seat,
including the seat frame or a tether anchorage.
Only attach the tether strap of a rear-facing car
seat to the tether anchorage that is approved for
that seating position, located behind the top of
the vehicle seat. For the location of approved
tether anchorages in your vehicle, see
Úpage 221.
2 — Cover
3 — Attaching Strap
A — Tether Strap Hook
B — Tether Anchor
WARNING!
An incorrectly anchored tether strap could
lead to increased head motion and possible
injury to the child. Use only the anchorage
position directly behind the child seat to
secure a child restraint top tether strap.
If your vehicle is equipped with a split rear
seat, make sure the tether strap does not slip
into the opening between the seatbacks as
you remove slack in the strap.
6
22_LA_OM_EN_USC_t.book Page 229
Page 232 of 336

230SAFETY
SAFETY TIPS
TRANSPORTING PASSENGERS
NEVER TRANSPORT PASSENGERS IN THE CARGO
AREA.
TRANSPORTING PETS
Air Bags deploying in the front seat could harm
your pet. An unrestrained pet will be thrown about
and possibly injured, or injure a passenger during
panic braking or in a collision. Pets should be restrained in the rear seat (if
equipped) in pet harnesses or pet carriers that are
secured by seat belts.
SAFETY CHECKS YOU SHOULD MAKE
I
NSIDE THE VEHICLE
Seat Belts
Inspect the seat belt system periodically, checking
for cuts, frays, and loose parts. Damaged parts
must be replaced immediately. Do not
disassemble or modify the system.
If your vehicle is involved in a collision, or if you
have questions regarding the seat belt or retractor
conditions, take your vehicle to an authorized FCA
dealer or authorized FCA Certified Collision Care
Program facility for inspection.
Air Bag Warning Light
The Air Bag Warning Light will turn on for
four to eight seconds as a bulb check
when the ignition switch is first placed in
the ON/RUN mode. If the light is either
not on during starting, stays on, or turns on while
driving, have the system inspected at an
authorized dealer as soon as possible. After the
bulb check, this light will illuminate with a single
chime when a fault with the Air Bag System has
been detected. It will stay on until the fault is removed. If the light comes on intermittently or
remains on while driving, have an authorized
dealer service the vehicle immediately
Ú
page 200.
Defroster
Check operation by selecting the defrost mode and
place the blower control on high speed. You should
be able to feel the air directed against the
windshield. See an authorized dealer for service if
your defroster is inoperable.
Floor Mat Safety Information
Always use floor mats designed to fit your vehicle.
Only use a floor mat that does not interfere with the
operation of the accelerator, brake or clutch
pedals. Only use a floor mat that is securely
attached using the floor mat fasteners so it cannot
slip out of position and interfere with the
accelerator, brake or clutch pedals or impair safe
operation of your vehicle in other ways.
WARNING!
Do not leave children or animals inside parked
vehicles in hot weather. Interior heat buildup
may cause serious injury or death.
It is extremely dangerous to ride in a cargo
area, inside or outside of a vehicle. In a colli -
sion, people riding in these areas are more
likely to be seriously injured or killed.
Do not allow people to ride in any area of your
vehicle that is not equipped with seats and
seat belts.
Be sure everyone in your vehicle is in a seat
and using a seat belt properly.
22_LA_OM_EN_USC_t.book Page 230
Page 311 of 336
SERVICING AND MAINTENANCE309
If your vehicle is damaged due to a collision or
similar cause that destroys the paint and protec -
tive coating, have your vehicle repaired as soon
as possible.
If you carry special cargo such as chemicals,
fertilizers, de-icer salt, etc., be sure that such
materials are well packaged and sealed.
If a lot of driving is done on gravel roads,
consider mud or stone shields behind each
wheel.
Use Mopar® Touch Up Paint on scratches as
soon as possible. An authorized dealer has
touch up paint to match the color of your
vehicle.
INTERIORS
SEATS AND FABRIC PARTS
Use Mopar® Total Clean to clean fabric upholstery
and carpeting.
Seat Belt Maintenance
Do not bleach, dye, or clean the belts with
chemical solvents or abrasive cleaners. This will
weaken the fabric.
If the belts need cleaning, use Mopar® Total
Clean, a mild soap solution, or lukewarm water. Do
not remove the belts from the vehicle to wash
them. Dry with a soft cloth.
Sun damage can also weaken the fabric. Replace
the belts if they appear frayed or worn or if the
buckles do not work properly.
PLASTIC AND COATED PARTS
Use Mopar® Total Clean to clean vinyl upholstery.
Cleaning Plastic Instrument Cluster
Lenses
The lenses in front of the instruments in this
vehicle are molded in clear plastic. When cleaning
the lenses, care must be taken to avoid scratching
the plastic.
Clean with a wet soft cloth. A mild soap solution
may be used, but do not use high alcohol content
or abrasive cleaners. If soap is used, wipe clean
with a clean damp cloth. Dry with a soft cloth.
WARNING!
Do not use volatile solvents for cleaning
purposes. Many are potentially flammable, and
if used in closed areas they may cause
respiratory harm.
WARNING!
A frayed or torn seat belt could rip apart in a
collision and leave you with no protection.
Inspect the seat belt system periodically,
checking for cuts, frays, or loose parts.
Damaged parts must be replaced immediately.
Do not disassemble or modify the seat belt
system. If your vehicle is involved in a collision,
or if you have questions regarding seat belt or
retractor conditions, take your vehicle to an
authorized FCA dealer or authorized FCA
Certified Collision Care Program facility for
inspection.
CAUTION!
Direct contact of air fresheners, insect repel -
lents, suntan lotions, or hand sanitizers to the
plastic, painted, or decorated surfaces of the
interior may cause permanent damage. Wipe
away immediately.
Damage caused by these type of products
may not be covered by your New Vehicle
Limited Warranty.
8
22_LA_OM_EN_USC_t.book Page 309