keyless DODGE CHALLENGER 2023 User Guide
[x] Cancel search | Manufacturer: DODGE, Model Year: 2023, Model line: CHALLENGER, Model: DODGE CHALLENGER 2023Pages: 300, PDF Size: 12.82 MB
Page 54 of 300
52GETTING TO KNOW YOUR VEHICLE
WINDOWS
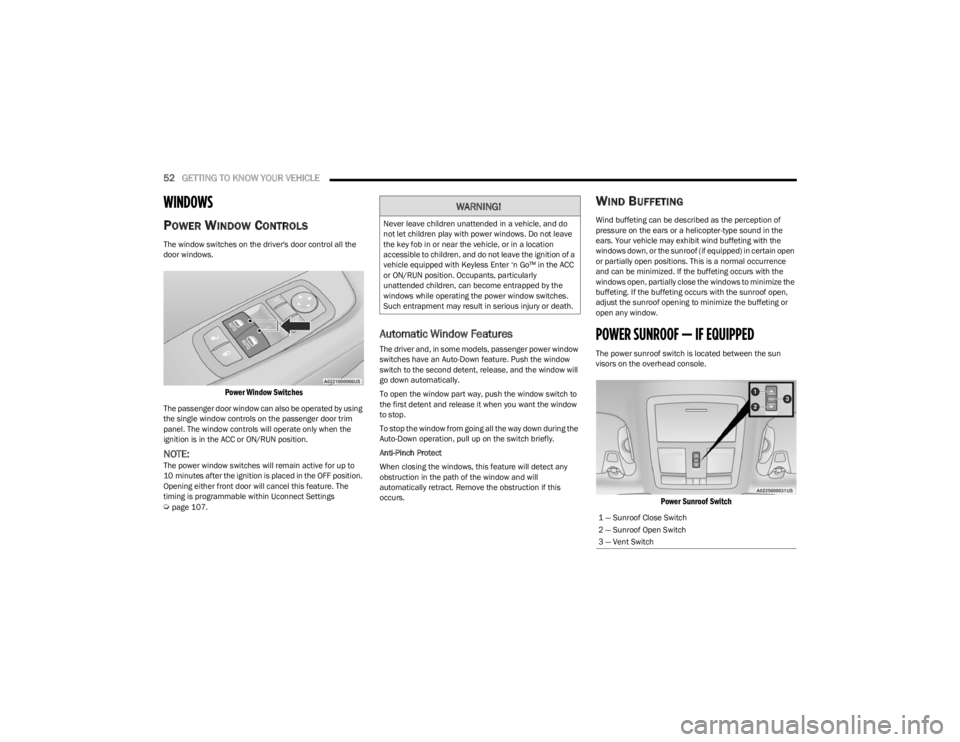
POWER WINDOW CONTROLS
The window switches on the driver's door control all the
door windows.
Power Window Switches
The passenger door window can also be operated by using
the single window controls on the passenger door trim
panel. The window controls will operate only when the
ignition is in the ACC or ON/RUN position.
NOTE:The power window switches will remain active for up to
10 minutes after the ignition is placed in the OFF position.
Opening either front door will cancel this feature. The
timing is programmable within Uconnect Settings
Úpage 107.
Automatic Window Features
The driver and, in some models, passenger power window
switches have an Auto-Down feature. Push the window
switch to the second detent, release, and the window will
go down automatically.
To open the window part way, push the window switch to
the first detent and release it when you want the window
to stop.
To stop the window from going all the way down during the
Auto-Down operation, pull up on the switch briefly.
Anti-Pinch Protect
When closing the windows, this feature will detect any
obstruction in the path of the window and will
automatically retract. Remove the obstruction if this
occurs.
WIND BUFFETING
Wind buffeting can be described as the perception of
pressure on the ears or a helicopter-type sound in the
ears. Your vehicle may exhibit wind buffeting with the
windows down, or the sunroof (if equipped) in certain open
or partially open positions. This is a normal occurrence
and can be minimized. If the buffeting occurs with the
windows open, partially close the windows to minimize the
buffeting. If the buffeting occurs with the sunroof open,
adjust the sunroof opening to minimize the buffeting or
open any window.
POWER SUNROOF — IF EQUIPPED
The power sunroof switch is located between the sun
visors on the overhead console.
Power Sunroof Switch
WARNING!
Never leave children unattended in a vehicle, and do
not let children play with power windows. Do not leave
the key fob in or near the vehicle, or in a location
accessible to children, and do not leave the ignition of a
vehicle equipped with Keyless Enter ‘n Go™ in the ACC
or ON/RUN position. Occupants, particularly
unattended children, can become entrapped by the
windows while operating the power window switches.
Such entrapment may result in serious injury or death.
1 — Sunroof Close Switch
2 — Sunroof Open Switch
3 — Vent Switch
23_LA_OM_EN_USC_t.book Page 52
Page 55 of 300

GETTING TO KNOW YOUR VEHICLE53
OPENING AND CLOSING THE SUNROOF
Express Open/Close
Push the switch rearward and release it within one
second, the sunroof and sunshade will open automatically
and stop at full open position. Push the switch forward and release it within one second
and the sunroof will close automatically from any position.
During Express Open or Express Close operation, any
other movement of the sunroof switch will stop the
sunroof.
Manual Open/Close
Push and hold the switch rearward, the sunroof and
sunshade will open and automatically stop at full open
position.
Push and hold the switch forward and the sunroof will
close from any position and stop at a full closed position.
Any release of the switch during open or close operation
will stop the sunroof movement. The sunroof will remain in
a partially opened position until the switch is operated and
held again.
Venting The Sunroof
Push and release the Vent switch within one second and
the sunroof will open to the vent position. During Express
Vent operation, any other actuation of the sunroof
switches will stop the sunroof operation.
PINCH PROTECT FEATURE —
I
F EQUIPPED
This feature will detect an obstruction in the closing of the
sunroof during the Express Close operation. If an
obstruction in the path of the sunroof is detected, the
sunroof will automatically retract. Remove the obstruction
if this occurs.
NOTE:If three consecutive sunroof close attempts result in Pinch
Protect reversals, Pinch Protect will disable and the
sunroof must be closed in Manual Mode.
SUNSHADE OPERATION
The sunshade can be opened manually. However, the
sunshade will open automatically as the sunroof opens.
NOTE:The sunshade cannot be closed if the sunroof is open.
SUNROOF MAINTENANCE
Use only a non-abrasive cleaner and a soft cloth to clean
the glass panel. Periodically check for and clear out any
debris that may have collected in the tracks.
IGNITION OFF OPERATION
The power sunroof switch can remain active in Accessory
Delay for up to approximately 10 minutes after the
vehicle’s ignition is placed in the OFF position. Opening
either front door will cancel this feature.
NOTE:This feature is programmable using the Uconnect system Úpage 107.
WARNING!
Never leave children unattended in a vehicle, or with
access to an unlocked vehicle. Never leave the key
fob in or near the vehicle, or in a location accessible
to children. Do not leave the ignition of a vehicle
equipped with Keyless Enter ‘n Go™ in the ACC or
ON/RUN position. Occupants, particularly unat -
tended children, can become entrapped by the
power sunroof while operating the power sunroof
switch. Such entrapment may result in serious injury
or death.
In a collision, there is a greater risk of being thrown
from a vehicle with an open sunroof. You could also
be seriously injured or killed. Always fasten your seat
belt properly and make sure all passengers are also
properly secured.
Do not allow small children to operate the sunroof.
Never allow your fingers, other body parts, or any
object, to project through the sunroof opening. Injury
may result.
2
23_LA_OM_EN_USC_t.book Page 53
Page 59 of 300
GETTING TO KNOW YOUR INSTRUMENT PANEL57
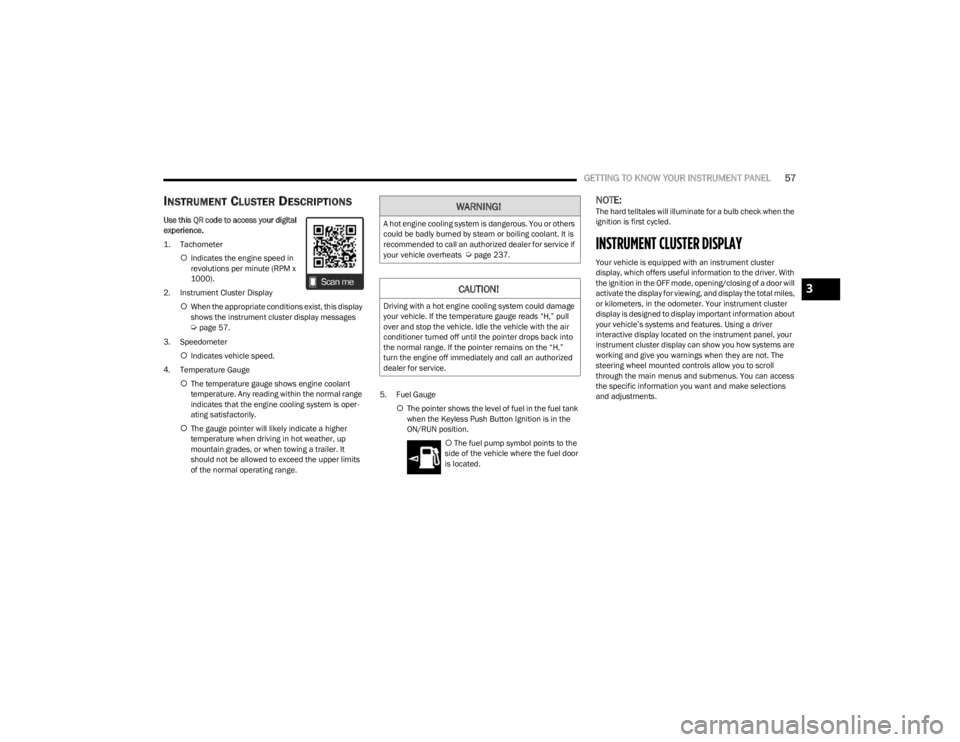
INSTRUMENT CLUSTER DESCRIPTIONS
Use this QR code to access your digital
experience.
1. Tachometer
Indicates the engine speed in
revolutions per minute (RPM x
1000).
2. Instrument Cluster Display When the appropriate conditions exist, this display
shows the instrument cluster display messages
Úpage 57.
3. Speedometer Indicates vehicle speed.
4. Temperature Gauge The temperature gauge shows engine coolant
temperature. Any reading within the normal range
indicates that the engine cooling system is oper -
ating satisfactorily.
The gauge pointer will likely indicate a higher
temperature when driving in hot weather, up
mountain grades, or when towing a trailer. It
should not be allowed to exceed the upper limits
of the normal operating range. 5. Fuel Gauge
The pointer shows the level of fuel in the fuel tank
when the Keyless Push Button Ignition is in the
ON/RUN position.
The fuel pump symbol points to the
side of the vehicle where the fuel door
is located.
NOTE:The hard telltales will illuminate for a bulb check when the
ignition is first cycled.
INSTRUMENT CLUSTER DISPLAY
Your vehicle is equipped with an instrument cluster
display, which offers useful information to the driver. With
the ignition in the OFF mode, opening/closing of a door will
activate the display for viewing, and display the total miles,
or kilometers, in the odometer. Your instrument cluster
display is designed to display important information about
your vehicle’s systems and features. Using a driver
interactive display located on the instrument panel, your
instrument cluster display can show you how systems are
working and give you warnings when they are not. The
steering wheel mounted controls allow you to scroll
through the main menus and submenus. You can access
the specific information you want and make selections
and adjustments.
WARNING!
A hot engine cooling system is dangerous. You or others
could be badly burned by steam or boiling coolant. It is
recommended to call an authorized dealer for service if
your vehicle overheats
Úpage 237.
CAUTION!
Driving with a hot engine cooling system could damage
your vehicle. If the temperature gauge reads “H,” pull
over and stop the vehicle. Idle the vehicle with the air
conditioner turned off until the pointer drops back into
the normal range. If the pointer remains on the “H,”
turn the engine off immediately and call an authorized
dealer for service.
3
23_LA_OM_EN_USC_t.book Page 57
Page 61 of 300
GETTING TO KNOW YOUR INSTRUMENT PANEL59
For the Trip and Fuel Economy menus (and Performance
Timers) — If Equipped:
Information is reset by pushing and holding the OK
button.
ENGINE OIL LIFE RESET
Use this QR code to access your digital
experience .
Oil Change Required
Your vehicle is equipped with an
engine oil change indicator system.
The “Oil Change Required” message
will display in the instrument cluster
display for five seconds after a single
chime has sounded, to indicate the next scheduled oil
change interval. The engine oil change indicator system is
duty cycle based, which means the engine oil change
interval may fluctuate, dependent upon your personal
driving style.
Unless reset, this message will continue to display each
time you place the ignition in the ON/RUN position. To turn
off the message temporarily, push and release the OK or
arrow buttons. To reset the oil change indicator system
(after performing the scheduled maintenance), refer to
the following procedure. Vehicles Equipped With Keyless Enter ‘n Go™ — Ignition
Use the steering wheel instrument cluster display controls
for the following procedure(s):
1. Without pressing the brake pedal, push the ENGINE
START/STOP button and place the ignition in the
ON/RUN position (do not start the engine).
2. Push and release the down arrow button to scroll
downward through the main menu to “Vehicle Info.”
3. Push and release the right arrow button to access
the ”Oil Life” screen.
4. Push and hold the OK button to reset oil life. If
conditions are met, the gauge and numeric display
will update to show 100%. If conditions are not met a
pop-up message of "To reset oil life engine must be
off with ignition in run” will be displayed (for five
seconds), and the user will remain at the Oil Life
screen.
5. Push and release the up or down arrow button
to return to previous main menu.
NOTE:If the indicator message illuminates when you start the
vehicle, the oil change indicator system did not reset. If
necessary, repeat this procedure. Secondary Method Of Resetting Engine Oil Life
1. Without pressing the brake pedal, push the ENGINE
START/STOP button and place the ignition to the
ON/RUN position (do not start the engine).
2. Fully press the accelerator pedal, slowly, three times within ten seconds.
3. Without pushing the brake pedal, push the ENGINE START/STOP button once to return the ignition to the
OFF position.
NOTE:If the indicator message illuminates when you start the
vehicle, the oil change indicator system did not reset.
If necessary, repeat this procedure.
PERFORMANCE SHIFT INDICATOR
(PSI) — I
F EQUIPPED
The PSI is enabled on vehicles with manual transmission,
or when a vehicle with automatic transmission is in
manual shift mode. The PSI provides the driver with a
visual indication within the instrument cluster display
when the driver configured gear shift point has been
reached and the driver is still accelerating. This indication
notifies the driver to change gear corresponding to the
configured RPMs in the head unit.
3
23_LA_OM_EN_USC_t.book Page 59
Page 73 of 300
71
STARTING AND OPERATING
STARTING THE ENGINE
Before starting your vehicle, adjust your seat, adjust the
inside and outside mirrors, fasten your seat belt, and if
present, instruct all other occupants to buckle their seat
belts.
MANUAL TRANSMISSION — IF EQUIPPED
Apply the parking brake, place the gear selector in
NEUTRAL and press the clutch pedal before starting
vehicle. This vehicle is equipped with a clutch interlocking
ignition system. It will not start unless the clutch pedal is
pressed to the floor.
AUTOMATIC TRANSMISSION —
I
F EQUIPPED
The gear selector must be in the PARK position before you
can start the engine. Apply the brakes before shifting into
any driving gear.
Tip Start Feature — Automatic
Transmission
Place the ignition in the START position and release it as
the starter engages. The starter motor will automatically
disengage itself once engine is running. If the engine fails
to start, the starter will disengage automatically in 10
seconds. If this occurs:
1. Place the ignition in the OFF position.
2. Wait 10 to 15 seconds.
3. Repeat the “Normal Starting” procedure.
NORMAL STARTING
To Turn On The Engine Using The ENGINE
START/STOP Button — Manual
Transmission Only
1. Press and hold the clutch pedal while pushing and
holding the ENGINE START/STOP button.
2. Release the ENGINE START/STOP button when the engine starts. If the vehicle fails to start within 10
seconds, release the ENGINE START/STOP button,
wait 10 to 15 seconds, then repeat the “Normal
Starting” procedure.
WARNING!
When exiting the vehicle, always make sure the igni -
tion is in OFF position, remove the key fob from the
vehicle and lock the vehicle.
Never leave children alone in a vehicle, or with
access to an unlocked vehicle. Leaving children in a
vehicle unattended is dangerous for a number of
reasons. A child or others could be seriously or fatally
injured. Children should be warned not to touch the
parking brake, brake pedal or the transmission gear
selector.
Do not leave the key fob in or near the vehicle (or in
a location accessible to children), and do not leave
the ignition (of a vehicle equipped with Keyless Enter
‘n Go™) in the ACC or ON/RUN position. A child could
operate power windows, other controls, or move the
vehicle.
Do not leave children or animals inside parked vehi -
cles in hot weather. Interior heat buildup may cause
serious injury or death.
CAUTION!
Shift into or out of PARK or REVERSE only after the
vehicle has come to a complete stop.
Do not shift between PARK, REVERSE, NEUTRAL, or
DRIVE when the engine is above idle speed.
Before shifting into any gear, make sure your foot is
firmly pressing the brake pedal.
4
23_LA_OM_EN_USC_t.book Page 71
Page 75 of 300
STARTING AND OPERATING73
If the vehicle is not in PARK and the driver turns off the
engine, the vehicle may AutoPark.
AutoPark will engage when all of these conditions are met:
Vehicle is equipped with an 8-speed transmission
Vehicle is not in PARK
Vehicle speed is 1.2 mph (1.9 km/h) or less
Ignition switched from RUN to ACC
NOTE:For Keyless Enter ‘n Go™ equipped vehicles, the engine
will turn off and the ignition switch will change to ACC
position. After 30 minutes, the ignition switches to OFF
automatically, unless the driver turns the ignition switch
OFF.
If the vehicle is not in PARK and the driver exits the vehicle
with the engine running, the vehicle may AutoPark.
AutoPark will engage when all of these conditions are met:
Vehicle is equipped with an 8-speed transmission
Vehicle is not in PARK
Vehicle speed is 1.2 mph (1.9 km/h) or less
Driver’s seat belt is unbuckled
Driver’s door is ajar
Brake pedal is not pressed The message “
AutoPark Engaged Shift to P then Shift to
Gear ” will display in the instrument cluster.
NOTE:In some cases the ParkSense graphic will be displayed in
the instrument cluster. In these cases, the gear selector
must be returned to “P” to select desired gear.
If the driver shifts into PARK while moving, the vehicle may
AutoPark.
AutoPark will engage ONLY when vehicle speed is 1.2 mph
(1.9 km/h) or less.
The message “ Vehicle Speed is Too High to Shift to P ” will
be displayed in the instrument cluster if vehicle speed is
above 1.2 mph (1.9 km/h).
ALWAYS DO A VISUAL CHECK
that your vehicle is in PARK
by looking for the "P" in the instrument cluster display and
on the gear selector. As an added precaution, always apply
the parking brake when exiting the vehicle.
EXTENDED PARK STARTING
NOTE:Extended Park condition occurs when the vehicle has not
been started or driven for at least 30 days.
1. Install a battery charger or jumper cables to the battery to ensure a full battery charge during the
crank cycle.
2. Place the ignition in the START position and release it when the engine starts. For Keyless Enter ‘n Go™
ignition systems, press and hold the brake pedal
while pushing the ENGINE START/STOP button once.
3. If the engine fails to start within 10 seconds, place the ignition in the OFF position, wait 10 to 15 seconds
to allow the starter to cool, then repeat the “Extended
Park Starting” procedure.
4. If the engine fails to start after eight attempts, allow the starter to cool for at least 10 minutes, then repeat
the procedure.
AutoPark is a supplemental feature. It is not
designed to replace the need to shift your vehicle
into PARK. It is a back up system and should not be
relied upon as the primary method by which the
driver shifts the vehicle into PARK.
WARNING!
WARNING!
If vehicle speed is above 1.2 mph (1.9 km/h), the
transmission will default to NEUTRAL until the vehicle
speed drops below 1.2 mph (1.9 km/h). A vehicle left in
the NEUTRAL position can roll. As an added precaution,
always apply the parking brake when exiting the vehicle.
CAUTION!
To prevent damage to the starter, do not crank
continuously for more than 10 seconds at a time. Wait
10 to 15 seconds before trying again.
4
23_LA_OM_EN_USC_t.book Page 73
Page 77 of 300
STARTING AND OPERATING75
(Continued)
NOTE:
When the parking brake is applied and the transmis -
sion is placed in gear, the Brake Warning Light will
flash. If vehicle speed is detected, a chime will sound
to alert the driver. Fully release the parking brake
before attempting to move the vehicle.
This light only shows that the parking brake is applied.
It does not show the degree of brake application.
When parking on a hill, it is important to turn the front
wheels toward the curb on a downhill grade and away from
the curb on an uphill grade. For vehicles equipped with an
automatic transmission, apply the parking brake before
placing the gear selector in PARK, otherwise the load on
the transmission locking mechanism may make it difficult
to move the gear selector out of PARK. The parking brake
should always be applied whenever the driver is not in the
vehicle.
Manual Transmission — If Equipped
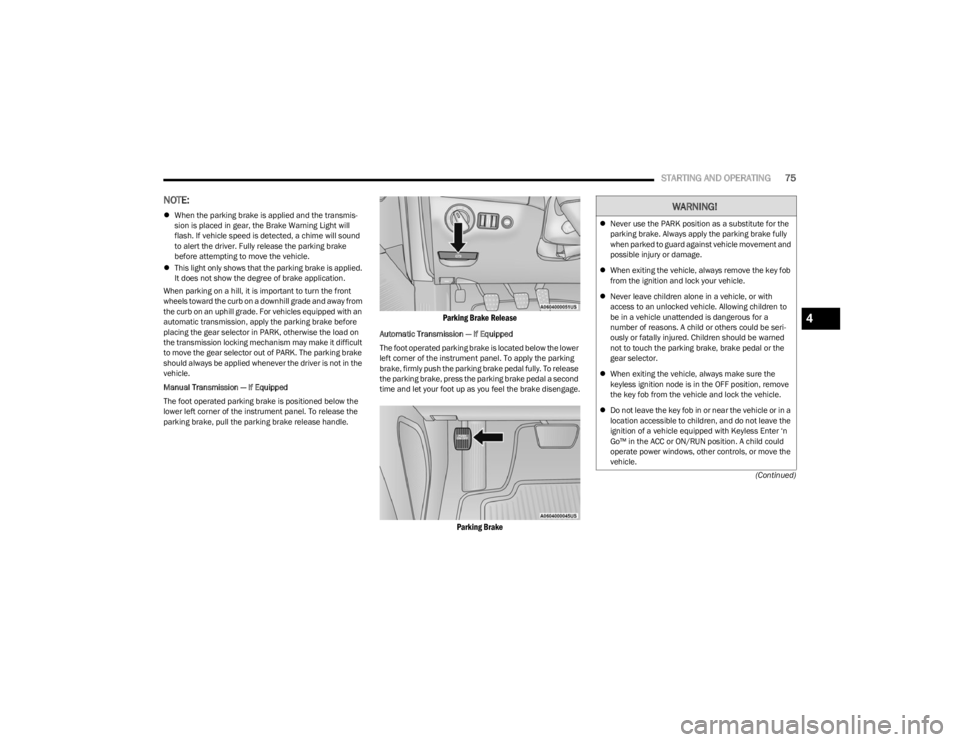
The foot operated parking brake is positioned below the
lower left corner of the instrument panel. To release the
parking brake, pull the parking brake release handle.
Parking Brake Release
Automatic Transmission — If Equipped
The foot operated parking brake is located below the lower
left corner of the instrument panel. To apply the parking
brake, firmly push the parking brake pedal fully. To release
the parking brake, press the parking brake pedal a second
time and let your foot up as you feel the brake disengage.
Parking Brake
WARNING!
Never use the PARK position as a substitute for the
parking brake. Always apply the parking brake fully
when parked to guard against vehicle movement and
possible injury or damage.
When exiting the vehicle, always remove the key fob
from the ignition and lock your vehicle.
Never leave children alone in a vehicle, or with
access to an unlocked vehicle. Allowing children to
be in a vehicle unattended is dangerous for a
number of reasons. A child or others could be seri -
ously or fatally injured. Children should be warned
not to touch the parking brake, brake pedal or the
gear selector.
When exiting the vehicle, always make sure the
keyless ignition node is in the OFF position, remove
the key fob from the vehicle and lock the vehicle.
Do not leave the key fob in or near the vehicle or in a
location accessible to children, and do not leave the
ignition of a vehicle equipped with Keyless Enter ‘n
Go™ in the ACC or ON/RUN position. A child could
operate power windows, other controls, or move the
vehicle.
4
23_LA_OM_EN_USC_t.book Page 75
Page 79 of 300

STARTING AND OPERATING77
The 6-speed manual transmission has a spring that
centers the gear selector near THIRD and FOURTH gear.
This spring helps you know which gear you are in when you
are shifting. Be careful when shifting from FIRST to
SECOND or downshifting from SIXTH to FIFTH.
The spring will try to pull the gear selector toward THIRD
and FOURTH gear. Make sure you move the gear selector
into SECOND or FIFTH gear. If you let the gear selector
move in the direction of the pulling, you may end shifting
from FIRST to FOURTH or from SIXTH to THIRD gear.
You must always use FIRST gear (or REVERSE) when
starting from a standing position.
RECOMMENDED SHIFT SPEEDS
To utilize your manual transmission efficiently for fuel
economy, it should be upshifted as listed in recommended
shift speed chart. Earlier upshifts during cruise conditions (relatively steady
speeds) may result in increased fuel economy.
Higher upshift speeds may be used to obtain a desired
acceleration rate.
NOTE:
Your vehicle is equipped with a transmission reverse
inhibitor system. Always press the clutch pedal fully to
the floor before shifting into REVERSE. When vehicle
speed is greater than 3 mph (5 km/h), the reverse
inhibitor activates to help prevent shifts into REVERSE.
When at a complete stop, you may notice lighter shift
efforts into REVERSE with the ignition switch in the ON
position (RUN position for Keyless Enter ‘n Go™), as
compared to the ignition LOCK position (OFF position
for Keyless Enter ‘n Go™). This is normal operation of
the transmission reverse inhibitor system.
Due to the high performance nature of your drivetrain,
you may hear your transmission. This can be most
noticeable when the vehicle is idling in NEUTRAL with
the clutch engaged (clutch pedal released), but it may
also be heard when driving at low engine RPM. Also,
this may be more noticeable when the transmission is
warm. This is a normal condition and is not an indica -
tion of a problem with your clutch or transmission.
1–4 SKIP SHIFT
In Auto Drive Mode, Default, or Street Drive Modes, there
are times when you must shift the transmission directly
from FIRST gear to FOURTH gear instead of from FIRST
gear to SECOND gear. This is to help you get the best
possible fuel economy from your vehicle. This occurs when the engine coolant (antifreeze) is higher
than 106°F (41°C), vehicle speed is greater than 19 mph
(30 km/h) but less than 21 mph (34 km/h), and the
transmission is in FIRST gear, and the accelerator is at ¼
throttle or less.
After you shift the transmission to FOURTH gear, you can
press the clutch in and shift to another forward gear.
DOWNSHIFTING
To maintain a safe speed and prolong brake life, downshift
to maintain a safe speed when descending a steep grade.
CAUTION!
Always make sure the vehicle comes to a complete stop
before shifting into REVERSE. Failure to do so may
result in transmission damage.
MANUAL TRANSMISSION RECOMMENDED SHIFT
SPEEDS
Axle
Ratio 1-4 4-5 5-6
3.90 mph 20 37 48
km/h 32 59 77
WARNING!
Skipping more than one gear while downshifting, could
cause you to lose control of your vehicle. You could have
a collision.
CAUTION!
If you skip more than one gear while downshifting or
downshift at too high an engine speed, you could
damage the engine, transmission, or clutch.
Do not downshift into FIRST gear when the vehicle is
moving faster than 15 mph (24 km/h), as you could
damage the engine and/or clutch.
4
23_LA_OM_EN_USC_t.book Page 77
Page 117 of 300

MULTIMEDIA115
Doors & Locks
When the Doors & Locks button is pressed on the touchscreen, the system displays the options related to locking and unlocking the vehicle’s doors.
NOTE:Depending on the vehicle’s options, feature settings may vary.
Setting Name Description
Auto Unlock On ExitThis setting will unlock the doors when any of the doors are opened from the inside.
Flash Lights With Lock This setting will allow you to turn on or off the flashing of the lights when the Lock button
is pushed on the key fob. Available settings are “On” and “Off”.
Sound Horn With Lock This setting will sound the horn when the Lock button is pushed on the key fob. The “Off”
setting will not sound the horn when the Lock button is pushed. The “1st Press” setting will sound the horn when the Lock button is pushed once. The “2nd Press” setting will sound the horn when the Lock button is pushed twice.
Sound Horn With Remote Start This setting will sound the horn when the remote start is activated from the key fob.
Remote Door Unlock/1st Press of Key Fob Unlocks This setting will change how many pushes of the Unlock button on the key fob are needed
to unlock all the doors. The “Driver Door” setting will only unlock the driver door on the first push on the Unlock button. The “All Doors” setting will unlock all doors on the first push of the Unlock button.
Passive Entry This setting will allow you to turn the Passive Entry feature (Keyless Enter ‘n Go™)
on or off.
Personal Settings Linked To Key Fob This setting will recall preset radio stations and driver seat position that have been linked
to the key fob.
5
23_LA_OM_EN_USC_t.book Page 115
Page 287 of 300

285
INDEX
AAbout Your Brakes ................................................ 74, 273
Adaptive Cruise Control (ACC) .................................84, 85
Adding Engine Coolant (Antifreeze) ............................ 238
Adding Washing Fluid .................................................. 230
Additives, Fuel .............................................................. 275
Advance Phone Connectivity ....................................... 142
Air Bag........................................................................... 180 Advance Front Air Bag ............................................ 180
Air Bag Operation.................................................... 181
Air Bag Warning Light ............................................. 179
Enhanced Accident Response ...................... 184
, 222
Event Data Recorder (EDR).................................... 222 Front Air Bag ........................................................... 180
If Deployment Occurs ............................................. 183
Knee Impact Bolsters ............................................. 181
Maintaining Your Air Bag System .......................... 184
Maintenance ........................................................... 184
Redundant Air Bag Warning Light ......................... 179
Side Air Bags ........................................................... 181
Transporting Pets.................................................... 196
Air Bag Light ................................................. 63
, 179, 196
Air Cleaner, Engine (Engine Air Cleaner Filter) ........... 233
Air Conditioner Maintenance ...................................... 234
Air Conditioner Refrigerant .......................................... 234
Air Conditioner System ................................................ 234
Air Conditioning ............................................................... 45
Air Conditioning Filter ........................................... 49
, 234
Air Conditioning System..................................................45 Air Conditioning, Operating Tips ..................................... 48Air Filter......................................................................... 233 Air Pressure
Tires.......................................................................... 261
Alarm Arm The System.................................................. 19
, 20
Panic........................................................................... 13
Rearm The System .................................................... 20
Security Alarm..................................................... 19
, 66
Alarm System Security Alarm............................................................ 19
All Wheel Drive Towing ...................................................................... 222
All Wheel Drive (AWD)...................................................241
Alterations/Modifications Vehicle.......................................................................... 8
Alternate Tire Service Kit — If Equipped
b
.............. 211
Android Auto........................................................ 144, 145
Android auto™
b
....................................................... 144
Antifreeze (Engine Coolant) ............................... 238, 277
Disposal ...................................................................239
Anti-Lock Brake System (ABS) ..................................... 159
Anti-Lock Warning Light.................................................. 66
Apple CarPlay ...................................................... 144
, 147
Apple carplay® ¹ ...........................................................146
Arming System Security Alarm............................................................ 19
Assist, Hill Start ............................................................. 162
Audio Settings ............................................................... 131
Audio Systems (Radio) ................................................. 106
Auto Down Power Windows............................................ 52
Automatic Door Locks .................................................... 24 Automatic Headlights ..................................................... 41 Automatic High Beams .................................................. 40
Automatic Temperature Control (ATC) .......................... 48
Automatic Transmission ................................................ 79 Adding Fluid .................................................... 241
, 279
Fluid And Filter Change........................................... 241
Fluid Change ........................................................... 241
Fluid Level Check .................................................... 241
Fluid Type .......................................................241
, 279
Special Additives ..................................................... 241
Automatic Transmission Limp Home Mode ................. 81
AutoPark ......................................................................... 72
Autostick Operation ................................................................... 82
AWD Towing...................................................................... 222
Axle Fluid....................................................................... 279
Axle Lubrication ............................................................ 279
BBack Up Camera............................................................. 96
Battery.................................................................... 64, 231
Charging System Light .............................................. 64
Keyless Key Fob Replacement................................. 13
Location ................................................................... 231
Belts, Seat..................................................................... 196
Blind Spot Monitoring .................................................. 164
Bluetooth Connecting To A Particular Mobile PhoneOr Audio Device After Pairing ............................ 139
Body Mechanism Lubrication ...................................... 235
B-Pillar Location ........................................................... 258
11
23_LA_OM_EN_USC_t.book Page 285