start stop button DODGE CHALLENGER 2023 User Guide
[x] Cancel search | Manufacturer: DODGE, Model Year: 2023, Model line: CHALLENGER, Model: DODGE CHALLENGER 2023Pages: 300, PDF Size: 12.82 MB
Page 81 of 300
STARTING AND OPERATING79
BRAKE TRANSMISSION SHIFT
I
NTERLOCK (BTSI) SYSTEM
This vehicle is equipped with a BTSI system that holds the
transmission gear selector in PARK unless the brakes are
applied. To shift the transmission out of PARK, the engine
must be running and the brake pedal must be pressed.
The brake pedal must also be pressed to shift from
NEUTRAL into DRIVE or REVERSE when the vehicle is
stopped or moving at low speeds.
8-SPEED AUTOMATIC TRANSMISSION
The transmission gear range is displayed both on the gear
selector and in the instrument cluster. To select a gear
range, push the lock button on the gear selector and move
the selector rearward or forward. To shift the transmission
out of PARK, the engine must be running and the brake
pedal must be pressed. You must also press the brake
pedal to shift from NEUTRAL into DRIVE or REVERSE when
the vehicle is stopped or moving at low speeds. Select the
DRIVE range for normal driving.
NOTE:
The transmission electronics are self-calibrating; there -
fore, the first few shifts on a new vehicle may be some -
what abrupt. This is a normal condition, and precision
shifts will develop within a few hundred miles
(kilometers).
In the event of a mismatch between the gear selector
position and the actual transmission gear (for example,
driver selects PARK while driving), the position indi -
cator will blink continuously until the selector is
returned to the proper position, or the requested shift
can be completed. The electronically controlled transmission adapts its shift
schedule based on driver inputs, along with environmental
and road conditions.
Only shift from DRIVE to PARK or REVERSE when the
accelerator pedal is released and the vehicle is stopped.
Be sure to keep your foot on the brake pedal when shifting
between these gears.
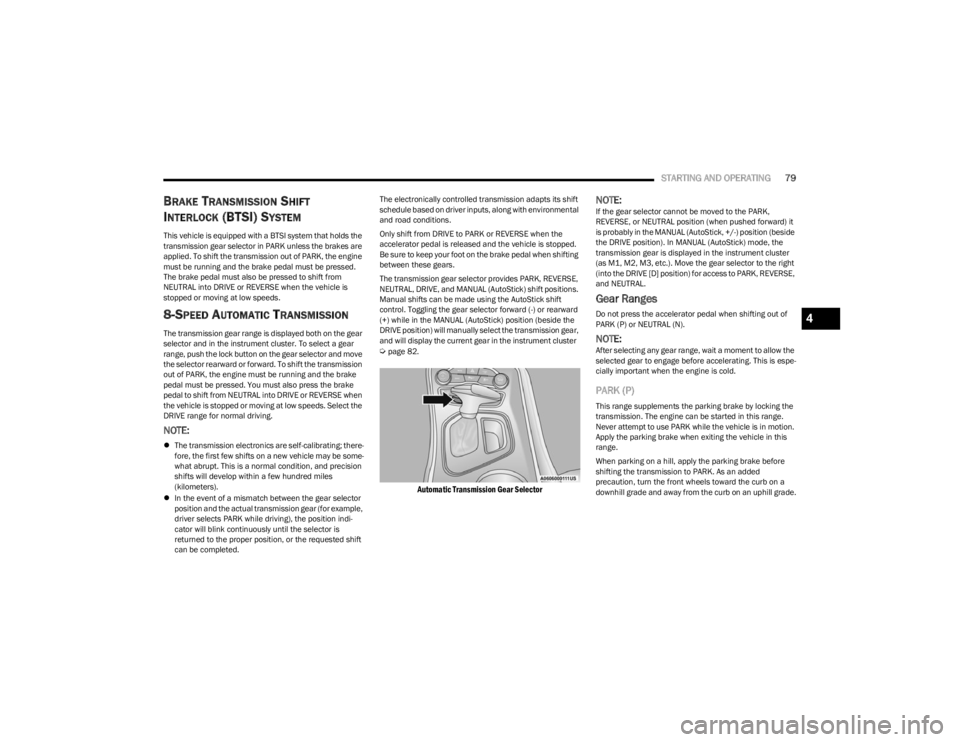
The transmission gear selector provides PARK, REVERSE,
NEUTRAL, DRIVE, and MANUAL (AutoStick) shift positions.
Manual shifts can be made using the AutoStick shift
control. Toggling the gear selector forward (-) or rearward
(+) while in the MANUAL (AutoStick) position (beside the
DRIVE position) will manually select the transmission gear,
and will display the current gear in the instrument cluster
Úpage 82.
Automatic Transmission Gear Selector
NOTE:If the gear selector cannot be moved to the PARK,
REVERSE, or NEUTRAL position (when pushed forward) it
is probably in the MANUAL (AutoStick, +/-) position (beside
the DRIVE position). In MANUAL (AutoStick) mode, the
transmission gear is displayed in the instrument cluster
(as M1, M2, M3, etc.). Move the gear selector to the right
(into the DRIVE [D] position) for access to PARK, REVERSE,
and NEUTRAL.
Gear Ranges
Do not press the accelerator pedal when shifting out of
PARK (P) or NEUTRAL (N).
NOTE:After selecting any gear range, wait a moment to allow the
selected gear to engage before accelerating. This is espe
-
cially important when the engine is cold.
PARK (P)
This range supplements the parking brake by locking the
transmission. The engine can be started in this range.
Never attempt to use PARK while the vehicle is in motion.
Apply the parking brake when exiting the vehicle in this
range.
When parking on a hill, apply the parking brake before
shifting the transmission to PARK. As an added
precaution, turn the front wheels toward the curb on a
downhill grade and away from the curb on an uphill grade.
4
23_LA_OM_EN_USC_t.book Page 79
Page 82 of 300
80STARTING AND OPERATING
(Continued)
When exiting the vehicle, always:
Apply the parking brake.
Shift the transmission into PARK.
Turn the ignition OFF.
Remove the key fob from the vehicle.
The following indicators should be used to ensure that you
have properly engaged the transmission into the PARK
position:
When shifting into PARK, push the lock button on the
gear selector and firmly move the selector all the way
forward until it stops and is fully seated.
Look at the transmission gear position display and
verify that it indicates the PARK position (P), and is not
blinking.
With the brake pedal released, verify that the gear
selector will not move out of PARK.
REVERSE (R)
This range is for moving the vehicle backward. Shift into
REVERSE only after the vehicle has come to a complete
stop.
NEUTRAL (N)
Use this range when the vehicle is standing for prolonged
periods with the engine running. Apply the parking brake
and shift the transmission into PARK if you must exit the
vehicle.
WARNING!
Never use the PARK position as a substitute for the
parking brake. Always apply the parking brake fully
when exiting the vehicle to guard against vehicle move -
ment and possible injury or damage.
Your vehicle could move and injure you and others if it
is not in PARK. Check by trying to move the transmis -
sion gear selector out of PARK with the brake pedal
released. Make sure the transmission is in PARK
before exiting the vehicle.
The transmission may not engage PARK if the vehicle is
moving. Always bring the vehicle to a complete stop
before shifting to PARK, and verify that the transmis -
sion gear position indicator solidly indicates PARK (P)
without blinking. Ensure that the vehicle is completely
stopped, and the PARK position is properly indicated,
before exiting the vehicle.
It is dangerous to shift out of PARK or NEUTRAL if the
engine speed is higher than idle speed. If your foot is
not firmly pressing the brake pedal, the vehicle could
accelerate quickly forward or in reverse. You could lose
control of the vehicle and hit someone or something.
Only shift into gear when the engine is idling normally
and your foot is firmly pressing the brake pedal.
Unintended movement of a vehicle could injure
those in or near the vehicle. As with all vehicles, you
should never exit a vehicle while the engine is
running. Before exiting a vehicle, always come to a
complete stop, then apply the parking brake, shift
the transmission into PARK, and turn the ignition
OFF. When the ignition is in the OFF position, the
transmission is locked in PARK, securing the vehicle
against unwanted movement.
When exiting the vehicle, always make sure the igni -
tion is in the OFF position, remove the key fob from
the vehicle, and lock the vehicle.
Never leave children alone in a vehicle, or with
access to an unlocked vehicle. Allowing children to
be in a vehicle unattended is dangerous for a
number of reasons. A child or others could be seri -
ously or fatally injured. Children should be warned
not to touch the parking brake, brake pedal or the
transmission gear selector.
Do not leave the key fob in or near the vehicle (or in
a location accessible to children), and do not leave
the ignition in the ACC or ON/RUN position. A child
could operate power windows, other controls, or
move the vehicle.
WARNING!CAUTION!
Before moving the transmission gear selector out of
PARK, you must start the engine, and also press the
brake pedal. Otherwise, damage to the gear selector
could result.
DO NOT race the engine when shifting from PARK or
NEUTRAL into another gear range, as this can
damage the drivetrain.
23_LA_OM_EN_USC_t.book Page 80
Page 85 of 300
STARTING AND OPERATING83
You can start out, from a stop, in FIRST or SECOND
gear. Tapping (+) (at a stop) will allow starting in
SECOND gear. Starting out in SECOND gear can be
helpful in snowy or icy conditions.
If a requested downshift would cause the engine to
overspeed, that shift will not occur and an indication
will display.
The system will ignore attempts to upshift at too low of
a vehicle speed and an indication will display.
Holding the (-) paddle pressed (if equipped), or holding
the gear selector in the (-) position, will downshift the
transmission to the lowest gear possible at the current
speed.
Transmission shifting will be more noticeable when
AutoStick is enabled.
The system may revert to automatic shift mode if a
fault or overheat condition is detected.
To disengage AutoStick mode, return the gear selector to
the DRIVE position, or press and hold the (+) shift paddle
(if equipped, and the gear selector is already in DRIVE)
until “D” is once again indicated in the instrument cluster.
You can shift in or out of the AutoStick mode at any time
without taking your foot off the accelerator pedal.SPORT MODE — WITHOUT PERFORMANCE
CONTROL
Your vehicle is equipped with a SPORT Mode feature. This
mode is a configuration set up for typical enthusiast
driving. The engine, transmission (when equipped with
automatic transmission), and steering systems are all set
to their SPORT settings. SPORT Mode will provide
improved throttle response and modified shifting for an
enhanced driving experience, as well the greatest amount
of steering feel. This mode may be activated and
deactivated by pushing the SPORT button on the
instrument panel switch bank.
NOTE:If equipped with a manual transmission, the 1 - 4 Skip
Shift feature is disabled in SPORT Mode.
FUEL SAVER TECHNOLOGY 5.7L —
IF EQUIPPED
This feature offers improved fuel economy by shutting off
four of the engine's eight cylinders during light load and
cruise conditions. The system is automatic with no driver
inputs or additional driving skills required. When the
system is active, an indication will display within the
instrument cluster “Fuel Economy” main menu screen.
NOTE:This system may take some time to return to full function -
ality after a battery disconnect.
ELECTRIC POWER STEERING
The electric power steering system provides increased
vehicle response and ease of maneuverability. The system
adapts to different driving conditions. If the electric
steering system experiences a fault that prevents it from
providing assist, you will still have the ability to steer the
vehicle manually.
Alternate electric power steering efforts can be selected
through the Uconnect System
Úpage 107.
If the Electric Power Steering Fault Warning Light is
displayed and the “SERVICE POWER STEERING” or the
“POWER STEERING ASSIST OFF – SERVICE SYSTEM”
message is displayed within the instrument cluster
display, this indicates the vehicle needs to be taken to the
dealer for service
Úpage 63.
NOTE:
Even if the power steering system is no longer opera -
tional, it is still possible to steer the vehicle. Under
these conditions there will be a substantial increase in
steering effort, especially at low speeds and during
parking maneuvers.
If the condition persists, see an authorized dealer for
service.WARNING!
Do not downshift for additional engine braking on a
slippery surface. The drive wheels could lose their grip
and the vehicle could skid, causing a collision or
personal injury.
WARNING!
Continued operation with reduced assist could pose a
safety risk to yourself and others. Service should be
obtained as soon as possible.4
23_LA_OM_EN_USC_t.book Page 83
Page 88 of 300
86STARTING AND OPERATING
(Continued)
NOTE:
If the ACC sensor detects a vehicle ahead, ACC will
apply limited braking or acceleration (not to exceed the
original set speed) automatically to maintain a preset
following distance, while matching the speed of the
vehicle ahead.
Any chassis/suspension or tire size modifications to
the vehicle will affect the performance of the Adaptive
Cruise Control and Forward Collision Warning system.
Fixed Speed Cruise Control (ACC not enabled) will not
detect vehicles directly ahead of you. Always be aware
of the feature selected
Úpage 284.
Adaptive Cruise Control (ACC) Operation
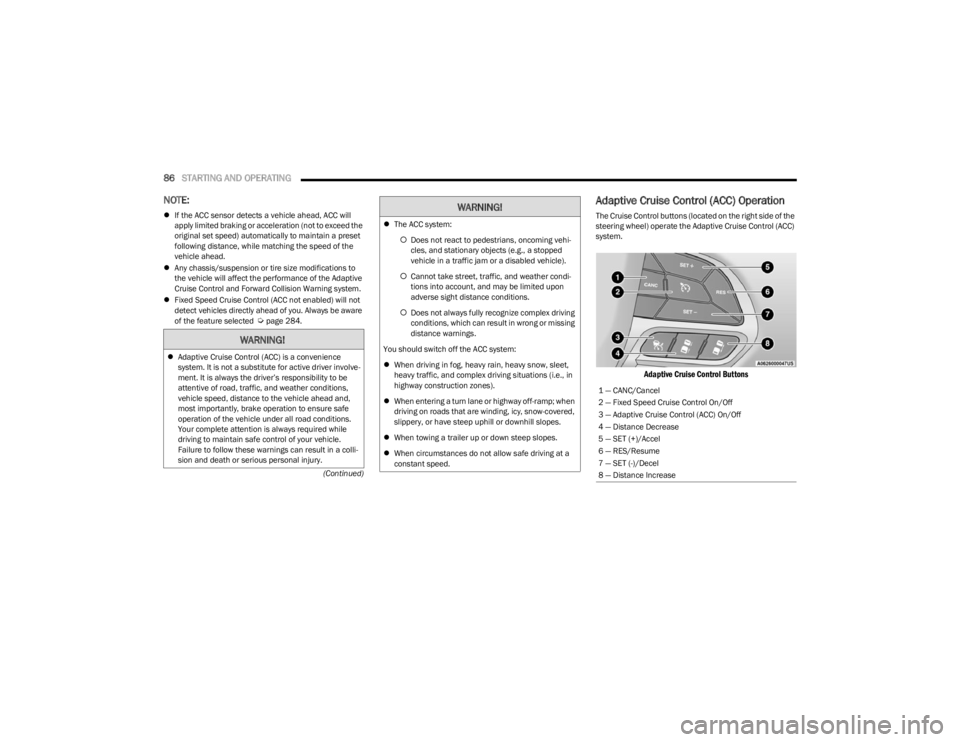
The Cruise Control buttons (located on the right side of the
steering wheel) operate the Adaptive Cruise Control (ACC)
system.
Adaptive Cruise Control Buttons
WARNING!
Adaptive Cruise Control (ACC) is a convenience
system. It is not a substitute for active driver involve -
ment. It is always the driver’s responsibility to be
attentive of road, traffic, and weather conditions,
vehicle speed, distance to the vehicle ahead and,
most importantly, brake operation to ensure safe
operation of the vehicle under all road conditions.
Your complete attention is always required while
driving to maintain safe control of your vehicle.
Failure to follow these warnings can result in a colli -
sion and death or serious personal injury.
The ACC system:
Does not react to pedestrians, oncoming vehi -
cles, and stationary objects (e.g., a stopped
vehicle in a traffic jam or a disabled vehicle).
Cannot take street, traffic, and weather condi -
tions into account, and may be limited upon
adverse sight distance conditions.
Does not always fully recognize complex driving
conditions, which can result in wrong or missing
distance warnings.
You should switch off the ACC system:
When driving in fog, heavy rain, heavy snow, sleet,
heavy traffic, and complex driving situations (i.e., in
highway construction zones).
When entering a turn lane or highway off-ramp; when
driving on roads that are winding, icy, snow-covered,
slippery, or have steep uphill or downhill slopes.
When towing a trailer up or down steep slopes.
When circumstances do not allow safe driving at a
constant speed.
WARNING!
1 — CANC/Cancel
2 — Fixed Speed Cruise Control On/Off
3 — Adaptive Cruise Control (ACC) On/Off
4 — Distance Decrease
5 — SET (+)/Accel
6 — RES/Resume
7 — SET (-)/Decel
8 — Distance Increase
23_LA_OM_EN_USC_t.book Page 86
Page 98 of 300
96STARTING AND OPERATING
PARKVIEW REAR BACK UP CAMERA
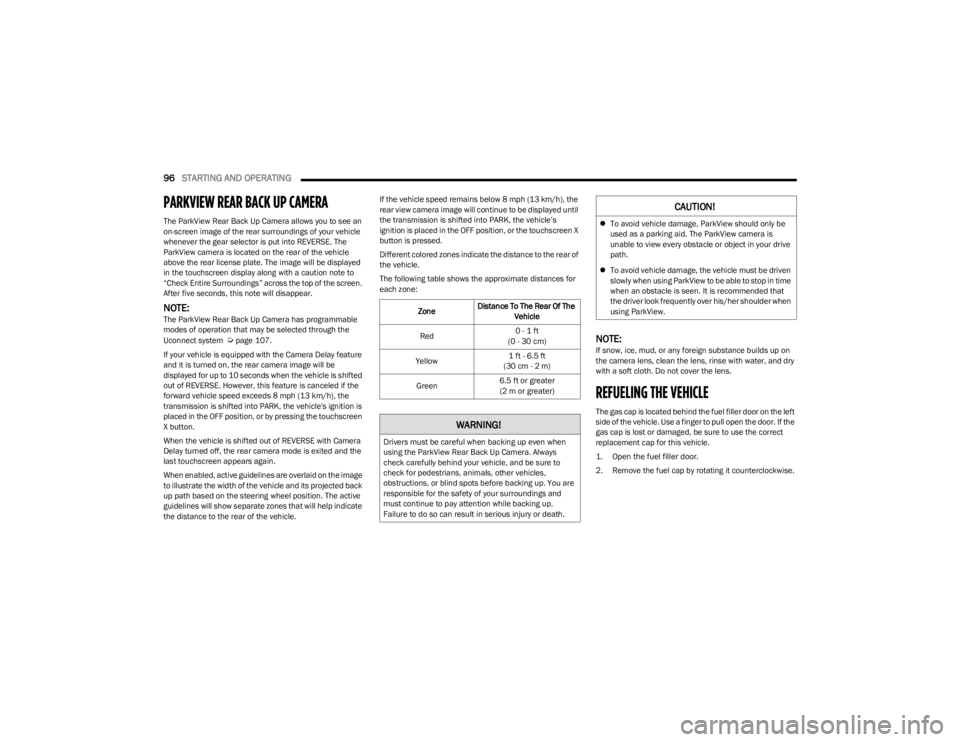
The ParkView Rear Back Up Camera allows you to see an
on-screen image of the rear surroundings of your vehicle
whenever the gear selector is put into REVERSE. The
ParkView camera is located on the rear of the vehicle
above the rear license plate. The image will be displayed
in the touchscreen display along with a caution note to
“Check Entire Surroundings” across the top of the screen.
After five seconds, this note will disappear.
NOTE:The ParkView Rear Back Up Camera has programmable
modes of operation that may be selected through the
Uconnect system
Úpage 107.
If your vehicle is equipped with the Camera Delay feature
and it is turned on, the rear camera image will be
displayed for up to 10 seconds when the vehicle is shifted
out of REVERSE. However, this feature is canceled if the
forward vehicle speed exceeds 8 mph (13 km/h), the
transmission is shifted into PARK, the vehicle's ignition is
placed in the OFF position, or by pressing the touchscreen
X button.
When the vehicle is shifted out of REVERSE with Camera
Delay turned off, the rear camera mode is exited and the
last touchscreen appears again.
When enabled, active guidelines are overlaid on the image
to illustrate the width of the vehicle and its projected back
up path based on the steering wheel position. The active
guidelines will show separate zones that will help indicate
the distance to the rear of the vehicle. If the vehicle speed remains below 8 mph (13 km/h), the
rear view camera image will continue to be displayed until
the transmission is shifted into PARK, the vehicle’s
ignition is placed in the OFF position, or the touchscreen X
button is pressed.
Different colored zones indicate the distance to the rear of
the vehicle.
The following table shows the approximate distances for
each zone:NOTE:If snow, ice, mud, or any foreign substance builds up on
the camera lens, clean the lens, rinse with water, and dry
with a soft cloth. Do not cover the lens.
REFUELING THE VEHICLE
The gas cap is located behind the fuel filler door on the left
side of the vehicle. Use a finger to pull open the door. If the
gas cap is lost or damaged, be sure to use the correct
replacement cap for this vehicle.
1. Open the fuel filler door.
2. Remove the fuel cap by rotating it counterclockwise.
Zone
Distance To The Rear Of The
Vehicle
Red 0 - 1 ft
(0 - 30 cm)
Yellow 1 ft - 6.5 ft
(30 cm - 2 m)
Green 6.5 ft or greater
(2 m or greater)
WARNING!
Drivers must be careful when backing up even when
using the ParkView Rear Back Up Camera. Always
check carefully behind your vehicle, and be sure to
check for pedestrians, animals, other vehicles,
obstructions, or blind spots before backing up. You are
responsible for the safety of your surroundings and
must continue to pay attention while backing up.
Failure to do so can result in serious injury or death.
CAUTION!
To avoid vehicle damage, ParkView should only be
used as a parking aid. The ParkView camera is
unable to view every obstacle or object in your drive
path.
To avoid vehicle damage, the vehicle must be driven
slowly when using ParkView to be able to stop in time
when an obstacle is seen. It is recommended that
the driver look frequently over his/her shoulder when
using ParkView.
23_LA_OM_EN_USC_t.book Page 96
Page 127 of 300
MULTIMEDIA125
RADIO MODE
Radio Controls
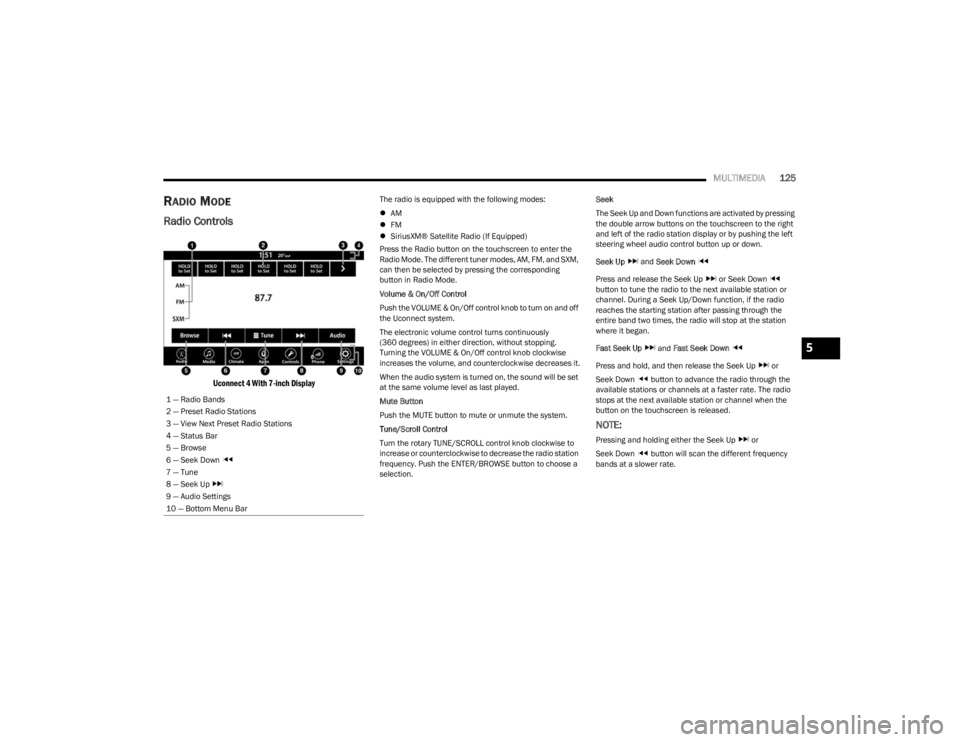
Uconnect 4 With 7-inch Display
The radio is equipped with the following modes:
AM
FM
SiriusXM® Satellite Radio (If Equipped)
Press the Radio button on the touchscreen to enter the
Radio Mode. The different tuner modes, AM, FM, and SXM,
can then be selected by pressing the corresponding
button in Radio Mode.
Volume & On/Off Control
Push the VOLUME & On/Off control knob to turn on and off
the Uconnect system.
The electronic volume control turns continuously
(360 degrees) in either direction, without stopping.
Turning the VOLUME & On/Off control knob clockwise
increases the volume, and counterclockwise decreases it.
When the audio system is turned on, the sound will be set
at the same volume level as last played.
Mute Button
Push the MUTE button to mute or unmute the system.
Tune/Scroll Control
Turn the rotary TUNE/SCROLL control knob clockwise to
increase or counterclockwise to decrease the radio station
frequency. Push the ENTER/BROWSE button to choose a
selection. Seek
The Seek Up and Down functions are activated by pressing
the double arrow buttons on the touchscreen to the right
and left of the radio station display or by pushing the left
steering wheel audio control button up or down.
Seek Up
and Seek Down
Press and release the Seek Up or Seek Down
button to tune the radio to the next available station or
channel. During a Seek Up/Down function, if the radio
reaches the starting station after passing through the
entire band two times, the radio will stop at the station
where it began.
Fast Seek Up and Fast Seek Down
Press and hold, and then release the Seek Up or
Seek Down button to advance the radio through the
available stations or channels at a faster rate. The radio
stops at the next available station or channel when the
button on the touchscreen is released.
NOTE:
Pressing and holding either the Seek Up or
Seek Down button will scan the different frequency
bands at a slower rate.
1 — Radio Bands
2 — Preset Radio Stations
3 — View Next Preset Radio Stations
4 — Status Bar
5 — Browse
6 — Seek Down
7 — Tune
8 — Seek Up
9 — Audio Settings
10 — Bottom Menu Bar
5
23_LA_OM_EN_USC_t.book Page 125
Page 156 of 300
154MULTIMEDIA
The following options can be selected:
Pressing the STOP button will freeze the graph.
Selecting Play will clear the graph and restart the
process over.
Press the + or - buttons to change the history of the
graph. The selectable options are “30”, “60”, “90”, and
“120” seconds. The graph will expand or constrict
depending on the setting selected.
Select the “Gear” display setting to turn the graph gear
markers on and off for automatic transmission vehicles
only.
NOTE:The Gear on/off feature will only display if your vehicle is
equipped with an Automatic Transmission.
DODGE DRIVE MODES — IF EQUIPPED
PERFORMANCE CONTROL —
I
F EQUIPPED
Your vehicle may be equipped with a Performance Control
feature which allows for coordinating the operation of
various vehicle systems depending upon the type of
driving behavior desired. The Performance Control feature
is controlled through the Uconnect system and may be
accessed by performing any of the following:
Pushing the Super Track Pack button on the instru -
ment panel switch bank.
Selecting “Performance Control” from the Apps menu.
Selecting “Performance Control” from within the
Performance Pages menu. You will be able to enable, disable, and customize the
functionality of the Launch Control and Performance
Control Set-Up features within Performance Control.
To access information about the functionality of these
features through the Uconnect system, press the Info
button on the touchscreen.
NOTE:Dodge vehicles equipped with a 6.4L engine, except for
R/T Scat Pack 1320 6.4L non-widebody vehicles, will use
SRT Drive Modes rather than the Dodge Performance
Control Pages. Please refer to the following sections for
further information on the SRT Drive Modes.
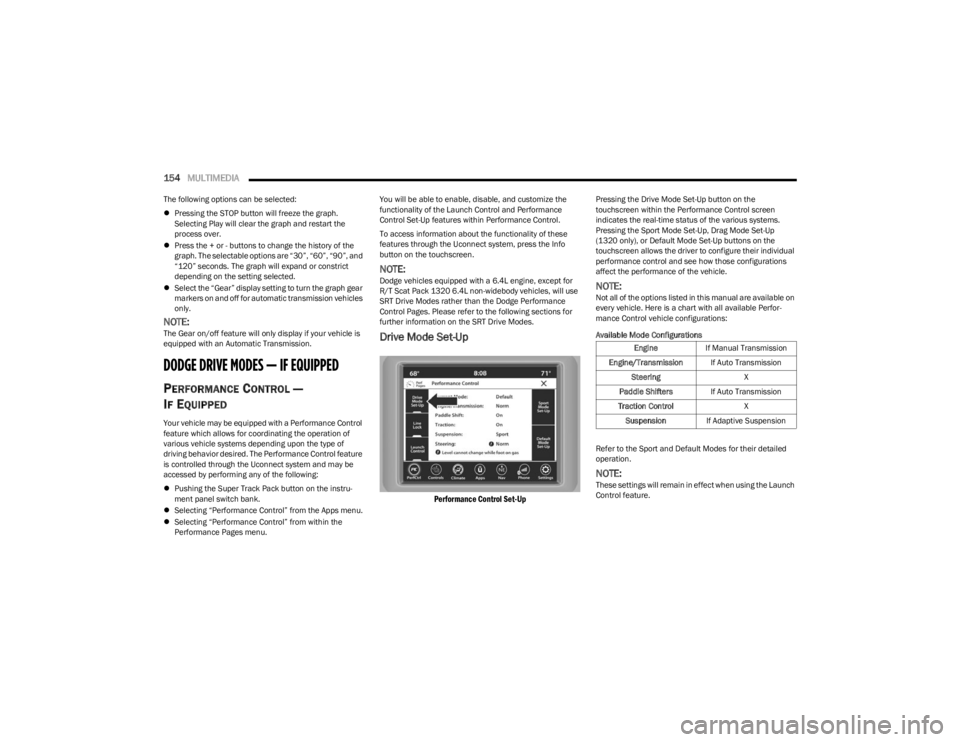
Drive Mode Set-Up
Performance Control Set-Up
Pressing the Drive Mode Set-Up button on the
touchscreen within the Performance Control screen
indicates the real-time status of the various systems.
Pressing the Sport Mode Set-Up, Drag Mode Set-Up
(1320 only), or Default Mode Set-Up buttons on the
touchscreen allows the driver to configure their individual
performance control and see how those configurations
affect the performance of the vehicle.
NOTE:Not all of the options listed in this manual are available on
every vehicle. Here is a chart with all available Perfor
-
mance Control vehicle configurations:
Available Mode Configurations
Refer to the Sport and Default Modes for their detailed
operation.
NOTE:These settings will remain in effect when using the Launch
Control feature.
Engine If Manual Transmission
Engine/Transmission If Auto Transmission
Steering X
Paddle Shifters If Auto Transmission
Traction Control X
Suspension If Adaptive Suspension
23_LA_OM_EN_USC_t.book Page 154
Page 164 of 300
162SAFETY
(Continued)
NOTE:
For vehicles with multiple partial ESC modes, the push
and release of the switch will toggle the ESC modes.
Multiple attempts may be required to return to "ESC
On" mode.
Trailer Sway Control (TSC) is disabled when the ESC
system is in the “Partial Off” mode.
If Equipped — "ESC Sport" and "ESC Track" are ESC
“Partial Off” mode(s).
Full Off – If Equipped
This mode is intended for off-highway or off-road use only
and should not be used on any public roadways. In this
mode, TCS and ESC features are turned off. To enter the
“Full Off” mode, push and hold the ESC OFF button for five
seconds while the vehicle is stopped with the engine
running. After five seconds, a chime will sound, the ESC
OFF Indicator Light will illuminate, and the “ESC OFF”
message will display in the instrument cluster. To turn ESC
on again, momentarily push the ESC OFF button.
ESC Activation/Malfunction Indicator Light
And ESC OFF Indicator Light
The ESC Activation/Malfunction Indicator Light
in the instrument cluster will come on when the
ignition is placed in the ON mode. It should go
out with the engine running. If the ESC
Activation/Malfunction Indicator Light comes on
continuously with the engine running, a malfunction has
been detected in the ESC system. If this light remains on
after several ignition cycles, and the vehicle has been
driven several miles (kilometers) at speeds greater than
30 mph (48 km/h), see an authorized dealer as soon as possible to have the problem diagnosed and corrected.
The ESC Activation/Malfunction Indicator Light starts to
flash as soon as the tires lose traction and the ESC system
becomes active. The ESC Activation/Malfunction Indicator
Light also flashes when TCS is active. If the ESC
Activation/Malfunction Indicator Light begins to flash
during acceleration, ease up on the accelerator and apply
as little throttle as possible. Be sure to adapt your speed
and driving to the prevailing road conditions. The ESC OFF Indicator Light indicates that the
Electronic Stability Control (ESC) is in a reduced
mode.
NOTE:
The ESC Activation/Malfunction Indicator Light and the
ESC OFF Indicator Light come on momentarily each
time the ignition is placed in the ON position.
Each time the ignition is placed in the ON position, the
ESC system will be on even if it was turned off
previously.
The ESC system will make buzzing or clicking sounds
when it is active. This is normal; the sounds will stop
when ESC becomes inactive following the maneuver
that caused the ESC activation.
Hill Start Assist (HSA)
HSA is designed to mitigate roll back from a complete stop
while on an incline. If the driver releases the brake while
stopped on an incline, HSA will continue to hold the brake
pressure for a short period. If the driver does not apply the
throttle before this time expires, the system will release
brake pressure and the vehicle will roll down the hill as
normal.
WARNING!
In the ESC “Full Off” mode, the engine torque reduc -
tion and stability features are disabled. Therefore,
enhanced vehicle stability offered by the ESC system
is unavailable. In an emergency evasive maneuver,
the ESC system will not engage to assist in main -
taining stability. ESC “Full Off” mode is intended for
off-highway or off-road use only.
The Electronic Stability Control (ESC) cannot prevent
the natural laws of physics from acting on the
vehicle, nor can it increase the traction afforded by
prevailing road conditions. ESC cannot prevent all
accidents, including those resulting from excessive
speed in turns, driving on very slippery surfaces, or
hydroplaning. ESC also cannot prevent collisions.
WARNING!
23_LA_OM_EN_USC_t.book Page 162
Page 210 of 300
208IN CASE OF EMERGENCY
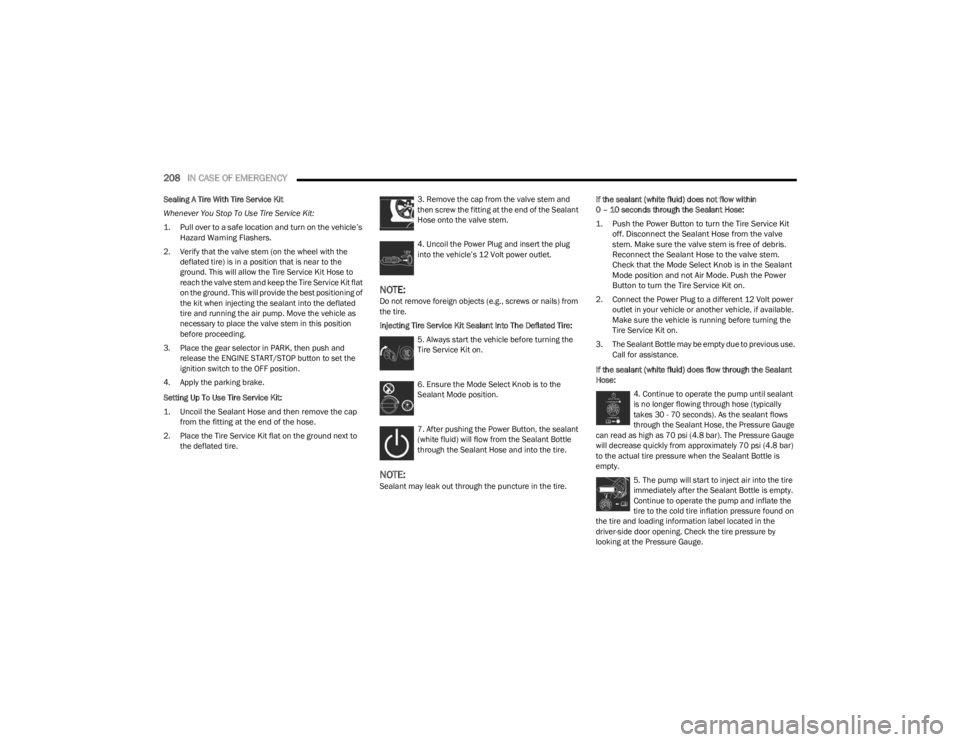
Sealing A Tire With Tire Service Kit
Whenever You Stop To Use Tire Service Kit:
1. Pull over to a safe location and turn on the vehicle’s
Hazard Warning Flashers.
2. Verify that the valve stem (on the wheel with the deflated tire) is in a position that is near to the
ground. This will allow the Tire Service Kit Hose to
reach the valve stem and keep the Tire Service Kit flat
on the ground. This will provide the best positioning of
the kit when injecting the sealant into the deflated
tire and running the air pump. Move the vehicle as
necessary to place the valve stem in this position
before proceeding.
3. Place the gear selector in PARK, then push and release the ENGINE START/STOP button to set the
ignition switch to the OFF position.
4. Apply the parking brake.
Setting Up To Use Tire Service Kit:
1. Uncoil the Sealant Hose and then remove the cap from the fitting at the end of the hose.
2. Place the Tire Service Kit flat on the ground next to the deflated tire. 3. Remove the cap from the valve stem and
then screw the fitting at the end of the Sealant
Hose onto the valve stem.
4. Uncoil the Power Plug and insert the plug
into the vehicle’s 12 Volt power outlet.
NOTE:Do not remove foreign objects (e.g., screws or nails) from
the tire.
Injecting Tire Service Kit Sealant Into The Deflated Tire:
5. Always start the vehicle before turning the
Tire Service Kit on.
6. Ensure the Mode Select Knob is to the
Sealant Mode position.
7. After pushing the Power Button, the sealant
(white fluid) will flow from the Sealant Bottle
through the Sealant Hose and into the tire.
NOTE:Sealant may leak out through the puncture in the tire. If the sealant (white fluid) does not flow within
0 – 10 seconds through the Sealant Hose:
1. Push the Power Button to turn the Tire Service Kit
off. Disconnect the Sealant Hose from the valve
stem. Make sure the valve stem is free of debris.
Reconnect the Sealant Hose to the valve stem.
Check that the Mode Select Knob is in the Sealant
Mode position and not Air Mode. Push the Power
Button to turn the Tire Service Kit on.
2. Connect the Power Plug to a different 12 Volt power outlet in your vehicle or another vehicle, if available.
Make sure the vehicle is running before turning the
Tire Service Kit on.
3. The Sealant Bottle may be empty due to previous use. Call for assistance.
If the sealant (white fluid) does flow through the Sealant
Hose: 4. Continue to operate the pump until sealant
is no longer flowing through hose (typically
takes 30 - 70 seconds). As the sealant flows
through the Sealant Hose, the Pressure Gauge
can read as high as 70 psi (4.8 bar). The Pressure Gauge
will decrease quickly from approximately 70 psi (4.8 bar)
to the actual tire pressure when the Sealant Bottle is
empty.
5. The pump will start to inject air into the tire
immediately after the Sealant Bottle is empty.
Continue to operate the pump and inflate the
tire to the cold tire inflation pressure found on
the tire and loading information label located in the
driver-side door opening. Check the tire pressure by
looking at the Pressure Gauge.
23_LA_OM_EN_USC_t.book Page 208