change wheel DODGE CHALLENGER 2023 Owners Manual
[x] Cancel search | Manufacturer: DODGE, Model Year: 2023, Model line: CHALLENGER, Model: DODGE CHALLENGER 2023Pages: 300, PDF Size: 12.82 MB
Page 8 of 300
6
TECHNICAL SPECIFICATIONS
VEHICLE IDENTIFICATION NUMBER (VIN) ..................... 273
BRAKE SYSTEM................................................................ 273
WHEEL AND TIRE TORQUE SPECIFICATIONS .............. 273
Torque Specifications ............................................... 273
FUEL REQUIREMENTS ..................................................... 274 3.6L Engine ............................................................... 274
5.7L Engine (With Automatic Transmission) ........... 2745.7L Engine (With Manual Transmission) ............... 274
Reformulated Gasoline............................................. 275
Materials Added To Fuel .......................................... 275
Gasoline/Oxygenate Blends ..................................... 275
Do Not Use E-85 In Non-Flex Fuel Vehicles............. 275
CNG And LP Fuel System Modifications .................. 276Methylcyclopentadienyl Manganese
Tricarbonyl (MMT) In Gasoline ................................. 276Fuel System Cautions ............................................... 276
FLUID CAPACITIES ........................................................... 277
ENGINE FLUIDS AND LUBRICANTS ............................... 278
CHASSIS FLUIDS AND LUBRICANTS ............................. 279
CUSTOMER ASSISTANCE
SUGGESTIONS FOR OBTAINING SERVICE FOR
YOUR VEHICLE ................................................................ 280 Prepare For The Appointment.................................. 280
Prepare A List............................................................ 280
Be Reasonable With Requests ................................ 280
IF YOU NEED ASSISTANCE ............................................. 280 Roadside Assistance ................................................ 280
FCA US LLC Customer Center .................................. 281
FCA Canada Inc. Customer Center .......................... 281
Mexico ....................................................................... 281Puerto Rico And US Virgin Islands ........................... 281
Customer Assistance For The Hearing Or
Speech Impaired (TDD/TTY) .................................... 282Service Contract ...................................................... 282 WARRANTY INFORMATION.............................................282
MOPAR® PARTS ..............................................................282
REPORTING SAFETY DEFECTS ......................................282 In The 50 United States And Washington, D.C........ 282
In Canada................................................................... 283
PUBLICATION ORDER FORMS .......................................283
GENERAL INFORMATION................................................. 284
CHANGE OF OWNERSHIP OR ADDRESS.......................284
23_LA_OM_EN_USC_t.book Page 6
Page 49 of 300
GETTING TO KNOW YOUR VEHICLE47
Driver And Passenger Up And Down
Buttons
These buttons provide the driver and passenger with
independent temperature control.
Push the red button on the faceplate or
touchscreen or press and slide the
temperature bar towards the red arrow button
on the touchscreen for warmer temperature
settings.
Push the blue button on the faceplate or
touchscreen or press and slide the
temperature bar towards the blue arrow on the
touchscreen for cooler temperature settings.
SYNC Button
Press the SYNC button on the touchscreen to
toggle the Sync feature on/off. The SYNC
indicator is illuminated when SYNC is on. SYNC
is used to synchronize the passenger
temperature setting with the driver temperature setting.
Changing the passenger temperature setting while in
SYNC will automatically exit this feature.
NOTE:The SYNC button is only available on the touchscreen.
Blower Control
Blower Control is used to regulate the amount
of air forced through the Climate Control
system. There are seven blower speeds
available. Adjusting the blower will cause automatic mode to switch
to manual operation. The speeds can be selected using
either the blower control knob on the faceplate or the
buttons on the touchscreen.
Faceplate
The blower speed increases as you turn the blower control
knob clockwise from the lowest blower setting. The blower
speed decreases as you turn the blower control knob
counterclockwise.
Touchscreen
Use the small blower icon to reduce the blower setting and
the large blower icon to increase the blower setting.
Blower can also be selected by pressing the blower bar
area between the icons.
Mode Control
Change the airflow distribution mode by
pressing one of the Mode buttons on the
touchscreen. The airflow distribution mode can
be adjusted so air comes from the instrument
panel outlets, floor outlets, defrost outlets and demist
outlets.
Panel Mode
Air comes from the outlets in the instrument
panel. Each of these outlets can be individually
adjusted to direct the flow of air. The air vanes
of the center outlets and outboard outlets can
be moved up and down or side to side to regulate airflow
direction. There is a shut-off wheel located below the air
vanes to shut off or adjust the amount of airflow from
these outlets.
Bi-Level Mode
Air comes from the instrument panel outlets
and floor outlets. A slight amount of air is
directed through the defrost and side window
demister outlets.
NOTE:Bi-Level mode is designed under comfort conditions to
provide cooler air out of the panel outlets and warmer air
from the floor outlets.
Floor Mode
Air comes from the floor outlets. A slight
amount of air is directed through the defrost
and side window demister outlets.
Mix Mode
Air is directed through the floor, defrost, and
side window demister outlets. This setting
works best in cold or snowy conditions that
require extra heat to the windshield. This
setting is good for maintaining comfort while reducing
moisture on the windshield.
Climate Control OFF Button
Press and release this button to turn the
Climate Control ON/OFF.
2
23_LA_OM_EN_USC_t.book Page 47
Page 50 of 300
48GETTING TO KNOW YOUR VEHICLE
AUTOMATIC TEMPERATURE CONTROL
(ATC)
Automatic Operation
1. Push the AUTO button on the faceplate, or the AUTO
button on the touchscreen on the Automatic
Temperature Control (ATC) Panel.
2. Next, adjust the temperature that you would like the system to maintain by adjusting the driver and
passenger temperature control buttons. Once the
desired temperature is displayed, the system will
achieve and automatically maintain that comfort
level.
3. When the system is set up for your comfort level, it is not necessary to change the settings. You will
experience the greatest efficiency by simply allowing
the system to function automatically.
NOTE:
It is not necessary to move the temperature settings for
cold or hot vehicles. The system automatically adjusts
the temperature, mode, and blower speed to provide
comfort as quickly as possible.
The temperature can be displayed in US or Metric units
within Uconnect Settings
Úpage 107.
To provide you with maximum comfort in the Automatic
mode during cold start-ups, the blower fan will remain on
low until the engine warms up. The blower will increase in
speed and transition into Auto mode.
Manual Operation Override
This system offers a full complement of manual override
features. The AUTO symbol in the front ATC display will be
turned off when the system is being used in the manual
mode.
CLIMATE VOICE COMMANDS
Adjust vehicle temperatures hands-free and keep
everyone comfortable while you keep moving ahead.
Push the VR button. After the beep, say one of the
following commands:
“Set driver temperature to 70 degrees”
“Set passenger temperature to 70 degrees”
TIP:Voice Command for Climate may only be used to adjust
the interior temperature of your vehicle. Voice Command
will not work to adjust the heated seats or steering wheel
if equipped.
OPERATING TIPS
Refer to the chart at the end of this section for suggested
control settings for various weather conditions.
Summer Operation
The engine cooling system must be protected with a
high-quality antifreeze coolant to provide proper corrosion
protection and to protect against engine overheating. OAT
coolant (conforming to MS.90032) is recommended.
Winter Operation
To ensure the best possible heater and defroster
performance, make sure the engine cooling system is
functioning properly and the proper amount, type, and
concentration of coolant is used. Use of the Air
Recirculation mode during Winter months is not
recommended, because it may cause window fogging.
Vacation/Storage
For information on maintaining the Climate Control system
when the vehicle is being stored for an extended period of
time, see
Úpage 269.
Window Fogging
Vehicle windows tend to fog on the inside in mild, rainy,
and/or humid weather. To clear the windows, select
Defrost or Mix mode and increase the front blower speed.
Do not use the Recirculation mode without A/C for long
periods, as fogging may occur.
Outside Air Intake
Make sure the air intake, located directly in front of the
windshield, is free of obstructions, such as leaves. Leaves
collected in the air intake may reduce airflow, and if they
enter the air distribution box, they could plug the water
drains. In Winter months, make sure the air intake is clear
of ice, slush, and snow.
23_LA_OM_EN_USC_t.book Page 48
Page 60 of 300
58GETTING TO KNOW YOUR INSTRUMENT PANEL
LOCATION AND CONTROLS
The instrument cluster display features an interactive
display which is located in the instrument cluster.
Instrument Cluster Display Location And Controls
This system conveniently allows the driver to select a
variety of useful information by pushing the arrow buttons
located on the left side of the steering wheel. The
instrument cluster display menu items may consist of the
following: The system allows the driver to select information by
pushing the following buttons mounted on the steering
wheel:
Instrument Cluster Display Controls
Up And Down Arrow Buttons:
Using the
up or down arrow button allows you to
cycle through the Main Menu Items.
Changes the Main Screen area and Menu Title area.
Left And Right Arrow Buttons:
Using the left or right arrow button allows you to
cycle through the submenu items of the Main menu item.
NOTE:
Holding the up or down or left or
right arrow button will loop the user through the
currently selected menu or options presented on the
screen.
Upon returning to a main menu, the last submenu
screen viewed within that main menu will be displayed.
OK Button:
For Digital Speedometer:
Pushing the OK button changes units (mph or km/h).
For Screen Setup:
OK button allows user to enter menu and submenus.
Within each submenu layer, the up and down
arrow buttons will allow the user to select the item of
interest.
Pushing the OK button makes the selection and a
confirmation screen will appear (returning the user to
the first page of the submenu).
Pushing the left arrow button will exit each
submenu layer and return to the main menu.
1 — Instrument Cluster Display Screen
2 — Instrument Cluster Display Controls
Speedometer Vehicle Info
Performance —
If Equipped
Driver Assist —
If Equipped Fuel Economy Trip
Audio Messages Screen Setup
Diagnostics —
If Equipped
1 — Left Arrow Button
2 — Up Arrow Button
3 — Right Arrow Button
4 — Down Arrow Button
5 — OK Button
23_LA_OM_EN_USC_t.book Page 58
Page 61 of 300
GETTING TO KNOW YOUR INSTRUMENT PANEL59
For the Trip and Fuel Economy menus (and Performance
Timers) — If Equipped:
Information is reset by pushing and holding the OK
button.
ENGINE OIL LIFE RESET
Use this QR code to access your digital
experience .
Oil Change Required
Your vehicle is equipped with an
engine oil change indicator system.
The “Oil Change Required” message
will display in the instrument cluster
display for five seconds after a single
chime has sounded, to indicate the next scheduled oil
change interval. The engine oil change indicator system is
duty cycle based, which means the engine oil change
interval may fluctuate, dependent upon your personal
driving style.
Unless reset, this message will continue to display each
time you place the ignition in the ON/RUN position. To turn
off the message temporarily, push and release the OK or
arrow buttons. To reset the oil change indicator system
(after performing the scheduled maintenance), refer to
the following procedure. Vehicles Equipped With Keyless Enter ‘n Go™ — Ignition
Use the steering wheel instrument cluster display controls
for the following procedure(s):
1. Without pressing the brake pedal, push the ENGINE
START/STOP button and place the ignition in the
ON/RUN position (do not start the engine).
2. Push and release the down arrow button to scroll
downward through the main menu to “Vehicle Info.”
3. Push and release the right arrow button to access
the ”Oil Life” screen.
4. Push and hold the OK button to reset oil life. If
conditions are met, the gauge and numeric display
will update to show 100%. If conditions are not met a
pop-up message of "To reset oil life engine must be
off with ignition in run” will be displayed (for five
seconds), and the user will remain at the Oil Life
screen.
5. Push and release the up or down arrow button
to return to previous main menu.
NOTE:If the indicator message illuminates when you start the
vehicle, the oil change indicator system did not reset. If
necessary, repeat this procedure. Secondary Method Of Resetting Engine Oil Life
1. Without pressing the brake pedal, push the ENGINE
START/STOP button and place the ignition to the
ON/RUN position (do not start the engine).
2. Fully press the accelerator pedal, slowly, three times within ten seconds.
3. Without pushing the brake pedal, push the ENGINE START/STOP button once to return the ignition to the
OFF position.
NOTE:If the indicator message illuminates when you start the
vehicle, the oil change indicator system did not reset.
If necessary, repeat this procedure.
PERFORMANCE SHIFT INDICATOR
(PSI) — I
F EQUIPPED
The PSI is enabled on vehicles with manual transmission,
or when a vehicle with automatic transmission is in
manual shift mode. The PSI provides the driver with a
visual indication within the instrument cluster display
when the driver configured gear shift point has been
reached and the driver is still accelerating. This indication
notifies the driver to change gear corresponding to the
configured RPMs in the head unit.
3
23_LA_OM_EN_USC_t.book Page 59
Page 63 of 300
GETTING TO KNOW YOUR INSTRUMENT PANEL61
1/8 Mile (200 meters) Timer
Best
Last
Recent
Reaction Timer
1/4 Mile (400 meters) Timer
Best
Last
Recent
Reaction Timer
Braking Distance
Distance
From Speed
Current G-Forces
Peak G-Forces
Lap Timer
Lap History
Will list the last five laps with the best lap high -
lighted in green.
Top Speed
The following describes each feature and its operation:
Driver Assist — If Equipped
Adaptive Cruise Control (ACC) Menu
The instrument cluster display displays the current ACC
system settings. The information displayed depends on
ACC system status. Push the ACC ON/OFF button (located on the steering
wheel) until one of the following displays in the instrument
cluster display:
Adaptive Cruise Control Off
When ACC is deactivated, the display will read “Adaptive
Cruise Control Off.”
Adaptive Cruise Control Ready
When ACC is activated but the vehicle speed setting has
not been selected, the display will read “Adaptive Cruise
Control Ready.”
Push the SET + or the SET- button (located on the steering
wheel) and the following will display in the instrument
cluster display:
ACC SET
When ACC is set, the set speed will display in the
instrument cluster.
If the Driver Assist main menu is not selected, an ACC
pop-up message may display if any ACC activity occurs,
which may include any of the following:
Distance Setting Change
System Cancel
Driver Override
System Off
ACC Proximity Warning
ACC Unavailable Warning
The instrument cluster display will return to the last
display selected after five seconds of no ACC display
activity
Úpage 85.
Fuel Economy
Two submenu pages; one with Current Value
(instantaneous calculation of the fuel economy) displayed
and one without the Current Value displayed (toggle the
left or right arrow button to select one):
Current Fuel Economy (MPG, L/100 km, or km/L).
Range To Empty (miles or km).
Average Fuel Economy (MPG, L/100 km, or km/L).
The Max and Min values will correspond to the
particular engine requirements.
Lower end of gauge will be displayed in an amber color
and turn green as Fuel Economy improves.
Hold the OK button to reset average fuel economy
information.
Trip Info
Push and release the up or down arrow button until
the Trip Menu item is displayed in the instrument cluster
display. Toggle the left or right arrow button to
select Trip A or Trip B. The Trip information will display the
following:
Distance – Shows the total distance (mi or km) traveled
for Trip A or Trip B since the last reset.
Average Fuel Economy – Shows the average fuel
economy (MPG, L/100km or km/L) of Trip A or Trip B
since the last reset.
Elapsed Time – Shows the total elapsed time of travel
since the last reset.
Hold the OK button to reset feature information.
3
23_LA_OM_EN_USC_t.book Page 61
Page 128 of 300
126MULTIMEDIA
Direct Tune
Press the Tune button located at the bottom of the radio
screen to directly tune to a desired radio station or
channel.
Press the available number button on the touchscreen to
begin selecting a desired station. Once a number has
been entered, any numbers that are no longer possible
(stations that cannot be reached) will become
deactivated/grayed out.
Undo
You can backspace an entry by pressing the
Back button on the touchscreen.
GO
Once the last digit of a station has been entered, press
“Ok”. The Direct Tune screen will close, and the system will
automatically tune to that station.
RADIO VOICE COMMANDS
Use your voice to quickly get to the AM, FM, or SiriusXM®
Satellite Radio stations you would like to hear.
(Subscription or included SiriusXM® Satellite Radio trial
required.) Push the VR button on the steering wheel and wait for
the beep to say a command. See an example:
“Tune to ninety-five-point-five FM”
“Tune to Satellite Channel Hits 1”
Did You Know: At any time, if you are not sure of what to
say or want to learn a Voice Command, push the VR button
and say “ Help”. The system provides you with a list of
commands.
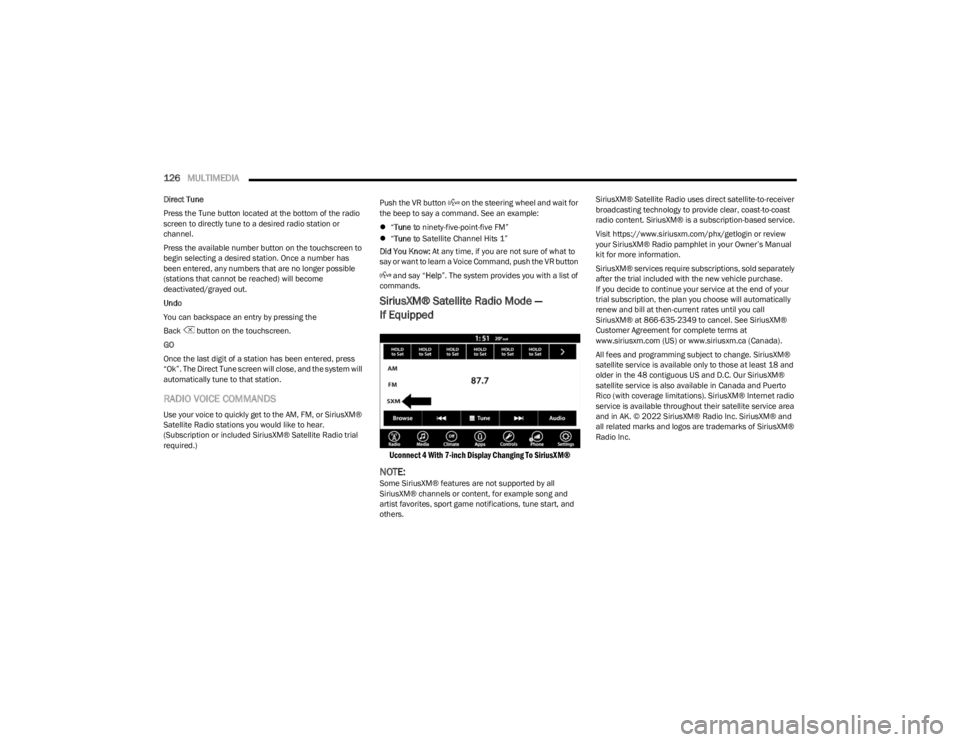
SiriusXM® Satellite Radio Mode —
If Equipped
Uconnect 4 With 7-inch Display Changing To SiriusXM®
NOTE:Some SiriusXM® features are not supported by all
SiriusXM® channels or content, for example song and
artist favorites, sport game notifications, tune start, and
others. SiriusXM® Satellite Radio uses direct satellite-to-receiver
broadcasting technology to provide clear, coast-to-coast
radio content. SiriusXM® is a subscription-based service.
Visit https://www.siriusxm.com/phx/getlogin or review
your SiriusXM® Radio pamphlet in your Owner’s Manual
kit for more information.
SiriusXM® services require subscriptions, sold separately
after the trial included with the new vehicle purchase.
If you decide to continue your service at the end of your
trial subscription, the plan you choose will automatically
renew and bill at then-current rates until you call
SiriusXM® at 866-635-2349 to cancel. See SiriusXM®
Customer Agreement for complete terms at
www.siriusxm.com (US) or www.siriusxm.ca (Canada).
All fees and programming subject to change. SiriusXM®
satellite service is available only to those at least 18 and
older in the 48 contiguous US and D.C. Our SiriusXM®
satellite service is also available in Canada and Puerto
Rico (with coverage limitations). SiriusXM® Internet radio
service is available throughout their satellite service area
and in AK. © 2022 SiriusXM® Radio Inc. SiriusXM® and
all related marks and logos are trademarks of SiriusXM®
Radio Inc.
23_LA_OM_EN_USC_t.book Page 126
Page 137 of 300
MULTIMEDIA135
Tracks
In USB Mode, press the Tracks button on the touchscreen
to display a pop-up with the Song List. The song currently
playing is indicated by an arrow and lines above and below
the song title. When in the Tracks List screen you can
rotate the TUNE/SCROLL knob to highlight a track
(indicated by the line above and below the track name)
and then push the ENTER/BROWSE knob to start playing
that track.
In Bluetooth® Mode, if the Bluetooth® device supports
this feature, press the Tracks button on the touchscreen
to display a pop-up with the Song List. The currently
playing song is indicated by a red arrow and lines above
and below the song title.
Pressing the Tracks button on the touchscreen while the
pop-up is displayed will close the pop-up.
MEDIA VOICE COMMANDS
Uconnect offers connections via USB, Bluetooth®, and
auxiliary (AUX) ports. Voice operation is only available for
connected USB and AUX devices. Push the VR button located on the steering wheel.
After the beep, say one of the following commands and
follow the prompts to switch your media source or choose
an artist:
“Change source to Bluetooth®”
“Change source to AUX”
“Change source to USB”
“Play artist Beethoven”; “ Play album Greatest Hits”;
“ Play song Moonlight Sonata”; “ Play genre Classical”
Did You Know: Press the Browse button on the
touchscreen to see all of the music on your USB device.
Your Voice Command must match exactly how the artist,
album, song, and genre information is displayed.
PHONE MODE
Overview
Uconnect Phone is a voice-activated, hands-free,
in-vehicle communications system. It allows you to dial a
phone number with your mobile phone.
The feature supports the following:
Voice Activated Features
Hands-Free dialing via Voice (“Call John Smith Mobile”
or “Dial 248-555-1212”).
Hands-Free text-to-speech listening of your incoming
SMS messages.
Hands-Free Text Message Replying: Forward one of
18 predefined SMS messages to incoming calls/text
messages.
Redialing last dialed numbers (“Redial”).
Calling Back the last incoming call number
(“Call Back”).
Viewing call logs on screen (“Show Incoming Calls,”
“Show Outgoing Calls,” “Show Missed Calls,” or “Show
Recent Calls”).
Searching Contacts phone number
(“Search for John Smith Mobile”).
Screen Activated Features
Dialing via Keypad using touchscreen.
Viewing and Calling contacts from Phonebooks
displayed on the touchscreen.
Setting Favorite Contact phone numbers so they are
easily accessible on the Main Phone screen.
Viewing and Calling contacts from Recent Call logs.
Reviewing your recent Incoming SMS Messages.
Pairing up to 10 phones/audio devices for easy access
to connect to them quickly.
NOTE:Your phone must be capable of SMS messaging via Blue -
tooth® for messaging features to work properly.
Your mobile phone’s audio is transmitted through your
vehicle’s audio system; the system will automatically mute
your radio when using the Uconnect Phone.
5
23_LA_OM_EN_USC_t.book Page 135
Page 146 of 300
144MULTIMEDIA
Did You Know: Voice Text Reply is not compatible with
iPhone®, but if your vehicle is equipped with Siri® Eyes
Free, you can use your voice to send a text message.
Siri® Eyes Free — If Equipped
When used with your Apple® iPhone® connected to your
vehicle via Bluetooth®, Siri lets you use your voice to send
text messages, select media, place phone calls and much
more. Siri uses your natural language to understand what
you mean and responds back to confirm your requests.
The system is designed to keep your eyes on the road and
your hands on the wheel by letting Siri help you perform
useful tasks.
To enable Siri, push and hold, then release the Uconnect
Voice Recognition (VR) button on the steering wheel. After
you hear a double beep, you can ask Siri to play podcasts
and music, get directions, read text messages, and many
other useful requests.
BLUETOOTH® COMMUNICATION LINK
Mobile phones may lose connection to the Uconnect
Phone. When this happens, the connection can generally
be re-established by restarting the mobile phone. Your
mobile phone is recommended to remain in Bluetooth®
ON Mode.
POWER-UP
After switching the ignition key from OFF to either the
ON/RUN or ACC position, or after a language change, you
must wait at least 15 seconds prior to using the system
Úpage 284.
ANDROID AUTO™ & APPLE CARPLAY® —
IF EQUIPPED
ANDROID AUTO™
Use this QR code to access your digital
experience.
Android Auto™ is a feature of your
Uconnect system, and your Android™
6.0 or higher powered smartphone
with a data plan, that allows you to
project your smartphone and a number
of its apps onto the touchscreen radio
display. Android Auto™ brings you useful information, and
organizes it into simple cards that appear just when they
are needed. Android Auto™ can be used with speech
technology, the steering wheel controls, the knobs and
buttons on your radio faceplate, and the radio display’s
touchscreen to control many of your apps. To use Android
Auto™, perform the following procedure:
NOTE:Feature availability depends on your carrier and mobile
phone manufacturer. Some Android Auto™ features may
or may not be available in every region and/or language.
1. Download the Android Auto™ app from the Google Play store on your Android™-powered smartphone.
2. Connect your Android™-powered smartphone to one of the media USB ports in your vehicle. If the Android
Auto™ app was not downloaded, the first time you
plug your device in the app begins to download.
Your vehicle should be in PARK the first time you use
the app.
NOTE:Be sure to use the factory-provided USB cable that came
with your phone, as aftermarket cables may not work.
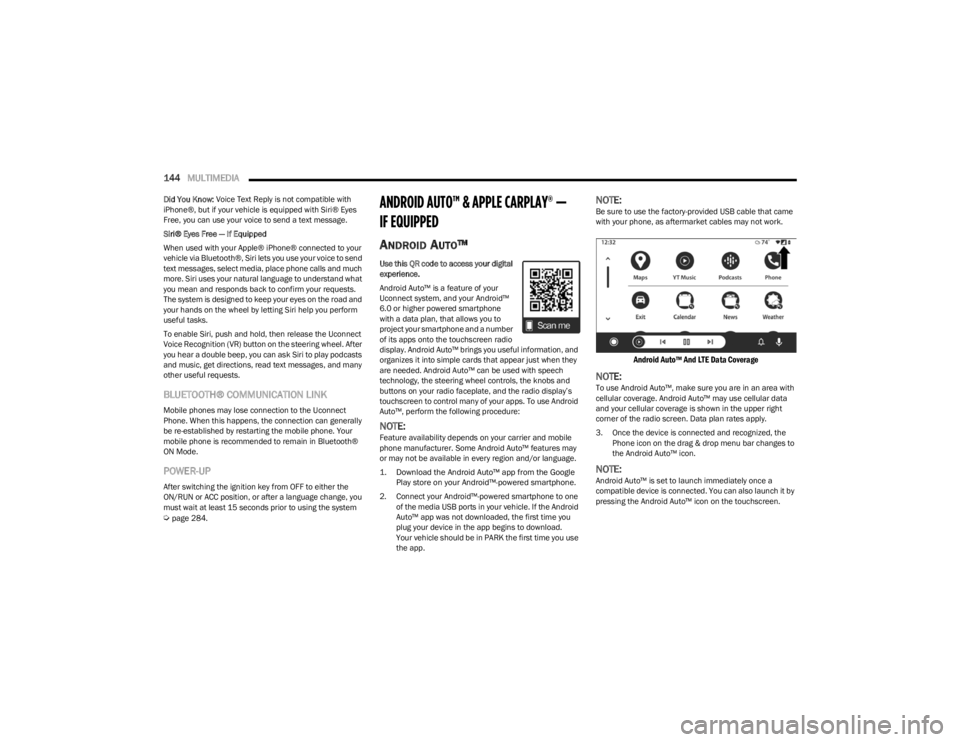
Android Auto™ And LTE Data Coverage
NOTE:To use Android Auto™, make sure you are in an area with
cellular coverage. Android Auto™ may use cellular data
and your cellular coverage is shown in the upper right
corner of the radio screen. Data plan rates apply.
3. Once the device is connected and recognized, the Phone icon on the drag & drop menu bar changes to
the Android Auto™ icon.
NOTE:Android Auto™ is set to launch immediately once a
compatible device is connected. You can also launch it by
pressing the Android Auto™ icon on the touchscreen.
23_LA_OM_EN_USC_t.book Page 144
Page 148 of 300
146MULTIMEDIA
APPLE CARPLAY®
Use this QR code to access your digital
experience.
Uconnect works seamlessly with Apple
CarPlay®, the smarter, more secure
way to use your iPhone® in the car, and
stay focused on the road. Use your
Uconnect Touchscreen display, the
vehicle's knobs and controls, and your
voice with Siri to get access to Apple Music®, Maps,
Messages, and more.
NOTE:Feature availability depends on your carrier and mobile
phone manufacturer. Some Apple CarPlay® features may
or may not be available in every region and/or language.
To use Apple CarPlay®, make sure you are using iPhone®
5 or later, have Siri enabled in Settings, ensure your
iPhone® is unlocked for the very first connection only, and
then use the following procedure:
1. Connect your iPhone® to one of the media USB
ports in your vehicle.
NOTE:Be sure to use the factory-provided Lightning cable that
came with your phone, as aftermarket cables may not
work.
2. Once the device is connected and recognized, the Phone icon on the drag & drop menu bar changes to
the Apple CarPlay® Icon.
NOTE:Apple CarPlay® is set to launch immediately. You can also
launch it by pressing the Apple CarPlay® icon on the
touchscreen.
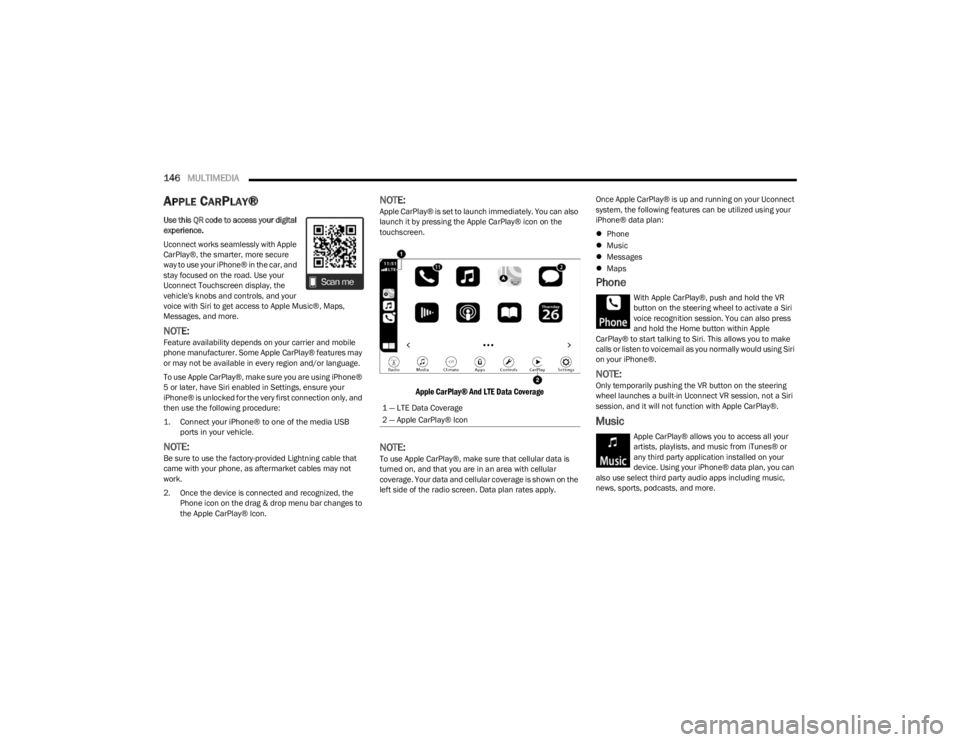
Apple CarPlay® And LTE Data Coverage
NOTE:To use Apple CarPlay®, make sure that cellular data is
turned on, and that you are in an area with cellular
coverage. Your data and cellular coverage is shown on the
left side of the radio screen. Data plan rates apply. Once Apple CarPlay® is up and running on your Uconnect
system, the following features can be utilized using your
iPhone® data plan:
Phone
Music
Messages
Maps
Phone
With Apple CarPlay®, push and hold the VR
button on the steering wheel to activate a Siri
voice recognition session. You can also press
and hold the Home button within Apple
CarPlay® to start talking to Siri. This allows you to make
calls or listen to voicemail as you normally would using Siri
on your iPhone®.
NOTE:Only temporarily pushing the VR button on the steering
wheel launches a built-in Uconnect VR session, not a Siri
session, and it will not function with Apple CarPlay®.
Music
Apple CarPlay® allows you to access all your
artists, playlists, and music from iTunes® or
any third party application installed on your
device. Using your iPhone® data plan, you can
also use select third party audio apps including music,
news, sports, podcasts, and more.
1 — LTE Data Coverage
2 — Apple CarPlay® Icon
23_LA_OM_EN_USC_t.book Page 146