trunk release DODGE CHALLENGER SRT 2019 Owners Manual
[x] Cancel search | Manufacturer: DODGE, Model Year: 2019, Model line: CHALLENGER SRT, Model: DODGE CHALLENGER SRT 2019Pages: 500, PDF Size: 4.73 MB
Page 23 of 500
In case the ignition switch does not change with the push
of a button, the key fob may have a low or fully depleted
battery. A low key fob battery can be verified by referring
to the instrument cluster, which will display directions to
follow.
NOTE:In a situation of a low or fully depleted battery, a
backup method can be used to operate the ignition switch.
Put the nose side of the key fob (side opposite of the
Emergency Key) against the ENGINE START/STOP button
and push to operate the ignition switch.
To Unlock The Doors
Push and release the unlock button on the key fob once to
unlock the driver’s door or twice within five seconds to
unlock all doors.
The turn signal lights will flash to acknowledge the unlock
signal. The illuminated entry system will also be activated.
NOTE: All door unlock settings can be programmed to
your convenience through Uconnect Settings. Refer to
“Uconnect Settings” in “Multimedia” for further informa-
tion. •
Unlock the driver door on the first push of the key fob
unlock button.
• Unlock all doors on the first push of the key fob unlock
button.
NOTE: To unlock doors and trunk with passive entry, refer
to “Keyless Enter-N-Go — Passive Entry” located in
“Doors” in “Getting To Know Your Vehicle” for further
information.
NOTE: When you use the key fob to open any door, the
courtesy lights, overhead lights, and approach lighting in
the outside mirrors (if equipped) will turn on. Refer to
“Interior Lights” in “Getting To Know Your Vehicle” for
further information.
1st Press Of Key Fob Unlocks
This feature lets you program the system to unlock either
the driver’s door or all doors on the first push of the unlock
button on the key fob.
To change the current setting, refer to “Uconnect Settings”
in “Multimedia” for further information.
3
GETTING TO KNOW YOUR VEHICLE 21
Page 24 of 500
Flash Lights With Lock
This feature will cause the turn signal lights to flash when
the doors are locked with the key fob. This feature can be
turned on or turned off. To change the current setting, refer
to “Uconnect Settings” in “Multimedia” for further infor-
mation.
Headlight Illumination On Approach
This feature activates the headlights for up to 90 seconds
when the doors are unlocked with the key fob. The time for
this feature is programmable, on vehicles equipped,
through Uconnect Settings. To change the current setting,
refer to “Uconnect Settings” in “Multimedia” for further
information.
To Unlatch The Trunk
Push the trunk button on the key fob two times within five
seconds to unlatch the trunk.
If the vehicle is equipped with Passive Entry, refer to
“Keyless Enter-N-Go — Passive Entry” under “Getting To
Know Your Vehicle” for further information.
To Lock The Doors And Trunk
Push and release the lock button on the key fob to lock all
doors.
The turn signal lights will flash and the horn will chirp to
acknowledge the signal if programmed. Refer to “Uconnect
Settings” in “Multimedia” for further programmable infor-
mation.
NOTE:To lock the doors with passive entry, Refer to
“Keyless Enter-N-Go — Passive Entry” located in “Doors”
in “Getting To Know Your Vehicle” for further information.
If one or more doors are open, or the trunk is open, the
doors will lock. The doors will unlock automatically if the
key fob is left inside the passenger compartment, otherwise
the doors will stay locked.
Sound Horn With Lock
This feature will cause the horn to chirp when the doors are
locked with the key fob. This feature can be turned on or
turned off. To change the current setting, refer to
“Uconnect Settings” in “Multimedia” for further informa-
tion.
22 GETTING TO KNOW YOUR VEHICLE
Page 37 of 500
CAUTION!
•Always remove the key fobs from the vehicle and
lock all doors when leaving the vehicle unattended.
• For vehicles equipped with Keyless Enter-N-Go —
Ignition, always remember to place the ignition in
the OFF position.
NOTE: Duplication of key fobs may be performed at an
authorized dealer. This procedure consists of programming
a blank key fob to the vehicle electronics. A blank key fob
is one that has never been programmed.
When having the Sentry Key Immobilizer System serviced,
bring all vehicle keys with you to an authorized dealer.
General Information
The following regulatory statement applies to all radio
frequency (RF) devices equipped in this vehicle:
This device complies with Part 15 of the FCC Rules and
with Industry Canada license-exempt RSS standard(s).
Operation is subject to the following two conditions: 1. This device may not cause harmful interference, and
2. This device must accept any interference received, in-
cluding interference that may cause undesired opera-
tion.
NOTE: Changes or modifications not expressly approved
by the party responsible for compliance could void the
user ’s authority to operate the equipment.
VEHICLE SECURITY ALARM — IF EQUIPPED
The vehicle security alarm monitors the vehicle doors for
unauthorized entry and the keyless push button ignition
for unauthorized operation. While the vehicle security
alarm is armed, interior switches for door locks and trunk
release are disabled. If something triggers the alarm, the
vehicle security alarm will provide the following audible
and visible signals: the horn will pulse, the park lamps
and/or turn signals will flash, and the vehicle security light
in the instrument cluster will flash.
3
GETTING TO KNOW YOUR VEHICLE 35
Page 86 of 500
CAUTION!
To prevent possible damage, do not slam the hood to
close it. Lower hood to approximately 12 inches (30 cm)
and drop the hood to close. Make sure hood is fully
closed for both latches. Never drive vehicle unless
hood is fully closed, with both latches engaged.
TRUNK
Opening
The trunk can be opened from inside the vehicle using the
power trunk button located on the instrument panel to the
left of the steering wheel.
The trunk lid can be released from outside the vehicle by
pushing the trunk button on the key fob twice within five
seconds or by using the external release switch located on
the underside of the decklid overhang. The release feature
will function only when the vehicle is in the unlock
condition.
With the ignition in the ON/RUN position, the trunk open
symbol will display in the instrument cluster indicating
that the trunk is open. The odometer display will reappear
once the trunk is closed.With the ignition in the OFF position, the trunk open
symbol will display until the trunk is closed.
NOTE:
Refer to “Keyless Enter-N-Go — Passive Entry” in
”Doors” in “Getting To Know Your Vehicle” for further
information on trunk operation with the Passive Entry
feature.
Opening From Inside The Vehicle
Interior Power Trunk Release
The trunk can be opened from inside the
vehicle using the power trunk release
button located on the instrument panel
to the left of the steering wheel.
NOTE:The transmission must be in
PARK before the button will operate.
Opening From Outside The Vehicle
To Unlock/Open The Trunk
The trunk may be unlocked/opened using either of the
following methods:
• Key Fob Trunk Release Button
• Passive Entry Button
Power Trunk
Release
84 GETTING TO KNOW YOUR VEHICLE
Page 87 of 500
Key Fob Trunk Release ButtonPush the power trunk button on the key fob
twice within five seconds to release the trunk.
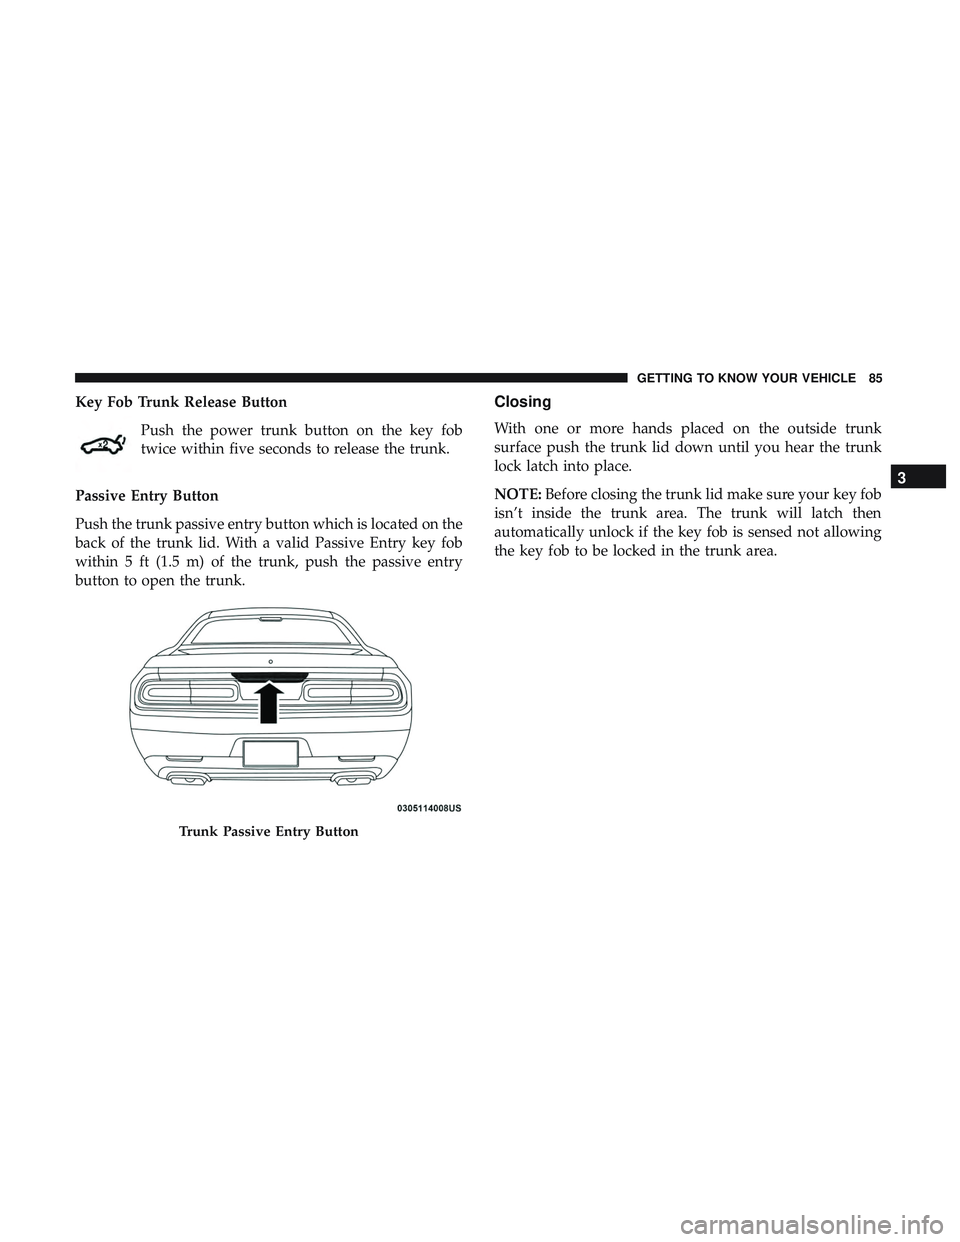
Passive Entry Button
Push the trunk passive entry button which is located on the
back of the trunk lid. With a valid Passive Entry key fob
within 5 ft (1.5 m) of the trunk, push the passive entry
button to open the trunk.Closing
With one or more hands placed on the outside trunk
surface push the trunk lid down until you hear the trunk
lock latch into place.
NOTE: Before closing the trunk lid make sure your key fob
isn’t inside the trunk area. The trunk will latch then
automatically unlock if the key fob is sensed not allowing
the key fob to be locked in the trunk area.
Trunk Passive Entry Button
3
GETTING TO KNOW YOUR VEHICLE 85
Page 88 of 500
Trunk Safety
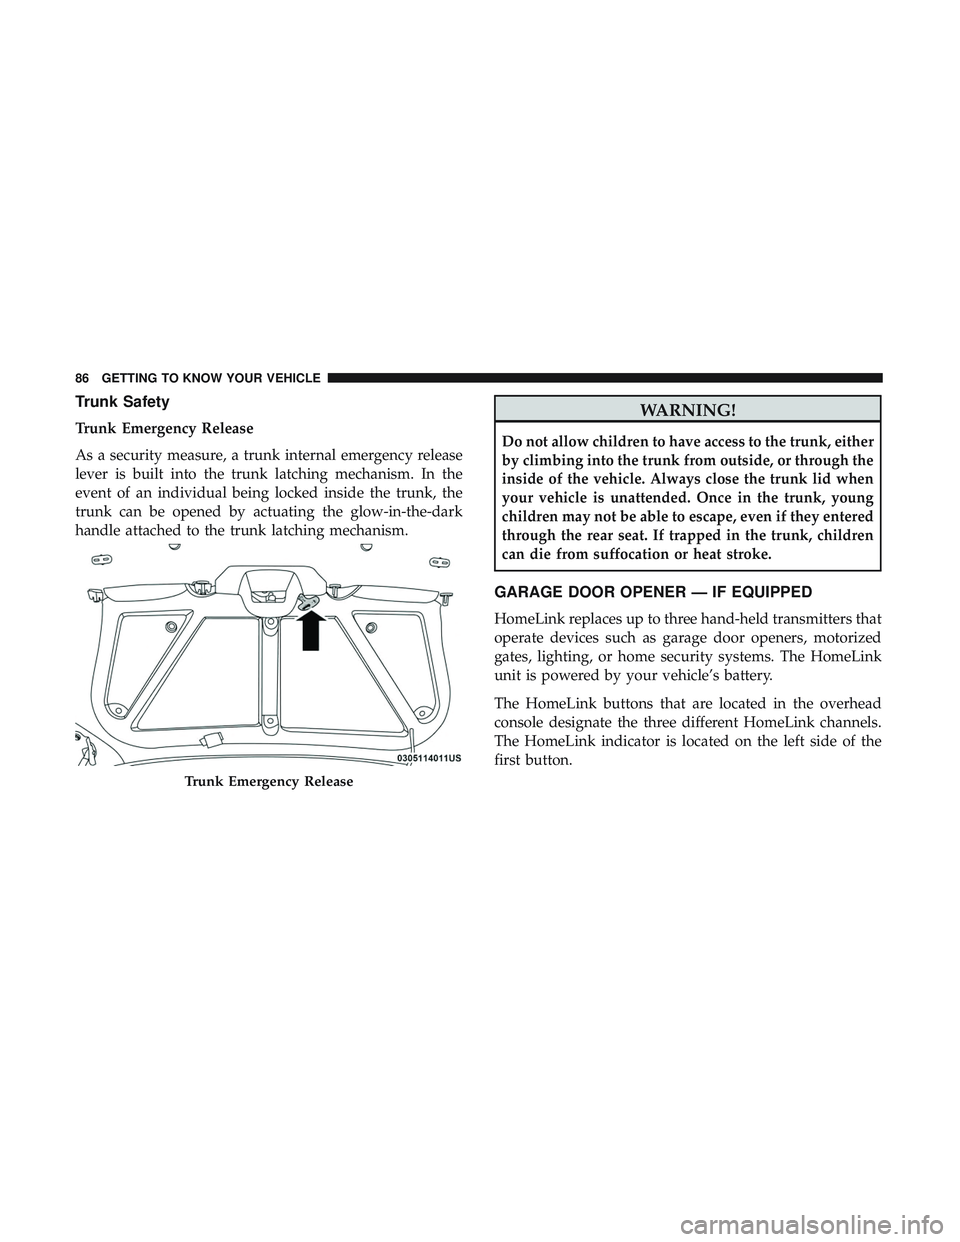
Trunk Emergency Release
As a security measure, a trunk internal emergency release
lever is built into the trunk latching mechanism. In the
event of an individual being locked inside the trunk, the
trunk can be opened by actuating the glow-in-the-dark
handle attached to the trunk latching mechanism.
WARNING!
Do not allow children to have access to the trunk, either
by climbing into the trunk from outside, or through the
inside of the vehicle. Always close the trunk lid when
your vehicle is unattended. Once in the trunk, young
children may not be able to escape, even if they entered
through the rear seat. If trapped in the trunk, children
can die from suffocation or heat stroke.
GARAGE DOOR OPENER — IF EQUIPPED
HomeLink replaces up to three hand-held transmitters that
operate devices such as garage door openers, motorized
gates, lighting, or home security systems. The HomeLink
unit is powered by your vehicle’s battery.
The HomeLink buttons that are located in the overhead
console designate the three different HomeLink channels.
The HomeLink indicator is located on the left side of the
first button.
Trunk Emergency Release
86 GETTING TO KNOW YOUR VEHICLE
Page 494 of 500
Programming Additional Key Fobs..........26, 34
Unlatch The Trunk ........................22
Remote Starting Exit Remote Start Mode .....................32
Uconnect Customer Programmable Features ......33
Uconnect Settings .........................33
Remote Trunk Release ........................84
Replacement Bulbs ........................ .288
Replacement Keys ........................26, 34
Replacement Tires ..........................375
Reporting Safety Defects .....................479
Restraints, Child .......................... .184
Restraints, Head ............................52
Rocking Vehicle When Stuck ...................325
Rotation, Tires ............................ .381
Safety Checks Inside Vehicle ...................206
Safety Checks Outside Vehicle .................208
Safety Defects, Reporting .....................479
Safety, Exhaust Gas ........................ .205
Safety Information, Tire ..................... .360
Safety Tips ...............................205
Schedule, Maintenance .......................333
Seat Belt Reminder .........................117
Seat Belts ............................ .161, 206Automatic Locking Retractor (ALR)
...........169
Child Restraints ........................ .184
Energy Management Feature ................168
Extender ...............................167
Front Seat .......................161, 163, 165
Inspection ............................. .206
Lap/Shoulder Belt Operation ................165
Lap/Shoulder Belts .......................163
Lap/Shoulder Belt Untwisting ...............167
Operating Instructions .....................165
Pregnant Women ........................ .168
Pretensioners .......................... .168
Rear Seat ............................. .163
Reminder ............................. .162
Seat Belt
Extender ........................167
Seat Belt Pretensioner .....................168
Untwisting Procedure .....................167
Seat Belts Maintenance .......................387
Seats ............................ .44, 47, 48, 51
Adjustment .......................... .44, 47
Head Restraints ..........................52
Heated .................................48
Height Adjustment ........................46
Power .................................46
Rear Folding ..........................44, 45
492 INDEX
Page 497 of 500
Towing Behind A Motorhome..................277
Traction .................................278
Traction Control .......................... .143
Trailer Towing ............................ .277
Transfer Case Fluid .................................398
Transmission ............................. .229
Automatic ..........................229, 358
Fluid ............................. .398, 400
Maintenance ............................358
Manual ............................... .223
Shifting ...............................227
Transporting Pets ..........................205
Tread Wear Indicators .......................374
Trunk Lid (Deck Lid) .........................84
Trunk Release Remote Control ..................84
Turn Signals ............................64, 126
Uconnect Uconnect Settings ....................21, 22, 33
Uconnect 4C/4C Nav With 8.4-Inch Display ........406
Uconnect Settings Customer Programmable Features .............33
Uniform Tire Quality Grades ..................383
Unleaded Gasoline ........................ .392Untwisting Procedure, Seat Belt
................167
Vanity Mirrors .............................60
Vehicle Certification Label ....................276
Vehicle Identification Number (VIN) .............390
Vehicle Loading .....................276, 277, 367
Vehicle Modifications/Alterations .................5
Vehicle Security Alarm ........................35
Vehicle Storage ..........................77, 384
Vehicle User Guide In Vehicle Help ...........................17
Navigation ..............................17
Operating Instructions ......................17
Searching User Guide ......................17
Viscosity, Engine Oil ........................341
Voice Command .......................... .459
Voice Recognition System (VR) .................459
W arning
Lights (Instrument Cluster Descriptions) . . . .123
Warnings And Cautions .......................5
Warranty Information .......................478
Washer Adding Fluid .......................... .338
Washers, Windshield ..................... .68, 338
Washing Vehicle .......................... .385
12
INDEX 495