key DODGE CHARGER 2010 7.G Owner's Manual
[x] Cancel search | Manufacturer: DODGE, Model Year: 2010, Model line: CHARGER, Model: DODGE CHARGER 2010 7.GPages: 80, PDF Size: 12.42 MB
Page 32 of 80
REMOTE AUDIO CONTROLS
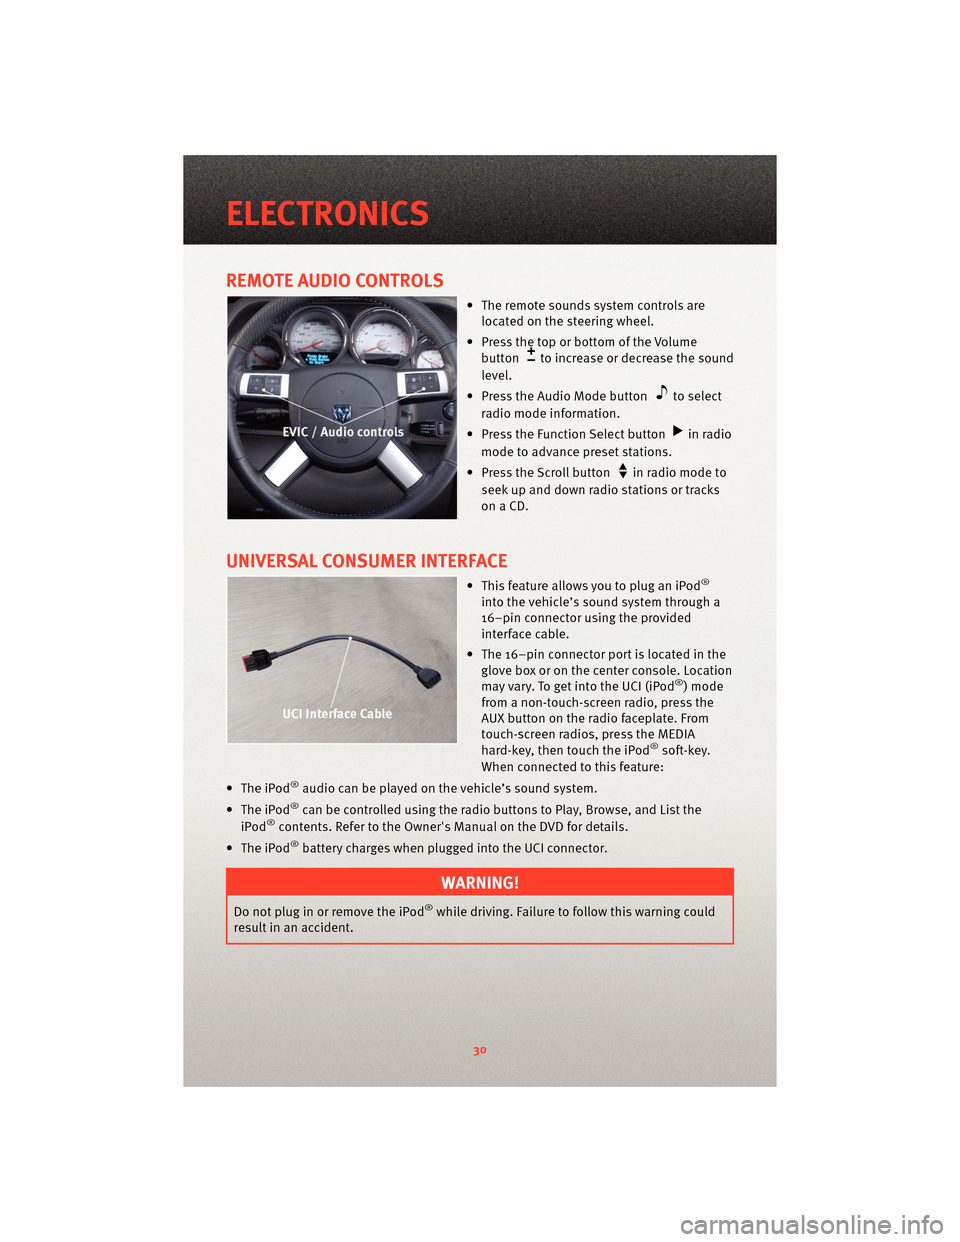
• The remote sounds system controls arelocated on the steering wheel.
• Press the top or bottom of the Volume button
to increase or decrease the sound
level.
• Press the Audio Mode button
to select
radio mode information.
• Press the Function Select button
in radio
mode to advance preset stations.
• Press the Scroll button
in radio mode to
seek up and down radio stations or tracks
onaCD.
UNIVERSAL CONSUMER INTERFACE
• This feature allows you to plug an iPod®
into the vehicle’s sound system through a
16–pin connector using the provided
interface cable.
• The 16–pin connector port is located in the glove box or on the center console. Location
may vary. To get into the UCI (iPod
®) mode
from a non-touch-screen radio, press the
AUX button on the radio faceplate. From
touch-screen radios, press the MEDIA
hard-key, then touch the iPod
®soft-key.
When connected to this feature:
• The iPod
®audio can be played on the vehicle’s sound system.
• The iPod
®can be controlled using the radio buttons to Play, Browse, and List the
iPod®contents. Refer to the Owner's Manual on the DVD for details.
• The iPod
®battery charges when plug ged into the UCI connector.
WARNING!
Do not plug in or remove the iPod®while driving. Failure to follow this warning could
result in an accident.
ELECTRONICS
30
Page 36 of 80
• You will be asked to create a four-digit PIN which you will later need to enter into yourphone (typically...settings, Bluetooth®, device, list, new).
• You will then be prompted to give the phone pairing a name (each phone paired
should have a unique name).
• Next you will be asked to give this new pairing a priority of 1 thru 7 (up to seven phones may be paired).
Making A Phone Call
• Press the Phone button.
• (After the BEEP), say “dial” (or “call” to a name).
• (After the BEEP), say number (or name).
Phonebook (Uconnect™ local) Edit
• Press the Phone button.
• (After the BEEP), say “phonebook”.
• (After the BEEP), say “new entry” or “list names” or “delete”.
• Follow the prompts.
Receiving A Call – Accept (And End)
• When an incoming call rings/is announced on Uconnect™, press the Phone button
.
• To end a call, press the Phone button
.
Mute (Or Unmute) Microphone During Call
• During a call, press the Voice Command button.
• (After the BEEP), say “mute on” (or “mute off”).
Transfer Ongoing Call Between Handset And Vehicle
• During a call, press the Voice Command button.
• (After the BEEP), say “transfer call”.
Changing The Volume
• Start a dialogue by pressing the Phone button, then adjust the volume during a
normal call.
• Use the radio ON/OFF VOLUME rotary knob to adjust the volume to a comfortable level while the Uconnect™ system is speaking. Please note the volume setting for
Uconnect™ is different than the audio system.
NOTE: To access the tutorial, press the Uconnect™ hard-key. After the BEEP, say
“tutorial”. Press any hard-key or touch the display to cancel the tutorial.
ELECTRONICS
34
Page 37 of 80
VOICE COMMAND
• The Voice Command system allows you to control your AM, FM radio, satellite radio,disc player, and a memo recorder. When you press the Voice Command
button
, you will hear a beep. The beep is your signal to give a command. If you
do not say a command within a few seconds, the system will present you with a list of
options. If you ever wish to interrupt the system while it lists options, press the Voice
Command button
, listen for the BEEP, and say your command.
• For vehicles equipped with Video Entertainment System (VES)™, refer to the Voice Command section of the Uconnect™ User's Manual on the DVD for further details.
• For vehicles not equipped with VES™, refer to your vehicle Owner's Manual on the DVD for Voice Command information.
Changing The Volume
• Start a dialogue by pressing the Voice Command button, then say a command
(e.g., “tutorial”).
• Use the radio ON/OFF VOLUME rotary knob to adjust the volume to a comfortable level while the Voice Command system is speaking. Please note the volume setting for
Voice Command is different than the audio system.
WARNING!
Any voice commanded system should be used only in safe driving conditions and all
attention should be kept on the roadway ahead. Failure to do so may result in an
accident causing serious injury or death.
NOTE: To access the tutorial, press the Voice Command button
. After the BEEP,
say “tutorial”. Press any hard-key or touch the display to cancel the tutorial.
35
ELECTRONICS
Page 40 of 80
BRAKE/TRANSMISSION
INTERLOCK MANUAL
OVERRIDE
• The manual override may be used inthe event that the shift lever should
fail to move from PARK with the Key
Fob in the ON position and the brake
pedal pressed.
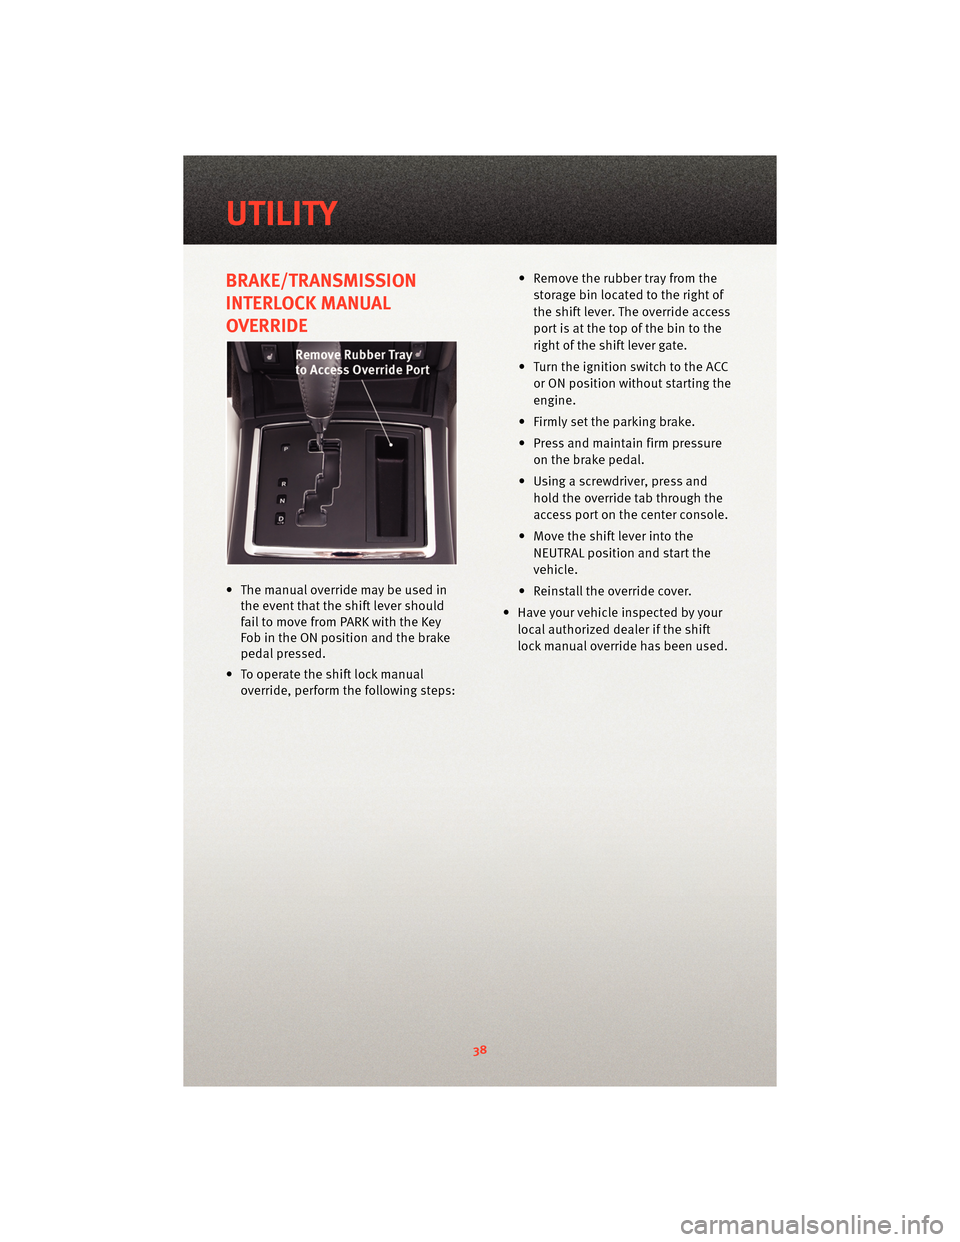
• To operate the shift lock manual override, perform the following steps: • Remove the rubber tray from the
storage bin located to the right of
the shift lever. The override access
port is at the top of the bin to the
right of the shift lever gate.
• Turn the ignition switch to the ACC or ON position without starting the
engine.
• Firmly set the parking brake.
• Press and maintain firm pressure on the brake pedal.
• Using a screwdriver, press and hold the override tab through the
access port on the center console.
• Move the shift lever into the NEUTRAL position and start the
vehicle.
• Reinstall the override cover.
• Have your vehicle inspected by your local authorized dealer if the shift
lock manual override has been used.
UTILITY
38
Page 55 of 80
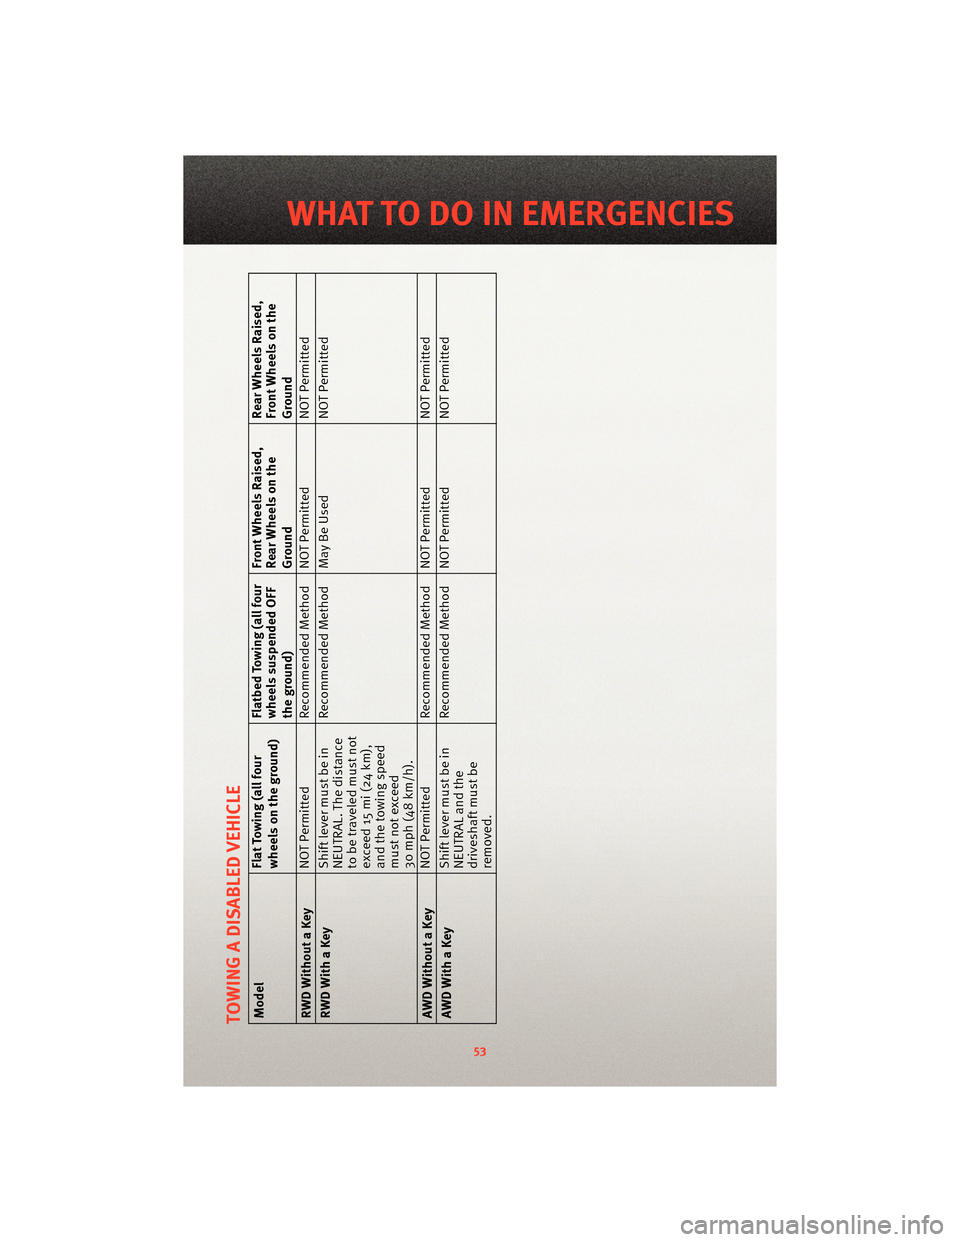
TOWING A DISABLED VEHICLEModelFlat Towing (all four
wheels on the ground)Flatbed Towing (all four
wheels suspended OFF
the ground)Front Wheels Raised,
Rear Wheels on the
GroundRear Wheels Raised,
Front Wheels on the
Ground
RWD Without a Key NOT Permitted
Recommended Method NOT Permitted NOT Permitted
RWD With a Key Shift lever must be in
NEUTRAL. The distance
to be traveled must not
exceed 15 mi (24 km),
and the towing speed
must not exceed
30 mph (48 km/h).Recommended Method May Be Used
NOT Permitted
AWD Without a Key NOT Permitted
Recommended Method NOT Permitted NOT Permitted
AWD With a Key Shift lever must be in
NEUTRAL and the
driveshaft must be
removed.Recommended Method NOT Permitted
NOT Permitted
53
WHAT TO DO IN EMERGENCIES
Page 72 of 80
WHEEL AND WHEEL TRIM CARE
• All wheels and wheel trim, especially aluminum and chrome plated wheels, should becleaned regularly with a mild soap and water to prevent corrosion.
• To remove heavy soil and/or excessive brake dust, use MOPAR
®Wheel Cleaner or
equivalent or select a non-ab rasive,non-acidic cleaner.
CAUTION!
Do not use scouring pads, steel wool, a bristle brush, or metal polishes. Do not use
oven cleaner. These products may damage the wheel's protective finish. Avoid
automatic car washes that use acidic solution s or harsh brushes that may damage the
wheel's protective finish. Only MOPAR
®Wheel Cleaner or equivalent is recommended.
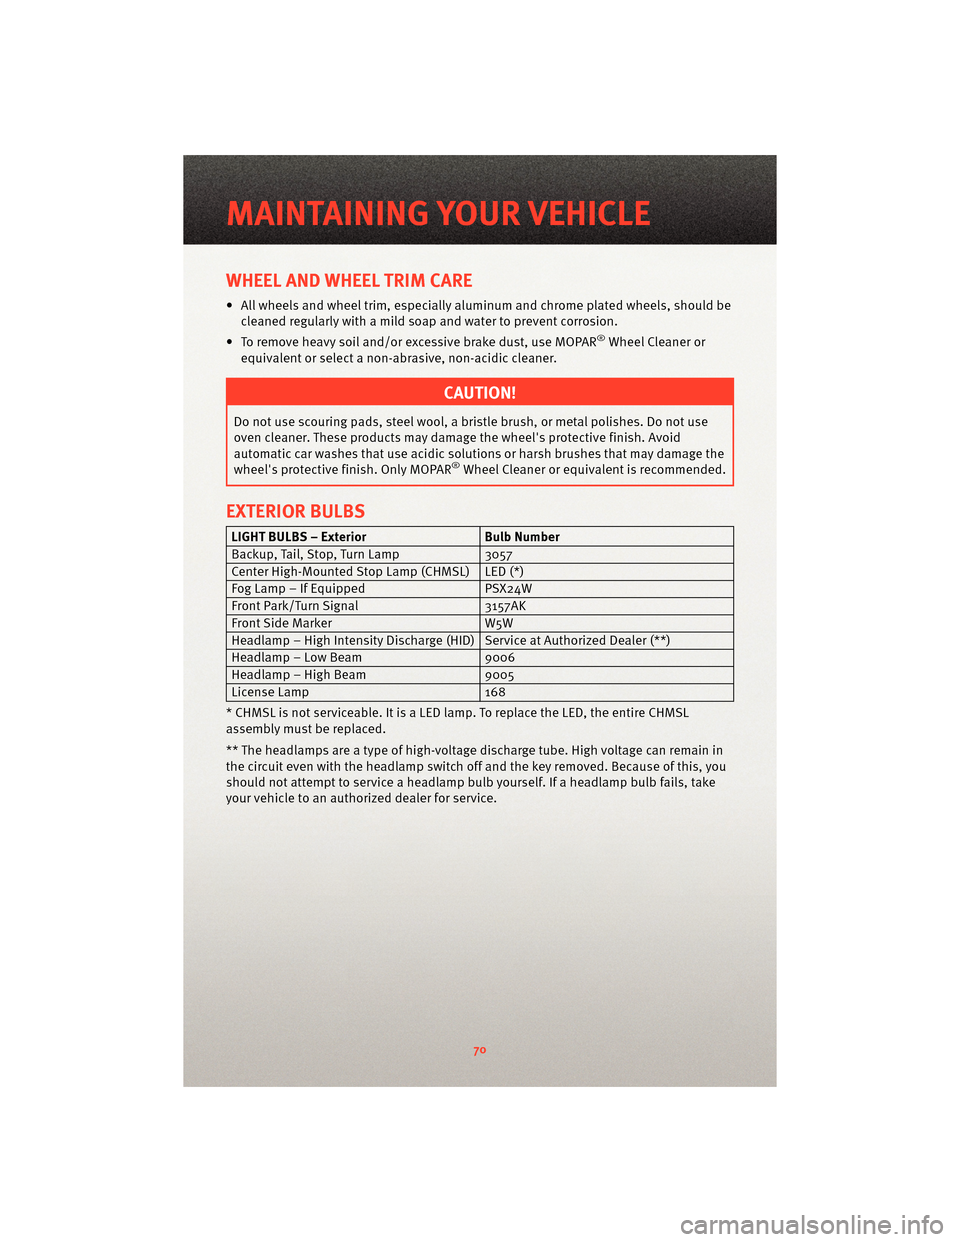
EXTERIOR BULBS
LIGHT BULBS – Exterior Bulb Number
Backup, Tail, Stop, Turn Lamp 3057
Center High-Mounted Stop Lamp (CHMSL) LED (*)
Fog Lamp – If Equipped PSX24W
Front Park/Turn Signal 3157AK
Front Side Marker W5W
Headlamp – High Intensity Discharge (HID) Service at Authorized Dealer (**)
Headlamp – Low Beam 9006
Headlamp – High Beam 9005
License Lamp 168
* CHMSL is not serviceable. It is a LED lamp. To replace the LED, the entire CHMSL
assembly must be replaced.
** The headlamps are a type of high-voltage discharge tube. High voltage can remain in
the circuit even with the headlamp switch off and the key removed. Because of this, you
should not attempt to service a headlamp bulb yourself. If a headlamp bulb fails, take
your vehicle to an authorized dealer for service.
MAINTAINING YOUR VEHICLE
70