brake DODGE CHARGER 2011 7.G Owners Manual
[x] Cancel search | Manufacturer: DODGE, Model Year: 2011, Model line: CHARGER, Model: DODGE CHARGER 2011 7.GPages: 104, PDF Size: 4.53 MB
Page 5 of 104
Vehicles Sold In Canada
With respect to any vehicles sold in Canada, the name Chrysler Group LLC shall be
deemed to be deleted and the name Chrysler Canada Inc. used in substitution
therefore.
WARNING!
• Pedals that cannot move freely can cause loss of vehicle control and increasethe risk of serious personal injury.
• Always make sure that objects cannot fall into the driver foot well while the vehicle is moving. Objects can become trapped under the brake pedal and
accelerator pedal causing a loss of vehicle control.
• Failure to properly follow floor mat installation or mounting can cause interference with the brake pedal and accelerator pedal operation causing
loss of control of the vehicle.
• Never use the ‘PARK’ position as a substitute for the parking brake. Always apply the parking brake fully when parked to guard against vehicle movement
and possible injury or damage.
• Refer to your Owner's Manual on the DVD for further details.
USE OF AFTERMARKET PRODUCTS (ELECTRONICS)
The use of aftermarket devices including cell phones, MP3 players, GPS systems, or
chargers may affect the performance of on-board wireless features including Keyless
Enter-N-Go and Remote Start range. If you are experiencing difficulties with any of your
wireless features, try disconnecting your aftermarket devices to see if the situation
improves. If your symptoms persist, please see an authorized dealer.
CHRYSLER, DODGE, JEEP, RAM TRUCK, ATF+4, MOPAR and Uconnect are registered
trademarks of Chrysler Group LLC. COPYRIGHT ©2011 CHRYSLER GROUP LLC
INTRODUCTION/WELCOME
3
Page 8 of 104
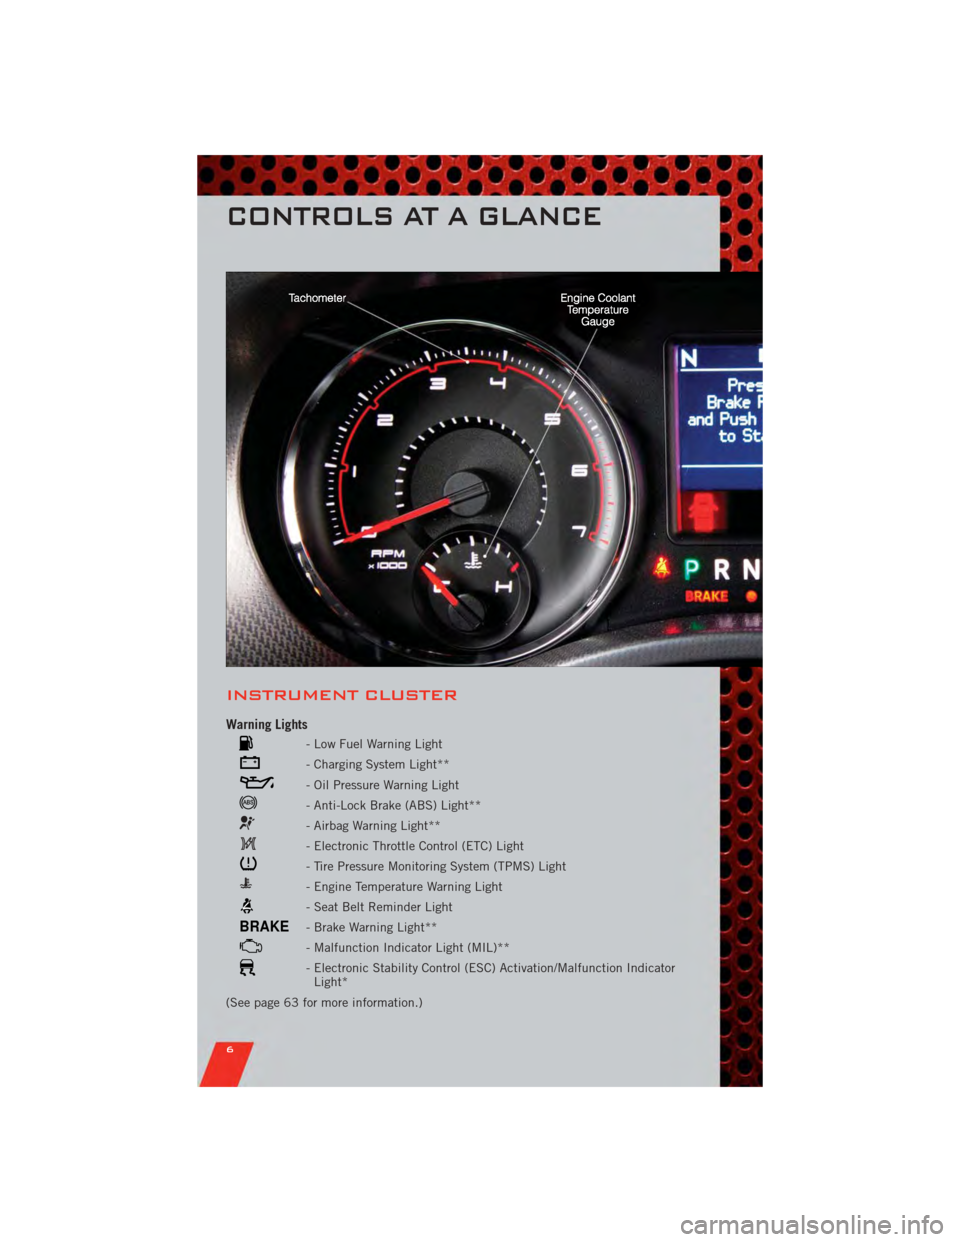
INSTRUMENT CLUSTER
Warning Lights
- Low Fuel Warning Light
- Charging System Light**
- Oil Pressure Warning Light
- Anti-Lock Brake (ABS) Light**
- Airbag Warning Light**
- Electronic Throttle Control (ETC) Light
- Tire Pressure Monitoring System (TPMS) Light
- Engine Temperature Warning Light
- Seat Belt Reminder Light
BRAKE- Brake Warning Light**
- Malfunction Indicator Light (MIL)**
- Electronic Stability Control (ESC) Activation/Malfunction IndicatorLight*
(See page 63 for more information.)
CONTROLS AT A GLANCE
6
Page 9 of 104
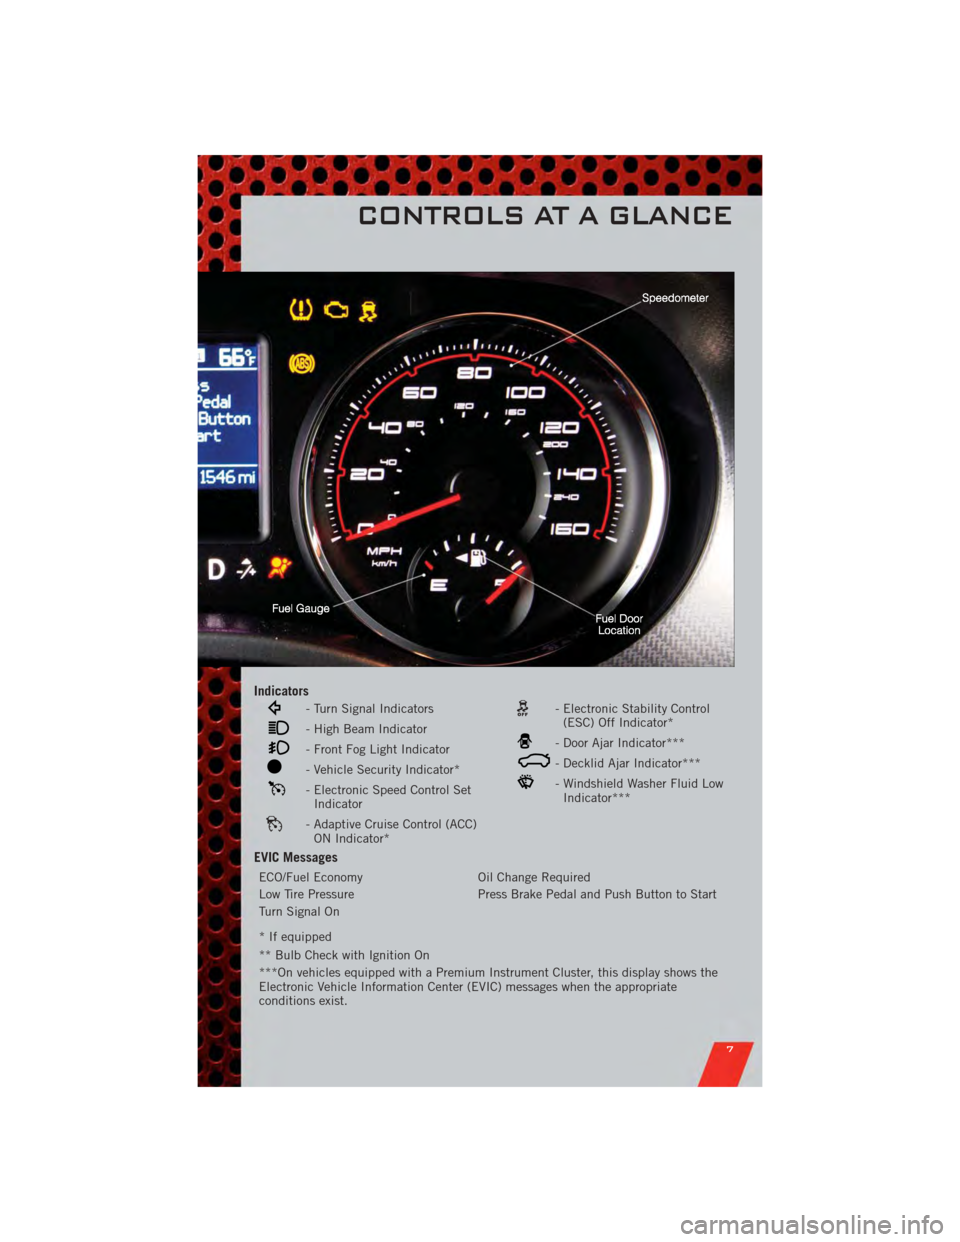
Indicators
- Turn Signal Indicators
- High Beam Indicator
- Front Fog Light Indicator
- Vehicle Security Indicator*
- Electronic Speed Control SetIndicator
- Adaptive Cruise Control (ACC)ON Indicator*
- Electronic Stability Control(ESC) Off Indicator*
- Door Ajar Indicator***
- Decklid Ajar Indicator***
- Windshield Washer Fluid LowIndicator***
EVIC Messages
ECO/Fuel Economy Oil Change Required
Low Tire Pressure Press Brake Pedal and Push Button to Start
Turn Signal On
* If equipped
** Bulb Check with Ignition On
***On vehicles equipped with a Premium Instrument Cluster, this display shows the
Electronic Vehicle Information Center (EVIC) messages when the appropriate
conditions exist.
CONTROLS AT A GLANCE
7
Page 10 of 104
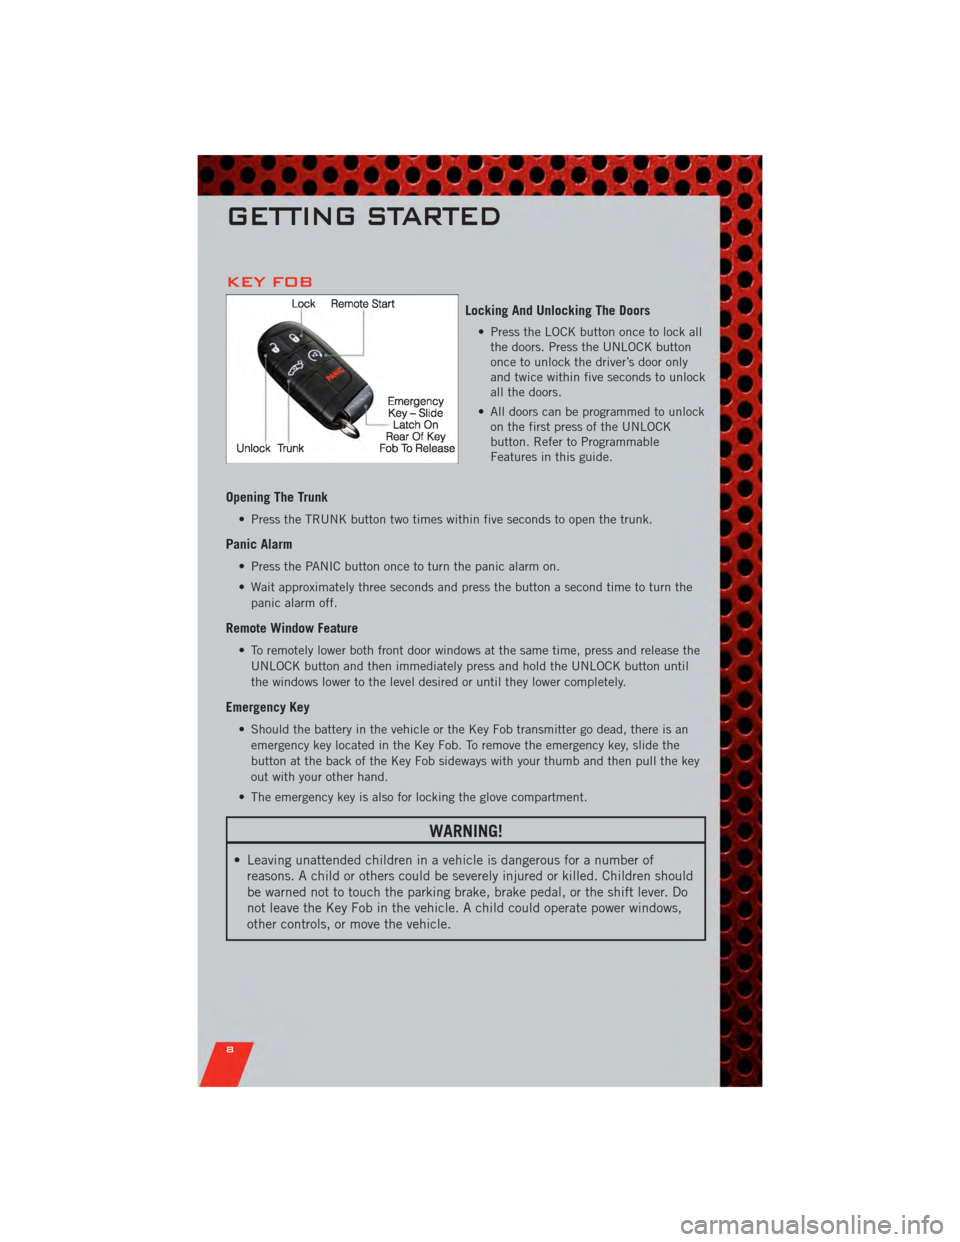
KEY FOB
Locking And Unlocking The Doors
• Press the LOCK button once to lock allthe doors. Press the UNLOCK button
once to unlock the driver’s door only
and twice within five seconds to unlock
all the doors.
• All doors can be programmed to unlock on the first press of the UNLOCK
button. Refer to Programmable
Features in this guide.
Opening The Trunk
• Press the TRUNK button two times within five seconds to open the trunk.
Panic Alarm
• Press the PANIC button once to turn the panic alarm on.
• Wait approximately three seconds and press the button a second time to turn the
panic alarm off.
Remote Window Feature
• To remotely lower both front door windows at the same time, press and release theUNLOCK button and then immediately press and hold the UNLOCK button until
the windows lower to the level desired or until they lower completely.
Emergency Key
• Should the battery in the vehicle or the Key Fob transmitter go dead, there is anemergency key located in the Key Fob. To remove the emergency key, slide the
button at the back of the Key Fob sideways with your thumb and then pull the key
out with your other hand.
• The emergency key is also for locking the glove compartment.
WARNING!
• Leaving unattended children in a vehicle is dangerous for a number of reasons. A child or others could be severely injured or killed. Children should
be warned not to touch the parking brake, brake pedal, or the shift lever. Do
not leave the Key Fob in the vehicle. A child could operate power windows,
other controls, or move the vehicle.
GETTING STARTED
8
Page 12 of 104
NOTE:
• If “Unlock All Doors 1st Press” is programmed all doors will unlock when you grabhold of the front driver's door handle. To select between “Unlock Driver Door 1st
Press” and “Unlock All Doors 1st Press”, refer to the Uconnect Touch™ Settings in
your vehicle's Owner's Manual on the DVD or Programmable Features in this guide for
further information.
• To select between “Unlock Driver Door 1st Press” and “Unlock All Doors 1st Press”, refer to the Uconnect Touch™ Settings in your vehicle's Owner's Manual on the DVD
or Programmable Features in this guide for further information.
• If a Key Fob is detected in the vehicle when locking the vehicle using the power door lock switch, the doors will unlock and the horn will chirp three times. On the third
attempt, your Key Fob can be locked inside the vehicle.
• After pressing the Keyless Enter-N-Go LOCK button, you must wait 2 seconds before you can lock or unlock the vehicle using the door handle.
• If a Keyless Enter-N-Go door handle has not been used for 72 hours, the Keyless Enter-N-Go feature for that handle may time out. Pulling the deactivated front door
handle will reactivate the door handle's Keyless Enter-N-Go feature.
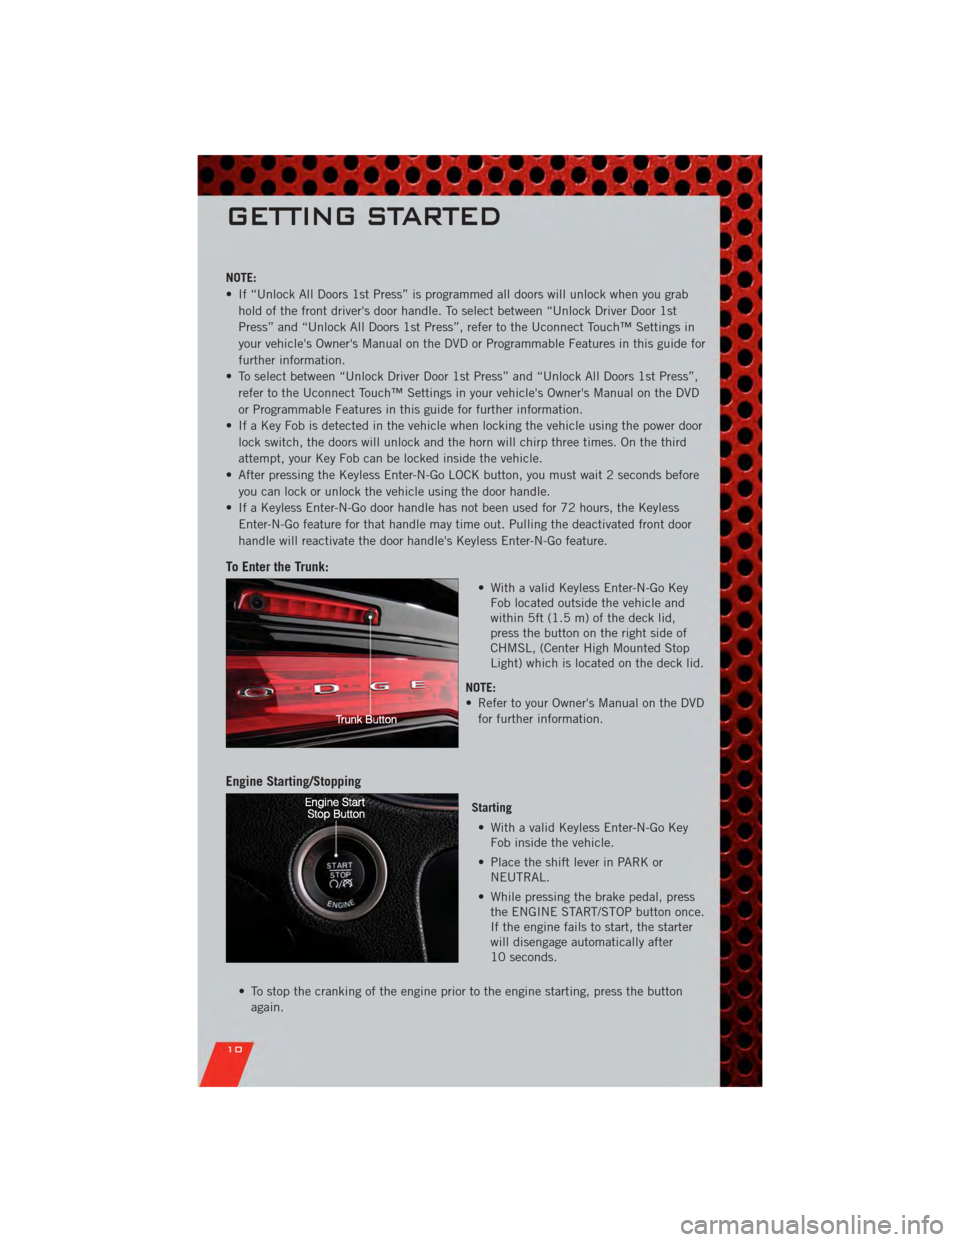
To Enter the Trunk:
• With a valid Keyless Enter-N-Go KeyFob located outside the vehicle and
within 5ft (1.5 m) of the deck lid,
press the button on the right side of
CHMSL, (Center High Mounted Stop
Light) which is located on the deck lid.
NOTE:
• Refer to your Owner's Manual on the DVD for further information.
Engine Starting/Stopping
Starting
• With a valid Keyless Enter-N-Go Key Fob inside the vehicle.
• Place the shift lever in PARK or NEUTRAL.
• While pressing the brake pedal, press the ENGINE START/STOP button once.
If the engine fails to start, the starter
will disengage automatically after
10 seconds.
• To stop the cranking of the engine prior to the engine starting, press the button again.
GETTING STARTED
10
Page 13 of 104
Stopping• Place the shift lever in PARK.
• Press the ENGINE START/STOP button once. The ignition switch will return to the OFF position.
• If the shift lever is not in PARK, the ENGINE START/STOP button must be held for two
seconds and vehicle speed must be above 5 mph (8 km/h) before the engine will shut
off.
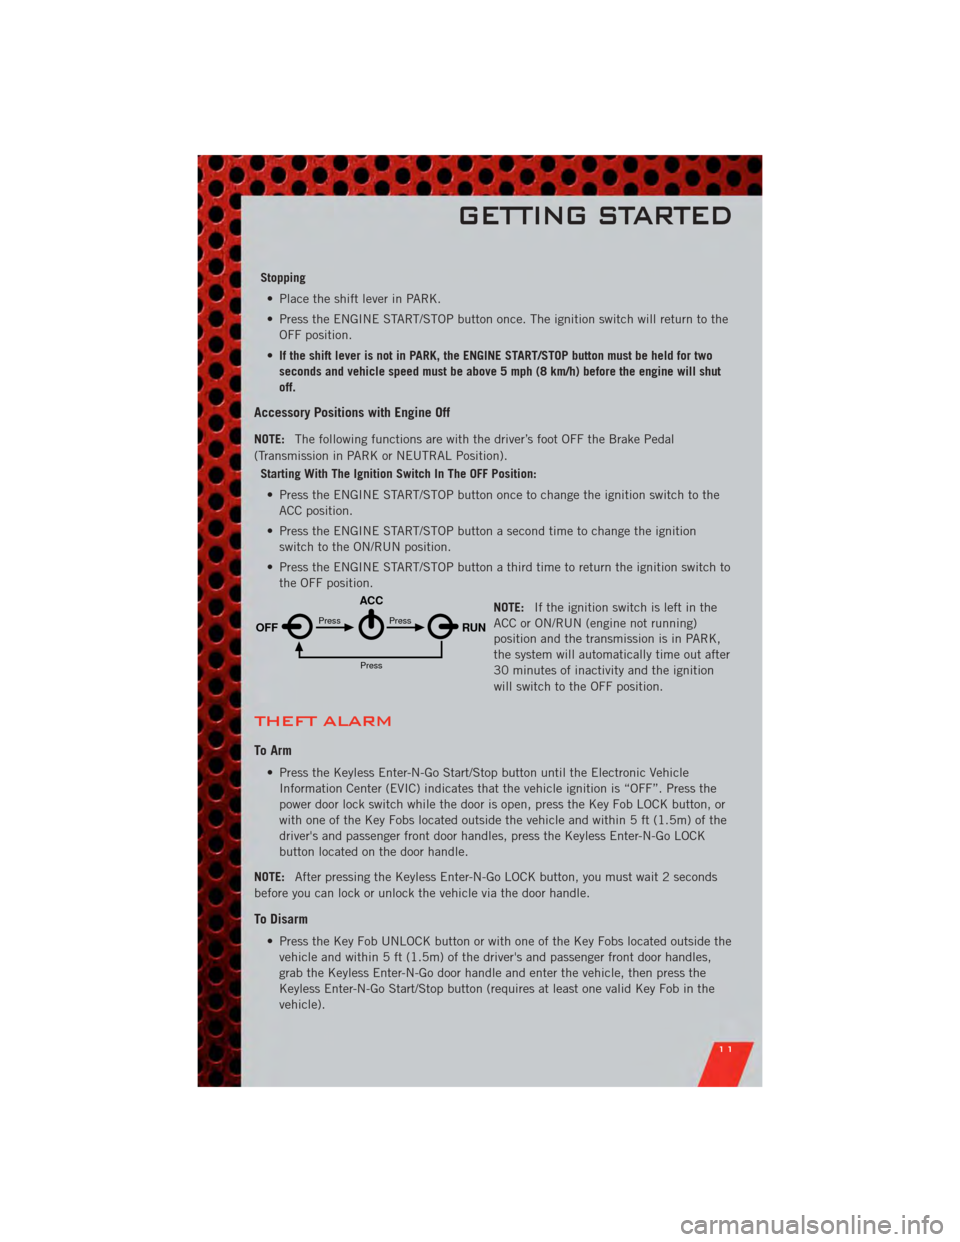
Accessory Positions with Engine Off
NOTE: The following functions are with the driver’s foot OFF the Brake Pedal
(Transmission in PARK or NEUTRAL Position).
Starting With The Ignition Switch In The OFF Position:
• Press the ENGINE START/STOP button once to change the ignition switch to the ACC position.
• Press the ENGINE START/STOP button a second time to change the ignition switch to the ON/RUN position.
• Press the ENGINE START/STOP button a third time to return the ignition switch to the OFF position.
NOTE:If the ignition switch is left in the
ACC or ON/RUN (engine not running)
position and the transmission is in PARK,
the system will automatically time out after
30 minutes of inactivity and the ignition
will switch to the OFF position.
THEFT ALARM
To Arm
• Press the Keyless Enter-N-Go Start/Stop button until the Electronic Vehicle
Information Center (EVIC) indicates that the vehicle ignition is “OFF”. Press the
power door lock switch while the door is open, press the Key Fob LOCK button, or
with one of the Key Fobs located outside the vehicle and within 5 ft (1.5m) of the
driver's and passenger front door handles, press the Keyless Enter-N-Go LOCK
button located on the door handle.
NOTE: After pressing the Keyless Enter-N-Go LOCK button, you must wait 2 seconds
before you can lock or unlock the vehicle via the door handle.
To Disarm
• Press the Key Fob UNLOCK button or with one of the Key Fobs located outside the vehicle and within 5 ft (1.5m) of the driver's and passenger front door handles,
grab the Keyless Enter-N-Go door handle and enter the vehicle, then press the
Keyless Enter-N-Go Start/Stop button (requires at least one valid Key Fob in the
vehicle).
OFF RUN
ACCPress
Press
Press
GETTING STARTED
11
Page 18 of 104
FRONT SEATS
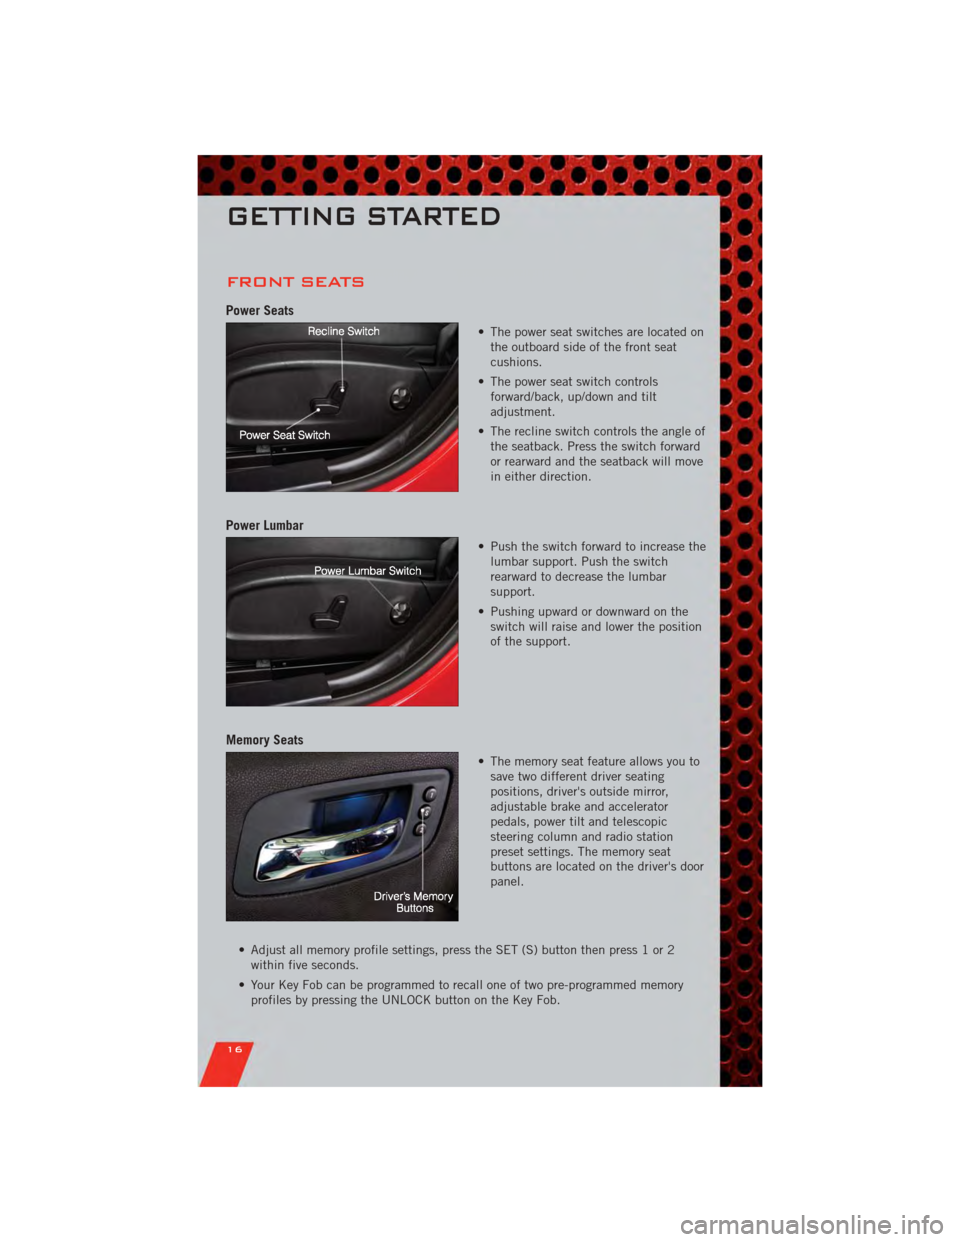
Power Seats
• The power seat switches are located onthe outboard side of the front seat
cushions.
• The power seat switch controls forward/back, up/down and tilt
adjustment.
• The recline switch controls the angle of the seatback. Press the switch forward
or rearward and the seatback will move
in either direction.
Power Lumbar
• Push the switch forward to increase thelumbar support. Push the switch
rearward to decrease the lumbar
support.
• Pushing upward or downward on the switch will raise and lower the position
of the support.
Memory Seats
• The memory seat feature allows you tosave two different driver seating
positions, driver's outside mirror,
adjustable brake and accelerator
pedals, power tilt and telescopic
steering column and radio station
preset settings. The memory seat
buttons are located on the driver's door
panel.
• Adjust all memory profile settings, press the SET (S) button then press 1 or 2 within five seconds.
• Your Key Fob can be programmed to recall one of two pre-programmed memory profiles by pressing the UNLOCK button on the Key Fob.
GETTING STARTED
16
Page 26 of 104
SPEED CONTROL
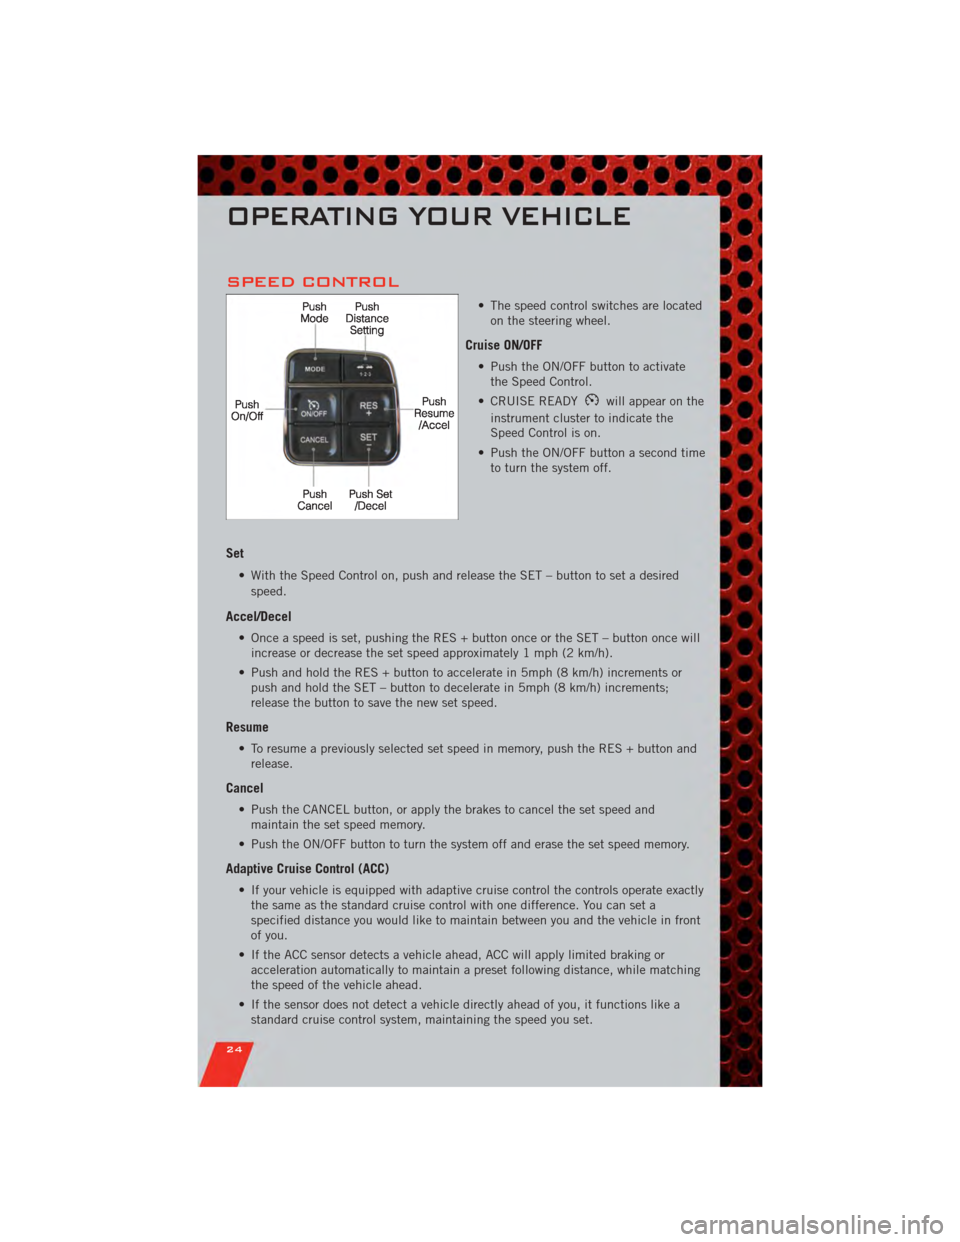
• The speed control switches are locatedon the steering wheel.
Cruise ON/OFF
• Push the ON/OFF button to activatethe Speed Control.
• CRUISE READY
will appear on the
instrument cluster to indicate the
Speed Control is on.
• Push the ON/OFF button a second time to turn the system off.
Set
• With the Speed Control on, push and release the SET – button to set a desired
speed.
Accel/Decel
• Once a speed is set, pushing the RES + button once or the SET – button once willincrease or decrease the set speed approximately 1 mph (2 km/h).
• Push and hold the RES + button to accelerate in 5mph (8 km/h) increments or push and hold the SET – button to decelerate in 5mph (8 km/h) increments;
release the button to save the new set speed.
Resume
• To resume a previously selected set speed in memory, push the RES + button andrelease.
Cancel
• Push the CANCEL button, or apply the brakes to cancel the set speed andmaintain the set speed memory.
• Push the ON/OFF button to turn the system off and erase the set speed memory.
Adaptive Cruise Control (ACC)
• If your vehicle is equipped with adaptive cruise control the controls operate exactly the same as the standard cruise control with one difference. You can set a
specified distance you would like to maintain between you and the vehicle in front
of you.
• If the ACC sensor detects a vehicle ahead, ACC will apply limited braking or acceleration automatically to maintain a preset following distance, while matching
the speed of the vehicle ahead.
• If the sensor does not detect a vehicle directly ahead of you, it functions like a standard cruise control system, maintaining the speed you set.
OPERATING YOUR VEHICLE
24
Page 28 of 104
WARNING!(Continued)
• Adaptive Cruise Control (ACC) is a convenience system. It is not a substitutefor active driving involvement. Pay attention to road, traffic, and weather
conditions, vehicle speed, distance to the vehicle ahead; and, brake
operation to ensure safe operation of the vehicle under all road conditions.
Your attention is always required while driving to maintain safe control of
your vehicle. Failure to follow these warnings can result in a collision or
serious personal injury.
The ACC system:
• Does not react to pedestrians, oncoming vehicles, and stationary objects (i.e., a stopped vehicle in a traffic jam or a disabled vehicle).
• Cannot take street, traffic, and weather conditions into account, and may be limited upon adverse sight distance conditions.
• Does not predict the lane curvature or the movement of preceding vehicles and will not compensate for such changes.
• Does not always fully recognize complex driving conditions, which can result in wrong or missing distance warnings.
• May not detect a vehicle ahead when strong light (for example, sunrise or sunset) is directly shining on the front of the vehicle.
• Can only apply a maximum of 25% of the vehicle’s braking capability, and will not bring the vehicle to a complete stop.
You should switch off the ACC system:
• When driving in fog, heavy rain, heavy snow, sleet, heavy traffic, and complex driving situations (i.e., in highway construction zones).
• When entering a turn lane or highway off ramp; when driving on roads that are winding, icy, snow-covered, slippery, or have steep uphill or downhill
slopes; and when towing a trailer.
• When circumstances do not allow safe driving at a constant speed.
• Failure to follow these warnings can result in a collision.
• Forward Collision Warning (FCW) is not intended to avoid a collision on its own. The driver has the responsibility to avoid a collision by controlling the
vehicle via braking and steering. Failure to follow this warning could lead to
serious injury or death.
OPERATING YOUR VEHICLE
26
Page 66 of 104
• Your vehicle has also been equipped with a TPMS malfunction indicator to indicatewhen the system is not operating properly. The TPMS malfunction indicator is
combined with the low tire pressure telltale. When the system detects a
malfunction, the telltale will flash for approximately one minute and then remain
continuously illuminated. This sequence will continue each time the vehicle is
restarted as long as the malfunction exists.
• When the malfunction indicator is illuminated, the system may not be able to detect or signal low tire pressure as intended. TPMS malfunctions may occur for a
variety of reasons, including the installation of replacement or alternate tires or
wheels on the vehicle that prevent the TPMS from functioning properly. Always
check the TPMS malfunction telltale after replacing one or more tires or wheels on
your vehicle, to ensure that the replacement or alternate tires and wheels allow the
TPMS to continue to function properly.
CAUTION!
The TPMS has been optimized for the original equipment tires and wheels.
TPMS pressures and warning have been established for the tire size equipped
on your vehicle. Undesirable system operation or sensor damage may result
when using replacement equipment that is not of the same size, type, and/or
style. Aftermarket wheels can cause sensor damage. Do not use tire sealant
from a can, or balance beads if your vehicle is equipped with a TPMS, as
damage to the sensors may result.
- Engine Temperature Warning Light
• This light warns of an overheated engine condition.
• If the light turns on or flashes continuously while driving, safely pull over and stopthe vehicle. If the A/C system is on, turn it off. Also, shift the transmission into
NEUTRAL and idle the vehicle. If the temperature reading does not return to
normal, turn the engine off immediately.
• We recommend that you do not operate the vehicle or engine damage will occur. Have the vehicle serviced immediately.
WARNING!
A hot engine cooling system is dangerous. You or others could be badly burned
by steam or boiling coolant. You may want to call an authorized service center
for service if your vehicle overheats.
BRAKE- Brake Warning Light
• The Brake Warning light illuminates when there is either a system malfunction orthe parking brake is applied. If the light is on and the parking brake is not applied,
it indicates a possible brake hydraulic malfunction, brake booster problem or an
Anti-Lock Brake System problem.
• We recommend you drive to the nearest service center and have the vehicle serviced immediately.
WHAT TO DO IN EMERGENCIES
64