steering DODGE CHARGER 2014 7.G Owner's Manual
[x] Cancel search | Manufacturer: DODGE, Model Year: 2014, Model line: CHARGER, Model: DODGE CHARGER 2014 7.GPages: 148, PDF Size: 3.77 MB
Page 80 of 148
AUTOSTICK®
Steering Wheel Mounted Paddle Shifters Or Console Mounted Shifter
• AutoStick® is a driver-interactive trans-
mission feature that offers manual gear
shifting to provide you with more control
of the vehicle. AutoStick® allows you to
maximize engine braking, and improve
overall vehicle performance.
• This system can also provide you with more control during passing, city driving,
cold slippery conditions, mountain driv-
ing, trailer towing, and many other
situations.
Operation
• When the shift lever is in the DRIVE posi-tion, the transmission will operate auto-
matically, shifting between the five avail-
able gears. To engage AutoStick®, simply move the shift lever to the right or left (+/-)
while in the DRIVE position, or press one of the steering wheel mounted shift paddles
(+/-). When AutoStick® is active, the current transmission gear is displayed in the
Electronic Vehicle Information Center (EVIC) portion of the instrument cluster. In
AutoStick® mode, the transmission will shift when manually selected by the driver (using
the shift lever, or the shift paddles), unless an engine lugging or overspeed condition
would result. It will remain in the selected gear until another upshift or downshift is
chosen, except as described below:• The transmission will automatically downshift as the vehicle slows (to prevent engine
lugging) and will display the current gear.
• The transmission will automatically downshift to first gear when coming to a stop.
• You can start out in first or second gear. Tapping (+) (at a stop) will allow starting in second gear. Starting out in second gear is helpful in snowy or icy conditions.
• The system will ignore attempts to upshift at too low of a vehicle speed.
•
Transmission shifting will be more noticeable when AutoStick® is engaged. To disengage
AutoStick® mode, hold the shift lever to the right or press and hold the (+) shift paddle until
“D” is once again displayed in the instrument cluster. You can shift in or out of the
AutoStick® mode at any time without taking your foot off the accelerator pedal.
SRT
78
Page 81 of 148
ELECTRONIC CONTROL DAMPING SYSTEM
• This vehicle may be equipped with an electronic controlled damping system. Thissystem reduces body roll and pitch in many driving situations including cornering,
acceleration and braking. There are three modes of operation:
Automatic (Auto) Mode
• This is the default position when vehicleignition is first turned on. This mode will
give a sporty, but comfortable ride. Within
this mode, the suspension will adapt to
the vehicle inputs, including vehicle
speed, steering inputs, braking, and ac-
celeration.
• If AutoStick® is engaged while in “Auto” mode, the transmission will automati-
cally shift up if maximum engine speed is
reached.
• Heavily pressing the accelerator pedal may generate an automatic downshift for improved acceleration.
• This mode should be used for most driving situations.
Sport ModeSPORT
• This mode is driver selectable when the vehicle is placed in SPORT mode (press
the CONTROLS button and then the
SPORT button on the display screen). This
mode will set suspension for maximum
performance handling and is intended for
spirited driving.
• When SPORT mode is enabled, a flag will light up in the instrument cluster.
NOTE:
The SPORT setting will provide a firmer ride.
SRT
79
Page 83 of 148
Braking Distance
• When selected, this screen displays the vehicle's braking distance and the speed atwhich the brake pedal was depressed.
1/8 Mile, 1/4 Mile
• When selected, this screen displays the time it takes the vehicle to travel 1/8 mile (1/4 mile) within 30 seconds and the vehicle's speed when it reaches 1/8 mile (1/4 mile).
Instantaneous G-Force
• When selected, this screen displays the current G-Force (lateral and longitudinal) along with a friction circle that displays the directions of the forces.
Peak G-Force
• When selected, this screen displays all four G-Force values (two lateral and two longitudinal).
Uconnect® SRT Performance Features
• To access the SRT Performance Features, touch the “SRT & More” soft-key then touchthe “SRT Performance” soft-key. Press the UP or DOWN soft-key to cycle through the
features. Press the feature soft-key to select that feature.
• The Performance Page includes the following menus:
• Home • Timers
• Instantaneou sG–Force • Gauges1
• Gauges 2 • Engine Values
• Options
Timers
0-60 mph (0-100 km/h), 1/8 Mile, 1/4 Mile
When selected, this screen displays the time it takes for the vehicle to go from 0 to 60 mph
(0 to 100 km/h), 1/8 mile or 1/4 mile.
Braking Distance
When selected, this screen displays the vehicle's braking distance and the speed at which
the brake pedal was depressed.
G-Force
When selected, this screen displays all four G-Force values (two lateral and two longitudi-
nal) as well as steering angle.
Gauges 1
• Oil Temperature
• Oil Pressure
• Battery Voltage
SRT
81
Page 84 of 148
Gauges 2
• Coolant Temperature
• Oil Temperature
• Transmission Temperature
• Intake Air Temperature
• Oil Pressure
• Battery Voltage
Engine
When selected, this screen displays miles per hour (mph), horsepower (hp), torque (ft/lb), oil
pressure (psi) and gear selector values.
Handling
When selected, this screen displays peak g-force, instantaneous g-force, steering and yaw
angles.
Options
When selected, this screen allows you to choose a standard or custom display for your SRT
home page.
WARNING!
Measurement of vehicle statistics with the Performance Features is intended for off-
highway or off-road use only and should not be done on any public roadways. It is
recommended that these features be used in a controlled environment and within the
limits of the law. The capabilities of the vehicle as measured by the performance pages
must never be exploited in a reckless or dangerous manner, which can jeopardize the
user’s safety or the safety of others. Only a safe, attentive, and skillful driver can prevent
accidents.
SRT
82
Page 109 of 148
FREEING A STUCK VEHICLE
If your vehicle becomes stuck in mud, sand or snow, it can often be moved using a rocking
motion. Turn the steering wheel right and left to clear the area around the front wheels.
Then, shift back and forth between REVERSE and DRIVE, while gently pressing the accel-
erator. Use the least amount of accelerator pedal pressure that will maintain the rocking
motion, without spinning the wheels or racing the engine.
NOTE:
Press the “ESC Off” switch, to place the Electronic Stability Control (ESC) system in “Partial
Off” mode, before rocking the vehicle. Once the vehicle has been freed, press the “ESC Off”
switch again to restore "ESC On" mode.
CAUTION!
• When “rocking” a stuck vehicle by shifting between REVERSE and DRIVE, do not spinthe wheels faster than 15 mph (24 km/h), or drivetrain damage may result.
• Revving the engine or spinning the wheels too fast may lead to transmission over-
heating and failure. It can also damage the tires. Do not spin the wheels above
30 mph (48 km/h) while in gear (no transmission shifting occurring).
WARNING!
Fast spinning tires can be dangerous. Forces generated by excessive wheel speeds may
cause tire damage or failure. A tire could explode and injure someone. Do not spin your
vehicle's wheels faster than 30 mph (48 km/h) when you are stuck. Do not let anyone
near a spinning wheel, no matter what the speed.
WHAT TO DO IN EMERGENCIES
107
Page 117 of 148
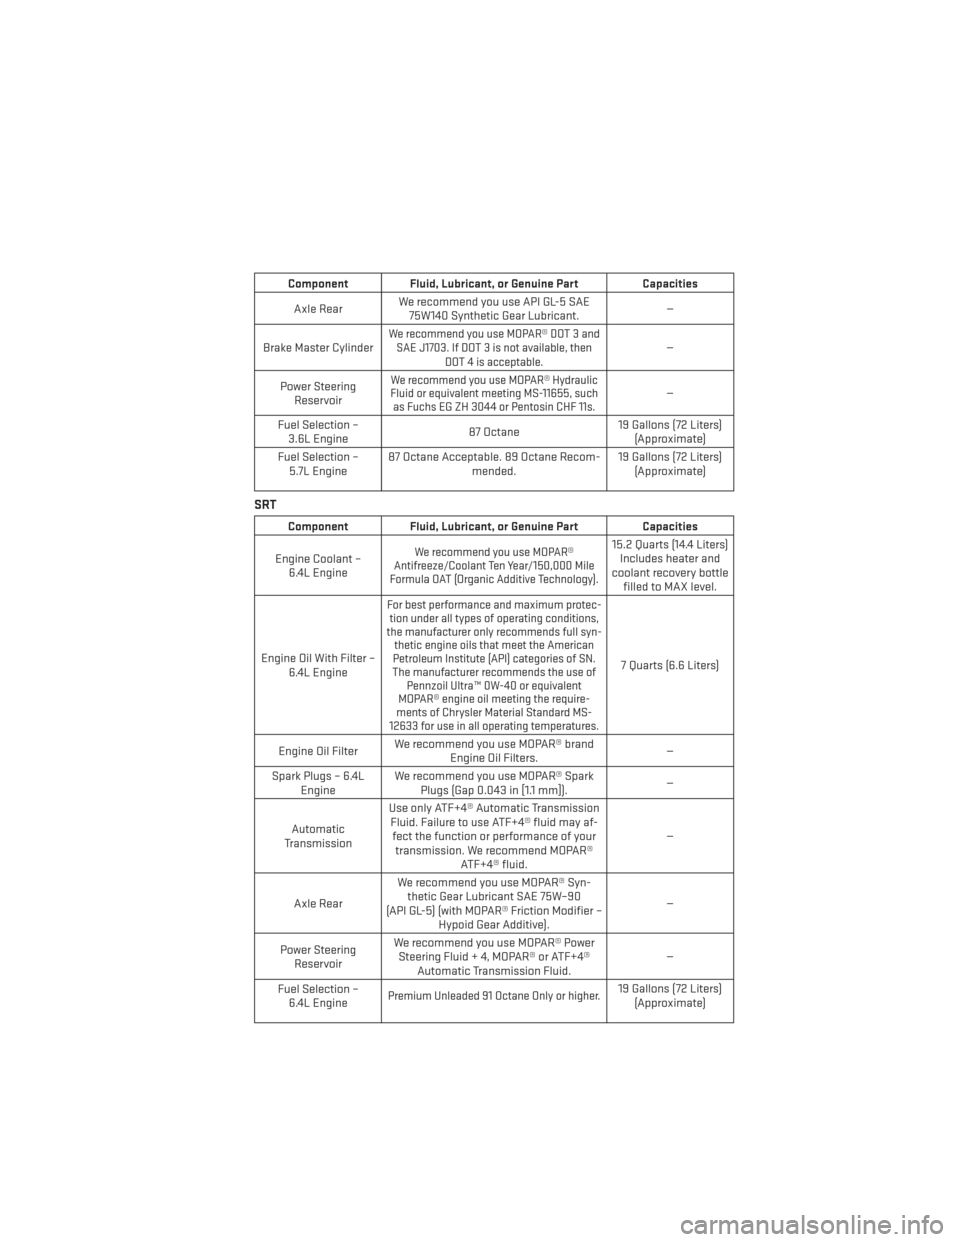
Component Fluid, Lubricant, or Genuine PartCapacities
Axle Rear We recommend you use API GL-5 SAE
75W140 Synthetic Gear Lubricant. —
Brake Master Cylinder
We recommend you use MOPAR® DOT 3 and SAE J1703. If DOT 3 is not available, then DOT 4 is acceptable.—
Power Steering Reservoir
We recommend you use MOPAR® Hydraulic
Fluid or equivalent meeting MS-11655, such as Fuchs EG ZH 3044 or Pentosin CHF 11s.—
Fuel Selection – 3.6L Engine 87 Octane19 Gallons (72 Liters)
(Approximate)
Fuel Selection – 5.7L Engine 87 Octane Acceptable. 89 Octane Recom-
mended. 19 Gallons (72 Liters)
(Approximate)
SRT
Component Fluid, Lubricant, or Genuine Part Capacities
Engine Coolant – 6.4L Engine
We recommend you use MOPAR®
Antifreeze/Coolant Ten Year/150,000 Mile
Formula OAT (Organic Additive Technology).15.2 Quarts (14.4 Liters)
Includes heater and
coolant recovery bottle filled to MAX level.
Engine Oil With Filter – 6.4L Engine
For best performance and maximum protec-tion under all types of operating conditions,
the manufacturer only recommends full syn- thetic engine oils that meet the American
Petroleum Institute (API) categories of SN.
The manufacturer recommends the use of Pennzoil Ultra™ 0W-40 or equivalent
MOPAR® engine oil meeting the require-
ments of Chrysler Material Standard MS-
12633 for use in all operating temperatures.
7 Quarts (6.6 Liters)
Engine Oil Filter We recommend you use MOPAR® brand
Engine Oil Filters. —
Spark Plugs – 6.4L Engine We recommend you use MOPAR® Spark
Plugs (Gap 0.043 in [1.1 mm]). —
Automatic
Transmission Use only ATF+4® Automatic Transmission
Fluid. Failure to use ATF+4® fluid may af- fect the function or performance of your transmission. We recommend MOPAR® ATF+4® fluid. —
Axle Rear We recommend you use MOPAR® Syn-
thetic Gear Lubricant SAE 75W–90
(API GL-5) (with MOPAR® Friction Modifier – Hypoid Gear Additive). —
Power Steering Reservoir We recommend you use MOPAR® Power
Steering Fluid + 4, MOPAR® or ATF+4® Automatic Transmission Fluid. —
Fuel Selection – 6.4L Engine
Premium Unleaded 91 Octane Only or higher.19 Gallons (72 Liters) (Approximate)
MAINTAINING YOUR VEHICLE
115
Page 119 of 148
Your authorized dealer will reset the oil change indicator message after completing the
scheduled oil change. If a scheduled oil change is performed by someone other than your
authorized dealer, the message can be reset by referring to the steps described under
“Instrument Cluster Warning Lights” in “What To Do In Emergencies” in this guide or
“Electronic Vehicle Information Center (EVIC)” in “Understanding Your Instrument Panel” in
your Owners Manual on the DVD for further information.
NOTE:
Under no circumstances should oil change intervals exceed 10,000 miles (16,000 km) or
twelve months, whichever comes first.
Severe Duty All Models
Change Engine Oil at 4000 miles (6,500 km) if the vehicle is operated in a dusty and off road
environment. This type of vehicle use is considered Severe Duty
Once A Month Or Before A Long Trip:
• Check engine oil level
• Check windshield washer fluid level
• Check tire pressure and look for unusual wear or damage. Rotate tires at the first sign ofirregular wear, even if it occurs before your next scheduled service.
• Check the fluid levels of the coolant reservoir, brake master cylinder, and power steering and fill as needed.
• Check function of all interior and exterior lights
Required Maintenance Intervals.
Refer to the maintenance schedules on the following page for the required maintenance
intervals.
At Every Oil Change Interval As Indicated By Oil Change Indicator System:
• Change oil and filter
• Rotate the tires. Rotate at the first sign of irregular wear, even if it occurs before your
next scheduled service
• Inspect battery and clean and tighten terminals as required
• Inspect brake pads, shoes, rotors, drums, hoses and park brake
• Inspect engine cooling system protection and hoses
• Inspect exhaust system
• Inspect engine air cleaner if using in dusty or off-road conditions
MAINTAINING YOUR VEHICLE
117
Page 124 of 148
Once A Month
• Check tire pressure and look for unusual wear or damage.
• Inspect the battery, and clean and tighten the terminals as required.
• Check the fluid levels of the coolant reservoir, brake master cylinder, and power steering,and add as needed.
• Check all lights and other electrical items for correct operation.
At Each Oil Change
• Change the engine oil filter.
• Inspect the brake hoses and lines.
CAUTION!
Failure to perform the required maintenance items may result in damage to the vehicle.
MAINTAINING YOUR VEHICLE
122
Page 127 of 148
FUSES
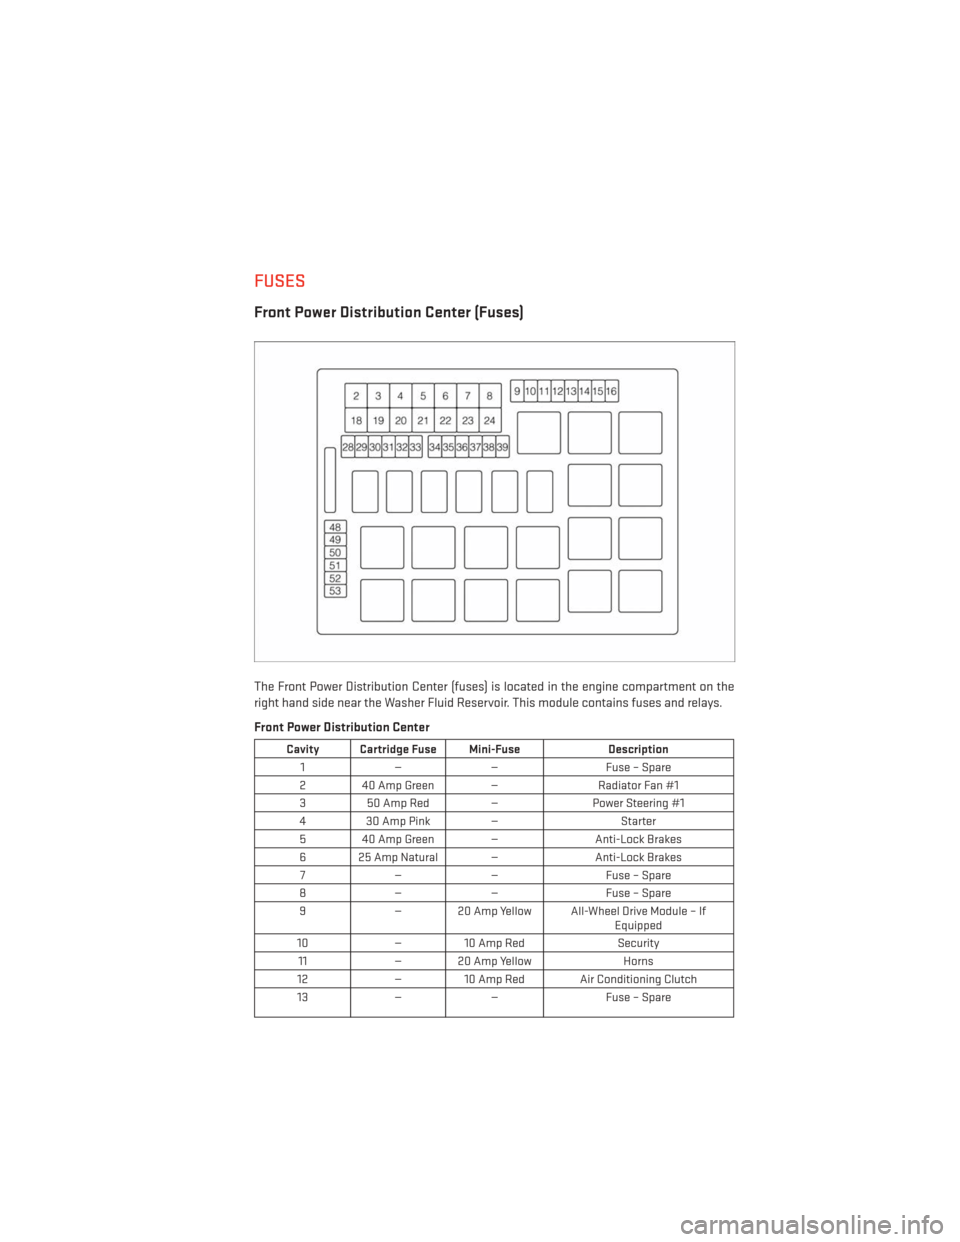
Front Power Distribution Center (Fuses)
The Front Power Distribution Center (fuses) is located in the engine compartment on the
right hand side near the Washer Fluid Reservoir. This module contains fuses and relays.
Front Power Distribution Center
Cavity Cartridge Fuse Mini-FuseDescription
1 — — Fuse – Spare
2 40 Amp Green — Radiator Fan #1
3 50 Amp Red — Power Steering #1
4 30 Amp Pink — Starter
5 40 Amp Green — Anti-Lock Brakes
6 25 Amp Natural — Anti-Lock Brakes
7 — — Fuse – Spare
8 — — Fuse – Spare
9 — 20 Amp Yellow All-Wheel Drive Module – If
Equipped
10 — 10 Amp Red Security
11 — 20 Amp Yellow Horns
12 — 10 Amp Red Air Conditioning Clutch
13 —— Fuse – Spare
MAINTAINING YOUR VEHICLE
125
Page 128 of 148
Cavity Cartridge Fuse Mini-FuseDescription
14 —— Fuse – Spare
15 — 25 Amp Natural Transmission
16 —— Fuse – Spare
18 50 Amp Red — Radiator Fan #2
19 50 Amp Red — Power Steering #2
20 30 Amp Pink — Wiper Motor
21 30 Amp Pink — Headlamp Washers
22 —— Fuse – Spare
23 —— Fuse – Spare
24 —— Fuse – Spare
28 — 25 Amp Natural Fuel Pump
29 — 15 Amp Blue Transmission Shifter
30 —— Fuse – Spare
31 — 25 Amp Natural Engine Module
32 —— Fuse – Spare
33 —— Fuse – Spare
34 — 25 Amp Natural Powertrain #1
35 — 20 Amp Yellow Powertrain #2
36 — 10 Amp Red Anti-Lock Brake Module
37 — 10 Amp Red Engine Controller/Rad Fan Relays
38 — 10 Amp Red Airbag Module
39 — 10 Amp Red Power Steering Module/AC Clutch
Relay
48 — 10 Amp Red AWD Module/Front Axle
Disconnect
49 —— Fuse – Spare
50 —— Fuse – Spare
51 — 20 Amp Yellow Vacuum Pump
52 —— Fuse – Spare
53 —— Fuse – Spare
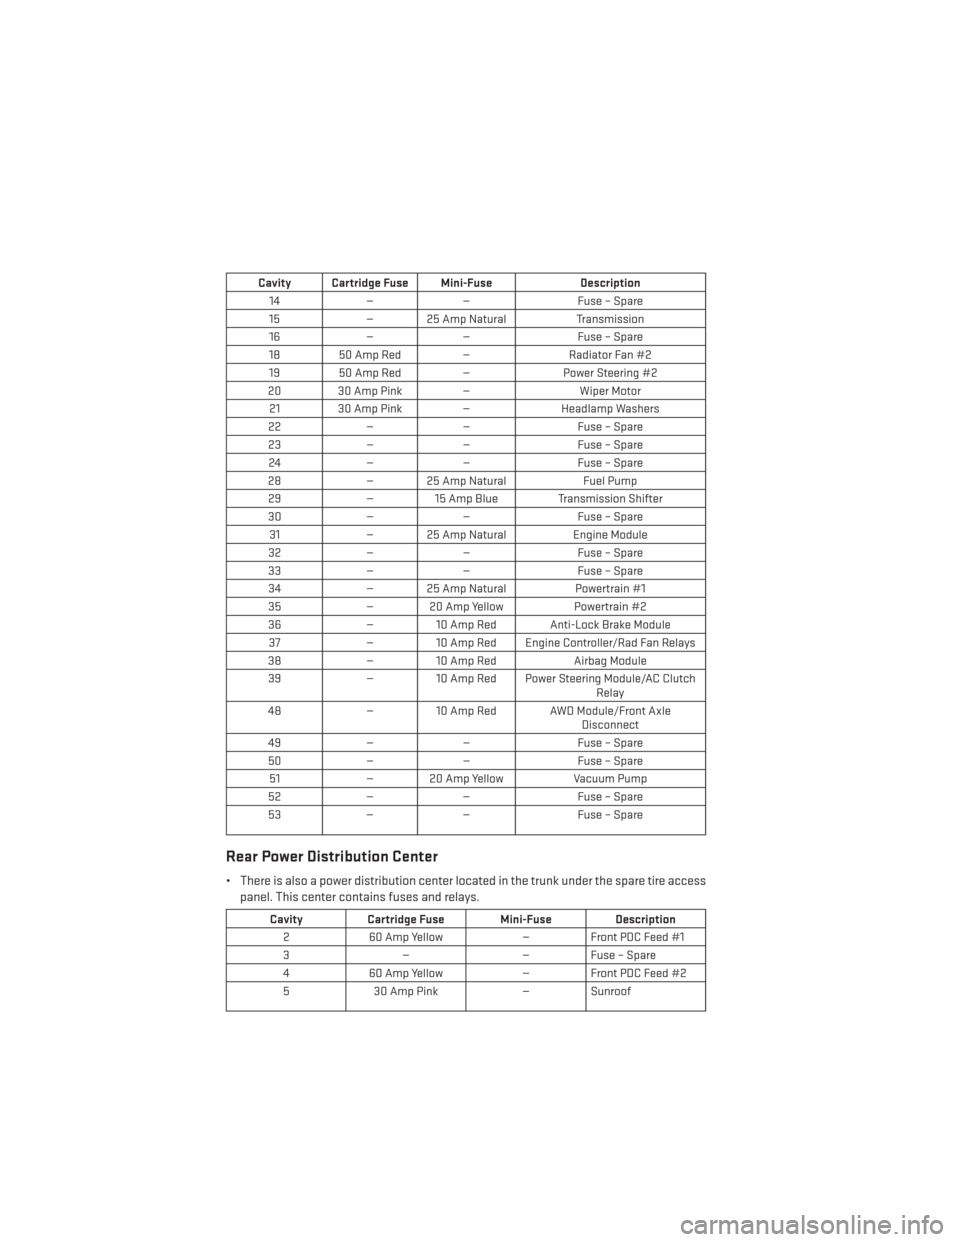
Rear Power Distribution Center
• There is also a power distribution center located in the trunk under the spare tire access
panel. This center contains fuses and relays.
Cavity Cartridge Fuse Mini-Fuse Description
2 60 Amp Yellow — Front PDC Feed #1
3 — — Fuse – Spare
4 60 Amp Yellow — Front PDC Feed #2
5 30 Amp Pink — Sunroof
MAINTAINING YOUR VEHICLE
126