reset DODGE CHARGER 2014 7.G User Guide
[x] Cancel search | Manufacturer: DODGE, Model Year: 2014, Model line: CHARGER, Model: DODGE CHARGER 2014 7.GPages: 148, PDF Size: 3.77 MB
Page 23 of 148
FRONT SEATS
Power Seats
The power seat switches are located on the
outboard side of the front seat cushions.
The power seat switch controls forward/back,
up/down and tilt adjustment. The recline
switch controls the angle of the seatback.
• Press the switch forward or rearward andthe seatback will move in either direction.
Power Lumbar
• Push the switch forward to increase thelumbar support. Push the switch rearward
to decrease the lumbar support.
• Pushing upward or downward on the switch will raise and lower the position of
the support.
Memory Seat
• The memory seat feature allows you toset two different driver seating positions
(excluding lumbar position), outside mir-
rors, radio station preset settings and tilt/
telescoping steering column position (if
equipped). The memory seat buttons are
located on the driver's door panel.
• To set a memory position:
1. Cycle the vehicles ignition to the ONposition.
2. Adjust all memory profile settings.
3. Press and release the S (SET) button.
4. Press and release the 1 or 2 button within five seconds.
GETTING STARTED
21
Page 36 of 148
WARNING!
Leaving the Electronic Speed Control system on when not in use is dangerous. You could
accidentally set the system or cause it to go faster than you want. You could lose control
and have an accident. Always leave the system OFF when you are not using it.
Adaptive Cruise Control (ACC)
If your vehicle is equipped with Adaptive Cruise Control the controls operate exactly the
same as the standard cruise control with one difference. You can set a specified distance
you would like to maintain between you and the vehicle in front of you.
If the ACC sensor detects a vehicle ahead, ACC will apply limited braking or acceleration
automatically to maintain a preset following distance, while matching the speed of the
vehicle ahead.
If the sensor does not detect a vehicle directly ahead of you, it functions like a standard
cruise control system, maintaining the speed you set.
Distance Setting (ACC Only)
The specified following distance for ACC can be set by varying the distance setting between
3 (long), 2 (medium), and 1 (short). Using this distance setting and the vehicle speed, ACC
calculates and sets the distance to the vehicle ahead. This distance setting displays in the
Electronic Vehicle Information Center (EVIC).
• To set or change the distance setting, press the Distance button and release. Each timethe button is pressed, the distance setting adjusts between long (3), medium (2), and
short (1). The distance setting will default to the last set mode the next time the vehicle is
restarted and the ACC system is turned on.
Mode (ACC Only)
If desired, the Adaptive Cruise Control mode can be turned off and the system can be
operated as a standard (fixed speed) Cruise Control. When in the standard (fixed speed)
Cruise Control mode the distance setting feature will be disabled and the system will
maintain the speed you set.
• To change modes, press the MODE button when the system is in either the OFF, READY, orSET position. “Cruise Ready” will be displayed if the system was in ACC READY or ACC
SET position. “Cruise Off” will be displayed if the system was in the ACC OFF position. To
switch back to Adaptive Cruise Control mode, press the MODE button a second time.
Refer to your Owner's Manual on the DVD for further information.
Forward Collision Warning
The Forward Collision Warning (FCW) system provides the driver with audible and visual
warnings (within the EVIC) when it detects a potential frontal collision. The warnings are
intended to provide the driver with enough time to react and avoid the potential collision.
OPERATING YOUR VEHICLE
34
Page 50 of 148
Equalizer
• Touch the “Equalizer” soft-key to adjust the Bass, Mid and Treble. Use the “+” or “–”soft-key to adjust the equalizer to your desired settings. Press the “Done” soft-key when
done.
Balance/Fade
• Touch the “Balance/Fade” soft-key to adjust the sound from the speakers. Use the “arrow” soft-key to adjust the sound level from the front and rear or right and left side
speakers. Touch the center “C” soft-key to reset the balance and fade to the factory
setting. Press the “Done” soft-key when done.
Speed Adjust Volume
• Touch the “Speed Adjust Volume” soft-key to select between OFF, 1, 2 or 3. This will decrease the radio volume relative to a decrease in vehicle speed. Press the “Done”
soft-key when done.
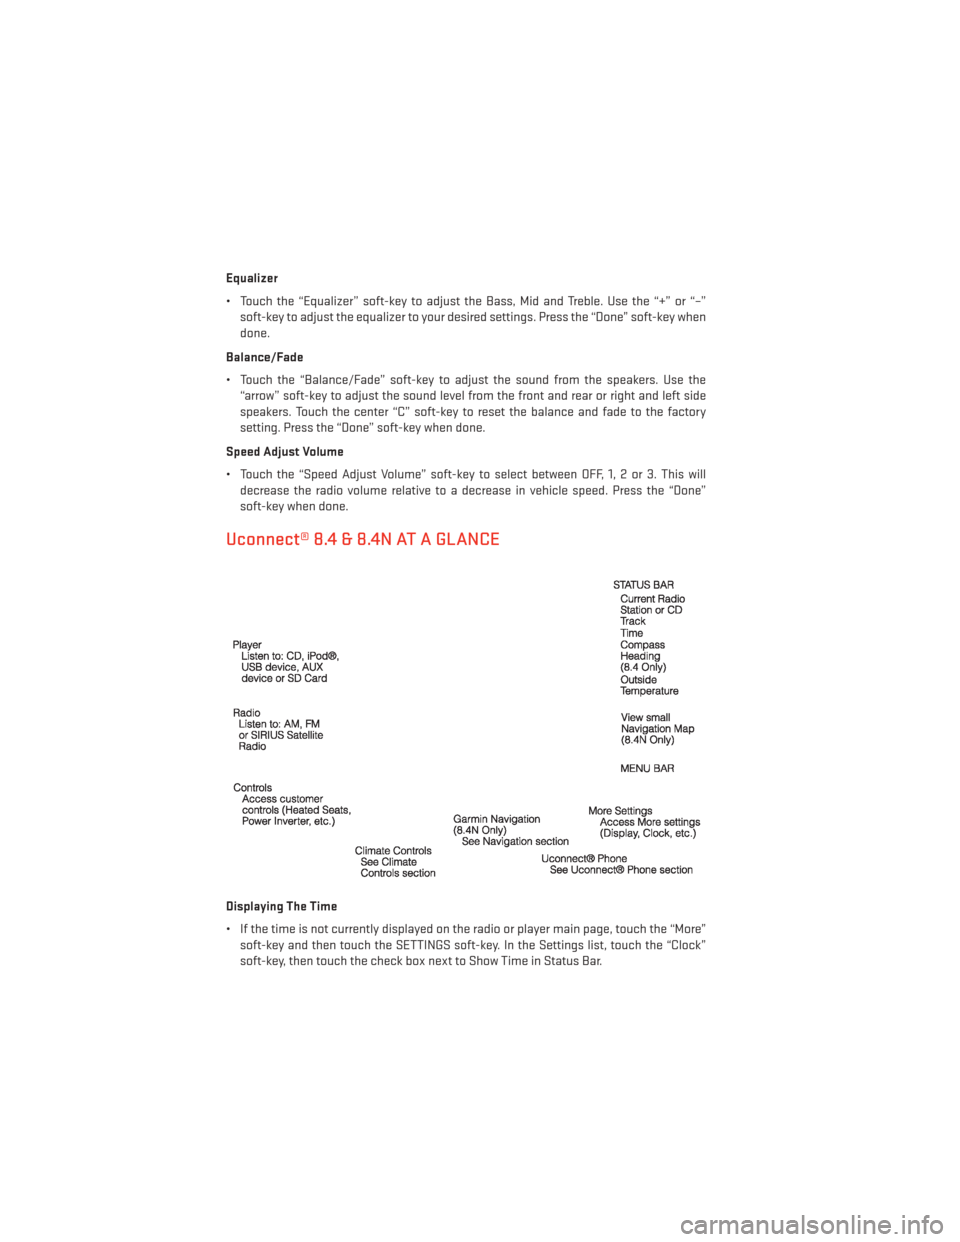
Uconnect® 8.4 & 8.4N AT A GLANCE
Displaying The Time
• If the time is not currently displayed on the radio or player main page, touch the “More”soft-key and then touch the SETTINGS soft-key. In the Settings list, touch the “Clock”
soft-key, then touch the check box next to Show Time in Status Bar.
ELECTRONICS
48
Page 53 of 148
• To access the Radio mode, touch the RADIO hard-key on the upper left side of thefaceplate (4.3 & 4.3S) or the “Radio” soft-key at the lower left of the screen (8.4 & 8.4N).
• Unless otherwise noted, the information provided on the operation and functionality of the radios in this section is common to all Uconnect® radios.
Selecting Radio Stations
• Touch the “Radio band” soft-key to cycle through AM, FM or SAT (4.3 & 4.3S) or the desired radio band (AM, FM or SAT) soft-key (8.4 & 8.4N). SiriusXM Satellite Radio is not
available on the 4.3.
Seek Up/Seek Down
• Touch the “Seek arrow” soft-keys for less than two seconds to seek through radio stations.
• Touch and hold either “arrow” soft-key for more than two seconds to bypass stations without stopping. The radio will stop at the next listenable station once the arrow
soft-key is released.
Direct Tune
• Tune directly to a radio station by pressing the “Tune” button on the screen, and entering the desired station number.
Store Radio Presets
• Your radio can store 12 total preset stations. They are shown at the top of your screen. To see all 12 stations, Press the “All” soft-key (4.3 & 4.3S) or press the “arrow” soft-key at the
top right of the screen to toggle between the six presets (8.4 & 8.4N).
• To set a station into memory press and hold the desired numbered soft-key for more than two seconds or until you hear a confirmation beep.
SiriusXM SATELLITE RADIO
• SiriusXM Satellite Radio gives you over 130 channels, including 100% commercial-freemusic from nearly every genre, plus all your favorite sports, news, talk and entertainment
channels – all with crystal clear, coast-to-coast coverage, all in one place and all at your
fingertips.
• To access SiriusXM Satellite Radio, touch the “Radio band” soft-key and select the “SAT” soft-key (4.3S) or touch the “SAT” soft-key on the main Radio screen (8.4 & 8.4N).
• The following describes features that are available when in SiriusXM Satellite Radio mode.
• Unless otherwise noted, the information provided on the operation and functionality of the radios in this section is common to all Uconnect® radios.
ELECTRONICS
51
Page 55 of 148
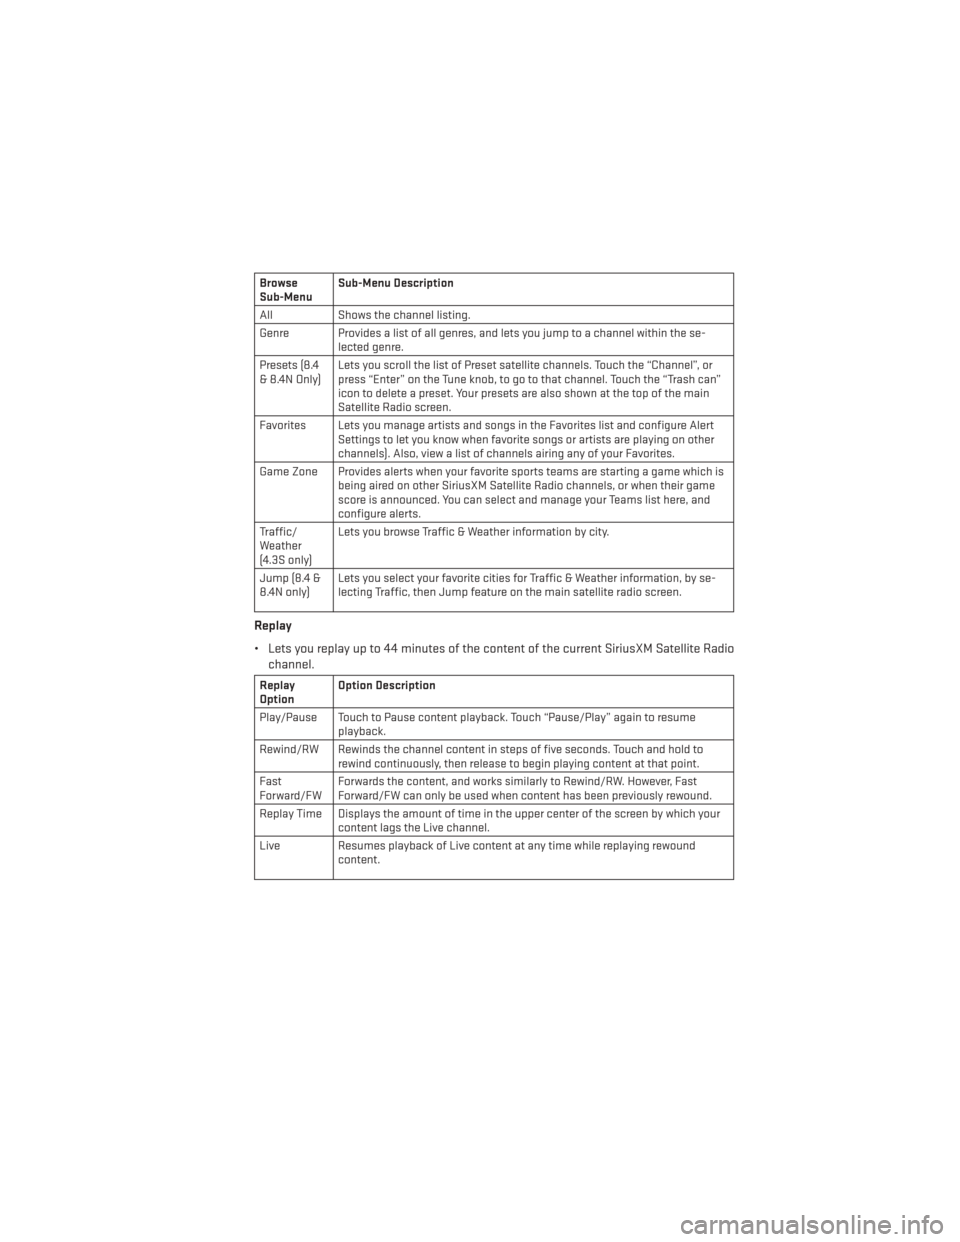
Browse
Sub-MenuSub-Menu Description
All Shows the channel listing.
Genre Provides a list of all genres, and lets you jump to a channel within the se- lected genre.
Presets (8.4
& 8.4N Only) Lets you scroll the list of Preset satellite channels. Touch the “Channel”, or
press “Enter” on the Tune knob, to go to that channel. Touch the “Trash can”
icon to delete a preset. Your presets are also shown at the top of the main
Satellite Radio screen.
Favorites Lets you manage artists and songs in the Favorites list and configure Alert Settings to let you know when favorite songs or artists are playing on other
channels). Also, view a list of channels airing any of your Favorites.
Game Zone Provides alerts when your favorite sports teams are starting a game which is being aired on other SiriusXM Satellite Radio channels, or when their game
score is announced. You can select and manage your Teams list here, and
configure alerts.
Traffic/
Weather
(4.3S only) Lets you browse Traffic & Weather information by city.
Jump (8.4 &
8.4N only) Lets you select your favorite cities for Traffic & Weather information, by se-
lecting Traffic, then Jump feature on the main satellite radio screen.
Replay
• Lets you replay up to 44 minutes of the content of the current SiriusXM Satellite Radio
channel.
Replay
Option Option Description
Play/Pause Touch to Pause content playback. Touch “Pause/Play” again to resume playback.
Rewind/RW Rewinds the channel content in steps of five seconds. Touch and hold to rewind continuously, then release to begin playing content at that point.
Fast
Forward/FW Forwards the content, and works similarly to Rewind/RW. However, Fast
Forward/FW can only be used when content has been previously rewound.
Replay Time Displays the amount of time in the upper center of the screen by which your content lags the Live channel.
Live Resumes playback of Live content at any time while replaying rewound content.
ELECTRONICS
53
Page 62 of 148
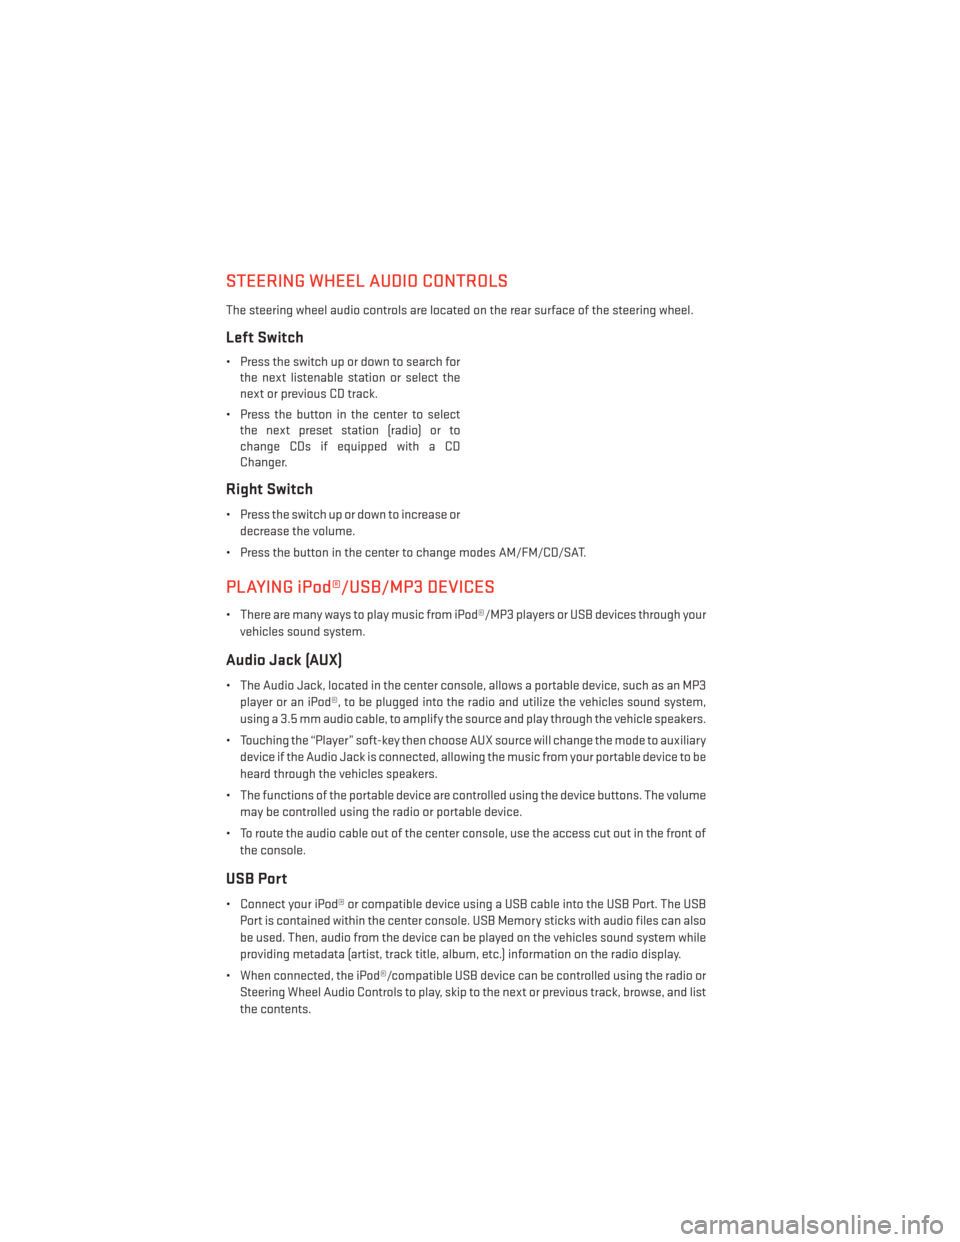
STEERING WHEEL AUDIO CONTROLS
The steering wheel audio controls are located on the rear surface of the steering wheel.
Left Switch
• Press the switch up or down to search forthe next listenable station or select the
next or previous CD track.
• Press the button in the center to select the next preset station (radio) or to
change CDs if equipped with a CD
Changer.
Right Switch
• Press the switch up or down to increase or
decrease the volume.
• Press the button in the center to change modes AM/FM/CD/SAT.
PLAYING iPod®/USB/MP3 DEVICES
• There are many ways to play music from iPod®/MP3 players or USB devices through your vehicles sound system.
Audio Jack (AUX)
• The Audio Jack, located in the center console, allows a portable device, such as an MP3player or an iPod®, to be plugged into the radio and utilize the vehicles sound system,
using a 3.5 mm audio cable, to amplify the source and play through the vehicle speakers.
• Touching the “Player” soft-key then choose AUX source will change the mode to auxiliary device if the Audio Jack is connected, allowing the music from your portable device to be
heard through the vehicles speakers.
• The functions of the portable device are controlled using the device buttons. The volume may be controlled using the radio or portable device.
• To route the audio cable out of the center console, use the access cut out in the front of the console.
USB Port
• Connect your iPod® or compatible device using a USB cable into the USB Port. The USBPort is contained within the center console. USB Memory sticks with audio files can also
be used. Then, audio from the device can be played on the vehicles sound system while
providing metadata (artist, track title, album, etc.) information on the radio display.
• When connected, the iPod®/compatible USB device can be controlled using the radio or Steering Wheel Audio Controls to play, skip to the next or previous track, browse, and list
the contents.
ELECTRONICS
60
Page 70 of 148
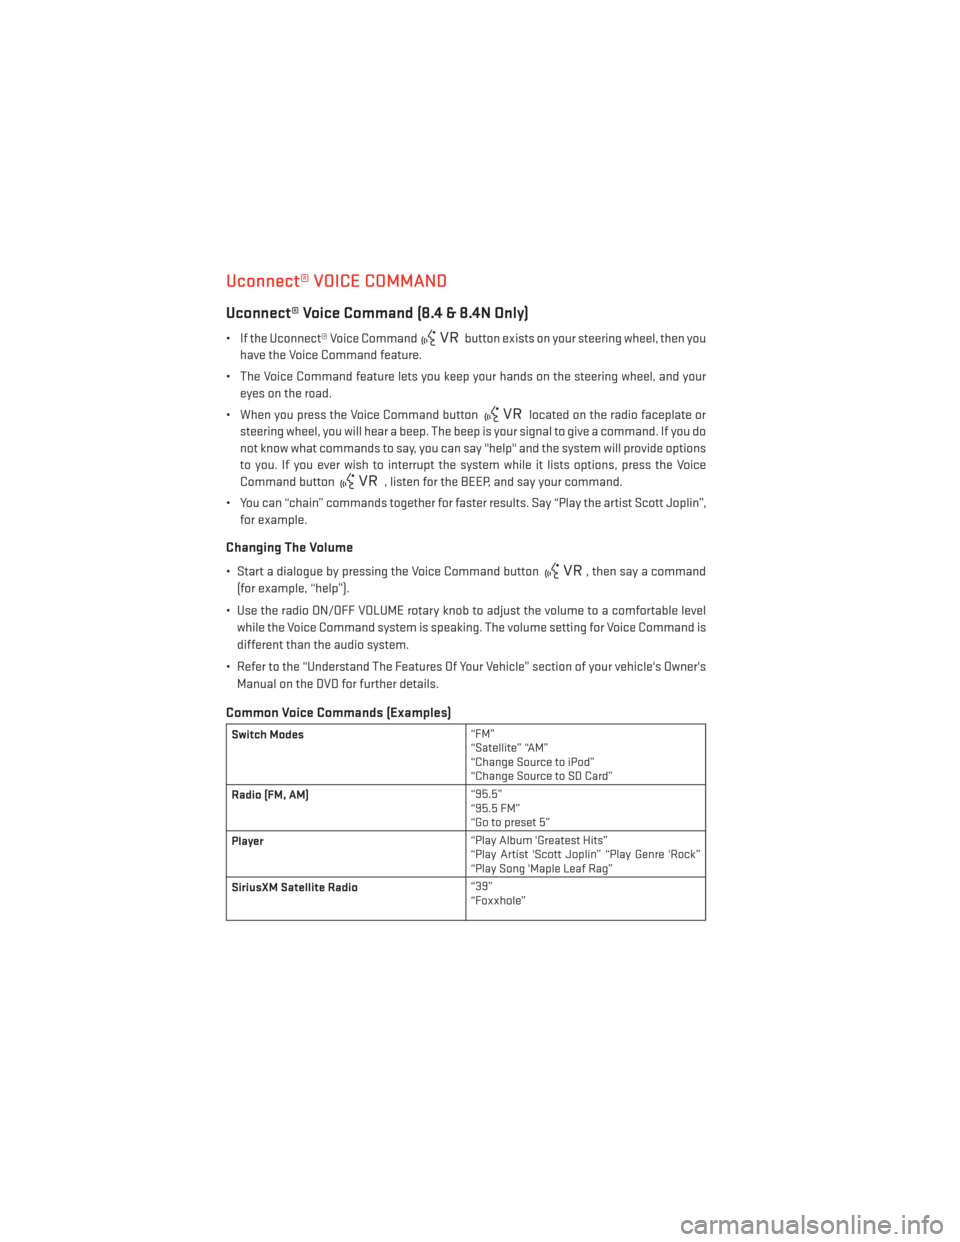
Uconnect® VOICE COMMAND
Uconnect® Voice Command (8.4 & 8.4N Only)
• If the Uconnect® Voice Commandbutton exists on your steering wheel, then you
have the Voice Command feature.
• The Voice Command feature lets you keep your hands on the steering wheel, and your eyes on the road.
• When you press the Voice Command button
located on the radio faceplate or
steering wheel, you will hear a beep. The beep is your signal to give a command. If you do
not know what commands to say, you can say "help" and the system will provide options
to you. If you ever wish to interrupt the system while it lists options, press the Voice
Command button
, listen for the BEEP, and say your command.
• You can “chain” commands together for faster results. Say “Play the artist Scott Joplin”, for example.
Changing The Volume
• Start a dialogue by pressing the Voice Command button, then say a command
(for example, “help”).
• Use the radio ON/OFF VOLUME rotary knob to adjust the volume to a comfortable level while the Voice Command system is speaking. The volume setting for Voice Command is
different than the audio system.
• Refer to the “Understand The Features Of Your Vehicle” section of your vehicle's Owner's Manual on the DVD for further details.
Common Voice Commands (Examples)
Switch Modes “FM”
“Satellite” “AM”
“Change Source to iPod”
“Change Source to SD Card”
Radio (FM, AM) “95.5”
“95.5 FM”
“Go to preset 5”
Player “Play Album 'Greatest Hits”
“Play Artist 'Scott Joplin” “Play Genre 'Rock”
“Play Song 'Maple Leaf Rag”
SiriusXM Satellite Radio “39”
“Foxxhole”
ELECTRONICS
68
Page 73 of 148
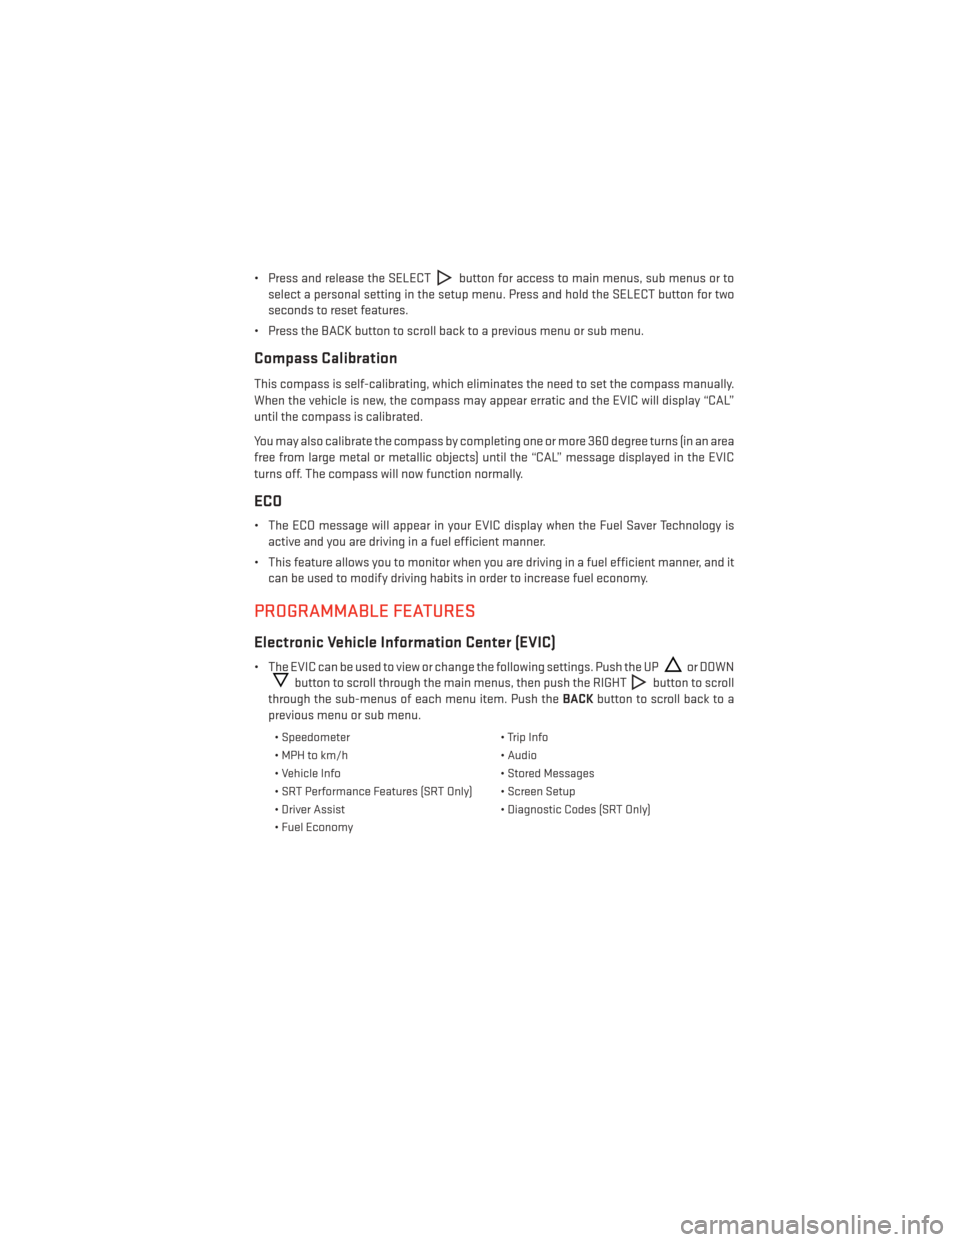
• Press and release the SELECTbutton for access to main menus, sub menus or to
select a personal setting in the setup menu. Press and hold the SELECT button for two
seconds to reset features.
• Press the BACK button to scroll back to a previous menu or sub menu.
Compass Calibration
This compass is self-calibrating, which eliminates the need to set the compass manually.
When the vehicle is new, the compass may appear erratic and the EVIC will display “CAL”
until the compass is calibrated.
You may also calibrate the compass by completing one or more 360 degree turns (in an area
free from large metal or metallic objects) until the “CAL” message displayed in the EVIC
turns off. The compass will now function normally.
ECO
• The ECO message will appear in your EVIC display when the Fuel Saver Technology is active and you are driving in a fuel efficient manner.
• This feature allows you to monitor when you are driving in a fuel efficient manner, and it can be used to modify driving habits in order to increase fuel economy.
PROGRAMMABLE FEATURES
Electronic Vehicle Information Center (EVIC)
• The EVIC can be used to view or change the following settings. Push the UPor DOWN
button to scroll through the main menus, then push the RIGHTbutton to scroll
through the sub-menus of each menu item. Push the BACKbutton to scroll back to a
previous menu or sub menu.
• Speedometer • Trip Info
• MPH to km/h • Audio
• Vehicle Info • Stored Messages
• SRT Performance Features (SRT Only) • Screen Setup
• Driver Assist • Diagnostic Codes (SRT Only)
• Fuel Economy
ELECTRONICS
71
Page 90 of 148
Resetting The Light After Servicing
Vehicles Equipped With Keyless Enter-N-Go™
• Without pressing the brake pedal, push the ENGINE START/STOP button and cycle theignition to the ON/RUN position (do not start the engine.)
• Fully depress the accelerator pedal, slowly, three times within 10 seconds.
• Without pressing the brake pedal, push the ENGINE START/STOP button once to return the ignition to the OFF/LOCK position.
Vehicles Not Equipped With Keyless Enter-N-Go™
• Turn the ignition switch to the ON/RUN position (do not start the engine.)
• Fully depress the accelerator pedal, slowly, three times within 10 seconds.
• Turn the ignition switch to the OFF/LOCK position.
NOTE:
If the indicator message illuminates when you start the vehicle, the oil change indicator
system did not reset. If necessary, repeat this procedure.
IF YOUR ENGINE OVERHEATS
In any of the following situations, you can reduce the potential for overheating by taking the
appropriate action:
• On the highways — slow down.
• In city traffic — while stopped, shift the transmission to NEUTRAL, but do not increase engine idle speed.
NOTE:
There are steps that you can take to slow down an impending overheat condition:
• If your air conditioner (A/C) is on, turn it off. The A/C system adds heat to the engine cooling system and turning the A/C off can help remove this heat.
• You can also turn the temperature control to maximum heat, the mode control to floor and the blower control to high. This allows the heater core to act as a supplement to the
radiator and aids in removing heat from the engine cooling system.
CAUTION!
Driving with a hot cooling system could damage your vehicle. If the temperature gauge
reads HOT (H), pull over and stop the vehicle. Idle the vehicle with the air conditioner
turned off until the pointer drops back into the normal range. If the pointer remains on
HOT (H), and you hear continuous chimes, turn the engine off immediately, and call for
service.
WHAT TO DO IN EMERGENCIES
88
Page 107 of 148
4. Insert the screwdriver into the slot in the center of the lever, and disengage the leverlocking tab by pushing it to the right.
5. While holding the locking tab in the disengaged position, pull the tether
strap to rotate the lever up and rear-
ward, until it locks in place in the ver-
tical position. The vehicle is now out
of PARK and can be towed. Release
the parking brake only when the ve-
hicle is securely connected to a tow
vehicle.
To Reset The Manual Park Release:
1. Push the latch (at the base of the lever, on the rear side) rearward (away from the lever) to unlatch the lever.
2. Rotate the Manual Park Release lever forward and down, to its original position, until the locking tab snaps into place to secure the lever.
3. Pull up gently on the tether strap to confirm that the lever is locked in its stowed position.
4. Tuck the tether strap into the base of the console. Reinstall the console storage bin.
WHAT TO DO IN EMERGENCIES
105