set clock DODGE CHARGER 2014 7.G User Guide
[x] Cancel search | Manufacturer: DODGE, Model Year: 2014, Model line: CHARGER, Model: DODGE CHARGER 2014 7.GPages: 148, PDF Size: 3.77 MB
Page 49 of 148
Uconnect® 4.3 & 4.3S AT A GLANCE
Displaying The Time
• If the time is not currently displayed at the top of the screen when in Radio mode, pressthe SETTINGS button, then touch “Clock.” Select “Show Time,” then touch “On.”
Setting The Time
• Press the SETTINGS hard-key, then touch the “Clock” soft-key.
• Touch the “Time” soft-key.
• Touch the “Up or Down” soft-keys to adjust the hours, minutes or AM/PM.
NOTE:
12hr format and 24hr format can also be set.
• Once the time is set press the “Done” soft-key to exit the time screen.
Audio Settings
• Press the SETTINGS hard-key on the right side of the unit.
• Then scroll down and press the “Audio” soft-key to get to the Audio menu.
• The Audio Menu shows the following options for you to customize your audio settings. • Equalizer
• Balance/Fade
• Speed Adjust Volume
• Touch the “Exit” soft-key to exit from the Audio Menu.
ELECTRONICS
47
Page 50 of 148
Equalizer
• Touch the “Equalizer” soft-key to adjust the Bass, Mid and Treble. Use the “+” or “–”soft-key to adjust the equalizer to your desired settings. Press the “Done” soft-key when
done.
Balance/Fade
• Touch the “Balance/Fade” soft-key to adjust the sound from the speakers. Use the “arrow” soft-key to adjust the sound level from the front and rear or right and left side
speakers. Touch the center “C” soft-key to reset the balance and fade to the factory
setting. Press the “Done” soft-key when done.
Speed Adjust Volume
• Touch the “Speed Adjust Volume” soft-key to select between OFF, 1, 2 or 3. This will decrease the radio volume relative to a decrease in vehicle speed. Press the “Done”
soft-key when done.
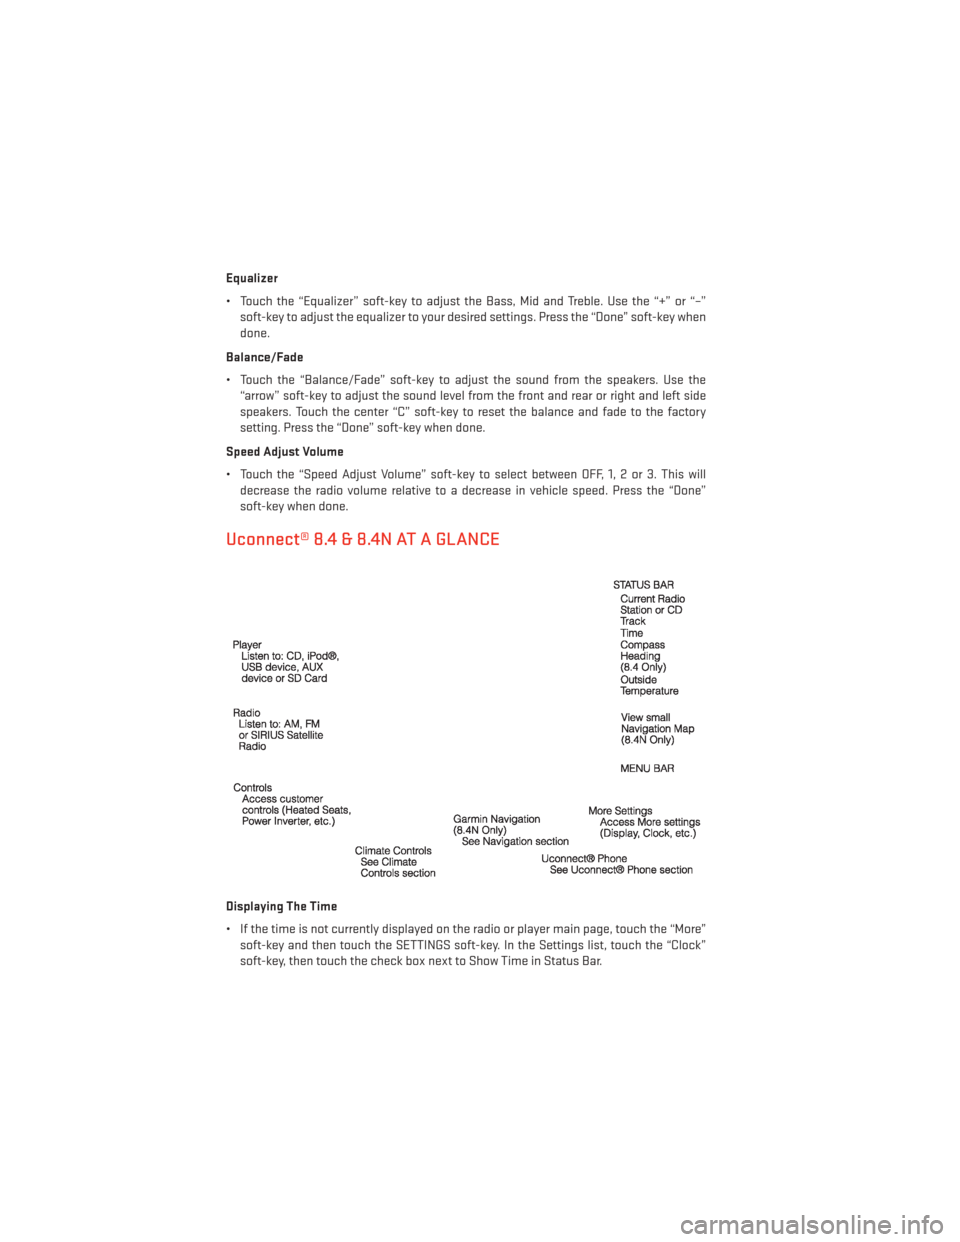
Uconnect® 8.4 & 8.4N AT A GLANCE
Displaying The Time
• If the time is not currently displayed on the radio or player main page, touch the “More”soft-key and then touch the SETTINGS soft-key. In the Settings list, touch the “Clock”
soft-key, then touch the check box next to Show Time in Status Bar.
ELECTRONICS
48
Page 51 of 148
Setting The Time
• Model 8.4N synchronizes time automatically via GPS, so should not require any timeadjustment. If you do need to set the time manually, follow the instructions below for
Model 8.4.
• For Model 8.4, turn the unit on, then touch the “Time Display” at the top of the screen. Touch “Yes”.
• If the time is not displayed at the top of the screen, touch “More” soft-key and then “Settings” soft-key. In the Settings screen, touch the “Clock” soft-key, then check or
uncheck this option.
• Touch “+” or “–” next to Set Time Hours and Set Time Minutes to adjust the time.
• If these features are not available, uncheck the “Sync” with GPS box.
• Touch “X” to save your settings and exit out of the Clock Setting screen.
Audio Settings
• Touch the “Audio” soft-key to activate the Audio settings screen to adjust Balance\Fade, Equalizer and Speed Adjusted Volume.
• You can return to the Radio screen by touching the “X” located at the top right.
Balance/Fade
• Touch the “Balance/Fade” soft-key to Balance audio between the front speakers or fade the audio between the rear and front speakers.
• Touching the “Front,” “Rear,” ”Left” or “Right” soft-keys or touch and drag the red Speaker Icon to adjust the Balance/Fade.
Equalizer
• Touch the “Equalizer” soft-key to activate the Equalizer screen.
• Touch the “+” or “ –” soft-keys, or by touching and dragging over the level bar for each of the equalizer bands. The level value, which spans between ±9, is displayed at the bottom
of each of the Bands.
Speed Adjusted Volume
• Touch the “Speed Adjusted Volume” soft-key to activate the Speed Adjusted Volume screen. The Speed Adjusted Volume is adjusted by touching the “+” and “–” buttons or by
touching and dragging over the level bar. This alters the automatic adjustment of the
audio volume with variation to vehicle speed.
ELECTRONICS
49
Page 74 of 148
Uconnect® 4.3 Customer Programmable Features
• The Uconnect® 4.3 system allows you to access Customer Programmable feature set-tings such as Display, Clock, Safety/Assistance, Lights, Doors & Locks, Heated Seats,
Engine Off Operation, Compass Settings, Audio, Phone/Bluetooth and SiriusXM Setup
through hard-keys and soft-keys.
• Press the Settings hard-key to on the right side of the unit to access the Settings screen, use the Page Up/Down soft-keys to scroll through the following settings. The following
feature settings are available:
• Display • Clock
• Safety / Assistance • Doors & Locks
• Heated Seats • Engine Off Options
• Compass Settings • Audio
• Phone / Bluetooth • SiriusXM Setup
• Auto-On Comfort & Remote Start • Lights
Uconnect® 8.4 Customer Programmable Features
• The Uconnect® 8.4 system allows you to access Customer Programmable feature set- tings such as Display, Clock, Safety/Assistance, Lights, Doors & Locks, Heated Seats,
Engine Off Operation, Compass Settings, Audio, Phone/Bluetooth and SiriusXM Setup
through soft-keys.
• Touch the More soft-key on the bottom of the screen, then touch the Settings soft-key to access the Settings screen. When making a selection, scroll up or down until the
preferred setting is highlighted, then press and release the preferred setting until a
check-mark appears next to the setting, showing that setting has been selected. The
following feature settings are available:
• Display • Clock
• Safety & Driving Assistance • Doors & Locks
• Auto-On Comfort & Remote Start • Engine Off Options
• Compass Settings • Audio
• Phone / Bluetooth • SiriusXM Setup
• Lights
ELECTRONICS
72
Page 93 of 148
Preparations For Jacking
1. Park the vehicle on a firm, level surface as far from the edge of the roadway as possible.Avoid icy or slippery areas.
2. Turn on the Hazard Warning flasher.
3. Set the parking brake.
4. Place the shift lever into PARK.
5. Turn OFF the ignition.
6. Block the front and rear of the wheel diagonally opposite of the jacking position. For example, if changing the right front tire, block the left rear wheel.
NOTE:
Passengers should not remain in the vehicle
when the vehicle is being jacked.
Jacking And Changing A Tire
1. Remove the spare tire, jack, and lug wrench.
2. If equipped with aluminum wheels where the center cap covers the lug nuts, use
the lug wrench to pry the center cap off
carefully before raising the vehicle.
3. Before raising the vehicle, use the lug wrench to loosen, but not remove, the lug
nuts on the wheel with the flat tire. Turn
the lug nuts counterclockwise one turn
while the wheel is still on the ground.
4. Place the jack underneath the lift area that is closest to the flat tire. Turn the jack screw clockwise to firmly engage the jack saddle with the lift area of the sill flange.
Wheel Blocked
WHAT TO DO IN EMERGENCIES
91
Page 137 of 148
FAQ’s
GETTING STARTED
• How do I install my LATCH Equipped Child Seat? pg. 18
• How do I program my Front Seat Memory? pg. 21
ELECTRONICS
• How do I know which radio I have?• Uconnect® 4.3, 4.3S pg. 47
• Uconnect® 8.4, 8.4N pg. 48
• How do I select the AUX music source? pg. 60
• How do I set the clock on my radio?
• Uconnect® 4.3, 4.3S pg. 47
• Uconnect® 8.4, 8.4N pg. 48
• How do I use the Navigation feature? pg. 56
• How do I pair my cell phone via Bluetooth® with the Uconnect® Hands-Free Voice Activation System? pg. 62
UTILITY
• How do I know how much I can tow with my Dodge Charger? pg. 77
WHAT TO DO IN EMERGENCIES
• What do I do if my TPMS warning light is blinking? pg. 84
• How do I change a flat tire? pg. 89
• How do I Jump-Start my vehicle? pg. 101
MAINTAINING YOUR VEHICLE
• Where is my Fuse Block located? pg. 125
• What type of oil do I use? pg. 114
• How often should I change my engine’s oil? pg. 116
• How often should I change my SRT engine’s oil? pg. 121
• What should my tire pressure be set at? pg. 130
FREQUENTLY ASKED QUESTIONS
135