display DODGE CHARGER 2015 7.G Owners Manual
[x] Cancel search | Manufacturer: DODGE, Model Year: 2015, Model line: CHARGER, Model: DODGE CHARGER 2015 7.GPages: 638, PDF Size: 16.56 MB
Page 17 of 638
Ignition Or Accessory On Message
Opening the driver’s door when the ignition is in ACC or
ON (engine not running), a chime will sound to remind
you to cycle the ignition to OFF. In addition to the chime,
the ignition or accessory on message will display in the
cluster.
NOTE:With the Uconnect® system, the power window
switches, radio, power sunroof (if equipped), and power
outlets will remain active for up to 10 minutes after the
ignition is placed in the OFF position. Opening either
front door will cancel this feature. The time for this
feature is programmable. Refer to “Uconnect® Settings”
in “Understanding Your Instrument Panel” for further
information.
WARNING!
•When leaving the vehicle, always remove the Key
Fob from the vehicle and lock your vehicle.
•Never leave children alone in a vehicle, or with
access to an unlocked vehicle.
•Allowing children to be in a vehicle unattended is
dangerous for a number of reasons. A child or
others could be seriously or fatally injured. Chil-
dren should be warned not to touch the parking
brake, brake pedal or the gear selector.
•Do not leave the Key Fob in or near the vehicle, or
in a location accessible to children, and do not
leave the ignition of a vehicle equipped with
Keyless Enter-N-Go™ in the ACC or ON/RUN
mode. A child could operate power windows, other
controls, or move the vehicle.
(Continued)
2
THINGS TO KNOW BEFORE STARTING YOUR VEHICLE 15
Page 30 of 638
•The engine can be started two consecutive times with
the RKE transmitter. However, the ignition must be
activated by pushing the START/STOP button twice
(or the ignition must be placed in the ON/RUN
position) before you can repeat the start sequence for a
third cycle.
To Exit Remote Start Mode Without Driving The
Vehicle
Push and release the REMOTE START button one time or
allow the engine to run for the entire 15-minute cycle.
NOTE:To avoid unintentional shut downs, the system
will disable the one time push of the REMOTE START
button for two seconds after receiving a valid Remote
Start request.
To Exit Remote Start Mode And Drive The Vehicle
Before the end of 15 minute cycle, push and release the
UNLOCK button on the RKE transmitter to unlock the
doors, or unlock the vehicle using Passive Entry via the
door handles, and disarm the Vehicle Security Alarm (if
equipped). Then, prior to the end of the 15 minute cycle,
push and release the START/STOP button.
NOTE:For vehicles equipped with the Keyless Enter-N-
Go™ feature, the message “Push Button/Insert Key” will
display in the Driver Information Display (DID) until
you push the START button.
Cancel Remote Start
Remote Starting will also cancel if any of the following
occur:
•The engine stalls or engine speed exceeds 2500 rpm.
•Any engine warning lights come on.
•Low Fuel Light turns on.
•The hood is opened.
28 THINGS TO KNOW BEFORE STARTING YOUR VEHICLE
Page 46 of 638
With the ignition in the ON/RUN position, the Trunk
Open symbol will display in the instrument cluster
indicating that the trunk is open. The odometer display
will reappear once the trunk is closed.
With the ignition in the OFF position , the Trunk Open
symbol will display until the trunk is closed.
Refer to “Keyless Enter-N-Go™” in “Things To Know
Before Starting Your Vehicle” for more information on
trunk operation with the Passive Entry feature.
TRUNK SAFETY WARNING
WARNING!
Do not allow children to have access to the trunk,
either by climbing into the trunk from outside, or
through the inside of the vehicle. Always close the
trunk lid when your vehicle is unattended. Once in
the trunk, young children may not be able to escape,
even if they entered through the rear seat. If trapped
in the trunk, children can die from suffocation or
heat stroke.
44 THINGS TO KNOW BEFORE STARTING YOUR VEHICLE
Page 108 of 638
▫To Deactivate........................176
▫To Resume Speed.....................176
▫To Vary The Speed Setting...............176
▫To Accelerate For Passing................177
!ADAPTIVE CRUISE CONTROL (ACC) — IF
EQUIPPED...........................178
▫Adaptive Cruise Control (ACC) Operation . . . .181
▫Activating Adaptive Cruise Control (ACC) . . . .182
▫To Activate/Deactivate..................182
▫To Set A Desired ACC Speed.............184
▫To Cancel...........................184
▫To Tu r n O f f . . . . . . . . . . . . . . . . . . . . . . . . ..185
▫To Resume..........................185
▫To Vary The Speed Setting...............186
▫Setting The Following Distance In ACC......188
▫Overtake Aid........................192
▫ACC Operation At Stop.................192
▫Adaptive Cruise Control (ACC) Menu.......193
▫Display Warnings And Maintenance........194
▫Precautions While Driving With ACC.......197
▫General Information....................202
▫Normal (Fixed Speed) Electronic Speed Control
Mode..............................202
!FORWARD COLLISION WARNING (FCW) WITH
MITIGATION — IF EQUIPPED.............206
▫Forward Collision Warning (FCW) With
Mitigation Operation...................206
106 UNDERSTANDING THE FEATURES OF YOUR VEHICLE
Page 109 of 638
▫Turning FCW ON Or OFF...............208
▫Changing FCW And Active Braking Status. . . .209
▫FCW Limited Warning..................209
▫Service FCW Warning..................210
!LANESENSE — IF EQUIPPED.............210
▫LaneSense Operation...................210
▫Turning LaneSense ON Or OFF............211
▫LaneSense Warning Message..............212
▫Changing LaneSense Status..............217
!PARKSENSE® REAR PARK ASSIST — IF
EQUIPPED...........................218
▫ParkSense® Sensors....................218
▫ParkSense® Warning Display.............219
▫ParkSense® Display....................219
▫Enabling And Disabling ParkSense®........224
▫Service The ParkSense® Rear Park Assist
System.............................225
▫Cleaning The ParkSense® System..........225
▫ParkSense® System Usage Precautions.......226
!PARKVIEW® REAR BACK UP CAMERA — IF
EQUIPPED...........................227
!OVERHEAD CONSOLE..................230
▫Front Map/Reading Lights — If Equipped . . .230
▫Courtesy Lights.......................231
▫Sunglasses Bin Door...................232
!GARAGE DOOR OPENER — IF EQUIPPED . . .232
▫Before You Begin Programming HomeLink® . .233
3
UNDERSTANDING THE FEATURES OF YOUR VEHICLE 107
Page 117 of 638
WARNING!(Continued)
•Modifications to any part of the 9-1-1 Call system
could cause the air bag system to fail when you
need it. You could be injured if the air bag system
is not there to help protect you.
9-1-1 Call System Limitations
Vehicles sold in Canada and MexicoDO NOThave 9-1-1
Call system capabilities.
9-1-1 or other emergency line operators in Canada and
Mexico may not answer or respond to 9-1-1 system calls.
If the 9-1-1 Call system detects a malfunction, any of the
following may occur at the time the malfunction is
detected, and at the beginning of each ignition cycle:
•The Rearview Mirror light located between the Assist
and 9-1-1 buttons will continuously be illuminated
red.
•The Phone Screen will display the following message
“Vehicle phone requires service. Please contact your
dealer.”
•An In-Vehicle Audio message will state “Vehicle phone
requires service. Please contact your dealer.”
WARNING!
•Ignoring the Rearview Mirror light could mean you
will not have 9-1-1 Call services. If the Rearview
Mirror light is illuminated, have an authorized
dealer service the 9-1-1 Call system immediately.
(Continued)
3
UNDERSTANDING THE FEATURES OF YOUR VEHICLE 115
Page 138 of 638
•Press the heated seat buttona second time to turn
the LO setting ON.
•Press the heated seat buttona third time to turn
the heating elements OFF.
If the HI-level setting is selected, the system will auto-
matically switch to LO-level after approximately 60 min-
utes of continuous operation. At that time, the display
will change from HI to LO, indicating the change. The
LO-level setting will turn OFF automatically after ap-
proximately 45 minutes.
NOTE:
•Once a heat setting is selected, heat will be felt within
two to five minutes.
•The engine must be running for the heated seats to
operate.
Vehicles Equipped With Remote Start
On models that are equipped with remote start, the
heated seats can be programed to come on during a
remote start.
This feature can be programmed through the Uconnect®
system. Refer to “Uconnect® Settings” in “Understand-
ing Your Instrument Panel” for further information.
Rear Heated Seats
On some models, the two outboard seats are equipped
with heated seats. The heated seat switches for these
seats are located on the rear of the center console. There
are two heated seat switchesthat allow the rear
passengers to operate the seats independently.
You can choose from HI, LO or OFF heat settings. The
indicator lights in each switch indicate the level of heat in
use. Two indicator lights will illuminate for HI, one for
LO and none for OFF.
136 UNDERSTANDING THE FEATURES OF YOUR VEHICLE
Page 149 of 638
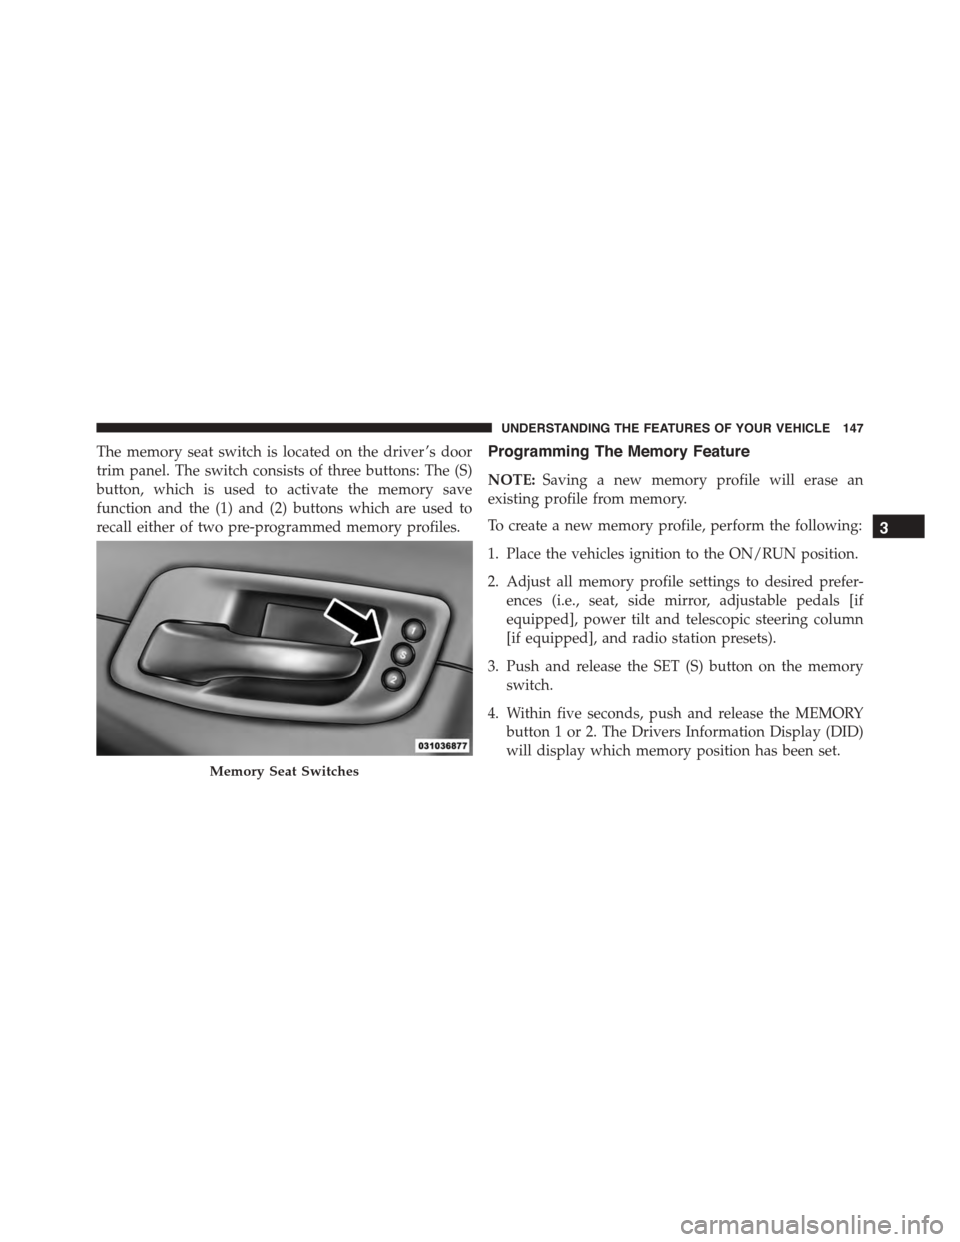
The memory seat switch is located on the driver ’s door
trim panel. The switch consists of three buttons: The (S)
button, which is used to activate the memory save
function and the (1) and (2) buttons which are used to
recall either of two pre-programmed memory profiles.
Programming The Memory Feature
NOTE:Saving a new memory profile will erase an
existing profile from memory.
To create a new memory profile, perform the following:
1. Place the vehicles ignition to the ON/RUN position.
2. Adjust all memory profile settings to desired prefer-
ences (i.e., seat, side mirror, adjustable pedals [if
equipped], power tilt and telescopic steering column
[if equipped], and radio station presets).
3. Push and release the SET (S) button on the memory
switch.
4. Within five seconds, push and release the MEMORY
button 1 or 2. The Drivers Information Display (DID)
will display which memory position has been set.
Memory Seat Switches
3
UNDERSTANDING THE FEATURES OF YOUR VEHICLE 147
Page 150 of 638
NOTE:
•Memory profiles can be set without the vehicle in
PARK, but the vehicle must be in PARK to recall a
memory profile.
•To set a memory profile to your RKE transmitter, refer
to “Linking And Unlinking The Remote Keyless Entry
Transmitter To Memory” in this section.
Linking And Unlinking The Remote Keyless Entry
Transmitter To Memory
Your RKE transmitters can be programmed to recall one
of two pre-programmed memory profiles by pushing the
UNLOCK button on the RKE transmitter.
NOTE:Before programming your RKE transmitters you
must select the “Memory To FOB” or “Personal Settings
Linked To Fob” feature through the Uconnect® system
screen. Refer to “Uconnect® Settings” in “Understanding
Your Instrument Panel” for further information.
To program your RKE transmitters, perform the follow-
ing:
1. Place the vehicles ignition to the OFF position.
2. Select desired memory profile (1) or (2). The system
will recall any stored settings for this profile. Wait for
the system to complete the memory recall before
continuing to Step 3.
NOTE:If a memory profile has not already been set,
refer to#Programming The Memory Feature#in this
section for instructions on how to set a memory profile.
3. Once the profile has been recalled, push and release
the SET (S) button on the memory switch, then push
and release button (1) or (2) accordingly. “Memory
Profile Set” (1 or 2) will display in the Drivers Infor-
mation Display (DID).
4. Push and release the LOCK button on the RKE trans-
mitter within 10 seconds.
148 UNDERSTANDING THE FEATURES OF YOUR VEHICLE
Page 151 of 638
NOTE:Your RKE transmitters can be unlinked from
your memory settings by pushing the SET (S) button, and
within 10 seconds, followed by pushing the UNLOCK
button on the RKE transmitter.
Memory Position Recall
NOTE:The vehicle must be in PARK to recall memory
positions. If a recall is attempted when the vehicle is not
in PARK, a message will display in the Drivers Informa-
tion Display (DID).
To recall the memory settings for driver 1, push
MEMORY button number 1 on the driver’s door or the
UNLOCK button on the RKE transmitter linked to
memory position 1.
NOTE:If the vehicle is equipped with Passive Entry, the
memory settings will be recalled with a Passive Entry
Unlock into the driver’s door using the Key Fob linked to
position 1.
To recall the memory setting for driver 2, push MEMORY
button number 2 on the driver’s door or the UNLOCK
button on the RKE transmitter linked to memory position 2.
NOTE:If the vehicle is equipped with Passive Entry, the
memory settings will be recalled with a Passive Entry
Unlock into the driver’s door using the Key Fob linked to
position 2.
A recall can be cancelled by pushing any of the MEMORY
buttons (S, 1, or 2) on the driver’s door during a recall.
When a recall is cancelled, the driver’s seat, adjustable
pedals (if equipped), and power tilt and telescopic steer-
ing column (if equipped) stop moving. A delay of one
second will occur before another recall can be selected.
Easy Entry/Exit Seat
This feature provides automatic driver seat positioning to
enhance driver mobility when entering and exiting the
vehicle.
3
UNDERSTANDING THE FEATURES OF YOUR VEHICLE 149