brake fluid DODGE CHARGER 2015 7.G User Guide
[x] Cancel search | Manufacturer: DODGE, Model Year: 2015, Model line: CHARGER, Model: DODGE CHARGER 2015 7.GPages: 236, PDF Size: 35.67 MB
Page 164 of 236
Electronic Stability Control (ESC) Activation/Malfunction Indicator Light
The “ESC Activation/Malfunction Indicator Light” in the instrument cluster will come on
when the ignition switch is turned to the ON/RUN position. It should go out with the
engine running. If the “ESC Activation/Malfunction Indicator Light” comes on continu-
ously with the engine running, a malfunction has been detected in the ESC system.
If this light remains on after several ignition cycles, and the vehicle has been driven
several miles (kilometers) at speeds greater than 30 mph (48 km/h), we recommend you
drive to the nearest service center and have the vehicle serviced immediately.
Brake Warning Light
This light monitors various brake functions, including brake fluid level and parking brake
application. If the brake light turns on, it may indicate that the parking brake is applied,
that the brake fluid level is low, or that there is a problem with the anti-lock brake system
reservoir.
If the light remains on when the parking brake has been disengaged, and the fluid level is
at the full mark on the master cylinder reservoir, it indicates a possible brake hydraulic
system malfunction or that a problem with the Brake Booster has been detected by the
Anti-Lock Brake System (ABS)/Electronic Stability Control (ESC) system. In this case, the
light will remain on until the condition has been corrected. If the problem is related to the
brake booster, the ABS pump will run when applying the brake, and a brake pedal
pulsation may be felt during each stop.
The dual brake system provides a reserve braking capacity in the event of a failure to a
portion of the hydraulic system. A leak in either half of the dual brake system is indicated
by the Brake Warning Light, which will turn on when the brake fluid level in the master
cylinder has dropped below a specified level. The light will remain on until the cause is
corrected.
Vehicles equipped with the Anti-Lock Brake System (ABS) are also equipped with
Electronic Brake Force Distribution (EBD). In the event of an EBD failure, the Brake
Warning Light will turn on along with the ABS Light. Immediate repair to the ABS system
is required.
Operation of the Brake Warning Light can be checked by turning the ignition switch from
the OFF position to the ON/RUN position. The light should illuminate for approximately
two seconds. The light should then turn off unless the parking brake is applied or a brake
fault is detected. If the light does not illuminate, have the light inspected by an authorized
dealer.
The light also will turn on when the parking brake is applied with the ignition switch in the
ON/RUN position.
NOTE:
This light shows only that the parking brake is applied. It does not show the degree of
brake application.
WHAT TO DO IN EMERGENCIES
162
Page 176 of 236
4. Remove the cap from the valve stem and then screw the fitting at the end of the
Sealant Hose (6) onto the valve stem.
5. Uncoil the Power Plug (8) and insert the plug into the vehicle’s 12 Volt power outlet.
6. Do not remove foreign objects (e.g., screws or nails) from the tire.
(C) Injecting Tire Service Kit Sealant Into The Deflated Tire:
Always start the engine before turning ON the Tire Service Kit.
NOTE:
Manual transmission vehicles must have the parking brake engaged and the shift lever in
NEUTRAL.
After pushing the Power Button (4), the sealant (white fluid) will flow from the Sealant
Bottle (1) through the Sealant Hose (6) and into the tire.
NOTE:
Sealant may leak out through the puncture in the tire.
If the sealant (white fluid) does not flow within 0 – 10seconds through the Sealant Hose
(6):
1. Push the Power Button (4) to turn Off the Tire Service Kit. Disconnect the Sealant Hose
(6) from the valve stem. Make sure the valve stem is free of debris. Reconnect the
Sealant Hose (6) to the valve stem. Check that the Mode Select Knob (5) is in the
Sealant Mode position and not Air Mode. Push the Power Button (4) to turn On the Tire
Service Kit.
2. Connect the Power Plug (8) to a different 12 Volt power outlet in your vehicle or
another vehicle, if available. Make sure the engine is running before turning ON the
Ti r e S e r v i c e K i t .
3. The Sealant Bottle (1) may be empty due to previous use. Call for assistance.
NOTE:
If the Mode Select Knob (5) is on Air Mode and the pump is operating, air will dispense
from the Air Pump Hose (7) only, not the Sealant Hose (6).
If the sealant (white fluid) does flow through the Sealant Hose (6):
1. Continue to operate the pump until sealant is no longer flowing through the hose
(typically takes 30 - 70 seconds). As the sealant flows through the Sealant Hose (6),
the Pressure Gauge (3) can read as high as 70 psi (4.8 Bar). The Pressure Gauge (3)
will decrease quickly from approximately 70 psi (4.8 Bar) to the actual tire pressure
when the Sealant Bottle (1) is empty.
2. The pump will start to inject air into the tire immediately after the Sealant Bottle (1)
is empty. Continue to operate the pump and inflate the tire to the pressure indicated
on the tire pressure label on the driver-side latch pillar (recommended pressure).
Check the tire pressure by looking at the Pressure Gauge (3).
WHAT TO DO IN EMERGENCIES
174
Page 188 of 236
ENGINE COMPARTMENT
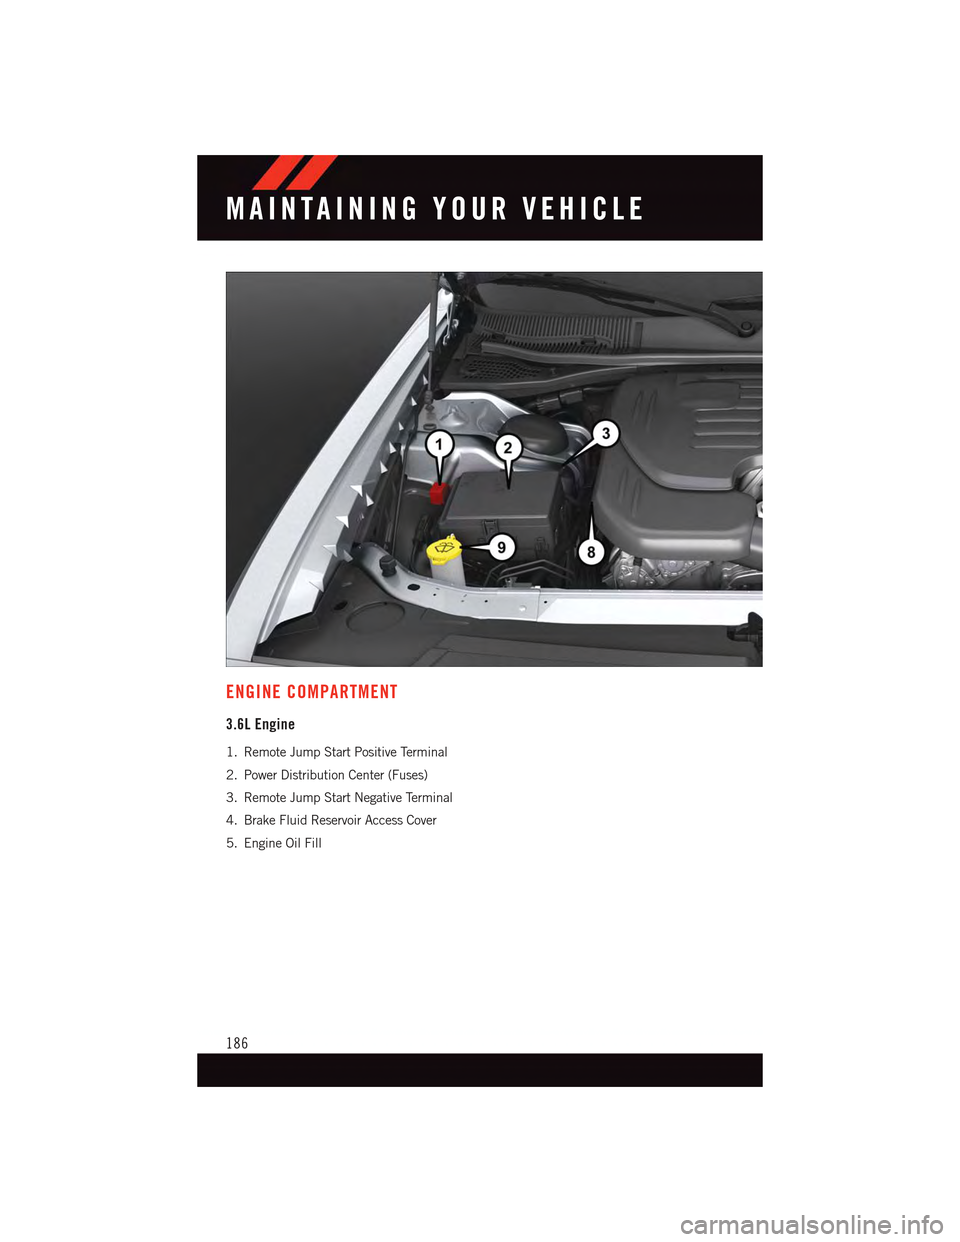
3.6L Engine
1. Remote Jump Start Positive Terminal
2. Power Distribution Center (Fuses)
3. Remote Jump Start Negative Terminal
4. Brake Fluid Reservoir Access Cover
5. Engine Oil Fill
MAINTAINING YOUR VEHICLE
186
Page 190 of 236
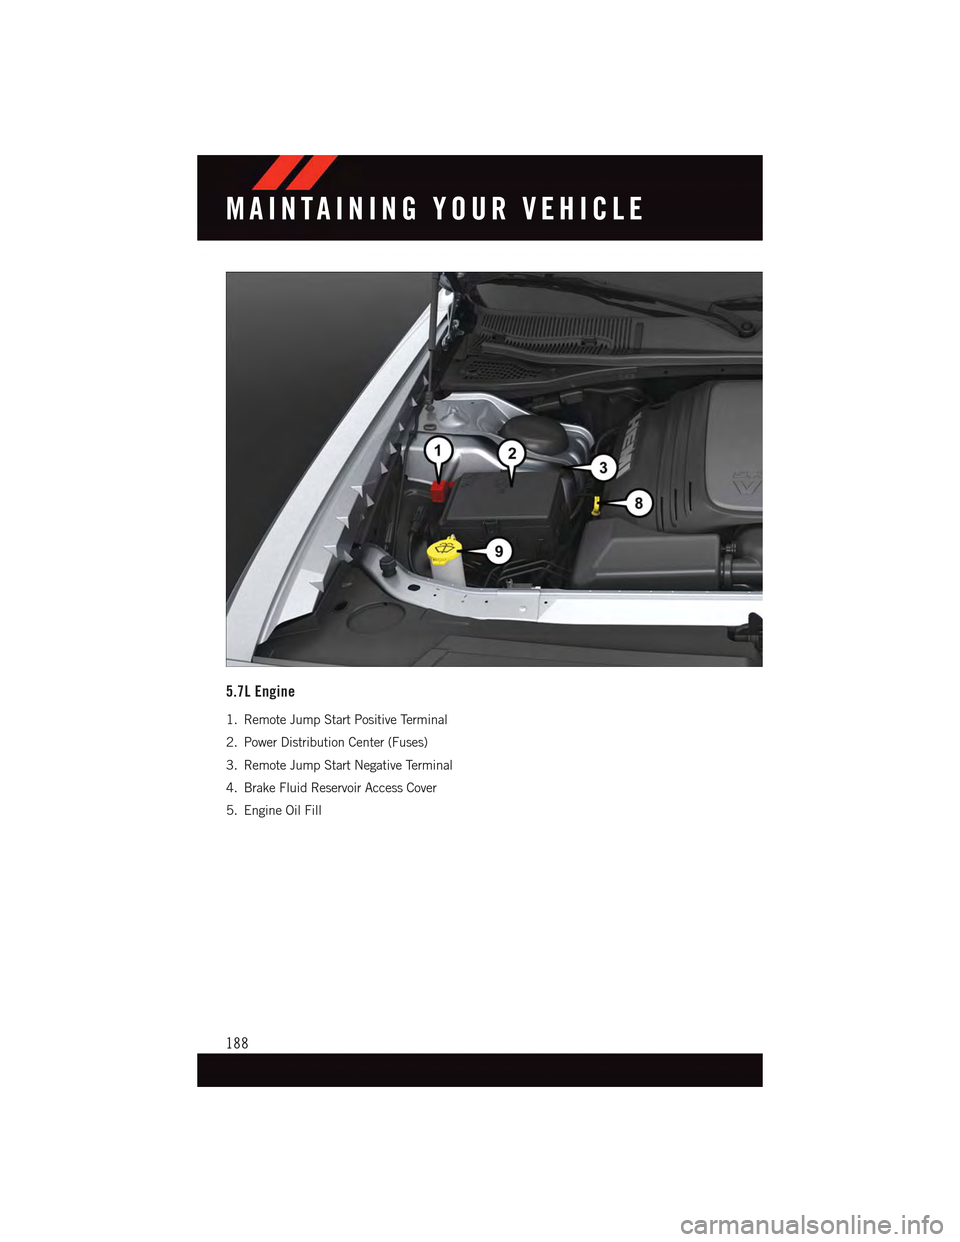
5.7L Engine
1. Remote Jump Start Positive Terminal
2. Power Distribution Center (Fuses)
3. Remote Jump Start Negative Terminal
4. Brake Fluid Reservoir Access Cover
5. Engine Oil Fill
MAINTAINING YOUR VEHICLE
188
Page 192 of 236
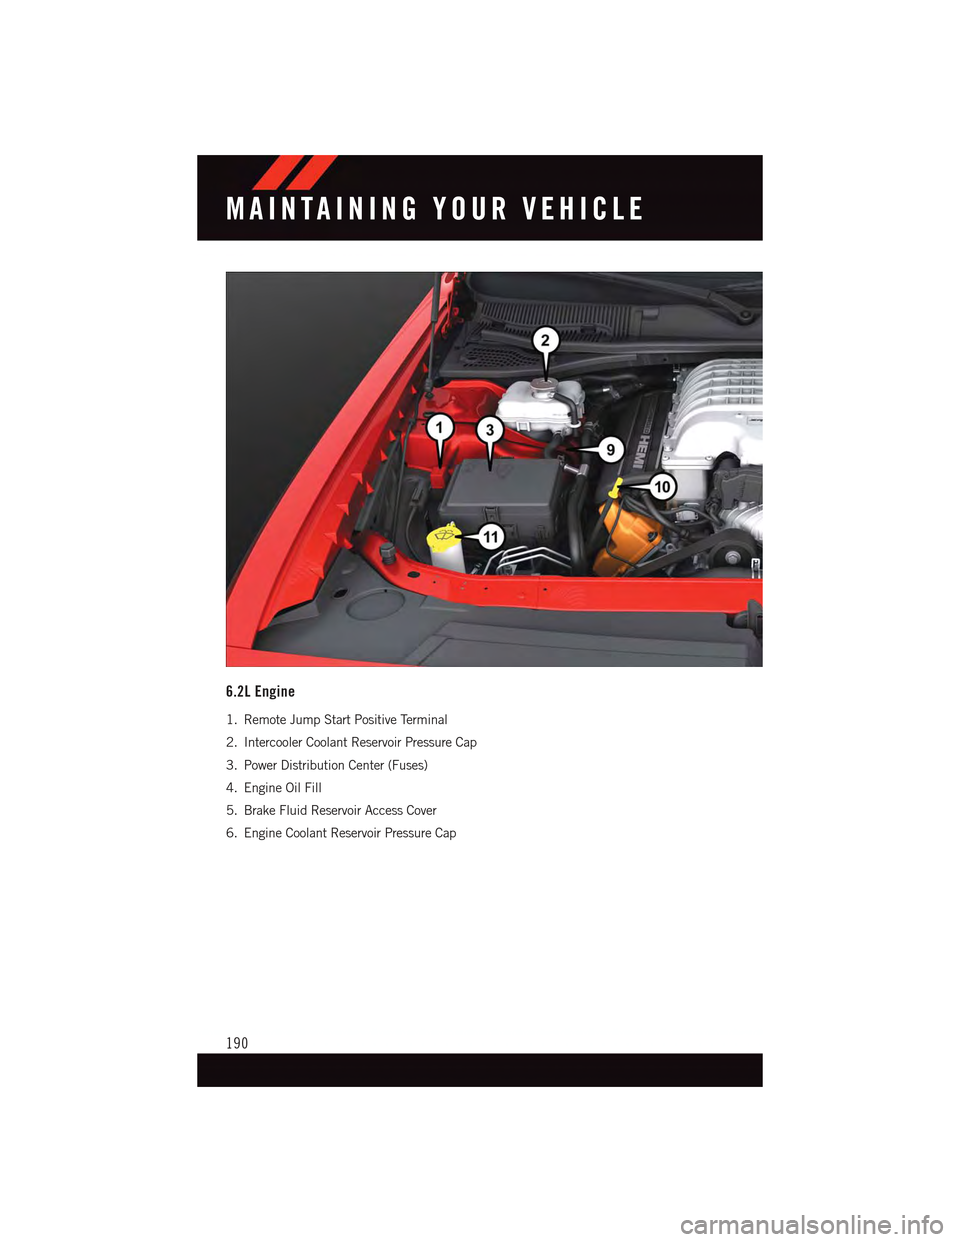
6.2L Engine
1. Remote Jump Start Positive Terminal
2. Intercooler Coolant Reservoir Pressure Cap
3. Power Distribution Center (Fuses)
4. Engine Oil Fill
5. Brake Fluid Reservoir Access Cover
6. Engine Coolant Reservoir Pressure Cap
MAINTAINING YOUR VEHICLE
190
Page 194 of 236
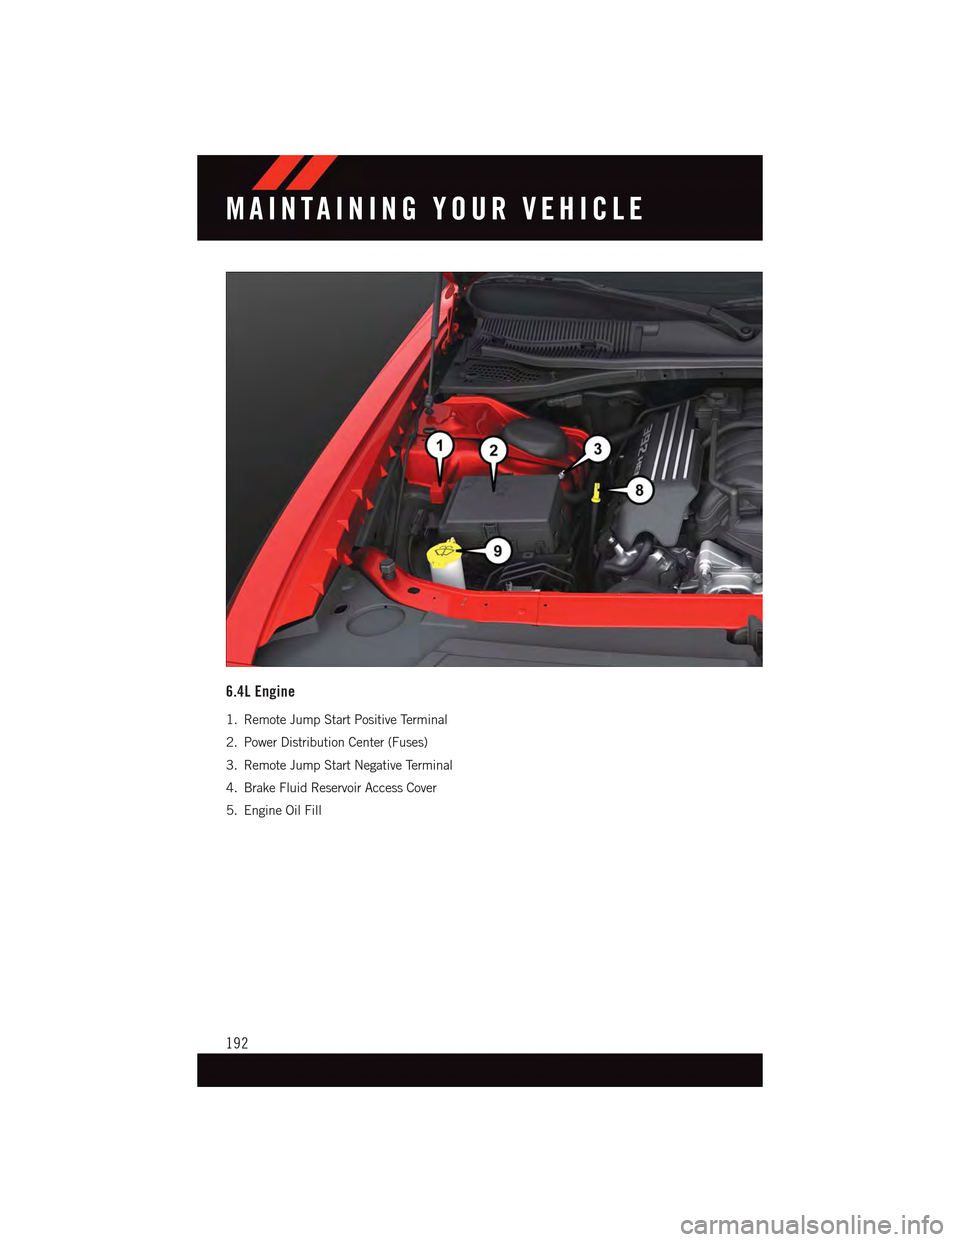
6.4L Engine
1. Remote Jump Start Positive Terminal
2. Power Distribution Center (Fuses)
3. Remote Jump Start Negative Terminal
4. Brake Fluid Reservoir Access Cover
5. Engine Oil Fill
MAINTAINING YOUR VEHICLE
192
Page 198 of 236
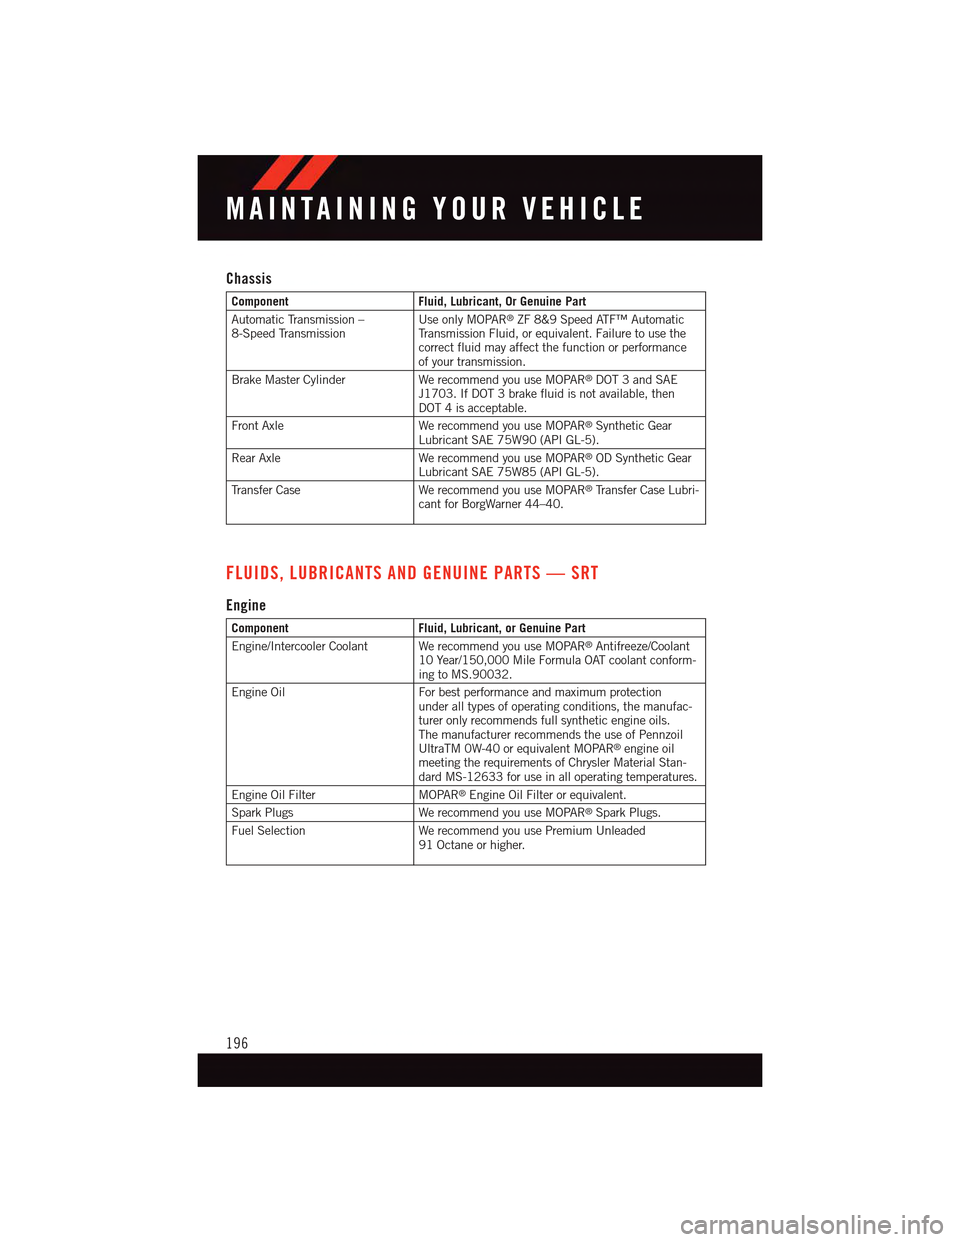
Chassis
ComponentFluid, Lubricant, Or Genuine Part
Automatic Transmission –8-Speed TransmissionUse only MOPAR®ZF 8&9 Speed ATF™ AutomaticTr a n s m i s s i o n F l u i d , o r e q u i v a l e n t . F a i l u r e t o u s e t h ecorrect fluid may affect the function or performanceof your transmission.
Brake Master Cylinder We recommend you use MOPAR®DOT 3 and SAEJ1703. If DOT 3 brake fluid is not available, thenDOT 4 is acceptable.
Front Axle We recommend you use MOPAR®Synthetic GearLubricant SAE 75W90 (API GL-5).
Rear Axle We recommend you use MOPAR®OD Synthetic GearLubricant SAE 75W85 (API GL-5).
Tr a n s f e r C a s e W e r e c o m m e n d y o u u s e M O PA R®Tr a n s f e r C a s e L u b r i -cant for BorgWarner 44–40.
FLUIDS, LUBRICANTS AND GENUINE PARTS — SRT
Engine
ComponentFluid, Lubricant, or Genuine Part
Engine/Intercooler Coolant We recommend you use MOPAR®Antifreeze/Coolant10 Year/150,000 Mile Formula OAT coolant conform-ing to MS.90032.
Engine Oil For best performance and maximum protectionunder all types of operating conditions, the manufac-turer only recommends full synthetic engine oils.The manufacturer recommends the use of PennzoilUltraTM 0W-40 or equivalent MOPAR®engine oilmeeting the requirements of Chrysler Material Stan-dard MS-12633 for use in all operating temperatures.
Engine Oil FilterMOPAR®Engine Oil Filter or equivalent.
Spark PlugsWe recommend you use MOPAR®Spark Plugs.
Fuel SelectionWe recommend you use Premium Unleaded91 Octane or higher.
MAINTAINING YOUR VEHICLE
196
Page 199 of 236
CAUTION!
•Mixing of engine coolant (antifreeze) other than specified Organic Additive Technology
(OAT) engine coolant (antifreeze), may result in engine damage and may decrease
corrosion protection. Organic Additive Technology (OAT) engine coolant is different
and should not be mixed with Hybrid Organic Additive Technology (HOAT) engine
coolant (antifreeze) or any “globally compatible” coolant (antifreeze). If a non-OAT
engine coolant (antifreeze) is introduced into the cooling system in an emergency, the
cooling system will need to be drained, flushed, and refilled with fresh OAT coolant
(conforming to MS.90032), by an authorized dealer as soon as possible.
•Donotusewateraloneoralcohol-basedenginecoolant(antifreeze)products.
Do not use additional rust inhibitors or antirust products, as they may not be
compatible with the radiator engine coolant and may plug the radiator.
•Thisvehiclehasnotbeendesignedforusewithpropyleneglycol-basedengine
coolant (antifreeze). Use of propylene glycol-based engine coolant (antifreeze) is
not recommended.
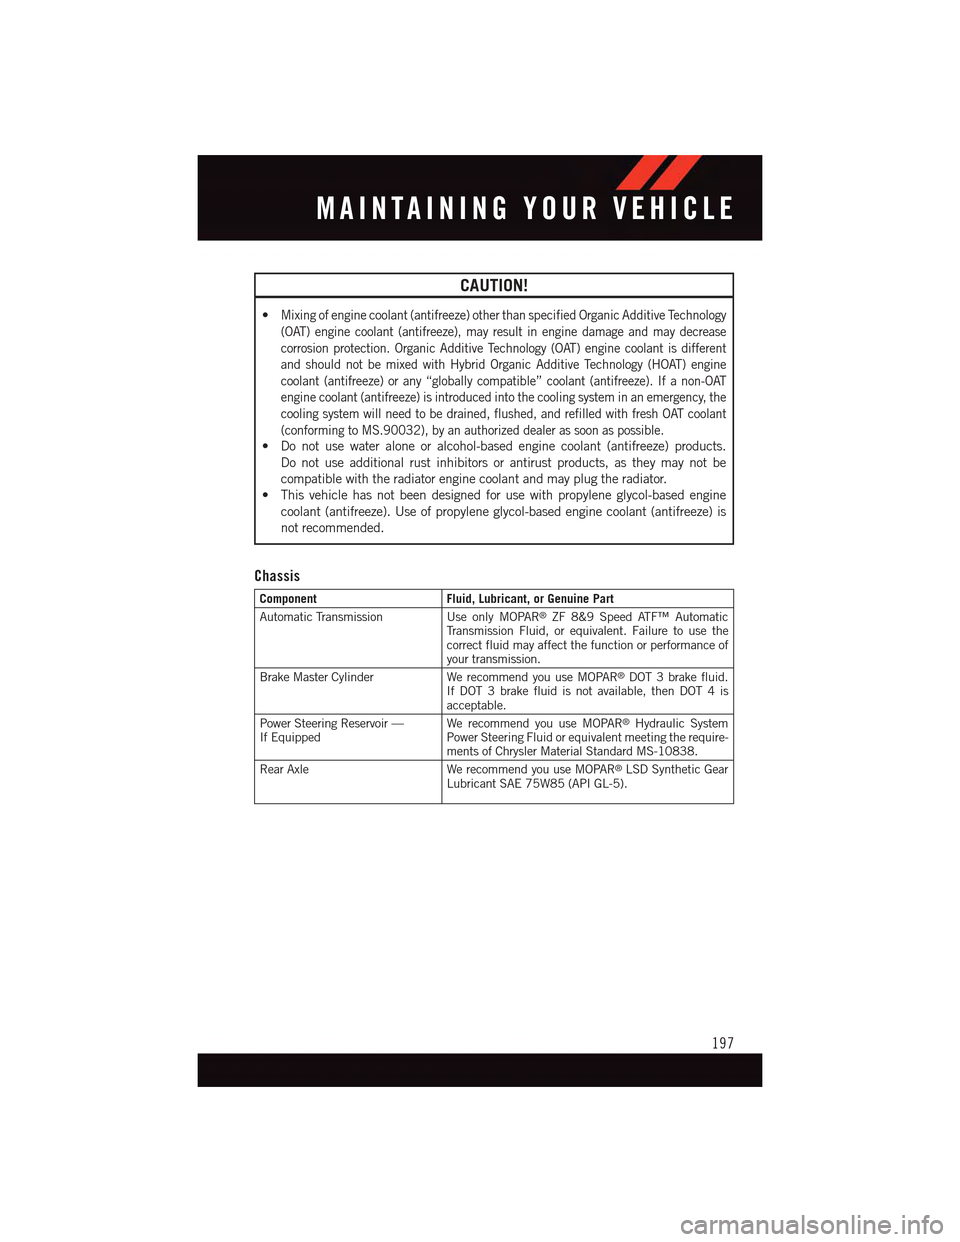
Chassis
ComponentFluid, Lubricant, or Genuine Part
Automatic TransmissionUse only MOPAR®ZF 8&9 Speed ATF™ AutomaticTr a n s m i s s i o n F l u i d , o r e q u i v a l e n t . F a i l u r e t o u s e t h ecorrect fluid may affect the function or performance ofyour transmission.
Brake Master Cylinder We recommend you use MOPAR®DOT 3 brake fluid.If DOT 3 brake fluid is not available, then DOT 4 isacceptable.
Power Steering Reservoir —If EquippedWe recommend you use MOPAR®Hydraulic SystemPower Steering Fluid or equivalent meeting the require-ments of Chrysler Material Standard MS-10838.
Rear Axle We recommend you use MOPAR®LSD Synthetic GearLubricant SAE 75W85 (API GL-5).
MAINTAINING YOUR VEHICLE
197
Page 201 of 236
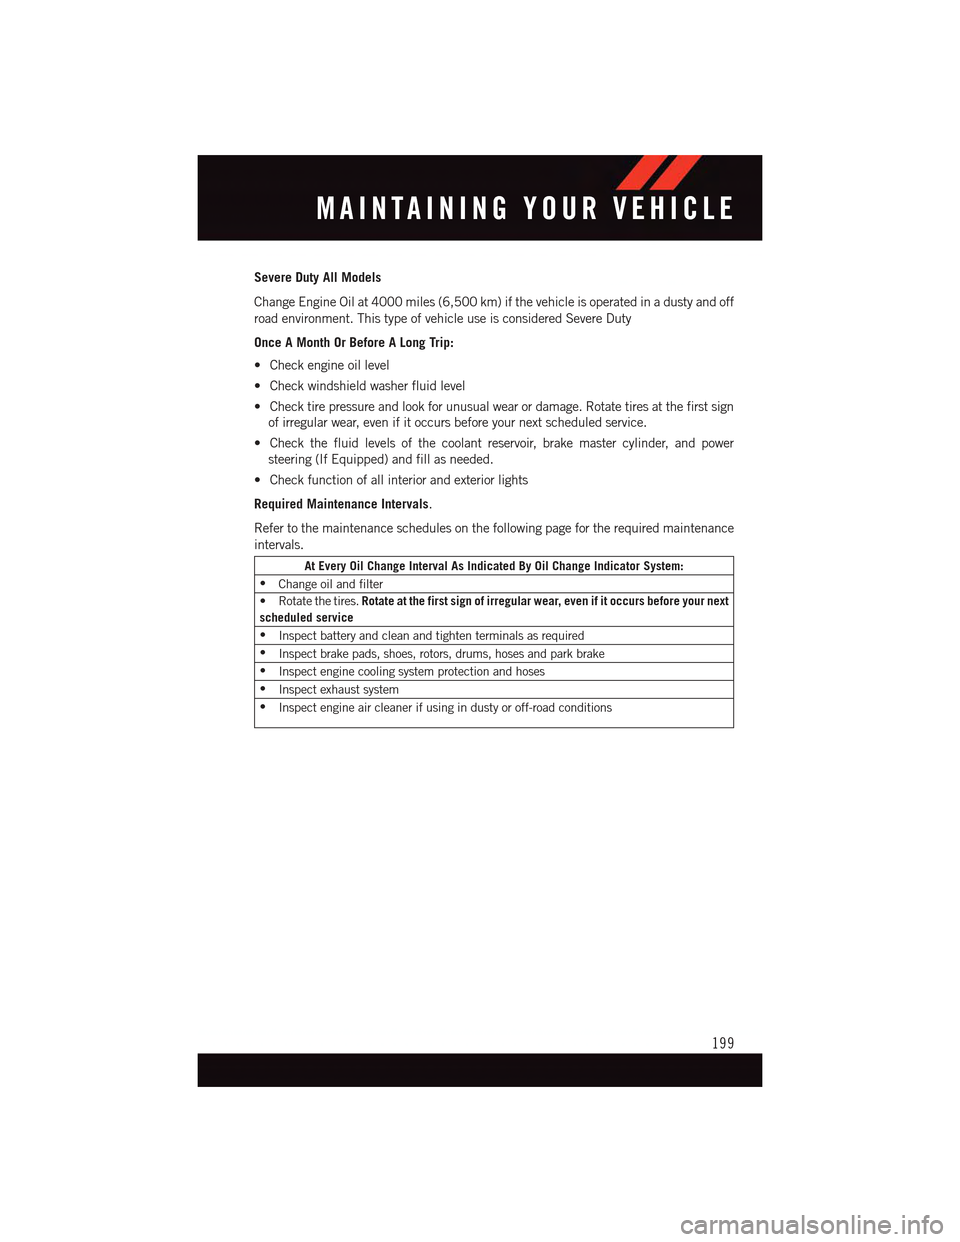
Severe Duty All Models
Change Engine Oil at 4000 miles (6,500 km) if the vehicle is operated in a dusty and off
road environment. This type of vehicle use is considered Severe Duty
Once A Month Or Before A Long Trip:
•Checkengineoillevel
•Checkwindshieldwasherfluidlevel
•Checktirepressureandlookforunusualwearordamage.Rotatetiresatthefirstsign
of irregular wear, even if it occurs before your next scheduled service.
•Checkthefluidlevelsofthecoolantreservoir,brakemastercylinder,andpower
steering (If Equipped) and fill as needed.
•Checkfunctionofallinteriorandexteriorlights
Required Maintenance Intervals.
Refer to the maintenance schedules on the following page for the required maintenance
intervals.
At Every Oil Change Interval As Indicated By Oil Change Indicator System:
•Change oil and filter
•Rotatethetires.Rotate at the first sign of irregular wear, even if it occurs before your next
scheduled service
•Inspect battery and clean and tighten terminals as required
•Inspect brake pads, shoes, rotors, drums, hoses and park brake
•Inspect engine cooling system protection and hoses
•Inspect exhaust system
•Inspect engine air cleaner if using in dusty or off-road conditions
MAINTAINING YOUR VEHICLE
199
Page 202 of 236
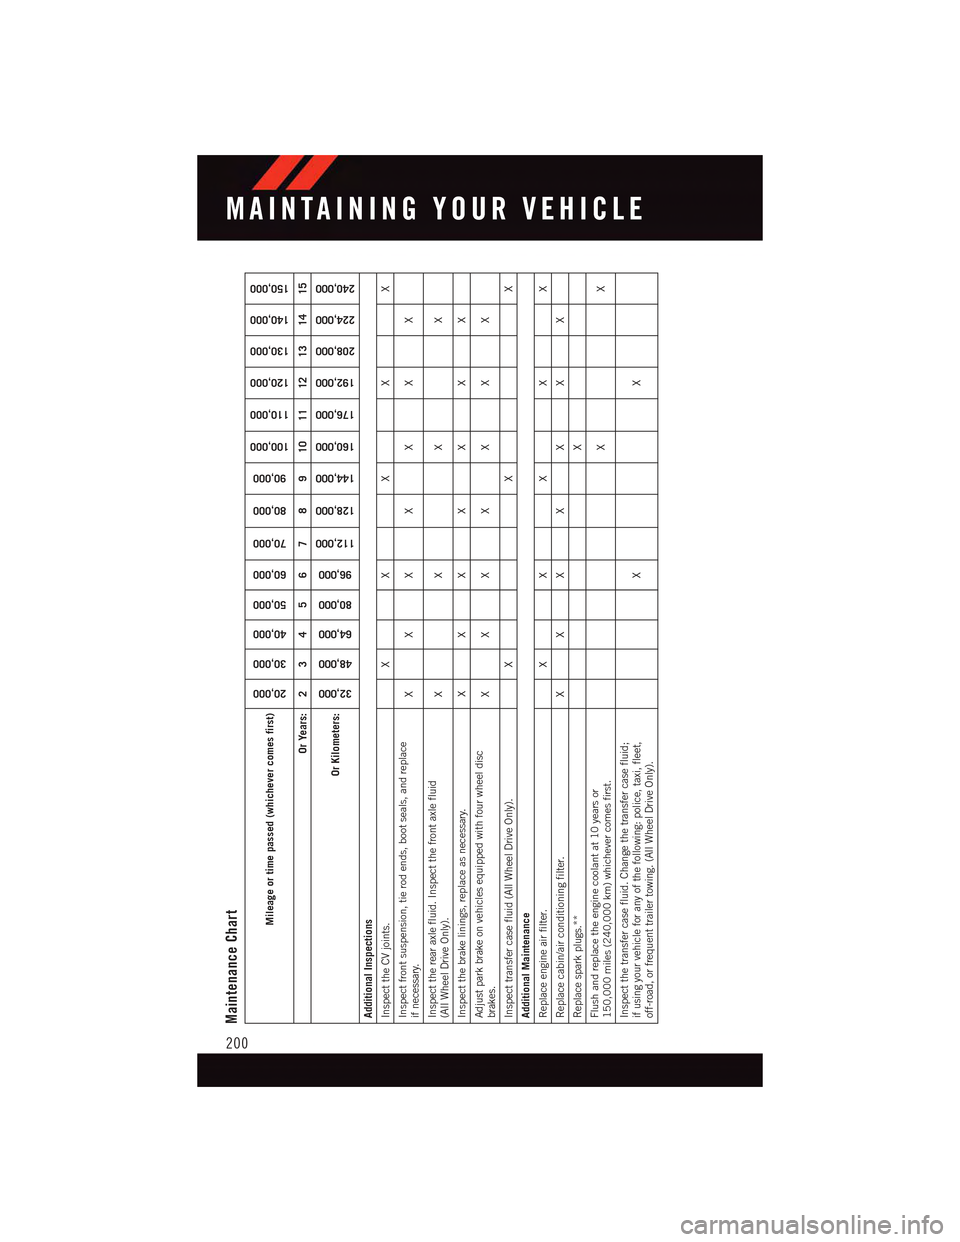
Maintenance Chart
Mileage or time passed (whichever comes first)
20,000
30,000
40,000
50,000
60,000
70,000
80,000
90,000
100,000
110,000
120,000
130,000
140,000
150,000
Or Years: 2 3 4 5 6 7 8 9 10 11 12 13 14 15
Or Kilometers:
32,000
48,000
64,000
80,000
96,000
112,000
128,000
144,000
160,000
176,000
192,000
208,000
224,000
240,000
Additional InspectionsInspect the CV joints. X X X X XInspect front suspension, tie rod ends, boot seals, and replaceif necessary.
XXX X X X X
Inspect the rear axle fluid. Inspect the front axle fluid(All Wheel Drive Only).
XX X X
Inspect the brake linings, replace as necessary. X X X X X X XAdjust park brake on vehicles equipped with four wheel discbrakes.
XXX X X X X
Inspect transfer case fluid (All Wheel Drive Only). X X XAdditional MaintenanceReplace engine air filter. X X X X XReplace cabin/air conditioning filter. X X X X X X XReplace spark plugs.**
X
Flush and replace the engine coolant at 10 years or150,000 miles (240,000 km) whichever comes first.
XX
Inspect the transfer case fluid. Change the transfer case fluid;if using your vehicle for any of the following: police, taxi, fleet,off-road, or frequent trailer towing. (All Wheel Drive Only).
XX
MAINTAINING YOUR VEHICLE
200