clock DODGE CHARGER 2015 7.G User Guide
[x] Cancel search | Manufacturer: DODGE, Model Year: 2015, Model line: CHARGER, Model: DODGE CHARGER 2015 7.GPages: 236, PDF Size: 35.67 MB
Page 83 of 236
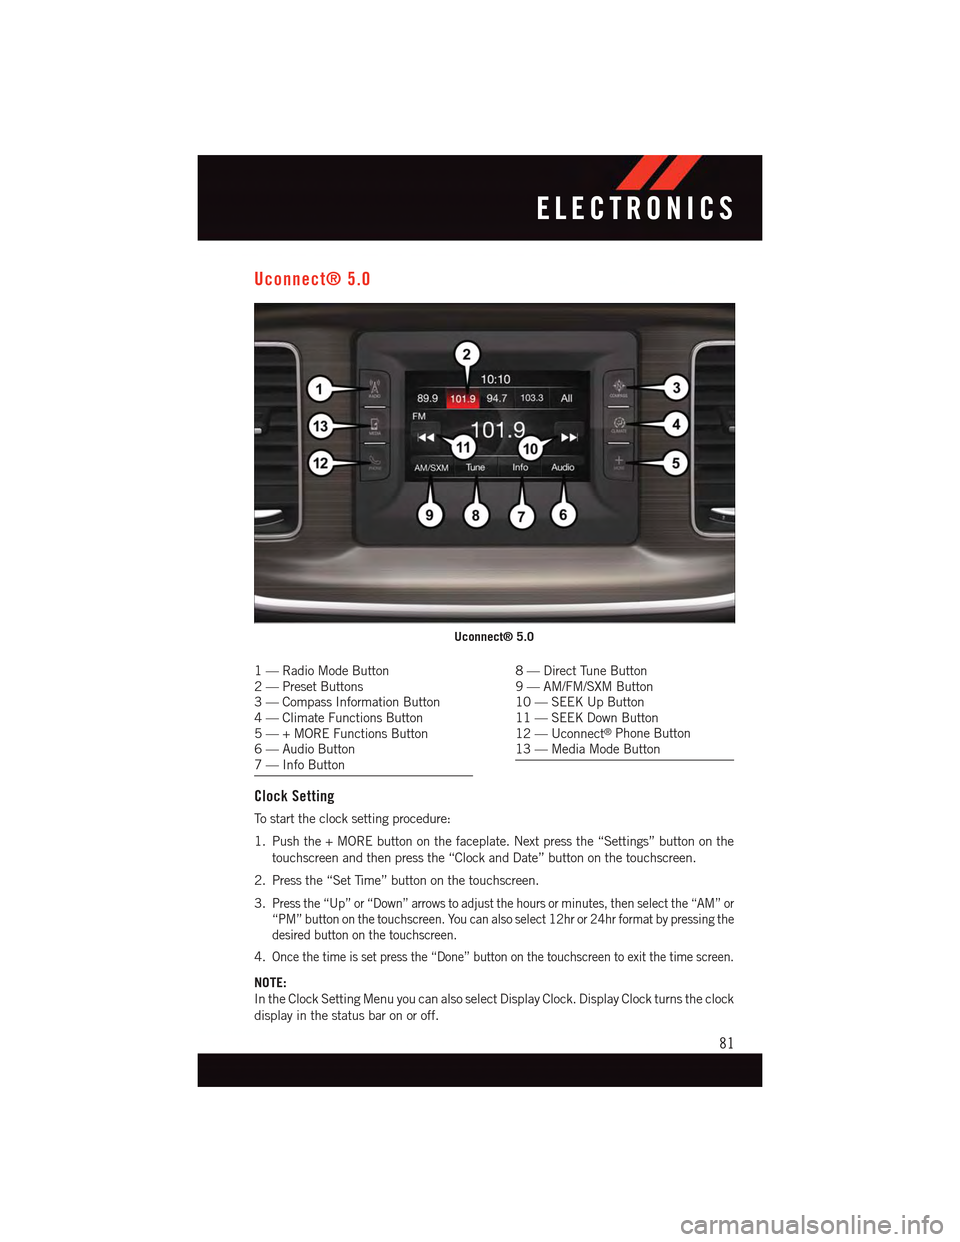
Uconnect® 5.0
1—RadioModeButton2—PresetButtons3—CompassInformationButton4—ClimateFunctionsButton5—+MOREFunctionsButton6—AudioButton7—InfoButton
8—DirectTuneButton9—AM/FM/SXMButton10 — SEEK Up Button11 — SEEK Down Button12 — Uconnect®Phone Button13 — Media Mode Button
Clock Setting
To s t a r t t h e c l o c k s e t t i n g p r o c e d u r e :
1. Push the + MORE button on the faceplate. Next press the “Settings” button on the
touchscreen and then press the “Clock and Date” button on the touchscreen.
2. Press the “Set Time” button on the touchscreen.
3.Press the “Up” or “Down” arrows to adjust the hours or minutes, then select the “AM” or
“PM” button on the touchscreen. You can also select 12hr or 24hr format by pressing the
desired button on the touchscreen.
4.Once the time is set press the “Done” button on the touchscreen to exit the time screen.
NOTE:
In the Clock Setting Menu you can also select Display Clock. Display Clock turns the clock
display in the status bar on or off.
Uconnect® 5.0
ELECTRONICS
81
Page 93 of 236
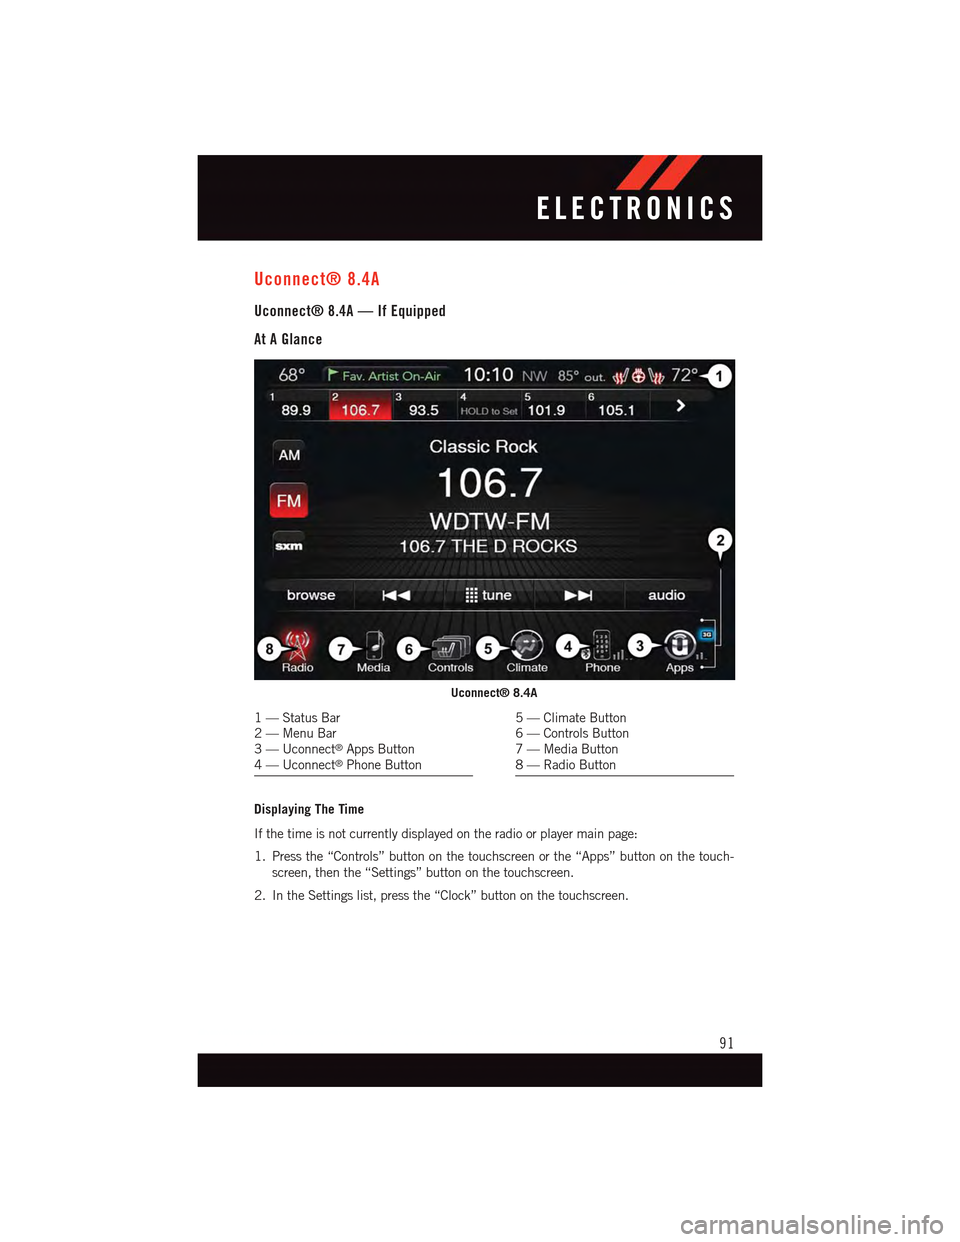
Uconnect® 8.4A
Uconnect® 8.4A — If Equipped
At A Glance
Displaying The Time
If the time is not currently displayed on the radio or player main page:
1. Press the “Controls” button on the touchscreen or the “Apps” button on the touch-
screen, then the “Settings” button on the touchscreen.
2. In the Settings list, press the “Clock” button on the touchscreen.
Uconnect® 8.4A
1—StatusBar2—MenuBar3—Uconnect®Apps Button4—Uconnect®Phone Button
5—ClimateButton6—ControlsButton7—MediaButton8—RadioButton
ELECTRONICS
91
Page 94 of 236
Setting The Time
Model 8.4AN synchronizes time automatically via GPS, so it should not require any time
adjustment. If you do need to set the time manually, follow the instructions below for
Model 8.4A.
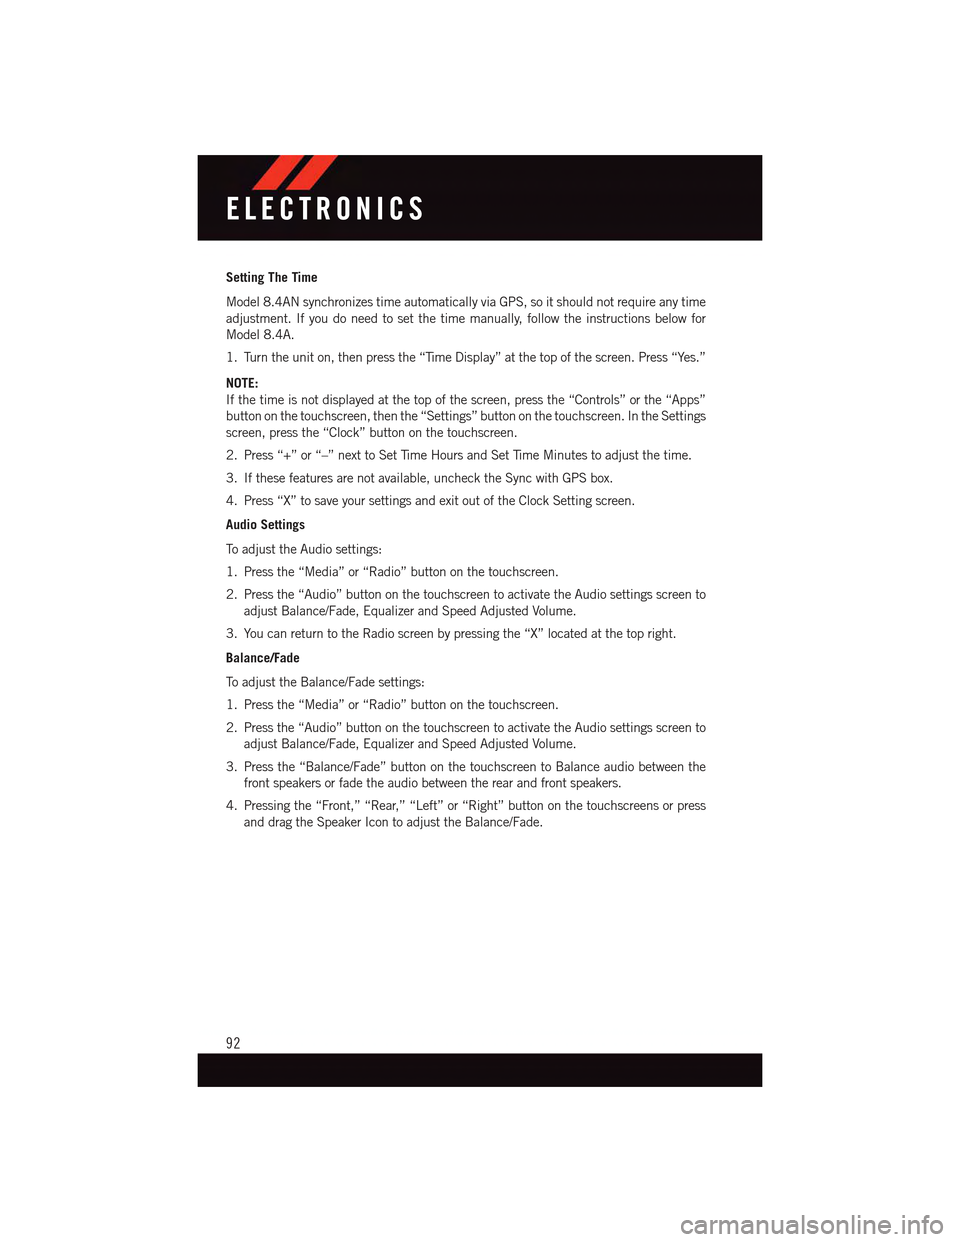
1. Turn the unit on, then press the “Time Display” at the top of the screen. Press “Yes.”
NOTE:
If the time is not displayed at the top of the screen, press the “Controls” or the “Apps”
button on the touchscreen, then the “Settings” button on the touchscreen. In the Settings
screen, press the “Clock” button on the touchscreen.
2. Press “+” or “–” next to Set Time Hours and Set Time Minutes to adjust the time.
3. If these features are not available, uncheck the Sync with GPS box.
4. Press “X” to save your settings and exit out of the Clock Setting screen.
Audio Settings
To a d j u s t t h e A u d i o s e t t i n g s :
1. Press the “Media” or “Radio” button on the touchscreen.
2. Press the “Audio” button on the touchscreen to activate the Audio settings screen to
adjust Balance/Fade, Equalizer and Speed Adjusted Volume.
3. You can return to the Radio screen by pressing the “X” located at the top right.
Balance/Fade
To a d j u s t t h e B a l a n c e / F a d e s e t t i n g s :
1. Press the “Media” or “Radio” button on the touchscreen.
2. Press the “Audio” button on the touchscreen to activate the Audio settings screen to
adjust Balance/Fade, Equalizer and Speed Adjusted Volume.
3. Press the “Balance/Fade” button on the touchscreen to Balance audio between the
front speakers or fade the audio between the rear and front speakers.
4. Pressing the “Front,” “Rear,” “Left” or “Right” button on the touchscreens or press
and drag the Speaker Icon to adjust the Balance/Fade.
ELECTRONICS
92
Page 120 of 236
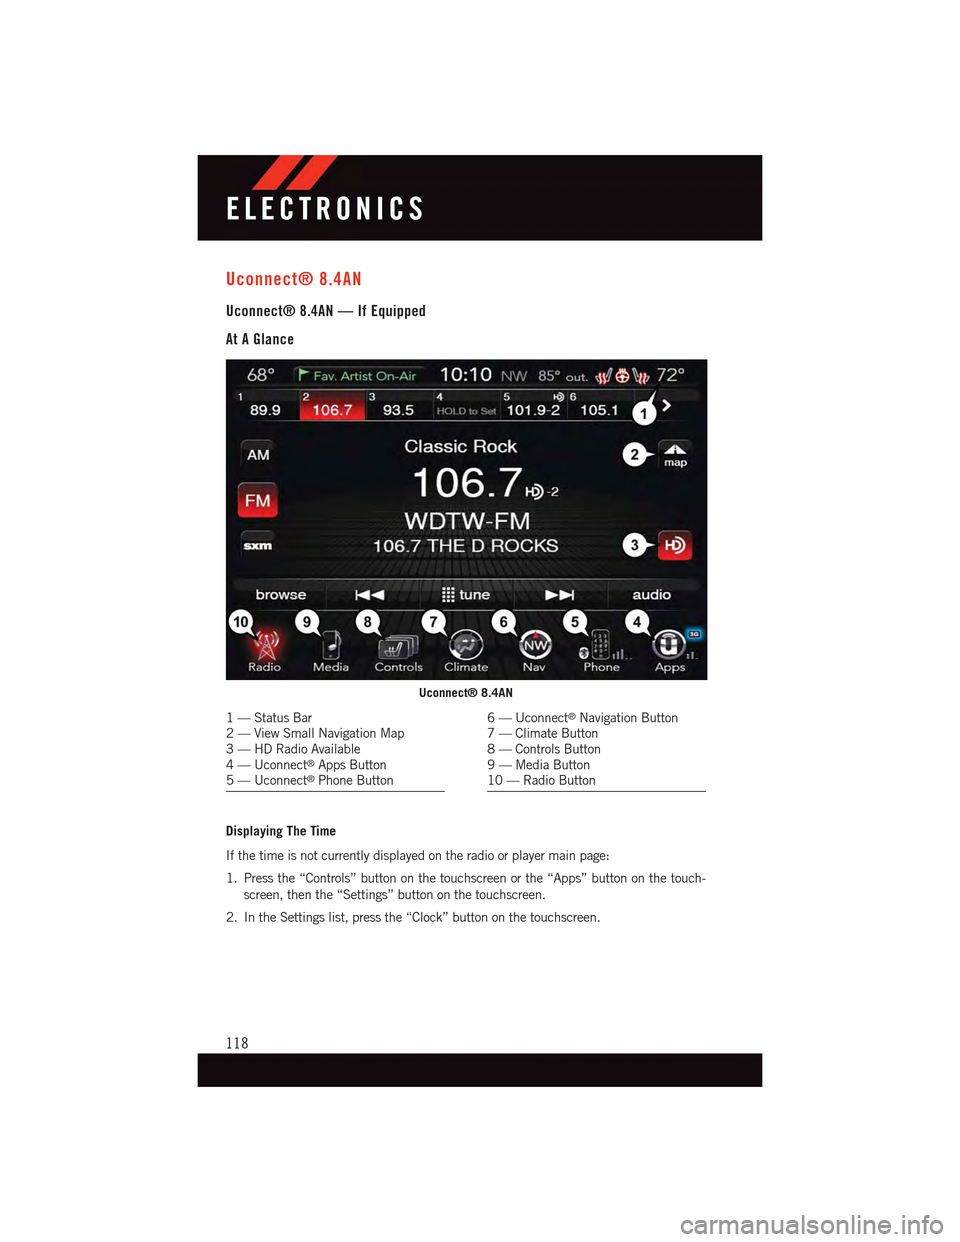
Uconnect® 8.4AN
Uconnect® 8.4AN — If Equipped
At A Glance
Displaying The Time
If the time is not currently displayed on the radio or player main page:
1. Press the “Controls” button on the touchscreen or the “Apps” button on the touch-
screen, then the “Settings” button on the touchscreen.
2. In the Settings list, press the “Clock” button on the touchscreen.
Uconnect® 8.4AN
1—StatusBar2—ViewSmallNavigationMap3—HDRadioAvailable4—Uconnect®Apps Button5—Uconnect®Phone Button
6—Uconnect®Navigation Button7—ClimateButton8—ControlsButton9—MediaButton10 — Radio Button
ELECTRONICS
118
Page 121 of 236
Setting The Time
Model 8.4AN synchronizes time automatically via GPS, so it should not require any time
adjustment. If you do need to set the time manually, follow the instructions below for
Model 8.4A.
1. Turn the unit on, then press the “Time Display” at the top of the screen. Press “Yes.”
NOTE:
If the time is not displayed at the top of the screen, press the “Controls” or the “Apps”
button on the touchscreen, then the “Settings” button on the touchscreen. In the Settings
screen, press the “Clock” button on the touchscreen.
2. Press “+” or “–” next to Set Time Hours and Set Time Minutes to adjust the time.
3. If these features are not available, uncheck the Sync with GPS box.
4. Press “X” to save your settings and exit out of the Clock Setting screen.
Audio Settings
To a d j u s t t h e A u d i o s e t t i n g s :
1. Press the “Media” or “Radio” button on the touchscreen.
2. Press the “Audio” button on the touchscreen to activate the Audio settings screen to
adjust Balance/Fade, Equalizer and Speed Adjusted Volume.
3. You can return to the Radio screen by pressing the “X” located at the top right.
Balance/Fade
To a d j u s t t h e B a l a n c e / F a d e s e t t i n g s :
1. Press the “Media” or “Radio” button on the touchscreen.
2. Press the “Audio” button on the touchscreen to activate the Audio settings screen to
adjust Balance/Fade, Equalizer and Speed Adjusted Volume.
3. Press the “Balance/Fade” button on the touchscreen to Balance audio between the
front speakers or fade the audio between the rear and front speakers.
4. Pressing the “Front,” “Rear,” “Left” or “Right” button on the touchscreens or press
and drag the Speaker Icon to adjust the Balance/Fade.
ELECTRONICS
119
Page 149 of 236
PROGRAMMABLE FEATURES
Driver Information Display (DID)
The DID can be used to view or change the following settings. Push the UPor DOWN
button to scroll through the main menus, then push the RIGHTbutton to scroll
through the submenus of each menu item. Push theBACKbutton to scroll back to a
previous menu or sub menu.
•Speedometer•Audio
•VehicleInfo•Messages
•DriverAssist—IfEquipped•ScreenSetup
•FuelEconomy•SpeedWarning—IfEquipped
•Trip•Diagnostic—IfEquipped
Uconnect® Customer Programmable Features
The Uconnect®system allows you to access Customer Programmable feature settings
such as Display, Units, Voice, Clock, Safety & Driving Assistance, Lights, Doors & Locks,
Auto-On Comfort, Engine Off Options, Audio, Phone/Bluetooth®,SiriusXMSetup,Restore
Settings, Clear Personal Data, System Information, and Compass Settings (5.0 Radio
Only) through buttons on the touchscreen.
NOTE:
If equipped with the Super Track Pak option please refer to the “Drive Mode Supplement”
within your Owners Information Kit for further descriptions of these modes.
•Pressthe“Controls”buttonlocatednearthebottomofthetouchscreen,thenpressthe
“Settings” button on the touchscreen to access the Settings screen. When making a
selection, scroll up or down until the preferred setting is highlighted, then press and
release the preferred setting until a check-mark appears next to the setting, showing
that setting has been selected. The following feature settings are available:
•Display•EngineOffOptions
•Units•Audio
•Voice•Phone/Bluetooth®
•Clock•SiriusXMSetup
•Safety&DrivingAssistance•RestoreSettings
•Lights•ClearPersonalData
•Doors&Locks•SystemInformation
•Auto-OnComfort•Compass(5.0RadioOnly)
Refer to “Uconnect Settings/Customer Programmable Features” found within “Under-
standing Your Instrument Panel” located in your Owner's Manual on the DVD for further
information.
ELECTRONICS
147
Page 170 of 236
Preparations For Jacking
1. Park the vehicle on a firm, level surface as far from the edge of the roadway as possible.
Avoid icy or slippery areas.
2. Turn on the Hazard Warning flasher.
3. Set the parking brake.
4. Place the shift lever into PARK.
5. Turn OFF the ignition.
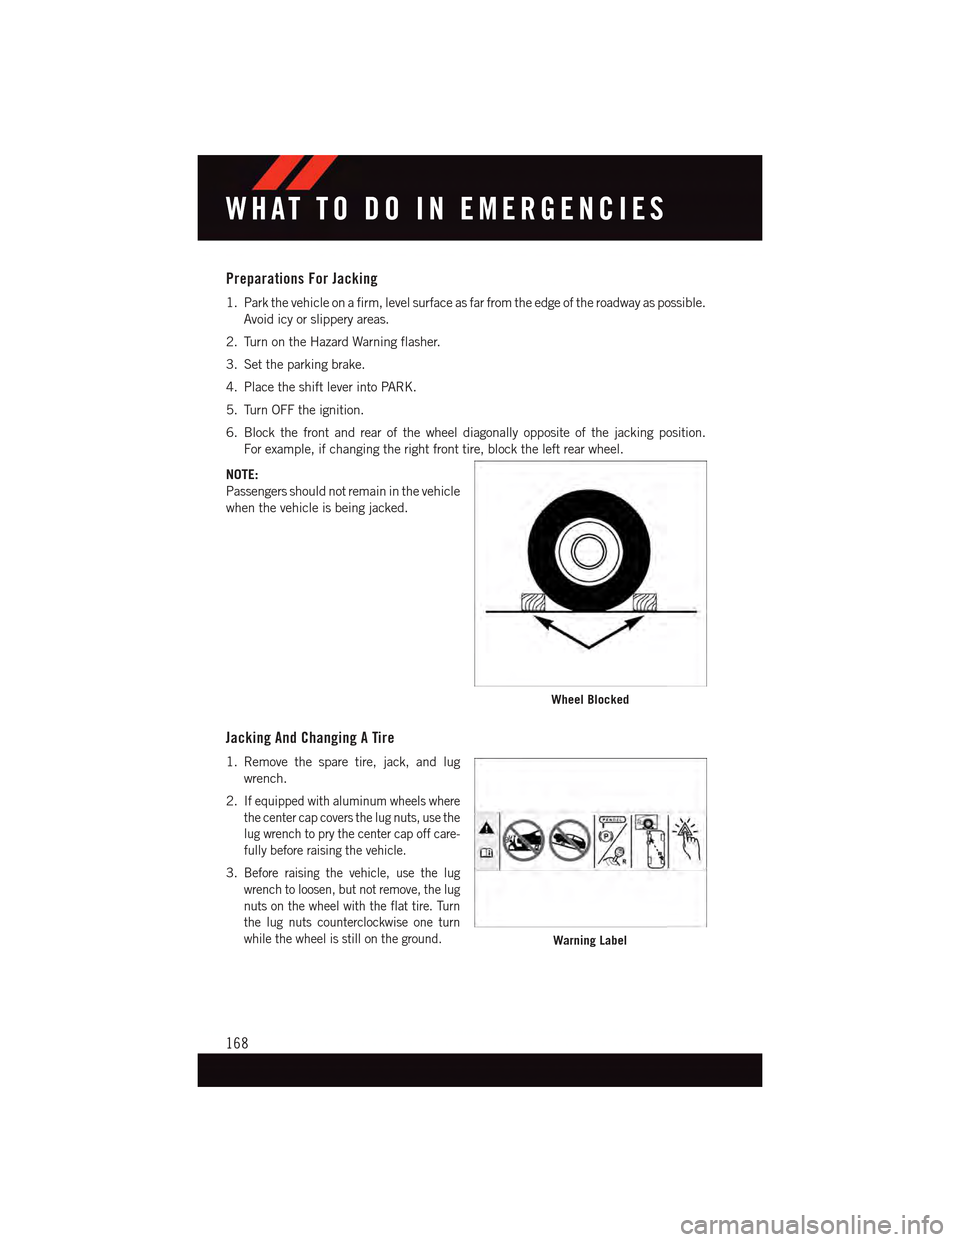
6. Block the front and rear of the wheel diagonally opposite of the jacking position.
For example, if changing the right front tire, block the left rear wheel.
NOTE:
Passengers should not remain in the vehicle
when the vehicle is being jacked.
Jacking And Changing A Tire
1. Remove the spare tire, jack, and lug
wrench.
2.If equipped with aluminum wheels where
the center cap covers the lug nuts, use the
lug wrench to pry the center cap off care-
fully before raising the vehicle.
3.Before raising the vehicle, use the lug
wrench to loosen, but not remove, the lug
nuts on the wheel with the flat tire. Turn
the lug nuts counterclockwise one turn
while the wheel is still on the ground.
Wheel Blocked
Warning Label
WHAT TO DO IN EMERGENCIES
168
Page 171 of 236
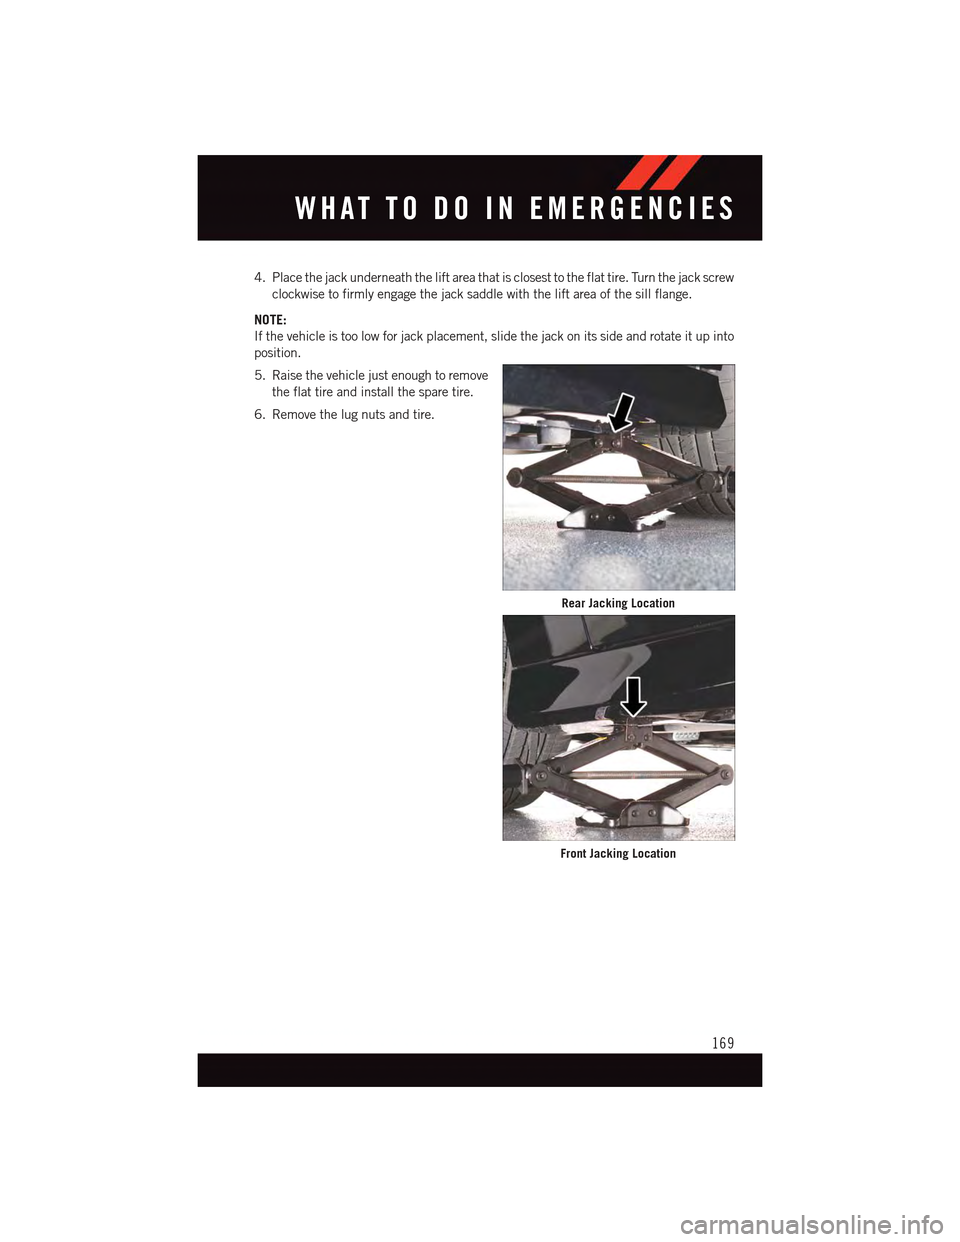
4. Place the jack underneath the lift area that is closest to the flat tire. Turn the jack screw
clockwise to firmly engage the jack saddle with the lift area of the sill flange.
NOTE:
If the vehicle is too low for jack placement, slide the jack on its side and rotate it up into
position.
5. Raise the vehicle just enough to remove
the flat tire and install the spare tire.
6. Remove the lug nuts and tire.
Rear Jacking Location
Front Jacking Location
WHAT TO DO IN EMERGENCIES
169
Page 172 of 236
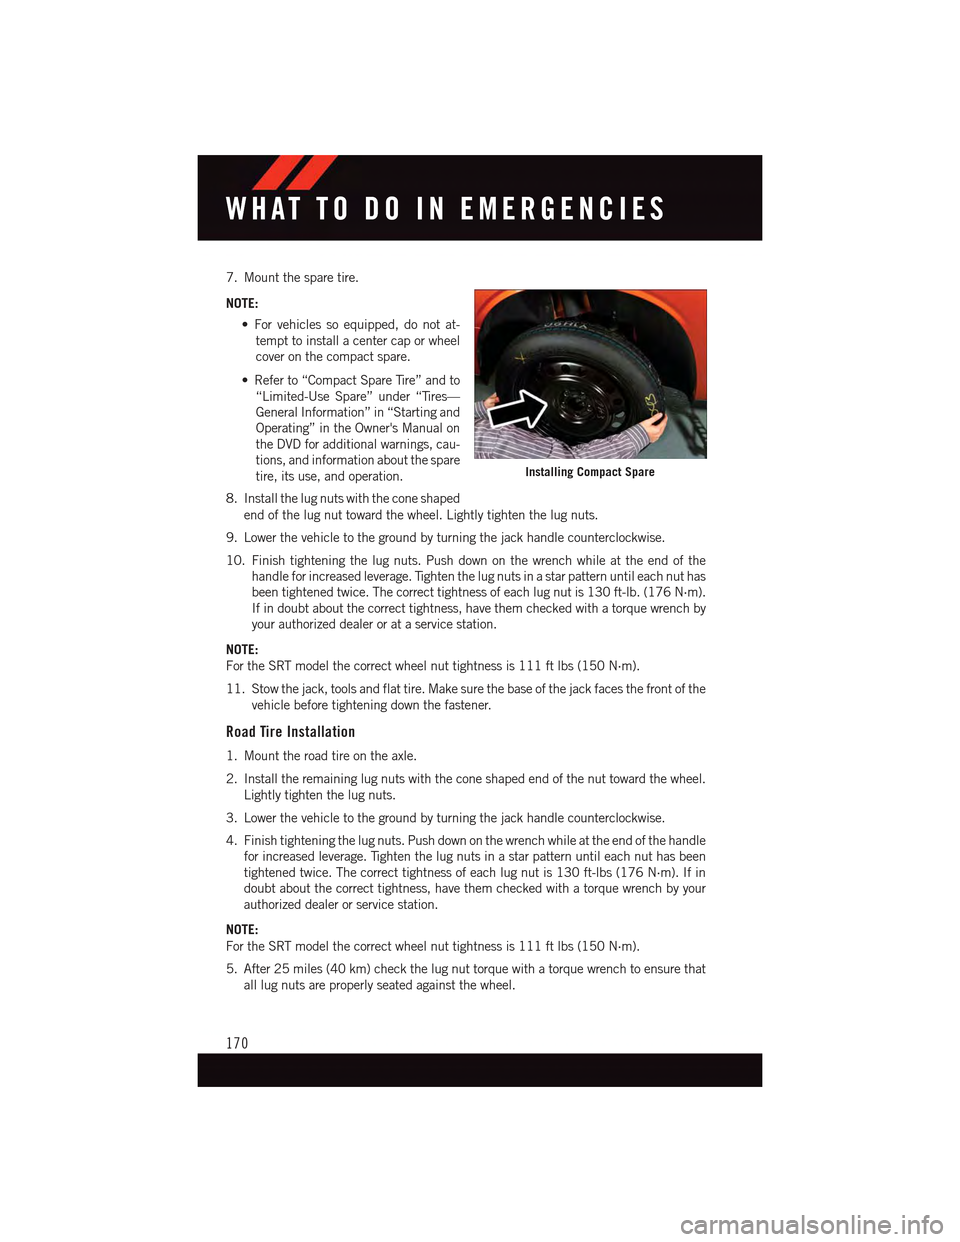
7. Mount the spare tire.
NOTE:
•Forvehiclessoequipped,donotat-
tempt to install a center cap or wheel
cover on the compact spare.
•Referto“CompactSpareTire”andto
“Limited-Use Spare” under “Tires—
General Information” in “Starting and
Operating” in the Owner's Manual on
the DVD for additional warnings, cau-
tions, and information about the spare
tire, its use, and operation.
8. Install the lug nuts with the cone shaped
end of the lug nut toward the wheel. Lightly tighten the lug nuts.
9. Lower the vehicle to the ground by turning the jack handle counterclockwise.
10. Finish tightening the lug nuts. Push down on the wrench while at the end of the
handle for increased leverage. Tighten the lug nuts in a star pattern until each nut has
been tightened twice. The correct tightness of each lug nut is 130 ft-lb. (176 N·m).
If in doubt about the correct tightness, have them checked with a torque wrench by
your authorized dealer or at a service station.
NOTE:
For the SRT model the correct wheel nut tightness is 111 ft lbs (150 N·m).
11. Stow the jack, tools and flat tire. Make sure the base of the jack faces the front of the
vehicle before tightening down the fastener.
Road Tire Installation
1. Mount the road tire on the axle.
2. Install the remaining lug nuts with the cone shaped end of the nut toward the wheel.
Lightly tighten the lug nuts.
3. Lower the vehicle to the ground by turning the jack handle counterclockwise.
4. Finish tightening the lug nuts. Push down on the wrench while at the end of the handle
for increased leverage. Tighten the lug nuts in a star pattern until each nut has been
tightened twice. The correct tightness of each lug nut is 130 ft-lbs (176 N·m). If in
doubt about the correct tightness, have them checked with a torque wrench by your
authorized dealer or service station.
NOTE:
For the SRT model the correct wheel nut tightness is 111 ft lbs (150 N·m).
5. After 25 miles (40 km) check the lug nut torque with a torque wrench to ensure that
all lug nuts are properly seated against the wheel.
Installing Compact Spare
WHAT TO DO IN EMERGENCIES
170
Page 213 of 236
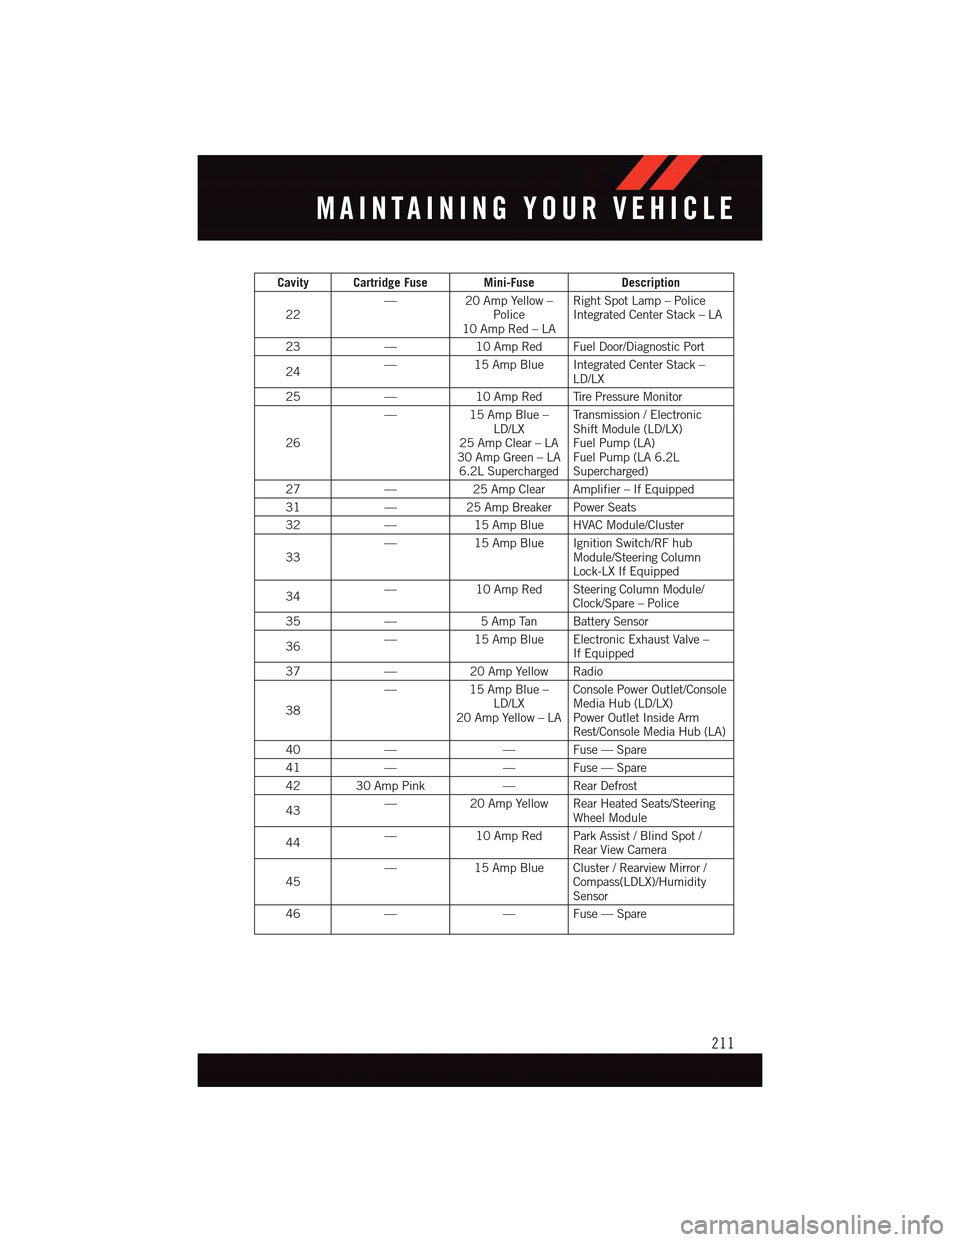
Cavity Cartridge Fuse Mini-FuseDescription
22—20 Amp Yellow –Police10 Amp Red – LA
Right Spot Lamp – PoliceIntegrated Center Stack – LA
23—10 Amp Red Fuel Door/Diagnostic Port
24—15 Amp Blue Integrated Center Stack –LD/LX
25—10 Amp Red Tire Pressure Monitor
26
—15 Amp Blue –LD/LX25 Amp Clear – LA30 Amp Green – LA6.2L Supercharged
Tr a n s m i s s i o n / E l e c t r o n i cShift Module (LD/LX)Fuel Pump (LA)Fuel Pump (LA 6.2LSupercharged)
27—25 Amp Clear Amplifier – If Equipped
31—25 Amp Breaker Power Seats
32—15 Amp Blue HVAC Module/Cluster
33—15 Amp Blue Ignition Switch/RF hubModule/Steering ColumnLock-LX If Equipped
34—10 Amp Red Steering Column Module/Clock/Spare – Police
35—5AmpTan BatterySensor
36—15 Amp Blue Electronic Exhaust Valve –If Equipped
37—20 Amp Yellow Radio
38
—15 Amp Blue –LD/LX20 Amp Yellow – LA
Console Power Outlet/ConsoleMedia Hub (LD/LX)Power Outlet Inside ArmRest/Console Media Hub (LA)
40——Fuse—Spare
41——Fuse—Spare
42 30 Amp Pink—RearDefrost
43—20 Amp Yellow Rear Heated Seats/SteeringWheel Module
44—10 Amp Red Park Assist / Blind Spot /Rear View Camera
45—15 Amp Blue Cluster / Rearview Mirror /Compass(LDLX)/HumiditySensor
46——Fuse—Spare
MAINTAINING YOUR VEHICLE
211