start stop button DODGE CHARGER 2015 7.G User Guide
[x] Cancel search | Manufacturer: DODGE, Model Year: 2015, Model line: CHARGER, Model: DODGE CHARGER 2015 7.GPages: 236, PDF Size: 35.67 MB
Page 8 of 236
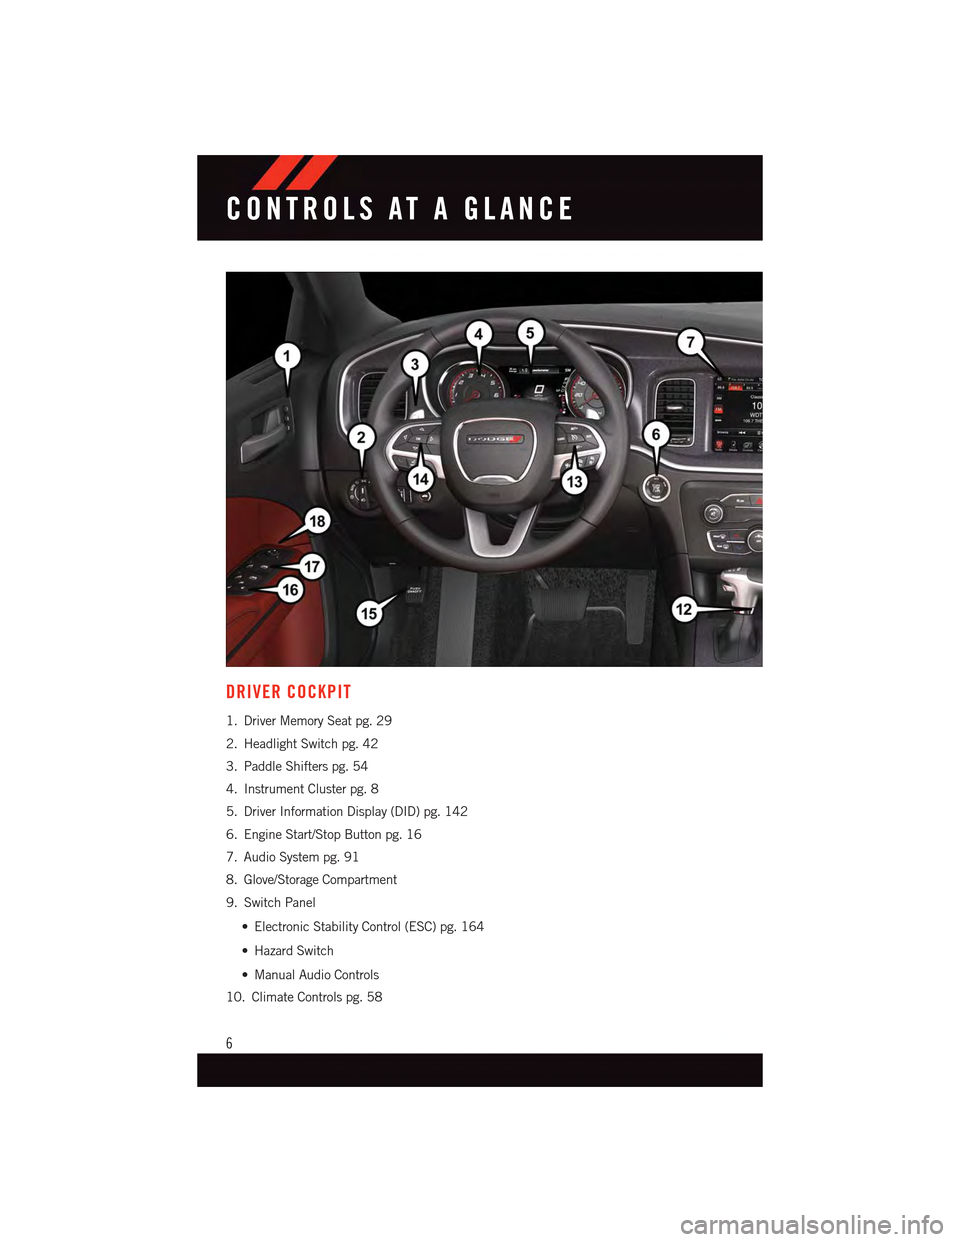
DRIVER COCKPIT
1. Driver Memory Seat pg. 29
2. Headlight Switch pg. 42
3. Paddle Shifters pg. 54
4. Instrument Cluster pg. 8
5. Driver Information Display (DID) pg. 142
6. Engine Start/Stop Button pg. 16
7. Audio System pg. 91
8. Glove/Storage Compartment
9. Switch Panel
•ElectronicStabilityControl(ESC)pg.164
•HazardSwitch
•ManualAudioControls
10. Climate Controls pg. 58
CONTROLS AT A GLANCE
6
Page 16 of 236
KEYLESS ENTER-N-GO™
The Keyless Enter-N-Go™ system is an enhancement to the vehicle's Key Fob. This
feature allows you to lock and unlock the vehicle's door(s) and trunk without having to
push the Key Fob lock or unlock buttons as well as starting and stopping the vehicle with
the push of a button.
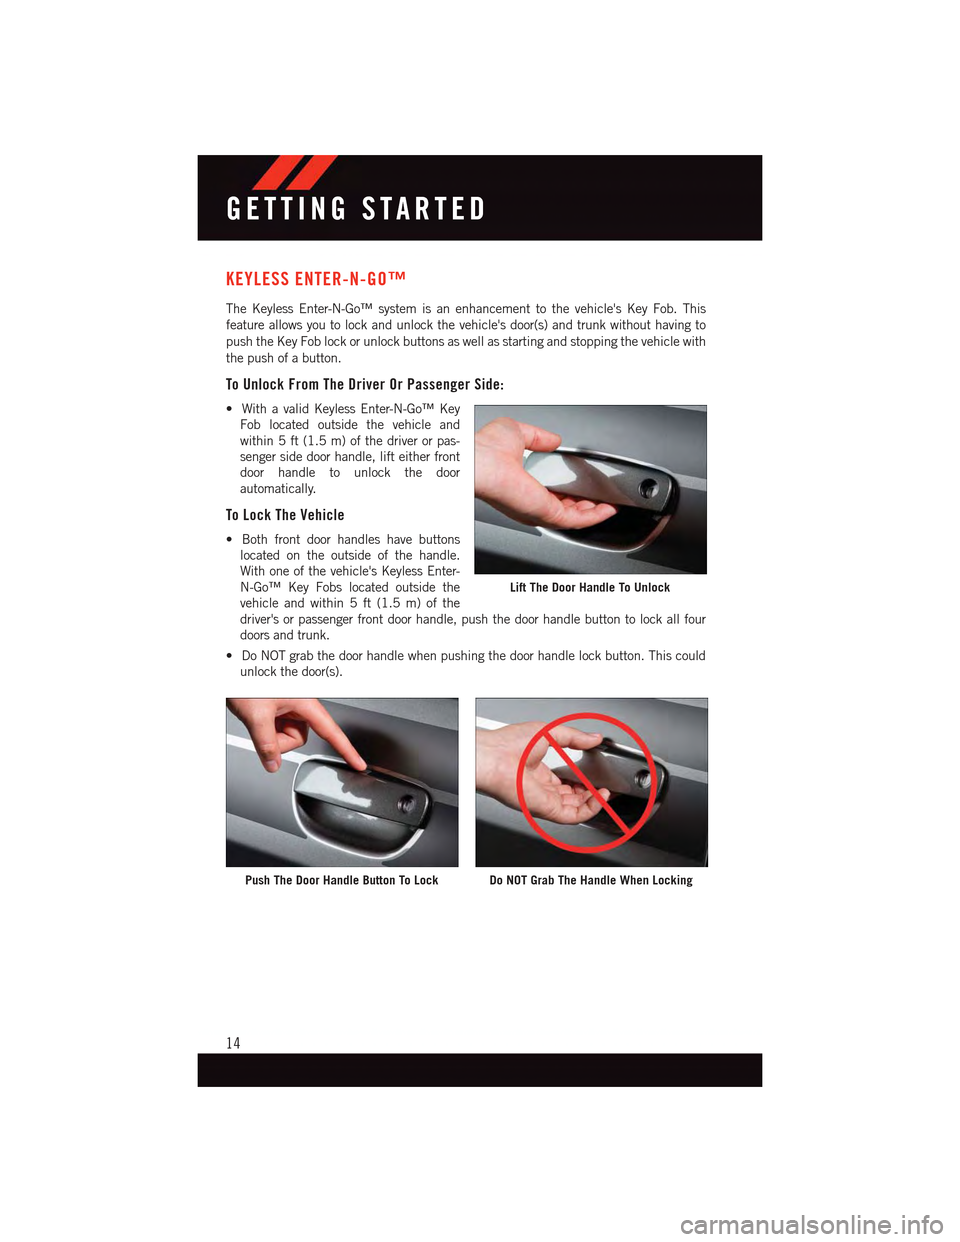
To Unlock From The Driver Or Passenger Side:
•WithavalidKeylessEnter-N-Go™Key
Fob located outside the vehicle and
within 5 ft (1.5 m) of the driver or pas-
senger side door handle, lift either front
door handle to unlock the door
automatically.
To Lock The Vehicle
•Bothfrontdoorhandleshavebuttons
located on the outside of the handle.
With one of the vehicle's Keyless Enter-
N-Go™ Key Fobs located outside the
vehicle and within 5 ft (1.5 m) of the
driver's or passenger front door handle, push the door handle button to lock all four
doors and trunk.
•DoNOTgrabthedoorhandlewhenpushingthedoorhandlelockbutton.Thiscould
unlock the door(s).
Lift The Door Handle To Unlock
Push The Door Handle Button To LockDo NOT Grab The Handle When Locking
GETTING STARTED
14
Page 18 of 236
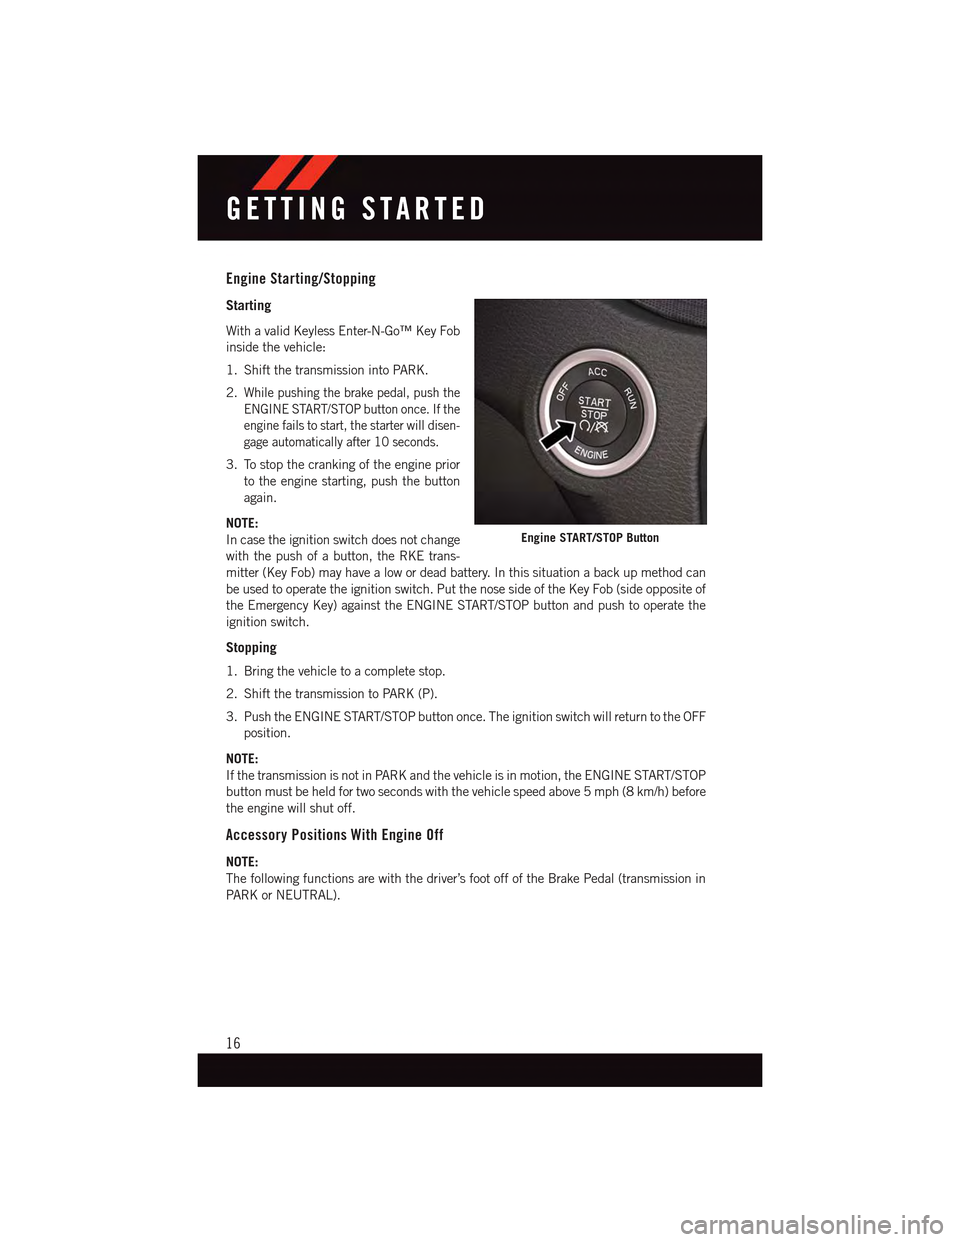
Engine Starting/Stopping
Starting
With a valid Keyless Enter-N-Go™ Key Fob
inside the vehicle:
1. Shift the transmission into PARK.
2.While pushing the brake pedal, push the
ENGINE START/STOP button once. If the
engine fails to start, the starter will disen-
gage automatically after 10 seconds.
3. To stop the cranking of the engine prior
to the engine starting, push the button
again.
NOTE:
In case the ignition switch does not change
with the push of a button, the RKE trans-
mitter (Key Fob) may have a low or dead battery. In this situation a back up method can
be used to operate the ignition switch. Put the nose side of the Key Fob (side opposite of
the Emergency Key) against the ENGINE START/STOP button and push to operate the
ignition switch.
Stopping
1. Bring the vehicle to a complete stop.
2. Shift the transmission to PARK (P).
3. Push the ENGINE START/STOP button once. The ignition switch will return to the OFF
position.
NOTE:
If the transmission is not in PARK and the vehicle is in motion, the ENGINE START/STOP
button must be held for two seconds with the vehicle speed above 5 mph (8 km/h) before
the engine will shut off.
Accessory Positions With Engine Off
NOTE:
The following functions are with the driver’s foot off of the Brake Pedal (transmission in
PA R K o r N E U T R A L ) .
Engine START/STOP Button
GETTING STARTED
16
Page 19 of 236
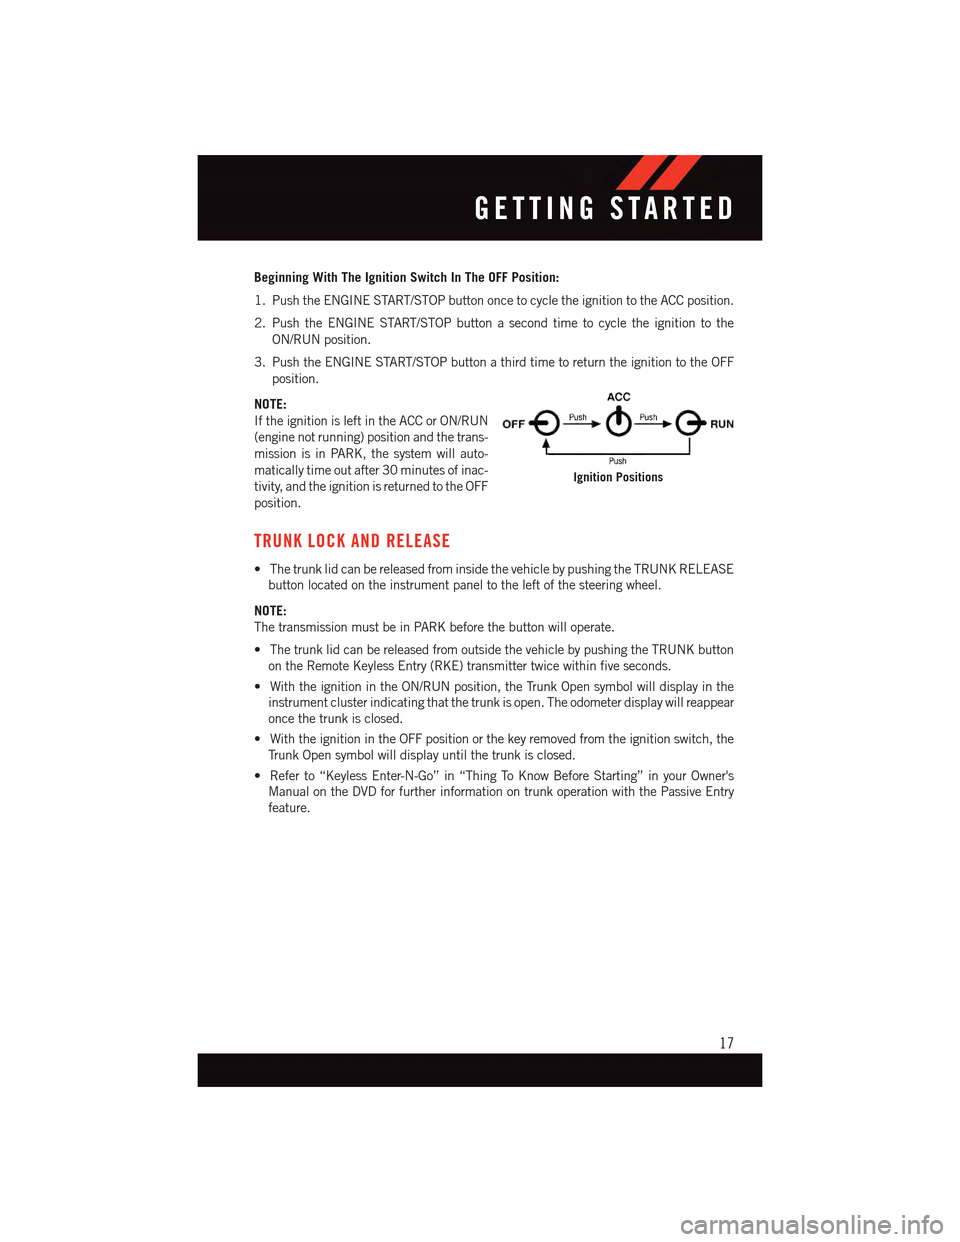
Beginning With The Ignition Switch In The OFF Position:
1. Push the ENGINE START/STOP button once to cycle the ignition to the ACC position.
2. Push the ENGINE START/STOP button a second time to cycle the ignition to the
ON/RUN position.
3. Push the ENGINE START/STOP button a third time to return the ignition to the OFF
position.
NOTE:
If the ignition is left in the ACC or ON/RUN
(engine not running) position and the trans-
mission is in PARK, the system will auto-
matically time out after 30 minutes of inac-
tivity, and the ignition is returned to the OFF
position.
TRUNK LOCK AND RELEASE
•ThetrunklidcanbereleasedfrominsidethevehiclebypushingtheTRUNKRELEASE
button located on the instrument panel to the left of the steering wheel.
NOTE:
The transmission must be in PARK before the button will operate.
•ThetrunklidcanbereleasedfromoutsidethevehiclebypushingtheTRUNKbutton
on the Remote Keyless Entry (RKE) transmitter twice within five seconds.
•WiththeignitionintheON/RUNposition,theTrunkOpensymbolwilldisplayinthe
instrument cluster indicating that the trunk is open. The odometer display will reappear
once the trunk is closed.
•WiththeignitionintheOFFpositionorthekeyremovedfromtheignitionswitch,the
Tr u n k O p e n s y m b o l w i l l d i s p l a y u n t i l t h e t r u n k i s c l o s e d .
•Referto“KeylessEnter-N-Go”in“ThingToKnowBeforeStarting”inyourOwner's
Manual on the DVD for further information on trunk operation with the Passive Entry
feature.
Ignition Positions
GETTING STARTED
17
Page 20 of 236
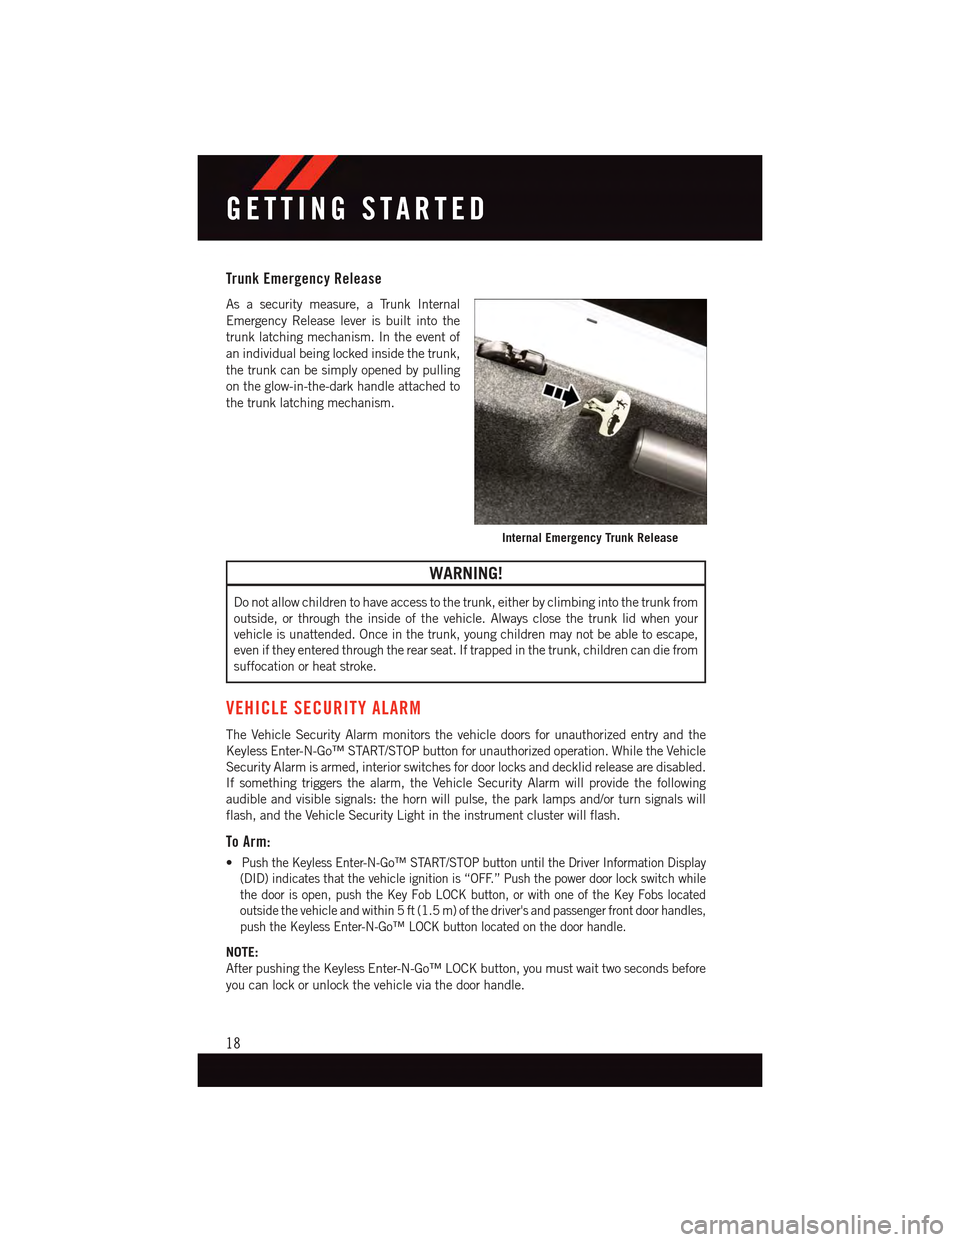
Trunk Emergency Release
As a security measure, a Trunk Internal
Emergency Release lever is built into the
trunk latching mechanism. In the event of
an individual being locked inside the trunk,
the trunk can be simply opened by pulling
on the glow-in-the-dark handle attached to
the trunk latching mechanism.
WARNING!
Do not allow children to have access to the trunk, either by climbing into the trunk from
outside, or through the inside of the vehicle. Always close the trunk lid when your
vehicle is unattended. Once in the trunk, young children may not be able to escape,
even if they entered through the rear seat. If trapped in the trunk, children can die from
suffocation or heat stroke.
VEHICLE SECURITY ALARM
The Vehicle Security Alarm monitors the vehicle doors for unauthorized entry and the
Keyless Enter-N-Go™ START/STOP button for unauthorized operation. While the Vehicle
Security Alarm is armed, interior switches for door locks and decklid release are disabled.
If something triggers the alarm, the Vehicle Security Alarm will provide the following
audible and visible signals: the horn will pulse, the park lamps and/or turn signals will
flash, and the Vehicle Security Light in the instrument cluster will flash.
To Arm:
•Push the Keyless Enter-N-Go™ START/STOP button until the Driver Information Display
(DID) indicates that the vehicle ignition is “OFF.” Push the power door lock switch while
the door is open, push the Key Fob LOCK button, or with one of the Key Fobs located
outside the vehicle and within 5 ft (1.5 m) of the driver's and passenger front door handles,
push the Keyless Enter-N-Go™ LOCK button located on the door handle.
NOTE:
After pushing the Keyless Enter-N-Go™ LOCK button, you must wait two seconds before
you can lock or unlock the vehicle via the door handle.
Internal Emergency Trunk Release
GETTING STARTED
18
Page 21 of 236
To Disarm:
•PushtheKeyFobUNLOCKbuttonorwithoneoftheKeyFobslocatedoutsidethe
vehicle and within 5 ft (1.5 m) of the driver's and passenger front door handles, grab the
Keyless Enter-N-Go™ door handle and enter the vehicle, then push the Keyless
Enter-N-Go™ START/STOP button (requires at least one valid Key Fob in the vehicle).
SEAT BELT SYSTEMS
Lap/Shoulder Belts
•Allseatingpositionsinyourvehicleareequippedwithlap/shoulderbelts.
•Besureeveryoneinyourvehicleisinaseatandusingaseatbeltproperly.
•Position the lap belt so that it is snug and lies low across your hips, below your abdomen.
To r e m o v e s l a c k i n t h e l a p b e l t p o r t i o n , p u l l u p o n t h e s h o u l d e r b e l t . To l o o s e n t h e l a p b e l t
if it is too tight, tilt the latch plate and pull on the lap belt. A snug seat belt reduces the risk
of sliding under the seat belt in a collision.
•Positiontheshoulderbeltacrosstheshoulderandchestwithminimal,ifanyslackso
that it is comfortable and not resting on your neck. The retractor will withdraw any slack
in the shoulder belt.
Seat Belt Pretensioner
•Thefrontseatbeltsystemisequippedwithpretensioningdevicesthataredesignedto
remove slack from the seat belt in the event of a collision.
•Adeployedpretensioneroradeployedairbagmustbereplacedimmediately.
WARNING!
•Inacollision,youandyourpassengerscansuffermuchgreaterinjuriesifyouare
not properly buckled up. You can strike the interior of your vehicle or other
passengers, or you can be thrown out of the vehicle. Always be sure you and others
in your vehicle are buckled up properly.
•Ashoulderbeltplacedbehindyouwillnotprotectyoufrominjuryduringacollision.
Yo u a r e m o r e l i k e l y t o h i t y o u r h e a d i n a c o l l i s i o n i f y o u d o n o t w e a r y o u r s h o u l d e r
belt. The lap and shoulder belt are meant to be used together.
•Aseatbeltthatistooloosewillnotprotectyouproperly.Inasuddenstop,youcould
move too far forward, increasing the possibility of injury. Wear your seat belt snugly.
•Afrayedortornseatbeltcouldripapartinacollisionandleaveyouwithno
protection. Inspect the seat belt system periodically, checking for cuts, frays, or
loose parts. Damaged parts must be replaced immediately. Do not disassemble or
modify the system. Seat belt assemblies must be replaced after a collision.
GETTING STARTED
19
Page 29 of 236
HEAD RESTRAINTS
Head restraints are designed to reduce the risk of injury by restricting head movement in
the event of a rear impact. Head restraints should be adjusted so that the top of the head
restraint is located above the top of your ear.
WARNING!
The head restraints for all occupants must be properly adjusted prior to operating the
vehicle or occupying a seat. Head restraints should never be adjusted while the vehicle
is in motion. Driving a vehicle with the head restraints improperly adjusted or removed
could cause serious injury or death in the event of a collision.
NOTE:
Do not reposition the head restraint 180 degrees to the incorrect position in an attempt to
gain additional clearance to the back of the head.
Reactive Head Restraints — Front Seats
The front driver and passenger seats are equipped with Reactive Head Restraints (RHR).
In the event of a rear impact the RHRs will automatically extend forward minimizing the
gap between the back of the occupants head and the RHR.
The RHRs will automatically return to their normal position following a rear impact. If the
RHRs do not return to their normal position see your authorized dealer immediately.
To r a i s e t h e h e a d r e s t r a i n t , p u l l u p w a r d o n t h e h e a d r e s t r a i n t . To l o w e r t h e h e a d r e s t r a i n t ,
push the adjustment button located at the base of the head restraint and push downward
on the head restraint.
NOTE:
To r e m o v e t h e h e a d r e s t r a i n t , r a i s e i t a s f a r a s i t c a n g o t h e n p u s h t h e r e l e a s e b u t t o n a n d t h e
adjustment button at the base of each post while pulling the head restraint up. To reinstall
the head restraint, put the head restraint posts into the holes and push downward. Then
adjust the head restraint to the appropriate height.
WARNING!
•Alooseheadrestraintthrownforwardinacollisionorhardstopcouldcauseserious
injury or death to occupants of the vehicle. Always securely stow removed head
restraints in a location outside the occupant compartment.
•ALLtheheadrestraintsMUSTbereinstalledinthevehicletoproperlyprotectthe
occupants. Follow the re-installation instructions above prior to operating the
vehicle or occupying a seat.
•DonotplaceitemsoverthetopoftheReactiveHeadRestraint,suchascoats,seat
covers or portable DVD players. These items may interfere with the operation of the
Reactive Head Restraint in the event of a collision and could result in serious injury
or death.
GETTING STARTED
27
Page 55 of 236
EIGHT-SPEED AUTOMATIC TRANSMISSION
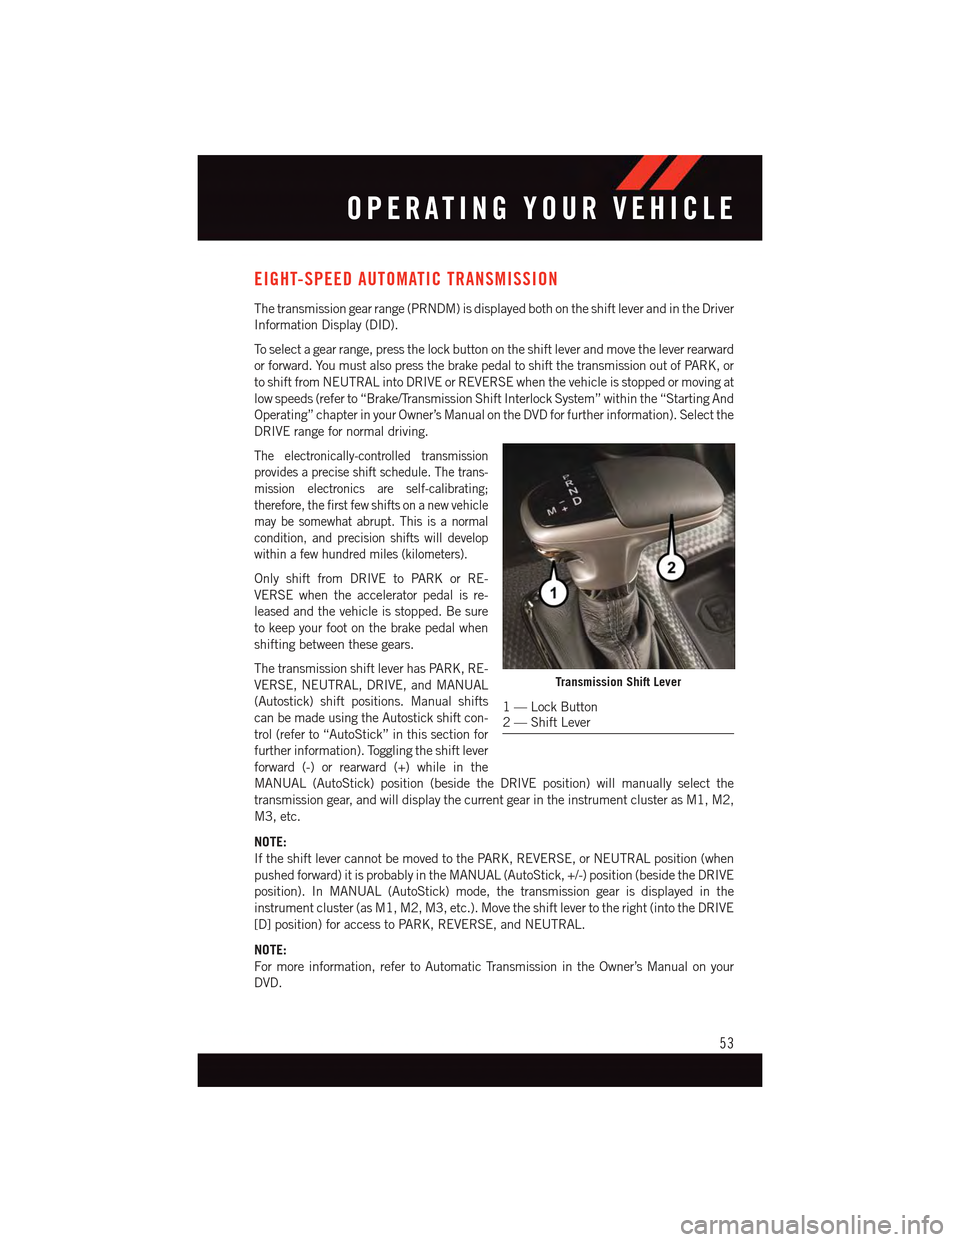
The transmission gear range (PRNDM) is displayed both on the shift lever and in the Driver
Information Display (DID).
To s e l e c t a g e a r r a n g e , p r e s s t h e l o c k b u t t o n o n t h e s h i f t l e v e r a n d m o v e t h e l e v e r r e a r w a r d
or forward. You must also press the brake pedal to shift the transmission out of PARK, or
to shift from NEUTRAL into DRIVE or REVERSE when the vehicle is stopped or moving at
low speeds (refer to “Brake/Transmission Shift Interlock System” within the “Starting And
Operating” chapter in your Owner’s Manual on the DVD for further information). Select the
DRIVE range for normal driving.
The electronically-controlled transmission
provides a precise shift schedule. The trans-
mission electronics are self-calibrating;
therefore, the first few shifts on a new vehicle
may be somewhat abrupt. This is a normal
condition, and precision shifts will develop
within a few hundred miles (kilometers).
Only shift from DRIVE to PARK or RE-
VERSE when the accelerator pedal is re-
leased and the vehicle is stopped. Be sure
to keep your foot on the brake pedal when
shifting between these gears.
The transmission shift lever has PARK, RE-
VERSE, NEUTRAL, DRIVE, and MANUAL
(Autostick) shift positions. Manual shifts
can be made using the Autostick shift con-
trol (refer to “AutoStick” in this section for
further information). Toggling the shift lever
forward (-) or rearward (+) while in the
MANUAL (AutoStick) position (beside the DRIVE position) will manually select the
transmission gear, and will display the current gear in the instrument cluster as M1, M2,
M3, etc.
NOTE:
If the shift lever cannot be moved to the PARK, REVERSE, or NEUTRAL position (when
pushed forward) it is probably in the MANUAL (AutoStick, +/-) position (beside the DRIVE
position). In MANUAL (AutoStick) mode, the transmission gear is displayed in the
instrument cluster (as M1, M2, M3, etc.). Move the shift lever to the right (into the DRIVE
[D] position) for access to PARK, REVERSE, and NEUTRAL.
NOTE:
For more information, refer to Automatic Transmission in the Owner’s Manual on your
DVD.
Transmission Shift Lever
1—LockButton2—ShiftLever
OPERATING YOUR VEHICLE
53
Page 57 of 236
•Thetransmissionwillautomaticallydownshiftasthevehicleslows(topreventengine
lugging) and will display the current gear.
•Thetransmissionwillautomaticallydownshifttofirstgearwhencomingtoastop.After
astop,thedrivershouldmanuallyupshift(+)thetransmissionasthevehicleis
accelerated.
•Youcanstartout,fromastop,infirstorsecondgear.Tapping(+)(atastop)willallow
starting in second gear. Starting out in second gear can be helpful in snowy or icy
conditions.
•Ifarequesteddownshiftwouldcausetheenginetoover-speed,thatshiftwillnotoccur.
•Thesystemwillignoreattemptstoupshiftattoolowofavehiclespeed.
•Holdingthe(-)paddledepressed(ifequipped),orholdingtheshiftleverinthe(-)
position, will downshift the transmission to the lowest gear possible at the current
speed.
•TransmissionshiftingwillbemorenoticeablewhenAutoStickisengaged.
•Thesystemmayreverttoautomaticshiftmodeifafaultoroverheatconditionis
detected.
To d i s e n g a g e A u t o S t i c k m o d e , r e t u r n t h e s h i f t l e v e r t o t h e D R I V E p o s i t i o n , o r p r e s s a n d
hold the (+) shift paddle (if equipped, and the shift lever is already in DRIVE) until “D” is
once again indicated in the instrument cluster. You can shift in or out of the AutoStick
mode at any time without taking your foot off the accelerator pedal.
WARNING!
Do not downshift for additional engine braking on a slippery surface. The drive wheels
could lose their grip and the vehicle could skid, causing a collision or personal injury.
SPORT MODE — WITHOUT PERFORMANCE CONTROL
Yo u r v e h i c l e i s e q u i p p e d w i t h a S p o r t M o d e f e a t u r e . T h i s m o d e i s a c o n f i g u r a t i o n s e t u p
for typical enthusiast driving. The engine, transmission (when equipped with automatic
transmission), and steering systems are all set to their SPORT settings. Sport Mode will
provide improved throttle response and modified shifting for an enhanced driving
experience, as well the greatest amount of steering feel. This mode may be activated and
deactivated by pressing the Sport button on the instrument panel switch bank.
For vehicles equipped with Drive Modes, refer to “Performance Control — If Equipped”
within “Uconnect Settings” in “Understanding Your Instrument Panel” chapter on your
DVD or in the “Drive Mode Supplement” within your Owners information kit for further
information.
OPERATING YOUR VEHICLE
55
Page 148 of 236
Lap Timer
When selected, the Lap Timer page will show the timer always at 0:00.00 with the
previous Best and Last time data (unless the driver has cleared it via hold to Reset).
•PushingOKwill start “current” timer from 0:00.0.
•WhenOKis pushed, the times are updated accordingly.
•AssoonasthedriverexitstheLapTimerpages,the“current”timerwillstopandthe
time will be reset to 0:00.00.
•IfthedriverstaysontheLapTimerpages,the“current”timerwillresetto0:00.0when
ignition is placed in the off position, or ignition placed in the ON position (or will roll
over at 59:59.99 if ever possible).
•EachtimethedriverpushesOKfor a Lap that current time populates, the Last time and
also populates the 1st (top) space on the Timer History page the current time resets to
0:00.0 at every push of theOKbutton.
•Thetimerwillstopwhenthedrivernavigatesawayfromthispage.
Lap History
When selected, this screen displays the Lap History, and will color highlight the time that
is the best time from the Timer Page.
•EachtimethedriverpushestheOKbutton(whileontheLapTimerpage)thecurrent
Lap Time populates the 1st spot and the rest of the data shifts down.
•ColorwillindicatethetimethatisthebesttimefromtheTimerPage.
•HoldingtheOKbutton only resets the page you are on.
•LapHistorypageisastaticdisplayoflaptimesonly.
Top Speed
When selected, this screen displays the Top Speed since last reset:
•Populatesatopspeedfromfirstdrivecycleandeverytimethatspeedisexceededthat
number is stored here unless/until the driver resets the screen.
•Latchingoverignitioncycles.
•Unitswillchangewiththeglobalchangeinunits.
ELECTRONICS
146