DODGE CHARGER 2018 Owners Manual
Manufacturer: DODGE, Model Year: 2018, Model line: CHARGER, Model: DODGE CHARGER 2018Pages: 553, PDF Size: 5.3 MB
Page 451 of 553
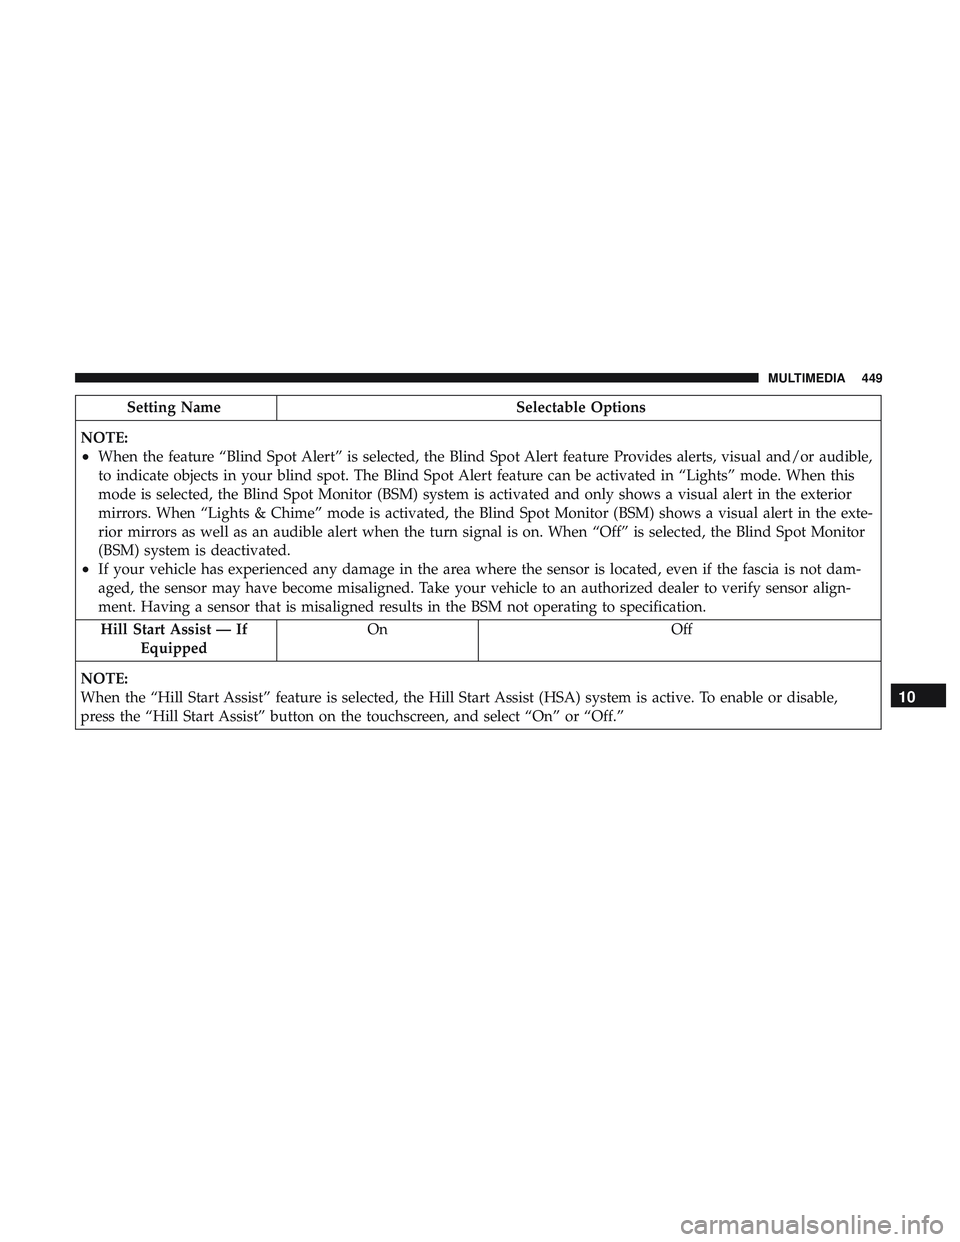
Setting NameSelectable Options
NOTE:
•When the feature “Blind Spot Alert” is selected, the Blind Spot Alert feature Provides alerts, visual and/or audible,
to indicate objects in your blind spot. The Blind Spot Alert feature can be activated in “Lights” mode. When this
mode is selected, the Blind Spot Monitor (BSM) system is activated and only shows a visual alert in the exterior
mirrors. When “Lights & Chime” mode is activated, the Blind Spot Monitor (BSM) shows a visual alert in the exte-
rior mirrors as well as an audible alert when the turn signal is on. When “Off” is selected, the Blind Spot Monitor
(BSM) system is deactivated.
•If your vehicle has experienced any damage in the area where the sensor is located, even if the fascia is not dam-
aged, the sensor may have become misaligned. Take your vehicle to an authorized dealer to verify sensor align-
ment. Having a sensor that is misaligned results in the BSM not operating to specification. Hill Start Assist — If Equipped On Off
NOTE:
When the “Hill Start Assist” feature is selected, the Hill Start Assist (HSA) system is active. To enable or disable,
press the “Hill Start Assist” button on the touchscreen, and select “On” or “Off.”
10
MULTIMEDIA 449
Page 452 of 553
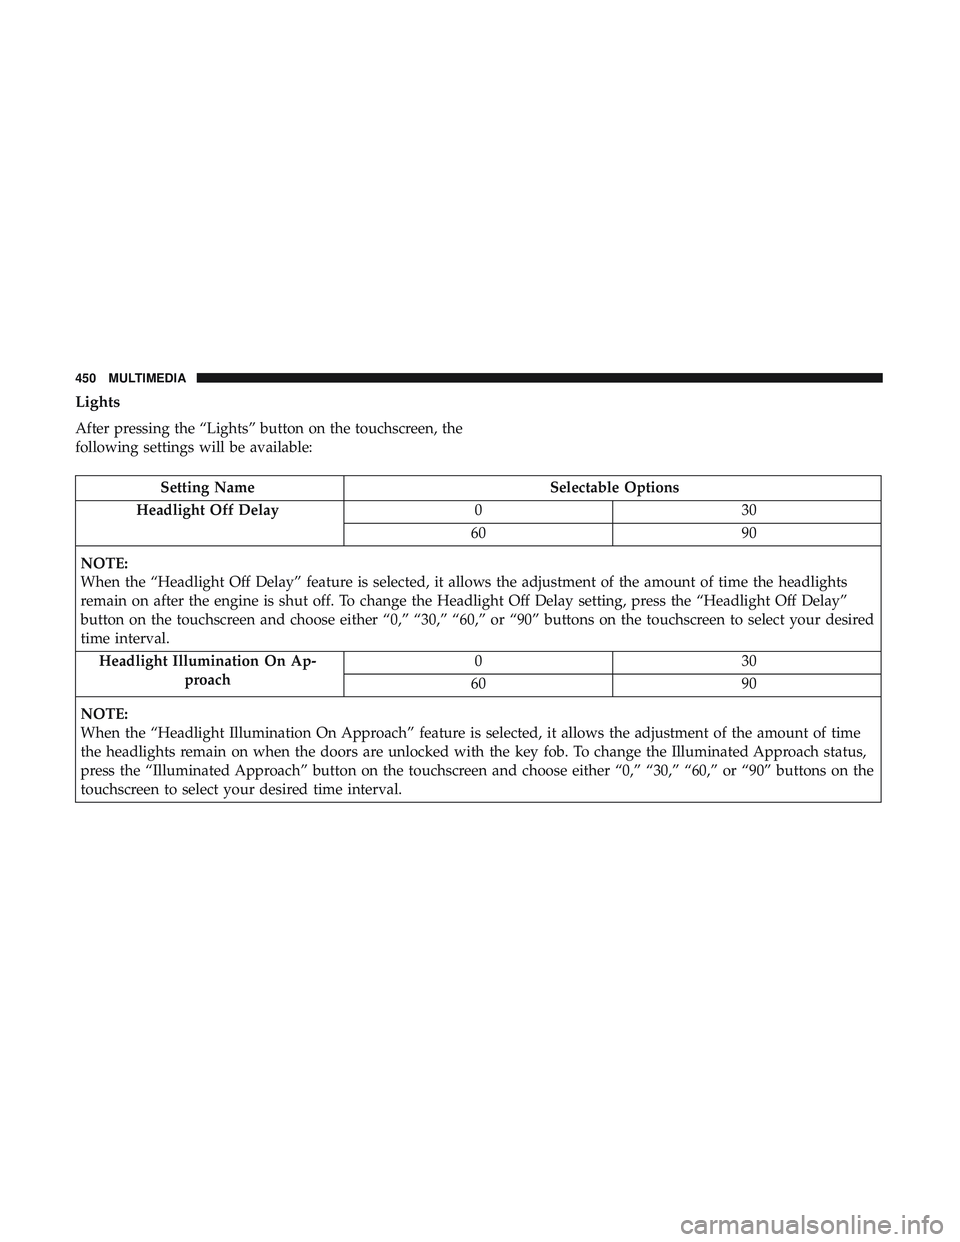
Lights
After pressing the “Lights” button on the touchscreen, the
following settings will be available:
Setting NameSelectable Options
Headlight Off Delay 030
60 90
NOTE:
When the “Headlight Off Delay” feature is selected, it allows the adjustment of the amount of time the headlights
remain on after the engine is shut off. To change the Headlight Off Delay setting, press the “Headlight Off Delay”
button on the touchscreen and choose either “0,” “30,” “60,” or “90” buttons on the touchscreen to select your desired
time interval. Headlight Illumination On Ap- proach 03
0
60 90
NOTE:
When the “Headlight Illumination On Approach” feature is selected, it allows the adjustment of the amount of time
the headlights remain on when the doors are unlocked with the key fob. To change the Illuminated Approach status,
press the “Illuminated Approach” button on the touchscreen and choose either “0,” “30,” “60,” or “90” buttons on the
touchscreen to select your desired time interval.
450 MULTIMEDIA
Page 453 of 553
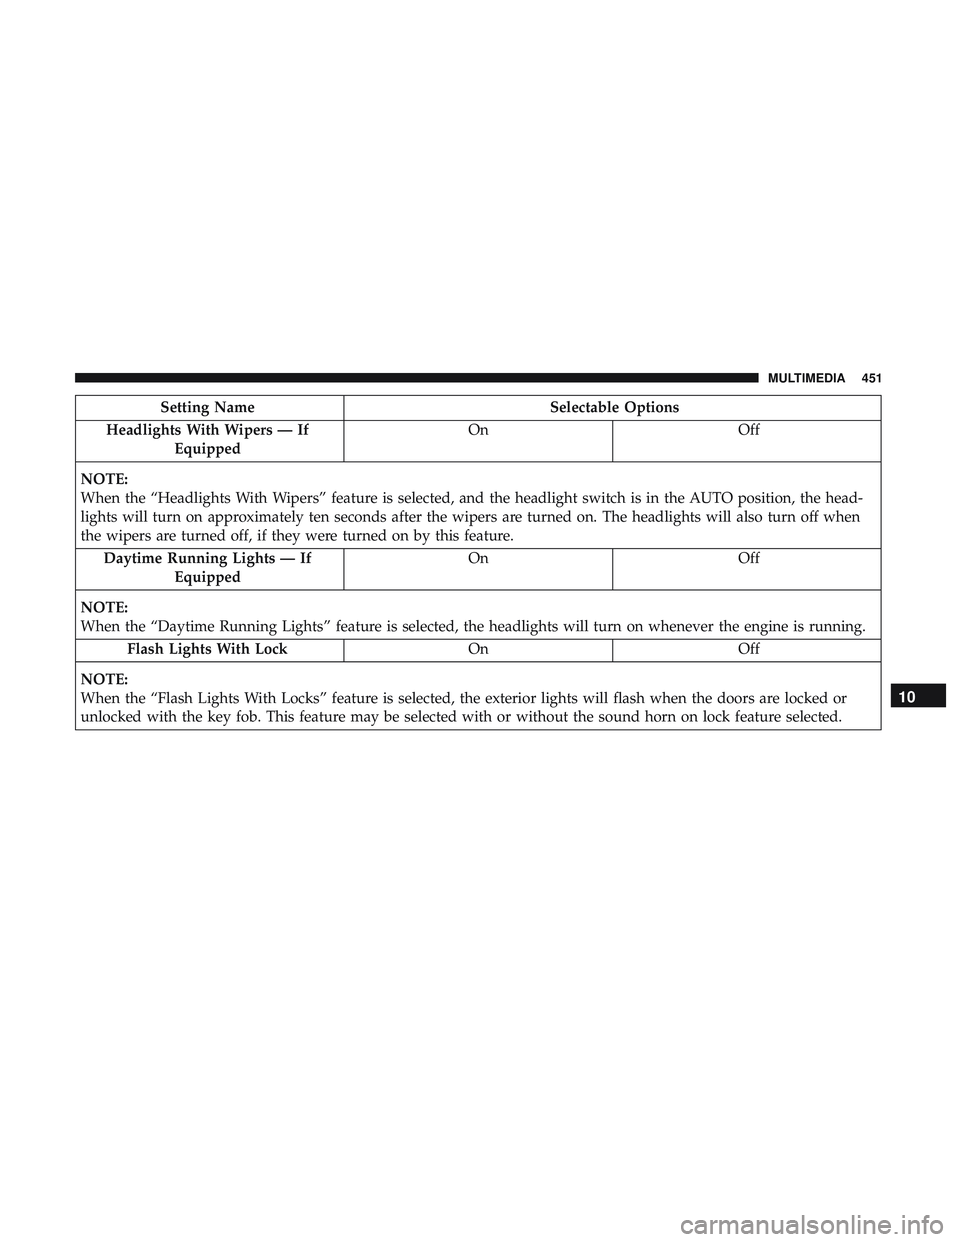
Setting NameSelectable Options
Headlights With Wipers — If Equipped On
Off
NOTE:
When the “Headlights With Wipers” feature is selected, and the headlight switch is in the AUTO position, the head-
lights will turn on approximately ten seconds after the wipers are turned on. The headlights will also turn off when
the wipers are turned off, if they were turned on by this feature. Daytime Running Lights — If Equipped On
Off
NOTE:
When the “Daytime Running Lights” feature is selected, the headlights will turn on whenever the engine is running. Flash Lights With Lock OnOff
NOTE:
When the “Flash Lights With Locks” feature is selected, the exterior lights will flash when the doors are locked or
unlocked with the key fob. This feature may be selected with or without the sound horn on lock feature selected.
10
MULTIMEDIA 451
Page 454 of 553
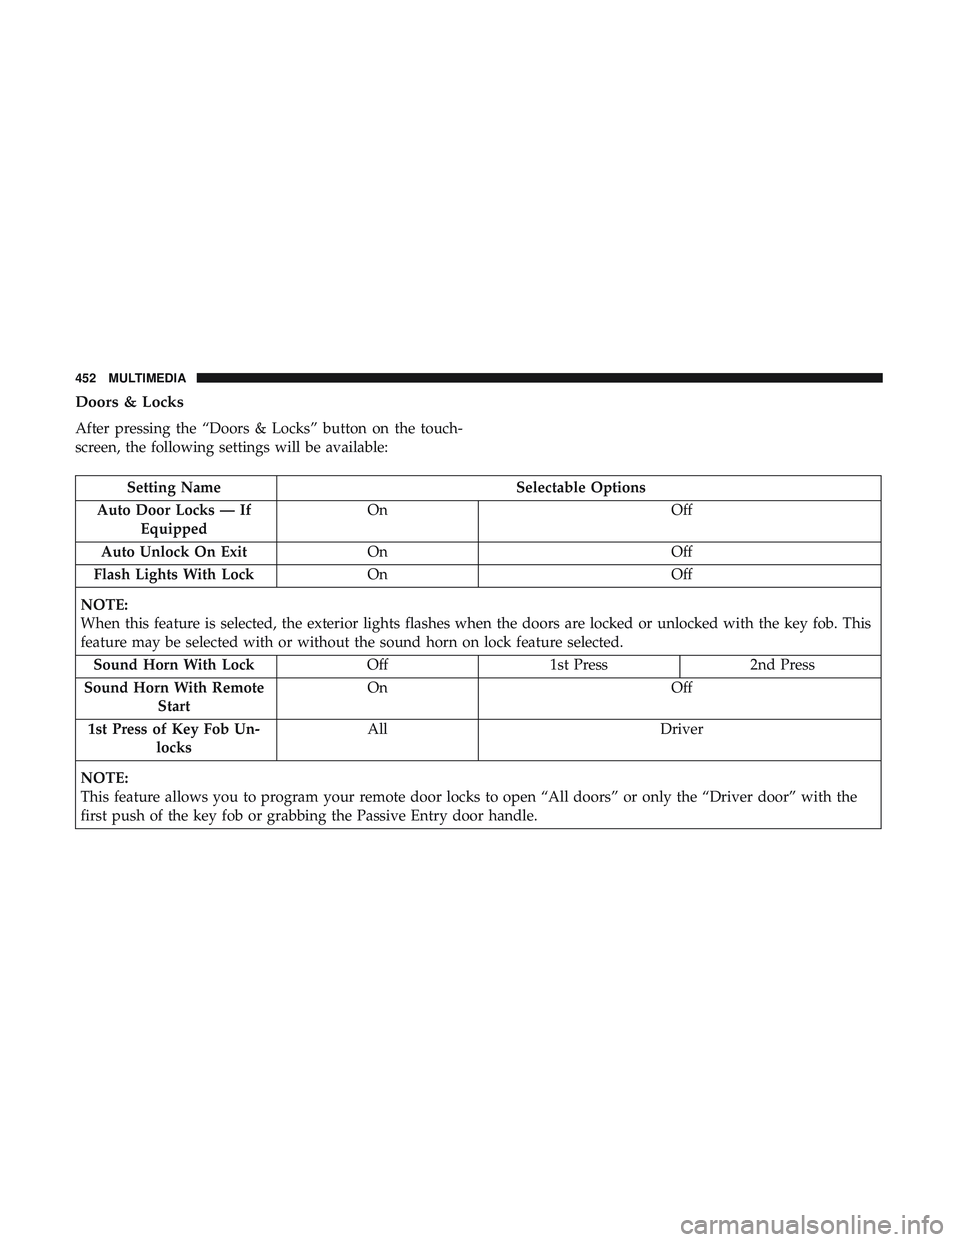
Doors & Locks
After pressing the “Doors & Locks” button on the touch-
screen, the following settings will be available:
Setting NameSelectable Options
Auto Door Locks — If Equipped On
Off
Auto Unlock On Exit On Off
Flash Lights With Lock On Off
NOTE:
When this feature is selected, the exterior lights flashes when the doors are locked or unlocked with the key fob. This
feature may be selected with or without the sound horn on lock feature selected. Sound Horn With Lock Off1st Press 2nd Press
Sound Horn With Remote Start On
Off
1st Press of Key Fob Un- locks All
Driver
NOTE:
This feature allows you to program your remote door locks to open “All doors” or only the “Driver door” with the
first push of the key fob or grabbing the Passive Entry door handle.
452 MULTIMEDIA
Page 455 of 553
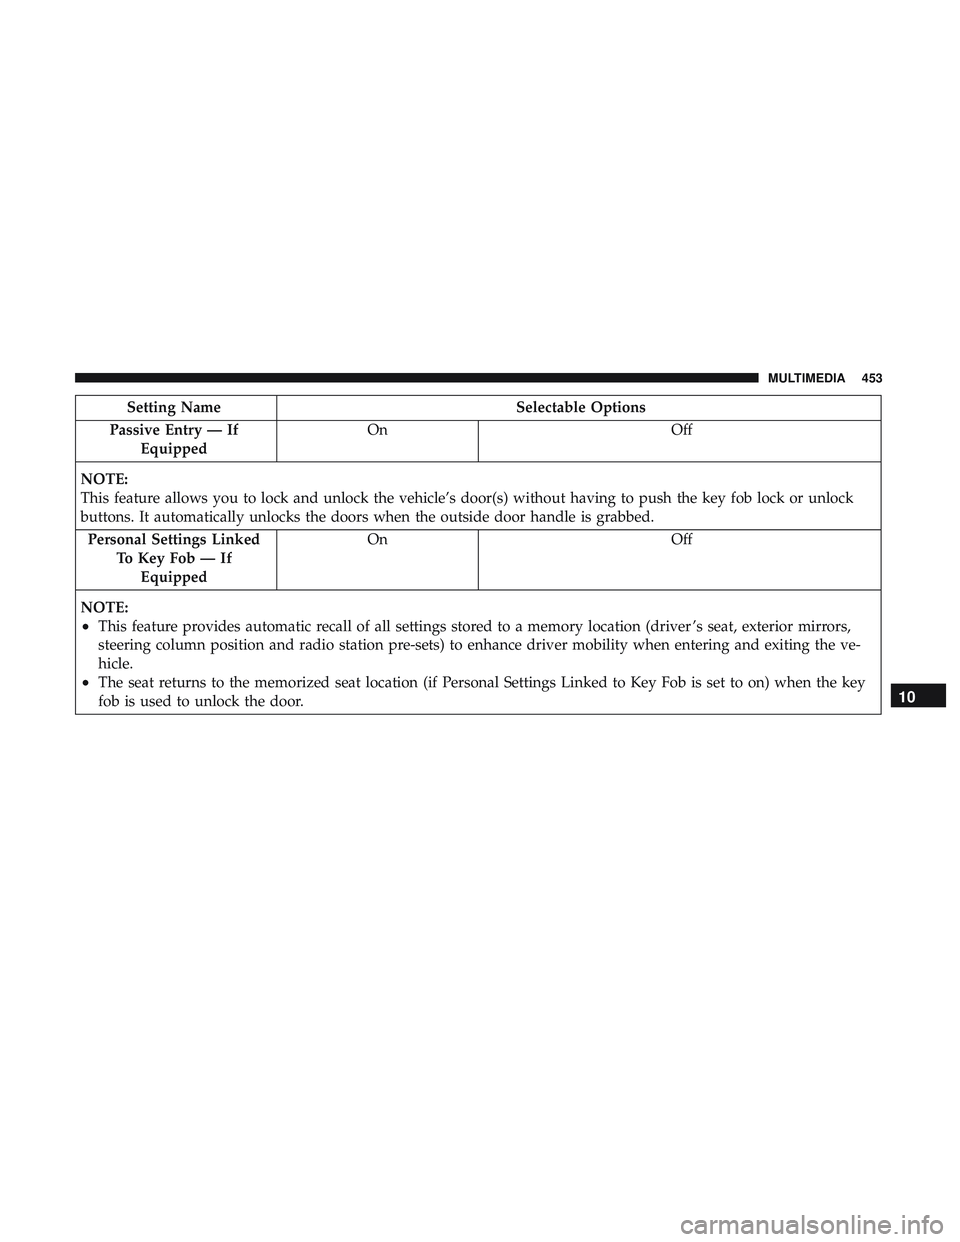
Setting NameSelectable Options
Passive Entry — If Equipped On
Off
NOTE:
This feature allows you to lock and unlock the vehicle’s door(s) without having to push the key fob lock or unlock
buttons. It automatically unlocks the doors when the outside door handle is grabbed. Personal Settings Linked To Key Fob — IfEquipped On
Off
NOTE:
•This feature provides automatic recall of all settings stored to a memory location (driver ’s seat, exterior mirrors,
steering column position and radio station pre-sets) to enhance driver mobility when entering and exiting the ve-
hicle.
•The seat returns to the memorized seat location (if Personal Settings Linked to Key Fob is set to on) when the key
fob is used to unlock the door.10
MULTIMEDIA 453
Page 456 of 553
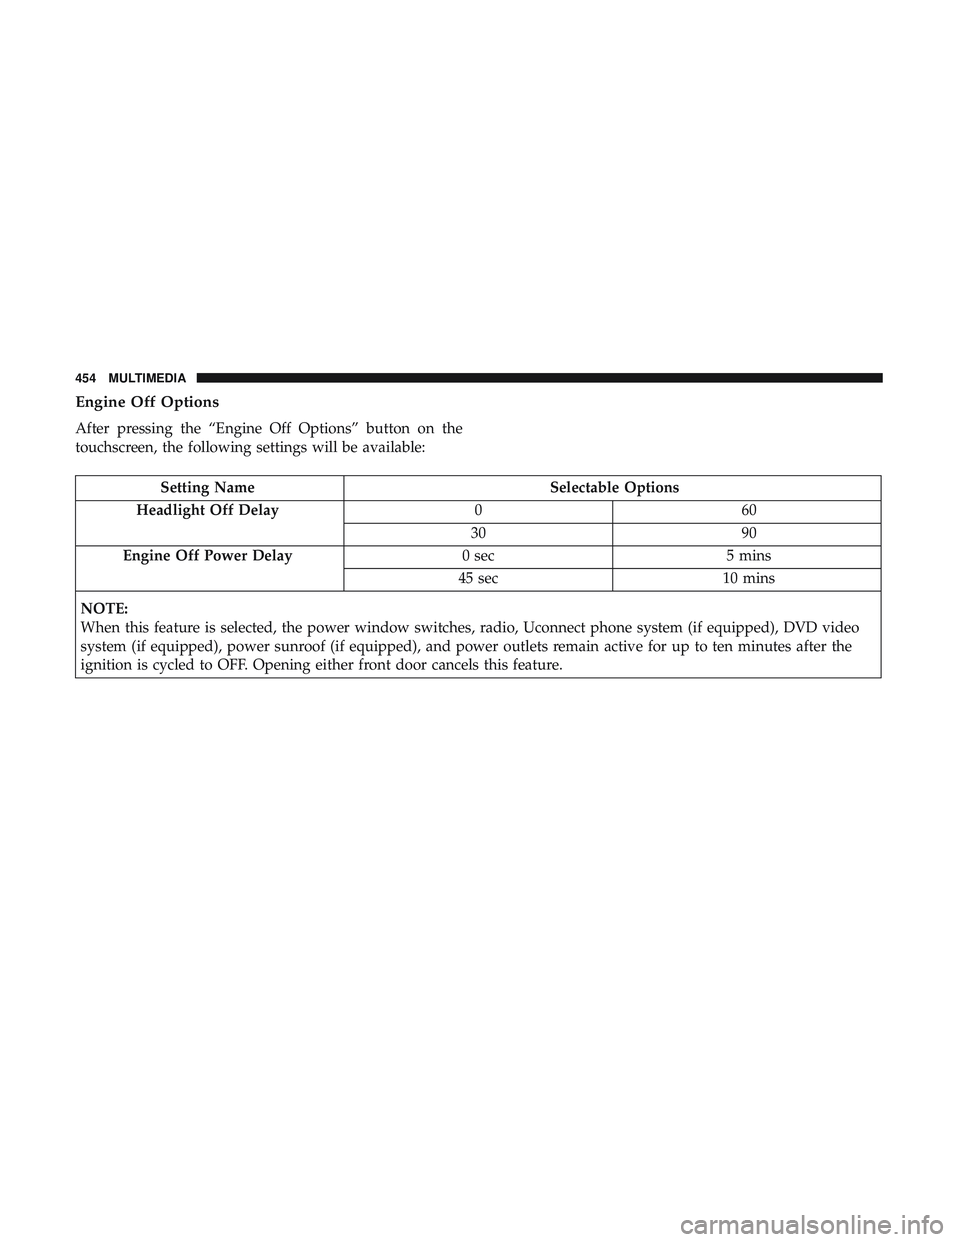
Engine Off Options
After pressing the “Engine Off Options” button on the
touchscreen, the following settings will be available:
Setting NameSelectable Options
Headlight Off Delay 060
30 90
Engine Off Power Delay 0 sec5 mins
45 sec 10 mins
NOTE:
When this feature is selected, the power window switches, radio, Uconnect phone system (if equipped), DVD video
system (if equipped), power sunroof (if equipped), and power outlets remain active for up to ten minutes after the
ignition is cycled to OFF. Opening either front door cancels this feature.
454 MULTIMEDIA
Page 457 of 553
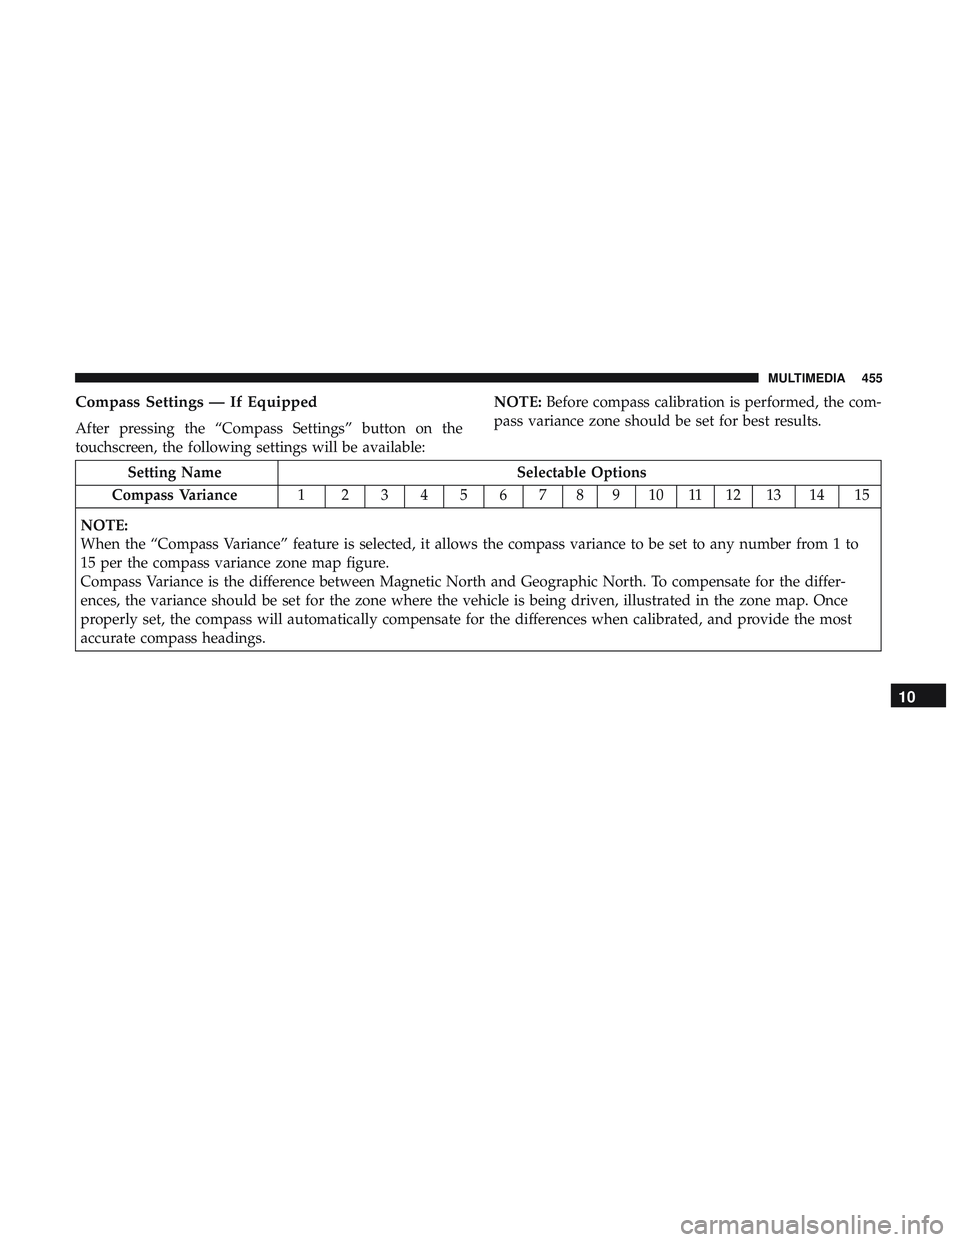
Compass Settings — If Equipped
After pressing the “Compass Settings” button on the
touchscreen, the following settings will be available:NOTE:
Before compass calibration is performed, the com-
pass variance zone should be set for best results.
Setting Name Selectable Options
Compass Variance 1 23456789101112131415
NOTE:
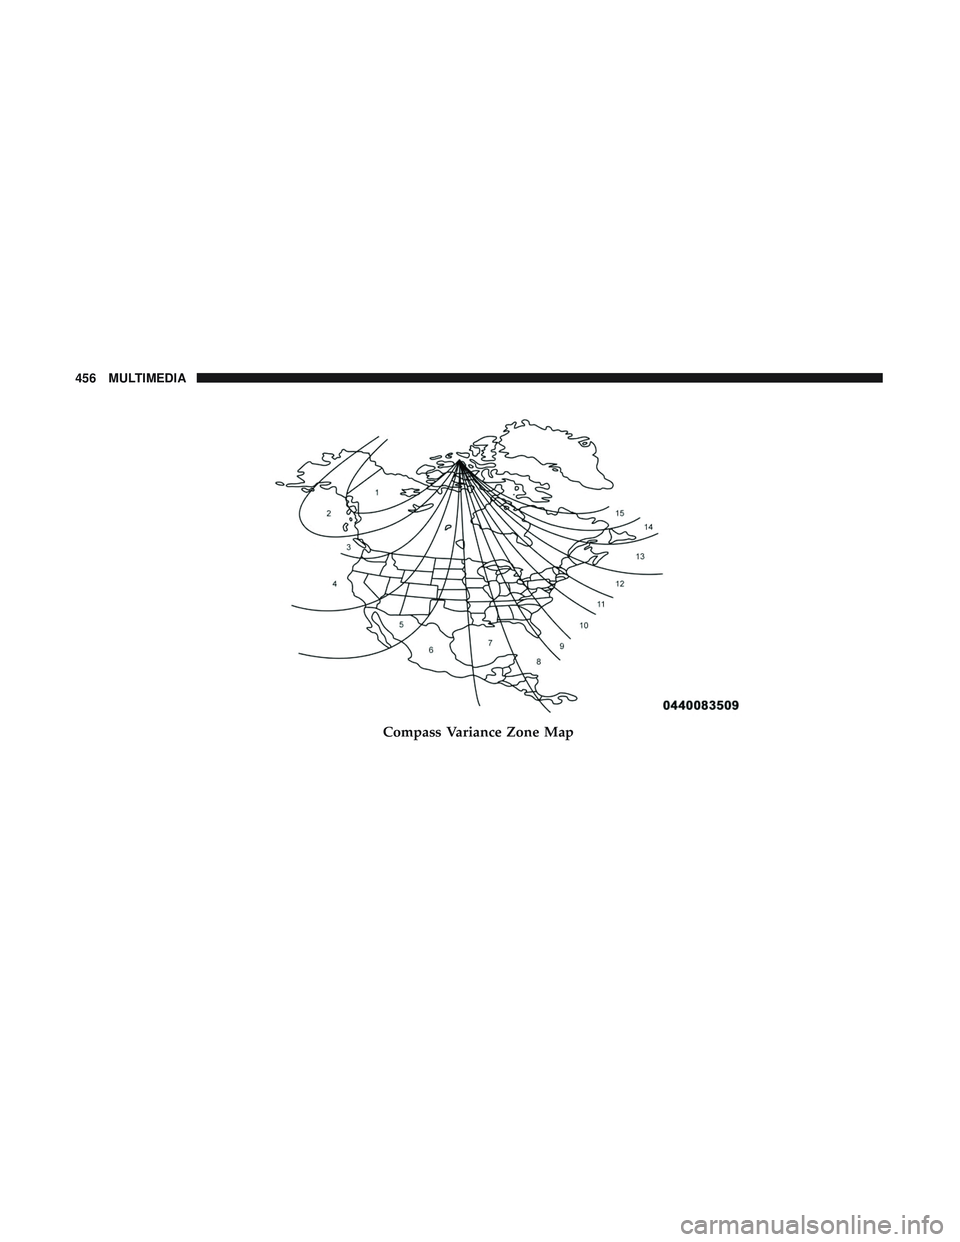
When the “Compass Variance” feature is selected, it allows the compass variance to be set to any number from 1 to
15 per the compass variance zone map figure.
Compass Variance is the difference between Magnetic North and Geographic North. To compensate for the differ-
ences, the variance should be set for the zone where the vehicle is being driven, illustrated in the zone map. Once
properly set, the compass will automatically compensate for the differences when calibrated, and provide the most
accurate compass headings.
10
MULTIMEDIA 455
Page 458 of 553
Compass Variance Zone Map
456 MULTIMEDIA
Page 459 of 553
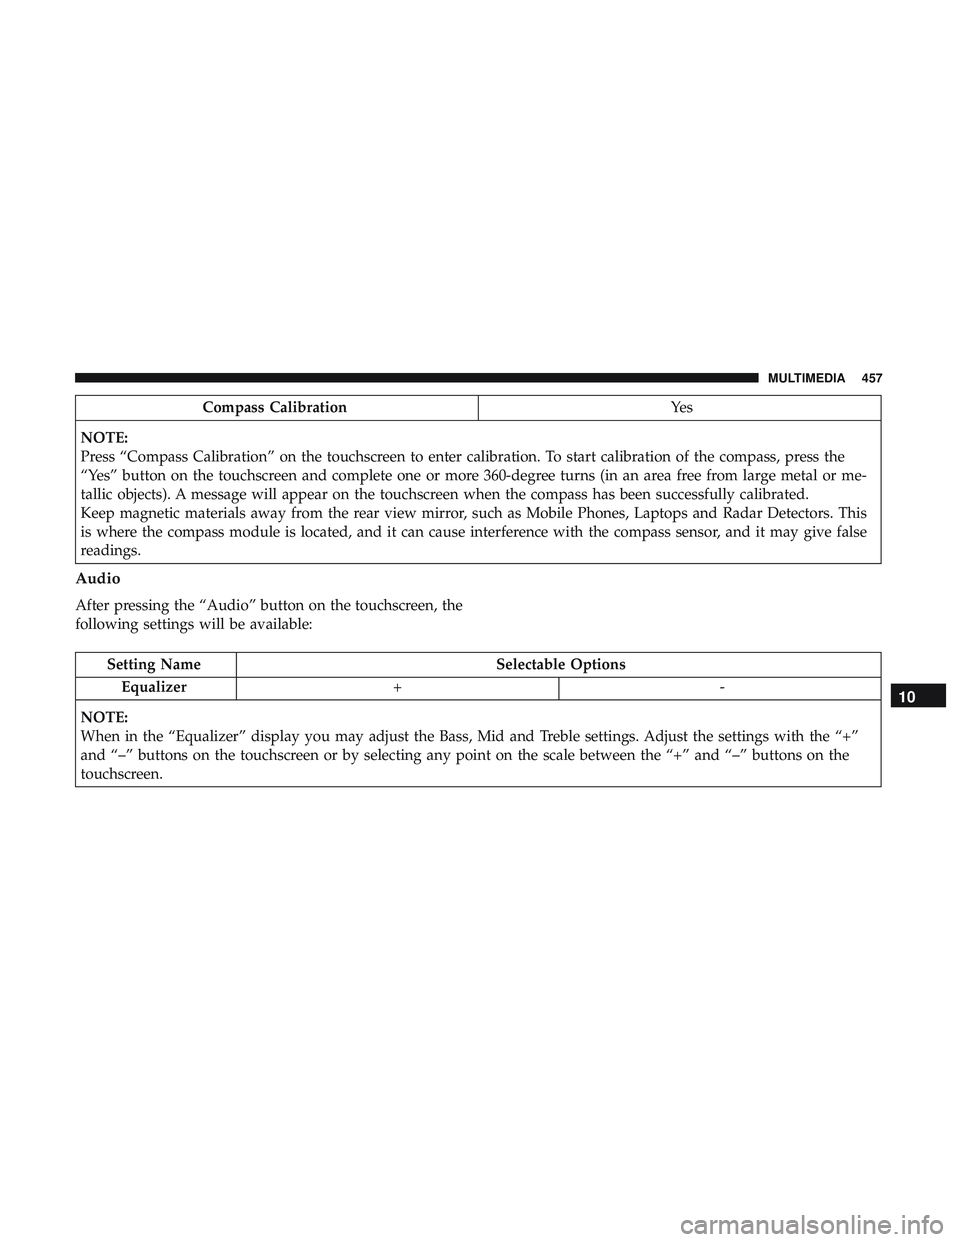
Compass CalibrationYe s
NOTE:
Press “Compass Calibration” on the touchscreen to enter calibration. To start calibration of the compass, press the
“Yes” button on the touchscreen and complete one or more 360-degree turns (in an area free from large metal or me-
tallic objects). A message will appear on the touchscreen when the compass has been successfully calibrated.
Keep magnetic materials away from the rear view mirror, such as Mobile Phones, Laptops and Radar Detectors. This
is where the compass module is located, and it can cause interference with the compass sensor, and it may give false
readings.
Audio
After pressing the “Audio” button on the touchscreen, the
following settings will be available:
Setting Name Selectable Options
Equalizer +-
NOTE:
When in the “Equalizer” display you may adjust the Bass, Mid and Treble settings. Adjust the settings with the “+”
and “–” buttons on the touchscreen or by selecting any point on the scale between the “+” and “–” buttons on the
touchscreen.
10
MULTIMEDIA 457
Page 460 of 553
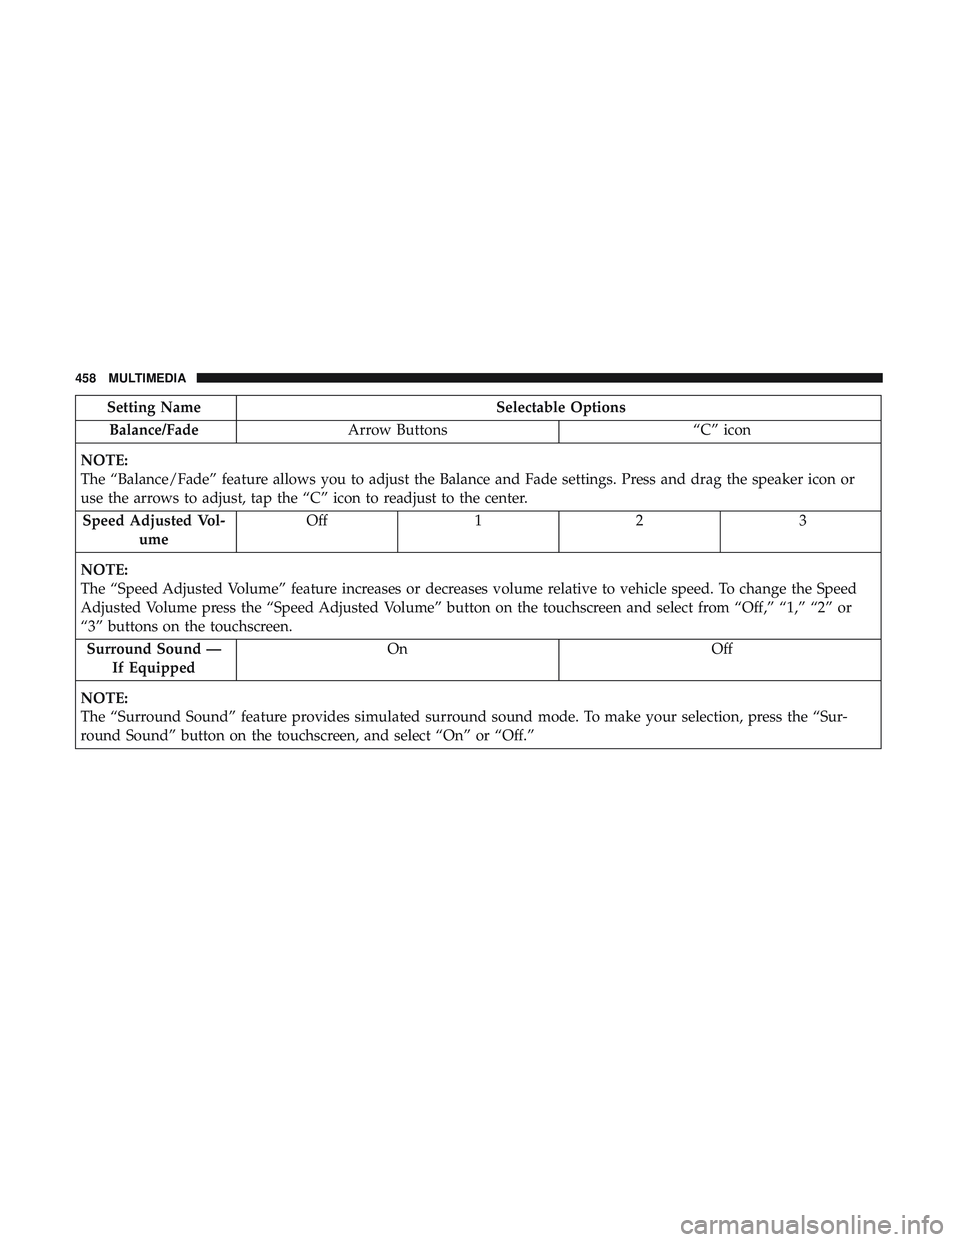
Setting NameSelectable Options
Balance/Fade Arrow Buttons “C” icon
NOTE:
The “Balance/Fade” feature allows you to adjust the Balance and Fade settings. Press and drag the speaker icon or
use the arrows to adjust, tap the “C” icon to readjust to the center. Speed Adjusted Vol- ume Off
12 3
NOTE:
The “Speed Adjusted Volume” feature increases or decreases volume relative to vehicle speed. To change the Speed
Adjusted Volume press the “Speed Adjusted Volume” button on the touchscreen and select from “Off,” “1,” “2” or
“3” buttons on the touchscreen. Surround Sound — If Equipped On
Off
NOTE:
The “Surround Sound” feature provides simulated surround sound mode. To make your selection, press the “Sur-
round Sound” button on the touchscreen, and select “On” or “Off.”
458 MULTIMEDIA