instrument panel DODGE CHARGER 2020 Repair Manual
[x] Cancel search | Manufacturer: DODGE, Model Year: 2020, Model line: CHARGER, Model: DODGE CHARGER 2020Pages: 412, PDF Size: 18.96 MB
Page 217 of 412
IN CASE OF EMERGENCY215
Even if the SOS Call system is fully functional,
factors beyond FCA US LLC’s control may
prevent or stop the SOS Call system operation.
These include, but are not limited to, the
following factors:
The ignition is in the OFF position.
The vehicle’s electrical systems are not
intact.
The SOS Call system software and/or hard -
ware are damaged during a crash.
The vehicle battery loses power or becomes
disconnected during a vehicle crash.
LTE (voice/data) or 4G (data) network and/or
Global Positioning Satellite signals are
unavailable or obstructed.
Equipment malfunction at the SOS operator
facility.
Operator error by the SOS operator.
LTE (voice/data) or 4G (data) network
congestion.
Weather.
Buildings, structures, geographic terrain, or
tunnels. NOTE:
Your vehicle may be transmitting data as
authorized by the subscriber.
Never place anything on or near the vehicle’s
LTE (voice/data) or 4G (data) and GPS
antennas. You could prevent LTE (voice/
data) or 4G (data) and GPS signal reception,
which can prevent your vehicle from placing
an emergency call. An operable LTE (voice/
data) or 4G (data) network connection and a
GPS signal is required for the SOS Call
system to function properly.
WARNING!
Ignoring the Rearview Mirror light could
mean you will not have SOS Call services. If
the Rearview Mirror light is illuminated,
have an authorized dealer service the SOS
Call system immediately.
The Occupant Restraint Control module
turns on the air bag Warning Light on the
instrument panel if a malfunction in any
part of the system is detected. If the Air Bag
Warning Light is illuminated, have an
authorized dealer service the Occupant
Restraint Control system immediately.
WARNING!
ALWAYS obey traffic laws and pay attention to
the road. ALWAYS drive safely with your hands
on the steering wheel. You have full
responsibility and assume all risks related to
the use of the Uconnect and SiriusXM
Guardian™ features and applications in this
vehicle. Only use Uconnect features and
SiriusXM Guardian™ services when it is safe
to do so. Failure to do so may result in an
accident involving serious injury or death.
6
20_LD_OM_EN_USC_t.book Page 215
Page 240 of 412
238IN CASE OF EMERGENCY
3. The Sealant Bottle (1) may be empty due to
previous use. Call for assistance.
NOTE:
If the Mode Select Knob (5) is on Air Mode and
the pump is operating, air will dispense from the
Air Pump Hose (7) only, not the Sealant Hose
(6).
If the sealant (white fluid) does flow through the
Sealant Hose (6):
1. Continue to operate the pump until sealant is no longer flowing through the hose
(typically takes 30 - 70 seconds). As the
sealant flows through the Sealant Hose (6),
the Pressure Gauge (3) can read as high as
70 psi (4.8 Bar). The Pressure Gauge (3)
will decrease quickly from approximately
70 psi (4.8 Bar) to the actual tire pressure
when the Sealant Bottle (1) is empty.
2. The pump will start to inject air into the tire immediately after the Sealant Bottle (1) is
empty. Continue to operate the pump and
inflate the tire to the pressure indicated on
the tire pressure label on the driver-side
latch pillar (recommended pressure). Check
the tire pressure by looking at the Pressure
Gauge (3). If the tire does not inflate to at least 26 psi (1.8
Bar) pressure within 15 minutes:
The tire is too badly damaged. Do not attempt
to drive the vehicle further. Call for assis
-
tance.
NOTE:
If the tire becomes overinflated, push the Defla-
tion Button (2) to reduce the tire pressure to the
recommended inflation pressure before
continuing.
If the tire inflates to the recommended pressure
or is at least 26 psi (1.8 Bar) pressure within
15 minutes:
1. Push the Power Button (4) to turn off the Tire Service Kit.
2. Remove the Speed Limit sticker from the top of the Sealant Bottle (1) and place the
sticker on the instrument panel.
3. Immediately disconnect the Sealant Hose (6) from the valve stem, reinstall the cap on
the fitting at the end of the hose, and place
the Tire Service Kit in the vehicle storage
location. Quickly proceed to (D) “Drive
Vehicle.”
(D) Drive Vehicle:
Immediately after injecting sealant and inflating
the tire, drive the vehicle 5 miles (8 km) or
10 minutes to ensure distribution of the Tire
Service Kit Sealant within the tire. Do not
exceed 50 mph (80 km/h).
CAUTION!
The metal end fitting from Power Plug (8)
may get hot after use, so it should be
handled carefully.
Failure to reinstall the cap on the fitting at the
end of the Sealant Hose (6) can result in
sealant contacting your skin, clothing, and the
vehicle’s interior. It can also result in sealant
contacting internal Tire Service Kit components
which may cause permanent damage to the kit.
WARNING!
Tire Service Kit is not a permanent flat tire repair.
Have the tire inspected and repaired or replaced
after using Tire Service Kit. Do not exceed
50 mph (80 km/h) until the tire is repaired or
replaced. Failure to follow this warning can result
in injuries that are serious or fatal to you, your
passengers, and others around you.
20_LD_OM_EN_USC_t.book Page 238
Page 241 of 412
IN CASE OF EMERGENCY239
(E) After Driving:
Pull over to a safe location. Refer to “(A)
Whenever You Stop To Use Tire Service Kit”
before continuing.
1. Push in the Mode Select Knob (5) and turn
to the Air Mode position.
2. Uncoil the power plug and insert the plug into the vehicle's 12 Volt power outlet.
3. Uncoil the Air Pump Hose (7) (black in color) and screw the fitting at the end of hose (7)
onto the valve stem.
4. Check the pressure in the tire by reading the Pressure Gauge (3).
If tire pressure is less than 19 psi (1.3 Bar):
The tire is too badly damaged. Do not attempt to
drive the vehicle further. Call for assistance.
If the tire pressure is 19 psi (1.3 Bar) or higher:
1. Push the Power Button (4) to turn on Tire Service Kit and inflate the tire to the
pressure indicated on the tire and loading
information label on the driver-side door
opening.
NOTE:
If the tire becomes over-inflated, push the
Deflation Button (2) to reduce the tire pressure
to the recommended inflation pressure before
continuing.
2. Disconnect the Tire Service Kit from the
valve stem, reinstall the cap on the valve
stem and unplug from 12 Volt outlet.
3. Place the Tire Service Kit in its proper storage area in the vehicle.
4. Have the tire inspected and repaired or replaced at the earliest opportunity at an
authorized dealer or tire service center.
5. Remove the Speed Limit sticker from the instrument panel after the tire has been
repaired.
6. Replace the Sealant Bottle (1) and Sealant Hose (6) assembly at an authorized dealer
as soon as possible. Refer to “(F) Sealant
Bottle And Hose Replacement”.
NOTE:
When having the tire serviced, advise the autho -
rized dealer or service center that the tire has
been sealed using the Tire Service Kit.
(F) Sealant Bottle And Hose Replacement:
1. Uncoil the Sealant Hose (6) (clear in color).
2. Locate the round Sealant Bottle release button in the recessed area under the
sealant bottle.
3. Push the Sealant Bottle release button. The Sealant Bottle (1) will pop up. Remove the
bottle and dispose of it accordingly.
4. Clean any remaining sealant from the Tire Service Kit housing.
5. Position the new Sealant Bottle (1) in the housing so that the Sealant Hose (6) aligns
with the hose slot in the front of the
housing. Push the bottle into the housing.
An audible click will be heard indicating the
bottle is locked into place.
6. Verify that the cap is installed on the fitting at the end of the Sealant Hose (6) and
return the hose to its storage area (located
on the bottom of the air pump).
7. Return the Tire Service Kit to its storage location in the vehicle.
6
20_LD_OM_EN_USC_t.book Page 239
Page 252 of 412
250
SERVICING AND MAINTENANCE
SCHEDULED SERVICING
3.6L AND 5.7L ENGINES
These vehicles are equipped with an automatic
oil change indicator system. The oil change
indicator system will remind you that it is time to
take your vehicle in for scheduled maintenance.
Based on engine operation conditions, the oil
change indicator message will illuminate. This
means that service is required for your vehicle.
Operating conditions such as frequent
short-trips, trailer tow, and extremely hot or cold
ambient temperatures will influence when the
“Change Oil” or “Oil Change Required” message
is displayed. Severe Operating Conditions can
cause the change oil message to illuminate as
early as 3,500 miles (5,600 km) since last
reset. Have your vehicle serviced as soon as
possible, within the next 500 miles (805 km).
The “Oil Change Required” message will be
displayed in the instrument cluster and a single
chime will sound, indicating that an oil change
is necessary.An authorized dealer will reset the oil change
indicator message after completing the
scheduled oil change. If a scheduled oil change
is performed by someone other than an
authorized dealer, the message can be reset by
referring to “Instrument Cluster Display” in
“Getting To Know Your Instrument Panel” for
further information.
NOTE:
Under no circumstances should oil change
intervals exceed 10,000 miles (16,000 km),
12 months or 350 hours of engine run time,
whichever comes first. The 350 hours of engine
run or idle time is generally only a concern for
fleet customers.
Severe Duty All Models
Change Engine Oil at 4,000 miles (6,500 km) or
350 hours of engine run time if the vehicle is
operated in a dusty and off-road environment,
or is operated predominantly at idle or only very
low engine RPM. This type of vehicle use is
considered Severe Duty.
Once A Month Or Before A Long Trip:
Check engine oil level.
Check windshield washer fluid level.
Check tire pressure and look for unusual
wear or damage. Rotate tires at the first sign
of irregular wear, even if it occurs before your
next scheduled service.
Check the fluid levels of the coolant reservoir,
brake master cylinder, and power steering
(if equipped) and fill as needed.
Check function of all interior and exterior
lights.
Maintenance Plan — 3.6L And 5.7L
Required Maintenance Intervals:
Refer to the maintenance schedules on the
following page for the required maintenance
intervals. More frequent maintenance may be
needed in severe conditions, such as dusty
areas and very short trip driving. In some
extreme conditions, additional maintenance
not specified in the maintenance schedule may
be required.
20_LD_OM_EN_USC_t.book Page 250
Page 257 of 412

SERVICING AND MAINTENANCE255
An authorized dealer will reset the oil change
indicator message after completing the
scheduled oil change. If a scheduled oil change
is performed by someone other than an
authorized dealer, the message can be reset by
referring to the steps described under
“Instrument Cluster Display” in “Getting To
Know Your Instrument Panel” for further
information.
At Each Stop For Fuel
Check the engine oil level. Refer to “Engine
Compartment” in this chapter for further
information.
Check the windshield washer solvent and
add if required. Once A Month
Check tire pressure and look for unusual
wear or damage.
Inspect the battery, and clean and tighten the
terminals as required.
Check the fluid levels of the coolant reservoir,
brake master cylinder, and power steering
(6.2L only), and add as needed.
Check all lights and other electrical items for
correct operation.
At Each Oil Change
Change the engine oil filter.
Inspect the brake hoses and lines.
Inspect the CV/Universal joints.
CAUTION!
Failure to perform the required maintenance
items may result in damage to the vehicle.
7
20_LD_OM_EN_USC_t.book Page 255
Page 310 of 412
308
TECHNICAL SPECIFICATIONS
IDENTIFICATION DATA
VEHICLE IDENTIFICATION NUMBER
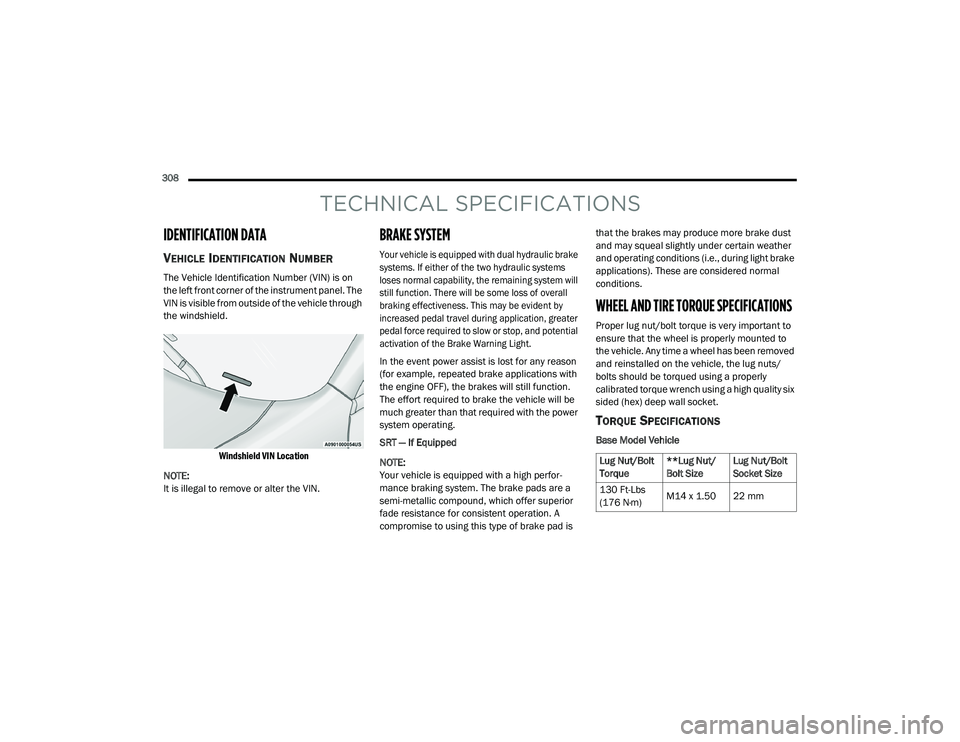
The Vehicle Identification Number (VIN) is on
the left front corner of the instrument panel. The
VIN is visible from outside of the vehicle through
the windshield.
Windshield VIN Location
NOTE:
It is illegal to remove or alter the VIN.
BRAKE SYSTEM
Your vehicle is equipped with dual hydraulic brake
systems. If either of the two hydraulic systems
loses normal capability, the remaining system will
still function. There will be some loss of overall
braking effectiveness. This may be evident by
increased pedal travel during application, greater
pedal force required to slow or stop, and potential
activation of the Brake Warning Light.
In the event power assist is lost for any reason
(for example, repeated brake applications with
the engine OFF), the brakes will still function.
The effort required to brake the vehicle will be
much greater than that required with the power
system operating.
SRT — If Equipped
NOTE:
Your vehicle is equipped with a high perfor -
mance braking system. The brake pads are a
semi-metallic compound, which offer superior
fade resistance for consistent operation. A
compromise to using this type of brake pad is that the brakes may produce more brake dust
and may squeal slightly under certain weather
and operating conditions (i.e., during light brake
applications). These are considered normal
conditions.
WHEEL AND TIRE TORQUE SPECIFICATIONS
Proper lug nut/bolt torque is very important to
ensure that the wheel is properly mounted to
the vehicle. Any time a wheel has been removed
and reinstalled on the vehicle, the lug nuts/
bolts should be torqued using a properly
calibrated torque wrench using a high quality six
sided (hex) deep wall socket.
TORQUE SPECIFICATIONS
Base Model Vehicle
Lug Nut/Bolt
Torque
**Lug Nut/
Bolt SizeLug Nut/Bolt
Socket Size
130 Ft-Lbs
(176 N·m) M14 x 1.50 22 mm
20_LD_OM_EN_USC_t.book Page 308
Page 324 of 412
322MULTIMEDIA
NOTE:
FCA US LLC or your dealer may contact you
directly regarding software updates.
To help further improve vehicle security and
minimize the potential risk of a security
breach, vehicle owners should:
Routinely check www.driveuconnect.com
(US Residents) or www.driveuconnect.ca
(Canadian Residents) to learn about
available Uconnect software updates.
Only connect and use trusted media
devices (e.g. personal mobile phones,
USBs, CDs).
Privacy of any wireless and wired
communications cannot be assured. Third
parties may unlawfully intercept information
and private communications without your
consent. For further information, refer to “Data
Collection & Privacy” in your Uconnect Owner’s
Manual Supplement or “Onboard Diagnostic
System (OBD II) Cybersecurity” in “Getting To
Know Your Instrument Panel”.
UCONNECT SETTINGS
The Uconnect system uses a combination of
buttons on the touchscreen and buttons on the
faceplate located on the center of the
instrument panel. These buttons allow you to
access and change the Customer
Programmable Features. Many features can
vary by vehicle.
Buttons on the faceplate are located below
and/or beside the Uconnect system in the
center of the instrument panel. In addition,
there is a Scroll/Enter control knob located on
the right side. Turn the control knob to scroll
through menus and change settings. Push the
center of the control knob one or more times to
select or change a setting.
Your Uconnect system may also have Screen
Off and Mute buttons on the faceplate.
Push the Screen Off button on the faceplate to
turn off the Uconnect screen. Push the button
again or tap the screen to turn the screen on.
Press the Back Arrow button to exit out of a
Menu or certain option on the Uconnect system.
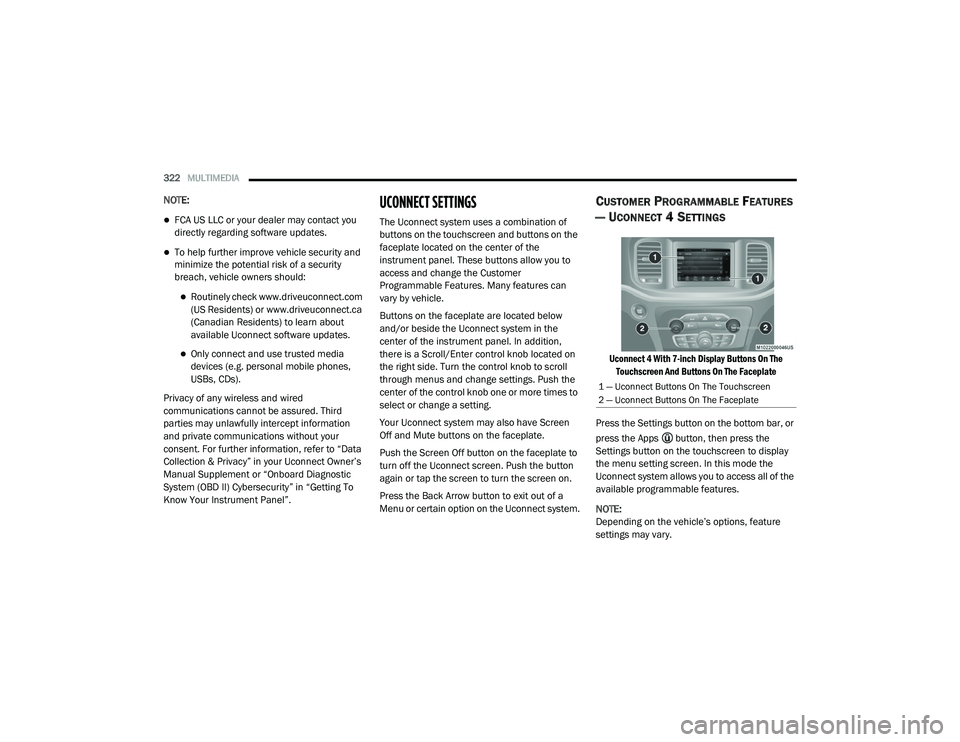
CUSTOMER PROGRAMMABLE FEATURES
— U
CONNECT 4 SETTINGS
Uconnect 4 With 7-inch Display Buttons On The
Touchscreen And Buttons On The Faceplate
Press the Settings button on the bottom bar, or
press the Apps button, then press the
Settings button on the touchscreen to display
the menu setting screen. In this mode the
Uconnect system allows you to access all of the
available programmable features.
NOTE:
Depending on the vehicle’s options, feature
settings may vary.
1 — Uconnect Buttons On The Touchscreen
2 — Uconnect Buttons On The Faceplate
20_LD_OM_EN_USC_t.book Page 322
Page 382 of 412
380MULTIMEDIA
NOTE:
Only the first 25 characters can be seen on the
touchscreen while typing a custom message.
While in Do Not Disturb, Conference Call can be
selected so you can still place a second call
without being interrupted by incoming calls.
NOTE:
Reply with text message is not compatible
with iPhones®.
Auto reply with text message is only available
on phones that support Bluetooth® MAP.
Place/Retrieve A Call From Hold
During an active call, press the Hold button on
the Phone main screen.
Making A Second Call While Current Call Is In
Progress
You can place a call on hold by pressing the
Hold button on the Phone main screen, then
dial a number from the dialpad, recent calls,
SMS Inbox or from the phonebooks. To go back
to the first call, refer to “Toggling Between Calls”
in this section. To combine two calls, refer to
“Join Calls” in this section. Toggling Between Calls
If two calls are in progress (one active and one
on hold), press the Swap button on the Phone
main screen. Only one call can be placed on
hold at a time.
You can also push the Phone button to toggle
between the active and held phone call.
Join Calls
When two calls are in progress (one active and
one on hold), press the Join Calls button on the
Phone main screen to combine all calls into a
Conference Call.
Call Termination
To end a call in progress, momentarily press the
Phone End button on the touchscreen or the
Phone End button on the steering wheel. Only
the active call(s) will be terminated and if there
is a call on hold, it will become the new active
call.
Redial
Press the Redial button on the touchscreen, or
push the VR button and after the “Listening”
prompt and the following beep, say “Redial.”
The Uconnect Phone will call the last number
that was dialed from your mobile phone.
Call Continuation
Call continuation is the progression of a phone
call on the Uconnect Phone after the vehicle
ignition has been switched to OFF.
NOTE:
The call will remain within the vehicle audio
system until the phone becomes out of range
for the Bluetooth® connection. It is recom
-
mended to press the Transfer button on the
touchscreen when leaving the vehicle.
Browsing SMS
Using the steering wheel commands, you can
view and manage the last 10 SMS messages
received on the instrument panel. To use this
function, the mobile phone must support the
SMS exchange function through Bluetooth®.
Select the PHONE button on the instrument
panel menu, and then select “SMS Reader”
using the arrow keys on the steering wheel
controls.
The “SMS Reader” submenu allows the last 10
SMS messages to be displayed.
20_LD_OM_EN_USC_t.book Page 380
Page 401 of 412
399
I
Ignition
............................................................ 18Switch......................................................... 18In Vehicle Help Vehicle User Guide...................................... 11Information Center, Vehicle............................. 86Inside Rearview Mirror..................... 41, 42, 212Instrument Cluster............................. 80, 82, 84Descriptions.............................................. 103Display................................................. 85, 88Instrument Panel Lens Cleaning.................... 306Interior Appearance Care............................... 306Interior Lights.................................................. 48Intermittent Wipers (Delay Wipers).................. 51Introduction....................................................... 8iPod/USB/MP3 Control................................. 364
J
Jack Location................................................. 230Jack Operation............................................... 286Jump Starting...................................... 240, 241
K
Key FobArm The System
.......................................... 24Panic Alarm................................................. 15Programming Additional Key Fobs....... 17, 23Unlatch The Trunk....................................... 14
Key Fob Battery Service (Remote
Keyless Entry).................................................... 15
Key Fob Programming (Remote
Keyless Entry).................................................. 17Key-In Reminder.............................................. 19Keyless Enter-N-Go.................................26, 162Enter The Trunk........................................... 14Passive Entry............................................... 26Passive Entry Programming......................... 26Keys................................................................. 12Replacement........................................ 17, 23
L
Lane Change And Turn Signals........................ 48Lane Change Assist......................................... 48LaneSense.................................................... 196Lap/Shoulder Belts....................................... 127Latches......................................................... 158Hood............................................................ 68Lead Free Gasoline....................................... 309Leaks, Fluid.................................................. 158Life Of Tires................................................... 296Light Bulbs........................................... 157, 217Lights............................................................ 157Air Bag...................................... 95, 134, 156Automatic Headlights.................................. 47Brake Assist Warning............................... 111Brake Warning....................................95, 308Bulb Replacement.................................... 217
Cruise.............................................. 102, 103Daytime Running.........................................45Dimmer Switch, Headlight.................... 45, 46Exterior.............................................. 45, 157Fog...............................................................48Hazard Warning Flasher........................... 212Headlight Switch..........................................45Headlights............................................ 45, 47Headlights On With Wipers..........................47High Beam...................................................46High Beam/Low Beam Select......................46Instrument Cluster.......................................45Intensity Control..........................................50Interior.........................................................48License..................................................... 220Lights On Reminder.....................................47Malfunction Indicator (Check Engine)..........98Park................................................... 47, 102Passing........................................................46Reading.......................................................49Seat Belt Reminder.....................................97Security Alarm.............................................98Service...................................................... 217Traction Control........................................ 111Turn Signals....................... 45, 48, 103, 157Vanity Mirror................................................44Warning Instrument Cluster Descriptions.................................. 97, 10311
20_LD_OM_EN_USC_t.book Page 399