remove seats DODGE CHARGER 2020 Owners Manual
[x] Cancel search | Manufacturer: DODGE, Model Year: 2020, Model line: CHARGER, Model: DODGE CHARGER 2020Pages: 412, PDF Size: 18.96 MB
Page 40 of 412
38GETTING TO KNOW YOUR VEHICLE
Press the ventilated seat button a third
time to turn the ventilated seat off.
NOTE:
The engine must be running for the ventilated
seats to operate.
Vehicles Equipped With Remote Start
On models that are equipped with remote start,
the ventilated seats can be programmed to
come on during a remote start.
This feature can be programmed through the
Uconnect system. Refer to “Uconnect Settings”
in “Multimedia” for further information.
HEAD RESTRAINTS
Head restraints are designed to reduce the risk
of injury by restricting head movement in the
event of a rear impact. Head restraints should
be adjusted so that the top of the head restraint
is located above the top of your ear. NOTE:
Do not reverse the head restraints (making the rear
of the head restraint face forward) in an attempt to
gain additional clearance to the back of your head.
REACTIVE HEAD RESTRAINTS — FRONT
S
EATS
The front driver and passenger seats are
equipped with Reactive Head Restraints (RHR).
In the event of a rear impact, the RHR will
automatically extend forward minimizing the
gap between the back of the occupant’s head
and the RHR. The RHR will automatically return to their
normal position following a rear impact. If the
RHR do not return to their normal position, see
an authorized dealer immediately.
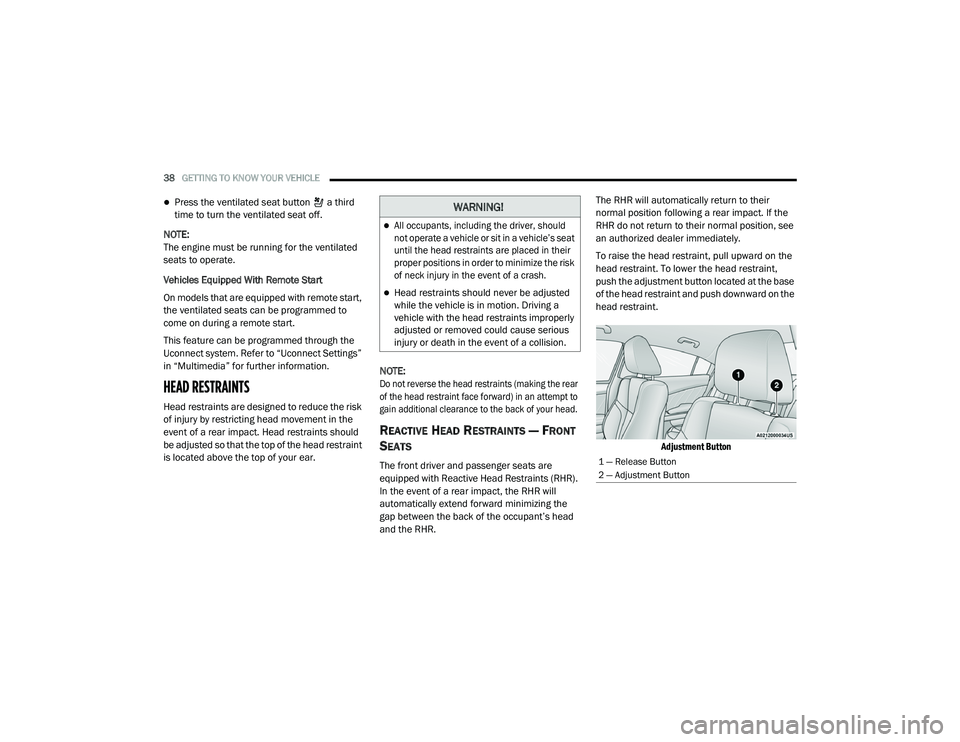
To raise the head restraint, pull upward on the
head restraint. To lower the head restraint,
push the adjustment button located at the base
of the head restraint and push downward on the
head restraint.
Adjustment Button
WARNING!
All occupants, including the driver, should
not operate a vehicle or sit in a vehicle’s seat
until the head restraints are placed in their
proper positions in order to minimize the risk
of neck injury in the event of a crash.
Head restraints should never be adjusted
while the vehicle is in motion. Driving a
vehicle with the head restraints improperly
adjusted or removed could cause serious
injury or death in the event of a collision.
1 — Release Button
2 — Adjustment Button
20_LD_OM_EN_USC_t.book Page 38
Page 132 of 412
130SAFETY
3. When the seat belt is long enough to fit,
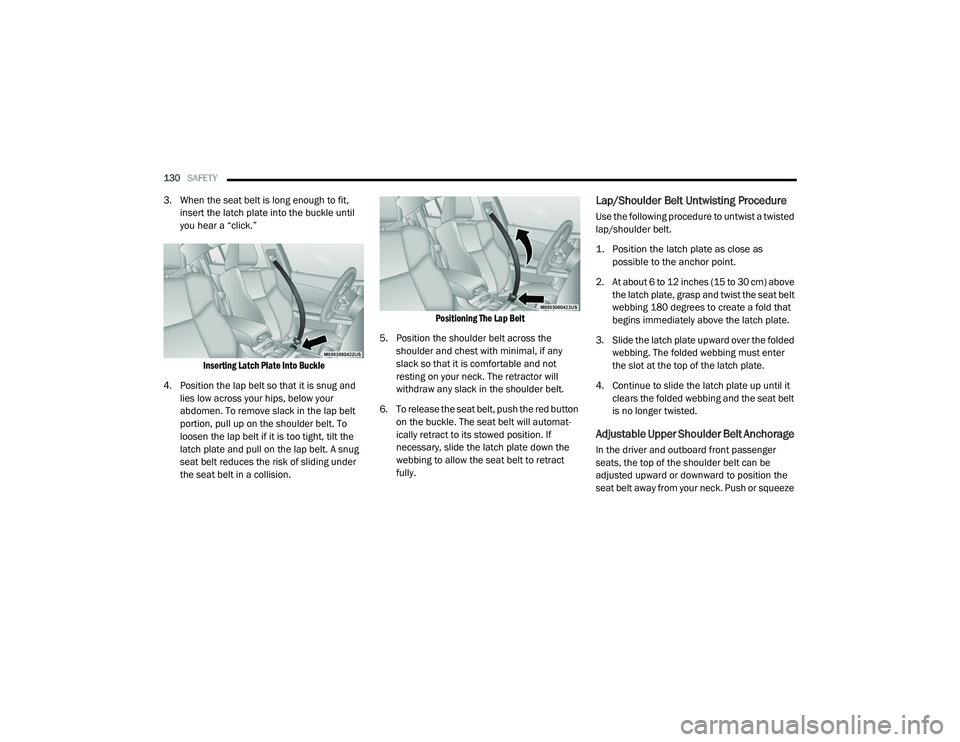
insert the latch plate into the buckle until
you hear a “click.”
Inserting Latch Plate Into Buckle
4. Position the lap belt so that it is snug and lies low across your hips, below your
abdomen. To remove slack in the lap belt
portion, pull up on the shoulder belt. To
loosen the lap belt if it is too tight, tilt the
latch plate and pull on the lap belt. A snug
seat belt reduces the risk of sliding under
the seat belt in a collision.
Positioning The Lap Belt
5. Position the shoulder belt across the shoulder and chest with minimal, if any
slack so that it is comfortable and not
resting on your neck. The retractor will
withdraw any slack in the shoulder belt.
6. To release the seat belt, push the red button on the buckle. The seat belt will automat -
ically retract to its stowed position. If
necessary, slide the latch plate down the
webbing to allow the seat belt to retract
fully.Lap/Shoulder Belt Untwisting Procedure
Use the following procedure to untwist a twisted
lap/shoulder belt.
1. Position the latch plate as close as possible to the anchor point.
2. At about 6 to 12 inches (15 to 30 cm) above the latch plate, grasp and twist the seat belt
webbing 180 degrees to create a fold that
begins immediately above the latch plate.
3. Slide the latch plate upward over the folded webbing. The folded webbing must enter
the slot at the top of the latch plate.
4. Continue to slide the latch plate up until it clears the folded webbing and the seat belt
is no longer twisted.
Adjustable Upper Shoulder Belt Anchorage
In the driver and outboard front passenger
seats, the top of the shoulder belt can be
adjusted upward or downward to position the
seat belt away from your neck. Push or squeeze
20_LD_OM_EN_USC_t.book Page 130
Page 147 of 412
SAFETY145
(Continued)
Older Children And Child Restraints
Children who are two years old or who have
outgrown their rear-facing convertible child seat
can ride forward-facing in the vehicle.
Forward-facing child seats and convertible child
seats used in the forward-facing direction are
for children who are over two years old or who
have outgrown the rear-facing weight or height
limit of their rear-facing convertible child seat.
Children should remain in a forward-facing child
seat with a harness for as long as possible, up
to the highest weight or height allowed by the
child seat.
All children whose weight or height is above the
forward-facing limit for the child seat should use
a belt-positioning booster seat until the vehicle’s
seat belts fit properly. If the child cannot sit with
knees bent over the vehicle’s seat cushion while
the child’s back is against the seatback, they
should use a belt-positioning booster seat. The
child and belt-positioning booster seat are held in
the vehicle by the seat belt.
Children Too Large For Booster Seats
Children who are large enough to wear the
shoulder belt comfortably, and whose legs are
long enough to bend over the front of the seat
when their back is against the seatback, should
use the seat belt in a rear seat. Use this simple
5-step test to decide whether the child can use
the vehicle’s seat belt alone:
1. Can the child sit all the way back against
the back of the vehicle seat?
2. Do the child’s knees bend comfortably over the front of the vehicle seat – while the child
is still sitting all the way back?
Never install a rear-facing child restraint in
the front seat of a vehicle. Only use a
rear-facing child restraint in the rear seat. If
the vehicle does not have a rear seat, do
not transport a rear-facing child restraint in
that vehicle.
WARNING! (Continued)
WARNING!
Improper installation can lead to failure of
an infant or child restraint. It could come
loose in a collision. The child could be badly
injured or killed. Follow the child restraint
manufacturer’s directions exactly when
installing an infant or child restraint.
After a child restraint is installed in the
vehicle, do not move the vehicle seat
forward or rearward because it can loosen
the child restraint attachments. Remove
the child restraint before adjusting the
vehicle seat position. When the vehicle seat
has been adjusted, reinstall the child
restraint.
When your child restraint is not in use,
secure it in the vehicle with the seat belt or
LATCH anchorages, or remove it from the
vehicle. Do not leave it loose in the vehicle.
In a sudden stop or accident, it could strike
the occupants or seatbacks and cause
serious personal injury. WARNING! (Continued)
4
20_LD_OM_EN_USC_t.book Page 145
Page 150 of 412
148SAFETY
Frequently Asked Questions About Installing Child Restraints With LATCH
What is the weight limit (child’s weight + weight
of the child restraint) for using the LATCH
anchorage system to attach the child restraint? 65 lbs (29.5 kg)Use the LATCH anchorage system until the
combined weight of the child and the child
restraint is 65 lbs (29.5 kg). Use the seat belt
and tether anchor instead of the LATCH system
once the combined weight is more than 65 lbs
(29.5 kg).
Can the LATCH anchorages and the seat belt be
used together to attach a rear-facing or
forward-facing child restraint? NoDo not use the seat belt when you use the
LATCH anchorage system to attach a rear-facing
or forward-facing child restraint.
Booster seats may be attached to the LATCH
anchorages if allowed by the booster seat
manufacturer. See your booster seat owner’s
manual for more information.
Can two child restraints be attached using a
common lower LATCH anchorage? NoNever “share” a LATCH anchorage with two or
more child restraints. If the center position does
not have dedicated LATCH lower anchorages,
use the seat belt to install a child seat in the
center position next to a child seat using the
LATCH anchorages in an outboard position.
Can the rear-facing child restraint touch the
back of the front passenger seat? YesThe child seat may touch the back of the front
passenger seat if the child restraint
manufacturer also allows contact. See your
child restraint owner’s manual for more
information.
Can the rear head restraints be removed? No
20_LD_OM_EN_USC_t.book Page 148
Page 154 of 412
152SAFETY
Installing A Child Restraint With A
Switchable Automatic Locking Retractor
(ALR):
Child restraint systems are designed to be
secured in vehicle seats by lap belts or the lap
belt portion of a lap/shoulder belt.
1. Place the child seat in the center of the
seating position. If the second row seat can
be reclined, you may recline the seat and/
or raise the head restraint (if adjustable) to
get a better fit. If the rear seat can be
moved forward and rearward in the
vehicle, you may wish to move it to its
rear-most position to make room for the
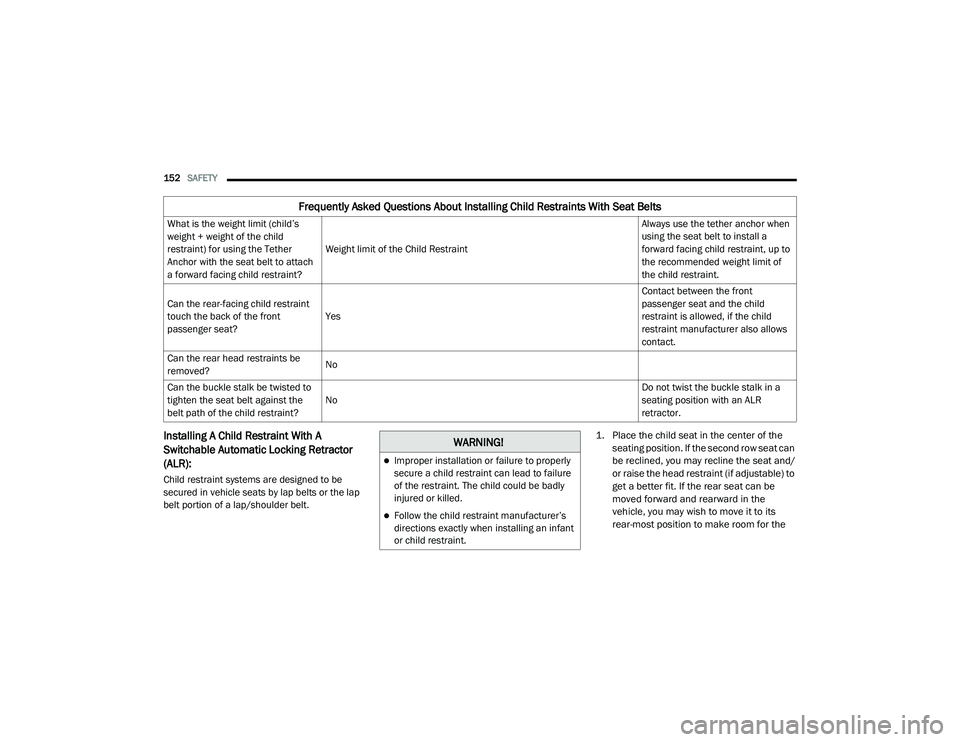
Frequently Asked Questions About Installing Child Restraints With Seat Belts
What is the weight limit (child’s
weight + weight of the child
restraint) for using the Tether
Anchor with the seat belt to attach
a forward facing child restraint? Weight limit of the Child Restraint Always use the tether anchor when
using the seat belt to install a
forward facing child restraint, up to
the recommended weight limit of
the child restraint.
Can the rear-facing child restraint
touch the back of the front
passenger seat? Yes Contact between the front
passenger seat and the child
restraint is allowed, if the child
restraint manufacturer also allows
contact.
Can the rear head restraints be
removed? No
Can the buckle stalk be twisted to
tighten the seat belt against the
belt path of the child restraint? No Do not twist the buckle stalk in a
seating position with an ALR
retractor.
WARNING!
Improper installation or failure to properly
secure a child restraint can lead to failure
of the restraint. The child could be badly
injured or killed.
Follow the child restraint manufacturer’s
directions exactly when installing an infant
or child restraint.
20_LD_OM_EN_USC_t.book Page 152
Page 308 of 412
306SERVICING AND MAINTENANCE
If a lot of driving is done on gravel roads,
consider mud or stone shields behind each
wheel.
Use Mopar Touch Up Paint on scratches as
soon as possible. An authorized dealer has
touch up paint to match the color of your
vehicle.
INTERIORS
SEATS AND FABRIC PARTS
Use Mopar Total Clean to clean fabric
upholstery and carpeting.
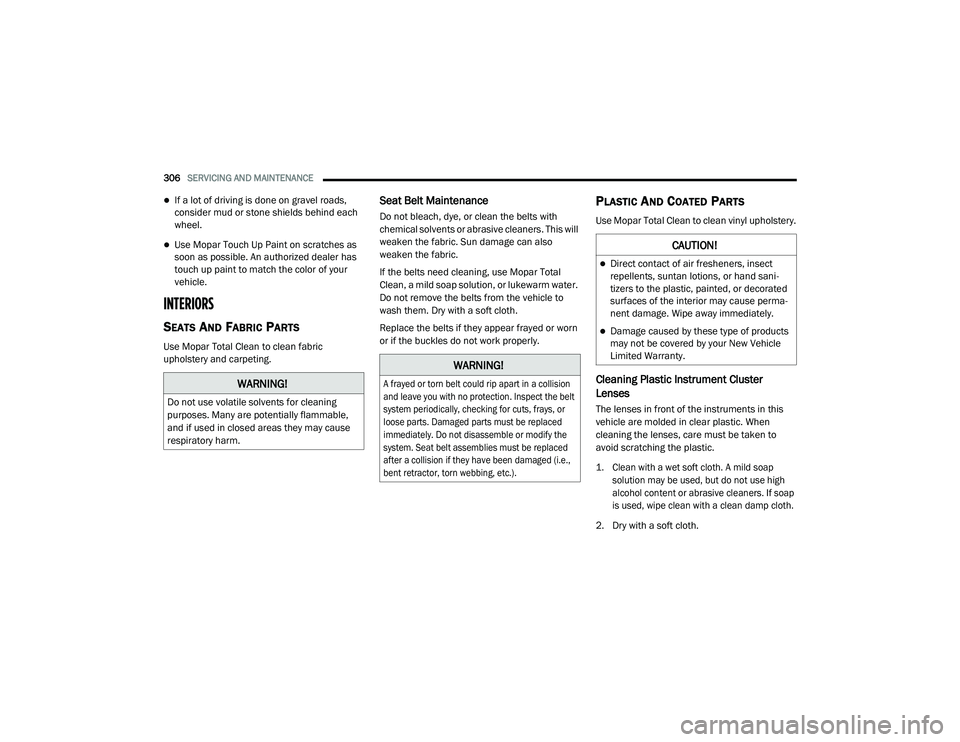
Seat Belt Maintenance
Do not bleach, dye, or clean the belts with
chemical solvents or abrasive cleaners. This will
weaken the fabric. Sun damage can also
weaken the fabric.
If the belts need cleaning, use Mopar Total
Clean, a mild soap solution, or lukewarm water.
Do not remove the belts from the vehicle to
wash them. Dry with a soft cloth.
Replace the belts if they appear frayed or worn
or if the buckles do not work properly.
PLASTIC AND COATED PARTS
Use Mopar Total Clean to clean vinyl upholstery.
Cleaning Plastic Instrument Cluster
Lenses
The lenses in front of the instruments in this
vehicle are molded in clear plastic. When
cleaning the lenses, care must be taken to
avoid scratching the plastic.
1. Clean with a wet soft cloth. A mild soap
solution may be used, but do not use high
alcohol content or abrasive cleaners. If soap
is used, wipe clean with a clean damp cloth.
2. Dry with a soft cloth.
WARNING!
Do not use volatile solvents for cleaning
purposes. Many are potentially flammable,
and if used in closed areas they may cause
respiratory harm.
WARNING!
A frayed or torn belt could rip apart in a collision
and leave you with no protection. Inspect the belt
system periodically, checking for cuts, frays, or
loose parts. Damaged parts must be replaced
immediately. Do not disassemble or modify the
system. Seat belt assemblies must be replaced
after a collision if they have been damaged (i.e.,
bent retractor, torn webbing, etc.).
CAUTION!
Direct contact of air fresheners, insect
repellents, suntan lotions, or hand sani -
tizers to the plastic, painted, or decorated
surfaces of the interior may cause perma -
nent damage. Wipe away immediately.
Damage caused by these type of products
may not be covered by your New Vehicle
Limited Warranty.
20_LD_OM_EN_USC_t.book Page 306
Page 309 of 412
SERVICING AND MAINTENANCE307
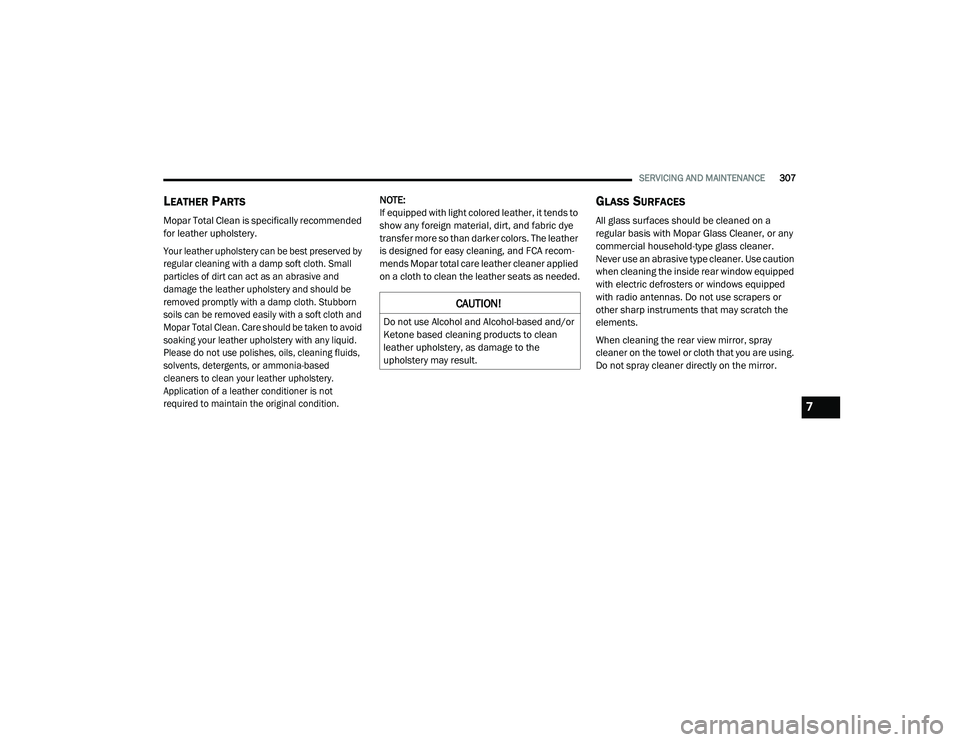
LEATHER PARTS
Mopar Total Clean is specifically recommended
for leather upholstery.
Your leather upholstery can be best preserved by
regular cleaning with a damp soft cloth. Small
particles of dirt can act as an abrasive and
damage the leather upholstery and should be
removed promptly with a damp cloth. Stubborn
soils can be removed easily with a soft cloth and
Mopar Total Clean. Care should be taken to avoid
soaking your leather upholstery with any liquid.
Please do not use polishes, oils, cleaning fluids,
solvents, detergents, or ammonia-based
cleaners to clean your leather upholstery.
Application of a leather conditioner is not
required to maintain the original condition.
NOTE:
If equipped with light colored leather, it tends to
show any foreign material, dirt, and fabric dye
transfer more so than darker colors. The leather
is designed for easy cleaning, and FCA recom
-
mends Mopar total care leather cleaner applied
on a cloth to clean the leather seats as needed.
GLASS SURFACES
All glass surfaces should be cleaned on a
regular basis with Mopar Glass Cleaner, or any
commercial household-type glass cleaner.
Never use an abrasive type cleaner. Use caution
when cleaning the inside rear window equipped
with electric defrosters or windows equipped
with radio antennas. Do not use scrapers or
other sharp instruments that may scratch the
elements.
When cleaning the rear view mirror, spray
cleaner on the towel or cloth that you are using.
Do not spray cleaner directly on the mirror.
CAUTION!
Do not use Alcohol and Alcohol-based and/or
Ketone based cleaning products to clean
leather upholstery, as damage to the
upholstery may result.
7
20_LD_OM_EN_USC_t.book Page 307
Page 339 of 412
MULTIMEDIA337
Clear Personal Data
After pressing the Clear Personal Data button on the touchscreen, the following setting will be available:
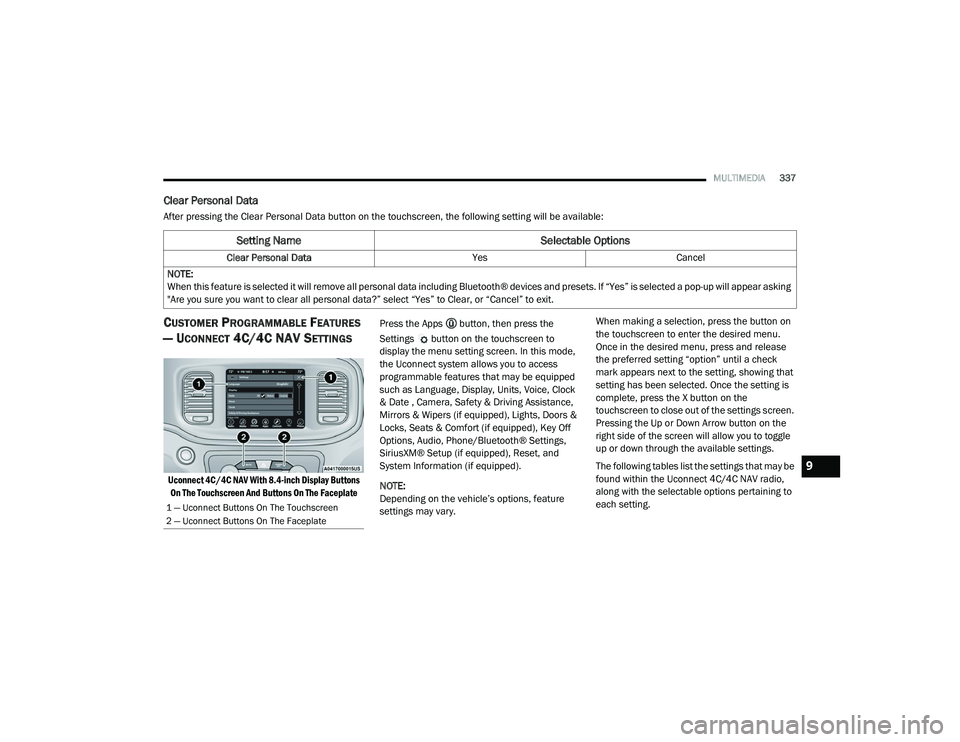
CUSTOMER PROGRAMMABLE FEATURES
— U
CONNECT 4C/4C NAV SETTINGS
Uconnect 4C/4C NAV With 8.4-inch Display Buttons
On The Touchscreen And Buttons On The Faceplate
Press the Apps button, then press the
Settings button on the touchscreen to
display the menu setting screen. In this mode,
the Uconnect system allows you to access
programmable features that may be equipped
such as Language, Display, Units, Voice, Clock
& Date , Camera, Safety & Driving Assistance,
Mirrors & Wipers (if equipped), Lights, Doors &
Locks, Seats & Comfort (if equipped), Key Off
Options, Audio, Phone/Bluetooth® Settings,
SiriusXM® Setup (if equipped), Reset, and
System Information (if equipped).
NOTE:
Depending on the vehicle’s options, feature
settings may vary. When making a selection, press the button on
the touchscreen to enter the desired menu.
Once in the desired menu, press and release
the preferred setting “option” until a check
mark appears next to the setting, showing that
setting has been selected. Once the setting is
complete, press the X button on the
touchscreen to close out of the settings screen.
Pressing the Up or Down Arrow button on the
right side of the screen will allow you to toggle
up or down through the available settings.
The following tables list the settings that may be
found within the Uconnect 4C/4C NAV radio,
along with the selectable options pertaining to
each setting.
Setting Name
Selectable Options
Clear Personal DataYesCancel
NOTE:
When this feature is selected it will remove all personal data including Bluetooth® devices and presets. If “Yes” is selected a pop-up will appear asking
"Are you sure you want to clear all personal data?” select “Yes” to Clear, or “Cancel” to exit.
1 — Uconnect Buttons On The Touchscreen
2 — Uconnect Buttons On The Faceplate
9
20_LD_OM_EN_USC_t.book Page 337