DODGE CHARGER 2022 Repair Manual
Manufacturer: DODGE, Model Year: 2022, Model line: CHARGER, Model: DODGE CHARGER 2022Pages: 312, PDF Size: 18.99 MB
Page 61 of 312
GETTING TO KNOW YOUR VEHICLE59
USB/AUX CONTROL
This feature allows an external USB device to be
plugged into the USB port.
Plugging in a smartphone device to a USB port may
activate Android Auto™ or Apple CarPlay®
features, if equipped. For further information, refer
to “Android Auto™” or “Apple CarPlay®” in the
Owner’s Manual Supplement.
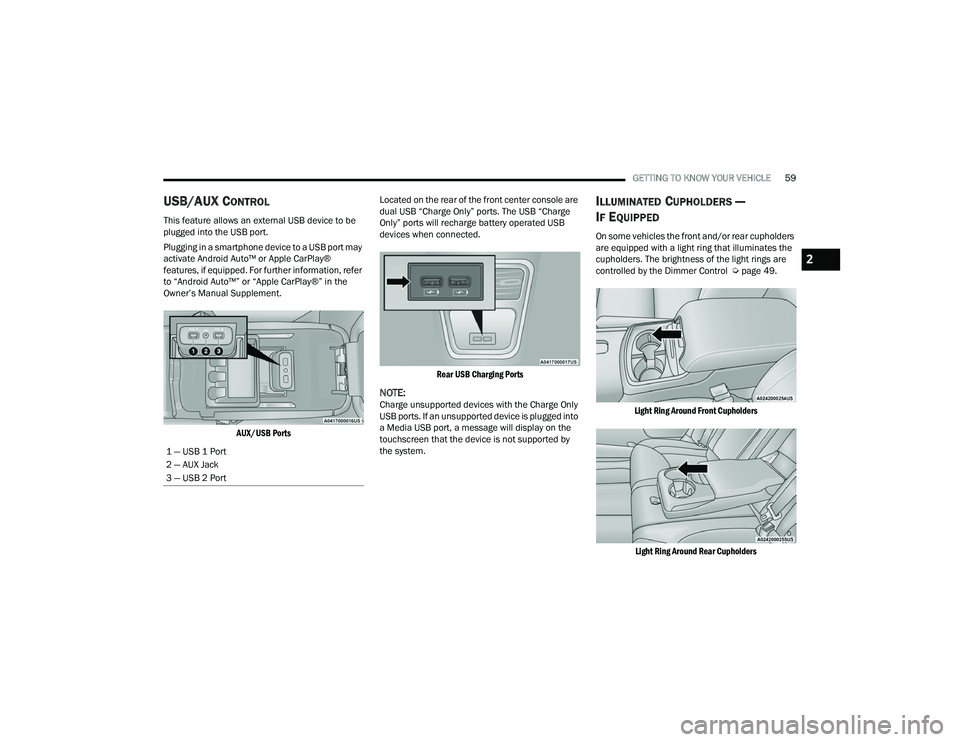
AUX/USB Ports
Located on the rear of the front center console are
dual USB “Charge Only” ports. The USB “Charge
Only” ports will recharge battery operated USB
devices when connected.
Rear USB Charging Ports
NOTE:Charge unsupported devices with the Charge Only
USB ports. If an unsupported device is plugged into
a Media USB port, a message will display on the
touchscreen that the device is not supported by
the system.
ILLUMINATED CUPHOLDERS —
I
F EQUIPPED
On some vehicles the front and/or rear cupholders
are equipped with a light ring that illuminates the
cupholders. The brightness of the light rings are
controlled by the Dimmer Control Ú page 49.
Light Ring Around Front Cupholders
Light Ring Around Rear Cupholders
1 — USB 1 Port
2 — AUX Jack
3 — USB 2 Port
2
22_LD_OM_EN_USC_t.book Page 59
Page 62 of 312
60GETTING TO KNOW YOUR VEHICLE
POWER OUTLETS
Your vehicle is equipped with 12 Volt (15 Amp)
power outlets that can be used to power cellular
phones, small electronics and other low powered
electrical accessories. The power outlets are
labeled with either a “key” or a “battery” symbol to
indicate how the outlet is powered. Power outlets
labeled with a key symbol are powered when the
ignition is in the ON or ACC position, while the
outlets labeled with a battery symbol are
connected directly to the battery and powered at
all times.
NOTE:All accessories connected to the battery powered
outlets should be removed or turned off when the
vehicle is not in use to protect the battery against
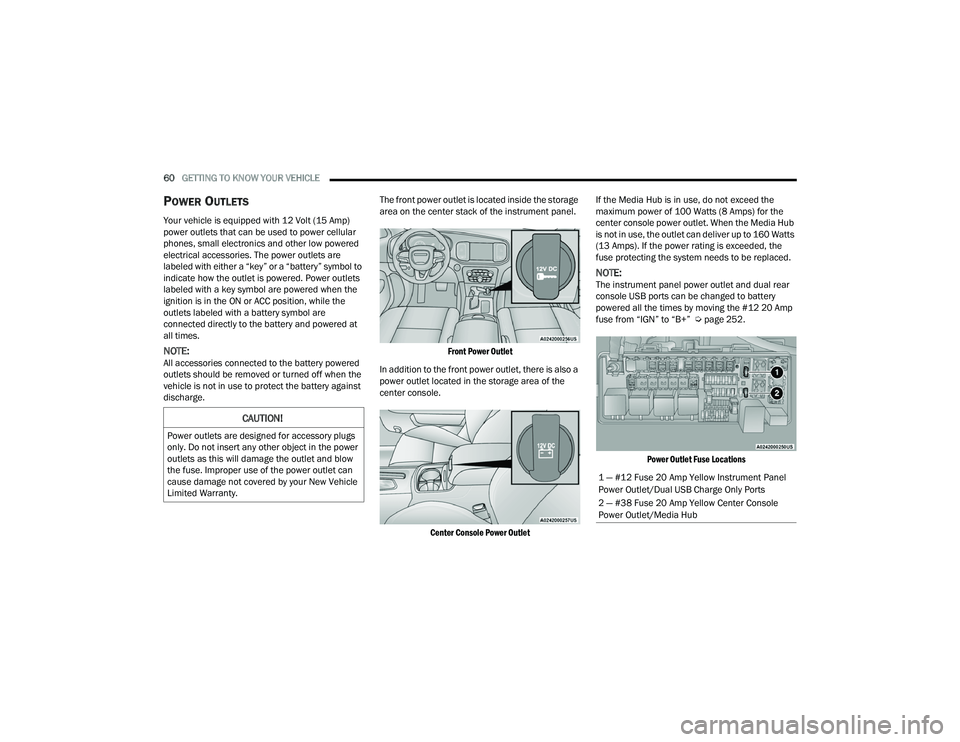
discharge. The front power outlet is located inside the storage
area on the center stack of the instrument panel.
Front Power Outlet
In addition to the front power outlet, there is also a
power outlet located in the storage area of the
center console.
Center Console Power Outlet
If the Media Hub is in use, do not exceed the
maximum power of 100 Watts (8 Amps) for the
center console power outlet. When the Media Hub
is not in use, the outlet can deliver up to 160 Watts
(13 Amps). If the power rating is exceeded, the
fuse protecting the system needs to be replaced.
NOTE:The instrument panel power outlet and dual rear
console USB ports can be changed to battery
powered all the times by moving the #12 20 Amp
fuse from “IGN” to “B+” Ú
page 252.
Power Outlet Fuse Locations
CAUTION!
Power outlets are designed for accessory plugs
only. Do not insert any other object in the power
outlets as this will damage the outlet and blow
the fuse. Improper use of the power outlet can
cause damage not covered by your New Vehicle
Limited Warranty.
1 — #12 Fuse 20 Amp Yellow Instrument Panel
Power Outlet/Dual USB Charge Only Ports
2 — #38 Fuse 20 Amp Yellow Center Console
Power Outlet/Media Hub
22_LD_OM_EN_USC_t.book Page 60
Page 63 of 312
GETTING TO KNOW YOUR VEHICLE61
(Continued)
WINDOWS
POWER WINDOW CONTROLS
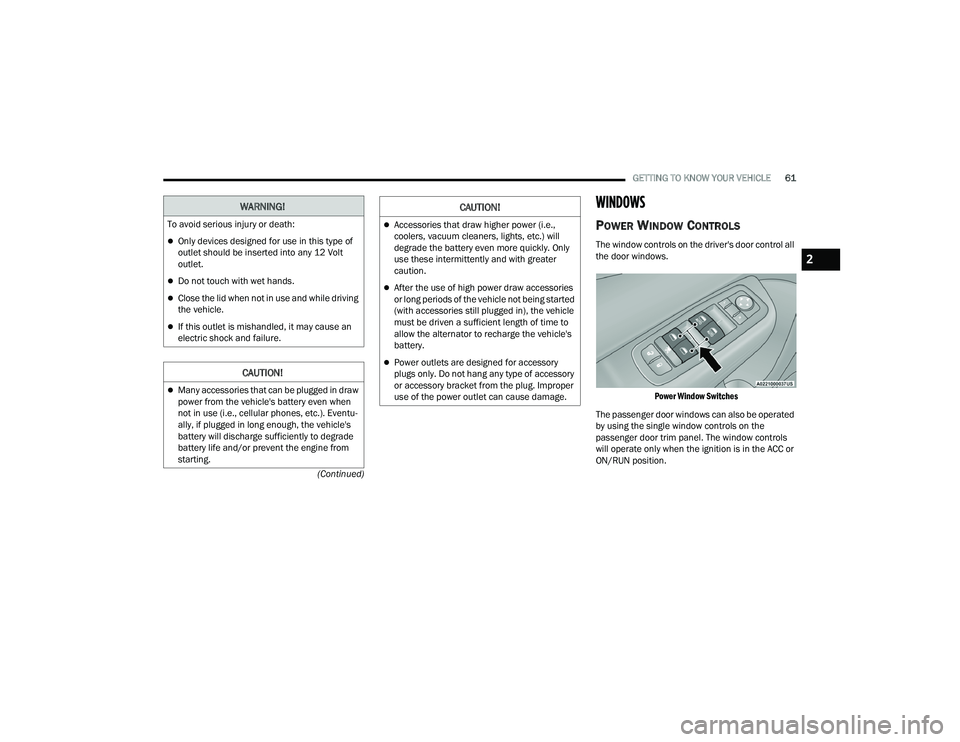
The window controls on the driver's door control all
the door windows.
Power Window Switches
The passenger door windows can also be operated
by using the single window controls on the
passenger door trim panel. The window controls
will operate only when the ignition is in the ACC or
ON/RUN position.
WARNING!
To avoid serious injury or death:
Only devices designed for use in this type of
outlet should be inserted into any 12 Volt
outlet.
Do not touch with wet hands.
Close the lid when not in use and while driving
the vehicle.
If this outlet is mishandled, it may cause an
electric shock and failure.
CAUTION!
Many accessories that can be plugged in draw
power from the vehicle's battery even when
not in use (i.e., cellular phones, etc.). Eventu -
ally, if plugged in long enough, the vehicle's
battery will discharge sufficiently to degrade
battery life and/or prevent the engine from
starting.
Accessories that draw higher power (i.e.,
coolers, vacuum cleaners, lights, etc.) will
degrade the battery even more quickly. Only
use these intermittently and with greater
caution.
After the use of high power draw accessories
or long periods of the vehicle not being started
(with accessories still plugged in), the vehicle
must be driven a sufficient length of time to
allow the alternator to recharge the vehicle's
battery.
Power outlets are designed for accessory
plugs only. Do not hang any type of accessory
or accessory bracket from the plug. Improper
use of the power outlet can cause damage.
CAUTION!
2
22_LD_OM_EN_USC_t.book Page 61
Page 64 of 312
62GETTING TO KNOW YOUR VEHICLE
To open the window part way (manually), push the
window switch down briefly and release.
NOTE:The power window switches will remain active for
up to 10 minutes after the ignition is placed in the
OFF position. Opening either front door will cancel
this feature. The timing is programmable within
Uconnect Settings Ú page 123.
AUTOMATIC WINDOW FEATURES
Auto-Down Feature
The driver and front passenger door power window
switches have an Auto-Down feature. Push the
window switch down to the second detent, release,
and the window will go down automatically.
To stop the window from going all the way down
during the Auto-Down operation, pull up or push
down on the switch briefly.
Auto-Up Feature With Anti-Pinch Protection
Pull the window switch up to the second detent and
the window will go up automatically.
To stop the window from going all the way up
during the Auto-Up operation, push down on the
switch briefly.
To close the window part way, lift the window
switch briefly and release it when you want the
window to stop.
If the window runs into any obstacle during
auto-closure, it will reverse direction and then go
back down. Remove the obstacle and use the
window switch again to close the window.
NOTE:Any impact due to rough road conditions may
trigger the auto-reverse function unexpectedly
during auto-closure. If this happens, pull the switch
lightly and hold to close the window manually.
RESET AUTO-UP
Should the Auto-Up feature stop working, the
window may need to be reset. To reset Auto-Up:
1. Pull the window switch up to close the window
completely and continue to hold the switch up
for an additional two seconds after the
window is closed.
2. Push the window switch down firmly to open the window completely and continue to hold
the switch down for an additional two seconds
after the window is fully open.
WARNING!
Never leave children unattended in a vehicle,
and do not let children play with power windows.
Do not leave the key fob in or near the vehicle, or
in a location accessible to children, and do not
leave the Keyless Enter ‘n Go™ Ignition in the
ACC or ON/RUN position. Occupants, particularly
unattended children, can become entrapped by
the windows while operating the power window
switches. Such entrapment may result in serious
injury or death.
WARNING!
There is no anti-pinch protection when the
window is almost closed. To avoid personal
injury be sure to clear your arms, hands, fingers
and all objects from the window path before
closing.
22_LD_OM_EN_USC_t.book Page 62
Page 65 of 312
GETTING TO KNOW YOUR VEHICLE63
WINDOW LOCKOUT SWITCH
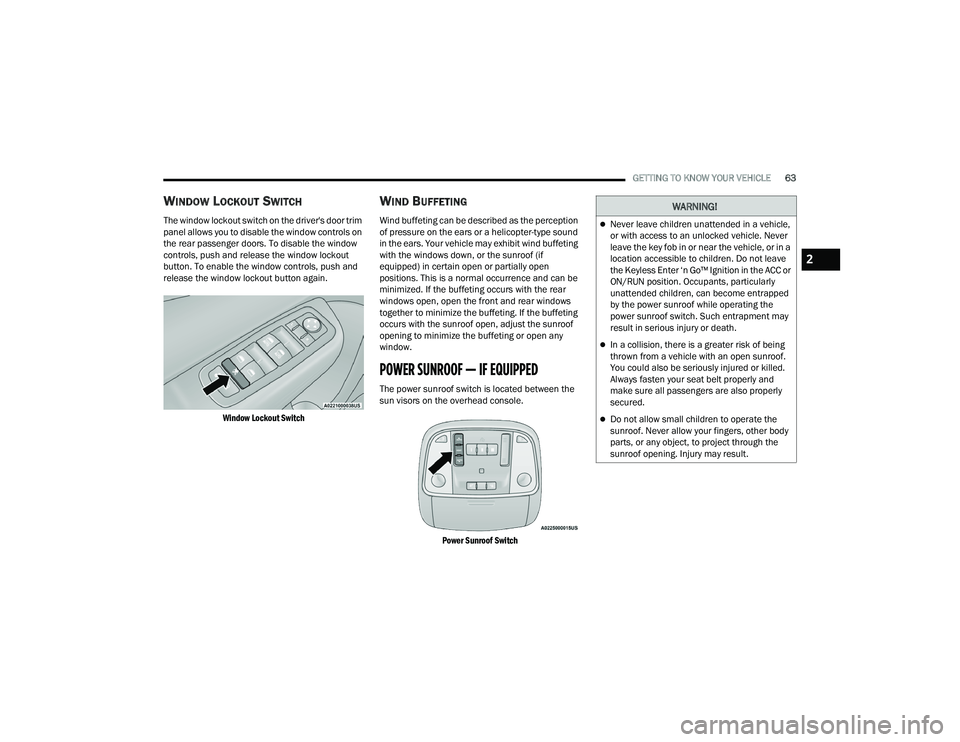
The window lockout switch on the driver's door trim
panel allows you to disable the window controls on
the rear passenger doors. To disable the window
controls, push and release the window lockout
button. To enable the window controls, push and
release the window lockout button again.
Window Lockout Switch
WIND BUFFETING
Wind buffeting can be described as the perception
of pressure on the ears or a helicopter-type sound
in the ears. Your vehicle may exhibit wind buffeting
with the windows down, or the sunroof (if
equipped) in certain open or partially open
positions. This is a normal occurrence and can be
minimized. If the buffeting occurs with the rear
windows open, open the front and rear windows
together to minimize the buffeting. If the buffeting
occurs with the sunroof open, adjust the sunroof
opening to minimize the buffeting or open any
window.
POWER SUNROOF — IF EQUIPPED
The power sunroof switch is located between the
sun visors on the overhead console.
Power Sunroof Switch
WARNING!
Never leave children unattended in a vehicle,
or with access to an unlocked vehicle. Never
leave the key fob in or near the vehicle, or in a
location accessible to children. Do not leave
the Keyless Enter ‘n Go™ Ignition in the ACC or
ON/RUN position. Occupants, particularly
unattended children, can become entrapped
by the power sunroof while operating the
power sunroof switch. Such entrapment may
result in serious injury or death.
In a collision, there is a greater risk of being
thrown from a vehicle with an open sunroof.
You could also be seriously injured or killed.
Always fasten your seat belt properly and
make sure all passengers are also properly
secured.
Do not allow small children to operate the
sunroof. Never allow your fingers, other body
parts, or any object, to project through the
sunroof opening. Injury may result.
2
22_LD_OM_EN_USC_t.book Page 63
Page 66 of 312
64GETTING TO KNOW YOUR VEHICLE
OPENING AND CLOSING THE SUNROOF
Express Open/Close
Push the switch rearward and release it within
one-half second and the sunroof will open
automatically from any position. The sunroof will
open fully and stop automatically.
Push the switch forward and release it within
one-half second and the sunroof will close
automatically from any position. The sunroof will
close fully and stop automatically.
During Express Open or Express Close operation,
any other movement of the sunroof switch will stop
the sunroof.
Manual Open/Close
To open the sunroof, push and hold the switch
rearward to full open.
To close the sunroof, push and hold the switch in
the forward position.
Any release of the switch during open or close
operation will stop the sunroof movement. The
sunroof will remain in a partially opened position
until the switch is operated and held again. Venting The Sunroof
Push and release the Vent button within one-half
second and the sunroof will open to the vent
position. This is called “Express Vent” and it will
occur regardless of sunroof position. During
Express Vent operation, any movement of the
switch will stop the sunroof.
PINCH PROTECT FEATURE
This feature will detect an obstruction in the
closing of the sunroof during the Express Close
operation. If an obstruction in the path of the
sunroof is detected, the sunroof will automatically
retract. Remove the obstruction if this occurs.
NOTE:If three consecutive sunroof close attempts result
in Pinch Protect reversals, Pinch Protect will
disable and the sunroof must be closed in Manual
mode.
SUNSHADE OPERATION
The sunshade can be opened manually. However,
the sunshade will open automatically as the
sunroof opens.
NOTE:The sunshade cannot be closed if the sunroof is
open.
SUNROOF MAINTENANCE
Use only a non-abrasive cleaner and a soft cloth to
clean the glass panel. Periodically check for and
clear out any debris that may have collected in the
tracks.
IGNITION OFF OPERATION
The power sunroof switch can remain active in
Accessory Delay for up to approximately
10 minutes after the vehicle’s ignition is placed to
the OFF position. Opening either front door will
cancel this feature.
This feature is programmable using the Uconnect
system Ú
page 123.
22_LD_OM_EN_USC_t.book Page 64
Page 67 of 312
GETTING TO KNOW YOUR VEHICLE65
HOOD
OPENING THE HOOD
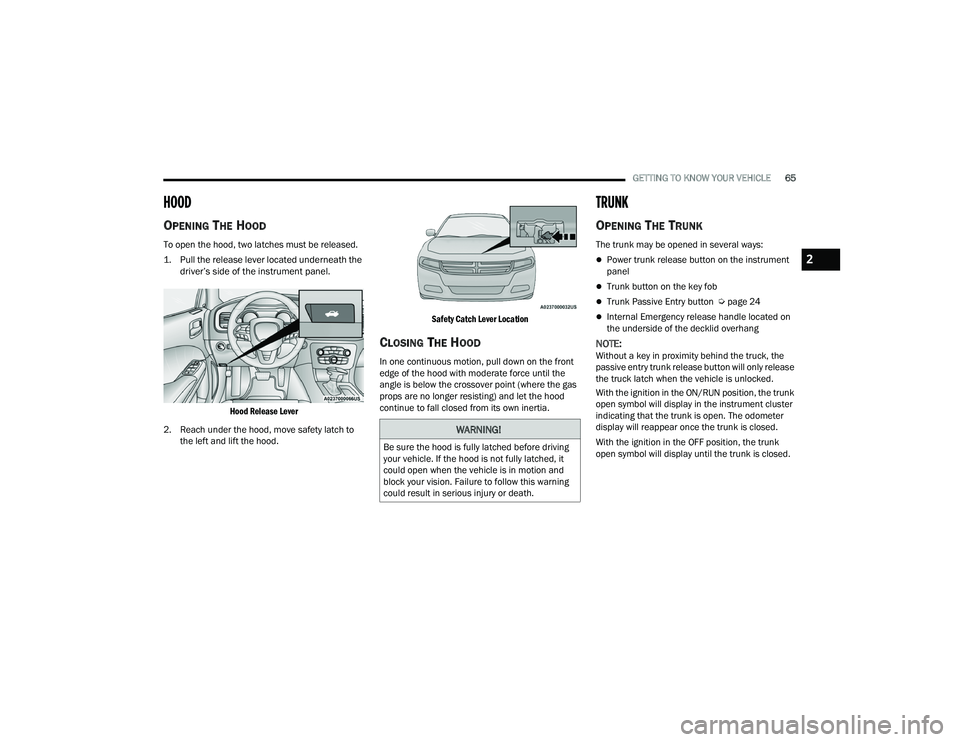
To open the hood, two latches must be released.
1. Pull the release lever located underneath the
driver’s side of the instrument panel.
Hood Release Lever
2. Reach under the hood, move safety latch to the left and lift the hood.
Safety Catch Lever Location
CLOSING THE HOOD
In one continuous motion, pull down on the front
edge of the hood with moderate force until the
angle is below the crossover point (where the gas
props are no longer resisting) and let the hood
continue to fall closed from its own inertia.
TRUNK
OPENING THE TRUNK
The trunk may be opened in several ways:
Power trunk release button on the instrument
panel
Trunk button on the key fob
Trunk Passive Entry button Ú
page 24
Internal Emergency release handle located on
the underside of the decklid overhang
NOTE:Without a key in proximity behind the truck, the
passive entry trunk release button will only release
the truck latch when the vehicle is unlocked.
With the ignition in the ON/RUN position, the trunk
open symbol will display in the instrument cluster
indicating that the trunk is open. The odometer
display will reappear once the trunk is closed.
With the ignition in the OFF position, the trunk
open symbol will display until the trunk is closed.
WARNING!
Be sure the hood is fully latched before driving
your vehicle. If the hood is not fully latched, it
could open when the vehicle is in motion and
block your vision. Failure to follow this warning
could result in serious injury or death.
2
22_LD_OM_EN_USC_t.book Page 65
Page 68 of 312
66GETTING TO KNOW YOUR VEHICLE
Power Trunk Release Button The trunk can be opened from inside the
vehicle using the power trunk release
button located on the instrument panel
to the left of the steering wheel.
NOTE:The gear selector must be in PARK before the
button will operate.
Key Fob Trunk Release ButtonPush the power trunk button on the key
fob twice within five seconds to release
the trunk.
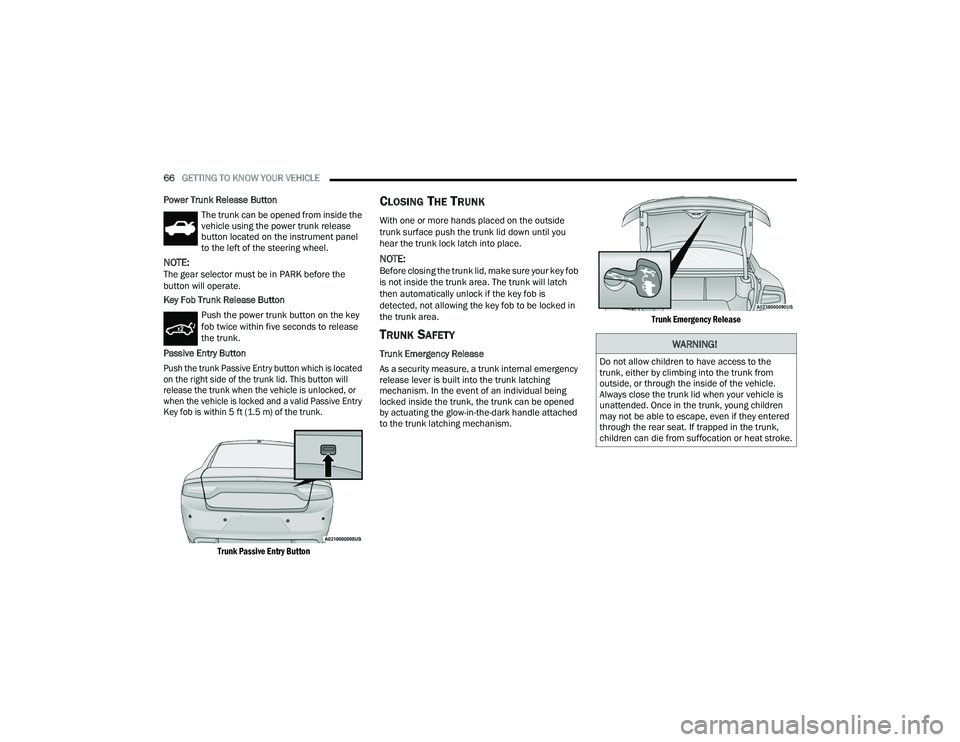
Passive Entry Button
Push the trunk Passive Entry button which is located
on the right side of the trunk lid. This button will
release the trunk when the vehicle is unlocked, or
when the vehicle is locked and a valid Passive Entry
Key fob is within 5 ft (1.5 m) of the trunk.
Trunk Passive Entry Button
CLOSING THE TRUNK
With one or more hands placed on the outside
trunk surface push the trunk lid down until you
hear the trunk lock latch into place.
NOTE:Before closing the trunk lid, make sure your key fob
is not inside the trunk area. The trunk will latch
then automatically unlock if the key fob is
detected, not allowing the key fob to be locked in
the trunk area.
TRUNK SAFETY
Trunk Emergency Release
As a security measure, a trunk internal emergency
release lever is built into the trunk latching
mechanism. In the event of an individual being
locked inside the trunk, the trunk can be opened
by actuating the glow-in-the-dark handle attached
to the trunk latching mechanism.
Trunk Emergency Release
WARNING!
Do not allow children to have access to the
trunk, either by climbing into the trunk from
outside, or through the inside of the vehicle.
Always close the trunk lid when your vehicle is
unattended. Once in the trunk, young children
may not be able to escape, even if they entered
through the rear seat. If trapped in the trunk,
children can die from suffocation or heat stroke.
22_LD_OM_EN_USC_t.book Page 66
Page 69 of 312
67
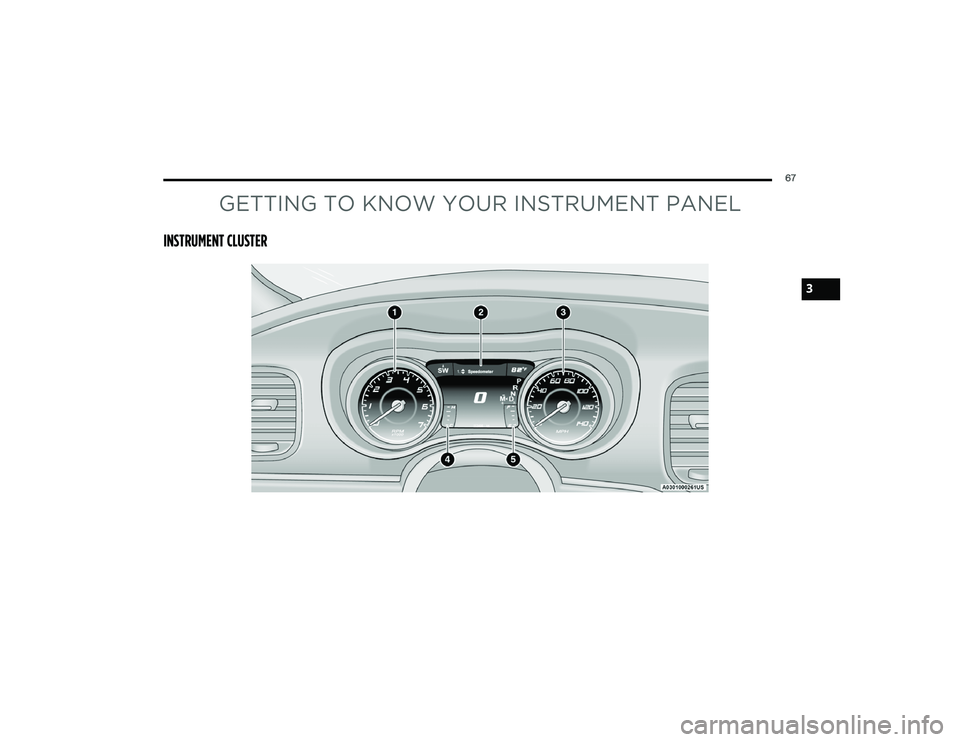
GETTING TO KNOW YOUR INSTRUMENT PANEL
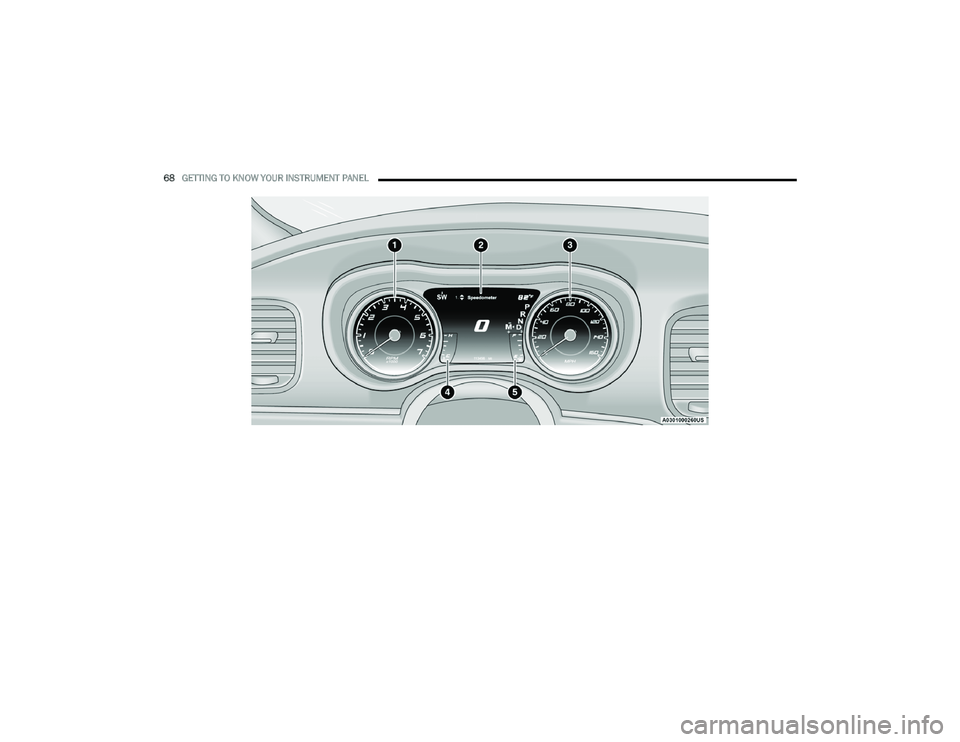
INSTRUMENT CLUSTER
3
22_LD_OM_EN_USC_t.book Page 67
Page 70 of 312
68GETTING TO KNOW YOUR INSTRUMENT PANEL
22_LD_OM_EN_USC_t.book Page 68