Rear Axle DODGE CHARGER 2022 Owners Manual
[x] Cancel search | Manufacturer: DODGE, Model Year: 2022, Model line: CHARGER, Model: DODGE CHARGER 2022Pages: 312, PDF Size: 18.99 MB
Page 6 of 312
4
GETTING TO KNOW YOUR
INSTRUMENT PANEL
INSTRUMENT CLUSTER......................................... 67
Instrument Cluster Descriptions .....................69
INSTRUMENT CLUSTER DISPLAY ........................ 69
Location And Controls .....................................70
Engine Oil Life Reset ........................................71
Performance Shift Indicator (PSI) —
If Equipped........................................................71
Instrument Cluster Display Selectable Menu
Items .................................................................72
Battery Saver On/Battery Saver Mode
Message — Electrical Load Reduction Actions —
If Equipped .......................................................74
WARNING LIGHTS AND MESSAGES ................... 75
Red Warning Lights ..........................................76
Yellow Warning Lights ......................................78
Yellow Indicator Lights .....................................81
Green Indicator Lights......................................81
White Indicator Lights ......................................82
Blue Indicator Lights ........................................82
ONBOARD DIAGNOSTIC SYSTEM — OBD II ....... 82
Onboard Diagnostic System
(OBD II) Cybersecurity ......................................82
EMISSIONS INSPECTION AND MAINTENANCE
PROGRAMS ........................................................... 83
STARTING AND OPERATING
STARTING THE ENGINE .........................................84
Automatic Transmission .................................84
Normal Starting ...............................................84
AutoPark ...........................................................85
Keyless Enter ‘n Go™ — Ignition......................86
Extended Park Starting ....................................86
If Engine Fails To Start .....................................87
Cold Weather Operation
(Below –22°F Or −30°C) ...............................87
After Starting ....................................................87
ENGINE BREAK-IN RECOMMENDATIONS — 3.6L
& 5.7L .....................................................................87
PARKING BRAKE ....................................................88
AUTOMATIC TRANSMISSION ................................89
Ignition Park Interlock ......................................90
Brake Transmission Shift Interlock (BTSI)
System .............................................................90
8-Speed Automatic Transmission ...................90
SPORT MODE — WITHOUT PERFORMANCE
CONTROL................................................................. 94
FUEL SAVER TECHNOLOGY 5.7L ONLY —
IF EQUIPPED ...........................................................94
ELECTRIC POWER STEERING ...............................94
CRUISE CONTROL SYSTEMS — IF EQUIPPED ....95
Cruise Control ...................................................95
Adaptive Cruise Control (ACC) .........................96 PARKSENSE REAR PARK ASSIST —
IF EQUIPPED ......................................................... 105
ParkSense Sensors ....................................... 105
ParkSense Display ........................................ 105
ParkSense Warning Display ......................... 108
Enabling And Disabling ParkSense.............. 108
Service The ParkSense Park Assist System ...108
Cleaning The ParkSense System ................. 108
ParkSense System Usage Precautions........ 108
LANESENSE — IF EQUIPPED ............................. 109
LaneSense Operation ................................... 109
Turning LaneSense On Or Off....................... 110
LaneSense Warning Message...................... 110
Changing LaneSense Status ........................ 112
PARKVIEW REAR BACK UP CAMERA ............... 112
REFUELING THE VEHICLE ................................... 113
VEHICLE LOADING .............................................. 114 Vehicle Certification Label ........................... 114
Gross Vehicle Weight Rating (GVWR) .......... 114
Gross Axle Weight Rating (GAWR) ............... 114
Overloading ................................................... 114
Loading ......................................................... 115
22_LD_OM_EN_USC_t.book Page 4
Page 8 of 312
6
IN CASE OF EMERGENCY
HAZARD WARNING FLASHERS ........................ 213
ASSIST AND SOS MIRROR — IF EQUIPPED...... 213
JACKING AND TIRE CHANGING.......................... 216 Preparations For Jacking .............................. 216Jack Location/Spare Tire Stowage .............. 217
Jacking Instructions ...................................... 218
TIRE SERVICE KIT — IF EQUIPPED ..................... 221
Tire Service Kit Storage ................................ 221
Tire Service Kit Components And Operation ....221
Tire Service Kit Usage Precautions .............. 221
Sealing A Tire With Tire Service Kit .............. 223
JUMP STARTING .................................................. 225
Preparations For Jump Start......................... 226Jump Starting Procedure .............................. 226
REFUELING IN EMERGENCY .............................. 227
IF YOUR ENGINE OVERHEATS ........................... 228
MANUAL PARK RELEASE–8–SPEED
TRANSMISSION.................................................... 229 FREEING A STUCK VEHICLE ............................... 231
TOWING A DISABLED VEHICLE ......................... 232 All Wheel Drive (AWD) Models ...................... 233Rear Wheel Drive (RWD) Models ................ 233
Without The Key Fob ..................................... 233
ENHANCED ACCIDENT RESPONSE SYSTEM
(EARS) .................................................................. 233
EVENT DATA RECORDER (EDR) ........................ 233
SERVICING AND MAINTENANCE
SCHEDULED SERVICING ................................... 234
3.6L And 5.7L Engines ................................. 234
ENGINE COMPARTMENT .................................... 238
3.6L Engine .................................................. 238
5.7L Engine .................................................. 239
Checking Oil Level ......................................... 240
Adding Washer Fluid ..................................... 240
Maintenance-Free Battery ........................... 241Pressure Washing ......................................... 241 VEHICLE MAINTENANCE ..................................... 241
Engine Oil....................................................... 242Engine Oil Filter ............................................. 242Engine Air Cleaner Filter .............................. 243
Air Conditioner Maintenance ....................... 243
Accessory Drive Belt Inspection ................... 244Body Lubrication ........................................... 245
Windshield Wiper Blades.............................. 245
Exhaust System ............................................. 247Cooling System ............................................. 248Brake System ............................................... 251Automatic Transmission ............................... 251
Rear Axle........................................................ 252
Fuses.............................................................. 252
Bulb Replacement ........................................ 261
TIRES ..................................................................... 264
Tire Safety Information ................................ 264Tires — General Information ........................ 273Tire Types....................................................... 276Spare Tires — If Equipped............................. 277Wheel And Wheel Trim Care ........................ 279Snow Traction Devices ................................. 280
Tire Rotation Recommendations ................. 281
22_LD_OM_EN_USC_t.book Page 6
Page 35 of 312
GETTING TO KNOW YOUR VEHICLE33
(Continued)
POWER ADJUSTMENT (FRONT SEATS) —
I
F EQUIPPED
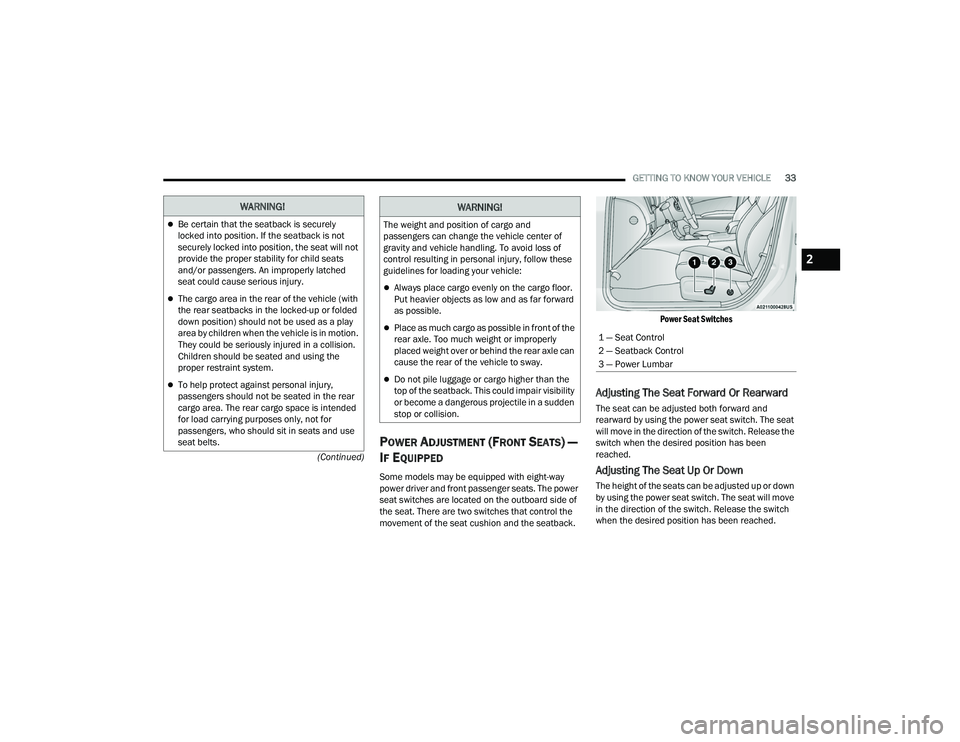
Some models may be equipped with eight-way
power driver and front passenger seats. The power
seat switches are located on the outboard side of
the seat. There are two switches that control the
movement of the seat cushion and the seatback.
Power Seat Switches
Adjusting The Seat Forward Or Rearward
The seat can be adjusted both forward and
rearward by using the power seat switch. The seat
will move in the direction of the switch. Release the
switch when the desired position has been
reached.
Adjusting The Seat Up Or Down
The height of the seats can be adjusted up or down
by using the power seat switch. The seat will move
in the direction of the switch. Release the switch
when the desired position has been reached.
WARNING!
Be certain that the seatback is securely
locked into position. If the seatback is not
securely locked into position, the seat will not
provide the proper stability for child seats
and/or passengers. An improperly latched
seat could cause serious injury.
The cargo area in the rear of the vehicle (with
the rear seatbacks in the locked-up or folded
down position) should not be used as a play
area by children when the vehicle is in motion.
They could be seriously injured in a collision.
Children should be seated and using the
proper restraint system.
To help protect against personal injury,
passengers should not be seated in the rear
cargo area. The rear cargo space is intended
for load carrying purposes only, not for
passengers, who should sit in seats and use
seat belts.
The weight and position of cargo and
passengers can change the vehicle center of
gravity and vehicle handling. To avoid loss of
control resulting in personal injury, follow these
guidelines for loading your vehicle:
Always place cargo evenly on the cargo floor.
Put heavier objects as low and as far forward
as possible.
Place as much cargo as possible in front of the
rear axle. Too much weight or improperly
placed weight over or behind the rear axle can
cause the rear of the vehicle to sway.
Do not pile luggage or cargo higher than the
top of the seatback. This could impair visibility
or become a dangerous projectile in a sudden
stop or collision.
WARNING!
1 — Seat Control
2 — Seatback Control
3 — Power Lumbar
2
22_LD_OM_EN_USC_t.book Page 33
Page 89 of 312
STARTING AND OPERATING87
IF ENGINE FAILS TO START
If the engine fails to start after you have followed
the "Normal Starting" procedure and has not
experienced an extended park condition as
previously defined, it may be flooded. Push the
accelerator pedal all the way to the floor and hold
it there. Crank the engine for no more than 10
seconds. This should clear any excess fuel in case
the engine is flooded. Leave the ignition key in the
ON/RUN position, release the accelerator pedal
and repeat the “Normal Starting” procedure.
COLD WEATHER OPERATION
(B
ELOW –22°F OR −30°C)
To ensure reliable starting at these temperatures,
use of an externally powered electric engine block
heater (available from an authorized dealer) is
recommended.
AFTER STARTING
The idle speed is controlled automatically, and it
will decrease as the engine warms up.
ENGINE BREAK-IN RECOMMENDATIONS —
3.6L & 5.7L
A long break-in period is not required for the
drivetrain (engine, transmission, clutch, and rear
axle) in your new vehicle.
Drive moderately during the first 300 miles
(500 km). After the initial 60 miles (100 km),
speeds up to 50 or 55 mph (80 or 90 km/h) are
desirable. While cruising, brief full-throttle acceleration within
the limits of local traffic laws contributes to a good
break-in. However, wide-open throttle acceleration
in low gear can be detrimental and should be
avoided.
The engine oil, transmission fluid, and axle
lubricant installed at the factory is high-quality and
energy-conserving. Oil, fluid, and lubricant changes
should be consistent with anticipated climate and
conditions under which vehicle operations will
occur. For the recommended viscosity and quality
grades Ú
page 291.
NOTE:A new engine may consume some oil during its first
few thousand miles (kilometers) of operation. This
should be considered a normal part of the break-in
and not interpreted as an indication of difficulty.
Please check your oil level with the engine oil indi -
cator often during the break in period. Add oil as
required.
WARNING!
Never pour fuel or other flammable liquid into
the throttle body air inlet opening in an
attempt to start the vehicle. This could result
in flash fire causing serious personal injury.
Do not attempt to push or tow your vehicle to
get it started. Vehicles equipped with an auto -
matic transmission cannot be started this
way. Unburned fuel could enter the catalytic
converter and once the engine has started,
ignite and damage the converter and vehicle.
If the vehicle has a discharged battery,
booster cables may be used to obtain a start
from a booster battery or the battery in
another vehicle. This type of start can be
dangerous if done improperly Ú page 225.
CAUTION!
To prevent damage to the starter, do not
continuously crank the engine for more than 10
seconds at a time. Wait 10 to 15 seconds before
trying again.
CAUTION!
Never use Non-Detergent Oil or Straight Mineral
Oil in the engine or damage may result.
4
22_LD_OM_EN_USC_t.book Page 87
Page 116 of 312
114STARTING AND OPERATING
VEHICLE LOADING
The load carrying capacity of your vehicle is shown
on the Vehicle Certification Label. This information
should be used for passenger and luggage loading
as indicated.
Do not exceed the specified Gross Vehicle Weight
Rating (GVWR) or the Gross Axle Weight Rating
(GAWR).
VEHICLE CERTIFICATION LABEL
Your vehicle has a Vehicle Certification Label
affixed to the driver’s side B-pillar or the rear of the
driver’s door.
The label contains the following information:
Name of manufacturer.
Month and year of manufacture.
Gross Vehicle Weight Rating (GVWR).
Gross Axle Weight Rating (GAWR) front.
Gross Axle Weight Rating (GAWR) rear.
Vehicle Identification Number (VIN).
Type of vehicle.
Month, Day, and Hour (MDH) of manufacture.
The bar code allows a computer scanner to read
the VIN.
GROSS VEHICLE WEIGHT RATING
(GVWR)
The GVWR is the total allowable weight of your
vehicle. This includes driver, passengers, and
cargo. The total load must be limited so that you do
not exceed the GVWR.
GROSS AXLE WEIGHT RATING (GAWR)
The GAWR is the maximum capacity of the front
and rear axles. Distribute the load over the front
and rear axles evenly. Make sure that you do not
exceed either front or rear GAWR.
OVERLOADING
The load carrying components (axle, springs, tires,
wheels, etc.) of your vehicle will provide
satisfactory service as long as you do not exceed
the GVWR and the front and rear GAWR.
The best way to figure out the total weight of your
vehicle is to weigh it when it is fully loaded and
ready for operation. Weigh it on a commercial scale
to ensure that it is not over the GVWR.
Figure out the weight on the front and rear of the
vehicle separately. It is important that you
distribute the load evenly over the front and rear
axles.
Never add fuel when the engine is running.
This is in violation of most state and federal
fire regulations and may cause the Malfunc -
tion Indicator Light to turn on.
A fire may result if fuel is pumped into a
portable container that is inside of a vehicle.
You could be burned. Always place fuel
containers on the ground while filling.
CAUTION!
To avoid fuel spillage and overfilling, do not “top
off” the fuel tank after filling.
WARNING!
WARNING!
Because the front wheels steer the vehicle, it is
important that you do not exceed the maximum
front or rear GAWR. A dangerous driving
condition can result if either rating is exceeded.
You could lose control of the vehicle and have a
collision.
22_LD_OM_EN_USC_t.book Page 114
Page 117 of 312
STARTING AND OPERATING115
Overloading can cause potential safety hazards
and shorten useful service life. Heavier axles or
suspension components do not necessarily
increase the vehicle's GVWR.
LOADING
To load your vehicle properly, first figure out its
empty weight, axle-by-axle and side-by-side. Store
heavier items down low and be sure you distribute
their weight as evenly as possible. Stow all loose
items securely before driving. If weighing the
loaded vehicle shows that you have exceeded
either GAWR, but the total load is within the
specified GVWR, you must redistribute the weight.
Improper weight distribution can have an adverse
effect on the way your vehicle steers and handles
and the way the brakes operate.
NOTE:
Refer to the Vehicle Certification Label affixed to
the rear of the driver's door for your vehicle's
GVWR and GAWR.
Refer to the Tire and Loading Information
Placard for your vehicle's proper tire pressure
Ú page 270.
TRAILER TOWING
In this section you will find safety tips and
information on limits to the type of towing you can
reasonably do with your vehicle. Before towing a
trailer, carefully review this information to tow your
load as efficiently and safely as possible.
To maintain the New Vehicle Limited Warranty
coverage, follow the requirements and
recommendations in this manual concerning
vehicles used for trailer towing.
COMMON TOWING DEFINITIONS
The following trailer towing related definitions will
assist you in understanding the following
information:
Gross Vehicle Weight Rating (GVWR)
The GVWR is the total allowable weight of your
vehicle. This includes driver, passengers, cargo
and tongue weight. The total load must be limited
so that you do not exceed the GVWR Ú page 114.
Gross Trailer Weight (GTW)
The GTW is the weight of the trailer plus the weight
of all cargo, consumables, and equipment
(permanent or temporary) loaded in or on the
trailer in its "loaded and ready for operation"
condition.
The recommended way to measure GTW is to put
your fully loaded trailer on a vehicle scale. The
entire weight of the trailer must be supported by
the scale.
Gross Combination Weight Rating (GCWR)
The GCWR is the total allowable weight of your
vehicle and trailer when weighed in combination.
Gross Axle Weight Rating (GAWR)
The GAWR is the maximum capacity of the front
and rear axles. Distribute the load over the front
and rear axles evenly. Make sure that you do not
exceed either front or rear GAWR Úpage 114.
WARNING!
It is important that you do not exceed the
maximum front or rear GAWR. A dangerous
driving condition can result if either rating is
exceeded. You could lose control of the vehicle
and have a collision.
4
22_LD_OM_EN_USC_t.book Page 115
Page 120 of 312
118STARTING AND OPERATING
(Continued)
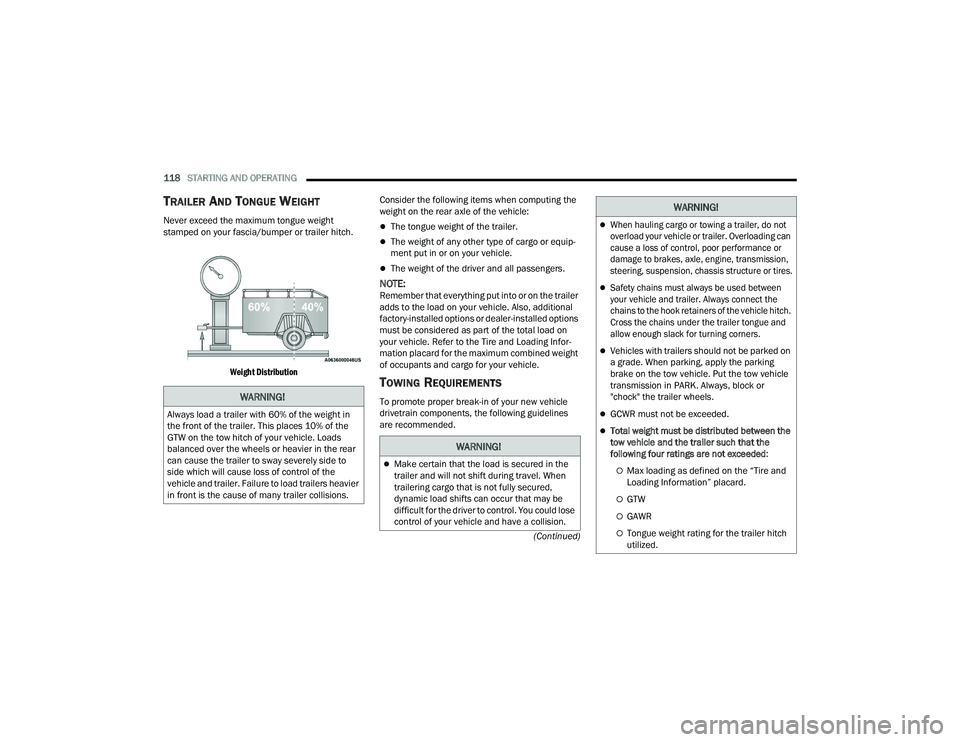
TRAILER AND TONGUE WEIGHT
Never exceed the maximum tongue weight
stamped on your fascia/bumper or trailer hitch.
Weight Distribution
Consider the following items when computing the
weight on the rear axle of the vehicle:The tongue weight of the trailer.
The weight of any other type of cargo or equip
-
ment put in or on your vehicle.
The weight of the driver and all passengers.
NOTE:Remember that everything put into or on the trailer
adds to the load on your vehicle. Also, additional
factory-installed options or dealer-installed options
must be considered as part of the total load on
your vehicle. Refer to the Tire and Loading Infor -
mation placard for the maximum combined weight
of occupants and cargo for your vehicle.
TOWING REQUIREMENTS
To promote proper break-in of your new vehicle
drivetrain components, the following guidelines
are recommended.WARNING!
Always load a trailer with 60% of the weight in
the front of the trailer. This places 10% of the
GTW on the tow hitch of your vehicle. Loads
balanced over the wheels or heavier in the rear
can cause the trailer to sway severely side to
side which will cause loss of control of the
vehicle and trailer. Failure to load trailers heavier
in front is the cause of many trailer collisions.
WARNING!
Make certain that the load is secured in the
trailer and will not shift during travel. When
trailering cargo that is not fully secured,
dynamic load shifts can occur that may be
difficult for the driver to control. You could lose
control of your vehicle and have a collision.
When hauling cargo or towing a trailer, do not
overload your vehicle or trailer. Overloading can
cause a loss of control, poor performance or
damage to brakes, axle, engine, transmission,
steering, suspension, chassis structure or tires.
Safety chains must always be used between
your vehicle and trailer. Always connect the
chains to the hook retainers of the vehicle hitch.
Cross the chains under the trailer tongue and
allow enough slack for turning corners.
Vehicles with trailers should not be parked on
a grade. When parking, apply the parking
brake on the tow vehicle. Put the tow vehicle
transmission in PARK. Always, block or
"chock" the trailer wheels.
GCWR must not be exceeded.
Total weight must be distributed between the
tow vehicle and the trailer such that the
following four ratings are not exceeded :
Max loading as defined on the “Tire and
Loading Information” placard.
GTW
GAWR
Tongue weight rating for the trailer hitch
utilized.
WARNING!
22_LD_OM_EN_USC_t.book Page 118
Page 171 of 312
SAFETY169
If the ABS Warning Light is on, the brake system
should be serviced as soon as possible to restore
the benefits of anti-lock brakes. If the ABS Warning
Light does not come on when the ignition is placed
in the ON/RUN mode, have the light repaired as
soon as possible.
ELECTRONIC BRAKE CONTROL (EBC)
S
YSTEM
Your vehicle is equipped with an advanced
Electronic Brake Control (EBC) system. This system
includes Electronic Brake Force Distribution (EBD),
Anti-Lock Brake System (ABS), Brake Assist
System (BAS), Hill Start Assist (HSA), Traction
Control System (TCS), Electronic Stability Control
(ESC), and Electronic Roll Mitigation (ERM). These
systems work together to enhance both vehicle
stability and control in various driving conditions.
Your vehicle may also be equipped with Ready
Alert Braking (RAB) and Rain Brake Support (RBS).
Brake System Warning Light
The red Brake System Warning Light will turn on
when the ignition is placed in the ON/RUN mode
and may stay on for as long as four seconds. If the Brake System Warning Light remains on or
comes on while driving, it indicates that the brake
system is not functioning properly and that
immediate service is required. If the Brake System
Warning Light does not come on when the ignition
is placed in the ON/RUN mode, have the light
repaired as soon as possible.
Brake Assist System (BAS)
The BAS is designed to optimize the vehicle’s
braking capability during emergency braking
maneuvers. The system detects an emergency
braking situation by sensing the rate and amount
of brake application and then applies optimum
pressure to the brakes. This can help reduce
braking distances. The BAS complements the
Anti-Lock Brake System (ABS). Applying the brakes
very quickly results in the best BAS assistance. To
receive the benefit of the system, you must apply
continuous braking pressure during the stopping
sequence (do not “pump” the brakes). Do not
reduce brake pedal pressure unless braking is no
longer desired. Once the brake pedal is released,
the BAS is deactivated.
Electronic Brake Force Distribution (EBD)
EBD manages the distribution of the braking
torque between the front and rear axles by limiting
braking pressure to the rear axle. This is done to
prevent overslip of the rear wheels to avoid vehicle
instability, and to prevent the rear axle from
entering ABS before the front axle.
WARNING!
The Brake Assist System (BAS) cannot prevent
the natural laws of physics from acting on the
vehicle, nor can it increase the traction afforded
by prevailing road conditions. BAS cannot
prevent collisions, including those resulting from
excessive speed in turns, driving on very slippery
surfaces, or hydroplaning. The capabilities of a
BAS-equipped vehicle must never be exploited in
a reckless or dangerous manner, which could
jeopardize the user's safety or the safety of
others.
6
22_LD_OM_EN_USC_t.book Page 169
Page 238 of 312
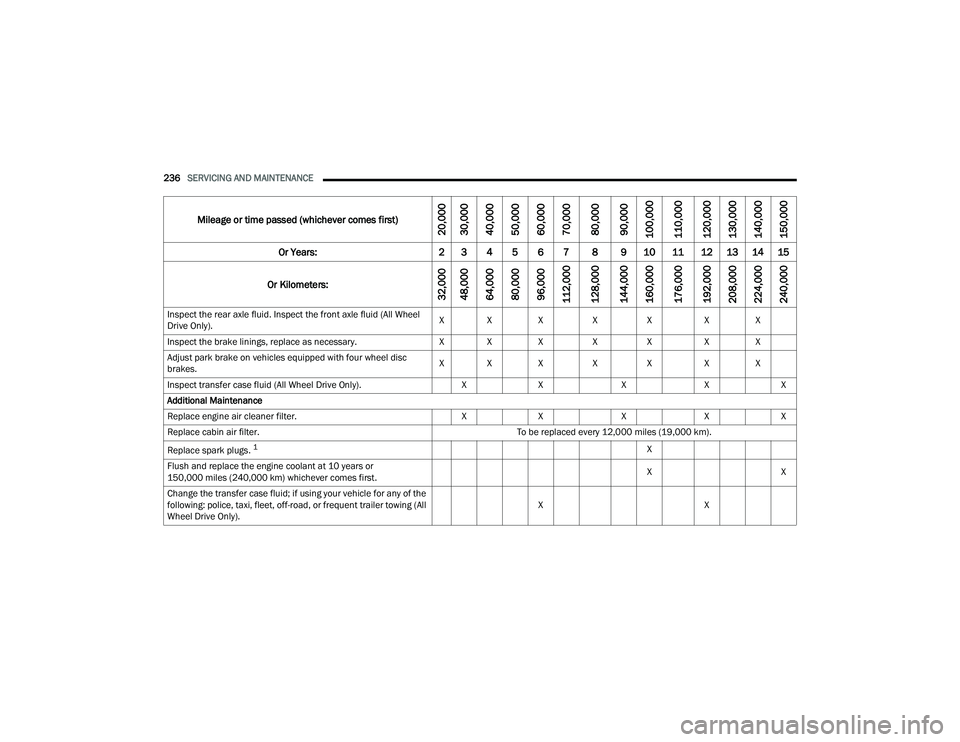
236SERVICING AND MAINTENANCE
Inspect the rear axle fluid. Inspect the front axle fluid (All Wheel
Drive Only). X X X
XX X X
Inspect the brake linings, replace as necessary. X X XXX X X
Adjust park brake on vehicles equipped with four wheel disc
brakes. X X X
XX X X
Inspect transfer case fluid (All Wheel Drive Only). XX XXX
Additional Maintenance
Replace engine air cleaner filter. XX XXX
Replace cabin air filter. To be replaced every 12,000 miles (19,000 km).
Replace spark plugs.
1X
Flush and replace the engine coolant at 10 years or
150,000 miles (240,000 km) whichever comes first. X
X
Change the transfer case fluid; if using your vehicle for any of the
following: police, taxi, fleet, off-road, or frequent trailer towing (All
Wheel Drive Only). X
X
Mileage or time passed (whichever comes first)
20,000
30,000
40,000
50,000
60,000
70,000
80,000
90,000
100,000
110,000
120,000
130,000
140,000
150,000
Or Years: 2 3 4 5 6 7 8 9 10 11 12 13 14 15
Or Kilometers:
32,000
48,000
64,000
80,000
96,000
112,000
128,000
144,000
160,000
176,000
192,000
208,000
224,000
240,000
22_LD_OM_EN_USC_t.book Page 236
Page 239 of 312
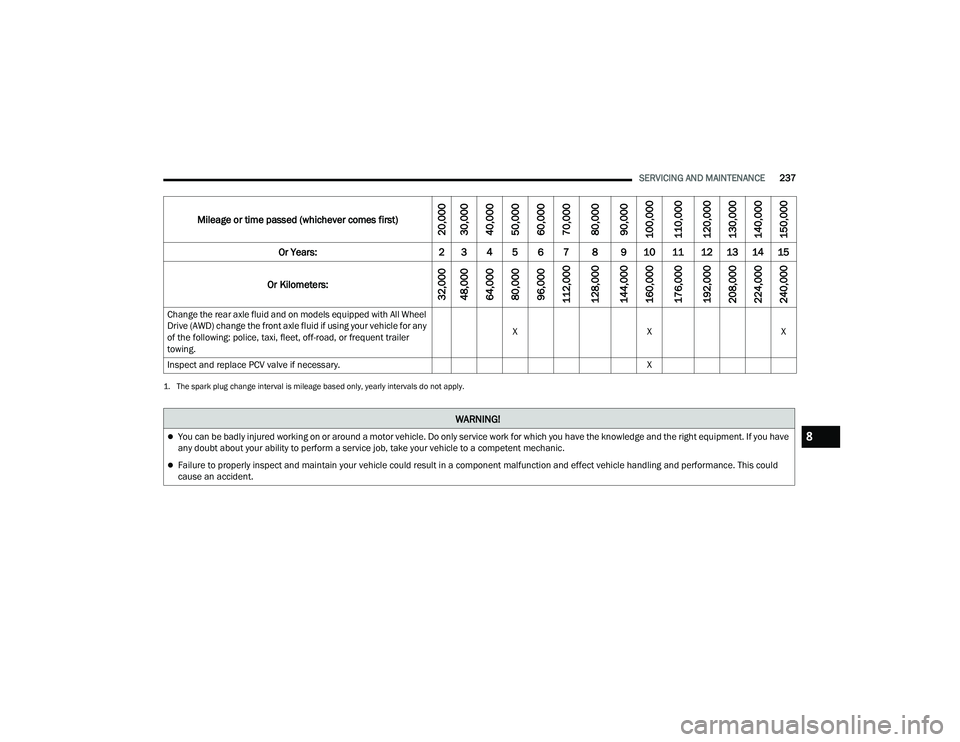
SERVICING AND MAINTENANCE237
Change the rear axle fluid and on models equipped with All Wheel
Drive (AWD) change the front axle fluid if using your vehicle for any
of the following: police, taxi, fleet, off-road, or frequent trailer
towing. X
XX
Inspect and replace PCV valve if necessary. X
1. The spark plug change interval is mileage based only, yearly intervals do not apply.
Mileage or time passed (whichever comes first)
20,000
30,000
40,000
50,000
60,000
70,000
80,000
90,000
100,000
110,000
120,000
130,000
140,000
150,000
Or Years: 2 3 4 5 6 7 8 9 10 11 12 13 14 15
Or Kilometers:
32,000
48,000
64,000
80,000
96,000
112,000
128,000
144,000
160,000
176,000
192,000
208,000
224,000
240,000
WARNING!
You can be badly injured working on or around a motor vehicle. Do only service work for which you have the knowledge and the right equipment. If you have
any doubt about your ability to perform a service job, take your vehicle to a competent mechanic.
Failure to properly inspect and maintain your vehicle could result in a component malfunction and effect vehicle handling and performance. This could
cause an accident.
8
22_LD_OM_EN_USC_t.book Page 237