change key battery DODGE CHARGER 2022 Owners Manual
[x] Cancel search | Manufacturer: DODGE, Model Year: 2022, Model line: CHARGER, Model: DODGE CHARGER 2022Pages: 312, PDF Size: 18.99 MB
Page 15 of 312
13
GETTING TO KNOW YOUR VEHICLE
KEYS
KEY FOB
Your vehicle is equipped with a key fob which
supports Passive Entry, Remote Keyless Entry
(RKE), Keyless Enter ‘n Go™ (if equipped), Remote
Start (if equipped), and remote trunk release. The
key fob allows you to lock or unlock the doors and
trunk from distances up to approximately 66 ft
(20 m). The key fob does not need to be pointed at
the vehicle to activate the system. The key fob also
contains an emergency key, which is stored in the
rear of the key fob.
NOTE:
The key fob’s wireless signal may be blocked if
the key fob is located next to a mobile phone,
laptop, or other electronic device. This may
result in poor performance.
With ignition in the ON position and the vehicle
moving at 2 mph (4 km/h), all RKE commands are disabled.
Key Fob
In case the ignition switch does not change with
the push of a button, the key fob may have a low or
fully depleted battery. A low key fob battery can be
verified by referring to the instrument cluster,
which will display directions to follow
Úpage 296.
To Lock/Unlock The Doors And Trunk
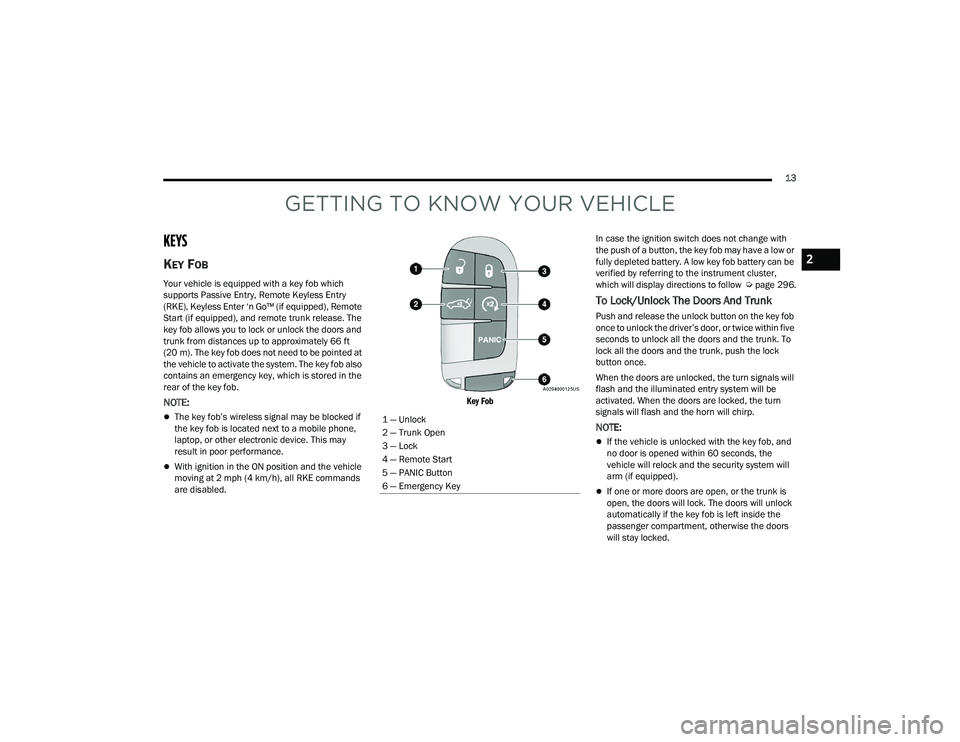
Push and release the unlock button on the key fob
once to unlock the driver’s door, or twice within five
seconds to unlock all the doors and the trunk. To
lock all the doors and the trunk, push the lock
button once.
When the doors are unlocked, the turn signals will
flash and the illuminated entry system will be
activated. When the doors are locked, the turn
signals will flash and the horn will chirp.
NOTE:
If the vehicle is unlocked with the key fob, and
no door is opened within 60 seconds, the
vehicle will relock and the security system will
arm (if equipped).
If one or more doors are open, or the trunk is
open, the doors will lock. The doors will unlock
automatically if the key fob is left inside the
passenger compartment, otherwise the doors
will stay locked.
1 — Unlock
2 — Trunk Open
3 — Lock
4 — Remote Start
5 — PANIC Button
6 — Emergency Key
2
22_LD_OM_EN_USC_t.book Page 13
Page 19 of 312
GETTING TO KNOW YOUR VEHICLE17
ON/RUN
Driving position.
All electrical devices are available (e.g. climate
controls, etc.).
START
The engine will start (when foot is on the brake
pedal).
NOTE:If the ignition switch does not change the mode by
pushing the button, the key fob may have a low or
depleted battery. In this situation, a backup
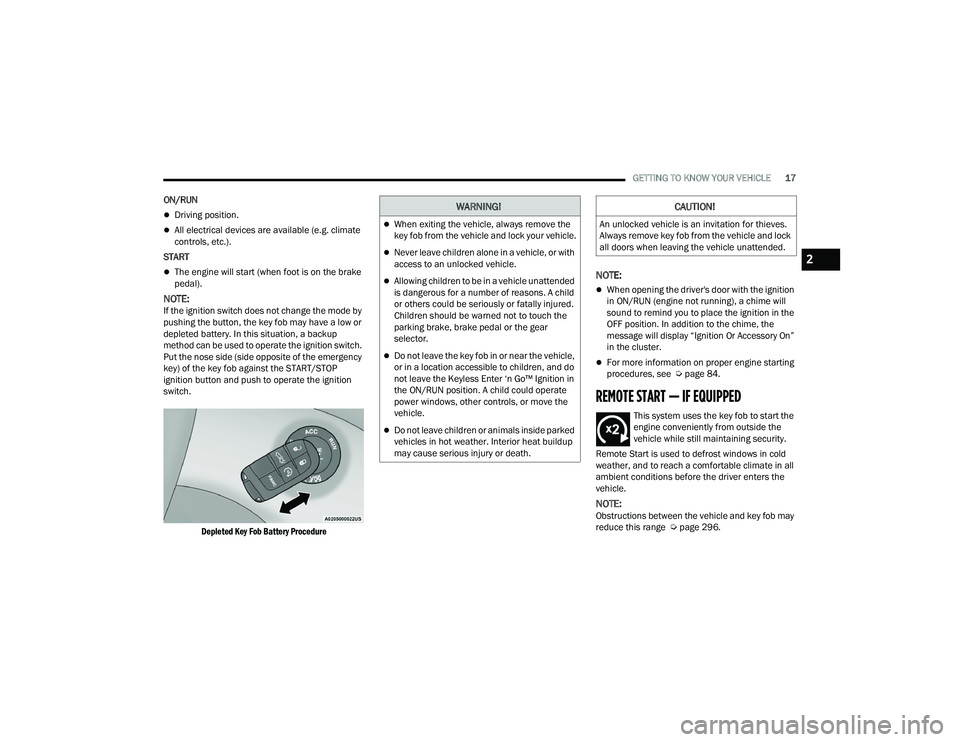
method can be used to operate the ignition switch.
Put the nose side (side opposite of the emergency
key) of the key fob against the START/STOP
ignition button and push to operate the ignition
switch.
Depleted Key Fob Battery Procedure
NOTE:
When opening the driver's door with the ignition
in ON/RUN (engine not running), a chime will
sound to remind you to place the ignition in the
OFF position. In addition to the chime, the
message will display “Ignition Or Accessory On”
in the cluster.
For more information on proper engine starting
procedures, see Ú page 84.
REMOTE START — IF EQUIPPED
This system uses the key fob to start the
engine conveniently from outside the
vehicle while still maintaining security.
Remote Start is used to defrost windows in cold
weather, and to reach a comfortable climate in all
ambient conditions before the driver enters the
vehicle.
NOTE:Obstructions between the vehicle and key fob may
reduce this range Ú page 296.
WARNING!
When exiting the vehicle, always remove the
key fob from the vehicle and lock your vehicle.
Never leave children alone in a vehicle, or with
access to an unlocked vehicle.
Allowing children to be in a vehicle unattended
is dangerous for a number of reasons. A child
or others could be seriously or fatally injured.
Children should be warned not to touch the
parking brake, brake pedal or the gear
selector.
Do not leave the key fob in or near the vehicle,
or in a location accessible to children, and do
not leave the Keyless Enter ‘n Go™ Ignition in
the ON/RUN position. A child could operate
power windows, other controls, or move the
vehicle.
Do not leave children or animals inside parked
vehicles in hot weather. Interior heat buildup
may cause serious injury or death.
CAUTION!
An unlocked vehicle is an invitation for thieves.
Always remove key fob from the vehicle and lock
all doors when leaving the vehicle unattended.
2
22_LD_OM_EN_USC_t.book Page 17
Page 45 of 312
GETTING TO KNOW YOUR VEHICLE43
(Continued)
NOTE:For vehicles equipped with Keyless Enter ‘n Go™,
place the ignition in the RUN position. Make sure
while programming HomeLink® with the engine on
that your vehicle is outside of your garage, or that
the garage door remains open at all times.
2. Place the hand-held transmitter 1 to 3 inches (3 to 8 cm) away from the HomeLink® button
you wish to program while keeping the
HomeLink® indicator light in view.
3. Continue to push and hold the HomeLink® button while you push and release (cycle) your
hand-held transmitter every two seconds until
HomeLink® has successfully accepted the
frequency signal. The indicator light will flash
slowly and then rapidly when fully trained.
4. Watch for the HomeLink® indicator to change flash rates. When it changes, it is
programmed. It may take up to 30 seconds or
longer in rare cases. The garage door may
open and close while you are programming.
5. Push and hold the programmed HomeLink® button and observe the indicator light.
NOTE:
If the indicator light stays on constantly,
programming is complete and the garage
door/device should activate when the
HomeLink® button is pushed.
To program the two remaining HomeLink®
buttons, repeat each step for each remaining
button. DO NOT erase the channels.
If you unplugged the garage door opener/device
for programming, plug it back in at this time.
Reprogramming A Single HomeLink® Button
(Canadian/Gate Operator)
To reprogram a channel that has been previously
trained, follow these steps:
1. Place the ignition in the ON/RUN position.
2. Press and hold the desired HomeLink® button until the indicator light begins to flash after 20
seconds. Do not release the button.
3. Without releasing the button, proceed with “Canadian/Gate Operator Programming” Step
2 and follow all remaining steps.
SECURITY
It is advised to erase all channels before you sell or
turn in your vehicle.
To do this, push and hold the two outside buttons
for 20 seconds until the orange indicator flashes.
Note that all channels will be erased. Individual
channels cannot be erased.
The HomeLink® Universal Transceiver is disabled
when the Vehicle Security Alarm is active.
TROUBLESHOOTING TIPS
If you are having trouble programming
HomeLink®, here are some of the most common
solutions:
Replace the battery in the garage door opener
hand-held transmitter.
Push the LEARN button on the garage door
opener to complete the training for a rolling
code.
Did you unplug the device for programming and
remember to plug it back in?
If you have any problems, or require assistance,
please call toll-free 1-800-355-3515 or, on the
Internet at
HomeLink.com for information or
assistance.
WARNING!
Vehicle exhaust contains carbon monoxide, a
dangerous gas. Do not run your vehicle in the
garage while programming the transmitter.
Exhaust gas can cause serious injury or death.
2
22_LD_OM_EN_USC_t.book Page 43
Page 49 of 312
GETTING TO KNOW YOUR VEHICLE47
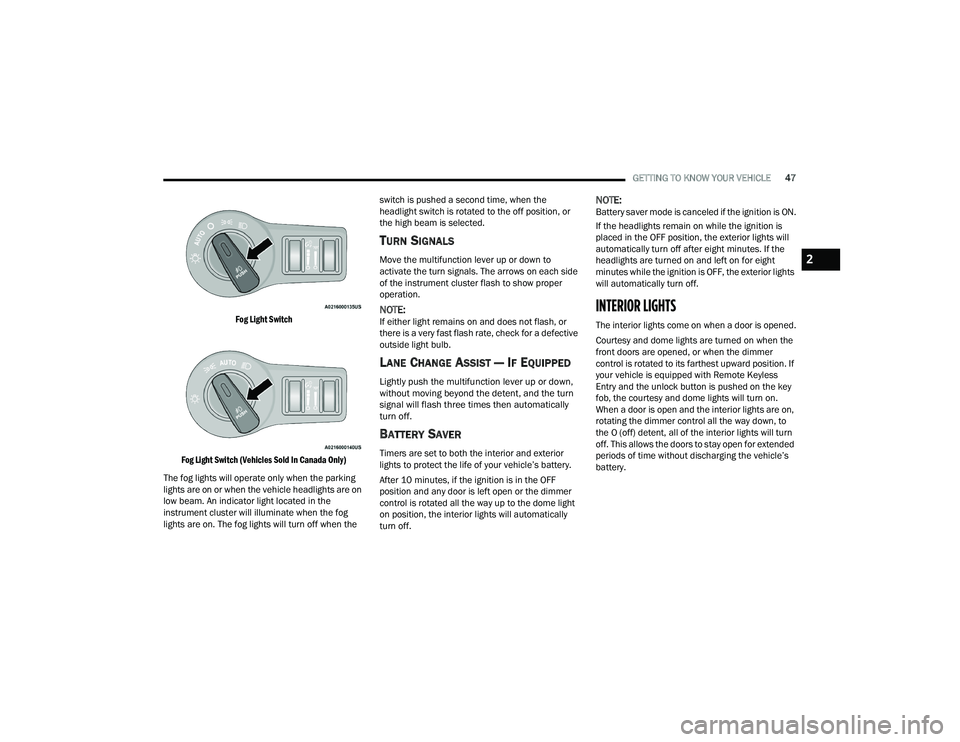
Fog Light Switch
Fog Light Switch (Vehicles Sold In Canada Only)
The fog lights will operate only when the parking
lights are on or when the vehicle headlights are on
low beam. An indicator light located in the
instrument cluster will illuminate when the fog
lights are on. The fog lights will turn off when the switch is pushed a second time, when the
headlight switch is rotated to the off position, or
the high beam is selected.
TURN SIGNALS
Move the multifunction lever up or down to
activate the turn signals. The arrows on each side
of the instrument cluster flash to show proper
operation.
NOTE:If either light remains on and does not flash, or
there is a very fast flash rate, check for a defective
outside light bulb.
LANE CHANGE ASSIST — IF EQUIPPED
Lightly push the multifunction lever up or down,
without moving beyond the detent, and the turn
signal will flash three times then automatically
turn off.
BATTERY SAVER
Timers are set to both the interior and exterior
lights to protect the life of your vehicle’s battery.
After 10 minutes, if the ignition is in the OFF
position and any door is left open or the dimmer
control is rotated all the way up to the dome light
on position, the interior lights will automatically
turn off.
NOTE:Battery saver mode is canceled if the ignition is ON.
If the headlights remain on while the ignition is
placed in the OFF position, the exterior lights will
automatically turn off after eight minutes. If the
headlights are turned on and left on for eight
minutes while the ignition is OFF, the exterior lights
will automatically turn off.
INTERIOR LIGHTS
The interior lights come on when a door is opened.
Courtesy and dome lights are turned on when the
front doors are opened, or when the dimmer
control is rotated to its farthest upward position. If
your vehicle is equipped with Remote Keyless
Entry and the unlock button is pushed on the key
fob, the courtesy and dome lights will turn on.
When a door is open and the interior lights are on,
rotating the dimmer control all the way down, to
the O (off) detent, all of the interior lights will turn
off. This allows the doors to stay open for extended
periods of time without discharging the vehicle’s
battery.
2
22_LD_OM_EN_USC_t.book Page 47
Page 62 of 312
60GETTING TO KNOW YOUR VEHICLE
POWER OUTLETS
Your vehicle is equipped with 12 Volt (15 Amp)
power outlets that can be used to power cellular
phones, small electronics and other low powered
electrical accessories. The power outlets are
labeled with either a “key” or a “battery” symbol to
indicate how the outlet is powered. Power outlets
labeled with a key symbol are powered when the
ignition is in the ON or ACC position, while the
outlets labeled with a battery symbol are
connected directly to the battery and powered at
all times.
NOTE:All accessories connected to the battery powered
outlets should be removed or turned off when the
vehicle is not in use to protect the battery against
discharge. The front power outlet is located inside the storage
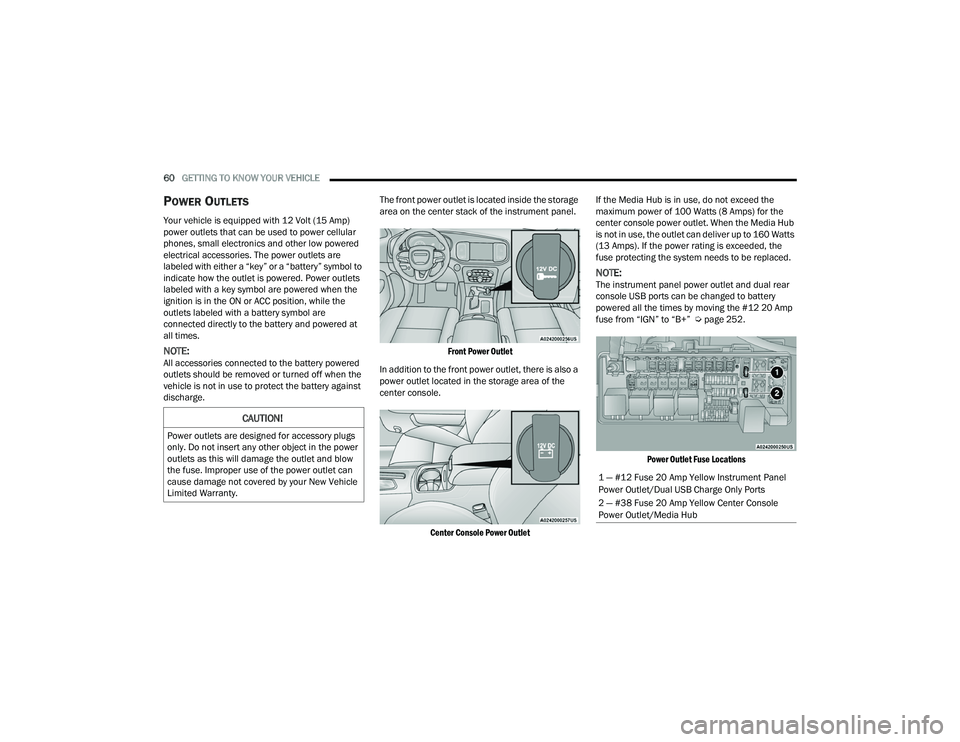
area on the center stack of the instrument panel.
Front Power Outlet
In addition to the front power outlet, there is also a
power outlet located in the storage area of the
center console.
Center Console Power Outlet
If the Media Hub is in use, do not exceed the
maximum power of 100 Watts (8 Amps) for the
center console power outlet. When the Media Hub
is not in use, the outlet can deliver up to 160 Watts
(13 Amps). If the power rating is exceeded, the
fuse protecting the system needs to be replaced.
NOTE:The instrument panel power outlet and dual rear
console USB ports can be changed to battery
powered all the times by moving the #12 20 Amp
fuse from “IGN” to “B+” Ú
page 252.
Power Outlet Fuse Locations
CAUTION!
Power outlets are designed for accessory plugs
only. Do not insert any other object in the power
outlets as this will damage the outlet and blow
the fuse. Improper use of the power outlet can
cause damage not covered by your New Vehicle
Limited Warranty.
1 — #12 Fuse 20 Amp Yellow Instrument Panel
Power Outlet/Dual USB Charge Only Ports
2 — #38 Fuse 20 Amp Yellow Center Console
Power Outlet/Media Hub
22_LD_OM_EN_USC_t.book Page 60
Page 88 of 312

86STARTING AND OPERATING
NOTE:For Keyless Enter ’n Go™ equipped vehicles, the
engine will turn off and the ignition switch will
change to ACC position.
If the vehicle is not in PARK and the driver exits the
vehicle with the engine running, the vehicle may
AutoPark.
AutoPark will engage when all of these conditions
are met:
Vehicle is equipped with an 8-speed transmis -
sion
Vehicle is not in PARK
Vehicle speed is 1.2 mph (1.9 km/h) or less
Driver’s seat belt is unbuckled
Driver’s door is ajar
Brake pedal is not pressed
The message “ AutoPark Engaged Shift to P then
Shift to Gear ” will display in the instrument cluster.
NOTE:In some cases the ParkSense graphic will be
displayed in the instrument cluster. In these cases,
the gear selector must be returned to “P” to select
desired gear. If the driver shifts into PARK while moving, the
vehicle may AutoPark.
AutoPark will engage
ONLY when vehicle speed is
1.2 mph (1.9 km/h) or less.
The message “ Vehicle Speed is Too High to Shift
to P ” will be displayed in the instrument cluster if
vehicle speed is above 1.2 mph (1.9 km/h).
ALWAYS DO A VISUAL CHECK
that your vehicle is in
PARK by looking for the "P" in the instrument
cluster display and on the gear selector. As an
added precaution, always apply the parking brake
when exiting the vehicle.
KEYLESS ENTER ‘N GO™ — IGNITION
This feature allows the driver to operate the
ignition switch with the push of a button, as long as
the Remote Start/Keyless Enter ’n Go™ key fob is
in the passenger compartment.
EXTENDED PARK STARTING
NOTE:Extended Park condition occurs when the vehicle
has not been started or driven for at least 30 days.
1. Install a battery charger or jumper cables to the battery to ensure a full battery charge
during the crank cycle.
2. Place the ignition in the START position and release it when the engine starts.
3. If the engine fails to start within 10 seconds, place the ignition in the OFF position, wait 10
to 15 seconds to allow the starter to cool, then
repeat the “Extended Park Starting”
procedure.
4. If the engine fails to start after eight attempts, allow the starter to cool for at least
10 minutes, then repeat the procedure.
WARNING!
If vehicle speed is above 1.2 mph (1.9 km/h),
the transmission will default to NEUTRAL until
the vehicle speed drops below 1.2 mph
(1.9 km/h). A vehicle left in the NEUTRAL
position can roll. As an added precaution,
always apply the parking brake when exiting the
vehicle.
CAUTION!
To prevent damage to the starter, do not crank
continuously for more than 10 seconds at a
time. Wait 10 to 15 seconds before trying again.
22_LD_OM_EN_USC_t.book Page 86
Page 89 of 312
STARTING AND OPERATING87
IF ENGINE FAILS TO START
If the engine fails to start after you have followed
the "Normal Starting" procedure and has not
experienced an extended park condition as
previously defined, it may be flooded. Push the
accelerator pedal all the way to the floor and hold
it there. Crank the engine for no more than 10
seconds. This should clear any excess fuel in case
the engine is flooded. Leave the ignition key in the
ON/RUN position, release the accelerator pedal
and repeat the “Normal Starting” procedure.
COLD WEATHER OPERATION
(B
ELOW –22°F OR −30°C)
To ensure reliable starting at these temperatures,
use of an externally powered electric engine block
heater (available from an authorized dealer) is
recommended.
AFTER STARTING
The idle speed is controlled automatically, and it
will decrease as the engine warms up.
ENGINE BREAK-IN RECOMMENDATIONS —
3.6L & 5.7L
A long break-in period is not required for the
drivetrain (engine, transmission, clutch, and rear
axle) in your new vehicle.
Drive moderately during the first 300 miles
(500 km). After the initial 60 miles (100 km),
speeds up to 50 or 55 mph (80 or 90 km/h) are
desirable. While cruising, brief full-throttle acceleration within
the limits of local traffic laws contributes to a good
break-in. However, wide-open throttle acceleration
in low gear can be detrimental and should be
avoided.
The engine oil, transmission fluid, and axle
lubricant installed at the factory is high-quality and
energy-conserving. Oil, fluid, and lubricant changes
should be consistent with anticipated climate and
conditions under which vehicle operations will
occur. For the recommended viscosity and quality
grades Ú
page 291.
NOTE:A new engine may consume some oil during its first
few thousand miles (kilometers) of operation. This
should be considered a normal part of the break-in
and not interpreted as an indication of difficulty.
Please check your oil level with the engine oil indi -
cator often during the break in period. Add oil as
required.
WARNING!
Never pour fuel or other flammable liquid into
the throttle body air inlet opening in an
attempt to start the vehicle. This could result
in flash fire causing serious personal injury.
Do not attempt to push or tow your vehicle to
get it started. Vehicles equipped with an auto -
matic transmission cannot be started this
way. Unburned fuel could enter the catalytic
converter and once the engine has started,
ignite and damage the converter and vehicle.
If the vehicle has a discharged battery,
booster cables may be used to obtain a start
from a booster battery or the battery in
another vehicle. This type of start can be
dangerous if done improperly Ú page 225.
CAUTION!
To prevent damage to the starter, do not
continuously crank the engine for more than 10
seconds at a time. Wait 10 to 15 seconds before
trying again.
CAUTION!
Never use Non-Detergent Oil or Straight Mineral
Oil in the engine or damage may result.
4
22_LD_OM_EN_USC_t.book Page 87
Page 198 of 312
196SAFETY
Do not drive your vehicle after the air bags have
deployed. If you are involved in another collision,
the air bags will not be in place to protect you.
NOTE:
Air bag covers may not be obvious in the interior
trim, but they will open during air bag deploy -
ment.
After any collision, the vehicle should be taken
to an authorized dealer immediately.
Enhanced Accident Response System
In the event of an impact, if the communication
network remains intact, and the power remains
intact, depending on the nature of the event, the
Occupant Restraint Controller (ORC) will determine
whether to have the Enhanced Accident Response
System perform the following functions:
Cut off fuel to the engine (if equipped).
Cut off battery power to the electric motor (if
equipped).
Flash hazard lights as long as the battery has
power.
Turn on the interior lights, which remain on as
long as the battery has power or for 15 minutes
from the intervention of the Enhanced Accident
Response System.
Unlock the power door locks.
Your vehicle may also be designed to perform any
of these other functions in response to the
Enhanced Accident Response System:
Turn off the Fuel Filter Heater, Turn off the HVAC
Blower Motor, Close the HVAC Circulation Door
Cut off battery power to the:
Engine
Electric Motor (if equipped)
Electric power steering
Brake booster
Electric park brake
Automatic transmission gear selector
Horn
Front wiper
Headlamp washer pump (if equipped)
NOTE:After an accident, remember to cycle the ignition to
the STOP (OFF/LOCK) position and remove the key
from the ignition switch to avoid draining the
battery. Carefully check the vehicle for fuel leaks in
the engine compartment and on the ground near
the engine compartment and fuel tank before
resetting the system and starting the engine. If
there are no fuel leaks or damage to the vehicle
electrical devices (e.g. headlights) after an
accident, reset the system by following the
procedure described below. If you have any doubt,
contact an authorized dealer.
Enhanced Accident Response System
Reset Procedure
In order to reset the Enhanced Accident Response
System functions after an event, the ignition switch
must be changed from ignition START or ON/RUN
to ignition OFF. Carefully check the vehicle for fuel
leaks in the engine compartment and on the
ground near the engine compartment and fuel
tank before resetting the system and starting the
engine.
After an accident, if the vehicle will not start after
performing the reset procedure, the vehicle must
be towed to an authorized dealer to be inspected
and to have the Enhanced Accident Response
System reset.
WARNING!
Deployed air bags and seat belt pretensioners
cannot protect you in another collision. Have the
air bags, seat belt pretensioners, and the seat
belt retractor assemblies replaced by an
authorized dealer immediately. Also, have the
Occupant Restraint Controller System serviced
as well.
22_LD_OM_EN_USC_t.book Page 196
Page 303 of 312
301
Heated Mirrors
................................................ 40
High Beam/Low Beam Select (Dimmer) Switch... 45
Hill Start Assist.............................................. 172Hitches Trailer Towing............................................ 117Holder, Coin..................................................... 58HomeLink (Garage Door Opener).................... 40Hood Prop........................................................ 65Hood Release.................................................. 65
I
Ignition............................................................ 16Switch......................................................... 16Indicator LightsBlue............................................................. 82Green.......................................................... 81White........................................................... 82Yellow.......................................................... 81Information Center, Vehicle............................. 70Inside Rearview Mirror............................ 38, 213Instrument Cluster.................................... 67, 69Descriptions................................................ 81Display................................................. 69, 72Instrument Panel Lens Cleaning.................... 284Interior Appearance Care............................... 284Interior Lights.................................................. 47
J
Jack Location................................................ 217Jump Starting...................................... 225, 226
K
Key FobArm The System
.......................................... 20Programming Additional Key Fobs............... 15Unlatch The Trunk....................................... 14Key Fob Battery Service
(Remote Keyless Entry).................................... 14
Key Fob Programming (Remote Keyless Entry).. 15
Keyless Enter 'n Go™................................ 24, 86Enter The Trunk........................................... 14Passive Entry............................................... 24Passive Entry Programming......................... 24Keys................................................................. 13
L
Lane Change And Turn Signals........................ 47Lane Change Assist......................................... 47LaneSense.................................................... 109Lap/Shoulder Belts....................................... 185Latches......................................................... 211Hood............................................................ 65Lead Free Gasoline....................................... 287
Leaks, Fluid................................................... 211Life Of Tires................................................... 275Light Bulbs........................................... 211, 261Lights............................................................ 211Adaptive Cruise Control (ACC) Set With Target Vehicle.....................................................81Adaptive Cruise Control (ACC) Set WithoutTarget Vehicle..........................................81Air Bag...................................... 76, 190, 210Automatic Headlights..................................46Brake Assist Warning................................ 172Brake Warning................................... 76, 286Bulb Replacement.................................... 261Cruise...................................................81, 82Daytime Running.........................................45Dimmer Switch, Headlight...........................45ECO Mode Indicator.....................................81Electric Power Steering Fault.......................77Electronic Stability Control (ESC)Active Warning........................................78
Electronic Stability Program(ESP) Indicator....77
Exterior.............................................. 44, 211Fog...............................................................46Forward Collision Warning (FCW) OFF Indicator...........................................81Front Fog Indicator......................................81
11
22_LD_OM_EN_USC_t.book Page 301