recommended oil DODGE CHARGER 2022 Owners Manual
[x] Cancel search | Manufacturer: DODGE, Model Year: 2022, Model line: CHARGER, Model: DODGE CHARGER 2022Pages: 312, PDF Size: 18.99 MB
Page 89 of 312
STARTING AND OPERATING87
IF ENGINE FAILS TO START
If the engine fails to start after you have followed
the "Normal Starting" procedure and has not
experienced an extended park condition as
previously defined, it may be flooded. Push the
accelerator pedal all the way to the floor and hold
it there. Crank the engine for no more than 10
seconds. This should clear any excess fuel in case
the engine is flooded. Leave the ignition key in the
ON/RUN position, release the accelerator pedal
and repeat the “Normal Starting” procedure.
COLD WEATHER OPERATION
(B
ELOW –22°F OR −30°C)
To ensure reliable starting at these temperatures,
use of an externally powered electric engine block
heater (available from an authorized dealer) is
recommended.
AFTER STARTING
The idle speed is controlled automatically, and it
will decrease as the engine warms up.
ENGINE BREAK-IN RECOMMENDATIONS —
3.6L & 5.7L
A long break-in period is not required for the
drivetrain (engine, transmission, clutch, and rear
axle) in your new vehicle.
Drive moderately during the first 300 miles
(500 km). After the initial 60 miles (100 km),
speeds up to 50 or 55 mph (80 or 90 km/h) are
desirable. While cruising, brief full-throttle acceleration within
the limits of local traffic laws contributes to a good
break-in. However, wide-open throttle acceleration
in low gear can be detrimental and should be
avoided.
The engine oil, transmission fluid, and axle
lubricant installed at the factory is high-quality and
energy-conserving. Oil, fluid, and lubricant changes
should be consistent with anticipated climate and
conditions under which vehicle operations will
occur. For the recommended viscosity and quality
grades Ú
page 291.
NOTE:A new engine may consume some oil during its first
few thousand miles (kilometers) of operation. This
should be considered a normal part of the break-in
and not interpreted as an indication of difficulty.
Please check your oil level with the engine oil indi -
cator often during the break in period. Add oil as
required.
WARNING!
Never pour fuel or other flammable liquid into
the throttle body air inlet opening in an
attempt to start the vehicle. This could result
in flash fire causing serious personal injury.
Do not attempt to push or tow your vehicle to
get it started. Vehicles equipped with an auto -
matic transmission cannot be started this
way. Unburned fuel could enter the catalytic
converter and once the engine has started,
ignite and damage the converter and vehicle.
If the vehicle has a discharged battery,
booster cables may be used to obtain a start
from a booster battery or the battery in
another vehicle. This type of start can be
dangerous if done improperly Ú page 225.
CAUTION!
To prevent damage to the starter, do not
continuously crank the engine for more than 10
seconds at a time. Wait 10 to 15 seconds before
trying again.
CAUTION!
Never use Non-Detergent Oil or Straight Mineral
Oil in the engine or damage may result.
4
22_LD_OM_EN_USC_t.book Page 87
Page 213 of 312
SAFETY211
(Continued)
(Continued)
PERIODIC SAFETY CHECKS YOU SHOULD
M
AKE OUTSIDE THE VEHICLE
Tires
Examine tires for excessive tread wear and uneven
wear patterns. Check for stones, nails, glass, or
other objects lodged in the tread or sidewall.
Inspect the tread for cuts and cracks. Inspect
sidewalls for cuts, cracks, and bulges. Check the
lug nuts/bolt torque for tightness. Check the tires
(including spare) for proper cold inflation pressure.
Lights
Have someone observe the operation of brake
lights and exterior lights while you work the
controls. Check turn signal and high beam
indicator lights on the instrument panel.
Door Latches
Check for proper closing, latching, and locking.
Fluid Leaks
Check area under the vehicle after overnight
parking for fuel, coolant, oil, or other fluid leaks.
Also, if gasoline fumes are detected or if fuel or
brake fluid leaks are suspected, the cause should
be located and corrected immediately.
EXHAUST GAS
ONLY use the driver’s side floor mat on the
driver’s side floor area. To check for interfer -
ence, with the vehicle properly parked with the
engine off, fully depress the accelerator, the
brake, and the clutch pedal (if present) to
check for interference. If your floor mat inter -
feres with the operation of any pedal, or is not
secure to the floor, remove the floor mat from
the vehicle and place the floor mat in your
trunk.
ONLY use the passenger’s side floor mat on
the passenger’s side floor area.
ALWAYS make sure objects cannot fall or slide
into the driver’s side floor area when the
vehicle is moving. Objects can become
trapped under accelerator, brake, or clutch
pedals and could cause a loss of vehicle
control.
NEVER place any objects under the floor mat
(e.g., towels, keys, etc.). These objects could
change the position of the floor mat and may
cause interference with the accelerator,
brake, or clutch pedals.
WARNING!
If the vehicle carpet has been removed and
re-installed, always properly attach carpet to
the floor and check the floor mat fasteners are
secure to the vehicle carpet. Fully depress
each pedal to check for interference with the
accelerator, brake, or clutch pedals then
re-install the floor mats.
It is recommended to only use mild soap and
water to clean your floor mats. After cleaning,
always check your floor mat has been properly
installed and is secured to your vehicle using
the floor mat fasteners by lightly pulling mat.
WARNING!
WARNING!
Exhaust gases can injure or kill. They contain
carbon monoxide (CO), which is colorless and
odorless. Breathing it can make you
unconscious and can eventually poison you. To
avoid breathing (CO), follow these safety tips:
Do not run the engine in a closed garage or in
confined areas any longer than needed to
move your vehicle in or out of the area.
6
22_LD_OM_EN_USC_t.book Page 211
Page 226 of 312
224IN CASE OF EMERGENCY
decrease quickly from approximately 70 psi
(4.8 Bar) to the actual tire pressure when the
Sealant Bottle (1) is empty.
2. The pump will start to inject air into the tire immediately after the Sealant Bottle (1) is
empty. Continue to operate the pump and
inflate the tire to the pressure indicated on the
tire pressure label on the driver-side latch
pillar (recommended pressure). Check the tire
pressure by looking at the Pressure Gauge (5).
If the tire does not inflate to at least 26 psi
(1.8 Bar) pressure within 15 minutes:
The tire is too badly damaged. Do not attempt to
drive the vehicle further. Call for assistance.
NOTE:If the tire becomes overinflated, push the Deflation
Button (2) to reduce the tire pressure to the recom -
mended inflation pressure before continuing.
If the tire inflates to the recommended pressure or
is at least 26 psi (1.8 Bar) pressure within
15 minutes:
1. Push the Power Button (3) to turn off the Tire Service Kit.
2. Remove the Speed Limit sticker from the top of the Sealant Bottle (1) and place the sticker on
the instrument panel. 3. Immediately disconnect the Sealant Hose (4)
from the valve stem, reinstall the cap on the
fitting at the end of the hose, and place the Tire
Service Kit in the vehicle storage location.
(D) Drive Vehicle:
Immediately after injecting sealant and inflating
the tire, drive the vehicle 5 miles (8 km) or 10 minutes to ensure distribution of the Tire
Service Kit Sealant within the tire. Do not exceed
50 mph (80 km/h).
(E) After Driving:
Pull over to a safe location before continuing
Ú page 223.
1. Push in the Mode Select Knob (6) and turn to the Air Mode position.
2. Uncoil the power plug and insert the plug into the vehicle's 12 Volt power outlet.
3. Uncoil the Air Pump Hose (8) (black in color) and screw the fitting at the end of hose (8)
onto the valve stem.
4. Check the pressure in the tire by reading the Pressure Gauge (5).
CAUTION!
The metal end fitting from Power Plug (3) may
get hot after use, so it should be handled care -
fully.
Failure to reinstall the cap on the fitting at the
end of the Sealant Hose (4) can result in
sealant contacting your skin, clothing, and the
vehicle’s interior. It can also result in sealant
contacting internal Tire Service Kit compo -
nents which may cause permanent damage to
the kit.
WARNING!
Tire Service Kit is not a permanent flat tire
repair. Have the tire inspected and repaired or
replaced after using Tire Service Kit. Do not
exceed 50 mph (80 km/h) until the tire is
repaired or replaced. Failure to follow this
warning can result in injuries that are serious or
fatal to you, your passengers, and others around
you.
22_LD_OM_EN_USC_t.book Page 224
Page 244 of 312
242SERVICING AND MAINTENANCE
NOTE:Intentional tampering with emissions control
systems may void your warranty and could result in
civil penalties being assessed against you.
ENGINE OIL
Engine Oil Selection — 3.6L/5.7L Engines
Use only the manufacturer's recommended fluids
Úpage 291.
NOTE:
Hemi engines at times can tick right after startup
and then quiet down after approximately 30
seconds. This is normal and will not harm the
engine. This characteristic can be caused by short
drive cycles. For example, if the vehicle is started
then shut off after driving a short distance. Upon
restarting, you may experience a ticking sound.
Other causes could be if the vehicle is unused for an
extended period of time, incorrect oil, extended oil
changes or extended idling. If the engine continues
to tick or if the Malfunction Indicator Light (MIL)
comes on, see the nearest authorized dealer.
American Petroleum Institute (API)
Approved Engine Oil
These symbols mean that the oil has been certified
by the API. The manufacturer only recommends API
trademark oils.
The API Starburst trademark certifies
0W-20, 0W-30 and 5W-30 engine oils.
The API Donut trademark certifies
0W-40 and 5W-40 engine oil.
Synthetic Engine Oils
Your engine was designed for synthetic engine oils,
only use synthetic API approved engine oils.
Synthetic engine oils which do not have both the
correct API trademark and the correct SAE viscosity
grade numbers should not be used.
Materials Added To Engine Oil
The manufacturer strongly recommends against
the addition of any additives (other than leak
detection dyes) to the engine oil. Engine oil is an
engineered product and its performance may be
impaired by supplemental additives.
Disposing Of Used Engine Oil And Oil
Filters
Care should be taken in disposing of used engine
oil and oil filters from your vehicle. Used oil and oil
filters, indiscriminately discarded, can present a
problem to the environment. Contact an
authorized dealer, service station or governmental
agency for advice on how and where used oil and
oil filters can be safely discarded in your area.
ENGINE OIL FILTER
The engine oil filter should be replaced with a new
filter at every engine oil change.
Engine Oil Filter Selection
A full-flow type disposable oil filter should be used
for replacement. The quality of replacement filters
varies considerably. Only high quality Mopar®
certified filters should be used.
WARNING!
You can be badly injured working on or around a
motor vehicle. Only do service work for which
you have the knowledge and the proper
equipment. If you have any doubt about your
ability to perform a service job, take your vehicle
to a competent mechanic.
CAUTION!
Do not use chemical flushes in your engine oil as
the chemicals can damage your engine. Such
damage is not covered by the New Vehicle
Limited Warranty.
22_LD_OM_EN_USC_t.book Page 242
Page 253 of 312
SERVICING AND MAINTENANCE251
(Continued)
BRAKE SYSTEM
In order to ensure brake system performance, all
brake system components should be inspected
periodically Ú page 234.
Fluid Level Check — Brake Master Cylinder
Check the fluid level in the master cylinder
immediately if the Brake System Warning Light
indicates system failure.
Check the fluid level in the master cylinder when
performing underhood services.
Clean the top of the master cylinder area before
removing the cap. Add fluid to bring the level up to
the top of the “FULL” mark on the side of the
master cylinder reservoir.
Overfilling of fluid is not recommended because it
may cause leaking in the system.
Add enough fluid to bring the level up to the
requirements described on the brake fluid reservoir. With disc brakes, fluid level can be
expected to fall as the brake pads wear. However,
low fluid level may be caused by a leak and a
checkup may be needed.
Use only brake fluid that has been recommended
by the manufacturer, and has been kept in a tightly
closed container to avoid contamination from
foreign matter or moisture.
For further information Ú
page 291.
AUTOMATIC TRANSMISSION
Special Additives
The manufacturer strongly recommends against
using any special additives in the transmission.
Automatic Transmission Fluid (ATF) is an
engineered product and its performance may be
impaired by supplemental additives. Therefore, do
not add any fluid additives to the transmission.
Avoid using transmission sealers as they may
adversely affect seals.
WARNING!
Riding the brakes can lead to brake failure and
possibly a collision. Driving with your foot resting
or riding on the brake pedal can result in
abnormally high brake temperatures, excessive
lining wear, and possible brake damage. You
would not have your full braking capacity in an
emergency.
WARNING!
Use only manufacturer's recommended brake
fluid Úpage 291. Using the wrong type of
brake fluid can severely damage your brake
system and/or impair its performance. The
proper type of brake fluid for your vehicle is
also identified on the original factory installed
hydraulic master cylinder reservoir.
To avoid contamination from foreign matter or
moisture, use only new brake fluid or fluid that
has been in a tightly closed container. Keep
the master cylinder reservoir cap secured at
all times. Brake fluid in an open container
absorbs moisture from the air resulting in a
lower boiling point. This may cause it to boil
unexpectedly during hard or prolonged
braking, resulting in sudden brake failure. This
could result in a collision.
Overfilling the brake fluid reservoir can result
in spilling brake fluid on hot engine parts,
causing the brake fluid to catch fire. Brake
fluid can also damage painted and vinyl
surfaces, care should be taken to avoid its
contact with these surfaces.
Do not allow petroleum based fluid to contam -
inate the brake fluid. Brake seal components
could be damaged, causing partial or
complete brake failure. This could result in a
collision.
WARNING!
8
22_LD_OM_EN_USC_t.book Page 251
Page 254 of 312
252SERVICING AND MAINTENANCE
(Continued)
Fluid Level Check
The fluid level is preset at the factory and does not
require adjustment under normal operating
conditions. Routine fluid level checks are not
required; therefore the transmission has no
dipstick. An authorized dealer can check your
transmission fluid level using special service tools.
If you notice fluid leakage or transmission
malfunction, visit an authorized dealer
immediately to have the transmission fluid level
checked. Operating the vehicle with an improper
fluid level can cause severe transmission damage.
Fluid And Filter Changes — 8-Speed
Transmission
Under normal operating conditions, the fluid
installed at the factory will provide satisfactory
lubrication for the life of the vehicle.
Routine fluid and filter changes are not required.
However, change the fluid and filter if the fluid
becomes contaminated (with water, etc.), or if the
transmission is disassembled for any reason.
Selection Of Lubricant
It is important to use the proper transmission fluid
to ensure optimum transmission performance and
life. Use only the manufacturer's specified
transmission fluid Úpage 291. It is important to
maintain the transmission fluid at the correct level
using the recommended fluid.
NOTE:No chemical flushes should be used in any trans -
mission; only the approved lubricant should be
used.
REAR AXLE
For normal service, periodic fluid level checks are
not required. When the vehicle is serviced for other
reasons the exterior surfaces of the axle assembly
should be inspected. If gear oil leakage is
suspected inspect the fluid level Ú page 291.
FUSES
General Information
CAUTION!
Do not use chemical flushes in your
transmission as the chemicals can damage your
transmission components. Such damage is not
covered by the New Vehicle Limited Warranty.
CAUTION!
If a transmission fluid leak occurs, visit an
authorized dealer immediately. Severe
transmission damage may occur. An authorized
dealer has the proper tools to adjust the fluid
level accurately.CAUTION!
Using a transmission fluid other than the
manufacturer’s recommended fluid may cause
deterioration in transmission shift quality and/or
torque converter shudder Úpage 291.
WARNING!
When replacing a blown fuse, always use an
appropriate replacement fuse with the same
amp rating as the original fuse. Never replace
a fuse with another fuse of higher amp rating.
The use of a fuse with a rating other than indi -
cated may result in a dangerous electrical
system overload. If a properly rated fuse
continues to blow, it indicates a problem in the
circuit that must be corrected. Never replace a
blown fuse with metal wires or any other mate -
rial. Do not place a fuse inside a circuit
breaker cavity or vice versa. Failure to use
proper fuses may result in serious personal
injury, fire and/or property damage.
22_LD_OM_EN_USC_t.book Page 252
Page 278 of 312
276SERVICING AND MAINTENANCE
NOTE:Wheel valve stem must be replaced as well when
installing new tires due to wear and tear in existing
tires.
Keep dismounted tires in a cool, dry place with as
little exposure to light as possible. Protect tires
from contact with oil, grease, and gasoline.
Replacement Tires
The tires on your new vehicle provide a balance of
many characteristics. They should be inspected
regularly for wear and correct cold tire inflation
pressures. The manufacturer strongly
recommends that you use tires equivalent to the
originals in size, quality and performance when
replacement is needed Úpage 275. Refer to the
Tire and Loading Information placard or the
Vehicle Certification Label for the size designation
of your tire. The Load Index and Speed Symbol for
your tire will be found on the original equipment
tire sidewall.
See the Tire Sizing Chart example found in the “Tire
Safety Information” section of this manual for
more information relating to the Load Index and
Speed Symbol of a tire Ú page 264.
It is recommended to replace the two front tires or
two rear tires as a pair. Replacing just one tire can
seriously affect your vehicle’s handling. If you ever
replace a wheel, make sure that the wheel’s
specifications match those of the original wheels. It is recommended you contact an authorized tire
dealer or original equipment dealer with any
questions you may have on tire specifications or
capability. Failure to use equivalent replacement
tires may adversely affect the safety, handling, and
ride of your vehicle.
TIRE TYPES
All Season Tires — If Equipped
All Season tires provide traction for all seasons
(Spring, Summer, Autumn, and Winter). Traction
levels may vary between different all season tires.
All season tires can be identified by the M+S, M&S,
M/S or MS designation on the tire sidewall. Use all
season tires only in sets of four; failure to do so
may adversely affect the safety and handling of
your vehicle.
Summer Or Three Season Tires —
If Equipped
Summer tires provide traction in both wet and dry
conditions, and are not intended to be driven in
snow or on ice. If your vehicle is equipped with
Summer tires, be aware these tires are not
designed for Winter or cold driving conditions.
Install Winter tires on your vehicle when ambient
temperatures are less than 40°F (5°C) or if roads
are covered with ice or snow. For more
information, contact an authorized dealer.
WARNING!
Do not use a tire, wheel size, load rating, or
speed rating other than that specified for your
vehicle. Some combinations of unapproved
tires and wheels may change suspension
dimensions and performance characteristics,
resulting in changes to steering, handling, and
braking of your vehicle. This can cause unpre
-
dictable handling and stress to steering and
suspension components. You could lose
control and have a collision resulting in
serious injury or death. Use only the tire and
wheel sizes with load ratings approved for
your vehicle.
Never use a tire with a smaller load index or
capacity, other than what was originally
equipped on your vehicle. Using a tire with a
smaller load index could result in tire over -
loading and failure. You could lose control and
have a collision.
Failure to equip your vehicle with tires having
adequate speed capability can result in
sudden tire failure and loss of vehicle control.
CAUTION!
Replacing original tires with tires of a different
size may result in false speedometer and
odometer readings.
22_LD_OM_EN_USC_t.book Page 276
Page 287 of 312
SERVICING AND MAINTENANCE285
LEATHER SURFACES
Mopar® Total Clean is specifically recommended
for leather upholstery.
Your leather upholstery can be best preserved by
regular cleaning with a damp soft cloth. Small
particles of dirt can act as an abrasive and damage
the leather upholstery and should be removed
promptly with a damp cloth. Stubborn soils can be
removed easily with a soft cloth and Mopar® Total
Clean. Care should be taken to avoid soaking your
leather upholstery with any liquid. Please do not
use polishes, oils, cleaning fluids, solvents,
detergents, or ammonia-based cleaners to clean
your leather upholstery.
NOTE:If equipped with light colored leather, it tends to
show any foreign material, dirt, and fabric dye
transfer more so than darker colors. The leather is
designed for easy cleaning, and the manufacturer
recommends Mopar® total care leather cleaner
applied on a cloth to clean the leather seats as
needed.GLASS SURFACES
All glass surfaces should be cleaned on a regular
basis with Mopar® Glass Cleaner, or any
commercial household-type glass cleaner. Never
use an abrasive type cleaner. Use caution when
cleaning the inside rear window equipped with
electric defrosters or windows equipped with radio
antennas. Do not use scrapers or other sharp
instruments that may scratch the elements.
When cleaning the rear view mirror, spray cleaner
on the towel or cloth that you are using. Do not
spray cleaner directly on the mirror.
CAUTION!
Do not use alcohol and alcohol-based and/or
Ketone based cleaning products to clean leather
upholstery, as damage to the upholstery may
result.
8
22_LD_OM_EN_USC_t.book Page 285
Page 288 of 312
286
TECHNICAL SPECIFICATIONS
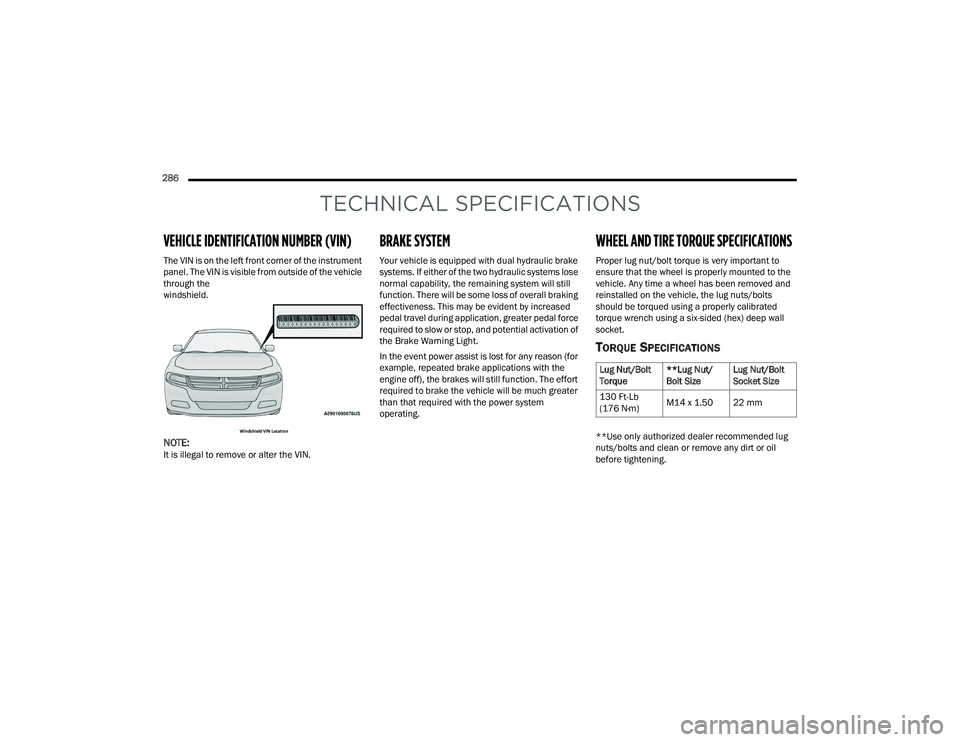
VEHICLE IDENTIFICATION NUMBER (VIN)
The VIN is on the left front corner of the instrument
panel. The VIN is visible from outside of the vehicle
through the
windshield.
Windshield VIN Location
NOTE:It is illegal to remove or alter the VIN.
BRAKE SYSTEM
Your vehicle is equipped with dual hydraulic brake
systems. If either of the two hydraulic systems lose
normal capability, the remaining system will still
function. There will be some loss of overall braking
effectiveness. This may be evident by increased
pedal travel during application, greater pedal force
required to slow or stop, and potential activation of
the Brake Warning Light.
In the event power assist is lost for any reason (for
example, repeated brake applications with the
engine off), the brakes will still function. The effort
required to brake the vehicle will be much greater
than that required with the power system
operating.
WHEEL AND TIRE TORQUE SPECIFICATIONS
Proper lug nut/bolt torque is very important to
ensure that the wheel is properly mounted to the
vehicle. Any time a wheel has been removed and
reinstalled on the vehicle, the lug nuts/bolts
should be torqued using a properly calibrated
torque wrench using a six-sided (hex) deep wall
socket.
TORQUE SPECIFICATIONS
**Use only authorized dealer recommended lug
nuts/bolts and clean or remove any dirt or oil
before tightening.
Lug Nut/Bolt
Torque**Lug Nut/
Bolt SizeLug Nut/Bolt
Socket Size
130 Ft-Lb
(176 N·m) M14 x 1.50 22 mm
22_LD_OM_EN_USC_t.book Page 286
Page 293 of 312

TECHNICAL SPECIFICATIONS291
ENGINE FLUIDS AND LUBRICANTS
Component Fluid, Lubricant, or Genuine Part
Engine Coolant We recommend using Mopar® Antifreeze/Coolant 10 Year/150,000 Mile
(240,000 km) Formula OAT (Organic Additive Technology).
Engine Oil – 3.6L Engine We recommend using Mopar® SAE 5W-20 Full Synthetic Engine Oil which
meets the requirements of the manufacturer Material Standard MS-6395.
Equivalent full synthetic SAE 5W-20 engine oil can be used but must have the
API Starburst trademark Ú
page 242.
Mopar® SAE 5W-30 engine oil approved to the manufacturer Material
Standard MS-6395 may be used when SAE 5W-20 engine oil meeting
MS-6395 is not available.
Engine Oil – 5.7L Engine We recommend using Mopar® SAE 0W-20 Full Synthetic Engine Oil which
meets the requirements of the manufacturer Material Standard MS-6395.
Equivalent full synthetic SAE 0W-20 engine oil can be used but must have the
API Starburst trademark Ú
page 242.
Engine Oil Filter We recommend using a Mopar® Engine Oil Filter. If a Mopar® Engine Oil Filter
is unavailable only use filters that meet or exceed SAE/USCAR-36 Filter
Performance Requirements.
Fuel Selection – 3.6L Engine 87 Octane (R+M)/2 Method, 0-15% Ethanol.
Fuel Selection – 5.7L Engine 89 Octane Recommended – 87 Octane acceptable (R+M)/2 Method, 0-15%
Ethanol.
9
22_LD_OM_EN_USC_t.book Page 291