coolant temperature DODGE CHARGER 2023 Owners Manual
[x] Cancel search | Manufacturer: DODGE, Model Year: 2023, Model line: CHARGER, Model: DODGE CHARGER 2023Pages: 292, PDF Size: 13.05 MB
Page 11 of 292
9
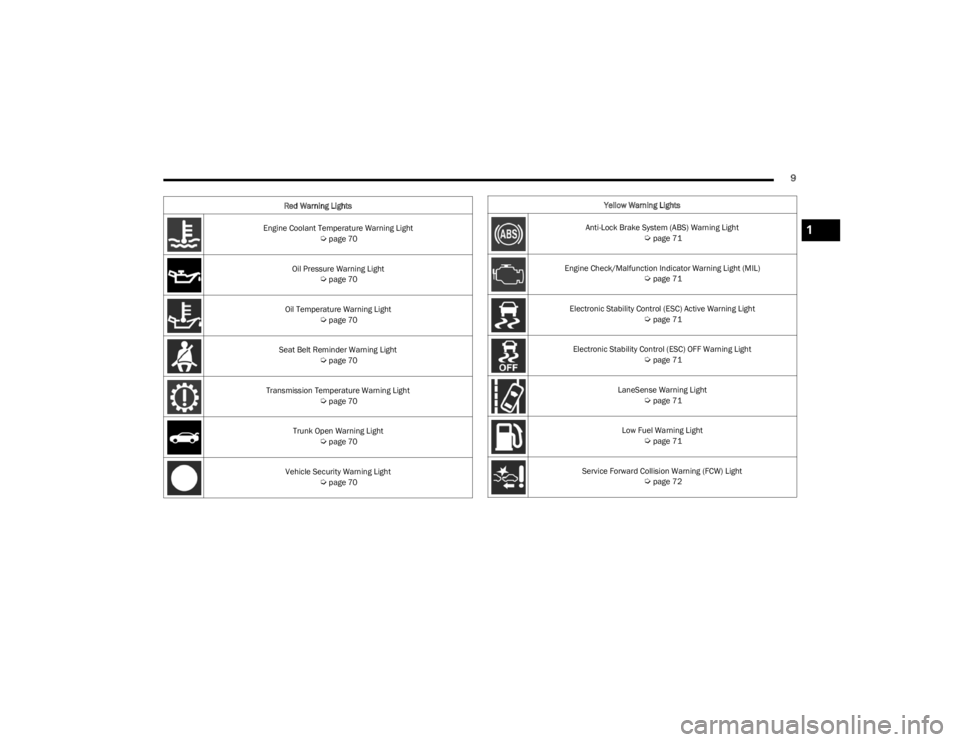
Engine Coolant Temperature Warning Light Úpage 70
Oil Pressure Warning Light
Úpage 70
Oil Temperature Warning Light
Úpage 70
Seat Belt Reminder Warning Light
Úpage 70
Transmission Temperature Warning Light
Úpage 70
Trunk Open Warning Light
Úpage 70
Vehicle Security Warning Light
Úpage 70
Red Warning Lights
Yellow Warning Lights
Anti-Lock Brake System (ABS) Warning Light
Úpage 71
Engine Check/Malfunction Indicator Warning Light (MIL)
Úpage 71
Electronic Stability Control (ESC) Active Warning Light
Úpage 71
Electronic Stability Control (ESC) OFF Warning Light
Úpage 71
LaneSense Warning Light
Úpage 71
Low Fuel Warning Light
Úpage 71
Service Forward Collision Warning (FCW) Light
Úpage 72
1
23_LD_OM_EN_USC_t.book Page 9
Page 65 of 292
GETTING TO KNOW YOUR INSTRUMENT PANEL63
INSTRUMENT CLUSTER DESCRIPTIONS
Use this QR code to access your digital
experience.
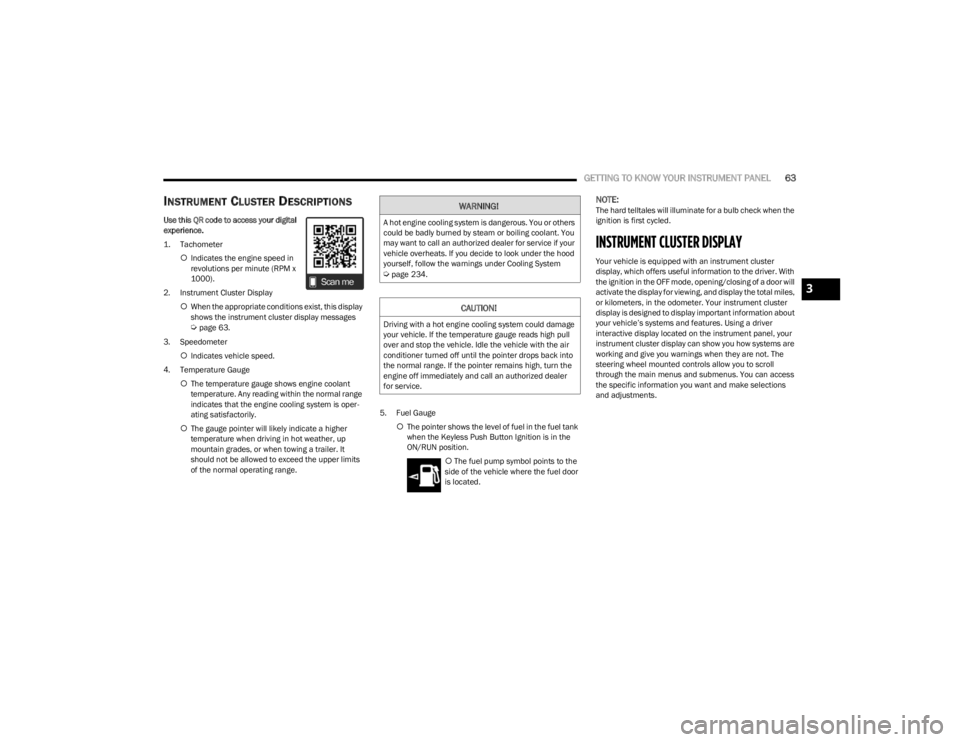
1. Tachometer
Indicates the engine speed in
revolutions per minute (RPM x
1000).
2. Instrument Cluster Display When the appropriate conditions exist, this display
shows the instrument cluster display messages
Úpage 63.
3. Speedometer Indicates vehicle speed.
4. Temperature Gauge The temperature gauge shows engine coolant
temperature. Any reading within the normal range
indicates that the engine cooling system is oper -
ating satisfactorily.
The gauge pointer will likely indicate a higher
temperature when driving in hot weather, up
mountain grades, or when towing a trailer. It
should not be allowed to exceed the upper limits
of the normal operating range. 5. Fuel Gauge
The pointer shows the level of fuel in the fuel tank
when the Keyless Push Button Ignition is in the
ON/RUN position.
The fuel pump symbol points to the
side of the vehicle where the fuel door
is located.
NOTE:The hard telltales will illuminate for a bulb check when the
ignition is first cycled.
INSTRUMENT CLUSTER DISPLAY
Your vehicle is equipped with an instrument cluster
display, which offers useful information to the driver. With
the ignition in the OFF mode, opening/closing of a door will
activate the display for viewing, and display the total miles,
or kilometers, in the odometer. Your instrument cluster
display is designed to display important information about
your vehicle’s systems and features. Using a driver
interactive display located on the instrument panel, your
instrument cluster display can show you how systems are
working and give you warnings when they are not. The
steering wheel mounted controls allow you to scroll
through the main menus and submenus. You can access
the specific information you want and make selections
and adjustments.
WARNING!
A hot engine cooling system is dangerous. You or others
could be badly burned by steam or boiling coolant. You
may want to call an authorized dealer for service if your
vehicle overheats. If you decide to look under the hood
yourself, follow the warnings under Cooling System
Úpage 234.
CAUTION!
Driving with a hot engine cooling system could damage
your vehicle. If the temperature gauge reads high pull
over and stop the vehicle. Idle the vehicle with the air
conditioner turned off until the pointer drops back into
the normal range. If the pointer remains high, turn the
engine off immediately and call an authorized dealer
for service.
3
23_LD_OM_EN_USC_t.book Page 63
Page 68 of 292
66GETTING TO KNOW YOUR INSTRUMENT PANEL
Vehicle Info
Push and release the up or down arrow button until
the “Vehicle Info” menu is displayed in the instrument
cluster display. Push and release the right or left
arrow button to scroll through the submenus items of
“Vehicle Info.” Follow the directional prompts to access or
reset any of the following “Vehicle Info” submenu items:
Tire Pressure Monitor
Coolant Temperature
Trans Temperature
Oil Temperature
Oil Pressure
Oil Life
Battery Voltage
AWD Status — If Equipped
Driver Assist — If Equipped
The Driver Assist menu displays the status of the ACC and
LaneSense systems.
Push and release the up or down arrow button until
the Driver Assist menu is displayed in the instrument
cluster display.
Adaptive Cruise Control (ACC) Feature
The instrument cluster displays the current ACC system
settings. The information displayed depends on ACC
system status.
Push the ACC on/off button (located on the steering
wheel) until one of the following displays in the instrument
cluster display: Adaptive Cruise Control Off
When ACC is deactivated, the display will read “Adaptive
Cruise Control Off.”
Adaptive Cruise Control Ready
When ACC is activated but the vehicle speed setting has
not been selected, the display will read “Adaptive Cruise
Control Ready.”
Push the SET + or the SET- button (located on the steering
wheel) and the following will display in the instrument
cluster display:
ACC SET
When ACC is set, the set speed will display in the
instrument cluster.
The ACC screen may display once again if any ACC activity
occurs, which may include any of the following:
Distance Setting Change
System Cancel
Driver Override
System Off
ACC Proximity Warning
ACC Unavailable Warning
The instrument cluster display will return to the last
display selected after five seconds of no ACC display
activity
Úpage 87.
LaneSense — If Equipped
The instrument cluster displays the current LaneSense
system settings. The information displayed depends on
LaneSense system status and the conditions that need to
be met
Úpage 98.
Fuel Economy
Two submenu pages; one with Current Value
(instantaneous calculation of the fuel economy) displayed
and one without the Current Value displayed (toggle the
left or right arrow button to select one):
Current Fuel Economy (MPG, L/100 km, or km/L).
Range To Empty (miles or km).
Average Fuel Economy (MPG, L/100 km, or km/L).
The Max and Min values will correspond to the partic -
ular engine requirements.
Lower end of gauge will be displayed in an amber color
and turn green as Fuel Economy improves.
Hold the OK button to reset average fuel economy
information.
Trip Info
Push and release the up or down arrow button until
the Trip Menu item is displayed in the instrument cluster
display. Toggle the left or right arrow button to
select Trip A or Trip B. The Trip information will display the
following:
Distance – Shows the total distance (mi or km) traveled
for Trip A or Trip B since the last reset.
Average Fuel Economy – Shows the average fuel
economy (MPG, L/100km or km/L) of Trip A or Trip B
since the last reset.
Elapsed Time – Shows the total elapsed time of travel
since the last reset.
Hold the OK button to reset feature information.
23_LD_OM_EN_USC_t.book Page 66
Page 72 of 292
70GETTING TO KNOW YOUR INSTRUMENT PANEL
If the light continues to flash when the vehicle is running,
immediate service is required and you may experience
reduced performance, an elevated/rough idle, or engine
stall and your vehicle may require towing. The light will
come on when the ignition is placed in the ON/RUN or
ACC/ON/RUN position and remain on briefly as a bulb
check. If the light does not come on during starting, have
the system checked by an authorized dealer.
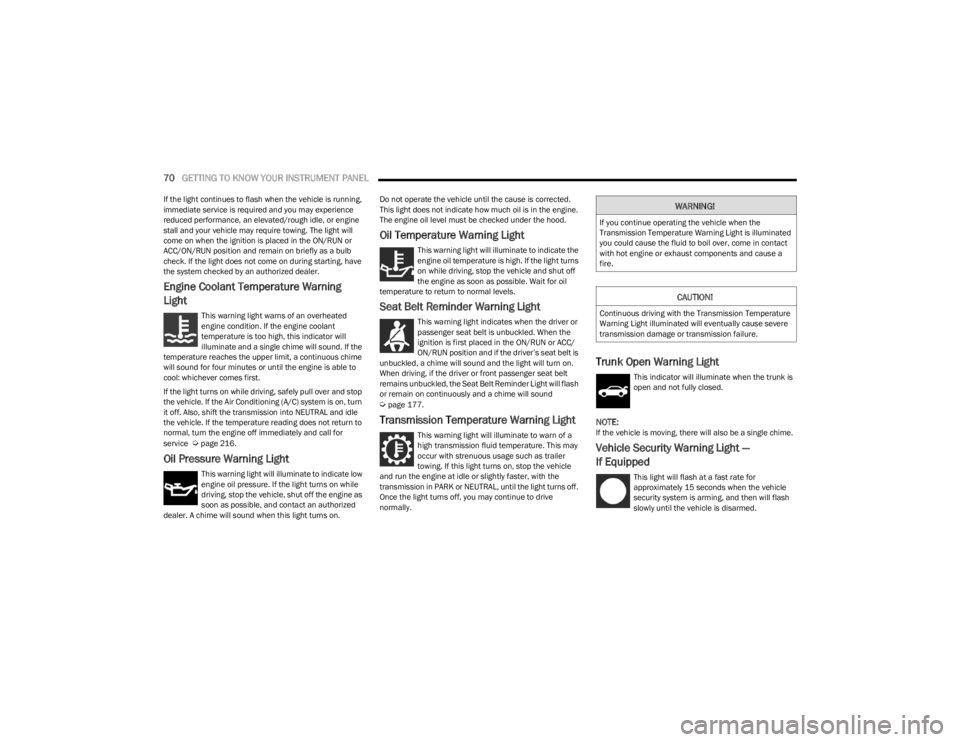
Engine Coolant Temperature Warning
Light
This warning light warns of an overheated
engine condition. If the engine coolant
temperature is too high, this indicator will
illuminate and a single chime will sound. If the
temperature reaches the upper limit, a continuous chime
will sound for four minutes or until the engine is able to
cool: whichever comes first.
If the light turns on while driving, safely pull over and stop
the vehicle. If the Air Conditioning (A/C) system is on, turn
it off. Also, shift the transmission into NEUTRAL and idle
the vehicle. If the temperature reading does not return to
normal, turn the engine off immediately and call for
service
Úpage 216.
Oil Pressure Warning Light
This warning light will illuminate to indicate low
engine oil pressure. If the light turns on while
driving, stop the vehicle, shut off the engine as
soon as possible, and contact an authorized
dealer. A chime will sound when this light turns on. Do not operate the vehicle until the cause is corrected.
This light does not indicate how much oil is in the engine.
The engine oil level must be checked under the hood.
Oil Temperature Warning Light
This warning light will illuminate to indicate the
engine oil temperature is high. If the light turns
on while driving, stop the vehicle and shut off
the engine as soon as possible. Wait for oil
temperature to return to normal levels.
Seat Belt Reminder Warning Light
This warning light indicates when the driver or
passenger seat belt is unbuckled. When the
ignition is first placed in the ON/RUN or ACC/
ON/RUN position and if the driver’s seat belt is
unbuckled, a chime will sound and the light will turn on.
When driving, if the driver or front passenger seat belt
remains unbuckled, the Seat Belt Reminder Light will flash
or remain on continuously and a chime will sound
Úpage 177.
Transmission Temperature Warning Light
This warning light will illuminate to warn of a
high transmission fluid temperature. This may
occur with strenuous usage such as trailer
towing. If this light turns on, stop the vehicle
and run the engine at idle or slightly faster, with the
transmission in PARK or NEUTRAL, until the light turns off.
Once the light turns off, you may continue to drive
normally.
Trunk Open Warning Light
This indicator will illuminate when the trunk is
open and not fully closed.
NOTE:If the vehicle is moving, there will also be a single chime.
Vehicle Security Warning Light —
If Equipped
This light will flash at a fast rate for
approximately 15 seconds when the vehicle
security system is arming, and then will flash
slowly until the vehicle is disarmed.
WARNING!
If you continue operating the vehicle when the
Transmission Temperature Warning Light is illuminated
you could cause the fluid to boil over, come in contact
with hot engine or exhaust components and cause a
fire.
CAUTION!
Continuous driving with the Transmission Temperature
Warning Light illuminated will eventually cause severe
transmission damage or transmission failure.
23_LD_OM_EN_USC_t.book Page 70
Page 159 of 292
MULTIMEDIA157
GAUGES
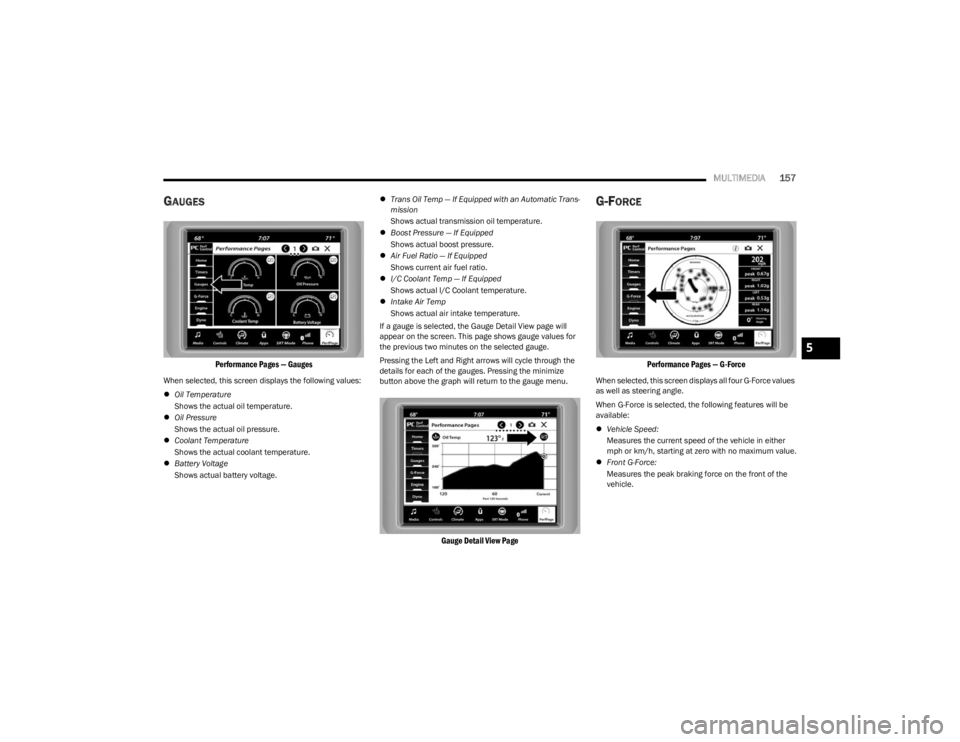
Performance Pages — Gauges
When selected, this screen displays the following values:
Oil Temperature
Shows the actual oil temperature.
Oil Pressure
Shows the actual oil pressure.
Coolant Temperature
Shows the actual coolant temperature.
Battery Voltage
Shows actual battery voltage.
Trans Oil Temp — If Equipped with an Automatic Trans -
mission
Shows actual transmission oil temperature.
Boost Pressure — If Equipped
Shows actual boost pressure.
Air Fuel Ratio — If Equipped
Shows current air fuel ratio.
I/C Coolant Temp — If Equipped
Shows actual I/C Coolant temperature.
Intake Air Temp
Shows actual air intake temperature.
If a gauge is selected, the Gauge Detail View page will
appear on the screen. This page shows gauge values for
the previous two minutes on the selected gauge.
Pressing the Left and Right arrows will cycle through the
details for each of the gauges. Pressing the minimize
button above the graph will return to the gauge menu.
Gauge Detail View Page
G-FORCE
Performance Pages — G-Force
When selected, this screen displays all four G-Force values
as well as steering angle.
When G-Force is selected, the following features will be
available:
Vehicle Speed:
Measures the current speed of the vehicle in either
mph or km/h, starting at zero with no maximum value.
Front G-Force:
Measures the peak braking force on the front of the
vehicle.
5
23_LD_OM_EN_USC_t.book Page 157
Page 218 of 292
216IN CASE OF EMERGENCY
3. Ensure funnel is inserted fully to hold flapper doors
open.
4. Pour fuel into funnel opening.
5. Remove funnel from filler pipe, clean off prior to putting back in the spare tire storage area.IF YOUR ENGINE OVERHEATS
If the vehicle is overheating, it will need to be serviced by
an authorized dealer.
Potential signs of vehicle overheating:
Temperature gauge is at HOT (H)
Strong smell of coolant
White smoke coming from engine or exhaust
Coolant bottle coolant has bubbles present
In the event it is observed that the temperature gauge is
moving towards or close to the HOT (H) position, you can
reduce the potential for overheating by taking the
appropriate action.
On the highways — slow down.
In city traffic — while stopped, place the transmission in
NEUTRAL (N), but do not increase the engine idle speed
while preventing vehicle motion with the brakes.
If your Air Conditioner (A/C) is on, turn it off. The A/C
system adds heat to the engine cooling system and
turning the A/C off can help remove this heat.
You can also turn the temperature control to maximum
heat, the mode control to floor and the blower control
to high. This allows the heater core to act as a supple -
ment to the radiator and aids in removing heat from the
engine cooling system.
MANUAL PARK RELEASE–8–SPEED
TRANSMISSION
CAUTION!
To avoid fuel spillage and overfilling, do not “top off” the
fuel tank after filling.
WARNING!
Never have any smoking materials lit in or near the
vehicle when the fuel door is open or the tank is
being filled.
Never add fuel when the engine is running. This is in
violation of most state and federal fire regulations
and may cause the Malfunction Indicator Light to
turn on.
A fire may result if fuel is pumped into a portable
container that is inside of a vehicle. You could be
burned. Always place fuel containers on the ground
while filling.
WARNING!
You or others can be badly burned by hot engine
coolant (antifreeze) or steam from your radiator. If you
see or hear steam coming from under the hood, do not
open the hood until the radiator has had time to cool.
Never try to open a cooling system pressure cap when
the radiator or coolant bottle is hot.
CAUTION!
Driving with a hot cooling system could damage your
vehicle. If the temperature gauge reads HOT (H), pull
over and stop the vehicle. Idle the vehicle with the air
conditioner turned off until the pointer drops back into
the normal range. If the pointer remains on HOT (H),
and you hear continuous chimes, turn the engine off
immediately and call for service.
WARNING!
Always secure your vehicle by fully applying the parking
brake before activating the Manual Park Release. In
addition, you should be seated in the driver's seat with
your foot firmly on the brake pedal when activating the
Manual Park Release. Activating the Manual Park
Release will allow your vehicle to roll away if it is not
secured by the parking brake, or by proper connection
to a tow vehicle. Activating the Manual Park Release on
an unsecured vehicle could lead to serious injury or
death for those in or around the vehicle.
23_LD_OM_EN_USC_t.book Page 216
Page 223 of 292
221
SERVICING AND MAINTENANCE
SCHEDULED SERVICING
3.6L AND 5.7L ENGINES
These vehicles are equipped with an automatic oil change
indicator system. The oil change indicator system will
remind you that it is time to take your vehicle in for
scheduled maintenance.
Based on engine operation conditions, the oil change
indicator message will illuminate. This means that service
is required for your vehicle. Operating conditions such as
frequent short-trips, trailer tow, and extremely hot or cold
ambient temperatures will influence when the “Change
Oil” or “Oil Change Required” message is displayed. Have
your vehicle serviced as soon as possible, within the next
500 miles (805 km).The “Oil Change Required” message will be displayed in
the instrument cluster and a single chime will sound,
indicating that an oil change is necessary.
An authorized dealer will reset the oil change indicator
message after completing the scheduled oil change.
If a scheduled oil change is performed by someone other
than an authorized dealer, the message can be reset by
referring to “Instrument Cluster Display”
Úpage 63.
NOTE:Under no circumstances should oil change intervals
exceed 10,000 miles (16,000 km), 12 months or
350 hours of engine run time, whichever comes first.
The 350 hours of engine run or idle time is generally only
a concern for fleet customers.
Once A Month Or Before A Long Trip:
Check engine oil level.
Check windshield washer fluid level.
Check tire pressure and look for unusual wear or
damage. Rotate tires at the first sign of irregular wear,
even if it occurs before your next scheduled service.
Check the fluid levels of the coolant reservoir, brake
master cylinder, and power steering (if equipped) and
fill as needed.
Check function of all interior and exterior lights.
8
23_LD_OM_EN_USC_t.book Page 221
Page 236 of 292
234SERVICING AND MAINTENANCE
(Continued)
To minimize the possibility of catalytic converter damage:
Do not shut off the engine or interrupt the ignition when
the transmission is in gear and the vehicle is in motion.
Do not try to start the engine by pushing or towing the
vehicle.
Do not idle the engine with any spark plug wires discon -
nected or removed, such as when diagnostic testing, or
for prolonged periods during very rough idle or malfunc -
tioning operating conditions.
NOTE:The vehicle exhaust system may be equipped with an Elec -
tronic Exhaust Valve (EEV) system, if the exhaust system is
replaced with aftermarket products a Malfunction Indi -
cator Light (MIL) will illuminate.
COOLING SYSTEM
Coolant Checks
Check engine coolant (antifreeze) protection every
12 months (before the onset of freezing weather, where
applicable). If the engine coolant is dirty, the system
should be drained, flushed, and refilled with fresh Organic
Additive Technology (OAT) coolant (conforming to
MS.90032) by an authorized dealer. Check the front of the
radiator for any accumulation of bugs, leaves, etc. If dirty,
clean by gently spraying water from a garden hose
vertically down the face of the condenser.
Check the coolant recovery bottle tubing for brittle rubber,
cracking, tears, cuts, and tightness of the connection at
the bottle and radiator. Inspect the entire system for
leaks. DO NOT REMOVE THE COOLANT PRESSURE CAP
WHEN THE COOLING SYSTEM IS HOT.
Cooling System — Drain, Flush And Refill
NOTE:Some vehicles require special tools to add coolant
properly. Failure to fill these systems properly could lead
to severe internal engine damage. If any coolant is needed
to be added to the system please contact an authorized
dealer. If the engine coolant (antifreeze) is dirty or contains visible
sediment, have an authorized dealer clean and flush with
Organic Additive Technology (OAT) coolant (conforming to
MS.90032).
For the proper maintenance intervals
Úpage 221.
Selection Of Coolant
For further information Úpage 271.
NOTE:
Mixing of engine coolant (antifreeze) other than speci-
fied Organic Additive Technology (OAT) engine coolant,
may result in engine damage and may decrease corro -
sion protection. OAT engine coolant is different and
should not be mixed with Hybrid Organic Additive Tech -
nology (HOAT) engine coolant or any “globally compat -
ible” coolant. If a non-OAT engine coolant is introduced
into the cooling system in an emergency, the cooling
system will need to be drained, flushed, and refilled
with fresh OAT coolant (conforming to MS.90032), by
an authorized dealer as soon as possible.
Do not use water alone or alcohol-based engine
coolant products. Do not use additional rust inhibitors
or anti-rust products, as they may not be compatible
with the radiator engine coolant and may plug the radi -
ator.
This vehicle has not been designed for use with
propylene glycol-based engine coolant. Use of
propylene glycol-based engine coolant is not recom -
mended.
WARNING!
You or others can be badly burned by hot engine
coolant (antifreeze) or steam from your radiator. If
you see or hear steam coming from under the hood,
do not open the hood until the radiator has had time
to cool. Never open a cooling system pressure cap
when the radiator or coolant bottle is hot.
Keep hands, tools, clothing, and jewelry away from
the radiator cooling fan when the hood is raised. The
fan starts automatically and may start at any time,
whether the engine is running or not.
When working near the radiator cooling fan, discon -
nect the fan motor lead or turn the ignition to the OFF
position. The fan is temperature controlled and can
start at any time the ignition is in the ON/RUN
position.
WARNING!
23_LD_OM_EN_USC_t.book Page 234
Page 237 of 292

SERVICING AND MAINTENANCE235
Some vehicles require special tools to add coolant
properly. Failure to fill these systems properly could
lead to severe internal engine damage. If any coolant is
needed to be added to the system please contact an
authorized dealer.
Adding Coolant
Your vehicle has been built with an improved engine
coolant (OAT coolant conforming to MS.90032) that
allows extended maintenance intervals. This engine
coolant (antifreeze) can be used up to 10 years or
150,000 miles (240,000 km) before replacement. To
prevent reducing this extended maintenance period, it is
important to use the same engine coolant (OAT coolant
conforming to MS.90032) throughout the life of your
vehicle.
Please review these recommendations for using Organic
Additive Technology (OAT) engine coolant that meets the
requirements of the manufacturer Material Standard
MS.90032. When adding engine coolant:
We recommend using Mopar® Antifreeze/Coolant
10 Year/150,000 Mile (240,000 km) Formula OAT
that meets the requirements of the manufacturer
Material Standard MS.90032.
Mix a minimum solution of 50% OAT engine coolant
that meets the requirements of the manufacturer
Material Standard MS.90032 and distilled water. Use
higher concentrations (not to exceed 70%) if tempera -
tures below −34°F (−37°C) are anticipated. Please
contact an authorized dealer for assistance.
Use only high purity water such as distilled or deionized
water when mixing the water/engine coolant solution.
The use of lower quality water will reduce the amount
of corrosion protection in the engine cooling system.
NOTE:
It is the owner's responsibility to maintain the proper
level of protection against freezing according to the
temperatures occurring in the area where the vehicle is
operated.
Some vehicles require special tools to add coolant
properly. Failure to fill these systems properly could
lead to severe internal engine damage. If any coolant is
needed to be added to the system, please contact an
authorized dealer.
Mixing engine coolant types is not recommended and
can result in cooling system damage. If HOAT and OAT
coolant are mixed in an emergency, have an authorized
dealer drain, flush, and refill with OAT coolant
(conforming to MS.90032) as soon as possible.
Cooling System Pressure Cap
The cap must be fully tightened to prevent loss of engine
coolant (antifreeze), and to ensure that engine coolant will
return to the radiator from the coolant expansion
bottle/recovery tank (if equipped).
The cap should be inspected and cleaned if there is any
accumulation of foreign material on the sealing surfaces.
Disposal Of Used Coolant
Used ethylene glycol-based coolant (antifreeze) is a
regulated substance requiring proper disposal. Check with
your local authorities to determine the disposal rules for
your community. To prevent ingestion by animals or
children, do not store ethylene glycol-based coolant in
open containers or allow it to remain in puddles on the
ground, clean up any ground spills immediately. If
ingested, seek emergency assistance immediately.
Coolant Level
The coolant bottle provides a quick visual method for
determining that the coolant level is adequate. With the
engine off and cold, the level of the engine coolant
(antifreeze) in the bottle should be between the ranges
indicated on the bottle.
WARNING!
Do not open hot engine cooling system. Never add
engine coolant (antifreeze) when the engine is over -
heated. Do not loosen or remove the cap to cool an
overheated engine. Heat causes pressure to build up
in the cooling system. To prevent scalding or injury,
do not remove the pressure cap while the system is
hot or under pressure.
Do not use a pressure cap other than the one speci -
fied for your vehicle. Personal injury or engine
damage may result.
8
23_LD_OM_EN_USC_t.book Page 235
Page 238 of 292
236SERVICING AND MAINTENANCE
(Continued)
The radiator normally remains completely full, so there is
no need to remove the radiator/coolant pressure cap
unless checking for engine coolant freeze point or
replacing coolant. Advise your service attendant of this. As
long as the engine operating temperature is satisfactory,
the coolant bottle need only be checked once a month.
When additional engine coolant is needed to maintain the
proper level, only OAT coolant that meets the
requirements of manufacturer Material Standard
MS.90032 should be added to the coolant bottle.
Do not overfill.
Cooling System Notes
NOTE:When the vehicle is stopped after a few miles/kilometers
of operation, you may observe vapor coming from the front
of the engine compartment. This is normally a result of
moisture from rain, snow, or high humidity accumulating
on the radiator and being vaporized when the thermostat
opens, allowing hot engine coolant (antifreeze) to enter
the radiator.
If an examination of your engine compartment shows no
evidence of radiator or hose leaks, the vehicle may be
safely driven. The vapor will soon dissipate.
Do not overfill the coolant expansion bottle.
Check the coolant freeze point in the radiator and in
the coolant expansion bottle. If engine coolant needs
to be added, the contents of the coolant expansion
bottle must also be protected against freezing.
If frequent engine coolant additions are required, the
cooling system should be pressure tested for leaks.
Maintain engine coolant concentration at a minimum
of 50% OAT coolant (conforming to MS.90032) and
distilled water for proper corrosion protection of your
engine which contains aluminum components.
Make sure that the coolant expansion bottle overflow
hoses are not kinked or obstructed.
Keep the front of the radiator clean. If your vehicle is
equipped with air conditioning, keep the front of the
condenser clean.
Do not change the thermostat for Summer or Winter
operation. If replacement is ever necessary, install
ONLY the correct type thermostat. Other designs may
result in unsatisfactory engine cooling performance,
poor gas mileage, and increased emissions.
BRAKE SYSTEM
In order to ensure brake system performance, all brake
system components should be inspected periodically
Úpage 221.
Fluid Level Check — Brake Master Cylinder
Check the fluid level in the master cylinder immediately if
the Brake System Warning Light indicates system failure.
Check the fluid level in the master cylinder when
performing underhood services.
Clean the top of the master cylinder area before removing
the cap. Add fluid to bring the level up to the top of the
“FULL” mark on the side of the master cylinder reservoir.
Overfilling of fluid is not recommended because it may
cause leaking in the system.
Add enough fluid to bring the level up to the requirements
described on the brake fluid reservoir. With disc brakes,
fluid level can be expected to fall as the brake pads wear.
However, low fluid level may be caused by a leak and a
checkup may be needed.
Use only brake fluid that has been recommended by the
manufacturer, and has been kept in a tightly closed
container to avoid contamination from foreign matter or
moisture.
For further information
Úpage 271.
WARNING!
Riding the brakes can lead to brake failure and possibly
a collision. Driving with your foot resting or riding on the
brake pedal can result in abnormally high brake
temperatures, excessive lining wear, and possible brake
damage. You would not have your full braking capacity
in an emergency.WARNING!
Use only manufacturer's recommended brake fluid Úpage 271. Using the wrong type of brake fluid can
severely damage your brake system and/or impair its
performance. The proper type of brake fluid for your
vehicle is also identified on the original factory
installed hydraulic master cylinder reservoir.
23_LD_OM_EN_USC_t.book Page 236