cruise control DODGE CHARGER 2023 Owners Manual
[x] Cancel search | Manufacturer: DODGE, Model Year: 2023, Model line: CHARGER, Model: DODGE CHARGER 2023Pages: 292, PDF Size: 13.05 MB
Page 6 of 292

4
SPORT MODE ŌĆö WITHOUT PERFORMANCE
CONTROL .............................................................................84
FUEL SAVER TECHNOLOGY 5.7L ONLY ŌĆö
IF EQUIPPED ........................................................................84
ELECTRIC POWER STEERING ............................................85
CRUISE CONTROL SYSTEMS ŌĆö IF EQUIPPED .................85
Cruise Control.............................................................. 85
Adaptive Cruise Control (ACC) .................................... 87
PARKSENSE REAR PARK ASSIST ŌĆö IF EQUIPPED .........94 ParkSense Sensors ..................................................... 94
ParkSense Display ...................................................... 94
ParkSense Warning Display ....................................... 96
Enabling And Disabling ParkSense............................ 96
Service The ParkSense Park Assist System .............. 97
Cleaning The ParkSense System ............................... 97
ParkSense System Usage Precautions ..................... 97
LANESENSE ŌĆö IF EQUIPPED .............................................98 LaneSense Operation ................................................. 98
Turning LaneSense On Or Off..................................... 98
LaneSense Warning Message.................................... 98
Changing LaneSense Status .................................... 100
PARKVIEW REAR BACK UP CAMERA ........................... 100
REFUELING THE VEHICLE ............................................... 101
VEHICLE LOADING ........................................................... 102 Vehicle Certification Label ....................................... 102
Gross Vehicle Weight Rating (GVWR) ...................... 102
Gross Axle Weight Rating (GAWR) ........................... 102
Overloading ............................................................... 103
Loading ................................................................... 103 TRAILER TOWING ........................................................... 103
Common Towing Definitions .................................... 103Trailer Hitch Classification ....................................... 105
Trailer Towing Weights
(Maximum Trailer Weight Ratings) .......................... 105
Trailer And Tongue Weight ...................................... 106
Towing Requirements............................................... 106
Towing Tips ............................................................... 108
RECREATIONAL TOWING (BEHIND MOTORHOME) ..... 109
DRIVING TIPS ................................................................... 109 Driving On Slippery Surfaces ................................... 109Driving Through Water ............................................. 110
MULTIMEDIA
UCONNECT SYSTEMS ..................................................... 111
CYBERSECURITY ............................................................. 111
UCONNECT SETTINGS .................................................... 112 Customer Programmable Features ......................... 112
UCONNECT INTRODUCTION............................................ 126 System Overview ...................................................... 126
Drag & Drop Menu Bar ............................................ 128
Safety And General Information ............................. 128
UCONNECT MODES ......................................................... 129 Steering Wheel Audio Controls ................................ 129
Radio Mode .............................................................. 130
Media Mode ............................................................. 138
Phone Mode ............................................................. 140
ANDROID AUTOŌäó & APPLE CARPLAY┬« ŌĆö
IF EQUIPPED ..................................................................... 149 Android AutoŌäó ......................................................... 149Apple CarPlay┬« ......................................................... 151Android AutoŌäó And Apple CarPlay┬« Tips
And Tricks.................................................................. 152 PERFORMANCE PAGES ................................................... 153
Home.......................................................................... 153Timers ........................................................................ 155
Gauges ....................................................................... 157
G-Force ....................................................................... 157
Engine ........................................................................ 158
Dynamometer (Dyno) ................................................ 158
DODGE DRIVE MODES ŌĆö IF EQUIPPED .........................159 Performance Control ŌĆö If Equipped ......................... 159
RADIO OPERATION AND MOBILE PHONES ..................163 Regulatory And Safety Information .......................... 163
SAFETY
SAFETY FEATURES ...........................................................164Anti-Lock Brake System (ABS) ................................. 164
Electronic Brake Control (EBC) System ................... 165
AUXILIARY DRIVING SYSTEMS .......................................169 Blind Spot Monitoring (BSM) ŌĆö If Equipped ............ 169
Forward Collision Warning (FCW) With
Mitigation Operation ................................................. 172
Tire Pressure Monitoring System (TPMS) ............... 174
OCCUPANT RESTRAINT SYSTEMS .................................177 Occupant Restraint Systems Features ................... 177
Important Safety Precautions................................... 177
Seat Belt Systems .................................................... 178
Supplemental Restraint Systems (SRS) .................. 183Child Restraints ........................................................ 190
23_LD_OM_EN_USC_t.book Page 4
Page 12 of 292
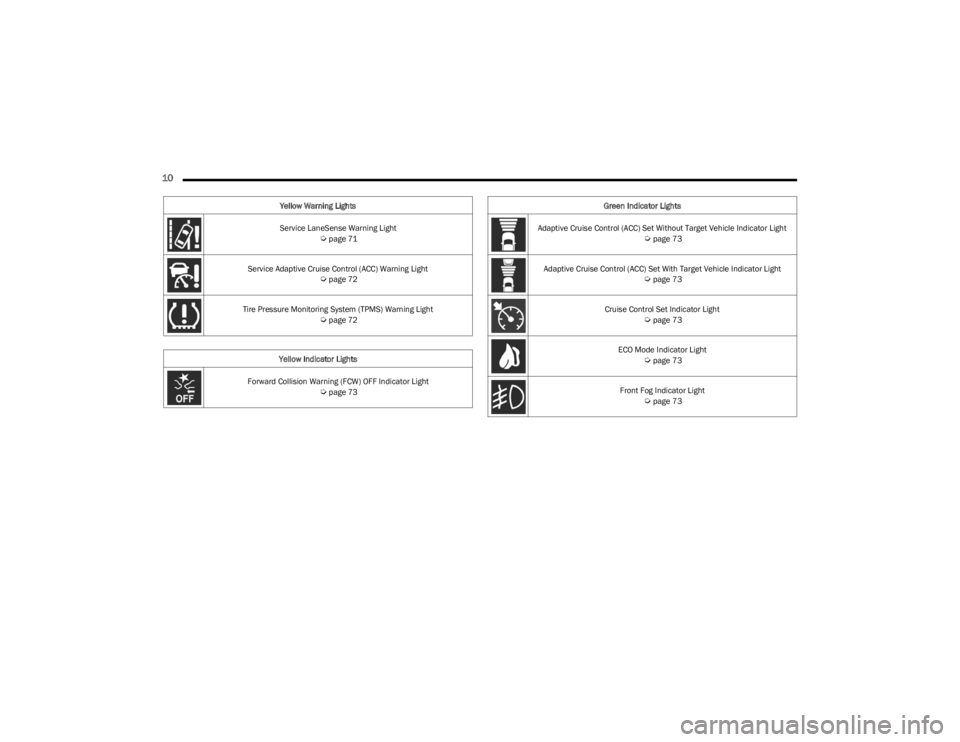
10
Service LaneSense Warning Light Úpage 71
Service Adaptive Cruise Control (ACC) Warning Light
Úpage 72
Tire Pressure Monitoring System (TPMS) Warning Light
Úpage 72
Yellow Indicator Lights
Forward Collision Warning (FCW) OFF Indicator Light
Úpage 73
Yellow Warning Lights
Green Indicator Lights
Adaptive Cruise Control (ACC) Set Without Target Vehicle Indicator Light
Úpage 73
Adaptive Cruise Control (ACC) Set With Target Vehicle Indicator Light
Úpage 73
Cruise Control Set Indicator Light
Úpage 73
ECO Mode Indicator Light
Úpage 73
Front Fog Indicator Light
Úpage 73
23_LD_OM_EN_USC_t.book Page 10
Page 13 of 292
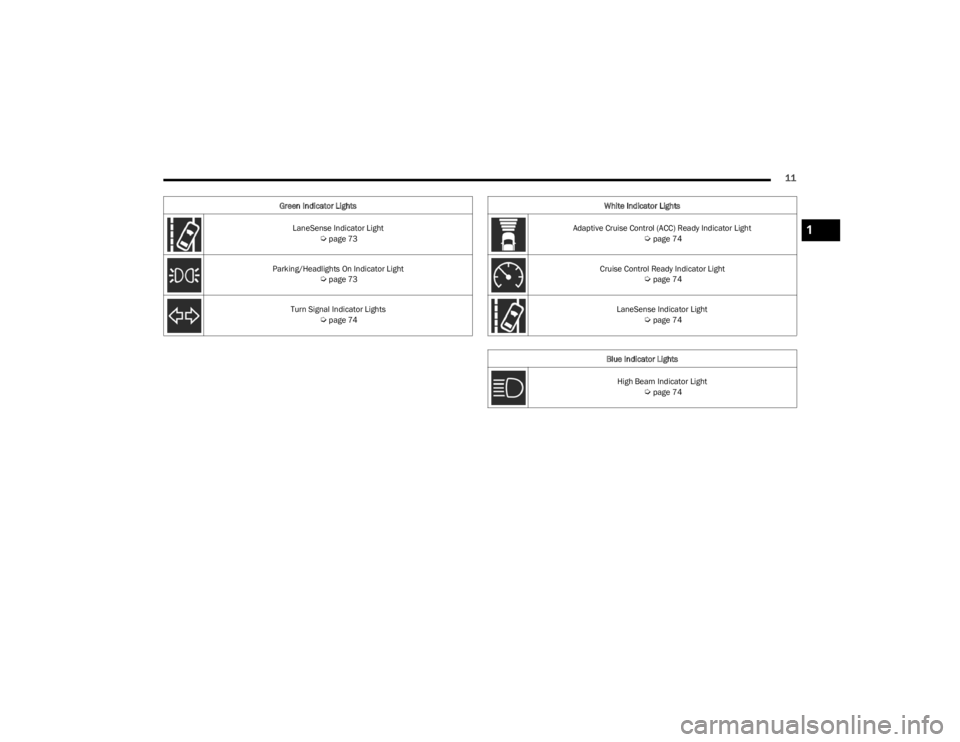
11
LaneSense Indicator Light Úpage 73
Parking/Headlights On Indicator Light
Úpage 73
Turn Signal Indicator Lights
Úpage 74
Green Indicator Lights
White Indicator Lights
Adaptive Cruise Control (ACC) Ready Indicator Light
Úpage 74
Cruise Control Ready Indicator Light
Úpage 74
LaneSense Indicator Light
Úpage 74
Blue Indicator Lights High Beam Indicator Light
Úpage 74
1
23_LD_OM_EN_USC_t.book Page 11
Page 68 of 292
66GETTING TO KNOW YOUR INSTRUMENT PANEL
Vehicle Info
Push and release the up or down arrow button until
the ŌĆ£Vehicle InfoŌĆØ menu is displayed in the instrument
cluster display. Push and release the right or left
arrow button to scroll through the submenus items of
ŌĆ£Vehicle Info.ŌĆØ Follow the directional prompts to access or
reset any of the following ŌĆ£Vehicle InfoŌĆØ submenu items:
’ü¼ Tire Pressure Monitor
’ü¼ Coolant Temperature
’ü¼ Trans Temperature
’ü¼ Oil Temperature
’ü¼ Oil Pressure
’ü¼ Oil Life
’ü¼ Battery Voltage
’ü¼ AWD Status ŌĆö If Equipped
Driver Assist ŌĆö If Equipped
The Driver Assist menu displays the status of the ACC and
LaneSense systems.
Push and release the up or down arrow button until
the Driver Assist menu is displayed in the instrument
cluster display.
Adaptive Cruise Control (ACC) Feature
The instrument cluster displays the current ACC system
settings. The information displayed depends on ACC
system status.
Push the ACC on/off button (located on the steering
wheel) until one of the following displays in the instrument
cluster display: Adaptive Cruise Control Off
When ACC is deactivated, the display will read ŌĆ£Adaptive
Cruise Control Off.ŌĆØ
Adaptive Cruise Control Ready
When ACC is activated but the vehicle speed setting has
not been selected, the display will read ŌĆ£Adaptive Cruise
Control Ready.ŌĆØ
Push the SET + or the SET- button (located on the steering
wheel) and the following will display in the instrument
cluster display:
ACC SET
When ACC is set, the set speed will display in the
instrument cluster.
The ACC screen may display once again if any ACC activity
occurs, which may include any of the following:
’ü¼
Distance Setting Change
’ü¼ System Cancel
’ü¼ Driver Override
’ü¼ System Off
’ü¼ ACC Proximity Warning
’ü¼ ACC Unavailable Warning
The instrument cluster display will return to the last
display selected after five seconds of no ACC display
activity
Úpage 87.
LaneSense ŌĆö If Equipped
The instrument cluster displays the current LaneSense
system settings. The information displayed depends on
LaneSense system status and the conditions that need to
be met
Úpage 98.
Fuel Economy
Two submenu pages; one with Current Value
(instantaneous calculation of the fuel economy) displayed
and one without the Current Value displayed (toggle the
left or right arrow button to select one):
’ü¼ Current Fuel Economy (MPG, L/100 km, or km/L).
’ü¼ Range To Empty (miles or km).
’ü¼ Average Fuel Economy (MPG, L/100 km, or km/L).
’ü¼ The Max and Min values will correspond to the partic -
ular engine requirements.
’ü¼ Lower end of gauge will be displayed in an amber color
and turn green as Fuel Economy improves.
’ü¼ Hold the OK button to reset average fuel economy
information.
Trip Info
Push and release the up or down arrow button until
the Trip Menu item is displayed in the instrument cluster
display. Toggle the left or right arrow button to
select Trip A or Trip B. The Trip information will display the
following:
’ü¼ Distance ŌĆō Shows the total distance (mi or km) traveled
for Trip A or Trip B since the last reset.
’ü¼ Average Fuel Economy ŌĆō Shows the average fuel
economy (MPG, L/100km or km/L) of Trip A or Trip B
since the last reset.
’ü¼ Elapsed Time ŌĆō Shows the total elapsed time of travel
since the last reset.
Hold the OK button to reset feature information.
23_LD_OM_EN_USC_t.book Page 66
Page 74 of 292
72GETTING TO KNOW YOUR INSTRUMENT PANEL
When the engine is running, the MIL may flash to alert
serious conditions that could lead to immediate loss of
power or severe catalytic converter damage. The vehicle
should be serviced by an authorized dealer as soon as
possible if this occurs.
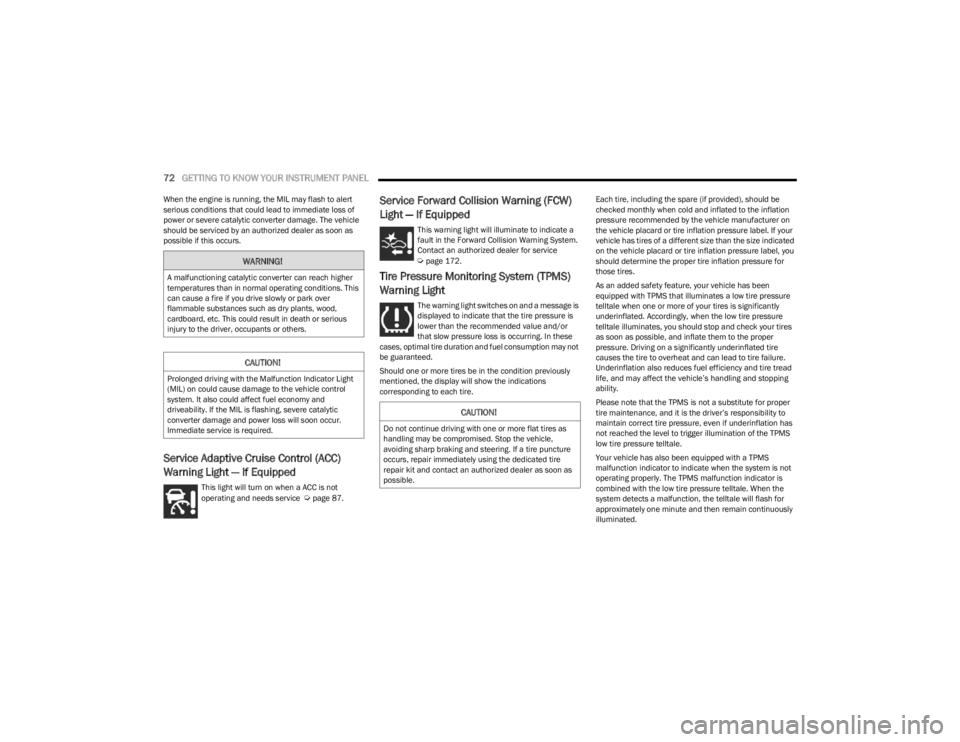
Service Adaptive Cruise Control (ACC)
Warning Light ŌĆö If Equipped
This light will turn on when a ACC is not
operating and needs service Úpage 87.
Service Forward Collision Warning (FCW)
Light ŌĆö If Equipped
This warning light will illuminate to indicate a
fault in the Forward Collision Warning System.
Contact an authorized dealer for service
Úpage 172.
Tire Pressure Monitoring System (TPMS)
Warning Light
The warning light switches on and a message is
displayed to indicate that the tire pressure is
lower than the recommended value and/or
that slow pressure loss is occurring. In these
cases, optimal tire duration and fuel consumption may not
be guaranteed.
Should one or more tires be in the condition previously
mentioned, the display will show the indications
corresponding to each tire. Each tire, including the spare (if provided), should be
checked monthly when cold and inflated to the inflation
pressure recommended by the vehicle manufacturer on
the vehicle placard or tire inflation pressure label. If your
vehicle has tires of a different size than the size indicated
on the vehicle placard or tire inflation pressure label, you
should determine the proper tire inflation pressure for
those tires.
As an added safety feature, your vehicle has been
equipped with TPMS that illuminates a low tire pressure
telltale when one or more of your tires is significantly
underinflated. Accordingly, when the low tire pressure
telltale illuminates, you should stop and check your tires
as soon as possible, and inflate them to the proper
pressure. Driving on a significantly underinflated tire
causes the tire to overheat and can lead to tire failure.
Underinflation also reduces fuel efficiency and tire tread
life, and may affect the vehicleŌĆÖs handling and stopping
ability.
Please note that the TPMS is not a substitute for proper
tire maintenance, and it is the driverŌĆÖs responsibility to
maintain correct tire pressure, even if underinflation has
not reached the level to trigger illumination of the TPMS
low tire pressure telltale.
Your vehicle has also been equipped with a TPMS
malfunction indicator to indicate when the system is not
operating properly. The TPMS malfunction indicator is
combined with the low tire pressure telltale. When the
system detects a malfunction, the telltale will flash for
approximately one minute and then remain continuously
illuminated.
WARNING!
A malfunctioning catalytic converter can reach higher
temperatures than in normal operating conditions. This
can cause a fire if you drive slowly or park over
flammable substances such as dry plants, wood,
cardboard, etc. This could result in death or serious
injury to the driver, occupants or others.
CAUTION!
Prolonged driving with the Malfunction Indicator Light
(MIL) on could cause damage to the vehicle control
system. It also could affect fuel economy and
driveability. If the MIL is flashing, severe catalytic
converter damage and power loss will soon occur.
Immediate service is required.
CAUTION!
Do not continue driving with one or more flat tires as
handling may be compromised. Stop the vehicle,
avoiding sharp braking and steering. If a tire puncture
occurs, repair immediately using the dedicated tire
repair kit and contact an authorized dealer as soon as
possible.
23_LD_OM_EN_USC_t.book Page 72
Page 75 of 292
GETTING TO KNOW YOUR INSTRUMENT PANEL73
This sequence will continue upon subsequent vehicle
start-ups as long as the malfunction exists. When the
malfunction indicator is illuminated, the system may not
be able to detect or signal low tire pressure as intended.
TPMS malfunctions may occur for a variety of reasons,
including the installation of replacement or alternate tires
or wheels on the vehicle that prevent the TPMS from
functioning properly. Always check the TPMS malfunction
telltale after replacing one or more tires or wheels on your
vehicle to ensure that the replacement or alternate tires
and wheels allow the TPMS to continue to function
properly.YELLOW INDICATOR LIGHTS
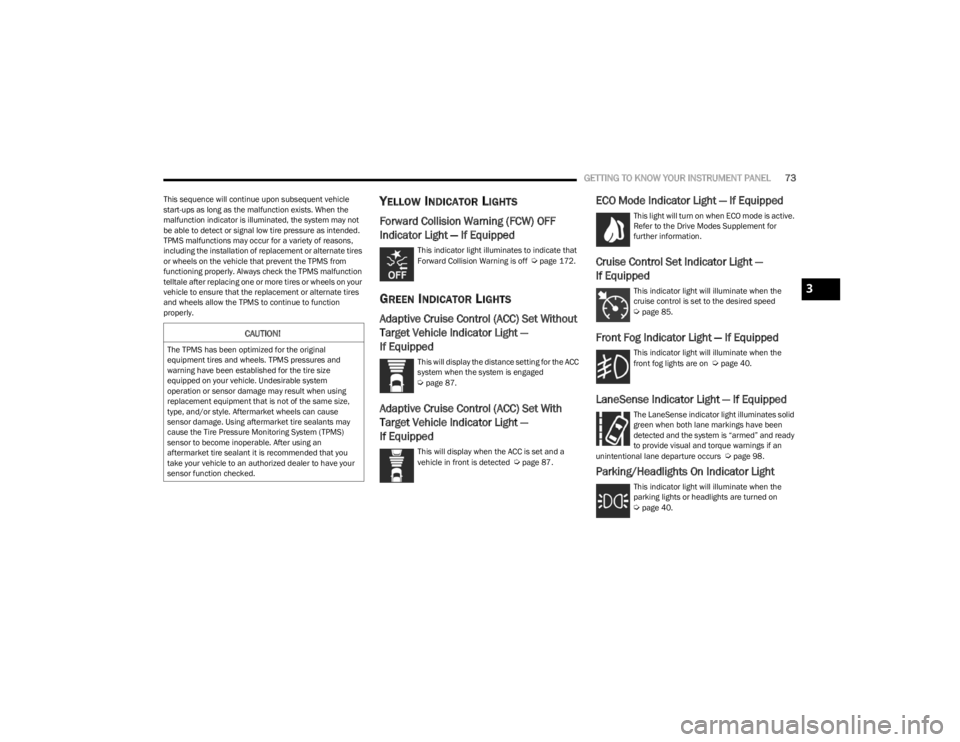
Forward Collision Warning (FCW) OFF
Indicator Light ŌĆö If Equipped
This indicator light illuminates to indicate that
Forward Collision Warning is off Úpage 172.
GREEN INDICATOR LIGHTS
Adaptive Cruise Control (ACC) Set Without
Target Vehicle Indicator Light ŌĆö
If Equipped
This will display the distance setting for the ACC
system when the system is engaged
Úpage 87.
Adaptive Cruise Control (ACC) Set With
Target Vehicle Indicator Light ŌĆö
If Equipped
This will display when the ACC is set and a
vehicle in front is detected Úpage 87.
ECO Mode Indicator Light ŌĆö If Equipped
This light will turn on when ECO mode is active.
Refer to the Drive Modes Supplement for
further information.
Cruise Control Set Indicator Light ŌĆö
If Equipped
This indicator light will illuminate when the
cruise control is set to the desired speed
Úpage 85.
Front Fog Indicator Light ŌĆö If Equipped
This indicator light will illuminate when the
front fog lights are on Úpage 40.
LaneSense Indicator Light ŌĆö If Equipped
The LaneSense indicator light illuminates solid
green when both lane markings have been
detected and the system is ŌĆ£armedŌĆØ and ready
to provide visual and torque warnings if an
unintentional lane departure occurs
Úpage 98.
Parking/Headlights On Indicator Light
This indicator light will illuminate when the
parking lights or headlights are turned on
Úpage 40.
CAUTION!
The TPMS has been optimized for the original
equipment tires and wheels. TPMS pressures and
warning have been established for the tire size
equipped on your vehicle. Undesirable system
operation or sensor damage may result when using
replacement equipment that is not of the same size,
type, and/or style. Aftermarket wheels can cause
sensor damage. Using aftermarket tire sealants may
cause the Tire Pressure Monitoring System (TPMS)
sensor to become inoperable. After using an
aftermarket tire sealant it is recommended that you
take your vehicle to an authorized dealer to have your
sensor function checked.
3
23_LD_OM_EN_USC_t.book Page 73
Page 76 of 292
74GETTING TO KNOW YOUR INSTRUMENT PANEL
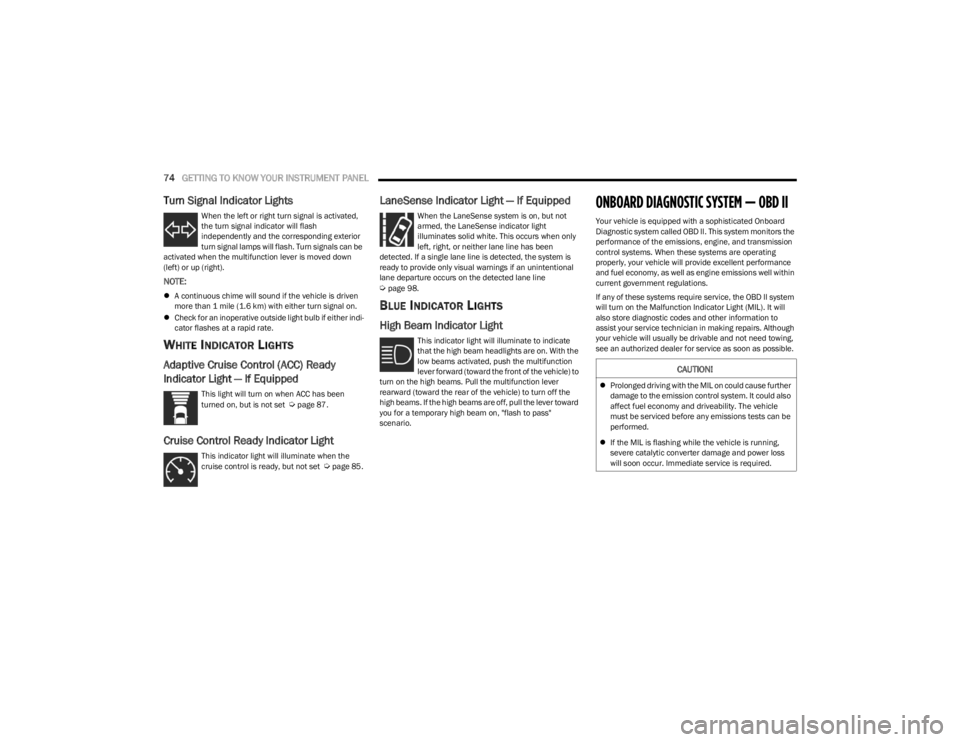
Turn Signal Indicator Lights
When the left or right turn signal is activated,
the turn signal indicator will flash
independently and the corresponding exterior
turn signal lamps will flash. Turn signals can be
activated when the multifunction lever is moved down
(left) or up (right).
NOTE:
’ü¼ A continuous chime will sound if the vehicle is driven
more than 1 mile (1.6 km) with either turn signal on.
’ü¼ Check for an inoperative outside light bulb if either indi -
cator flashes at a rapid rate.
WHITE INDICATOR LIGHTS
Adaptive Cruise Control (ACC) Ready
Indicator Light ŌĆö If Equipped
This light will turn on when ACC has been
turned on, but is not set Úpage 87.
Cruise Control Ready Indicator Light
This indicator light will illuminate when the
cruise control is ready, but not set Úpage 85.
LaneSense Indicator Light ŌĆö If Equipped
When the LaneSense system is on, but not
armed, the LaneSense indicator light
illuminates solid white. This occurs when only
left, right, or neither lane line has been
detected. If a single lane line is detected, the system is
ready to provide only visual warnings if an unintentional
lane departure occurs on the detected lane line
Úpage 98.
BLUE INDICATOR LIGHTS
High Beam Indicator Light
This indicator light will illuminate to indicate
that the high beam headlights are on. With the
low beams activated, push the multifunction
lever forward (toward the front of the vehicle) to
turn on the high beams. Pull the multifunction lever
rearward (toward the rear of the vehicle) to turn off the
high beams. If the high beams are off, pull the lever toward
you for a temporary high beam on, "flash to pass"
scenario.
ONBOARD DIAGNOSTIC SYSTEM ŌĆö OBD II
Your vehicle is equipped with a sophisticated Onboard
Diagnostic system called OBD II. This system monitors the
performance of the emissions, engine, and transmission
control systems. When these systems are operating
properly, your vehicle will provide excellent performance
and fuel economy, as well as engine emissions well within
current government regulations.
If any of these systems require service, the OBD II system
will turn on the Malfunction Indicator Light (MIL). It will
also store diagnostic codes and other information to
assist your service technician in making repairs. Although
your vehicle will usually be drivable and not need towing,
see an authorized dealer for service as soon as possible.
CAUTION!
’ü¼ Prolonged driving with the MIL on could cause further
damage to the emission control system. It could also
affect fuel economy and driveability. The vehicle
must be serviced before any emissions tests can be
performed.
’ü¼ If the MIL is flashing while the vehicle is running,
severe catalytic converter damage and power loss
will soon occur. Immediate service is required.
23_LD_OM_EN_USC_t.book Page 74
Page 86 of 292
84STARTING AND OPERATING
NOTE:
’ü¼Tapping one of the steering wheel-mounted shift
paddles (+/-), if equipped, while the gear selector is in
DRIVE, will activate a temporary AutoStick mode.
Tapping (-) to enter AutoStick mode will downshift the
transmission to the next lower gear, while tapping (+) to
enter AutoStick mode will retain the current gear. The
current gear will be displayed in the instrument cluster,
but the ŌĆ£MŌĆØ will not be highlighted. The transmission
will revert back to normal operation (if the gear selector
remains in DRIVE) after a period of time, depending on
accelerator pedal activity.
’ü¼ In some models, the shift paddles may be disabled (or
re-enabled, as desired) using Drive Mode Set-Up,
accessed by selecting Performance Control.
In AutoStick mode, the transmission will shift up or down
when (+/-) is manually selected by the driver (using the
gear selector, or the shift paddles [if equipped]), unless an
engine lugging or overspeed condition would result. It will
remain in the selected gear until another upshift or
downshift is chosen, except as follows:
’ü¼ If normal AutoStick mode is engaged (gear selector in
MANUAL position), manual gear selection will be main -
tained until the gear selector is returned to DRIVE, or as
described in the following conditions. The transmission
will not upshift automatically at redline in this mode,
nor will downshifts be obtained if the accelerator pedal
is pressed to the floor.
’ü¼ The transmission will automatically downshift as the
vehicle slows (to prevent engine lugging) and will
display the current gear. ’ü¼
The transmission will automatically downshift to FIRST
gear when coming to a stop. After a stop, the driver
should manually upshift (+) the transmission as the
vehicle is accelerated.
’ü¼ You can start out, from a stop, in FIRST or SECOND
gear. Tapping (+) (at a stop) will allow starting in
SECOND gear. Starting out in SECOND gear can be
helpful in snowy or icy conditions.
’ü¼ If a requested downshift would cause the engine to
over-speed, that shift will not occur.
’ü¼ The system will ignore attempts to upshift at too low of
a vehicle speed and an indication will display.
’ü¼ Holding the (-) paddle pressed (if equipped), or holding
the gear selector in the (-) position, will downshift the
transmission to the lowest gear possible at the current
speed.
’ü¼ Transmission shifting will be more noticeable when
AutoStick is enabled.
’ü¼ The system may revert to automatic shift mode if a
fault or overheat condition is detected.
To disengage AutoStick mode, return the gear selector to
the DRIVE position, or press and hold the (+) shift paddle
(if equipped, and the gear selector is already in DRIVE)
until ŌĆ£DŌĆØ is once again indicated in the instrument cluster.
You can shift in or out of the AutoStick mode at any time
without taking your foot off the accelerator pedal.SPORT MODE ŌĆö WITHOUT PERFORMANCE
CONTROL
Your vehicle is equipped with a SPORT Mode feature. This
mode is a configuration set up for typical enthusiast
driving. The engine, transmission, and steering systems
are all set to their SPORT settings. SPORT Mode will
provide improved throttle response and modified shifting
for an enhanced driving experience, as well the greatest
amount of steering feel. This mode may be activated and
deactivated by pushing the Sport button on the instrument
panel switch bank.
For vehicles equipped with Drive Modes or a SUPER
TRACK PAK button, refer to Drive Modes Supplement for
further information.
FUEL SAVER TECHNOLOGY 5.7L ONLYŌĆö IF
EQUIPPED
This feature offers improved fuel economy by shutting off
four of the engine's eight cylinders during light load and
cruise conditions. The system is automatic with no driver
inputs or additional driving skills required.
NOTE:This system may take some time to return to full function -
ality after a battery disconnect.
WARNING!
Do not downshift for additional engine braking on a
slippery surface. The drive wheels could lose their grip
and the vehicle could skid, causing a collision or
personal injury.
23_LD_OM_EN_USC_t.book Page 84
Page 87 of 292
STARTING AND OPERATING85
ELECTRIC POWER STEERING
The Electric Power Steering system provides increased
vehicle response and ease of maneuverability. The system
adapts to different driving conditions. If the electric
steering system experiences a fault that prevents it from
providing assist, you will still have the ability to steer the
vehicle manually.
Alternate electric power steering efforts can be selected
through the Uconnect System
Úpage 112.
If the Electric Power Steering Fault Warning Light is
displayed and the ŌĆ£SERVICE POWER STEERINGŌĆØ or the
ŌĆ£POWER STEERING ASSIST OFF ŌĆō SERVICE SYSTEMŌĆØ
message is displayed within the instrument cluster
display, this indicates the vehicle needs to be taken to the
dealer for service
Úpage 68.
NOTE:
’ü¼ Even if the power steering assistance is no longer oper -
ational, it is still possible to steer the vehicle. Under
these conditions there will be a substantial increase in
steering effort, especially at low speeds and during
parking maneuvers.
’ü¼ If the condition persists, see an authorized dealer for
service. If the Electric Power Steering Fault Warning Light is
displayed and the ŌĆ£POWER STEERING SYSTEM OVER
TEMPŌĆØ message is displayed on the instrument cluster
screen, they indicate that extreme steering maneuvers
may have occurred which caused an over temperature
condition in the power steering system. Once driving
conditions are safe, pull over and let the vehicle idle for a
few moments until the Electric Power Steering Fault
Warning Light and message turn off.
CRUISE CONTROL SYSTEMS ŌĆö IF EQUIPPED
Your vehicle may be equipped with the Cruise Control
system, or the Adaptive Cruise Control (ACC) system:
’ü¼
Cruise Control will keep your vehicle at a constant
preset speed.
’ü¼ Adaptive Cruise Control (ACC) will adjust the vehicle
speed up to the preset speed to maintain a distance
with the vehicle ahead.
NOTE:
’ü¼In vehicles equipped with ACC, if ACC is not enabled,
Fixed Speed Cruise Control will not detect vehicles
directly ahead of you. Always be aware of the feature
selected.
’ü¼ Only one Cruise Control feature can operate at a time.
For example, if Fixed Speed Cruise Control is enabled,
Adaptive Cruise Control will be unavailable, and vice
versa.
CRUISE CONTROL
When engaged, the Cruise Control takes over accelerator
operations at speeds greater than 20 mph (32 km/h),
depending on engine size and axle ratio.
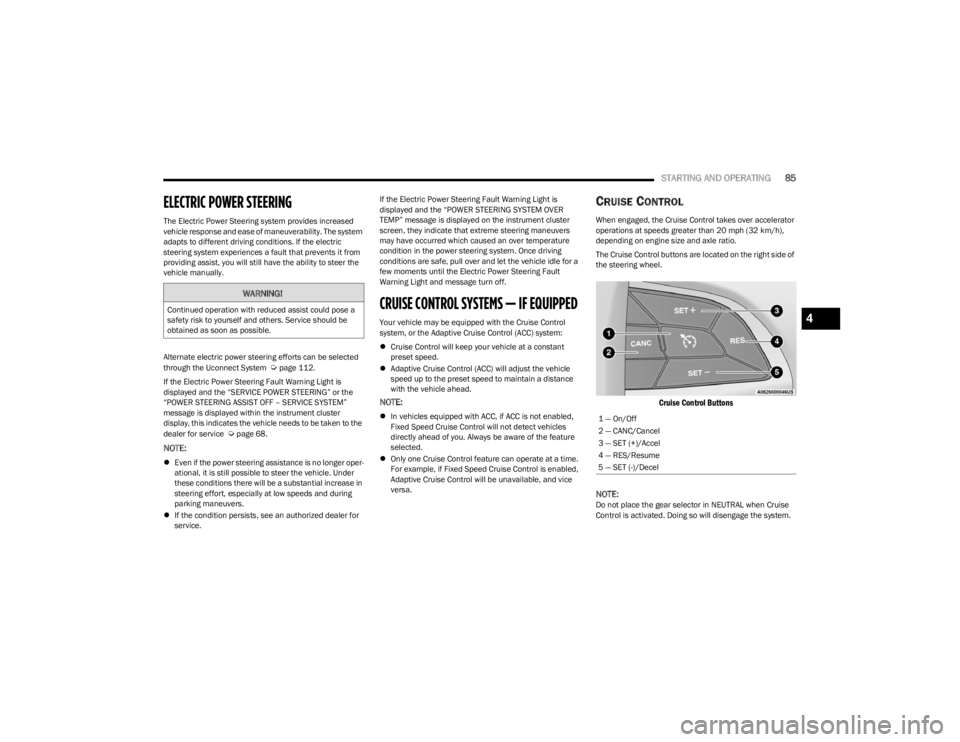
The Cruise Control buttons are located on the right side of
the steering wheel.
Cruise Control Buttons
NOTE:
Do not place the gear selector in NEUTRAL when Cruise
Control is activated. Doing so will disengage the system.
WARNING!
Continued operation with reduced assist could pose a
safety risk to yourself and others. Service should be
obtained as soon as possible.
1 ŌĆö On/Off
2 ŌĆö CANC/Cancel
3 ŌĆö SET (+)/Accel
4 ŌĆö RES/Resume
5 ŌĆö SET (-)/Decel
4
23_LD_OM_EN_USC_t.book Page 85
Page 88 of 292
86STARTING AND OPERATING
To Activate
Push the on/off button to activate the Cruise Control.
ŌĆ£CRUISE CONTROL READYŌĆØ will appear in the instrument
cluster display to indicate the Cruise Control is on. To turn
the system off, push the on/off button a second time.
ŌĆ£CRUISE CONTROL OFFŌĆØ will appear in the instrument
cluster display to indicate the Cruise Control is off. The
system should be turned off when not in use.
To Set A Desired Speed
Turn the Cruise Control on. When the vehicle has reached
the desired speed, push and release the SET (+) or SET (-)
button. Release the accelerator and the vehicle will
operate at the selected speed. Once a speed has been
set, a message ŌĆ£CRUISE CONTROL SET TO MPH (km/h)ŌĆØ
will appear indicating the set speed. A cruise indicator
light, along with set speed will also appear and stay on in
the instrument cluster when the speed is set.
To Vary The Speed Setting
To Increase Or Decrease The Set Speed
When the Cruise Control is set, you can increase speed by
pushing the SET (+) button, or decrease speed by pushing
the SET (-) button. U.S. Speed (mph)
’ü¼ Pushing the SET (+), or SET (-) button once will result in
a 1 mph speed adjustment. Each subsequent tap of
the button results in an adjustment of 1 mph.
’ü¼ If the button is continually pushed, the set speed will
continue to adjust until the button is released, then the
new set speed will be established.
Metric Speed (km/h)
’ü¼ Pushing the SET (+), or SET (-) button once will result in
a 1 km/h speed adjustment. Each subsequent tap of
the button results in an adjustment of 1 km/h.
’ü¼ If the button is continually pushed, the set speed will
continue to adjust until the button is released, then the
new set speed will be established.
To Accelerate For Passing
While the Cruise Control is set, press the accelerator to
pass as you would normally. When the pedal is released,
the vehicle will return to the set speed.
USING CRUISE CONTROL ON HILLS
The transmission may downshift on hills to maintain the
vehicle set speed.
The Cruise Control system maintains speed up and down
hills. A slight speed change on moderate hills is normal.
On steep hills, a greater speed loss or gain may occur so it
may be preferable to drive without Cruise Control.
To Resume Speed
To resume a previously set speed, push the RES button
and release. Resume can be used at any speed above
20 mph (32 km/h).
To Deactivate
A tap on the brake pedal, pushing the CANC button, or
normal brake pressure will deactivate the Cruise Control
system without erasing the set speed from memory.
The following conditions will also deactivate the Cruise
Control without erasing the set speed from memory:
’ü¼Vehicle parking brake is applied
’ü¼ Stability event occurs
’ü¼ Gear selector is moved out of DRIVE
’ü¼ Engine overspeed occurs
Pushing the on/off button or placing the ignition in the OFF
position erases the set speed from memory.
WARNING!
Leaving the Cruise Control system on when not in use is
dangerous. You could accidentally set the system or
cause it to go faster than you want. You could lose
control and have an accident. Always ensure the system
is off when you are not using it.
WARNING!
Cruise Control can be dangerous where the system
cannot maintain a constant speed. Your vehicle could
go too fast for the conditions, and you could lose control
and have an accident. Do not use Cruise Control in
heavy traffic or on roads that are winding, icy,
snow-covered or slippery.
23_LD_OM_EN_USC_t.book Page 86