radiator cap DODGE CHARGER 2023 Owners Manual
[x] Cancel search | Manufacturer: DODGE, Model Year: 2023, Model line: CHARGER, Model: DODGE CHARGER 2023Pages: 292, PDF Size: 13.05 MB
Page 216 of 292
214IN CASE OF EMERGENCY
PREPARATIONS FOR JUMP START
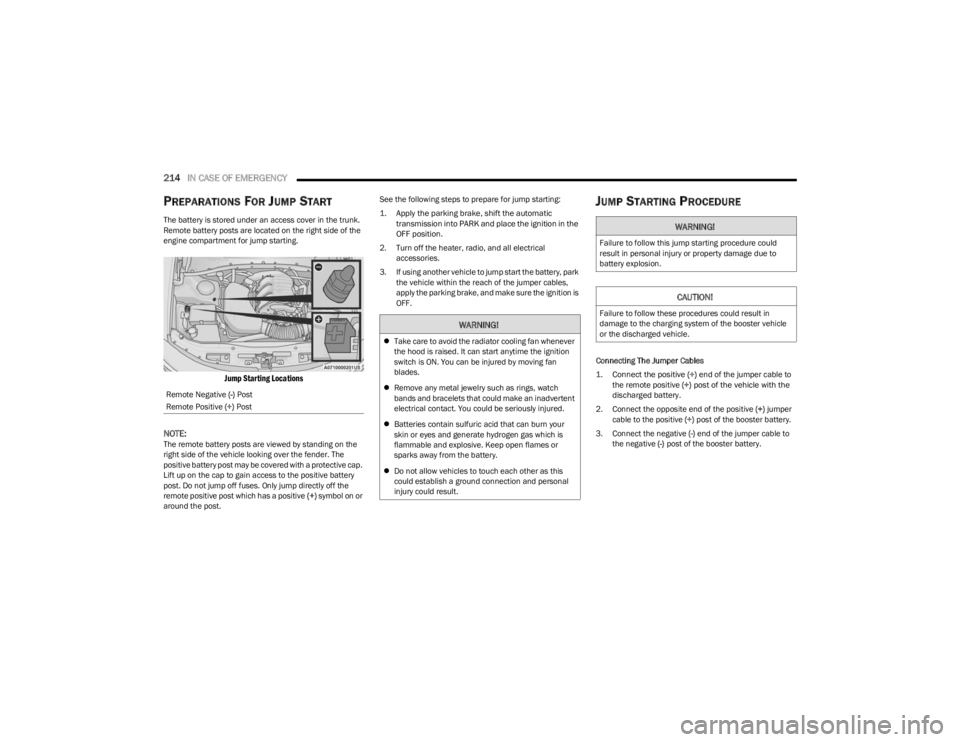
The battery is stored under an access cover in the trunk.
Remote battery posts are located on the right side of the
engine compartment for jump starting.
Jump Starting Locations
NOTE:
The remote battery posts are viewed by standing on the
right side of the vehicle looking over the fender. The
positive battery post may be covered with a protective cap.
Lift up on the cap to gain access to the positive battery
post. Do not jump off fuses. Only jump directly off the
remote positive post which has a positive (+) symbol on or
around the post. See the following steps to prepare for jump starting:
1. Apply the parking brake, shift the automatic
transmission into PARK and place the ignition in the
OFF position.
2. Turn off the heater, radio, and all electrical accessories.
3. If using another vehicle to jump start the battery, park the vehicle within the reach of the jumper cables,
apply the parking brake, and make sure the ignition is
OFF.
JUMP STARTING PROCEDURE
Connecting The Jumper Cables
1. Connect the positive
(+) end of the jumper cable to
the remote positive (+)
post of the vehicle with the
discharged battery.
2. Connect the opposite end of the positive (+) jumper
cable to the positive (+) post of the booster battery.
3. Connect the negative (-) end of the jumper cable to
the negative (-) post of the booster battery.
Remote Negative
(-) Post
Remote Positive (+) Post
WARNING!
Take care to avoid the radiator cooling fan whenever
the hood is raised. It can start anytime the ignition
switch is ON. You can be injured by moving fan
blades.
Remove any metal jewelry such as rings, watch
bands and bracelets that could make an inadvertent
electrical contact. You could be seriously injured.
Batteries contain sulfuric acid that can burn your
skin or eyes and generate hydrogen gas which is
flammable and explosive. Keep open flames or
sparks away from the battery.
Do not allow vehicles to touch each other as this
could establish a ground connection and personal
injury could result.
WARNING!
Failure to follow this jump starting procedure could
result in personal injury or property damage due to
battery explosion.
CAUTION!
Failure to follow these procedures could result in
damage to the charging system of the booster vehicle
or the discharged vehicle.
23_LD_OM_EN_USC_t.book Page 214
Page 218 of 292
216IN CASE OF EMERGENCY
3. Ensure funnel is inserted fully to hold flapper doors
open.
4. Pour fuel into funnel opening.
5. Remove funnel from filler pipe, clean off prior to putting back in the spare tire storage area.IF YOUR ENGINE OVERHEATS
If the vehicle is overheating, it will need to be serviced by
an authorized dealer.
Potential signs of vehicle overheating:
Temperature gauge is at HOT (H)
Strong smell of coolant
White smoke coming from engine or exhaust
Coolant bottle coolant has bubbles present
In the event it is observed that the temperature gauge is
moving towards or close to the HOT (H) position, you can
reduce the potential for overheating by taking the
appropriate action.
On the highways — slow down.
In city traffic — while stopped, place the transmission in
NEUTRAL (N), but do not increase the engine idle speed
while preventing vehicle motion with the brakes.
If your Air Conditioner (A/C) is on, turn it off. The A/C
system adds heat to the engine cooling system and
turning the A/C off can help remove this heat.
You can also turn the temperature control to maximum
heat, the mode control to floor and the blower control
to high. This allows the heater core to act as a supple -
ment to the radiator and aids in removing heat from the
engine cooling system.
MANUAL PARK RELEASE–8–SPEED
TRANSMISSION
CAUTION!
To avoid fuel spillage and overfilling, do not “top off” the
fuel tank after filling.
WARNING!
Never have any smoking materials lit in or near the
vehicle when the fuel door is open or the tank is
being filled.
Never add fuel when the engine is running. This is in
violation of most state and federal fire regulations
and may cause the Malfunction Indicator Light to
turn on.
A fire may result if fuel is pumped into a portable
container that is inside of a vehicle. You could be
burned. Always place fuel containers on the ground
while filling.
WARNING!
You or others can be badly burned by hot engine
coolant (antifreeze) or steam from your radiator. If you
see or hear steam coming from under the hood, do not
open the hood until the radiator has had time to cool.
Never try to open a cooling system pressure cap when
the radiator or coolant bottle is hot.
CAUTION!
Driving with a hot cooling system could damage your
vehicle. If the temperature gauge reads HOT (H), pull
over and stop the vehicle. Idle the vehicle with the air
conditioner turned off until the pointer drops back into
the normal range. If the pointer remains on HOT (H),
and you hear continuous chimes, turn the engine off
immediately and call for service.
WARNING!
Always secure your vehicle by fully applying the parking
brake before activating the Manual Park Release. In
addition, you should be seated in the driver's seat with
your foot firmly on the brake pedal when activating the
Manual Park Release. Activating the Manual Park
Release will allow your vehicle to roll away if it is not
secured by the parking brake, or by proper connection
to a tow vehicle. Activating the Manual Park Release on
an unsecured vehicle could lead to serious injury or
death for those in or around the vehicle.
23_LD_OM_EN_USC_t.book Page 216
Page 229 of 292
SERVICING AND MAINTENANCE227
CHECKING OIL LEVELTo ensure proper engine lubrication, the engine oil must
be maintained at the correct level. Check the oil level at
regular intervals, such as every fuel stop. The best time to
check the engine oil level is about ten minutes after a fully
warmed up engine is shut off.
Checking the oil while the vehicle is on level ground will
improve the accuracy of the oil level readings.
There are four possible dipstick types:
Crosshatched zone.
Crosshatched zone marked SAFE.
Crosshatched zone marked with MIN at the low end of
the range and MAX at the high end of the range.
Crosshatched zone marked with dimples at the MIN
and the MAX ends of the range.
NOTE:Always maintain the oil level within the crosshatch
markings on the dipstick.
Adding 1 qt (1 L) of oil when the reading is at the low end
of the dipstick range will raise the oil level to the high end
of the range marking.
ADDING WASHER FLUID
The windshield washer fluid reservoir is located in the
front of the engine compartment. Be sure to check the
fluid level at regular intervals. Fill the reservoir with
windshield washer solvent (not radiator antifreeze) and
operate the system for a few seconds to flush out the
residual water.
When refilling the washer fluid reservoir, apply some
washer fluid to a cloth or towel and wipe the wiper blades
clean. This will help blade performance.
To prevent freeze-up of your windshield washer system in
cold weather, select a solution or mixture that meets or
exceeds the temperature range of your climate. This rating
information can be found on most washer fluid containers.
The fluid reservoir will hold nearly 1 gal (4 L) of washer
fluid when the message “Low Washer Fluid” appears in
the instrument cluster.WARNING!
Never smoke while working in the engine compart -
ment: gas and flammable vapors may be present,
with the risk of fire.
Be very careful when working in the engine compart -
ment when the engine is hot: you may get burned. Do
not get too close to the radiator cooling fan: the elec -
tric fan may start; danger of injury. Scarves, ties and
other loose clothing might be pulled by moving parts.
CAUTION!
Be careful not to confuse the various types of fluids
while topping up: they are not compatible with each
other! Topping up with an unsuitable fluid could
severely damage your car.
The oil level must never exceed the MAX mark.
Always top up using engine oil of the same specifica -
tions as that already in the engine.
If the engine oil is being topped up, wait for the
engine to cool down before loosening the filler cap,
particularly for vehicles with aluminum caps (if
equipped). WARNING: risk of burns!
Overfilling or underfilling the crankcase will cause
aeration or loss of oil pressure. This could damage
your engine.
CAUTION!
Overfilling or underfilling the crankcase will cause
aeration or loss of oil pressure. This could damage your
engine.
WARNING!
Commercially available windshield washer solvents are
flammable. They could ignite and burn you. Care must
be exercised when filling or working around the washer
solution.
8
23_LD_OM_EN_USC_t.book Page 227
Page 236 of 292
234SERVICING AND MAINTENANCE
(Continued)
To minimize the possibility of catalytic converter damage:
Do not shut off the engine or interrupt the ignition when
the transmission is in gear and the vehicle is in motion.
Do not try to start the engine by pushing or towing the
vehicle.
Do not idle the engine with any spark plug wires discon -
nected or removed, such as when diagnostic testing, or
for prolonged periods during very rough idle or malfunc -
tioning operating conditions.
NOTE:The vehicle exhaust system may be equipped with an Elec -
tronic Exhaust Valve (EEV) system, if the exhaust system is
replaced with aftermarket products a Malfunction Indi -
cator Light (MIL) will illuminate.
COOLING SYSTEM
Coolant Checks
Check engine coolant (antifreeze) protection every
12 months (before the onset of freezing weather, where
applicable). If the engine coolant is dirty, the system
should be drained, flushed, and refilled with fresh Organic
Additive Technology (OAT) coolant (conforming to
MS.90032) by an authorized dealer. Check the front of the
radiator for any accumulation of bugs, leaves, etc. If dirty,
clean by gently spraying water from a garden hose
vertically down the face of the condenser.
Check the coolant recovery bottle tubing for brittle rubber,
cracking, tears, cuts, and tightness of the connection at
the bottle and radiator. Inspect the entire system for
leaks. DO NOT REMOVE THE COOLANT PRESSURE CAP
WHEN THE COOLING SYSTEM IS HOT.
Cooling System — Drain, Flush And Refill
NOTE:Some vehicles require special tools to add coolant
properly. Failure to fill these systems properly could lead
to severe internal engine damage. If any coolant is needed
to be added to the system please contact an authorized
dealer. If the engine coolant (antifreeze) is dirty or contains visible
sediment, have an authorized dealer clean and flush with
Organic Additive Technology (OAT) coolant (conforming to
MS.90032).
For the proper maintenance intervals
Úpage 221.
Selection Of Coolant
For further information Úpage 271.
NOTE:
Mixing of engine coolant (antifreeze) other than speci-
fied Organic Additive Technology (OAT) engine coolant,
may result in engine damage and may decrease corro -
sion protection. OAT engine coolant is different and
should not be mixed with Hybrid Organic Additive Tech -
nology (HOAT) engine coolant or any “globally compat -
ible” coolant. If a non-OAT engine coolant is introduced
into the cooling system in an emergency, the cooling
system will need to be drained, flushed, and refilled
with fresh OAT coolant (conforming to MS.90032), by
an authorized dealer as soon as possible.
Do not use water alone or alcohol-based engine
coolant products. Do not use additional rust inhibitors
or anti-rust products, as they may not be compatible
with the radiator engine coolant and may plug the radi -
ator.
This vehicle has not been designed for use with
propylene glycol-based engine coolant. Use of
propylene glycol-based engine coolant is not recom -
mended.
WARNING!
You or others can be badly burned by hot engine
coolant (antifreeze) or steam from your radiator. If
you see or hear steam coming from under the hood,
do not open the hood until the radiator has had time
to cool. Never open a cooling system pressure cap
when the radiator or coolant bottle is hot.
Keep hands, tools, clothing, and jewelry away from
the radiator cooling fan when the hood is raised. The
fan starts automatically and may start at any time,
whether the engine is running or not.
When working near the radiator cooling fan, discon -
nect the fan motor lead or turn the ignition to the OFF
position. The fan is temperature controlled and can
start at any time the ignition is in the ON/RUN
position.
WARNING!
23_LD_OM_EN_USC_t.book Page 234
Page 237 of 292
SERVICING AND MAINTENANCE235
Some vehicles require special tools to add coolant
properly. Failure to fill these systems properly could
lead to severe internal engine damage. If any coolant is
needed to be added to the system please contact an
authorized dealer.
Adding Coolant
Your vehicle has been built with an improved engine
coolant (OAT coolant conforming to MS.90032) that
allows extended maintenance intervals. This engine
coolant (antifreeze) can be used up to 10 years or
150,000 miles (240,000 km) before replacement. To
prevent reducing this extended maintenance period, it is
important to use the same engine coolant (OAT coolant
conforming to MS.90032) throughout the life of your
vehicle.
Please review these recommendations for using Organic
Additive Technology (OAT) engine coolant that meets the
requirements of the manufacturer Material Standard
MS.90032. When adding engine coolant:
We recommend using Mopar® Antifreeze/Coolant
10 Year/150,000 Mile (240,000 km) Formula OAT
that meets the requirements of the manufacturer
Material Standard MS.90032.
Mix a minimum solution of 50% OAT engine coolant
that meets the requirements of the manufacturer
Material Standard MS.90032 and distilled water. Use
higher concentrations (not to exceed 70%) if tempera -
tures below −34°F (−37°C) are anticipated. Please
contact an authorized dealer for assistance.
Use only high purity water such as distilled or deionized
water when mixing the water/engine coolant solution.
The use of lower quality water will reduce the amount
of corrosion protection in the engine cooling system.
NOTE:
It is the owner's responsibility to maintain the proper
level of protection against freezing according to the
temperatures occurring in the area where the vehicle is
operated.
Some vehicles require special tools to add coolant
properly. Failure to fill these systems properly could
lead to severe internal engine damage. If any coolant is
needed to be added to the system, please contact an
authorized dealer.
Mixing engine coolant types is not recommended and
can result in cooling system damage. If HOAT and OAT
coolant are mixed in an emergency, have an authorized
dealer drain, flush, and refill with OAT coolant
(conforming to MS.90032) as soon as possible.
Cooling System Pressure Cap
The cap must be fully tightened to prevent loss of engine
coolant (antifreeze), and to ensure that engine coolant will
return to the radiator from the coolant expansion
bottle/recovery tank (if equipped).
The cap should be inspected and cleaned if there is any
accumulation of foreign material on the sealing surfaces.
Disposal Of Used Coolant
Used ethylene glycol-based coolant (antifreeze) is a
regulated substance requiring proper disposal. Check with
your local authorities to determine the disposal rules for
your community. To prevent ingestion by animals or
children, do not store ethylene glycol-based coolant in
open containers or allow it to remain in puddles on the
ground, clean up any ground spills immediately. If
ingested, seek emergency assistance immediately.
Coolant Level
The coolant bottle provides a quick visual method for
determining that the coolant level is adequate. With the
engine off and cold, the level of the engine coolant
(antifreeze) in the bottle should be between the ranges
indicated on the bottle.
WARNING!
Do not open hot engine cooling system. Never add
engine coolant (antifreeze) when the engine is over -
heated. Do not loosen or remove the cap to cool an
overheated engine. Heat causes pressure to build up
in the cooling system. To prevent scalding or injury,
do not remove the pressure cap while the system is
hot or under pressure.
Do not use a pressure cap other than the one speci -
fied for your vehicle. Personal injury or engine
damage may result.
8
23_LD_OM_EN_USC_t.book Page 235
Page 238 of 292
236SERVICING AND MAINTENANCE
(Continued)
The radiator normally remains completely full, so there is
no need to remove the radiator/coolant pressure cap
unless checking for engine coolant freeze point or
replacing coolant. Advise your service attendant of this. As
long as the engine operating temperature is satisfactory,
the coolant bottle need only be checked once a month.
When additional engine coolant is needed to maintain the
proper level, only OAT coolant that meets the
requirements of manufacturer Material Standard
MS.90032 should be added to the coolant bottle.
Do not overfill.
Cooling System Notes
NOTE:When the vehicle is stopped after a few miles/kilometers
of operation, you may observe vapor coming from the front
of the engine compartment. This is normally a result of
moisture from rain, snow, or high humidity accumulating
on the radiator and being vaporized when the thermostat
opens, allowing hot engine coolant (antifreeze) to enter
the radiator.
If an examination of your engine compartment shows no
evidence of radiator or hose leaks, the vehicle may be
safely driven. The vapor will soon dissipate.
Do not overfill the coolant expansion bottle.
Check the coolant freeze point in the radiator and in
the coolant expansion bottle. If engine coolant needs
to be added, the contents of the coolant expansion
bottle must also be protected against freezing.
If frequent engine coolant additions are required, the
cooling system should be pressure tested for leaks.
Maintain engine coolant concentration at a minimum
of 50% OAT coolant (conforming to MS.90032) and
distilled water for proper corrosion protection of your
engine which contains aluminum components.
Make sure that the coolant expansion bottle overflow
hoses are not kinked or obstructed.
Keep the front of the radiator clean. If your vehicle is
equipped with air conditioning, keep the front of the
condenser clean.
Do not change the thermostat for Summer or Winter
operation. If replacement is ever necessary, install
ONLY the correct type thermostat. Other designs may
result in unsatisfactory engine cooling performance,
poor gas mileage, and increased emissions.
BRAKE SYSTEM
In order to ensure brake system performance, all brake
system components should be inspected periodically
Úpage 221.
Fluid Level Check — Brake Master Cylinder
Check the fluid level in the master cylinder immediately if
the Brake System Warning Light indicates system failure.
Check the fluid level in the master cylinder when
performing underhood services.
Clean the top of the master cylinder area before removing
the cap. Add fluid to bring the level up to the top of the
“FULL” mark on the side of the master cylinder reservoir.
Overfilling of fluid is not recommended because it may
cause leaking in the system.
Add enough fluid to bring the level up to the requirements
described on the brake fluid reservoir. With disc brakes,
fluid level can be expected to fall as the brake pads wear.
However, low fluid level may be caused by a leak and a
checkup may be needed.
Use only brake fluid that has been recommended by the
manufacturer, and has been kept in a tightly closed
container to avoid contamination from foreign matter or
moisture.
For further information
Úpage 271.
WARNING!
Riding the brakes can lead to brake failure and possibly
a collision. Driving with your foot resting or riding on the
brake pedal can result in abnormally high brake
temperatures, excessive lining wear, and possible brake
damage. You would not have your full braking capacity
in an emergency.WARNING!
Use only manufacturer's recommended brake fluid Úpage 271. Using the wrong type of brake fluid can
severely damage your brake system and/or impair its
performance. The proper type of brake fluid for your
vehicle is also identified on the original factory
installed hydraulic master cylinder reservoir.
23_LD_OM_EN_USC_t.book Page 236
Page 281 of 292

279
BluetoothConnecting To A Particular Mobile PhoneOr Audio Device After Pairing ............................ 143
Body Mechanism Lubrication...................................... 231
B-Pillar Location ........................................................... 252
Brake Assist System .................................................... 165
Brake Control System .................................................. 165
Brake Fluid .......................................................... 236
, 272
Brake System ...................................................... 236, 267
Fluid Check..................................................... 236, 272
Master Cylinder ....................................................... 236
Parking ....................................................................... 79
Warning Light ................................................... 68
, 267
Brake/Transmission Interlock........................................81
Break-In Recommendations, New Vehicle .................... 79
Brightness, Interior Lights .............................................. 45
Bulb Replacement ....................................................... 246
Bulbs, Light.......................................................... 201
, 246
CCamera, Rear ............................................................... 100
Capacities, Fluid ........................................................... 270
Caps, Filler Oil (Engine) .............................................................. 225
Radiator (Coolant Pressure)................................... 235
Car Washes .................................................................. 265
Carbon Monoxide Warning .......................................... 201
Cargo Vehicle Loading....................................................... 102
Cargo Area Cover ............................................................60
Cargo Compartment ....................................................... 60
Cargo Net .........................................................................60
CD.................................................................................. 138
Certification Label ........................................................ 102 Chains, Tire ...................................................................262
Chart, Tire Sizing ...........................................................249
Check Engine Light (Malfunction Indicator Light) ........ 75
Checking Your Vehicle For Safety ................................ 199
Checks, Safety .............................................................. 199
Child Restraint .............................................................. 190
Child Restraints Booster Seats .......................................................... 192
Child Seat Installation ............................................. 197How To Stow An unused ALR Seat Belt .................196Infant And Child Restraints ..................................... 191
Lower Anchors And Tethers For Children............... 193
Older Children And Child Restraints....................... 191
Seating Positions ..................................................... 193
Child Safety Locks .......................................................... 24
Clean Air Gasoline ........................................................ 268
Cleaning Wheels .....................................................................260
Climate Control ............................................................... 46 Automatic ................................................................... 47
Manual ....................................................................... 49
Coin Holder ..................................................................... 53
Cold Weather Operation ................................................. 78
Compact Spare Tire ...................................................... 259
Console Floor ........................................................................... 53
Contract, Service .......................................................... 275
Controls ......................................................................... 130
Cooling Pressure Cap (Radiator Cap) ..........................235
Cooling System ............................................................. 234 Adding Coolant (Antifreeze) ....................................235
Coolant Level ................................................. 234
, 235
Cooling Capacity ...................................................... 270
Disposal Of Used Coolant ....................................... 235 Drain, Flush, And Refill............................................234 Inspection ................................................................ 235
Points To Remember .............................................. 236
Pressure Cap ........................................................... 235
Radiator Cap............................................................ 235
Selection Of Coolant (Antifreeze) ........ 234
, 270, 271
Corrosion Protection .................................................... 264
Cruise Control (Speed Control) ............................... 85
, 87
Cruise Light .............................................................. 73, 74
Customer Assistance ................................................... 273
Customer Programmable Features ............................. 112
Cybersecurity ................................................................ 111
DDaytime Running Lights ................................................. 41 Deck Lid Power Release........................................................... 59
Defroster, Windshield .................................................. 200
De-Icer, Remote Start .................................................... 18
Deleting A Phone .......................................................... 144
Deluxe Security Alarm .................................................... 19
Diagnostic System, Onboard ......................................... 74 Dimmer Switch Headlight ................................................................... 41
Dipsticks Oil (Engine) .............................................................. 227
Disabled Vehicle Towing .............................................. 219
Disc Drive ...................................................................... 138
Disconnecting ............................................................... 144
Disposal Antifreeze (Engine Coolant) .................................... 235
Disturb........................................................................... 146
Door Ajar ......................................................................... 69
Door Ajar Light ................................................................ 69
11
23_LD_OM_EN_USC_t.book Page 279
Page 285 of 292

283
Synthetic.................................................................. 229
Viscosity................................................................... 270
Onboard Diagnostic System .................................... 74
, 75
Operating Precautions ....................................................74
Operator Manual Owner's Manual ...................................................... 276
Outside Rearview Mirrors ...............................................35
Overheating, Engine..................................................... 216
PPaddle Shift Mode ..........................................................83 Paddle Shifters................................................................83Paint Care ..................................................................... 264
Pair (link) Uconnect Phone To A mobile Phone
b
... 142
Panic Alarm .....................................................................13
Parking Brake ..................................................................79
ParkSense System, Rear ................................................94
Passing Light ...................................................................42
Passive Entry ...................................................................22
Performance....................................................................65
Personalized Main Menu Bar ...................................... 128
Pets ............................................................................... 199
Phone Mode ................................................................. 140
Pinch Protection .............................................................. 58
Placard, Tire And Loading Information ....................... 252
Power Brakes ..................................................................... 267
Deck Lid Release ....................................................... 59
Distribution Center (Fuses) .................................... 242 Door Locks .................................................................21
Mirrors ........................................................................36
Outlet (Auxiliary Electrical Outlet) ............................. 55
Seats...........................................................................30
Steering ...................................................................... 85 Sunroof....................................................................... 57
Tilt/Telescoping Steering Column ............................ 25
Windows..................................................................... 56
Power Seats Forward ...................................................................... 30
Lumbar ....................................................................... 31
Rearward.................................................................... 30
Recline ....................................................................... 31
Pregnant Women And Seat Belts ................................ 182
Preparation For Jacking ............................................... 205
Presets .......................................................................... 135
Pretensioners Seat Belts................................................................. 182
Programmable Features .............................................. 112
RRadial Ply Tires ............................................................. 256
Radiator Cap (Coolant Pressure Cap) ......................... 235
Radio Presets .....................................................................135
Radio Controls .............................................................. 130
Radio Mode ...................................................................130
Radio Operation .................................................. 130
, 163
Radio Remote Controls ................................................ 129
Rain Sensitive Wiper System ......................................... 46
Rear Axle (Differential) ................................................. 237
Rear Camera ................................................................. 100
Rear Cross Path ............................................................171
Rear ParkSense System................................................. 94
Rear Seats, Folding ........................................................ 29
Rear Wheel Drive (RWD) Towing ...................................................................... 220
Recreational Towing ..................................................... 109
Reformulated Gasoline ................................................ 268 Refrigerant .................................................................... 230
Release, Hood ................................................................ 59
Reminder, Lights On....................................................... 42
Reminder, Seat Belt ..................................................... 178
Remote Control Starting System ......................................................... 16
Remote Keyless Entry Arm The Alarm ........................................................... 19
Panic Alarm ............................................................... 13
Programming Additional Key Fobs ........................... 14
Unlatch The Trunk ..................................................... 13
Remote Sound System (Radio) Control ...................... 129
Remote Starting Exit Remote Start Mode............................................ 17
Uconnect Customer Programmable Features......... 18
Uconnect Settings ..................................................... 18
Remote Starting System ................................................ 16 Remote Trunk Release .................................................. 59
Replacement Bulbs ...................................................... 246
Replacement Tires ....................................................... 258
Reporting Safety Defects ............................................. 276
Restraints, Child ........................................................... 190
Restraints, Head............................................................. 33
Rocking Vehicle When Stuck ....................................... 218
Rotation, Tires .............................................................. 263
SSafety ............................................................................ 128
Safety Checks Inside Vehicle....................................... 199
Safety Checks Outside Vehicle .................................... 201
Safety Defects, Reporting ............................................ 276
Safety Features ............................................................ 128
Safety Information, Tire ............................................... 248
Safety Tips .................................................................... 199
11
23_LD_OM_EN_USC_t.book Page 283