DODGE CHARGER SRT 2006 6.G Owners Manual
Manufacturer: DODGE, Model Year: 2006, Model line: CHARGER SRT, Model: DODGE CHARGER SRT 2006 6.GPages: 336, PDF Size: 9.85 MB
Page 281 of 336
CAUTION!
Do not use abrasive or strong cleaning materials
such as steel wool or scouring powder, which will
scratch metal and painted surfaces.
Special Care
•
If you drive on salted or dusty roads or if you drive
near the ocean, hose off the undercarriage at least once
a month.
•It is important that the drain holes in the lower edges
of the doors, rocker panels and trunk be kept clear and
open.
•If you detect any stone chips or scratches in the paint,
touch them up immediately. The cost of such repairs is
considered the responsibility of the owner.
•If your vehicle is damaged due to an accident or
similar cause which destroys the paint and protective
coating have your vehicle repaired as soon as possible.
The cost of such repairs is considered the responsibil-
ity of the owner.
•All wheels and wheel trim, especially aluminum and
chrome plated wheels should be cleaned regularly
with a mild soap and water to prevent corrosion. To
remove heavy soil, use Mopar Wheel Cleaner or select
a nonabrasive, non-acidic cleaner. Do not use scouring
pads, steel wool, a bristle brush or metal polishes.
Only Mopar cleaners are recommended. Do not use
oven cleaner. Avoid automatic car washes that use
acidic solutions or harsh brushes that may damage the
wheels’ protective finish.
•If you carry special cargo such as chemicals, fertilizers,
de-icer salt, etc., be sure that such materials are well
packaged and sealed.
•If a lot of driving is done on gravel roads, consider
mud or stone shields behind each wheel.
•Use Mopar touch up paint or equivalent on scratches
as soon as possible. Your dealer has touch up paint to
match the color of your vehicle.
MAINTAINING YOUR VEHICLE 281
7
Page 282 of 336
Interior Care
Use Mopar Fabric Cleaner or equivalent to clean fabric
upholstery and Mopar Carpet Cleaner for carpeting.
Interior Trim should be cleaned starting with a damp
cloth, or Mopar Satin Select. Do not use harsh cleaners or
Armorall. Use Mopar Total Clean to clean vinyl uphol-
stery.
Mopar Total Clean is specifically recommended for
leather upholstery.
Your leather upholstery can be best preserved by regular
cleaning with a damp soft cloth. Small particles of dirt
can act as an abrasive and damage the leather upholstery
and should be removed promptly with a damp cloth.
Stubborn soils can be removed easily with a soft cloth
and Mopar Total Clean or equivalent. Care should be
taken to avoid soaking your leather upholstery with any
liquid. Please do not use polishes, oils, cleaning fluids,
solvents, detergents, or ammonia based cleaners to clean
your leather upholstery. Application of a leather condi-
tioner is not required to maintain the original condition.WARNING!
Do not use volatile solvents for cleaning purposes.
Many are potentially flammable, and if used in
closed areas they may cause respiratory harm.
Glass Surfaces
All glass surfaces should be cleaned on a regular basis
with Mopar Glass Cleaner or any commercial household-
type glass cleaner. Never use an abrasive type cleaner.
Use caution when cleaning the inside rear window
equipped with electric defrosters or the right rear quarter
window equipped with the radio antenna. Do not use
scrapers or other sharp instruments which may scratch
the elements.
When cleaning the rear view mirror, spray cleaner on the
towel or rag that you are using. Do not spray cleaner
directly on the mirror.
282 MAINTAINING YOUR VEHICLE
Page 283 of 336

Cleaning Plastic Instrument Cluster Lenses
The lenses in front of the instruments in this vehicle are
molded in clear plastic. When cleaning the lenses, care
must be taken to avoid scratching the plastic.
1. Clean with a wet soft rag or microfiber towel. A mild
soap solution may be used, but do not use high alcohol
content or abrasive cleaners. If soap is used, wipe clean
with a clean damp rag.
2. Dry with a soft tissue.
Seat Belt Maintenance
Do not bleach, dye or clean the belts with chemical
solvents or abrasive cleaners. This will weaken the fabric.
Sun damage can also weaken the fabric.
If the belts need cleaning use Mopar Total Clean, a mild
soap solution, or lukewarm water. Do not remove the
belts from the vehicle to wash them.
Replace the belts if they appear frayed or worn or if the
buckles do not work properly.
Cleaning The Center Console Cup Holders
Clean with a damp cloth or towel using a mild detergent
with the cup holder in the center console.
NOTE:The cup holder cannot be removed.
Power Distribution Centers
Front Power Distribution Center
A power distribution center is located in the engine
compartment. This center contains fuses and relays.
Front Power Distribution Center
MAINTAINING YOUR VEHICLE 283
7
Page 284 of 336
CAUTION!
•When installing the Power Distribution Center
cover, it is important to ensure the cover is prop-
erly positioned and fully latched. Failure to do so
may allow water to get into the Power Distribu-
tion Center, and possibly result in a electrical
system failure.
•When replacing a blown fuse, it is important to
use only a fuse having the correct amperage
rating. The use of a fuse with a rating other than
indicated may result in a dangerous electrical
system overload. If a properly rated fuse contin-
ues to blow, it indicates a problem in the circuit
that must be corrected.
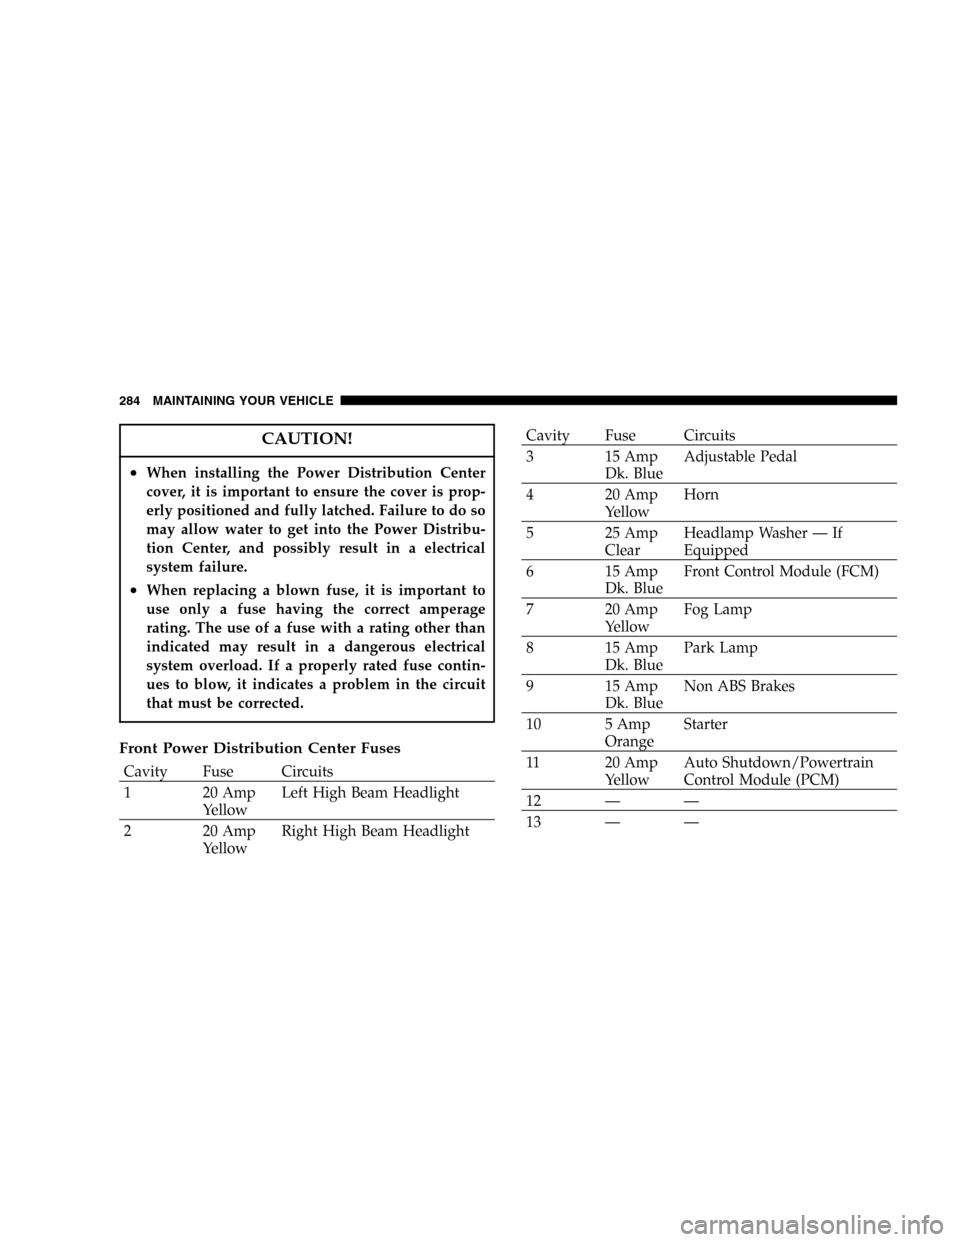
Front Power Distribution Center Fuses
Cavity Fuse Circuits
1 20 Amp
YellowLeft High Beam Headlight
2 20 Amp
YellowRight High Beam Headlight
Cavity Fuse Circuits
3 15 Amp
Dk. BlueAdjustable Pedal
4 20 Amp
YellowHorn
5 25 Amp
ClearHeadlamp Washer — If
Equipped
6 15 Amp
Dk. BlueFront Control Module (FCM)
7 20 Amp
YellowFog Lamp
8 15 Amp
Dk. BluePark Lamp
9 15 Amp
Dk. BlueNon ABS Brakes
10 5 Amp
OrangeStarter
11 20 Amp
YellowAuto Shutdown/Powertrain
Control Module (PCM)
12——
13——
284 MAINTAINING YOUR VEHICLE
Page 285 of 336
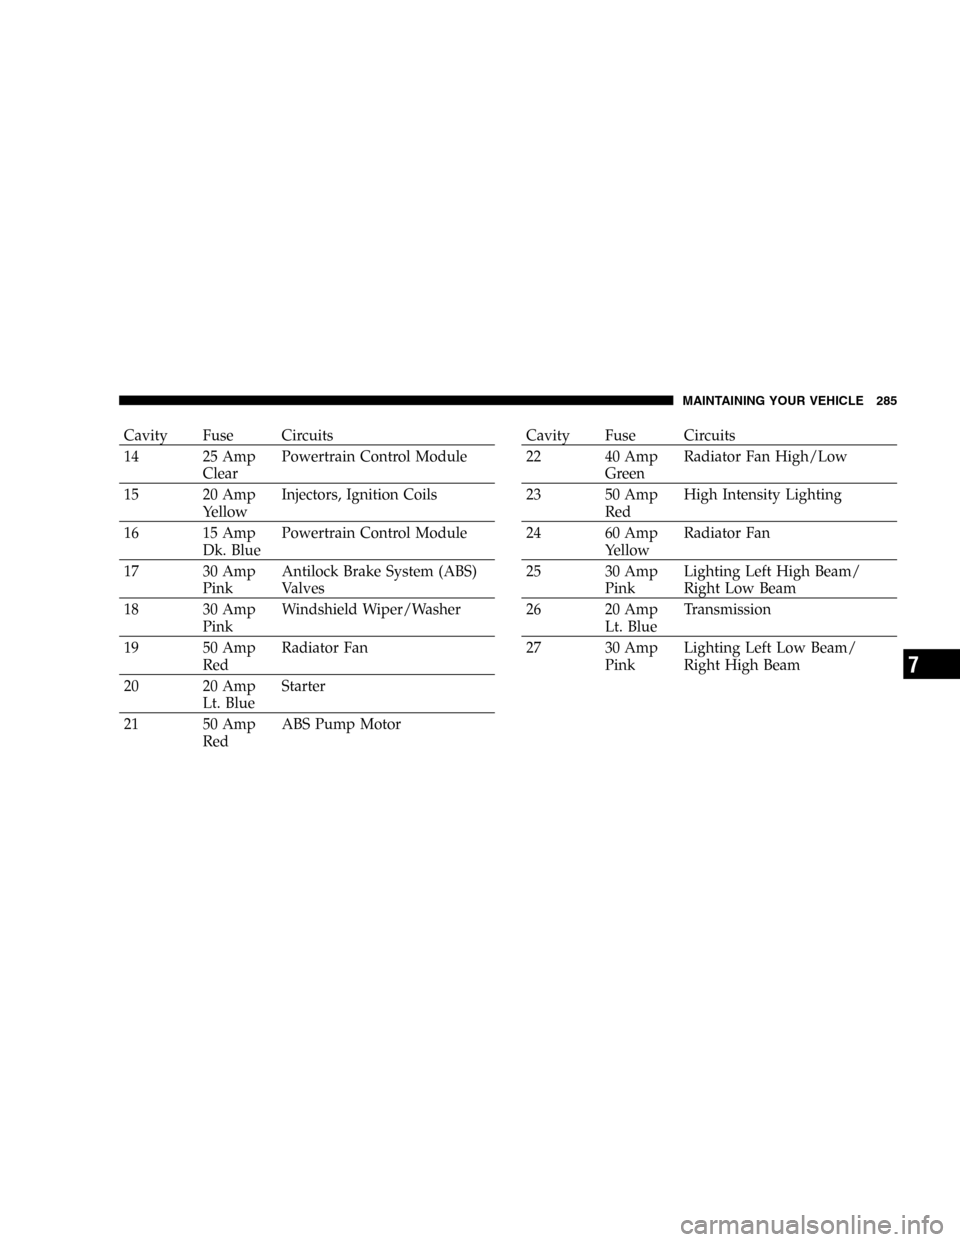
Cavity Fuse Circuits
14 25 Amp
ClearPowertrain Control Module
15 20 Amp
YellowInjectors, Ignition Coils
16 15 Amp
Dk. BluePowertrain Control Module
17 30 Amp
PinkAntilock Brake System (ABS)
Valves
18 30 Amp
PinkWindshield Wiper/Washer
19 50 Amp
RedRadiator Fan
20 20 Amp
Lt. BlueStarter
21 50 Amp
RedABS Pump MotorCavity Fuse Circuits
22 40 Amp
GreenRadiator Fan High/Low
23 50 Amp
RedHigh Intensity Lighting
24 60 Amp
YellowRadiator Fan
25 30 Amp
PinkLighting Left High Beam/
Right Low Beam
26 20 Amp
Lt. BlueTransmission
27 30 Amp
PinkLighting Left Low Beam/
Right High Beam
MAINTAINING YOUR VEHICLE 285
7
Page 286 of 336

Rear Power Distribution Center
There is also a power distribution center located in the
rear compartment under an access panel. This center
contains fuses and relays.CAUTION!
•When installing the Power Distribution Center
cover, it is important to ensure the cover is prop-
erly positioned and fully latched. Failure to do so
may allow water to get into the Power Distribu-
tion Center, and possibly result in a electrical
system failure.
•When replacing a blown fuse, it is important to
use only a fuse having the correct amperage
rating. The use of a fuse with a rating other than
indicated may result in a dangerous electrical
system overload. If a properly rated fuse contin-
ues to blow, it indicates a problem in the circuit
that must be corrected.
Rear Power Distribution Center Fuses
Cavity Fuse Circuits
1 60 Amp
ClearIgnition Off Draw
2 40 Amp
GreenBattery
Rear Power Distribution Center
286 MAINTAINING YOUR VEHICLE
Page 287 of 336
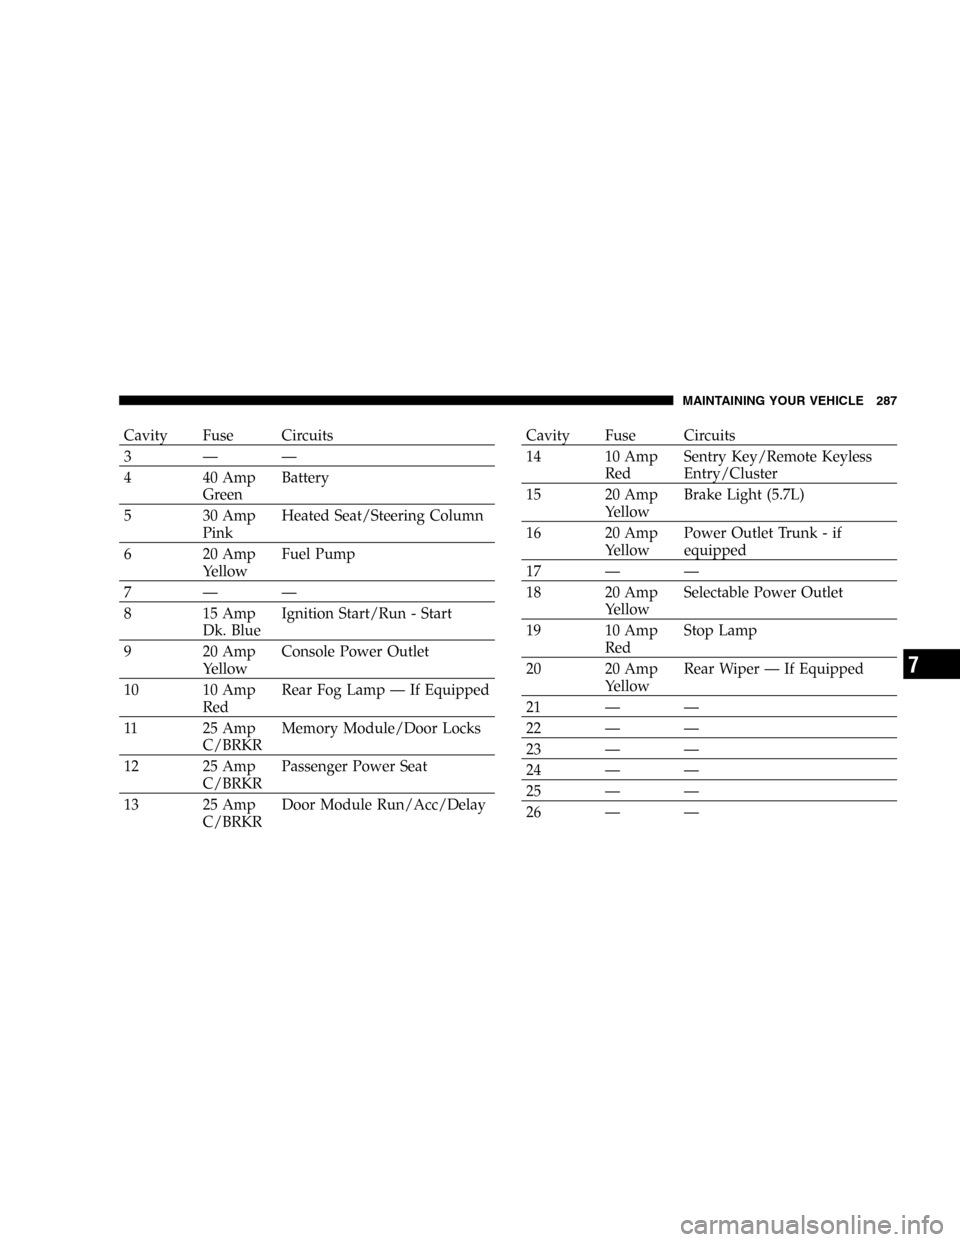
Cavity Fuse Circuits
3——
4 40 Amp
GreenBattery
5 30 Amp
PinkHeated Seat/Steering Column
6 20 Amp
YellowFuel Pump
7——
8 15 Amp
Dk. BlueIgnition Start/Run - Start
9 20 Amp
YellowConsole Power Outlet
10 10 Amp
RedRear Fog Lamp — If Equipped
11 25 Amp
C/BRKRMemory Module/Door Locks
12 25 Amp
C/BRKRPassenger Power Seat
13 25 Amp
C/BRKRDoor Module Run/Acc/DelayCavity Fuse Circuits
14 10 Amp
RedSentry Key/Remote Keyless
Entry/Cluster
15 20 Amp
YellowBrake Light (5.7L)
16 20 Amp
YellowPower Outlet Trunk - if
equipped
17——
18 20 Amp
YellowSelectable Power Outlet
19 10 Amp
RedStop Lamp
20 20 Amp
YellowRear Wiper — If Equipped
21——
22——
23——
24——
25——
26——
MAINTAINING YOUR VEHICLE 287
7
Page 288 of 336
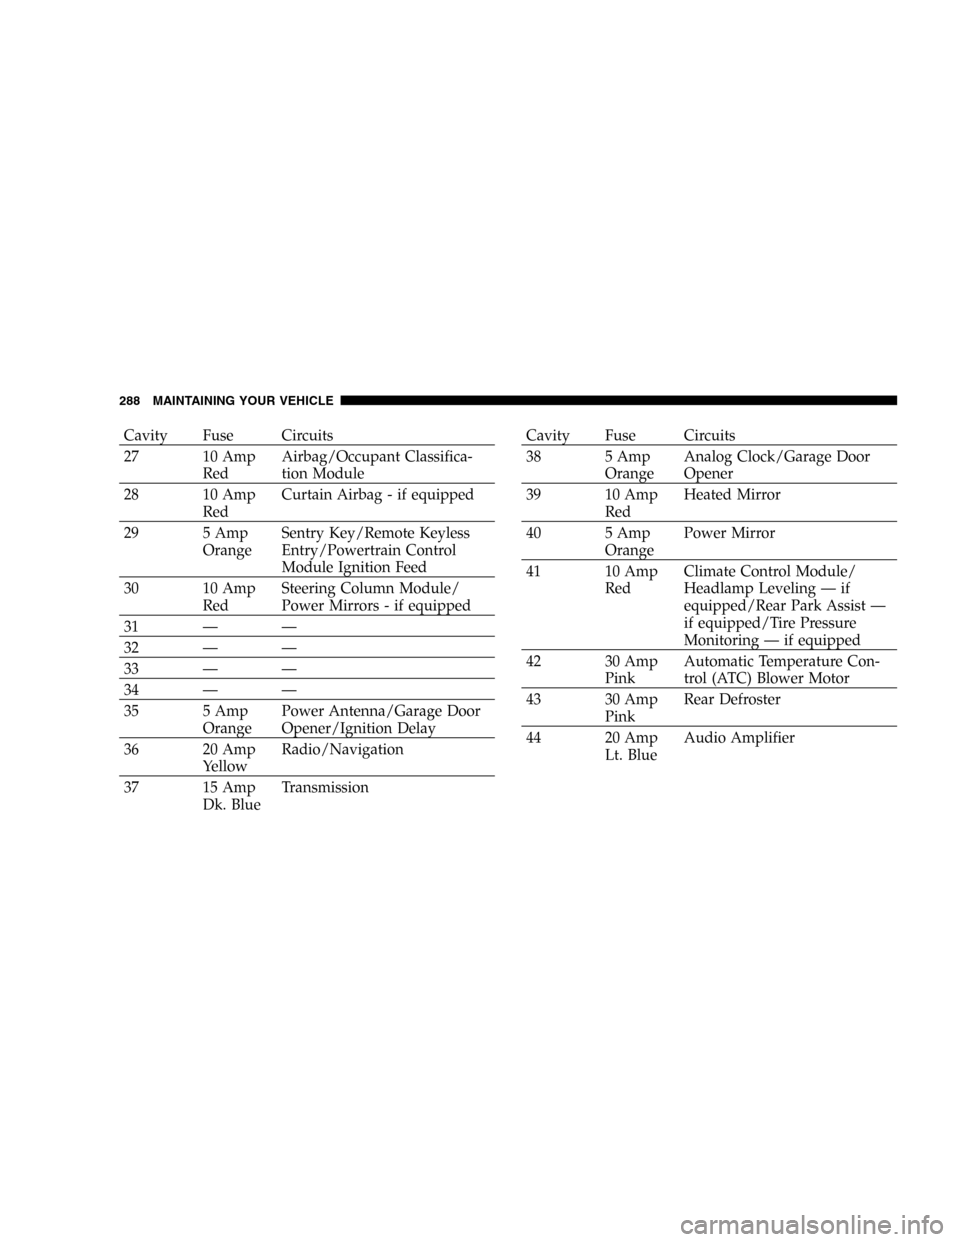
Cavity Fuse Circuits
27 10 Amp
RedAirbag/Occupant Classifica-
tion Module
28 10 Amp
RedCurtain Airbag - if equipped
29 5 Amp
OrangeSentry Key/Remote Keyless
Entry/Powertrain Control
Module Ignition Feed
30 10 Amp
RedSteering Column Module/
Power Mirrors - if equipped
31——
32——
33——
34——
35 5 Amp
OrangePower Antenna/Garage Door
Opener/Ignition Delay
36 20 Amp
YellowRadio/Navigation
37 15 Amp
Dk. BlueTransmissionCavity Fuse Circuits
38 5 Amp
OrangeAnalog Clock/Garage Door
Opener
39 10 Amp
RedHeated Mirror
40 5 Amp
OrangePower Mirror
41 10 Amp
RedClimate Control Module/
Headlamp Leveling — if
equipped/Rear Park Assist —
if equipped/Tire Pressure
Monitoring — if equipped
42 30 Amp
PinkAutomatic Temperature Con-
trol (ATC) Blower Motor
43 30 Amp
PinkRear Defroster
44 20 Amp
Lt. BlueAudio Amplifier
288 MAINTAINING YOUR VEHICLE
Page 289 of 336

VEHICLE STORAGE
If you are leaving your vehicle dormant for more than 21
days you may want to take steps to protect your battery.
You may:
•Disconnect the negative cable from the battery.
•Anytime you store your vehicle, or keep it out of
service (i.e. vacation) for two weeks or more, run the
air conditioning system at idle for about five minutes
in the fresh air and high blower setting. This will
insure adequate system lubrication to minimize the
possibility of compressor damage when the system is
started again.
REPLACEMENT LIGHT BULBS
LIGHT BULBS — Interior Bulb Number
Rear Courtesy/Reading Lights.............. W5W
Rear Compartment (Trunk) Light............. 562
Overhead Console Reading Lights............. 578
Visor Vanity Lights.....................A6220
Glove Box Light......................... 194
Door Courtesy.......................... 562
Shift Indicator Light.................JKLE14140
NOTE:For lighted switches, see your dealer for re-
placement instructions.
All of the interior bulbs are glass wedge base or glass
cartridge types. Aluminum base bulbs are not approved
and should not be used for replacement.
MAINTAINING YOUR VEHICLE 289
7
Page 290 of 336

LIGHT BULBS — Exterior Bulb Number
Low Beam Headlamp.....................9006
High Beam Headlamp....................9005
Front Park/Turn Lamp................3157NAK
Front Fog Lamp—If Equipped. . . 9145/H10 (Serviced at
Dealer)
Front Sidemarker........... 194(Serviced at Dealer)
Tail/Stop Lamp.........................3057
Tail/Turn Lamp.........................3057
Rear Sidemarker......................... 168
Backup Lamp........................... 921
Center High Mount Stop Lamp (CHMSL)....... LED
License................................ 168BULB REPLACEMENT
Low Beam Headlamp, High Beam Headlamp,
Park/Turn Lamp, and Front Sidemarker Lamp
•
Open the hood.
•Twist the appropriate bulb socket assembly counter-
clockwise and pull out. Pull the bulb out of the socket
assembly.
NOTE:Removal of the air cleaner filter housing may be
necessary prior to replacing bulbs on driver’s side head-
lamp assembly.
•Replace the bulb and push into socket assembly.
Reinstall the socket assembly, and turn clockwise.
290 MAINTAINING YOUR VEHICLE