charging DODGE CHARGER SRT 2018 Owners Manual
[x] Cancel search | Manufacturer: DODGE, Model Year: 2018, Model line: CHARGER SRT, Model: DODGE CHARGER SRT 2018Pages: 490, PDF Size: 5.08 MB
Page 120 of 490
Battery Saver On/Battery Saver Mode Message —
Electrical Load Reduction Actions — If Equipped
This vehicle is equipped with an Intelligent Battery Sensor
(IBS) to perform additional monitoring of the electrical
system and status of the vehicle battery.
In cases when the IBS detects charging system failure, or
the vehicle battery conditions are deteriorating, electrical
load reduction actions will take place to extend the driving
time and distance of the vehicle. This is done by reducing
power to or turning off non-essential electrical loads.
Load reduction is only active when the engine is running.
It will display a message if there is a risk of battery
depletion to the point where the vehicle may stall due to
lack of electrical supply, or will not restart after the current
drive cycle.
When load reduction is activated, the message “Battery
Saver On” or “Battery Saver Mode” will appear in the
instrument cluster.
These messages indicate the vehicle battery has a low state
of charge and continues to lose electrical charge at a rate
that the charging system cannot sustain.NOTE:
•
The charging system is independent from load reduc-
tion. The charging system performs a diagnostic on the
charging system continuously.
• If the Battery Charge Warning Light is on it may indicate
a problem with the charging system. Refer to “Battery
Charge Warning Light” in “Getting To Know Your
Instrument Panel” for further information.
The electrical loads that may be switched off (if equipped),
and vehicle functions which can be affected by load
reduction:
• Heated Seat/Vented Seats/Heated Wheel
• Heated/Cooled Cup Holders — If Equipped
• Rear Defroster And Heated Mirrors
• HVAC System
• 115V AC Power Inverter System
• Audio and Telematics System
Loss of the battery charge may indicate one or more of the
following conditions:
• The charging system cannot deliver enough electrical
power to the vehicle system because the electrical loads
118 GETTING TO KNOW YOUR INSTRUMENT PANEL
Page 121 of 490
are larger than the capability of charging system. The
charging system is still functioning properly.
• Turning on all possible vehicle electrical loads (e.g.
HVAC to max settings, exterior and interior lights,
overloaded power outlets +12V, 115V AC, USB ports)
during certain driving conditions (city driving, towing,
frequent stopping).
• Installing options like additional lights, upfitter electri-
cal accessories, audio systems, alarms and similar de-
vices.
• Unusual driving cycles (short trips separated by long
parking periods).
• The vehicle was parked for an extended period of time
(weeks, months).
• The battery was recently replaced and was not charged
completely.
• The battery was discharged by an electrical load left on
when the vehicle was parked.
• The battery was used for an extended period with the
engine not running to supply radio, lights, chargers,
+12V portable appliances like vacuum cleaners, game
consoles and similar devices. What to do when an electrical load reduction action
message is present (“Battery Saver On” or “Battery Saver
Mode”)
During a trip:
•
Reduce power to unnecessary loads if possible:
– Turn off redundant lights (interior or exterior)
– Check what may be plugged in to power outlets +12V, 115V AC, USB ports
– Check HVAC settings (blower, temperature)
– Check the audio settings (volume)
After a trip:
• Check if any aftermarket equipment was installed (ad-
ditional lights, upfitter electrical accessories, audio sys-
tems, alarms) and review specifications if any (load and
Ignition Off Draw currents).
• Evaluate the latest driving cycles (distance, driving time
and parking time).
• The vehicle should have service performed if the mes-
sage is still present during consecutive trips and the
evaluation of the vehicle and driving pattern did not
help to identify the cause.
4
GETTING TO KNOW YOUR INSTRUMENT PANEL 119
Page 123 of 490
NOTE:The light may flash momentarily during sharp
cornering maneuvers, which change fluid level conditions.
The vehicle should have service performed, and the brake
fluid level checked.
If brake failure is indicated, immediate repair is necessary.
WARNING!
Driving a vehicle with the red brake light on is
dangerous. Part of the brake system may have failed. It
will take longer to stop the vehicle. You could have a
collision. Have the vehicle checked immediately.
Vehicles equipped with the Anti-Lock Brake System (ABS)
are also equipped with Electronic Brake Force Distribution
(EBD). In the event of an EBD failure, the Brake Warning
Light will turn on along with the ABS Light. Immediate
repair to the ABS system is required.
Operation of the Brake Warning Light can be checked by
turning the ignition switch from the OFF position to the
ON/RUN position. The light should illuminate for ap-
proximately two seconds. The light should then turn off
unless the parking brake is applied or a brake fault is
detected. If the light does not illuminate, have the light
inspected by an authorized dealer. The light also will turn on when the parking brake is
applied with the ignition switch in the ON/RUN position.
NOTE:
This light shows only that the parking brake is
applied. It does not show the degree of brake application.
— Battery Charge Warning Light
This warning light will illuminate when the battery is not
charging properly. If it stays on while the engine is run-
ning, there may be a malfunction with the charging system.
Contact an authorized dealer as soon as possible.
This indicates a possible problem with the electrical system
or a related component.
— Door Open Warning Light
This indicator will illuminate when a door is ajar/open and
not fully closed.
NOTE: If the vehicle is moving, there will also be a single
chime.
— Electric Power Steering Fault Warning Light
This warning light will turn on when there’s a fault with
the EPS (Electric Power Steering) system. Refer to “Power
Steering” in “Starting And Operating” for further informa-
tion.
4
GETTING TO KNOW YOUR INSTRUMENT PANEL 121
Page 312 of 490
WARNING!
•Take care to avoid the radiator cooling fan whenever
the hood is raised. It can start anytime the ignition
switch is ON. You can be injured by moving fan
blades.
• Remove any metal jewelry such as rings, watch
bands and bracelets that could make an inadvertent
electrical contact. You could be seriously injured.
• Batteries contain sulfuric acid that can burn your
skin or eyes and generate hydrogen gas which is
flammable and explosive. Keep open flames or
sparks away from the battery.
1. Apply the parking brake, shift the automatic transmis- sion into PARK and place the ignition in the OFF
position.
2. Turn off the heater, radio, and all unnecessary electrical accessories.
3. If using another vehicle to jump start the battery, park the vehicle within the jumper cable’s reach, apply the
parking brake and make sure the ignition is OFF.
WARNING!
Do not allow vehicles to touch each other as this could
establish a ground connection and personal injury
could result.
Jump Starting Procedure
WARNING!
Failure to follow this jump starting procedure could
result in personal injury or property damage due to
battery explosion.
CAUTION!
Failure to follow these procedures could result in
damage to the charging system of the booster vehicle
or the discharged vehicle.
Connecting The Jumper Cables
1. Connect the positive (+)end of the jumper cable to the
remote positive (+)post of the vehicle with the dis-
charged battery.
310 IN CASE OF EMERGENCY
Page 313 of 490
2. Connect the opposite end of the positive(+)jumper
cable to the positive (+)post of the booster battery.
3. Connect the negative (-)end of the jumper cable to the
negative (-)post of the booster battery.
4. Connect the opposite end of the negative (-)jumper
cable to the remote negative (-)post of the vehicle with
the discharged battery.
WARNING!
Do not connect the jumper cable to the negative (-) post
of the discharged battery. The resulting electrical spark
could cause the battery to explode and could result in
personal injury. Only use the specific ground point, do
not use any other exposed metal parts.
5. Start the engine in the vehicle that has the booster battery, let the engine idle a few minutes, and then start
the engine in the vehicle with the discharged battery. 6. Once the engine is started, remove the jumper cables in
the reverse sequence:
Disconnecting The Jumper Cables
1. Disconnect the negative (-)end of the jumper cable from
the remote negative (-)post of the vehicle with the
discharged battery.
2. Disconnect the opposite end of the negative (-)jumper
cable from the negative (-)post of the booster battery.
3. Disconnect the positive (+)end of the jumper cable from
the positive (+)post of the booster battery.
4. Disconnect the opposite end of the positive (+)jumper
cable from the remote positive (+)post of the vehicle
with the discharged battery.
If frequent jump starting is required to start your vehicle
you should have the battery and charging system in-
spected at an authorized dealer.7
IN CASE OF EMERGENCY 311
Page 449 of 490
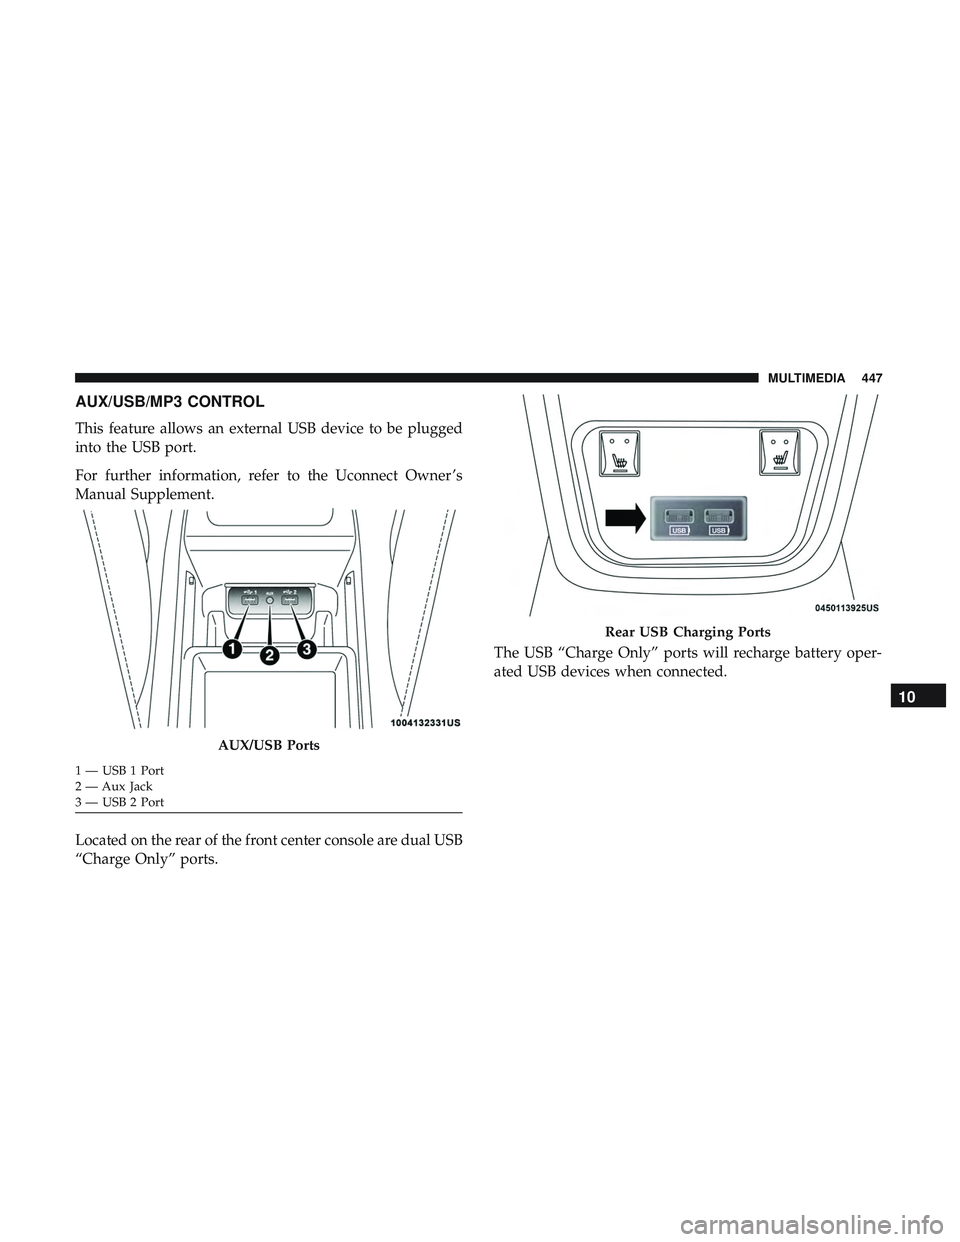
AUX/USB/MP3 CONTROL
This feature allows an external USB device to be plugged
into the USB port.
For further information, refer to the Uconnect Owner ’s
Manual Supplement.
Located on the rear of the front center console are dual USB
“Charge Only” ports.The USB “Charge Only” ports will recharge battery oper-
ated USB devices when connected.
AUX/USB Ports
1 — USB 1 Port
2 — Aux Jack
3 — USB 2 Port
Rear USB Charging Ports
10
MULTIMEDIA 447
Page 475 of 490
Arming SystemSecurity Alarm ...........................33
Assist, Hill Start .......................... .143
Audio Systems (Radio) .......................391
Auto Down Power Windows ...................81
Automatic Door Locks .....................40, 41
Automatic Headlights ........................62
Automatic High Beams .......................61
Automatic Temperature Control (ATC) ..........72, 77
Automatic Transmission ..................... .221
Adding Fluid .....................346, 385, 387
Fluid And Filter Change ...................346
Fluid Change .......................... .346
Fluid Level Check ........................345
Fluid Type .......................345, 385, 387
Special Additives ........................ .345
Automatic Transmission Limp Home Mode .....40, 226
Autostick Operation ............................. .226
Auto Up Power Windows .....................81
AuxCord............................... .447
Auxiliary Electrical Outlet (Power Outlet) .........101
Axle Fluid ............................385, 387
Axle Lubrication ........................385, 387 Back-Up
.................................269
Battery ...............................121, 327
Charging System Light ....................121
Keyless Key Fob Replacement ................21
Location ...............................327
Belts, Seat ............................... .204
Body Mechanism Lubrication ..................336
B-Pillar Location .......................... .352
Brake Assist System ........................ .137
Brake Control System ........................137
Brake Fluid ........................343, 385, 387
Brake System ..........................343, 377
Fluid Check ..................... .343, 385, 387
Master Cylinder ........................ .343
Parking ...............................217
W arning
Light .......................120, 377
Brake/Transmission Interlock ..................221
Brightness, Interior Lights .....................67
Bulb Replacement ..........................285
Bulbs, Light .......................... .206, 285
Camera, Rear ............................ .269
Capacities, Fluid .......................... .384
Caps, Filler Oil (Engine) ........................ .325, 330
12
INDEX 473