load capacity DODGE CHARGER SRT 2018 Owners Manual
[x] Cancel search | Manufacturer: DODGE, Model Year: 2018, Model line: CHARGER SRT, Model: DODGE CHARGER SRT 2018Pages: 490, PDF Size: 5.08 MB
Page 235 of 490
capacity. Resurfacing also thins the rotor cheek, making
it less robust and increasing the likelihood of pulsation
in further track use.
FUEL SAVER TECHNOLOGY 6.4L ONLY — IF
EQUIPPED
This feature offers improved fuel economy by shutting off
four of the engine’s eight cylinders during light load and
cruise conditions. The system is automatic with no driver
inputs or additional driving skills required.
NOTE:This system may take some time to return to full
functionality after a battery disconnect.
HYDRAULIC POWER STEERING — IF EQUIPPED
The hydraulic power steering system is sport tuned and
will give you good vehicle response and increased ease of
maneuverability in tight spaces. The system will provide
mechanical steering capability if power assist is lost.
If for some reason the power assist is interrupted, it will
still be possible to steer your vehicle. Under these condi-
tions, you will observe a substantial increase in steering
effort, especially at very low vehicle speeds and during
parking maneuvers. NOTE:
•
Increased noise levels at the end of the steering wheel
travel are considered normal and do not indicate that
there is a problem with the power steering system.
• Upon initial start-up in cold weather, the power steering
pump may make noise for a short amount of time. This
is due to the cold, thick fluid in the steering system. This
noise should be considered normal, and it does not in
any way damage the steering system.
WARNING!
Continued operation with reduced power steering as-
sist could pose a safety risk to yourself and others.
Service should be obtained as soon as possible.
CAUTION!
Prolonged operation of the steering system at the end
of the steering wheel travel will increase the steering
fluid temperature and it should be avoided when
possible. Damage to the power steering pump may
occur.
6
STARTING AND OPERATING 233
Page 276 of 490
VEHICLE LOADING
The load carrying capacity of your vehicle is shown on the
“Vehicle Certification Label”. This information should be
used for passenger and luggage loading as indicated.
Do not exceed the specified Gross Vehicle Weight Rating
(GVWR) or the Gross Axle Weight Rating (GAWR).
Vehicle Certification Label
Your vehicle has a Vehicle Certification Label affixed to the
drivers side B-Pillar or the rear of the driver ’s door.
The label contains the following information:
•Name of manufacturer
• Month and year of manufacture
• Gross Vehicle Weight Rating (GVWR)
• Gross Axle Weight Rating (GAWR) front
• Gross Axle Weight Rating (GAWR) rear
• Vehicle Identification Number (VIN)
• Type of vehicle
• Month, Day, and Hour of manufacture (MDH)
The bar code allows a computer scanner to read the VIN.
Gross Vehicle Weight Rating (GVWR)
The GVWR is the total allowable weight of your vehicle.
This includes driver, passengers, and cargo. The total load
must be limited so that you do not exceed the GVWR.
Gross Axle Weight Rating (GAWR)
The GAWR is the maximum capacity of the front and rear
axles. Distribute the load over the front and rear axles
evenly. Make sure that you do not exceed either front or
rear GAWR.
WARNING!
Because the front wheels steer the vehicle, it is impor-
tant that you do not exceed the maximum front or rear
GAWR. A dangerous driving condition can result if
either rating is exceeded. You could lose control of the
vehicle and have a collision.
Overloading
The load carrying components (axle, springs, tires, wheels,
etc.) of your vehicle will provide satisfactory service as
long as you do not exceed the GVWR and the front and
rear GAWR.
274 STARTING AND OPERATING
Page 353 of 490
Tire Terminology And Definitions
TermDefinition
B-Pillar The vehicle B-Pillar is the structural member of the body located be-
hind the front door.
Cold Tire Inflation Pressure Cold tire inflation pressure is defined as the tire pressure after the
vehicle has not been driven for at least three hours, or driven less
than 1 mile (1.6 km) after sitting for a minimum of three hours. In-
flation pressure is measured in units of PSI (pounds per square inch)
or kPa (kilopascals).
Maximum Inflation Pressure The maximum inflation pressure is the maximum permissible cold
tire inflation pressure for this tire. The maximum inflation pressure is
molded into the sidewall.
Recommended Cold Tire Inflation Pressure Vehicle manufacturer’s recommended cold tire inflation pressure as
shown on the tire placard.
Tire Placard A label permanently attached to the vehicle describing the vehicle’s
loading capacity, the original equipment tire sizes and the recom-
mended cold tire inflation pressures.
8
SERVICING AND MAINTENANCE 351
Page 355 of 490
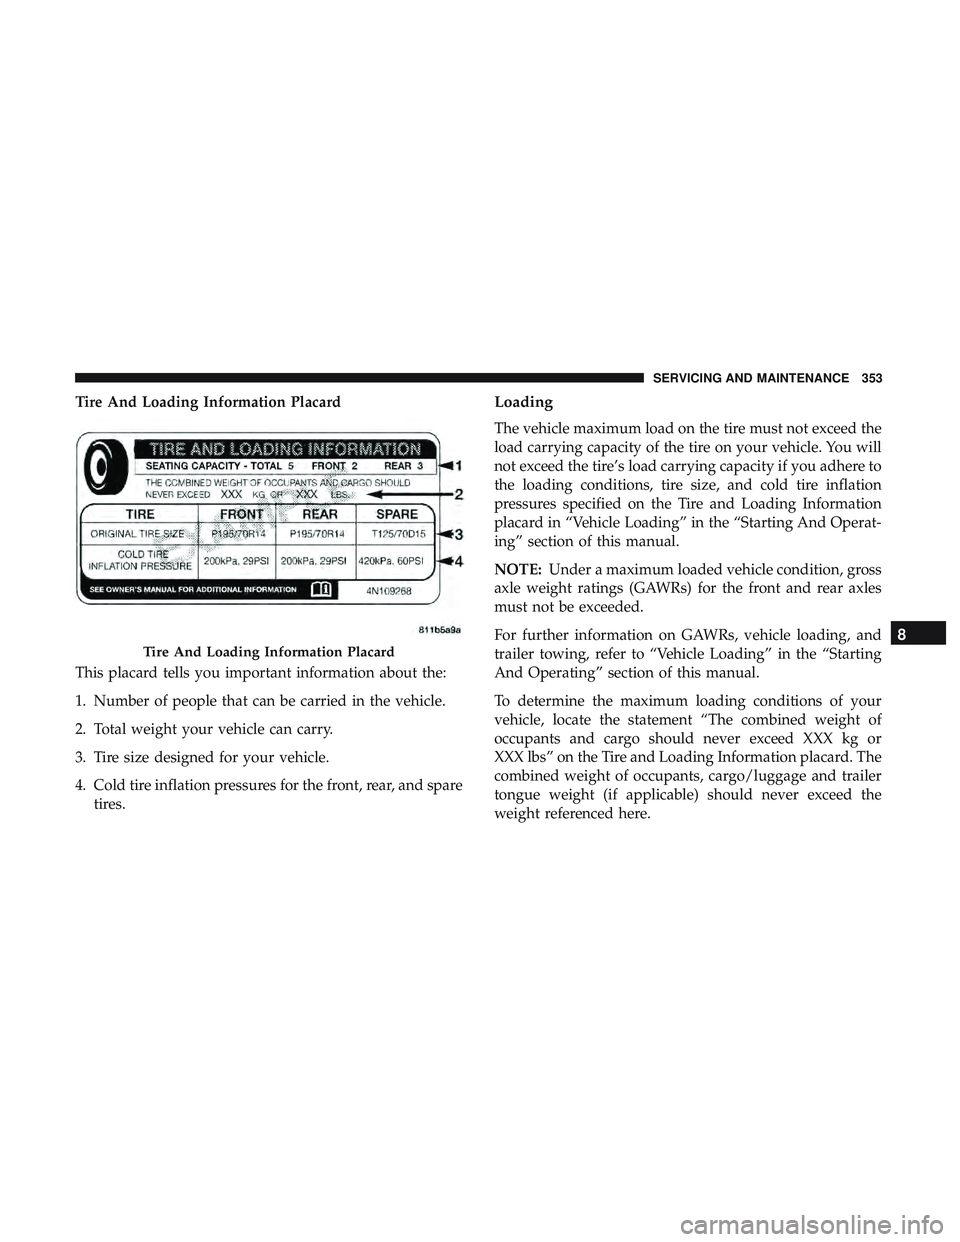
Tire And Loading Information Placard
This placard tells you important information about the:
1. Number of people that can be carried in the vehicle.
2. Total weight your vehicle can carry.
3. Tire size designed for your vehicle.
4. Cold tire inflation pressures for the front, rear, and sparetires.Loading
The vehicle maximum load on the tire must not exceed the
load carrying capacity of the tire on your vehicle. You will
not exceed the tire’s load carrying capacity if you adhere to
the loading conditions, tire size, and cold tire inflation
pressures specified on the Tire and Loading Information
placard in “Vehicle Loading” in the “Starting And Operat-
ing” section of this manual.
NOTE: Under a maximum loaded vehicle condition, gross
axle weight ratings (GAWRs) for the front and rear axles
must not be exceeded.
For further information on GAWRs, vehicle loading, and
trailer towing, refer to “Vehicle Loading” in the “Starting
And Operating” section of this manual.
To determine the maximum loading conditions of your
vehicle, locate the statement “The combined weight of
occupants and cargo should never exceed XXX kg or
XXX lbs” on the Tire and Loading Information placard. The
combined weight of occupants, cargo/luggage and trailer
tongue weight (if applicable) should never exceed the
weight referenced here.
Tire And Loading Information Placard
8
SERVICING AND MAINTENANCE 353
Page 356 of 490
Steps For Determining Correct Load Limit—
(1) Locate the statement “The combined weight of
occupants and cargo should never exceed XXX kg or
XXX lbs.” on your vehicle’s placard.
(2) Determine the combined weight of the driver and
passengers that will be riding in your vehicle.
(3) Subtract the combined weight of the driver and
passengers from XXX kg or XXX lbs.
(4) The resulting figure equals the available amount of
cargo and luggage load capacity. For example, if “XXX”
amount equals 1400 lbs. and there will be five 150 lb
passengers in your vehicle, the amount of available
cargo and luggage load capacity is 650 lbs. (1400-750
(5x150) = 650 lbs.)
(5) Determine the combined weight of luggage and
cargo being loaded on the vehicle. That weight may not
safely exceed the available cargo and luggage load
capacity calculated in Step 4.
(6) If your vehicle will be towing a trailer, load from
your trailer will be transferred to your vehicle. Consult
this manual to determine how this reduces the available
cargo and luggage load capacity of your vehicle.Metric Example For Load Limit
For example, if “XXX” amount equals 635 kg and there will
be five 68 kg passengers in your vehicle, the amount of
available cargo and luggage load capacity is 295 kg (635-
340 (5x68) = 295 kg) as shown in step 4.
NOTE:
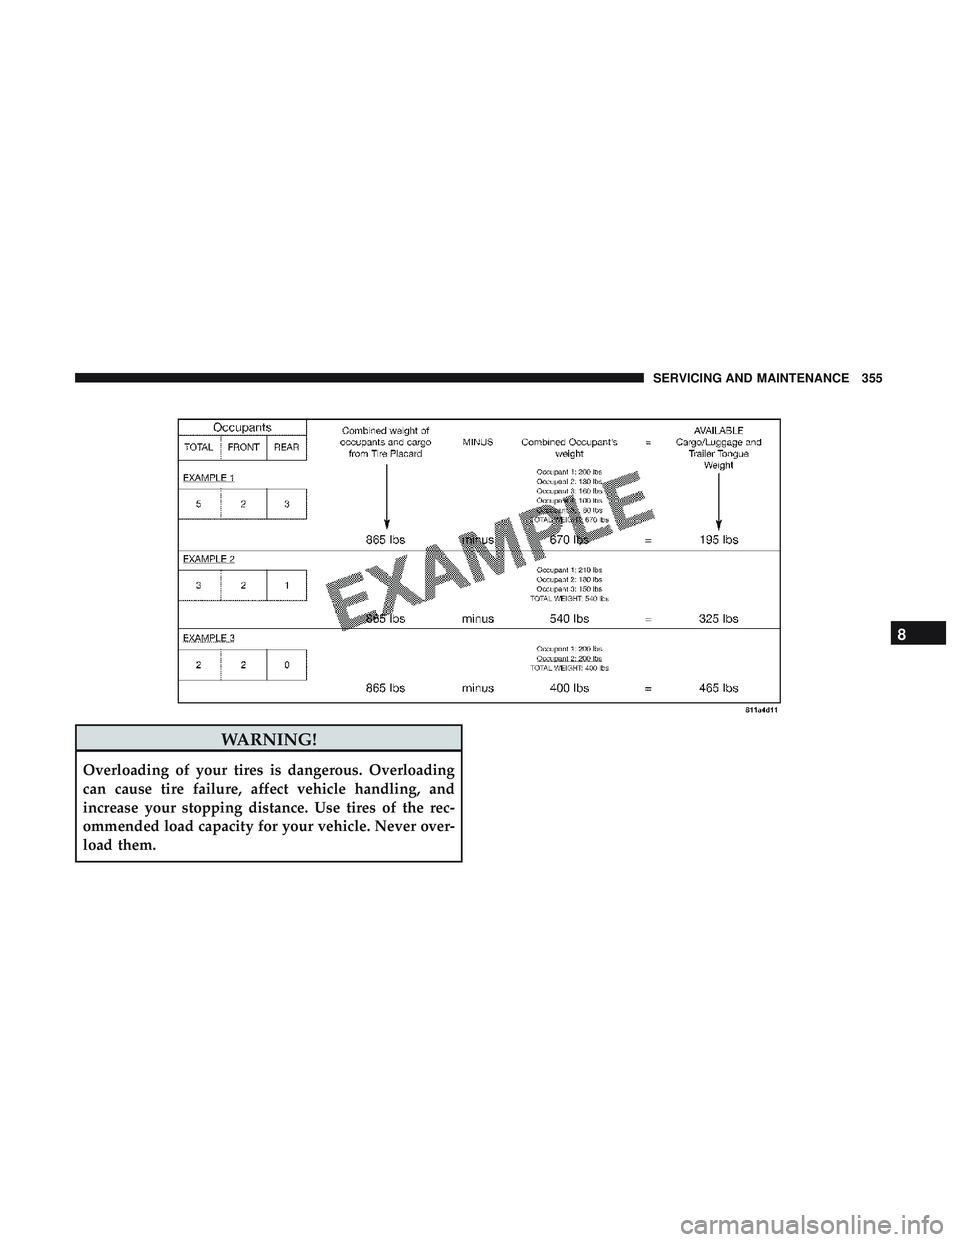
•If your vehicle will be towing a trailer, load from your
trailer will be transferred to your vehicle. The following
table shows examples on how to calculate total load,
cargo/luggage, and towing capacities of your vehicle
with varying seating configurations and number and
size of occupants. This table is for illustration purposes
only and may not be accurate for the seating and load
carry capacity of your vehicle.
• For the following example, the combined weight of
occupants and cargo should never exceed 865 lbs
(392 kg).
354 SERVICING AND MAINTENANCE
Page 357 of 490
WARNING!
Overloading of your tires is dangerous. Overloading
can cause tire failure, affect vehicle handling, and
increase your stopping distance. Use tires of the rec-
ommended load capacity for your vehicle. Never over-
load them.
8
SERVICING AND MAINTENANCE 355
Page 360 of 490
Tire pressure may increase from 2 to 6 psi (13 to 40 kPa)
during operation. DO NOT reduce this normal pressure
build up or your tire pressure will be too low.
Tire Pressures For High Speed Operation
The manufacturer advocates driving at safe speeds and
within posted speed limits. Where speed limits or condi-
tions are such that the vehicle can be driven at high speeds,
maintaining correct tire inflation pressure is very impor-
tant. Increased tire pressure and reduced vehicle loading
may be required for high-speed vehicle operation. Refer to
an authorized tire dealer or original equipment vehicle
dealer for recommended safe operating speeds, loading
and cold tire inflation pressures.
WARNING!
High speed driving with your vehicle under maximum
load is dangerous. The added strain on your tires could
cause them to fail. You could have a serious collision.
Do not drive a vehicle loaded to the maximum capacity
at continuous speeds above 75 mph (120 km/h).
Radial Ply Tires
WARNING!
Combining radial ply tires with other types of tires on
your vehicle will cause your vehicle to handle poorly.
The instability could cause a collision. Always use
radial ply tires in sets of four. Never combine them
with other types of tires.
Tire Repair
If your tire becomes damaged, it may be repaired if it meets
the following criteria:
• The tire has not been driven on when flat.
• The damage is only on the tread section of your tire
(sidewall damage is not repairable).
• The puncture is no greater thana¼ofaninch (6 mm).
Consult an authorized tire dealer for tire repairs and
additional information.
Damaged Run Flat tires, or Run Flat tires that have
experienced a loss of pressure should be replaced immedi-
ately with another Run Flat tire of identical size and service
description (Load Index and Speed Symbol).
358 SERVICING AND MAINTENANCE
Page 361 of 490
Run Flat Tires — If Equipped
Run Flat tires allow you the capability to drive 50 miles
(80 km) at 50 mph (80 km/h) after a rapid loss of inflation
pressure. This rapid loss of inflation is referred to as the
Run Flat mode. A Run Flat mode occurs when the tire
inflation pressure is of/or below 14 psi (96 kPa). Once a
Run Flat tire reaches the run flat mode it has limited
driving capabilities and needs to be replaced immediately.
A Run Flat tire is not repairable.
It is not recommended driving a vehicle loaded at full
capacity or to tow a trailer while a tire is in the run flat
mode.
See the tire pressure monitoring section for more informa-
tion.
Tire Spinning
When stuck in mud, sand, snow, or ice conditions, do not
spin your vehicle’s wheels above 30 mph (48 km/h) or for
longer than 30 seconds continuously without stopping.
Refer to “Freeing A Stuck Vehicle” in “In Case Of Emer-
gency” for further information.
WARNING!
Fast spinning tires can be dangerous. Forces generated
by excessive wheel speeds may cause tire damage or
failure. A tire could explode and injure someone. Do
not spin your vehicle’s wheels faster than 30 mph
(48 km/h) for more than 30 seconds continuously when
you are stuck, and do not let anyone near a spinning
wheel, no matter what the speed.
8
SERVICING AND MAINTENANCE 359
Page 364 of 490
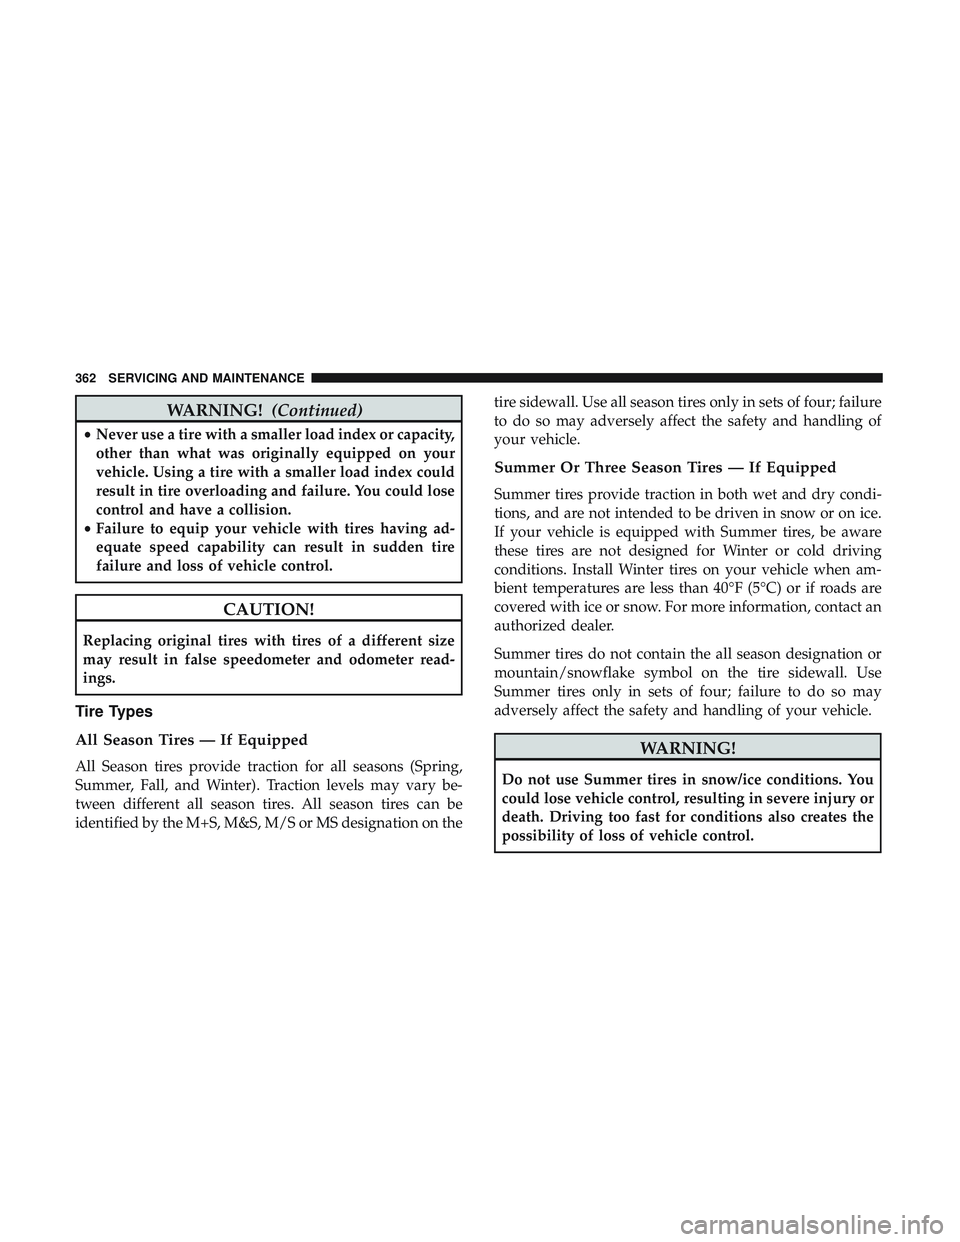
WARNING!(Continued)
•Never use a tire with a smaller load index or capacity,
other than what was originally equipped on your
vehicle. Using a tire with a smaller load index could
result in tire overloading and failure. You could lose
control and have a collision.
• Failure to equip your vehicle with tires having ad-
equate speed capability can result in sudden tire
failure and loss of vehicle control.
CAUTION!
Replacing original tires with tires of a different size
may result in false speedometer and odometer read-
ings.
Tire Types
All Season Tires — If Equipped
All Season tires provide traction for all seasons (Spring,
Summer, Fall, and Winter). Traction levels may vary be-
tween different all season tires. All season tires can be
identified by the M+S, M&S, M/S or MS designation on the tire sidewall. Use all season tires only in sets of four; failure
to do so may adversely affect the safety and handling of
your vehicle.
Summer Or Three Season Tires — If Equipped
Summer tires provide traction in both wet and dry condi-
tions, and are not intended to be driven in snow or on ice.
If your vehicle is equipped with Summer tires, be aware
these tires are not designed for Winter or cold driving
conditions. Install Winter tires on your vehicle when am-
bient temperatures are less than 40°F (5°C) or if roads are
covered with ice or snow. For more information, contact an
authorized dealer.
Summer tires do not contain the all season designation or
mountain/snowflake symbol on the tire sidewall. Use
Summer tires only in sets of four; failure to do so may
adversely affect the safety and handling of your vehicle.
WARNING!
Do not use Summer tires in snow/ice conditions. You
could lose vehicle control, resulting in severe injury or
death. Driving too fast for conditions also creates the
possibility of loss of vehicle control.
362 SERVICING AND MAINTENANCE
Page 476 of 490
Power Steering..........................234
Radiator (Coolant Pressure) .................341
Carbon Monoxide Warning ................203, 383
Cargo Vehicle Loading ..........................274
Cargo Area Cover ...........................89
Cargo Compartment .........................89
Car Washes ...............................370
Cellular Phone ............................448
Certification Label ..........................274
Chains, Tire ............................. .367
Changing A Flat Tire ........................346
Chart, Tire Sizing .......................... .348
Check Engine Light (Malfunction Indicator Light). . . .132
Checking Your Vehicle For Safety ...............203
Checks, Safety ............................ .203
Child Restraint ............................187
Child Restraints Booster Seats ............................190
Child Seat Installation .....................200
How To Stow An unused ALR Seat Belt ........196
Infant And Child Restraints .................189
Lower Anchors And Tethers For Children .......192
Older Children And Child Restraints ...........189
Seating Positions ........................ .191Child Safety Locks
..........................41
Clean Air Gasoline ........................ .380
Cleaning Wheels ............................... .365
Climate Control ............................72
Automatic ..............................72
Coin Holder ...............................97
Cold Weather Operation ..................... .215
Compact Disc (CD) Maintenance ................464
Compact Spare Tire ........................ .363
Console Floor ..................................97
Contract, Service .......................... .468
Cooling Pressure Cap (Radiator Cap) ............341
Cooling System ............................338
Adding Coolant
(Antifreeze).................340
Coolant Level ........................339, 342
Cooling Capacity ........................ .384
Disposal Of Used Coolant ..................342
Drain, Flush, And Refill ....................339
Inspection ............................. .342
Points To Remember ..................... .342
Pressure Cap ............................341
Radiator Cap .......................... .341
Selection Of Coolant (Antifreeze) .......339, 384, 385
474 INDEX