Tire change DODGE DAKOTA 2006 3.G Owners Manual
[x] Cancel search | Manufacturer: DODGE, Model Year: 2006, Model line: DAKOTA, Model: DODGE DAKOTA 2006 3.GPages: 408, PDF Size: 24.05 MB
Page 240 of 408

CAUTION!
After inspecting or adjusting the tire pressure, al-
ways reinstall the valve stem cap–if equipped. This
will prevent moisture and dirt from entering the
valve stem, which could damage the valve stem.
Inflation pressures specified on the placard are always
“cold tire inflation pressure”. Cold tire inflation pressure
is defined as the tire pressure after the vehicle has not
been driven for at least 3 hours, or driven less than 1 mile
(1 km) afte r a 3 hour period. The cold tire inflation
pressure must not exceed the maximum inflation pres-
sure molded into the tire side wall.
Check tire pressures more often if subject to a wide range
of outdoor temperatures, as tire pressures vary with
temperature changes. Tire pressures change by approximately 1 psi (7 kPa) per
12° F (7° C) of air temperature change. Keep this in mind
when checking tire pressure inside a garage, especially in
the winter.
Example: If garage temperature = 68° F (20° C) and the
outside temperature = 32° F (0° C) then the cold tire
inflation pressure should be increased by 3 psi (21 kPa),
which equals 1 psi (7 kPa) for every 12° F (7° C) for this
outside temperature condition.
Tire pressure may increase from 2 to 6 psi (13 to 40 kPa)
during operation. DO NOT reduce this normal pressure
build up or your tire pressure will be too low.
Tire Pressures for High Speed Operation
The manufacturer advocates driving at safe speeds
within posted speed limits. Where speed limits or condi-
tions are such that the vehicle can be driven at high
speeds, maintaining correct tire inflation pressure is very
important. Increased tire pressure and reduced vehicle
240 STARTING AND OPERATING
Page 246 of 408

WARNING!
•Do not use a tire, wheel size or rating other than
that specified for your vehicle. Some combina-
tions of unapproved tires and wheels may change
suspension dimensions and performance charac-
teristics, resulting in changes to steering, han-
dling, and braking of your vehicle. This can cause
unpredictable handling and stress to steering and
suspension components. You could lose control
and have an accident resulting in serious injury or
death. Use only the tire and wheel sizes with load
ratings approved for your vehicle.
•Never use a tire with a smaller load index or
capacity, other than what was originally equipped
on your vehicle. Using a tire with a smaller load
index could result in tire overloading and failure.
You could lose control and have an accident.
•Failure to equip your vehicle with tires having
adequate speed capability can result in sudden
tire failure and loss of vehicle control.
CAUTION!
Replacing original tires with tires of a different size
may result in false speedometer and odometer read-
ings.
Alignment And Balance
Poor suspension alignment may result in:
•Fast tire wear.
•Uneven tire wear, such as feathering and one-sided
wear.
•Vehicle pull to right or left.
Tires may also cause the vehicle to pull to the left or right.
Alignment will not correct this condition. See your dealer
for proper diagnosis.
246 STARTING AND OPERATING
Page 289 of 408
Preparations
Park the vehicle on a firm level surface, avoiding ice or
slippery areas. Set the parking brake and place the gear
selector in PARK (automatic transmission). On Four
Wheel Drive vehicles, shift the transfer case to the “4L”
position.
WARNING!
Do not attempt to change a tire on the side of the
vehicle close to moving traffic. Pull far enough off
the road to avoid the danger of being hit when
operating the jack or changing the wheel.
•Turn on the Hazard Warning Flasher.
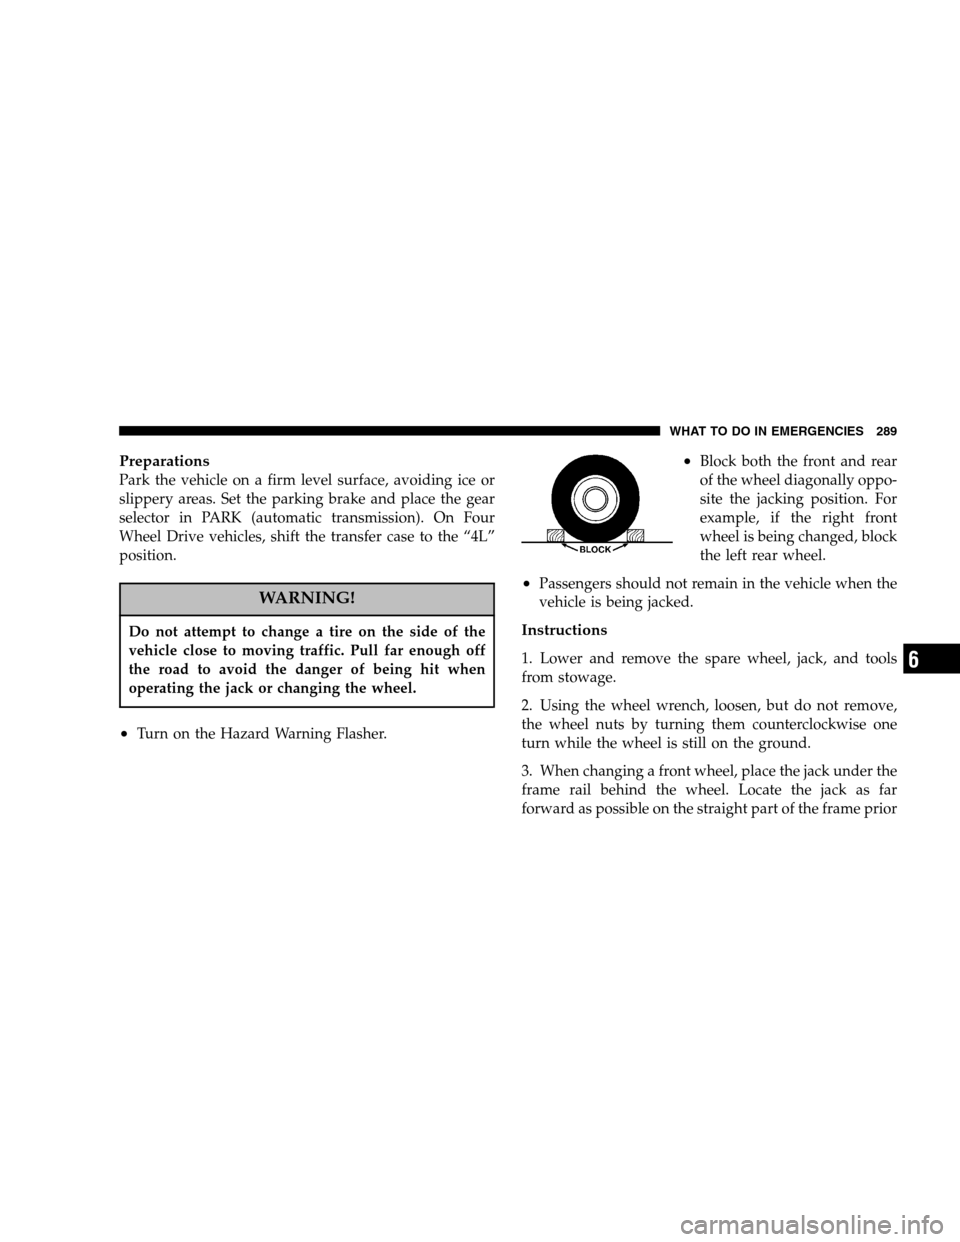
•Block both the front and rear
of the wheel diagonally oppo-
site the jacking position. For
example, if the right front
wheel is being changed, block
the left rear wheel.
•Passengers should not remain in the vehicle when the
vehicle is being jacked.
Instructions
1. Lower and remove the spare wheel, jack, and tools
from stowage.
2. Using the wheel wrench, loosen, but do not remove,
the wheel nuts by turning them counterclockwise one
turn while the wheel is still on the ground.
3. When changing a front wheel, place the jack under the
frame rail behind the wheel. Locate the jack as far
forward as possible on the straight part of the frame prior
WHAT TO DO IN EMERGENCIES 289
6
Page 363 of 408

Once a Month
•Check tire pressure and look for unusual wear or
damage.
•Inspect the battery and clean and tighten the terminals
as required.
•Check the fluid levels of coolant reservoir, brake
master cylinder, and transmission and add as needed.
•Check all lights and all other electrical items for correct
operation. At Each Oil Change
•Change the engine oil filter.
•Inspect the exhaust system.
•Inspect the brake hoses.
•Inspect the CV joints (if equipped) and front suspen-
sion components.
•Check the automatic transmission fluid level (if
equipped).
•Check the manual transmission fluid level (if
equipped).
•Check the coolant level, hoses, and clamps.
MAINTENANCE SCHEDULES 363
8
M
A I
N T
E
N A
N C E
S
C
H E
D
U L
E
S
Page 365 of 408

Miles 3,000 6,000 9,000 12,000 15,000
(Kilometers) (5 000) (10 000) (15 000) (20 000) (25 000)
Change engine oil and engine oil filter, or at 3
months whichever comes first. X X XXX
Rotate tires. X X
Check spare tire for proper pressure and correct
stowage. XX
Change rear axle fluid. X
Change front axle fluid (4X4). X
Inspect engine air cleaner filter, replace if neces-
sary. X
SCHEDULE “B” 365
8
M
A I
N T
E
N A
N C E
S
C
H E
D
U L
E
S
Page 366 of 408
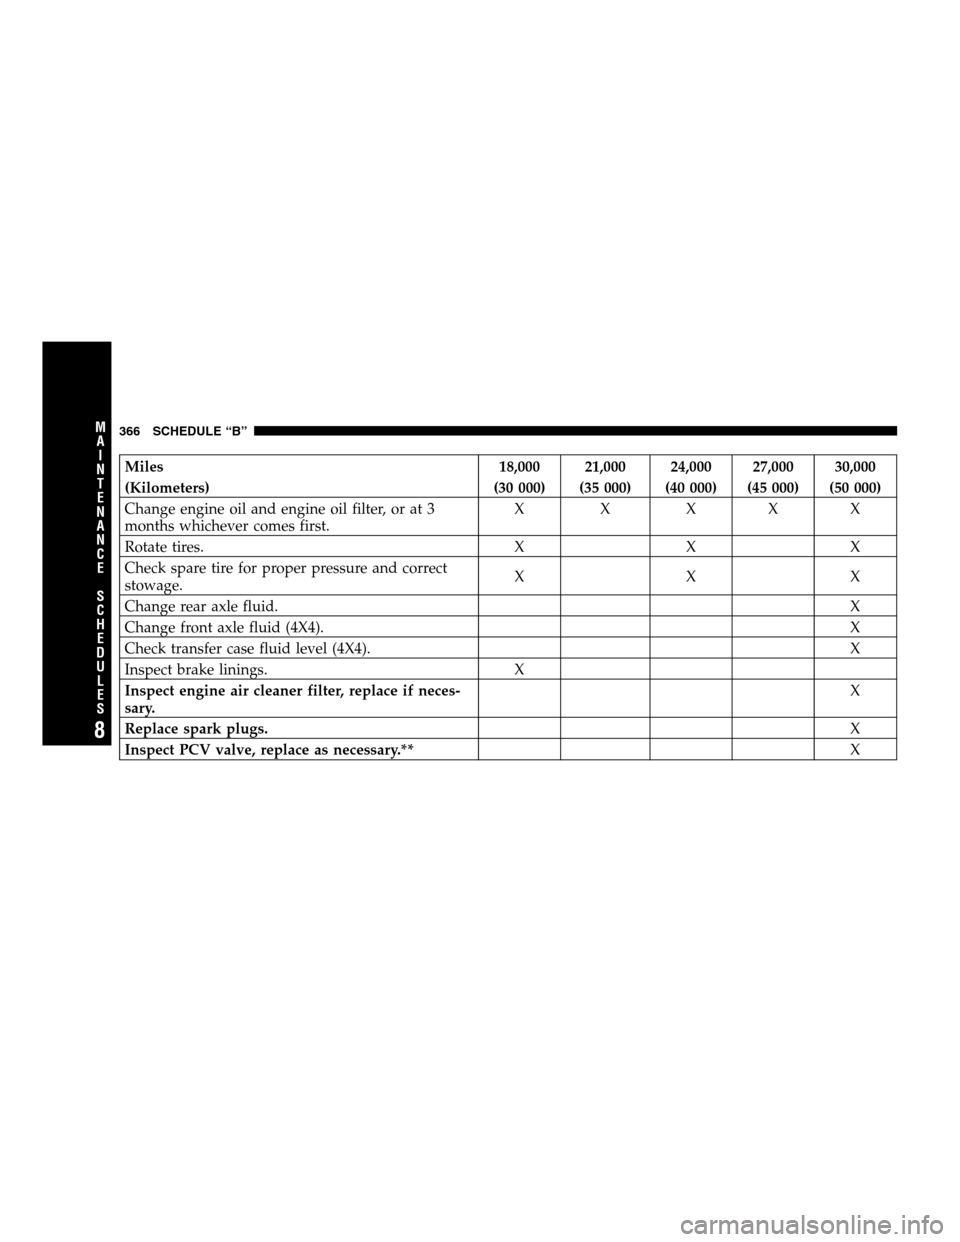
Miles 18,000 21,000 24,000 27,000 30,000
(Kilometers) (30 000) (35 000) (40 000) (45 000) (50 000)
Change engine oil and engine oil filter, or at 3
months whichever comes first. X X XXX
Rotate tires. X X X
Check spare tire for proper pressure and correct
stowage. XXX
Change rear axle fluid. X
Change front axle fluid (4X4). X
Check transfer case fluid level (4X4). X
Inspect brake linings. X
Inspect engine air cleaner filter, replace if neces-
sary. X
Replace spark plugs. X
Inspect PCV valve, replace as necessary.** X
366 SCHEDULE “B”
8
M
A I
N T
E
N A
N C E
S
C
H E
D
U L
E
S
Page 367 of 408

Miles 33,000 36,000 39, 000 42,000 45,000
(Kilometers) (55 000) (60 000) (65 000) (70 000) (75 000)
Change engine oil and engine oil filter, or at 3
months whichever comes first. X X XXX
Rotate tires. X X
Check spare tire for proper pressure and correct
stowage. XX
Change rear axle fluid. X
Change front axle fluid (4X4). X
Inspect brake linings. X
Inspect engine air cleaner filter, replace if neces-
sary. X
SCHEDULE “B” 367
8
M
A I
N T
E
N A
N C E
S
C
H E
D
U L
E
S
Page 368 of 408
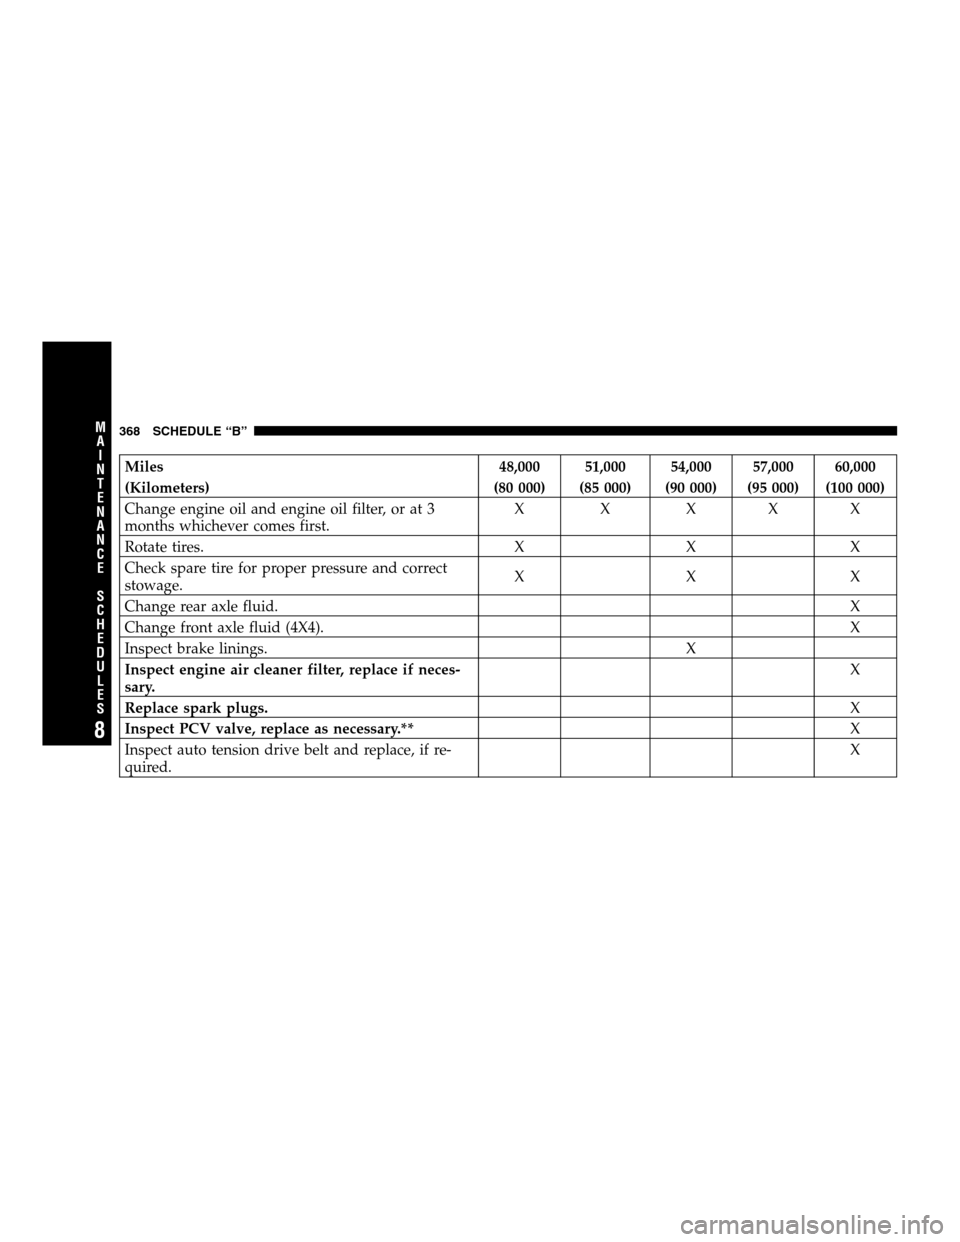
Miles 48,000 51,000 54,000 57,000 60,000
(Kilometers) (80 000) (85 000) (90 000) (95 000) (100 000)
Change engine oil and engine oil filter, or at 3
months whichever comes first. X X XXX
Rotate tires. X X X
Check spare tire for proper pressure and correct
stowage. XXX
Change rear axle fluid. X
Change front axle fluid (4X4). X
Inspect brake linings. X
Inspect engine air cleaner filter, replace if neces-
sary. X
Replace spark plugs. X
Inspect PCV valve, replace as necessary.** X
Inspect auto tension drive belt and replace, if re-
quired. X
368 SCHEDULE “B”
8
M
A I
N T
E
N A
N C E
S
C
H E
D
U L
E
S
Page 370 of 408
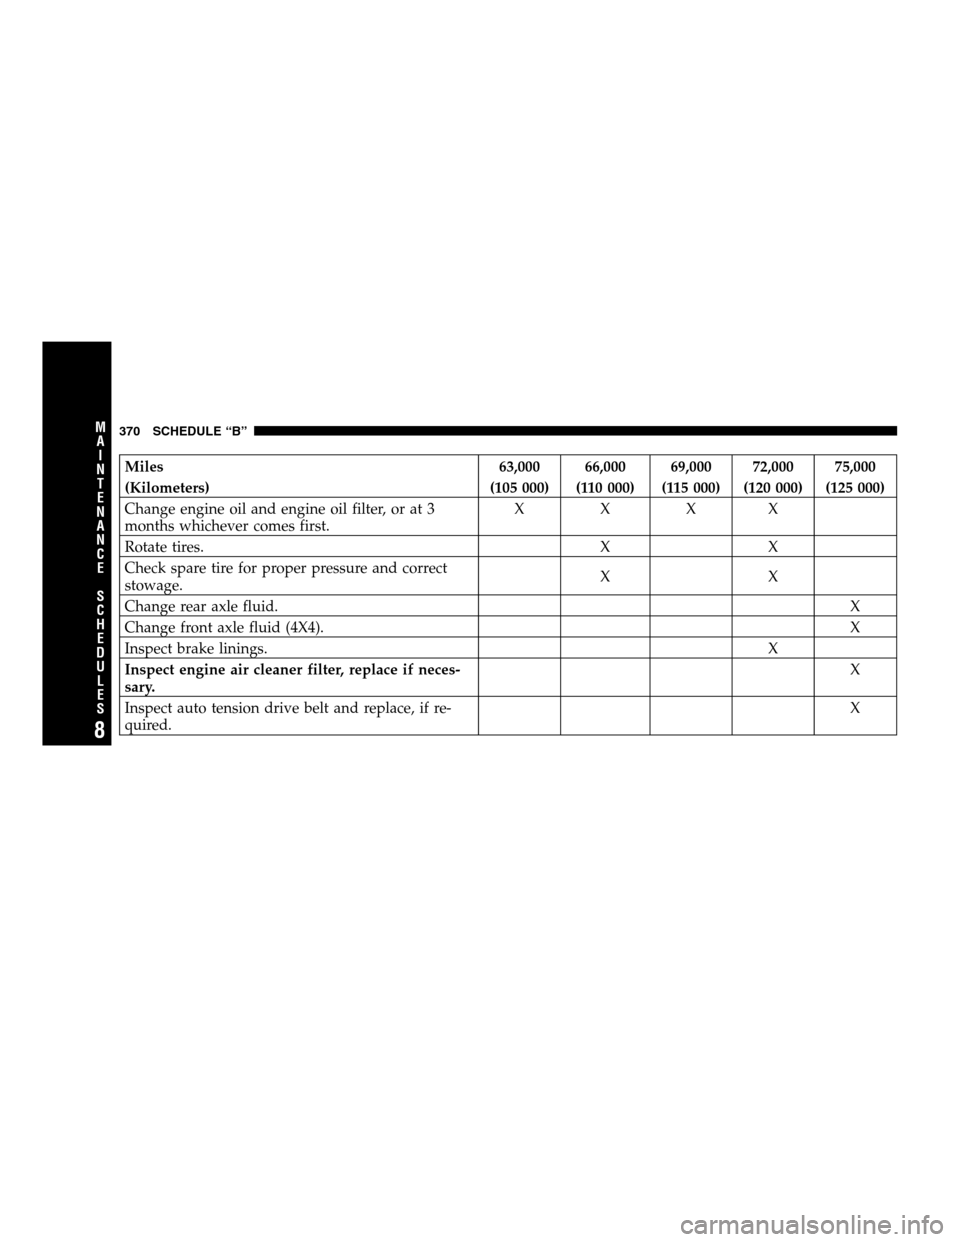
Miles 63,000 66,000 69,000 72,000 75,000
(Kilometers) (105 000) (110 000) (115 000) (120 000) (125 000)
Change engine oil and engine oil filter, or at 3
months whichever comes first. XXXX
Rotate tires. X X
Check spare tire for proper pressure and correct
stowage. XX
Change rear axle fluid. X
Change front axle fluid (4X4). X
Inspect brake linings. X
Inspect engine air cleaner filter, replace if neces-
sary. X
Inspect auto tension drive belt and replace, if re-
quired. X
370 SCHEDULE “B”
8
M
A I
N T
E
N A
N C E
S
C
H E
D
U L
E
S
Page 371 of 408

Miles 78,000 81,000 84,000 87,000 90,000
(Kilometers ) (130 000) (135 000) (140 000) (145 000) (150 000)
Change engine oil and engine oil filter, or at 3
months whichever comes first. X X XXX
Rotate tires. X X X
Check spare tire for proper pressure and correct
stowage. XXX
Change rear axle fluid. X
Change front axle fluid (4X4). X
Check transfer case fluid level (4X4). X
Inspect brake linings. X
Inspect engine air cleaner filter, replace if neces-
sary. X
Replace spark plugs. X
Inspect PCV valve, replace as necessary.** X
Inspect auto tension drive belt and replace, if re-
quired. X
SCHEDULE “B” 371
8
M
A I
N T
E
N A
N C E
S
C
H E
D
U L
E
S