airbag off DODGE DAKOTA 2008 3.G Owners Manual
[x] Cancel search | Manufacturer: DODGE, Model Year: 2008, Model line: DAKOTA, Model: DODGE DAKOTA 2008 3.GPages: 426, PDF Size: 6.39 MB
Page 49 of 426

How the Airbag System Works
²
TheOccupant Restraint Controller (ORC)determines
if a frontal collision is severe enough to require the
airbags to inflate. The front airbag inflators are de-
signed to provide different rates of airbag inflation
from direction provided by the ORC. The ORC will not
detect roll over.
The ORC also monitors the readiness of the electronic
parts of the system whenever the ignition switch is in
the START or RUN positions. These include all of the
items listed above except the steering wheel and
column, and knee bolsters. If the key is in the OFF
position, in the ACC position, or not in the ignition,
the airbags are not on and will not inflate.
During a moderate-to-severe rear impact the ORC may
deploy the seat belt pretensioners alone.Also, the ORC turns on the AIRBAG warning
light in the instrument cluster for 6 to 8 seconds
for a self-check when the ignition is first turned
on. After the self-check, the AIRBAG warning
light will turn off. If the ORC detects a malfunction in any
part of the system, it turns on the AIRBAG warning light
either momentarily or continuously. A single chime will
sound if the light comes on again after initial start up.
WARNING!
Ignoring the AIRBAG warning light in your instru-
ment panel could mean you won't have the airbags to
protect you in a collision. If the light does not come
on, stays on after you start the vehicle, or if it comes
on as you drive, have the airbag system checked right
away.
THINGS TO KNOW BEFORE STARTING YOUR VEHICLE 49
2
Page 53 of 426

NOTE:Perchlorate Material ± special handling may ap-
ply, See www.dtsc.ca.gov/hazardouswaste/perchlorate.
Enhanced Accident Response System
If the airbags deploy after an impact and the electrical
system remains functional, vehicles equipped with
power door locks will unlock automatically. In addition,
approximately 5 seconds after the vehicle has stopped
moving, the interior lights will light until the ignition
switch is turned off.
Airbag Light
You will want to have the airbags ready to
inflate for your protection in an impact. While
the airbag system is designed to be mainte-
nance free, if any of the following occurs, have
an authorized dealer service the system promptly:
²The airbag light does not come on or flickers during
the 6 to 8 seconds when the ignition switch is first
turned on.
²The light remains on or flickers after the 6 to 8 second
interval.
²The light flickers or comes on and remains on while
driving.
NOTE:If the speedometer, tachometer or any engine
related gauges are not working, the airbag control mod-
ule may also be disabled. The airbags may not be ready
to inflate for your protection. Promptly check the fuse
block for blown fuses. Refer to the label located on the
inside of the fuse block cover for the proper airbag fuses.
See your dealer if the fuse is good.
Event Data Recorder (EDR)
In the event of an accident, your vehicle is designed to
record up to 5-seconds of specific vehicle data parameters
(see the following list) in an event data recorder prior to
the moment of airbag deployment, and up to a quarter
second of high-speed deceleration data during and/or
THINGS TO KNOW BEFORE STARTING YOUR VEHICLE 53
2
Page 54 of 426

after airbag deployment. EDR data are ONLY recorded if
an airbag deploys, and are otherwise unavailable.
NOTE:Under certain circumstances, EDR data may not
be recorded (e.g., loss of battery power).
In conjunction with other data gathered during a com-
plete accident investigation, the electronic data may be
used by DaimlerChrysler Corporation and others to learn
more about the possible causes of crashes and associated
injuries in order to assess and improve vehicle perfor-
mance. In addition to crash investigations initiated by
DaimlerChrysler Corporation, such investigations may
be requested by customers, insurance carriers, govern-
ment officials, and professional crash researchers, such as
those associated with universities, and with hospital and
insurance organizations.
In the event that an investigation is undertaken by
DaimlerChrysler Corporation (regardless of initiative),
the company or its designated representative will firstobtain permission of the appropriate custodial entity for
the vehicle (usually the vehicle owner or lessee) before
accessing the electronic data stored, unless ordered to
download data by a court with legal jurisdiction (i.e.,
pursuant to a warrant). A copy of the data will be
provided to the custodial entity upon request. General
data that does not identify particular vehicles or crashes
may be released for incorporation in aggregate crash
databases, such as those maintained by the US govern-
ment and various states. Data of a potentially sensitive
nature, such as would identify a particular driver, ve-
hicle, or crash, will be treated confidentially. Confidential
data will not be disclosed by DaimlerChrysler
Corporation to any third party except when:
1. Used for research purposes, such as to match data
with a particular crash record in an aggregate database,
provided confidentiality of personal data is thereafter
preserved
54 THINGS TO KNOW BEFORE STARTING YOUR VEHICLE
Page 56 of 426

There are different sizes and types of restraints for
children from newborn size to the child almost large
enough for an adult seat belt. Always check the child seat
owner's manual to ensure you have the right seat for
your child. Use the restraint that is correct for your child:
Infants and Small Children
²
Safety experts recommend that children ride
rearward-facing in the vehicle until they are at least
one year old and weigh at least 20 lbs (9 kg). Two types
of child restraints can be used rearward facing: infant
carriers and9convertible9child seats.
²The infant carrier is only used rearward-facing in the
vehicle. It is recommended for children who weigh up
to about 20 lbs (9 kg).9Convertible9child seats can be
used either rearward-facing or forward-facing in the
vehicle. Convertible child seats often have a higher
weight limit in the rearward-facing direction than
infant carriers do, so they can be used rearward-facingby children who weigh more than 20 lbs (9 kg) but are
less than one year old. Both types of child restraints are
held in the vehicle by the seatbelt or the LATCH child
restraint anchorage system. (See the LATCH - Child
Seat Anchorage System section.)
²Rearward-facing child seats mustNEVERbe used in
the front seat of a vehicle with a front passenger airbag
that does not have a switch to turn the airbag Off. An
airbag deployment could cause severe injury or death
to infants in this position.
Older Children and Child Restraints
²Children who weigh more than 20 lbs (9 kg) and who
are older than one year can ride forward-facing in the
vehicle. Forward-facing child seats and convertible
child seats used in the forward-facing direction are for
children who weigh 20 to 40 lbs (9 to 18 kg), and are
older than one year old. These child seats are also held
56 THINGS TO KNOW BEFORE STARTING YOUR VEHICLE
Page 58 of 426

WARNING!
²Improper installation can lead to failure of an
infant or child restraint. It could come loose in a
collision. The child could be badly injured or
killed. Follow the manufacturer's directions ex-
actly when installing an infant or child restraint.
²A rearward facing infant restraint should only be
used in a rear seat of a vehicle that does not have
an airbag off switch. A rearward facing infant
restraint in the front seat may be struck by a
deploying passenger airbag which may cause se-
vere or fatal to the infant.
Here are some tips for getting the most out of your child
restraint:
²Before buying any restraint system, make sure that it
has a label certifying that it meets all applicable SafetyStandards. The manufacturer recommends that you
try a child restraint in the vehicle seats where you will
use it before you buy it.
²The restraint must be appropriate for your child's
weight and height. Check the label on the restraint for
weight and height limits.
²Carefully follow the instructions that come with the
restraint. If you install the restraint improperly, it may
not work when you need it.
²The Extended Cab first and Club/Crew Cab second
row outside seating positions have cinching latch
plates. These are designed to keep the lap portion tight
around the child restraint so that it is not necessary to
use a locking clip. If the seat belt has a cinching latch
plate, pulling up on the shoulder portion of the
lap/shoulder belt will tighten the belt. The cinching
latch plate will keep the belt tight, however, any seat
58 THINGS TO KNOW BEFORE STARTING YOUR VEHICLE
Page 159 of 426

left/right turn signal is left on with the engine RPM
vehicle speed greater than 15 mph (24 km/h) for more
than one mile.
4. Low Fuel Warning Light
This indicator lights when the fuel gauge reads 1/8
of a tank or less. There is a pointer on the side of
this symbol that indicates the side that your fuel
filler door is located.
5. High Beam Indicator
Indicates that headlights are on high beam.
6. Seat Belt Reminder Light
This light comes on for several seconds after the
ignition is turned ON as a reminder to ªbuckle
up.º This light will remain on as long as the seat
belt remains unbuckled. If this light flashes, it indicates a
fault in the airbag system. Have the system checked by
an authorized dealer.7. Coolant Temperature Light
This light warns of an overheated engine condi-
tion. For a bulb check, this light will come on
momentarily when the ignition is turned On. If the
light turns on while driving, stop the vehicle, shift into N
(Neutral) and increase the engine speed for 2 to 3
minutes. If the temperature reading does not return to
normal, seek authorized service immediately.
CAUTION!
Driving with a hot engine cooling system could
damage your vehicle. If the temperature light is on,
safely pull over and stop the vehicle. Idle the vehicle
in neutral with the air conditioner turned off until
the light turns off. If the light remains on, turn the
engine off immediately, and call for service.
INSTRUMENT PANEL AND CONTROLS 159
4
Page 369 of 426
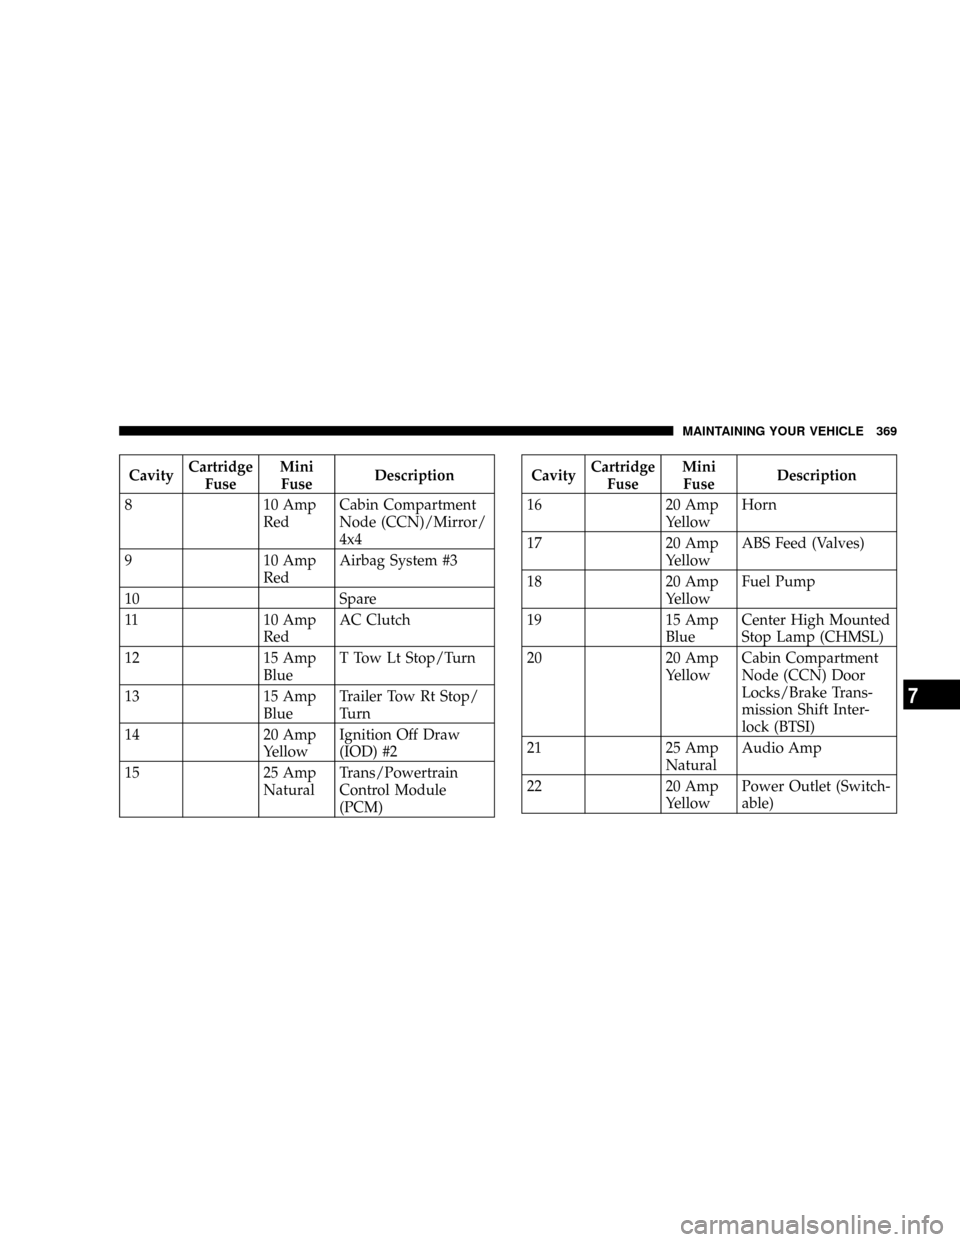
CavityCartridge
FuseMini
FuseDescription
8 10 Amp
RedCabin Compartment
Node (CCN)/Mirror/
4x4
9 10 Amp
RedAirbag System #3
10 Spare
11 10 Amp
RedAC Clutch
12 15 Amp
BlueT Tow Lt Stop/Turn
13 15 Amp
BlueTrailer Tow Rt Stop/
Turn
14 20 Amp
YellowIgnition Off Draw
(IOD) #2
15 25 Amp
NaturalTrans/Powertrain
Control Module
(PCM)CavityCartridge
FuseMini
FuseDescription
16 20 Amp
YellowHorn
17 20 Amp
YellowABS Feed (Valves)
18 20 Amp
YellowFuel Pump
19 15 Amp
BlueCenter High Mounted
Stop Lamp (CHMSL)
20 20 Amp
YellowCabin Compartment
Node (CCN) Door
Locks/Brake Trans-
mission Shift Inter-
lock (BTSI)
21 25 Amp
NaturalAudio Amp
22 20 Amp
YellowPower Outlet (Switch-
able)
MAINTAINING YOUR VEHICLE 369
7
Page 372 of 426

CavityCartridge
FuseMini
FuseDescription
55 10 Amp
RedCabin Compartment
Node (CCN) Acces-
sory (ACC) Feed
56 10 Amp
RedHeated Seats
57 20 Amp
YellowAirbag System # 2
58 20 Amp
YellowHeated Seats
59 10 Amp
RedHVAC Module
60 10 Amp
RedABS Module
61 20 Amp
YellowFront Control Module
(FCM) 3 (Reverse
Lamps)CAUTION!
When replacing a blown fuse, it is important to use
only a fuse having the correct amperage rating. The
use of a fuse with a rating other than indicated may
result in a dangerous electrical system overload. If a
properly rated fuse continues to blow, it suggests a
problem in the circuit that must be corrected.
NOTE:If you are leaving your vehicle dormant for
longer than 21 days you may want to take steps to protect
your battery. You may do this by disconnecting the
battery or by disconnecting the two ignition-off draw
(I.O.D.) fuses located in the Auxiliary Power Distribution
Center (PDC) located in the engine compartment. The
I.O.D. cavities include a snap-in retainer that allows the
372 MAINTAINING YOUR VEHICLE
Page 426 of 426
INTRODUCTION INTRODUCTION HOW TO USE THIS MANUAL WARNINGS AND CAUTIONS VEHICLE IDENTIFICATION NUMBER VEHICLE MODIFICATIONS/ALTERATIONS THINGS TO KNOW BEFORE STARTING YOUR VEHICLE A WORD ABOUT YOUR KEYS
Ignition Key RemovalLocking Doors With The KeySENTRY KEY Replacement KeysCustomer Key ProgrammingGeneral InformationSTEERING WHEEL LOCK - IF EQUIPPED If You Wish To Manually Lock The Steering WheelTo Release The Steering Wheel LockAutomatic
Transmission Ignition Interlock SystemSECURITY ALARM SYSTEM - IF EQUIPPED To Set the AlarmTo Disarm the SystemILLUMINATED ENTRY Vehicles EquippedWith Power Door LocksREMOTE KEYLESS ENTRY To unlock the doorsTo lock the doorsUsing the Panic
AlarmGeneral InformationProgramming Additional TransmittersBattery ReplacementREMOTE STARTING SYSTEM - IF EQUIPPED DOOR LOCKS Manual Door LocksPower Door LocksChild Protection Door LockWINDOWS Power Windows Auto Down (Drivers Side Only)
Window Lockout SwitchWIND BUFFETINGOCCUPANT RESTRAINTS Lap/Shoulder BeltsAdjustable Upper Shoulder Belt AnchorageAutomatic Locking Retractors (ALR) Mode - If EquippedCenter Lap BeltsSeat Belt PretensionersEnhanced Driver Seat Belt Reminder
System (BeltAlert) Seat Belts and Pregnant WomenSeat Belt ExtenderDriver And Right Front Passenger Supplemental Restraint System (SRS) - Airbags Event Data Recorder (EDR)Child RestraintENGINE BREAK-IN RECOMMENDATIONS SAFETY TIPS Exhaust System
Safety Checks You Should Make Inside The VehicleSafety Checks You Should Make Outside The VehicleUNDERSTANDING THE FEATURES OF YOUR VEHICLE MIRRORSInside Day/Night MirrorOutside MirrorsExterior Mirrors Folding Feature - If EquippedElectric
Remote-Control MirrorsHANDS-FREE COMMUNICATION (UConnect) - IF EQUIPPED OperationPhone Call FeaturesUConnect System FeaturesAdvanced Phone ConnectivityThings You Should Know About Your UConnect SystemGeneral InformationSEATS Manual Seat
AdjustmentFront Seats Manual Seat ReclinersManual Lumbar Support Adjustment - If EquippedAdjustable Head Restraints - Front Seating Positions6 -Way Power Seat Adjuster - Drivers Side OnlyExtended Cab/Crew Cab Rear SeatHeated Seats - If EquippedTO OPEN
AND CLOSE THE HOOD LIGHTS Interior Lights Battery SaverHeadlamp DelayHeadlights, Parking Lights, Panel LightsDaytime Running Lights (Canada - Standard and US Fleet Vehicles - If Equipped)Lights-on ReminderFog Lights - If EquippedCARGO Light - If Equipped
Multifunction Control LeverWINDSHIELD WIPERS AND WASHERS Windshield Wipers Windshield WashersTILT STEERING COLUMN ELECTRONIC SPEED CONTROL - IFEQUIPPED To ActivateTo Set At A Desired SpeedTo DeactivateTo Resume SpeedTo Vary The
Speed SettingTo Accelerate For PassingOVERHEAD CONSOLE Courtesy/Reading LightsCOMPASS/TEMPERATURE MINI-TRIP COMPUTER US/M ButtonRESET Button Global ResetStep Button Average Fuel Economy (AVG ECO)Distance To Empty (DTE)Trip Odometer
(ODO)Elapsed Time (ET)C/T Button Compass/Temperature DisplayAutomatic Compass CalibrationManual Compass CalibrationTo Put Into a CalibrationModeOutside TemperatureGARAGE DOOR OPENER - IF EQUIPPED Programming HomeLinkGate Operator/Canadian
ProgrammingUsing HomeLinkReprogramming a Single HomeLink ButtonSecurityTroubleshooting TipsGeneral InformationELECTRICAL POWER OUTLETS Electrical Outlet Use With Engine OFF
(Battery Fed Configuration)FLOOR CONSOLE - IF EQUIPPED Floor Console FeaturesCENTER STORAGE COMPARTMENT - IF EQUIPPED CUP HOLDERS REAR STORAGE - IFEQUIPPED Rear Convenience Storage CratesPlastic Grocery Bag Retainers REAR
WINDOW FEATURES Rear Window Defroster - If EquippedSliding Rear Window - If Equipped TAILGATE Tailgate RemovalTwo Position Tailgate / Upper Load PlatformREAR CARGO AREA UTILITY RAILS SLIDE-IN CAMPERS Camper ApplicationsGeneral Information
Carbon Monoxide Warning Vehicles Equipped With A Cap or Slide-In CampersINSTRUMENT PANEL AND CONTROLS INSTRUMENTS AND CONTROLS INSTRUMENT CLUSTERINSTRUMENT CLUSTER DESCRIPTION ELECTRONIC DIGITAL CLOCK Clock Setting
ProcedureRADIO GENERAL INFORMATION Radio Broadcast SignalsTwo Types of SignalsElectrical DisturbancesAM ReceptionFM ReceptionSALES CODE RES -AM/FM STEREO RADIO WITH CD PLAYER (MP3 AUX JACK) Operating Instructions - Radio ModeOperation
Instructions - CD MODE for CD and MP3 Audio PlayNotes On Playing MP3 FilesLIST Button (CD Mode for MP3 Play)INFO Button (CD Mode for MP3 Play)SALES CODE REQ - AM/FM STEREO RADIO AND 6-DISC CD/DVD CHANGER (MP3/WMA AUX JACK) Operating
Instructions - Radio ModeOperation Instructions - (DISC MODE for CD and MP3/WMA Audio Play, DVD-VIDEO)Notes On Playing MP3/WMA FilesLIST Button (DISC Mode for MP3/WMA Play)INFO Button (DISC Mode for MP3/WMA Play)SALES CODE RER - MULTIMEDIA
SYSTEM - IF EQUIPPED Operating Instructions - Satellite RadioOperating Instructions - Hands-Free Communication (UConnect) (If Equipped)Clock Setting ProcedureSATELLITE RADIO (RSC) - IF EQUIPPED (RER/REQ/REN RADIOS ONLY) System ActivationElectronic
Serial Number/Sirius Identification Number (ENS/SID)Selecting Satellite ModeSatellite AntennaReception QualityOperating Instructions - Satellite ModeOperating Instructions - Hands Free Phone (If Equipped)Operating Instructions - Video Entertainment System (VES) (If
Equipped)REMOTE SOUND SYSTEM CONTROLS - IF EQUIPPED Radio OperationCD PlayerCOMPACT DISC MAINTENANCE SOUND BOX OPERATION RADIO OPERATION AND CELLULAR PHONES CLIMATE CONTROLS Air Conditioning And Heater Operating
TipsOperation Tips Chart STARTING AND OPERATING STARTING PROCEDURES Manual TransmissionAutomatic TransmissionNormal StartingIf Engine Fails To StartAfter StartingEngine Block Heater - If Equipped AUTOMATIC TRANSMISSION Brake/Transmission
Interlock SystemAutomatic TransmissionMANUAL TRANSMISSION Recommended Shift SpeedsDownshiftingFOUR-WHEEL DRIVE OPERATION NV233/243 GII Transfer Case Operating Information/PrecautionsShifting Procedure - NV233/243 Transfer Case NV 244
Generation II Transfer Case Operating Information / PrecautionsShifting Procedure - NV 244 Generation II Transfer Case LIMITED-SLIP REAR AXLE DIFFERENTIAL - IF EQUIPPED DRIVING ON SLIPPERY SURFACES DRIVING THROUGH WATER Flowing/Rising Water
Shallow Standing WaterPARKING BRAKE BRAKE SYSTEM Rear Wheel Anti-Lock Brake System - If EquippedFour-Wheel Anti-Lock Brake SystemPOWER STEERING TIRE SAFETY INFORMATION Tire Markings Tire Identification Number (TIN)Tire Loading and Tire
PressureTIRES - GENERAL INFORMATION Tire PressureTire Inflation PressuresRadial-Ply TiresCompact Spare Tire - If EquippedLimited Use Spare - If EquippedTire SpinningTread Wear IndicatorsLife of TireReplacement TiresAlignment And BalanceSUPPLEMENTAL
TIRE PRESSURE
INFORMATION - IF EQUIPPED TIRE CHAINS SNOW TIRES TIRE ROTATION RECOMMENDATIONS TIRE PRESSURE MONITOR SYSTEM (TPMS) - IF EQUIPPED Base System - If EquippedGeneral InformationFUEL REQUIREMENTS Reformulated Gasoline
Gasoline/Oxygenate BlendsMMT In GasolineMaterials Added To FuelFuel System CautionsCarbon Monoxide WarningsADDING FUEL Fuel Filler Cap (Gas Cap)FLEXIBLE FUEL - IF EQUIPPED E-85 General InformationETHANOL FUEL (E-85)Fuel RequirementsSelection
Of Engine Oil For Flexible Fuel Vehicles (E-85) and Gasoline VehiclesStartingCruising RangeReplacement PartsMaintenanceVEHICLE LOADING Certification LabelCurb WeightLoadingTRAILER TOWING Common Towing DefinitionsTrailer Hitch ClassificationTrailer Towing
Weights
(Maximum Trailer Weight Ratings)Trailer and Tongue WeightTowing RequirementsTowing TipsSNOWPLOW Snowplow UsageRECREATIONAL TOWING (BEHIND MOTORHOME, ETC.) Recreational Towing 2WD ModelsRecreational Towing 4WD ModelsEQUIPMENT
IDENTIFICATION PLATE WHAT TO DO IN EMERGENCIES HAZARD WARNING FLASHER ADDING FUEL CHANGING A FLAT TIRE Jack LocationRemoving The Spare TireTire Changing ProcedureJUMP STARTING FREEING A STUCK VEHICLE EMERGENCY TOW
HOOKS - IF EQUIPPED TOWING A DISABLED VEHICLE Four-Wheel Drive VehiclesTwo-Wheel Drive VehiclesMAINTAINING YOUR VEHICLE 3.7L ENGINE COMPARTMENT 4.7L ENGINE COMPARTMENT ONBOARD DIAGNOSTIC SYSTEM - OBD II Loose Fuel Filler
Cap MessageEMISSIONS INSPECTION AND MAINTENANCE PROGRAMS REPLACEMENT PARTS DEALER SERVICE MAINTENANCE PROCEDURES Engine OilEngine Oil FilterDrive Belts - Check Condition and TensionSpark PlugsEngine Air Cleaner FilterEngine
Fuel FilterCatalytic ConverterMaintenance Free BatteryAir Conditioner MaintenancePower Steering - Fluid CheckFront Suspension Ball JointsDrive Shaft Constant Velocity JointsBody LubricationWindshield Wiper BladesWindshield WashersExhaust SystemCooling System
Emission Related ComponentsBrake SystemClutch Hydraulic SystemManual TransmissionAutomatic TransmissionTransfer CaseAxlesAppearance Careand Protection from CorrosionFUSES (POWER DISTRIBUTION CENTER) VEHICLE STORAGE REPLACEMENT
LIGHT BULBS BULB REPLACEMENT Headlight (Halogen)/Front Park and Turn LightsRear Side Marker, Taillamps/Stoplamp, and Turn Signal Bulbs - ReplacementCenter High-Mounted Stoplamp And Cargo LampLicense LampsFog LampsFLUIDS AND CAPACITIES
FLUIDS, LUBRICANTS AND GENUINE PARTS EngineChassisMAINTENANCE SCHEDULES EMISSION CONTROL SYSTEM MAINTENANCE MAINTENANCE SCHEDULE Required Maintenance IntervalsIF YOU NEED CONSUMER ASSISTANCE SUGGESTIONS FOR
OBTAINING SERVICE FOR YOUR VEHICLE Prepare For The AppointmentPrepare A ListBe Reasonable With RequestsIF YOU NEED ASSISTANCE WARRANTY INFORMATION (U.S. Vehicles Only) MOPAR PARTS REPORTING SAFETY DEFECTS In Canada
PUBLICATION ORDER FORMS DEPARTMENT OF TRANSPORTATION UNIFORM TIRE QUALITY GRADES TreadwearTraction GradesTemperature GradesINDEX