parking brake DODGE DAKOTA 2009 3.G Owners Manual
[x] Cancel search | Manufacturer: DODGE, Model Year: 2009, Model line: DAKOTA, Model: DODGE DAKOTA 2009 3.GPages: 449, PDF Size: 10.96 MB
Page 59 of 449
court with legal jurisdiction (i.e., pursuant to a warrant).
A copy of the data will be provided to the custodial entity
upon request. General data, that does not identify par-
ticular vehicles or crashes, may be released for incorpo-
ration in aggregate crash databases, such as those main-
tained by the U.S. government and various states. Data of
a potentially sensitive nature, such as would identify a
particular driver, vehicle, or crash, will be treated confi-
dentially. Confidential data will not be disclosed by
Chrylser LLC to any third party, except when:
1. Used for research purposes, such as to match data
with a particular crash record in an aggregate database,
provided confidentiality of personal data is thereafter
preserved
2. Used in defense of litigation involving a Chrylser LLC
product
3. Requested by police under a legal warrant4. Otherwise required by law.
Data Parameters that May Be Recorded:
²Diagnostic trouble code(s) and warning lamp status
for electronically-controlled safety systems, including
the airbag system
²9Time9of airbag deployment (in terms of ignition
cycles and vehicle mileage)
²Airbag deployment level (if applicable)
²Impact acceleration and angle
²Seat belt status
²Brake status (service and parking brakes)
²Accelerator status (including vehicle speed)
²Engine control status (including engine speed)
²Transmission gear selection
THINGS TO KNOW BEFORE STARTING YOUR VEHICLE 57
2
Page 128 of 449
Plastic is not as scratch resistant as glass and therefore
different lens cleaning procedures must be followed.
To minimize the possibility of scratching the lenses and
reducing light output, avoid wiping with a dry cloth. To
remove road dirt, wash with a mild soap solution fol-
lowed by rinsing.
Do not use abrasive cleaning components, solvents, steel
wool or other abrasive materials to clean the lenses.
Daytime Running Lights (Canada ± Standard and
U.S. Fleet Vehicles) Ð If Equipped
The headlights on your vehicle will illuminate when the
engine is started, the transmission is out of the PARK
position and the parking brake is released. This provides
a constant9lights on9condition until the ignition is
turned OFF. The lights illuminate at less than normal
intensity. If the parking brake is applied or the transmis-
sion is in the PARK position, the Daytime Running Lights
(DRL) will turn off.
Lights-on Reminder
If the headlights, parking lights, courtesy lights or cargo
lights are left on, after the ignition is turned OFF, a chime
will sound when the driver's door is opened.
Fog Lights Ð If Equipped
The Fog Lights are turned on by placing the
headlight rotary control in the parking light or
headlight position and pushing on the headlight
rotary control. The fog lights will operate only when the
parking lights are on, or when the vehicle headlights are
on low beam. An indicator light located in the instrument
cluster will illuminate when the fog lights are on. The fog
lights will turn off when the switch is pushed a second
time, also when the headlight switch is rotated to the off
position, or the high beam is selected.
Cargo Light Ð If Equipped
The cargo lights are turned on by pressing on the
CARGO button. The cargo lights will also turn on for
126 UNDERSTANDING THE FEATURES OF YOUR VEHICLE
Page 168 of 449
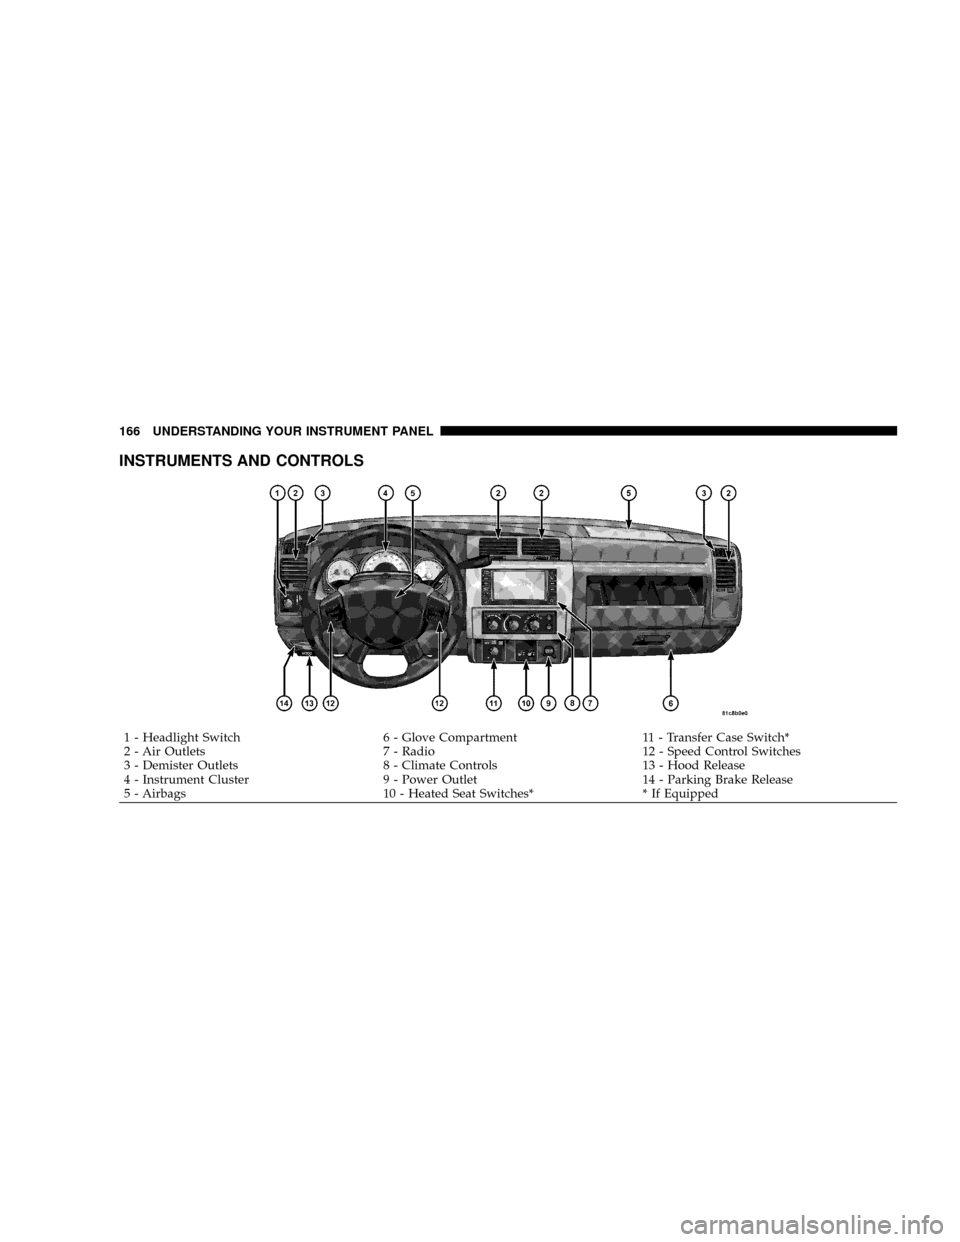
INSTRUMENTS AND CONTROLS
1 - Headlight Switch 6 - Glove Compartment 11 - Transfer Case Switch*
2 - Air Outlets 7 - Radio 12 - Speed Control Switches
3 - Demister Outlets 8 - Climate Controls 13 - Hood Release
4 - Instrument Cluster 9 - Power Outlet 14 - Parking Brake Release
5 - Airbags 10 - Heated Seat Switches* * If Equipped 166 UNDERSTANDING YOUR INSTRUMENT PANEL
Page 176 of 449
20. Brake System Warning Light
This light monitors various brake functions,
including brake fluid level and parking brake
application. If the brake light turns on, it may
indicate that the parking brake is applied, that
the brake fluid level is low, or that there is a problem with
the anti-lock brake system reservoir.
If the light remains on when the parking brake has been
disengaged, and the fluid level is at the full mark on the
master cylinder reservoir, it indicates a possible brake
hydraulic system malfunction or a problem with the
Brake Booster has been detected by the Anti-Lock Brake
System (ABS) / Electronic Stability Program (ESP) sys-
tem. In this case, the light will remain on until the
condition has been corrected. If the problem is related to
the brake booster, the ABS pump will run when applying
the brake and a brake pedal pulsation may be felt during
each stop.The dual brake system provides a reserve braking capac-
ity in the event of a failure to a portion of the hydraulic
system. A leak in either half of the dual brake system is
indicated by the Brake Warning Light which will turn on
when the brake fluid level in the master cylinder has
dropped below a specified level.
The light will remain on until the cause is corrected.
NOTE:The light may flash momentarily during sharp
cornering maneuvers which change fluid level condi-
tions. The vehicle should have service performed, and
the brake fluid level checked.
If brake failure is indicated, immediate repair is neces-
sary.
174 UNDERSTANDING YOUR INSTRUMENT PANEL
Page 177 of 449
WARNING!
Driving a vehicle with the red brake light on is
dangerous. Part of the brake system may have failed.
It will take longer to stop the vehicle. You could have
an accident. Have the vehicle checked immediately.
Vehicles equipped with the Anti-Lock Brake System
(ABS), are also equipped with Electronic Brake Force
Distribution (EBD). In the event of an EBD failure, the
Brake Warning Light will turn on along with the ABS
Light. Immediate repair to the ABS system is required.
Operation of the Brake Warning Light can be checked by
turning the ignition switch from the OFF position to the
ON position. The light should illuminate for approxi-
mately two seconds. The light should then turn off unless
the parking brake is applied or a brake fault is detected.
If the light does not illuminate, have the light inspected
by an authorized dealer.The light also will turn on when the parking brake is
applied with the ignition switch in the ON position.
NOTE:This light shows only that the parking brake is
applied. It does not show the degree of brake application.
21. Malfunction Indicator Light (MIL)
The Malfunction Indicator Light (MIL) is part of
an Onboard Diagnostic system (OBD II) that
monitors the emissions and engine control sys-
tem. If the vehicle is ready for emissions testing, the light
will come on when the ignition is first turned ON and
remain on, as a bulb check, until the engine is started. If
the vehicle is not ready for emissions testing, the light
will come on when the ignition is first turned ON and
remain on for 15 seconds, then blink for 5 seconds, and
remain on until the vehicle is started. If the bulb does not
come on during starting, have the condition investigated
promptly.
UNDERSTANDING YOUR INSTRUMENT PANEL 175
4
Page 238 of 449
NNV233/243 GII Transfer Case Operating
Information/Precautions................ 251
NShifting Procedure - NV233/243 Transfer
Case.............................. 255
NNV 244 Generation II Transfer Case
Operating Information / Precautions....... 257
NShifting Procedure - NV 244 Generation II
Transfer Case....................... 261
mLimited-Slip Rear Axle Differential Ð If
Equipped............................ 262
mDriving On Slippery Surfaces............. 263
mDriving Through Water.................. 264
NFlowing/Rising Water................. 264
NShallow Standing Water................ 264
mPower Steering........................ 266NPower Steering Fluid Check............. 266
mParking Brake........................ 267
mBrake System......................... 269
NRear-Wheel Anti-Lock Brake System (ABS) ±
If Equipped......................... 269
NFour-Wheel Anti-Lock Brake System (ABS) . . 270
mTire Safety Information.................. 272
NTire Markings....................... 272
NTire Identification Number (TIN).......... 275
NTire Loading And Tire Pressure........... 276
mTires Ð General Information.............. 280
NTire Pressure........................ 280
NTire Inflation Pressures................. 281
236 STARTING AND OPERATING
Page 241 of 449
STARTING PROCEDURES
Before starting your vehicle, adjust your seat, adjust both
inside and outside mirrors, and fasten your seat belts.
WARNING!
Do not leave children or animals inside parked
vehicles in hot weather. Interior heat buildup may
cause serious injury or death.
Manual Transmission
Apply the parking brake, place the shift lever in NEU-
TRAL and depress clutch pedal to the floor before
starting the vehicle. This vehicle is equipped with a
clutch interlocking ignition system. It will not start unless
the clutch is pressed to the floor.
Automatic Transmission
Start the engine with the shift lever in NEUTRAL or
PARK position. Apply the brake before shifting to any
driving range.
NOTE: This vehicle is equipped with a transmission
shift interlocking system. The brake pedal must be
depressed to shift out of PARK.
Tip Start Feature
Turn the ignition switch to START position and release it
as soon as the starter engages. The starter motor will
continue to run, but will automatically disengage itself
when the engine is running. If the engine fails to start, the
starter will disengage automatically in 10 seconds. If this
occurs, turn the ignition switch to the LOCK position,
wait 10 to 15 seconds, then repeat the normal starting
procedure.
STARTING AND OPERATING 239
5
Page 244 of 449
WARNING!
Remember to disconnect the cord before driving.
Damage to the 110-115 Volt electrical cord could cause
electrocution.
MANUAL TRANSMISSION
WARNING!
You or others could be injured if you leave the
vehicle unattended without having the parking
brake fully applied. The parking brake should al-
ways be applied when the driver is not in the vehicle,
especially on an incline.
CAUTION!
Never drive with your foot resting on the clutch
pedal, or attempt to hold the vehicle on a hill with the
clutch pedal partially engaged, as this will cause
abnormal wear on the clutch.
NOTE:During cold weather, you may experience in-
creased effort in shifting until the transmission fluid
warms up. This is normal.
242 STARTING AND OPERATING
Page 248 of 449
CAUTION! (Continued)
²Before shifting into any gear, make sure your foot
is firmly on the brake pedal.
WARNING!
It is dangerous to move the shift lever out of PARK or
NEUTRAL if the engine speed is higher than idle
speed. If your foot is not firmly on the brake pedal,
the vehicle could accelerate quickly forward or in
reverse. You could lose control of the vehicle and hit
someone or something. Only shift into gear when the
engine is idling normally and when your right foot is
firmly on the brake pedal.
Brake/Transmission Interlock System
This system prevents you from moving the shift lever out
of PARK and into any gear unless the brake pedal is
pressed. This system is active only while the ignitionswitch is in the ON position. Always depress thebrake
pedal first,before moving the shift lever out of PARK.
Automatic Transmission
The electronic PRNDL on the instrument cluster indicates
the transmission gear selected. The shift lever is mounted
on the right side of the steering column. To drive, move
the shift lever from PARK or NEUTRAL to the desired
drive position. Pull the shift lever toward you when
shifting into REVERSE, SECOND, FIRST or PARK, or
when shifting out of PARK.
Gear Ranges
DO NOT race the engine when shifting from PARK or
NEUTRAL position into another gear range.
PARK
PARK supplements the parking brake by locking the
transmission. The engine can be started in this range.
Never use PARK while the vehicle is in motion. Apply
246 STARTING AND OPERATING
Page 249 of 449
the parking brake when leaving the vehicle in this range.
Always apply the parking brake first, then place the shift
lever into the PARK position.
WARNING!
²Never use PARK position on an automatic trans-
mission as a substitute for the parking brake.
Always apply the parking brake fully, when
parked, to guard against vehicle movement and
possible injury or damage.
²It is dangerous to move the shift lever out of PARK
or NEUTRAL if the engine speed is higher than
idle speed. If your foot is not firmly on the brake
pedal, the vehicle could accelerate quickly forward
or in reverse. You could lose control of the vehicle
and hit someone or something. Only shift into
gear when the engine is idling normally and when
your right foot is firmly on the brake pedal.REVERSE
Use the REVERSE range only after the vehicle has come
to a complete stop.
NEUTRAL
Shift to NEUTRAL when vehicle is standing for pro-
longed periods with engine running. Engine may be
started in this range. Set the parking brake if you must
leave the vehicle.
DRIVE
Use DRIVE for most city and highway driving.
2 (Second)
For driving slowly in heavy city traffic or on mountain
roads where more precise speed control is desirable, use
2nd gear. Use it also when climbing long grades, and for
engine braking when descending moderately steep
grades. To prevent excessive engine speed, do not exceed
45 mph (72 km/h) in this range.
STARTING AND OPERATING 247
5