DODGE DAKOTA 2010 3.G Owners Manual
Manufacturer: DODGE, Model Year: 2010, Model line: DAKOTA, Model: DODGE DAKOTA 2010 3.GPages: 450, PDF Size: 9.32 MB
Page 341 of 450
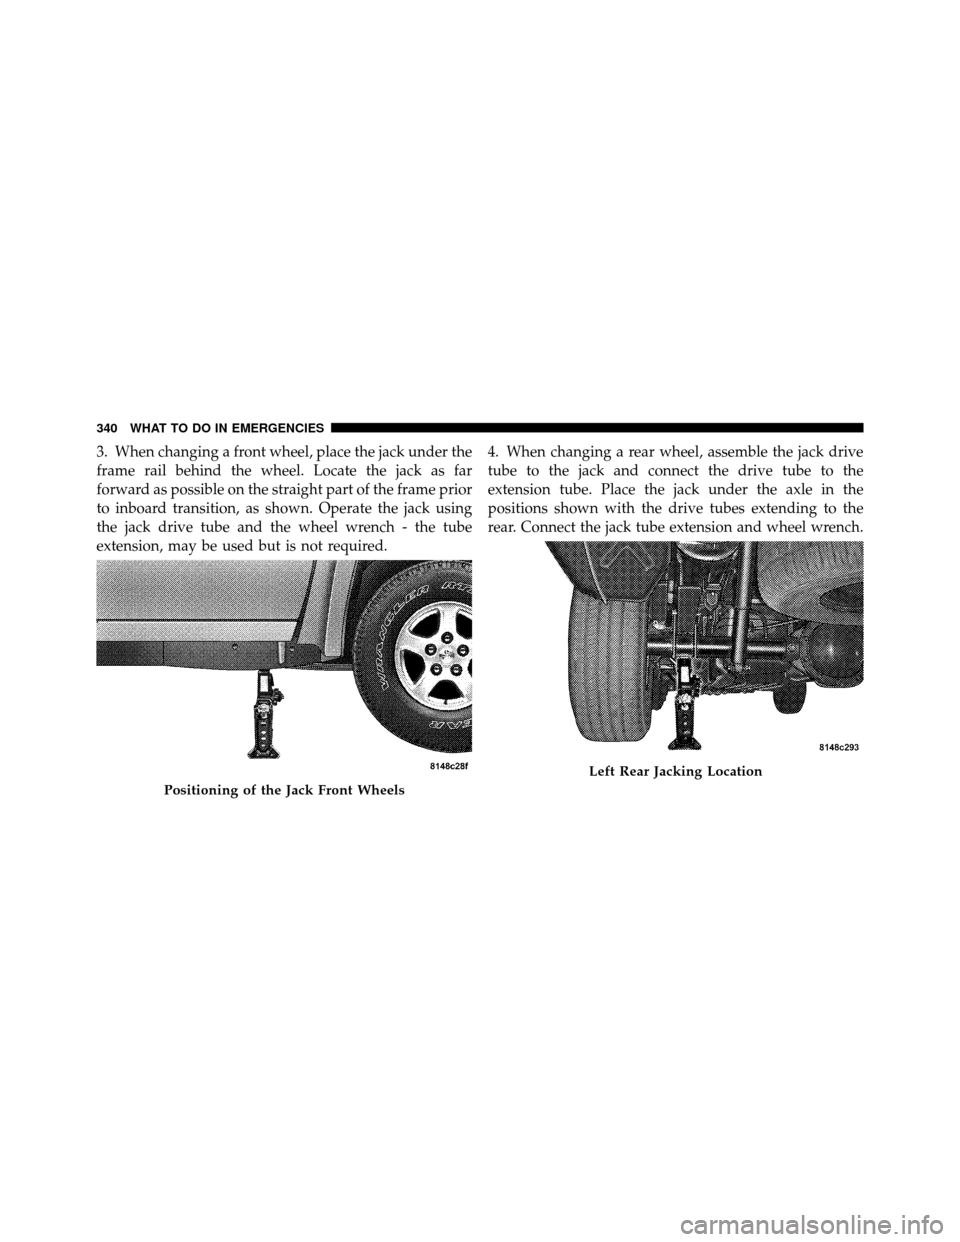
3. When changing a front wheel, place the jack under the
frame rail behind the wheel. Locate the jack as far
forward as possible on the straight part of the frame prior
to inboard transition, as shown. Operate the jack using
the jack drive tube and the wheel wrench - the tube
extension, may be used but is not required.4. When changing a rear wheel, assemble the jack drive
tube to the jack and connect the drive tube to the
extension tube. Place the jack under the axle in the
positions shown with the drive tubes extending to the
rear. Connect the jack tube extension and wheel wrench.
Positioning of the Jack Front Wheels
Left Rear Jacking Location
340 WHAT TO DO IN EMERGENCIES
Page 342 of 450
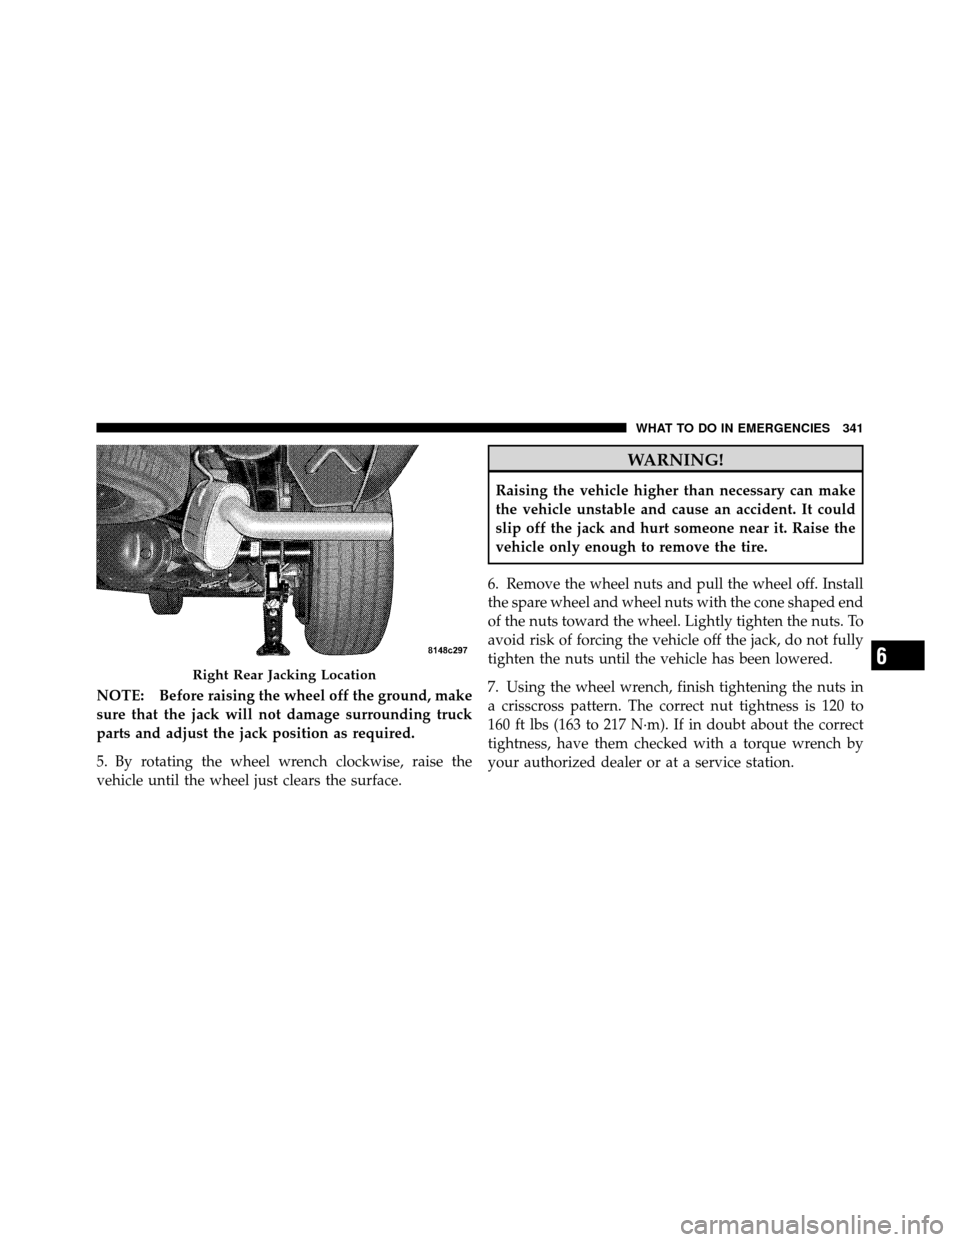
NOTE: Before raising the wheel off the ground, make
sure that the jack will not damage surrounding truck
parts and adjust the jack position as required.
5. By rotating the wheel wrench clockwise, raise the
vehicle until the wheel just clears the surface.
WARNING!
Raising the vehicle higher than necessary can make
the vehicle unstable and cause an accident. It could
slip off the jack and hurt someone near it. Raise the
vehicle only enough to remove the tire.
6. Remove the wheel nuts and pull the wheel off. Install
the spare wheel and wheel nuts with the cone shaped end
of the nuts toward the wheel. Lightly tighten the nuts. To
avoid risk of forcing the vehicle off the jack, do not fully
tighten the nuts until the vehicle has been lowered.
7. Using the wheel wrench, finish tightening the nuts in
a crisscross pattern. The correct nut tightness is 120 to
160 ft lbs (163 to 217 N·m). If in doubt about the correct
tightness, have them checked with a torque wrench by
your authorized dealer or at a service station.
Right Rear Jacking Location6
WHAT TO DO IN EMERGENCIES 341
Page 343 of 450
WARNING!
A loose tire or jack thrown forward in a collision or
hard stop could injure someone in the vehicle. Al-
ways stow the jack, tools and the extra tire and wheel
in the places provided.
8. Lower the jack to its fully closed position. Stow the
replaced tire, jack, and tools as previously described.
9. Adjust the tire pressure when possible.
NOTE: Do not oil wheel studs. For chrome wheels, do
not substitute with chrome plated wheel nuts.
WARNING!
Carefully follow these tire changing warnings to
help prevent personal injury or damage to your
vehicle:
(Continued)
WARNING! (Continued)
•Always park on a firm, level surface as far from
the edge of the roadway as possible before raising
the vehicle.
•Block the wheel diagonally opposite the wheel to
be raised.
•Apply the parking brake firmly before jacking.
•Never start the engine with the vehicle on a jack.
•Do not let anyone sit in the vehicle when it is on a
jack.
•Do not get under the vehicle when it is on a jack.
•Only use the jack in the positions indicated.
•If working on or near a roadway, be extremely
careful of motor traffic.
•To assure that spare tires, flat or inflated, are
securely stowed, spares must be stowed with the
valve stem facing the ground.
342 WHAT TO DO IN EMERGENCIES
Page 344 of 450
To Stow the Flat or Spare
Turn the wheel so that the valve stem is down. Slide the
wheel retainer through the center of the wheel and
position it properly across the wheel opening.
For convenience in checking the spare tire inflation, stow
with the valve stem toward the rear of the vehicle.
Rotate the winch mechanism until the wheel is drawn
into place against the underside of the vehicle. Continue
to rotate until you feel the winch mechanism slip or click
three times. It cannot be overtightened. Push against the
tire several times to be sure it is firmly in place.
NOTE:To Stow the Flat or Spare: Wheel retainer does
not fit through the center of the aluminum wheel. The tire
must be stored in a safe manner in the bed of the truck.
JUMP-STARTING PROCEDURES
If your vehicle has a discharged battery it can be jump-
started using a set of jumper cables and a battery in
another vehicle or by using a portable battery booster
pack. Jump-starting can be dangerous if done improperly
so please follow the procedures in this section carefully.
NOTE: When using a portable battery booster pack
follow the manufacturer ’s operating instructions and
precautions.
CAUTION!
Do not use a portable battery booster pack or any
other booster source with a system voltage greater
than 12 Volts or damage to the battery, starter motor,
alternator or electrical system may occur.
6
WHAT TO DO IN EMERGENCIES 343
Page 345 of 450
WARNING!
When temperatures are below the freezing point,
electrolyte in a discharged battery may freeze. Do not
attempt jump-starting because the battery could rup-
ture or explode and cause personal injury. Battery
temperature must be brought above freezing point
before attempting a jump-start.
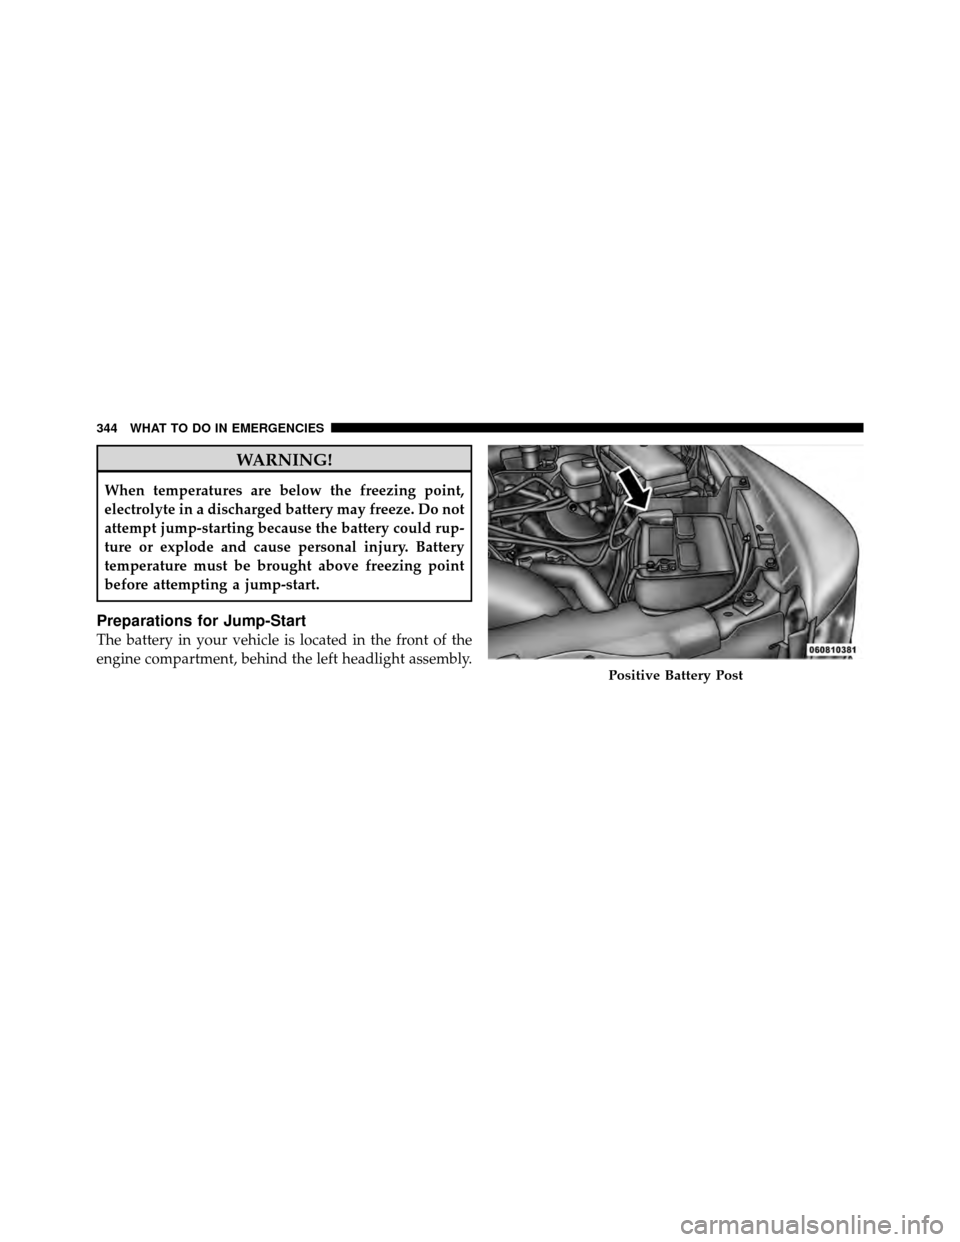
Preparations for Jump-Start
The battery in your vehicle is located in the front of the
engine compartment, behind the left headlight assembly.
Positive Battery Post
344 WHAT TO DO IN EMERGENCIES
Page 346 of 450
WARNING!
•Take care to avoid the radiator cooling fan when-
ever the hood is raised. It can start anytime the
ignition switch is on. You can be injured by
moving fan blades.
•Remove any metal jewelry such as watch bands or
bracelets that might make an inadvertent electrical
contact. You could be seriously injured.
•Batteries contain sulfuric acid that can burn your
skin or eyes and generate hydrogen gas which is
flammable and explosive. Keep open flames or
sparks away from the battery.
1. Set the parking brake, shift the automatic transmission
into PARK and turn the ignition to LOCK.
2. Turn off the heater, radio, and all unnecessary electri-
cal accessories. 3. If using a another vehicle to jump-start the battery,
park the vehicle within the jumper cables reach, set the
parking brake and make sure the ignition is OFF.
WARNING!
Do not allow vehicles to touch each other as this
could establish a ground connection and personal
injury could result.
Jump-Starting Procedure
WARNING!
Failure to follow this procedure could result in per-
sonal injury or property damage due to battery ex-
plosion.
6
WHAT TO DO IN EMERGENCIES 345
Page 347 of 450
CAUTION!
Failure to follow these procedures could result in
damage to the charging system of the booster vehicle
or the discharged vehicle.
1. Connect the positive (+)end of the jumper cable to the
positive (+)post of the discharged vehicle.
2. Connect the opposite end of the positive (+)jumper
cable to the positive (+)post of the booster battery.
3. Connect the negative end (-)of the jumper cable to the
negative (-)post of the booster battery.
4. Connect the opposite end of the negative (-)jumper
cable to a good engine ground (exposed metal part of the
discharged vehicle’s engine) away from the battery and
the fuel injection system.
WARNING!
Do not connect the cable to the negative post (-) of the
discharged battery. The resulting electrical spark
could cause the battery to explode and could result in
personal injury.
5. Start the engine in the vehicle that has the booster
battery, let the engine idle a few minutes, and then start
the engine in the vehicle with the discharged battery.
Once the engine is started, remove the jumper cables in
the reverse sequence:
6. Disconnect the negative (-)jumper cable from the
engine ground of the vehicle with the discharged battery.
7. Disconnect the negative end (-)of the jumper cable
from the negative (-)post of the booster battery.
346 WHAT TO DO IN EMERGENCIES
Page 348 of 450
8. Disconnect the opposite end of the positive(+)jumper
cable from the positive (+)post of the booster battery.
9. Disconnect the positive (+)end of the jumper cable
from the positive (+)post of the discharged vehicle.
10. Reinstall the air intake duct.
If frequent jump-starting is required to start your vehicle
you should have the battery and charging system in-
spected at your authorized dealer.
CAUTION!
Accessories that can be plugged into the vehicle
power outlets draw power from the vehicle’s battery,
even when not in use (i.e., cellular phones, etc.).
Eventually, if plugged in long enough, the vehicle’s
battery will discharge sufficiently to degrade battery
life and/or prevent the engine from starting.
FREEING A STUCK VEHICLE
If vehicle becomes stuck in snow, sand, or mud, it can
often be moved by a rocking motion. Move the shift lever
rhythmically between FIRST and REVERSE, while apply-
ing slight pressure to the accelerator.
WARNING!
Fast spinning tires can be dangerous. Forces gener-
ated by excessive wheel speeds may cause damage, or
even failure, of the axle and tires. A tire could
explode and injure someone. Do not spin your vehi-
cle’s wheels faster than 30 mph (48 km/h) or for
longer than 30 seconds continuously without stop-
ping when you are stuck. And do not let anyone near
a spinning wheel, no matter what the speed.
The least amount of accelerator pedal pressure to main-
tain the rocking motion without spinning the wheels or
racing the engine is most effective. Allow the engine to
6
WHAT TO DO IN EMERGENCIES 347
Page 349 of 450
idle with the shift lever in NEUTRAL for at least one
minute after every five rocking-motion cycles. This will
minimize overheating and reduce the risk of transmis-
sion failure during prolonged efforts to free a stuck
vehicle.
CAUTION!
Revving the engine or spinning the wheels too fast
may lead to transaxle overheating and failure. It can
also damage the tires. Do not spin the wheels above
30 mph (48 km/h). Do not spin the wheels continu-
ously for more than 30 seconds.
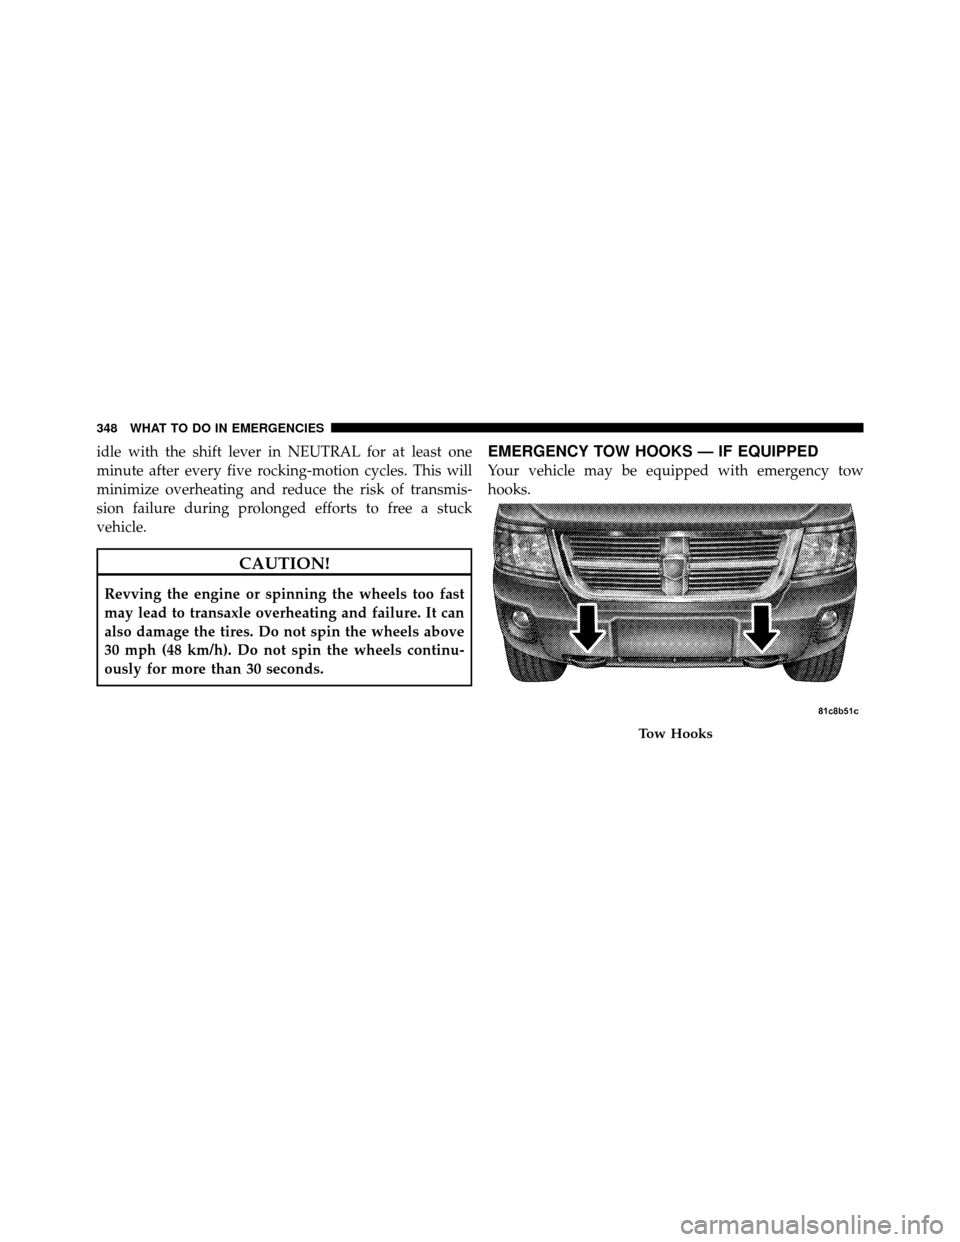
EMERGENCY TOW HOOKS — IF EQUIPPED
Your vehicle may be equipped with emergency tow
hooks.
Tow Hooks
348 WHAT TO DO IN EMERGENCIES
Page 350 of 450
WARNING!
•Chains are not recommended for freeing a stuck
vehicle. Chains may break, causing serious injury
or death.
•Stand clear of vehicles when pulling with tow
hooks. Tow straps and chains may break, causing
serious injury.
CAUTION!
Tow hooks are for emergency use only, to rescue a
vehicle stranded off road. Do not use tow hooks for
tow truck hookup or highway towing. You could
damage your vehicle.
TOWING A DISABLED VEHICLE
Proper towing or lifting equipment is required to prevent
damage to your vehicle. Use of safety chains is recom-
mended.Attach towing device to main structural mem-
bers of the vehicle, not to bumpers or associated brack-
ets. State and local laws, applying to vehicles under
tow, must be observed.
Four-Wheel Drive Vehicles
The manufacturer recommends towing with all wheels
OFF the ground. Acceptable methods are to tow the
vehicle on a flatbed or with one end of the vehicle raised
and the opposite end on a towing dolly.
6
WHAT TO DO IN EMERGENCIES 349