engine DODGE DAKOTA 2011 3.G Owner's Manual
[x] Cancel search | Manufacturer: DODGE, Model Year: 2011, Model line: DAKOTA, Model: DODGE DAKOTA 2011 3.GPages: 76, PDF Size: 4.62 MB
Page 41 of 76
WARNING!
Driving a vehicle with the red brake light on is dangerous. Part of the brake
system may have failed. It will take longer to stop the vehicle. You could
have a collision. Have the vehicle checked immediately.
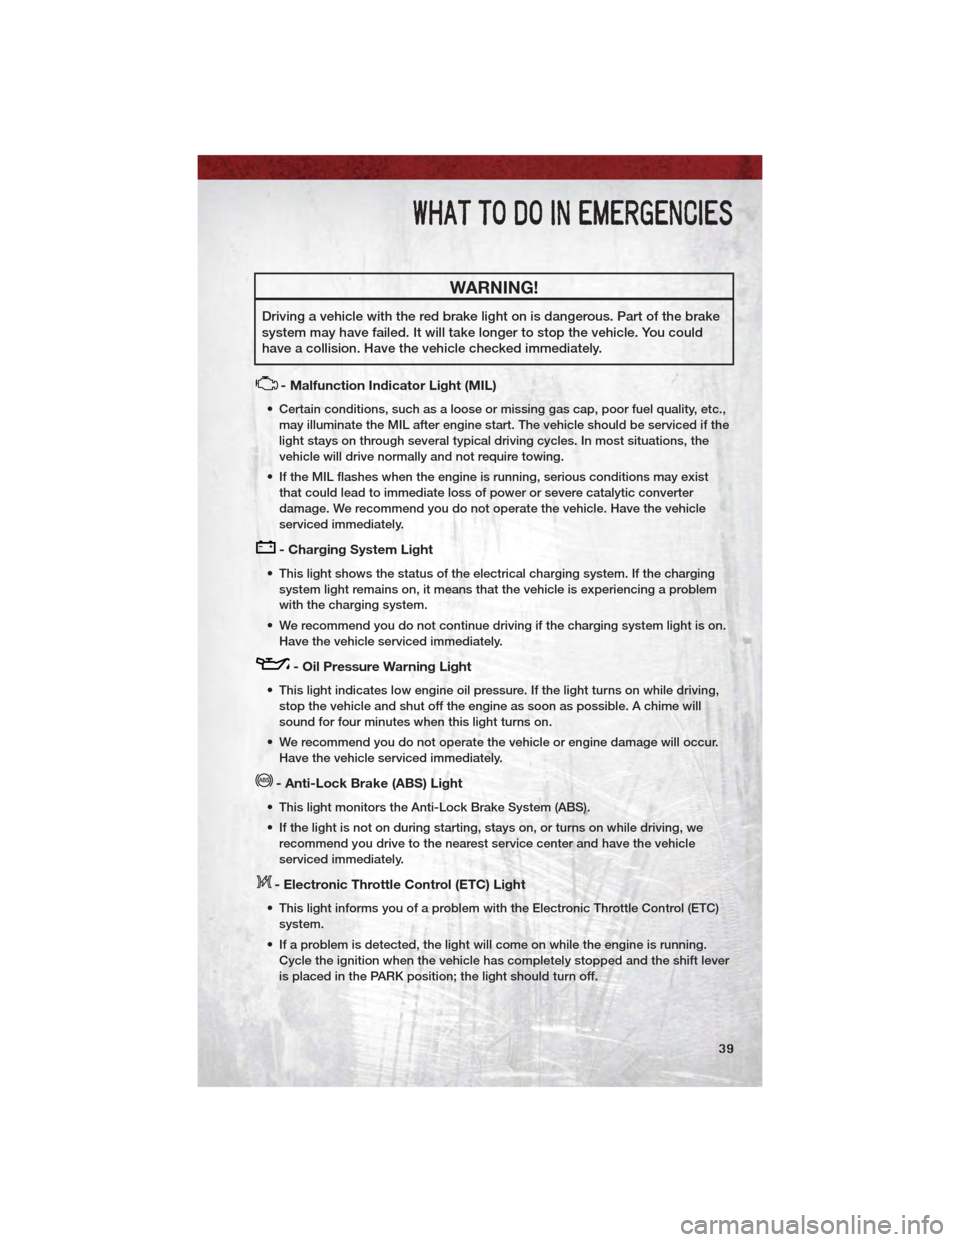
- Malfunction Indicator Light (MIL)
• Certain conditions, such as a loose or missing gas cap, poor fuel quality, etc.,may illuminate the MIL after engine start. The vehicle should be serviced if the
light stays on through several typical driving cycles. In most situations, the
vehicle will drive normally and not require towing.
• If the MIL flashes when the engine is running, serious conditions may exist that could lead to immediate loss of power or severe catalytic converter
damage. We recommend you do not operate the vehicle. Have the vehicle
serviced immediately.
- Charging System Light
• This light shows the status of the electrical charging system. If the chargingsystem light remains on, it means that the vehicle is experiencing a problem
with the charging system.
• We recommend you do not continue driving if the charging system light is on. Have the vehicle serviced immediately.
- Oil Pressure Warning Light
• This light indicates low engine oil pressure. If the light turns on while driving,stop the vehicle and shut off the engine as soon as possible. A chime will
sound for four minutes when this light turns on.
• We recommend you do not operate the vehicle or engine damage will occur. Have the vehicle serviced immediately.
- Anti-Lock Brake (ABS) Light
• This light monitors the Anti-Lock Brake System (ABS).
• If the light is not on during starting, stays on, or turns on while driving, werecommend you drive to the nearest service center and have the vehicle
serviced immediately.
- Electronic Throttle Control (ETC) Light
• This light informs you of a problem with the Electronic Throttle Control (ETC)system.
• If a problem is detected, the light will come on while the engine is running. Cycle the ignition when the vehicle has completely stopped and the shift lever
is placed in the PARK position; the light should turn off.
WHAT TO DO IN EMERGENCIES
39
Page 42 of 76
• If the light remains lit with the engine running, your vehicle will usually bedrivable; however, see an authorized service center immediately. If the light is
flashing when the engine is running, immediate service is required and you
may experience reduced performance, an elevated/rough idle or engine stall
and your vehicle may require towing.
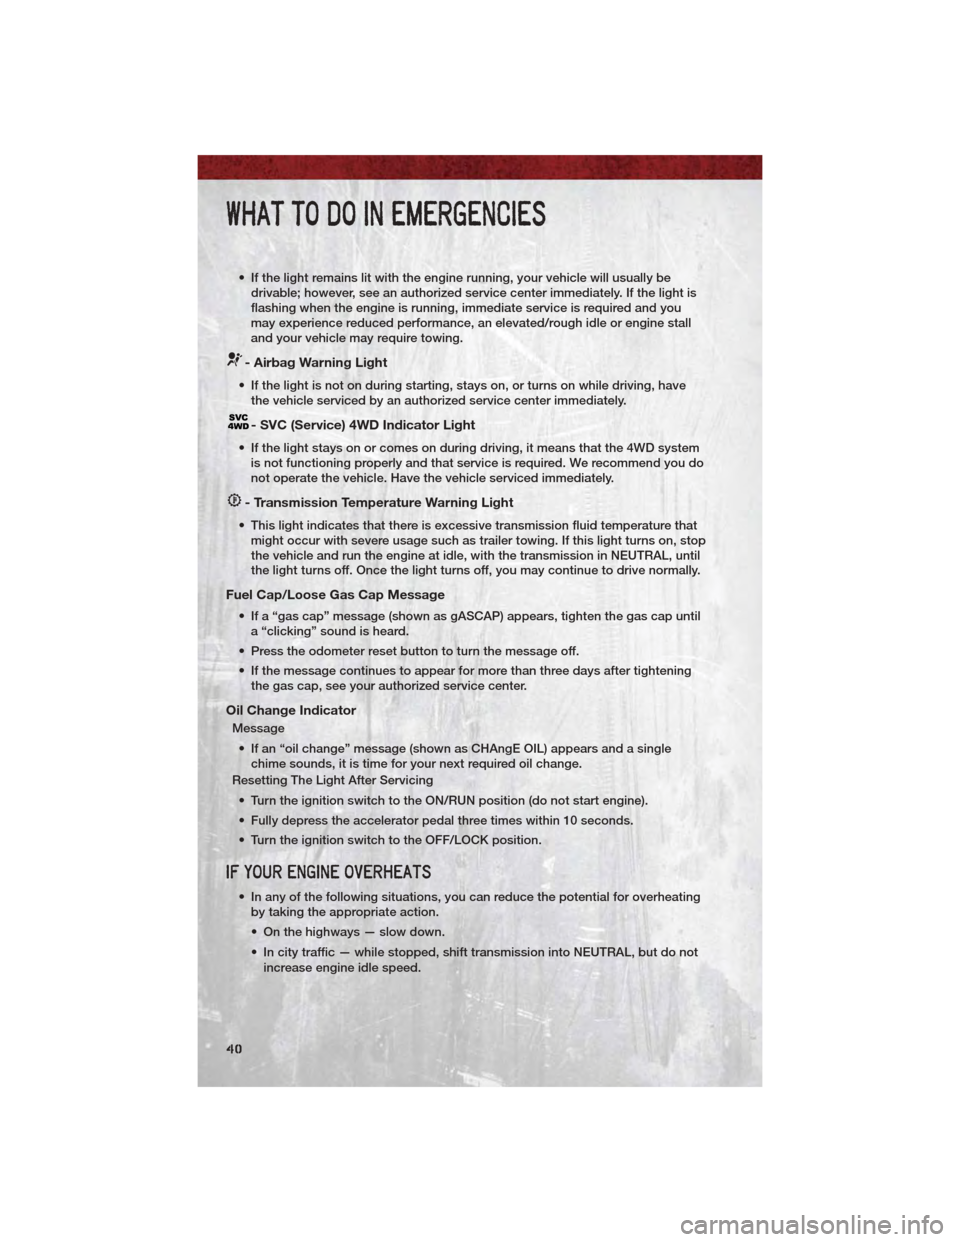
- Airbag Warning Light
• If the light is not on during starting, stays on, or turns on while driving, havethe vehicle serviced by an authorized service center immediately.
- SVC (Service) 4WD Indicator Light
• If the light stays on or comes on during driving, it means that the 4WD systemis not functioning properly and that service is required. We recommend you do
not operate the vehicle. Have the vehicle serviced immediately.
- Transmission Temperature Warning Light
• This light indicates that there is excessive transmission fluid temperature thatmight occur with severe usage such as trailer towing. If this light turns on, stop
the vehicle and run the engine at idle, with the transmission in NEUTRAL, until
the light turns off. Once the light turns off, you may continue to drive normally.
Fuel Cap/Loose Gas Cap Message
• If a “gas cap” message (shown as gASCAP) appears, tighten the gas cap untila “clicking” sound is heard.
• Press the odometer reset button to turn the message off.
• If the message continues to appear for more than three days after tightening the gas cap, see your authorized service center.
Oil Change Indicator
Message
• If an “oil change” message (shown as CHAngE OIL) appears and a single chime sounds, it is time for your next required oil change.
Resetting The Light After Servicing
• Turn the ignition switch to the ON/RUN position (do not start engine).
• Fully depress the accelerator pedal three times within 10 seconds.
• Turn the ignition switch to the OFF/LOCK position.
IF YOUR ENGINE OVERHEATS
• In any of the following situations, you can reduce the potential for overheating by taking the appropriate action.
• On the highways — slow down.
• In city traffic — while stopped, shift transmission into NEUTRAL, but do not
increase engine idle speed.
WHAT TO DO IN EMERGENCIES
40
Page 43 of 76
NOTE:There are steps that you can take to slow down an impending overheat
condition:
• If your air conditioner (A/C) is on, turn it off. The A/C system adds heat to the engine cooling system and turning the A/C off can help remove this heat.
• You can also turn the Temperature Control to maximum heat, the Mode Control to floor and the Fan Control to high. This allows the heater core to act as a
supplement to the radiator and aids in removing heat from the engine cooling
system.
• If the temperature reading does not return to normal, turn the engine off immediately.
• We recommend that you do not operate the vehicle or engine damage will occur. Have the vehicle serviced immediately.
CAUTION!
Driving with a hot cooling system could damage your vehicle. If the
temperature gauge reads HOT (H), pull over and stop the vehicle. Idle the
vehicle with the air conditioner turned off until the pointer drops back into
the normal range. If the pointer remains on HOT (H), and you hear
continuous chimes, turn the engine off immediately and call for service.
WARNING!
You or others can be badly burned by hot engine coolant (antifreeze) or
steam from your radiator. If you see or hear steam coming from under the
hood, do not open the hood until the radiator has had time to cool. Never
try to open a cooling system pressure cap when the radiator or coolant
bottle is hot.
WHAT TO DO IN EMERGENCIES
41
Page 49 of 76
WARNING!(Continued)
• Raising the vehicle higher than necessary can make the vehicle lessstable and could cause it to slip off the jack and hurt someone near it.
Raise the vehicle only enough to remove the tire.
• A loose tire or jack, thrown forward in a collision or hard stop, could endanger the occupants of the vehicle. Always stow the jack parts and
the spare tire in the places provided.
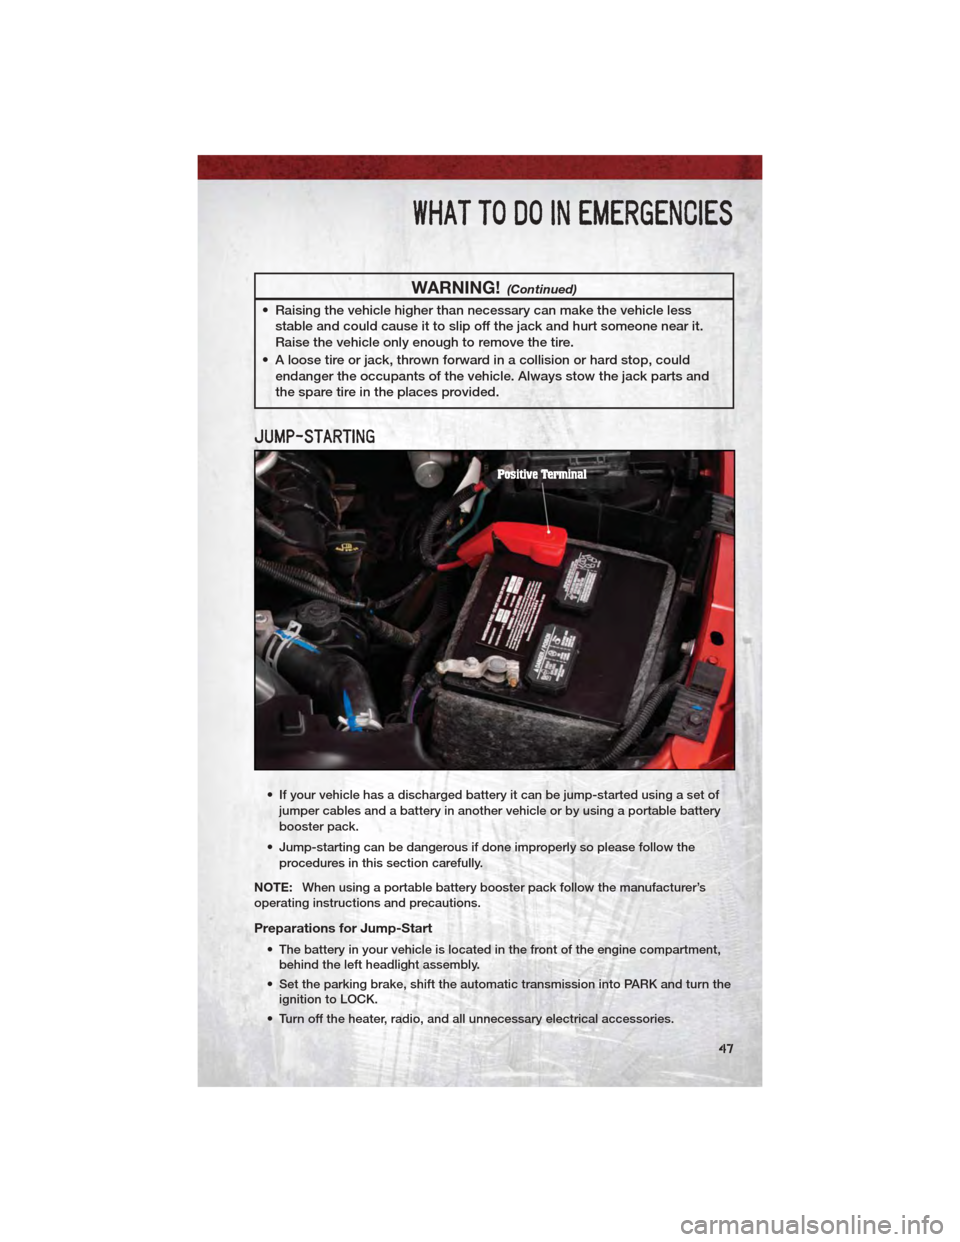
JUMP-STARTING
• If your vehicle has a discharged battery it can be jump-started using a set of
jumper cables and a battery in another vehicle or by using a portable battery
booster pack.
• Jump-starting can be dangerous if done improperly so please follow the procedures in this section carefully.
NOTE: When using a portable battery booster pack follow the manufacturer’s
operating instructions and precautions.
Preparations for Jump-Start
• The battery in your vehicle is located in the front of the engine compartment, behind the left headlight assembly.
• Set the parking brake, shift the automatic transmission into PARK and turn the ignition to LOCK.
• Turn off the heater, radio, and all unnecessary electrical accessories.
WHAT TO DO IN EMERGENCIES
47
Page 50 of 76
• If using another vehicle to jump-start the battery, park the vehicle within thejumper cables reach, set the parking brake and make sure the ignition is OFF.
Jump-Starting Procedure
• Connect the positive (+)end of the jumper cable to the positive (+)post of the
discharged vehicle.
• Connect the opposite end of the positive (+)jumper cable to the positive (+)
post of the booster battery.
• Connect the negative end (-)of the jumper cable to the negative (-)post of the
booster battery.
• Connect the opposite end of the negative (-)jumper cable to a good engine
ground (exposed metal part of the discharged vehicle’s engine) away from the
battery and the fuel injection system.
• Start the engine in the vehicle that has the booster battery, let the engine idle a few minutes, and then start the engine in the vehicle with the discharged
battery.
Once the engine is started, remove the jumper cables in the reverse sequence:
• Disconnect the negative (-)jumper cable from the engine ground of the vehicle
with the discharged battery.
• Disconnect the negative end (-)of the jumper cable from the negative (-)post
of the booster battery.
• Disconnect the opposite end of the positive (+)jumper cable from the positive
(+) post of the booster battery.
• Disconnect the positive (+)end of the jumper cable from the positive (+)post
of the discharged vehicle.
• If frequent jump-starting is required to start your vehicle you should have the battery and charging system inspected at your authorized dealer.
CAUTION!
• Accessories that can be plugged into the vehicle power outlets drawpower from the vehicle’s battery, even when not in use (i.e., cellular
phones, etc.). Eventually, if plugged in long enough, the vehicle’s battery
will discharge sufficiently to degrade battery life and/or prevent the
engine from starting.
• Do not use a portable battery booster pack or any other booster source with a system voltage greater than 12 Volts or damage to the battery,
starter motor, alternator or electrical system may occur.
• Failure to follow these procedures could result in damage to the charging system of the booster vehicle or the discharged vehicle.
WHAT TO DO IN EMERGENCIES
48
Page 53 of 76
FREEING A STUCK VEHICLE
• If your vehicle becomes stuck in mud, sand or snow, it can often be moved bya rocking motion. Turn your steering wheel right and left to clear the area
around the front wheels. Then move the shift lever back and forth between
REVERSE and DRIVE. Using minimal accelerator pedal pressure to maintain
the rocking motion, without spinning the wheels, is most effective.
• Allow the engine to idle with the shift lever in NEUTRAL for at least one minute after every five rocking-motion cycles. This will minimize overheating and
reduce the risk of transmission failure during prolonged efforts to free a stuck
vehicle.
CAUTION!
• When “rocking” a stuck vehicle by moving between REVERSE andDRIVE, do not spin the wheels faster than 15 mph (24 km/h), or drivetrain
damage may result.
• Revving the engine or spinning the wheels too fast may lead to transmission overheating and failure. It can also damage the tires. Do not
spin the wheels above 30 mph (48 km/h) while in gear (no transmission
shifting occurring).
WARNING!
• Fast spinning tires can be dangerous. Forces generated by excessivewheel speeds may cause tire damage or failure. A tire could explode and
injure someone. Do not spin your vehicle's wheels faster than 30 mph
(48 km/h) when you are stuck. Do not let anyone near a spinning wheel,
no matter what the speed.
• Chains are not recommended for freeing a stuck vehicle. Chains may break, causing serious injury or death.
• Stand clear of vehicles when pulling with tow hooks. Tow straps and chains may break, causing serious injury.
WHAT TO DO IN EMERGENCIES
51
Page 56 of 76
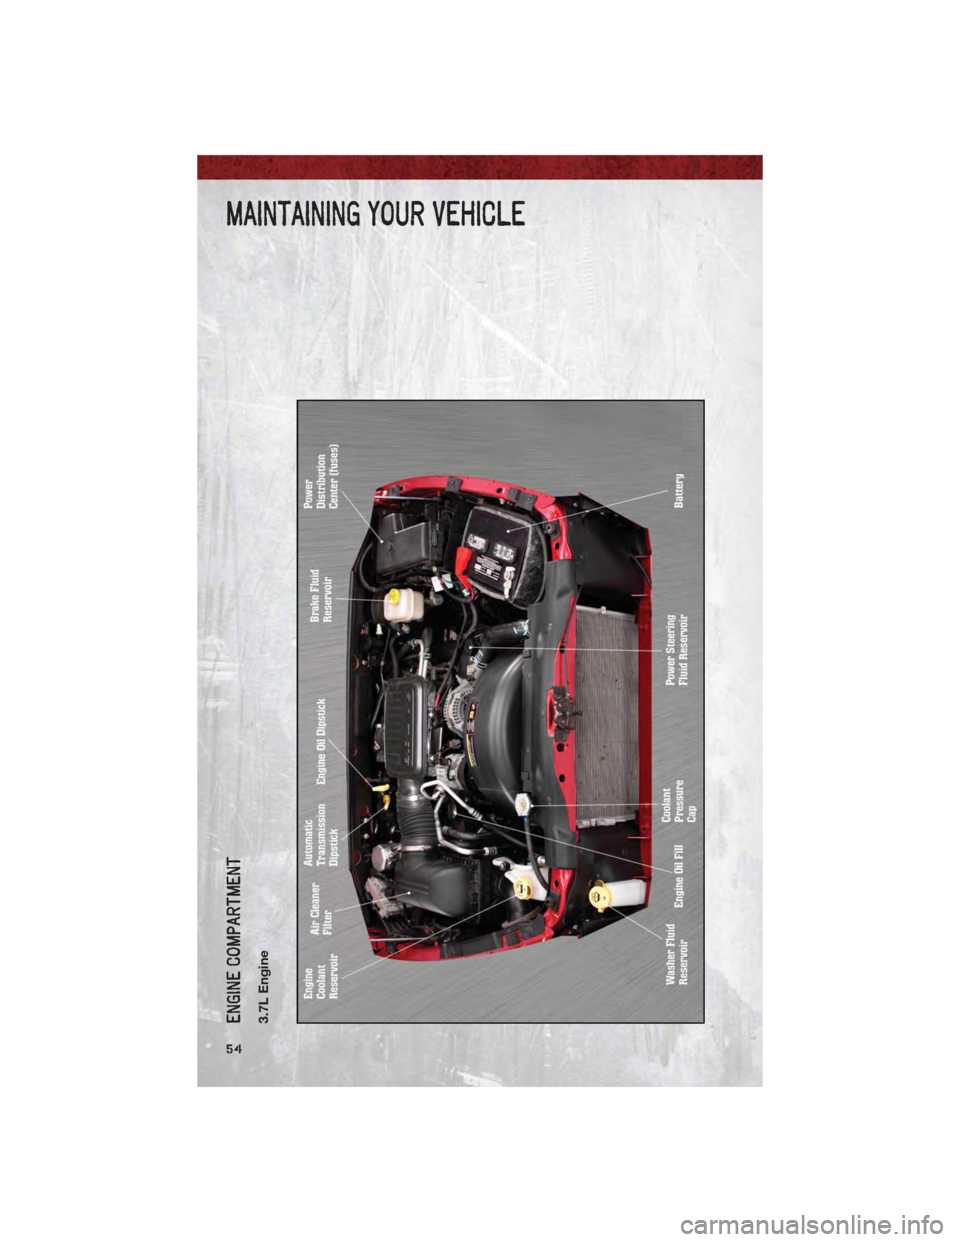
ENGINE COMPARTMENT3.7L Engine
MAINTAINING YOUR VEHICLE
54
Page 57 of 76
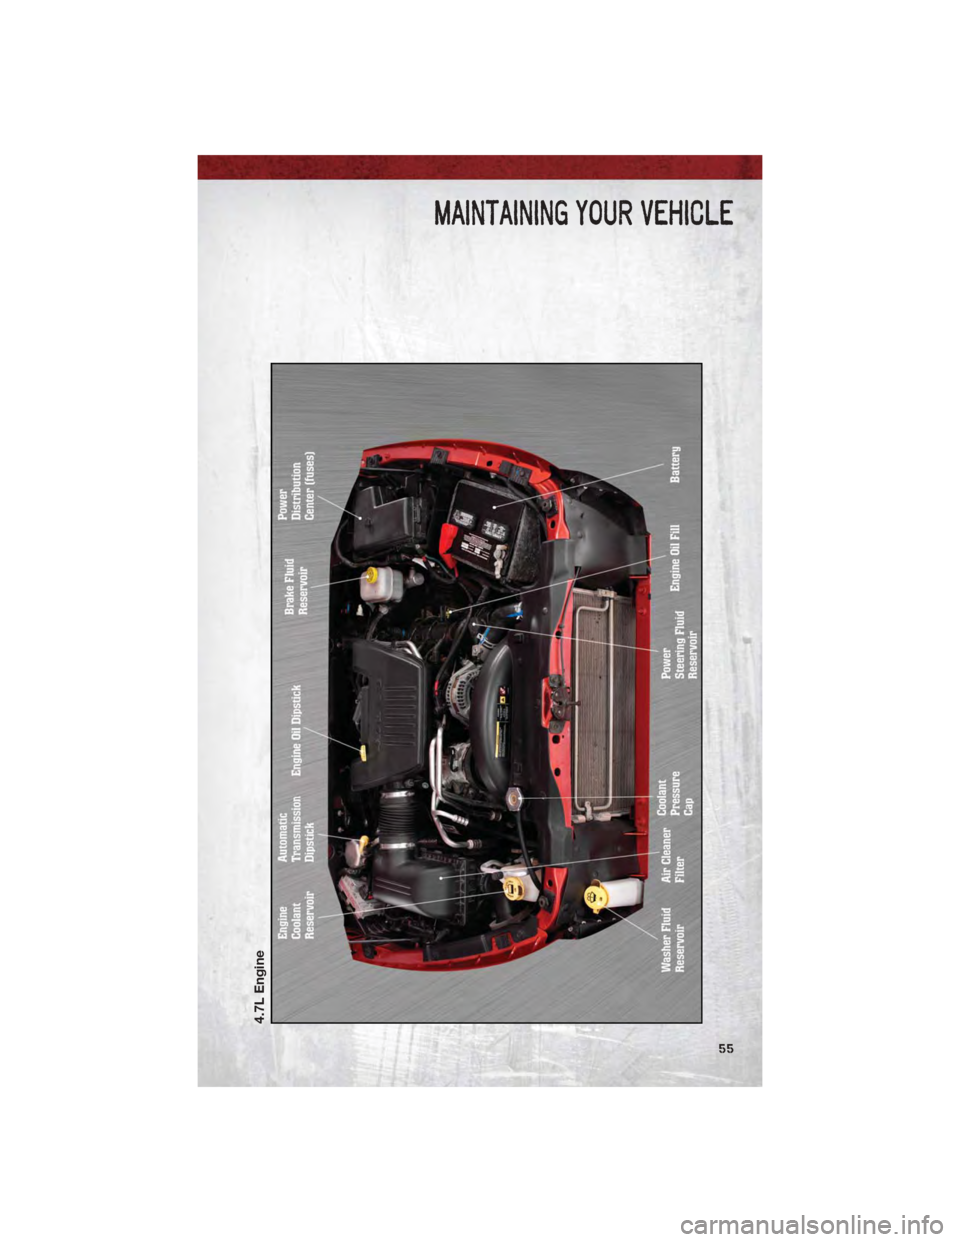
4.7L Engine
MAINTAINING YOUR VEHICLE
55
Page 58 of 76
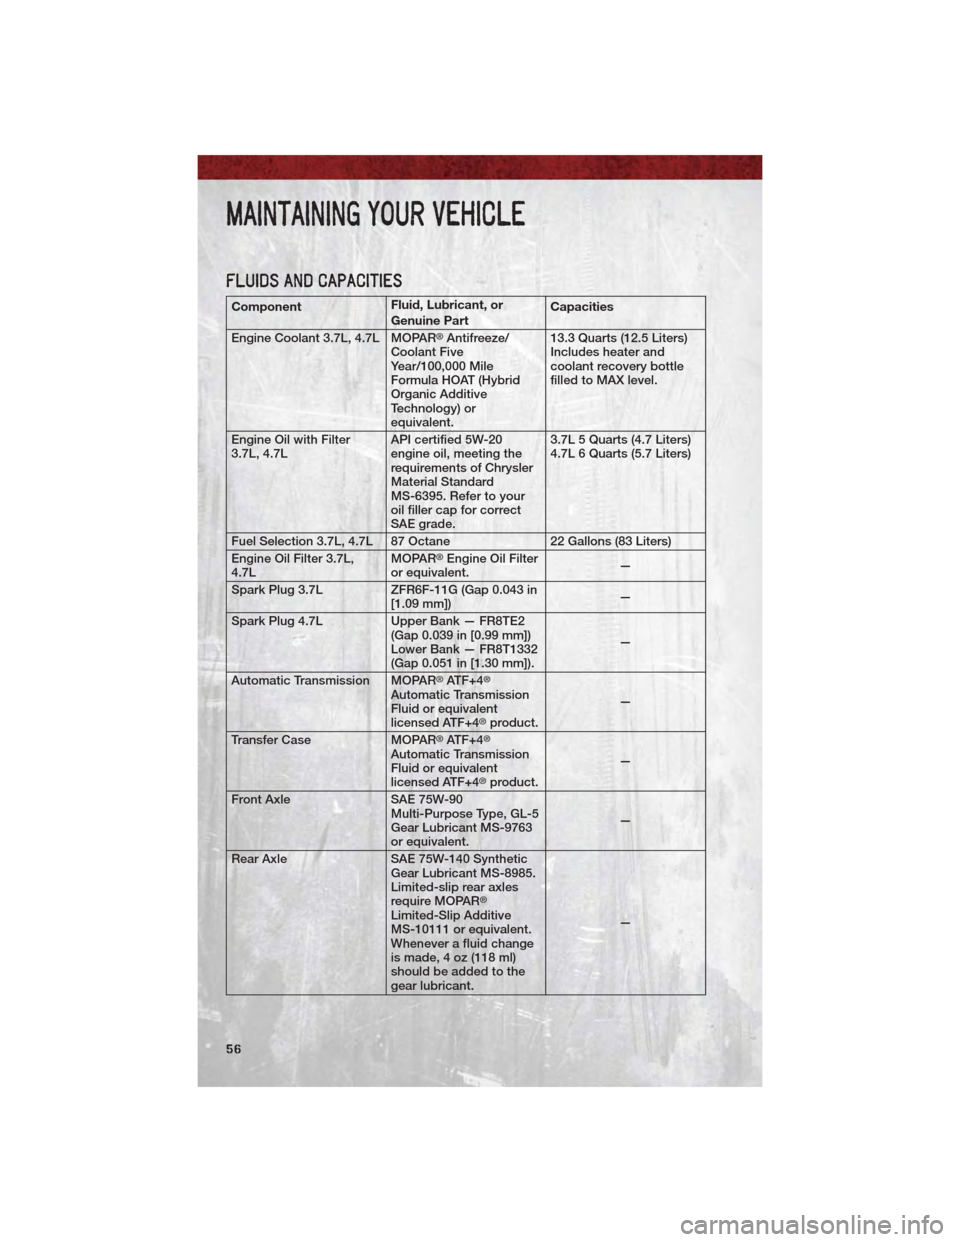
FLUIDS AND CAPACITIES
ComponentFluid, Lubricant, or
Genuine PartCapacities
Engine Coolant 3.7L, 4.7L MOPAR
®Antifreeze/
Coolant Five
Year/100,000 Mile
Formula HOAT (Hybrid
Organic Additive
Technology) or
equivalent. 13.3 Quarts (12.5 Liters)
Includes heater and
coolant recovery bottle
filled to MAX level.
Engine Oil with Filter
3.7L, 4.7L API certified 5W-20
engine oil, meeting the
requirements of Chrysler
Material Standard
MS-6395. Refer to your
oil filler cap for correct
SAE grade.3.7L 5 Quarts (4.7 Liters)
4.7L 6 Quarts (5.7 Liters)
Fuel Selection 3.7L, 4.7L 87 Octane 22 Gallons (83 Liters)
Engine Oil Filter 3.7L,
4.7L MOPAR
®Engine Oil Filter
or equivalent. —
Spark Plug 3.7L ZFR6F-11G (Gap 0.043 in
[1.09 mm]) —
Spark Plug 4.7L Upper Bank — FR8TE2
(Gap 0.039 in [0.99 mm])
Lower Bank — FR8T1332
(Gap 0.051 in [1.30 mm]). —
Automatic Transmission MOPAR
®ATF+4®
Automatic Transmission
Fluid or equivalent
licensed ATF+4
®product. —
Transfer Case MOPAR®ATF+4®
Automatic Transmission
Fluid or equivalent
licensed ATF+4
®product. —
Front Axle SAE 75W-90 Multi-Purpose Type, GL-5
Gear Lubricant MS-9763
or equivalent. —
Rear Axle SAE 75W-140 Synthetic Gear Lubricant MS-8985.
Limited-slip rear axles
require MOPAR
®
Limited-Slip Additive
MS-10111 or equivalent.
Whenever a fluid change
is made, 4 oz (118 ml)
should be added to the
gear lubricant. —
MAINTAINING YOUR VEHICLE
56
Page 60 of 76
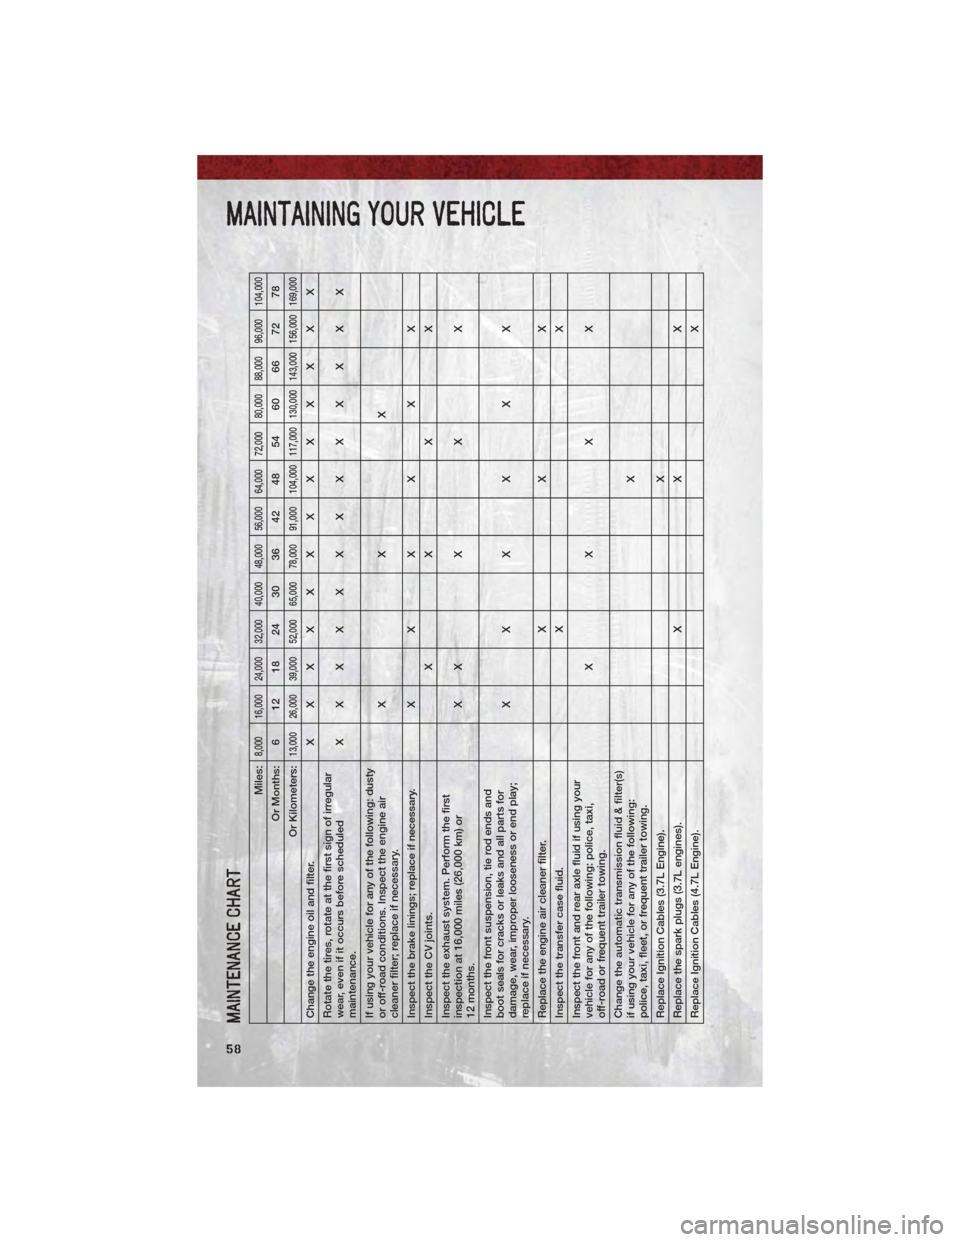
MAINTENANCE CHART
Miles:
8,000 16,000 24,000 32,000 40,000 48,000 56,000 64,000 72,000 80,000 88,000 96,000 104,000
Or Months: 6 12 18 24 30 36 42 48 54 60 66 72 78
Or Kilometers:
13,000 26,000 39,000 52,000 65,000 78,000 91,000 104,000 117,000 130,000 143,000 156,000 169,000
Change the engine oil and filter. XXXXXXXXXXXXX
Rotate the tires, rotate at the first sign of irregular
wear, even if it occurs before scheduled
maintenance. XXXXXXXXXXXXX
If using your vehicle for any of the following: dusty
or off-road conditions. Inspect the engine air
cleaner filter; replace if necessary. XXX
Inspect the brake linings; replace if necessary. X X X X X X
Inspect the CV joints. XXXX
Inspect the exhaust system. Perform the first
inspection at 16,000 miles (26,000 km) or
12 months. XXXXX
Inspect the front suspension, tie rod ends and
boot seals for cracks or leaks and all parts for
damage, wear, improper looseness or end play;
replace if necessary. XXXXXX
Replace the engine air cleaner filter. XXX
Inspect the transfer case fluid. XX
Inspect the front and rear axle fluid if using your
vehicle for any of the following: police, taxi,
off-road or frequent trailer towing. XXXX
Change the automatic transmission fluid & filter(s)
if using your vehicle for any of the following:
police, taxi, fleet, or frequent trailer towing. X
Replace Ignition Cables (3.7L Engine). X
Replace the spark plugs (3.7L engines). XXX
Replace Ignition Cables (4.7L Engine). X
MAINTAINING YOUR VEHICLE
58