buttons DODGE DAKOTA 2011 3.G User Guide
[x] Cancel search | Manufacturer: DODGE, Model Year: 2011, Model line: DAKOTA, Model: DODGE DAKOTA 2011 3.GPages: 76, PDF Size: 4.62 MB
Page 25 of 76
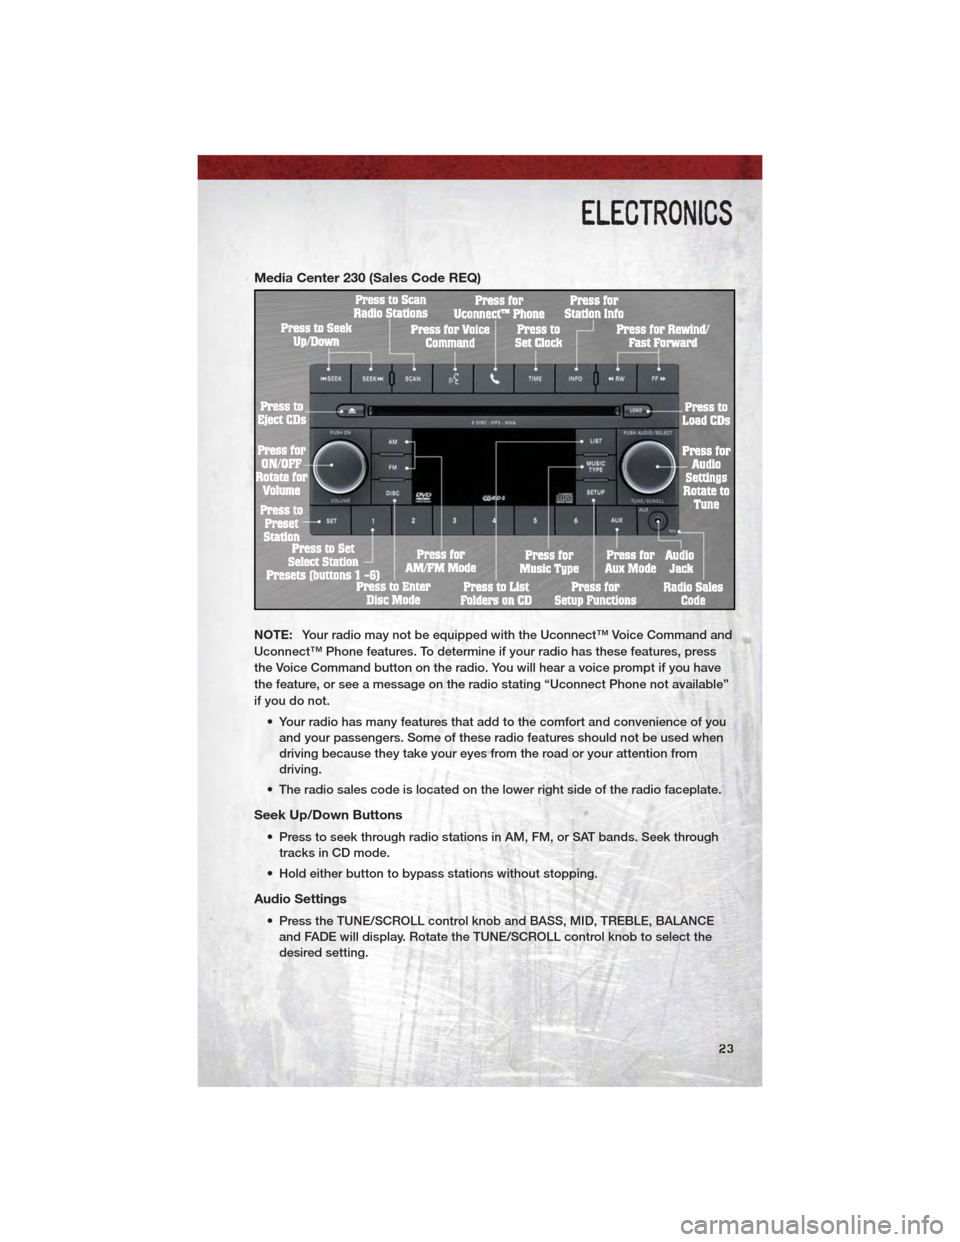
Media Center 230 (Sales Code REQ)
NOTE:Your radio may not be equipped with the Uconnect™ Voice Command and
Uconnect™ Phone features. To determine if your radio has these features, press
the Voice Command button on the radio. You will hear a voice prompt if you have
the feature, or see a message on the radio stating “Uconnect Phone not available”
if you do not.
• Your radio has many features that add to the comfort and convenience of youand your passengers. Some of these radio features should not be used when
driving because they take your eyes from the road or your attention from
driving.
• The radio sales code is located on the lower right side of the radio faceplate.
Seek Up/Down Buttons
• Press to seek through radio stations in AM, FM, or SAT bands. Seek through tracks in CD mode.
• Hold either button to bypass stations without stopping.
Audio Settings
• Press the TUNE/SCROLL control knob and BASS, MID, TREBLE, BALANCE and FADE will display. Rotate the TUNE/SCROLL control knob to select the
desired setting.
ELECTRONICS
23
Page 26 of 76
Audio Jack
• The Audio Jack allows a portable device, such as an MP3 player or a cassetteplayer, to be plugged into the radio and utilize the vehicle’s audio system,
using a 3.5 mm audio cable, to amplify the source and play through the vehicle
speakers.
• Pressing the AUX button will change the mode to auxiliary device if the Audio Jack is connected, allowing the music from your portable device to play
through the vehicle's speakers.
• The functions of the portable device are controlled using the device buttons. The volume may be controlled using the radio or portable device.
Clock Setting
• Press and hold the TIME button until the hours blink; turn the TUNE/SCROLLcontrol knob to set the hours.
• Press the TUNE/SCROLL control knob until the minutes begin to blink; turn the TUNE/SCROLL control knob to set the minutes.
• Press the TUNE/SCROLL control knob to save the time change.
• To exit, press any button/knob or wait five seconds.
Store Radio Presets
• Press the SET/RND button once and SET 1 will show in the display. Then select the button (1–6).
• A second station may be added to each push button. Press the SET/RND button twice and SET 2 will show in the display, then select button (1–6).
How To Load Multiple CDs/DVDs
Media Center 230 (Sales Code REQ) Only
• Press the LOAD button and then press the button with the corresponding number (1–6) where the CD will be loaded. The radio will display PLEASE WAIT
and prompt when to INSERT DISC.
• After the radio displays INSERT DISC, insert the CD into the player. The radio display will show LOADING DISC when the disc is loading and “READING
DISC” when the radio is reading the disc.
• Press the eject button and then the corresponding number (1–6) to eject the desired disc.
ELECTRONICS
24
Page 30 of 76
• For vehicles equipped with Video Entertainment System (VES)™, refer to theUconnect™ Voice Command section of the Uconnect™ User's Manual on the
DVD for further details.
• For vehicles not equipped with VES™, refer to your vehicle Owner's Manual on the DVD for Uconnect™ Voice Command information.
NOTE: To access the tutorial, press the Voice Command button
.Afterthe
BEEP, say “tutorial”. Press any hard-key/button or touch the display (Touch-Screen
radio) to cancel the tutorial.
WARNING!
Any voice commanded system should be used only in safe driving
conditions following local laws and phone use. All attention should be kept
on the roadway ahead. Failure to do so may result in a collision causing you
and others to be severely injured or killed.
PROGRAMMABLE FEATURES
• The following features may be programmed using the Key Fob transmitter or the ignition switch and driver's door lock switch.
NOTE: Pressing the LOCK button while you are inside the vehicle will activate the
Vehicle Security Alarm. Opening a door with the Vehicle Security Alarm activated
will cause the alarm to sound. Press the UNLOCK button to deactivate the Vehicle
Security Alarm.
Unlock On First Press
• To unlock either the driver's side, or all doors, on the first press of the UNLOCK button:
• Press and hold the LOCK button for at least 4 seconds, but no longer than
10 seconds. Then, press and hold the UNLOCK button while still holding the
LOCK button.
• Release both buttons at the same time.
Auto Unlock Doors On Exit
• To have all of the vehicle doors unlock when any door is opened: • Enter your vehicle and close all the doors.
• Fasten your seatbelt.
• Within 15 seconds, cycle the ignition switch between LOCK and ON andthen back to LOCK four times, ending up in the LOCK position (do not start
the engine).
• Press the power door UNLOCK switch to unlock the doors. A single chime will indicate that programming is complete.
ELECTRONICS
28
Page 31 of 76
Auto Door Lock
• To have the doors lock automatically when the vehicle’s speed exceeds15 mph (24 km/h):
• Enter your vehicle and close all the doors.
• Fasten your seatbelt.
• Within 10 seconds, cycle the ignition switch between LOCK and ON and
then back to LOCK four times, ending up in the LOCK position (do not start
the engine).
• Press the power door LOCK switch to lock the doors. A single chime will indicate that programming is complete.
Sound Horn With Lock
• To turn the horn chirp on or off when the doors are locked:
• Press the LOCK button for at least 4 seconds, but no longer than 6 seconds.Then, press the PANIC button while still holding the LOCK button. A single
chime will sound to indicate that this feature has changed.
• Release both buttons at the same time.
Flashing Lights With Lock
• The turn signal lights flashing when the doors are locked or unlocked feature can be turned on or off. To turn this feature on or off:
• Press and hold the UNLOCK button for at least 4 seconds, but no longer
than 6 seconds. Then, press and hold the LOCK button while still holding
the UNLOCK button. A single chime will sound to indicate that this feature
has changed.
• Release both buttons at the same time.
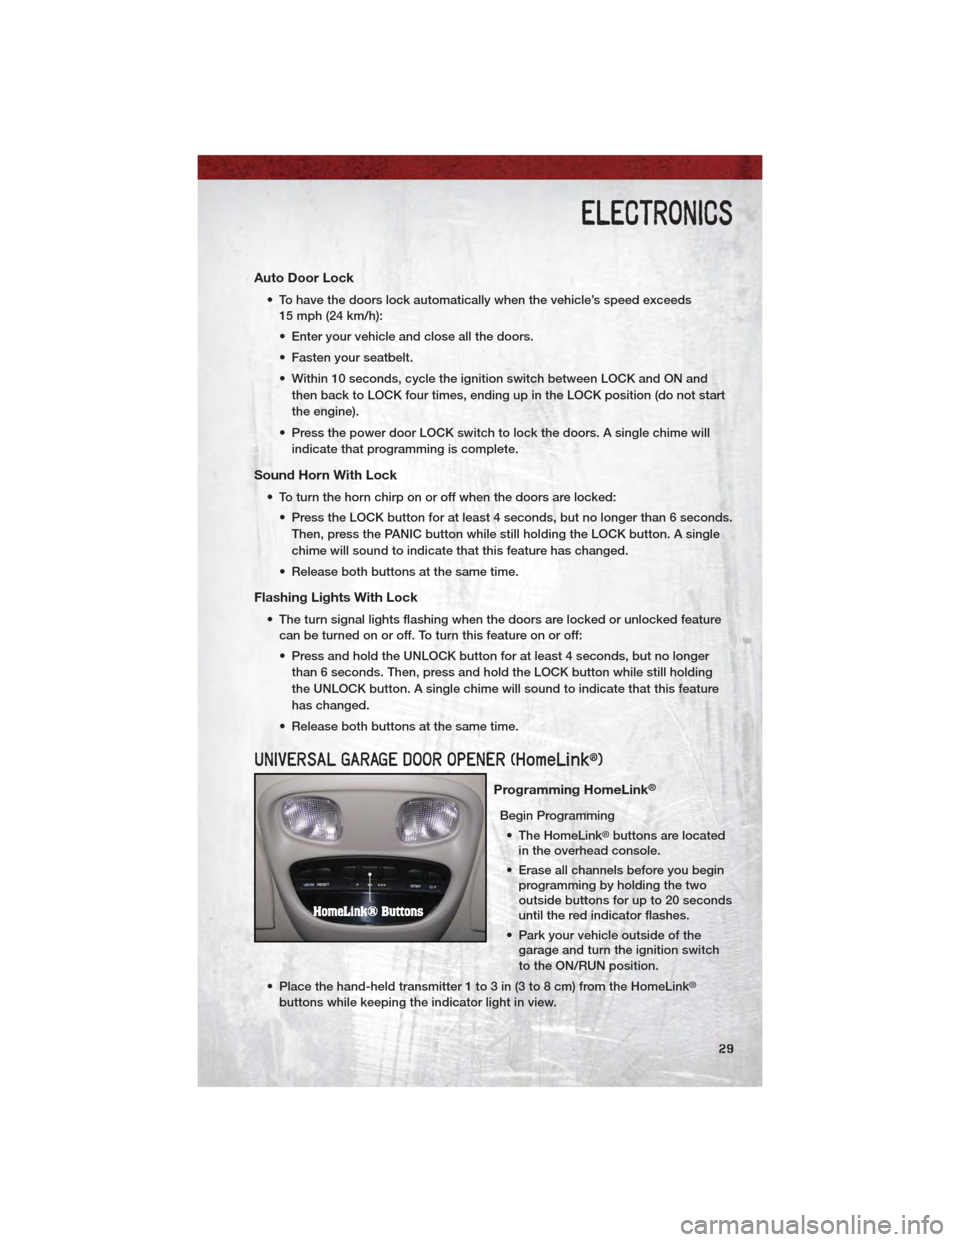
UNIVERSAL GARAGE DOOR OPENER (HomeLink®)
Programming HomeLink®
Begin Programming • The HomeLink
®buttons are located
in the overhead console.
• Erase all channels before you begin programming by holding the two
outside buttons for up to 20 seconds
until the red indicator flashes.
• Park your vehicle outside of the garage and turn the ignition switch
to the ON/RUN position.
• Place the hand-held transmitter 1 to 3 in (3 to 8 cm) from the HomeLink
®
buttons while keeping the indicator light in view.
ELECTRONICS
29
Page 32 of 76
• Simultaneously, press and hold both the chosen HomeLink®button and the
hand-held transmitter button until the HomeLink®indicator flash rate changes
from a slow to a rapidly blinking light, then release both the HomeLink®and
the hand-held transmitter buttons. This may take up to 30 seconds, or longer
in rare cases.
• Press and hold the just-programmed HomeLink
®button; if the indicator light
stays on constantly, programming is complete and the garage door should
open.
NOTE:
• Only use this transceiver with a garage door opener that has a “stop and reverse” feature as required by Federal safety standards. This includes most
garage door opener models manufactured after 1982. Do not use a garage door
opener without these safety features. Call toll-free 1–800–355–3515 or, on the
Internet, at www.HomeLink.com for safety information or assistance.
• If you are having difficulty programming your HomeLink
®and your garage door
opener was manufactured after 1995, you may have a rolling code. Follow the
steps below for Programming A Rolling Code System.
Programming A Rolling Code System • At the garage door opener motor (in the garage), locate the “learn” or “programming” button. This can usually be found where the hanging antenna
wire is attached to the garage door opener motor (it is NOT the button
normally used to open and close the door).
• Firmly press and release the “learn” or “programming” button. The name and color of the button may vary by manufacturer. Within 30 seconds, return to the
vehicle and press the programmed HomeLink
®button twice (holding the
button for two seconds each time). If the device is plugged in and activates,
programming is complete.
• If the device does not activate, press the button a third time (for two seconds) to complete the programming.
Using HomeLink
®
• To operate, simply press and release the programmed HomeLink®button and
the programmed device will operate.
• Refer to your Owner’s Manual on the DVD for further details. If you have any problems programming HomeLink
®, or require assistance, please call toll-free
1–800–355–3515 or, on the Internet, at www.HomeLink.com.
WARNING!
• Your motorized door or gate will open and close while you are programming the universal transceiver. Do not program the transceiver if
people or pets are in the path of the door or gate.
(Continued)
ELECTRONICS
30