oil change DODGE DART 2013 PF / 1.G User Guide
[x] Cancel search | Manufacturer: DODGE, Model Year: 2013, Model line: DART, Model: DODGE DART 2013 PF / 1.GPages: 132, PDF Size: 4.13 MB
Page 26 of 132
ENGINE BREAK-IN RECOMMENDATIONS
• A long break-in period is not required for the engine and drivetrain (transmission andaxle) in your vehicle.
• Drive moderately during the first 300 miles (500 km). After the initial 60 miles (100 km), speeds up to 50 or 55 mph (80 or 90 km/h) are desirable.
• While cruising, brief full-throttle acceleration within the limits of local traffic laws contributes to a good break-in. Wide-open throttle acceleration in low gear can be
detrimental and should be avoided.
• The engine oil installed in the engine at the factory is a high-quality energy conserving type lubricant. Oil changes should be consistent with anticipated climate conditions
under which vehicle operations will occur. For the recommended viscosity and quality
grades, refer to “Maintaining Your Vehicle”.
NOTE:
A new engine may consume some oil during its first few thousand miles (kilometers) of
operation. This should be considered a normal part of the break-in and not interpreted as
an indication to an engine problem or malfunction.
CAUTION!
Never use Non-Detergent Oil or Straight Mineral Oil in the engine or damage may result.
TURN SIGNAL/WIPER/WASHER/HIGH BEAM LEVER
Turn Signal/Lane Change Assist
• Tap the lever up or down once and the turn signal (right or left) will flash three times and automatically turn off.
OPERATING YOUR VEHICLE
24
Page 83 of 132
• Your vehicle has also been equipped with a TPMS malfunction indicator to indicate whenthe system is not operating properly. The TPMS malfunction indicator is combined with
the low tire pressure telltale. When the system detects a malfunction, the telltale will
flash for approximately one minute and then remain continuously illuminated. This
sequence will continue each time the vehicle is restarted as long as the malfunction
exists.
• When the malfunction indicator is illuminated, the system may not be able to detect or signal low tire pressure as intended. TPMS malfunctions may occur for a variety of
reasons, including the installation of replacement or alternate tires or wheels on the
vehicle that prevent the TPMS from functioning properly. Always check the TPMS mal-
function telltale after replacing one or more tires or wheels on your vehicle, to ensure that
the replacement or alternate tires and wheels allow the TPMS to continue to function
properly.
NOTE:
Tire pressures change by approximately 1 psi (7 kPa) per 12° F (7° C) of air temperature
change. Keep this in mind when checking tire pressure inside a garage, especially in the
Winter. Example: If garage temperature is 68°F (20°C) and the outside temperature is 32°F
(0°C), then the cold tire inflation pressure should be increased by 3 psi (21 kPa), which equals
1 psi (7 kPa) for every 12°F (7°C) for this outside temperature condition.
CAUTION!
The TPMS has been optimized for the original equipment tires and wheels. TPMS
pressures and warning have been established for the tire size equipped on your vehicle.
Undesirable system operation or sensor damage may result when using replacement
equipment that is not of the same size, type, and/or style. Aftermarket wheels can cause
sensor damage. Do not use tire sealant from a can, or balance beads if your vehicle is
equipped with a TPMS, as damage to the sensors may result.
- Engine Temperature Warning Light
• This light warns of an overheated engine condition.
• If the light turns on or flashes continuously while driving, safely pull over and stop the vehicle. If the A/C system is on, turn it off. Also, shift the transmission into NEUTRAL and
idle the vehicle. If the temperature reading does not return to normal, turn the engine off
immediately.
• We recommend that you do not operate the vehicle or engine damage will occur. Have the vehicle serviced immediately.
WARNING!
A hot engine cooling system is dangerous. You or others could be badly burned by steam
or boiling coolant.
WHAT TO DO IN EMERGENCIES
81
Page 85 of 132
- Anti-Lock Brake (ABS) Light
• This light monitors the Anti-Lock Brake System (ABS).
• If the light is not on during starting, stays on, or turns on while driving, we recommend you drive to the nearest authorized dealer immediately and have the vehicle serviced
immediately.
- Electronic Throttle Control (ETC) Indicator Light
• This light informs you of a problem with the system.
• If a problem is detected, the light will come on while the engine is running. Cycle the ignition when the vehicle has completely stopped and the shift lever is placed in the
PARK position; the light should turn off.
• If the light remains lit with the engine running, your vehicle will usually be drivable; however, see an authorized dealer immediately. If the light is flashing when the engine is
running, immediate service is required and you may experience reduced performance,
an elevated/rough idle or engine stall and your vehicle may require towing.
- Air Bag Warning Light
• If the light is not on during starting, stays on, or turns on while driving, have the vehicle serviced by an authorized dealer immediately.
Fuel Cap/Loose Gas Cap Message
• If a “gas cap” message (shown as gASCAP) appears, tighten the gas cap until a “clicking” sound is heard.
• Press the odometer reset button to turn the message off.
• If the message continues to appear for more than three days after tightening the gas cap, see your authorized service center.
Oil Change Indicator
• Your vehicle is equipped with an engine oil change indicator system. The “Oil Change Due” message will flash in the EVIC display for approximately 10 seconds after a single
chime has sounded, to indicate the next scheduled oil change interval. The engine oil
change indicator system is duty cycle based, which means the engine oil change interval
may fluctuate, dependent upon your personal driving style
• Unless reset, this message will continue to display each time you turn the ignition switch to the ON/RUN position or cycle the ignition to the ON/RUN position if equipped with
Keyless Enter-N-Go™. To turn off the message temporarily, press and release the MENU
button. To reset the oil change indicator system (after performing the scheduled main-
tenance) refer to the following procedure.
WHAT TO DO IN EMERGENCIES
83
Page 86 of 132
Vehicles Equipped With Keyless Enter-N-Go™
1. Without pressing the brake pedal, cycle the ignition to the ON/RUN position (do not startthe engine).
2. Fully depress the accelerator pedal, slowly, three times within 10 seconds.
3. Cycle the ignition to the OFF/LOCK position.
Vehicles Not Equipped With Keyless Enter-N-Go™
1. Turn the ignition switch to the ON/RUN position (do not start the engine).
2. Fully depress the accelerator pedal, slowly, three times within 10 seconds.
3. Turn the ignition switch to the OFF/LOCK position.
NOTE:
If the indicator message illuminates when you start the vehicle, the oil change indicator
system did not reset. If necessary, repeat this procedure.
Resetting The Light After Servicing
• Vehicles Equipped With Keyless Enter-N-Go™
• Without pressing the brake pedal, push the ENGINE START/STOP button and cycle the ignition to the ON/RUN position (Do not start the engine.)
• Fully depress the accelerator pedal, slowly, three times within 10 seconds.
• Without pressing the brake pedal, push the ENGINE START/STOP button once to return the ignition to the OFF/LOCK position.
• Vehicles Not Equipped With Keyless Enter-N-Go™
• Turn the ignition switch to the ON/RUN position (Do not start the engine.)
• Fully depress the accelerator pedal, slowly, three times within 10 seconds.
• Turn the ignition switch to the OFF/LOCK position.
WHAT TO DO IN EMERGENCIES
84
Page 110 of 132
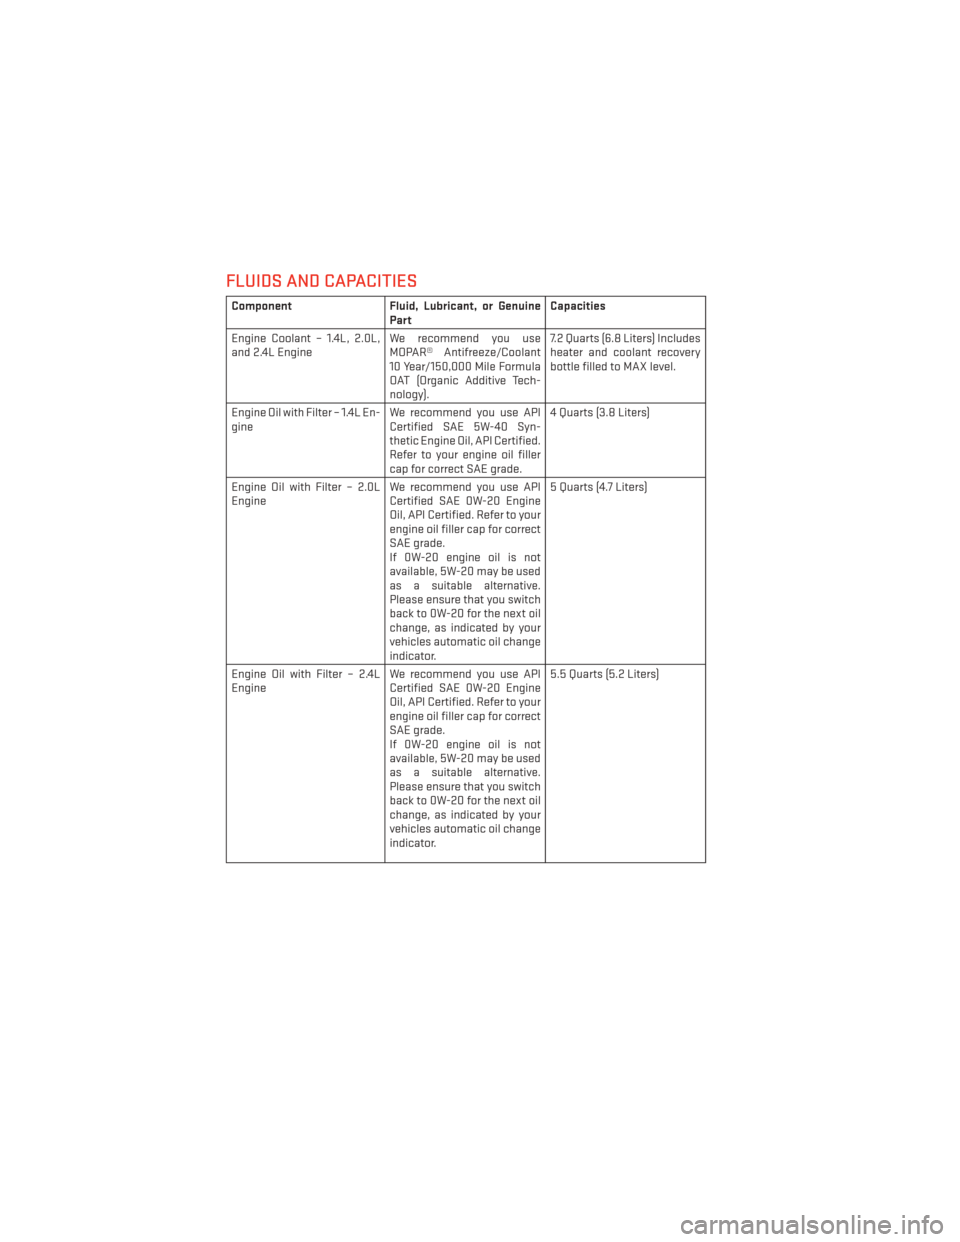
FLUIDS AND CAPACITIES
ComponentFluid, Lubricant, or Genuine
Part Capacities
Engine Coolant – 1.4L, 2.0L,
and 2.4L Engine We recommend you use
MOPAR® Antifreeze/Coolant
10 Year/150,000 Mile Formula
OAT (Organic Additive Tech-
nology). 7.2 Quarts (6.8 Liters) Includes
heater and coolant recovery
bottle filled to MAX level.
Engine Oil with Filter – 1.4L En-
gine We recommend you use API
Certified SAE 5W-40 Syn-
thetic Engine Oil, API Certified.
Refer to your engine oil filler
cap for correct SAE grade. 4 Quarts (3.8 Liters)
Engine Oil with Filter – 2.0L
Engine We recommend you use API
Certified SAE 0W-20 Engine
Oil, API Certified. Refer to your
engine oil filler cap for correct
SAE grade.
If 0W-20 engine oil is not
available, 5W-20 may be used
as a suitable alternative.
Please ensure that you switch
back to 0W-20 for the next oil
change, as indicated by your
vehicles automatic oil change
indicator. 5 Quarts (4.7 Liters)
Engine Oil with Filter – 2.4L
Engine We recommend you use API
Certified SAE 0W-20 Engine
Oil, API Certified. Refer to your
engine oil filler cap for correct
SAE grade.
If 0W-20 engine oil is not
available, 5W-20 may be used
as a suitable alternative.
Please ensure that you switch
back to 0W-20 for the next oil
change, as indicated by your
vehicles automatic oil change
indicator. 5.5 Quarts (5.2 Liters)
MAINTAINING YOUR VEHICLE
108
Page 112 of 132
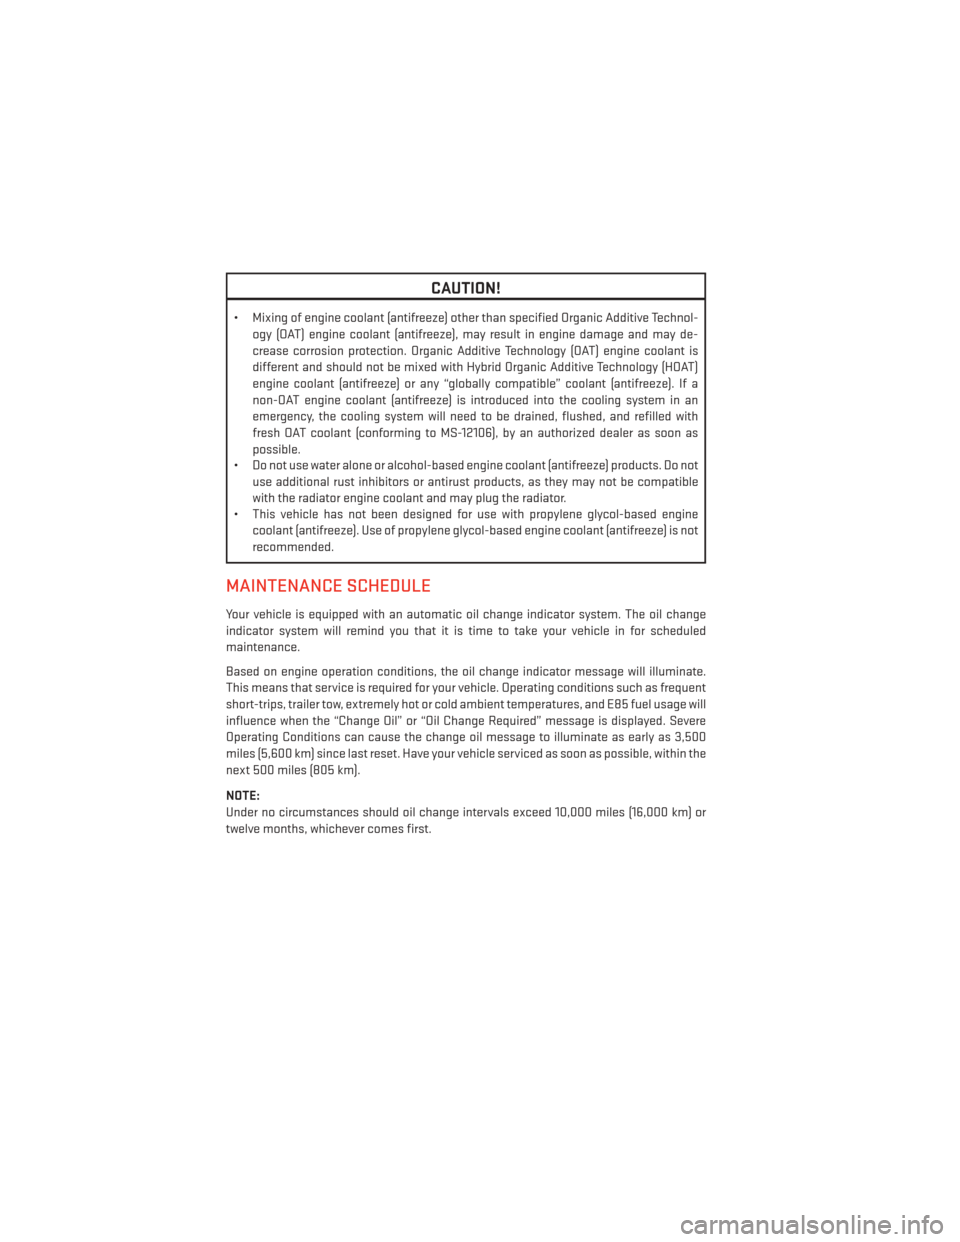
CAUTION!
• Mixing of engine coolant (antifreeze) other than specified Organic Additive Technol-ogy (OAT) engine coolant (antifreeze), may result in engine damage and may de-
crease corrosion protection. Organic Additive Technology (OAT) engine coolant is
different and should not be mixed with Hybrid Organic Additive Technology (HOAT)
engine coolant (antifreeze) or any “globally compatible” coolant (antifreeze). If a
non-OAT engine coolant (antifreeze) is introduced into the cooling system in an
emergency, the cooling system will need to be drained, flushed, and refilled with
fresh OAT coolant (conforming to MS-12106), by an authorized dealer as soon as
possible.
• Do not use water alone or alcohol-based engine coolant (antifreeze) products. Do not
use additional rust inhibitors or antirust products, as they may not be compatible
with the radiator engine coolant and may plug the radiator.
• This vehicle has not been designed for use with propylene glycol-based engine
coolant (antifreeze). Use of propylene glycol-based engine coolant (antifreeze) is not
recommended.
MAINTENANCE SCHEDULE
Your vehicle is equipped with an automatic oil change indicator system. The oil change
indicator system will remind you that it is time to take your vehicle in for scheduled
maintenance.
Based on engine operation conditions, the oil change indicator message will illuminate.
This means that service is required for your vehicle. Operating conditions such as frequent
short-trips, trailer tow, extremely hot or cold ambient temperatures, and E85 fuel usage will
influence when the “Change Oil” or “Oil Change Required” message is displayed. Severe
Operating Conditions can cause the change oil message to illuminate as early as 3,500
miles (5,600 km) since last reset. Have your vehicle serviced as soon as possible, within the
next 500 miles (805 km).
NOTE:
Under no circumstances should oil change intervals exceed 10,000 miles (16,000 km) or
twelve months, whichever comes first.
MAINTAINING YOUR VEHICLE
110
Page 113 of 132
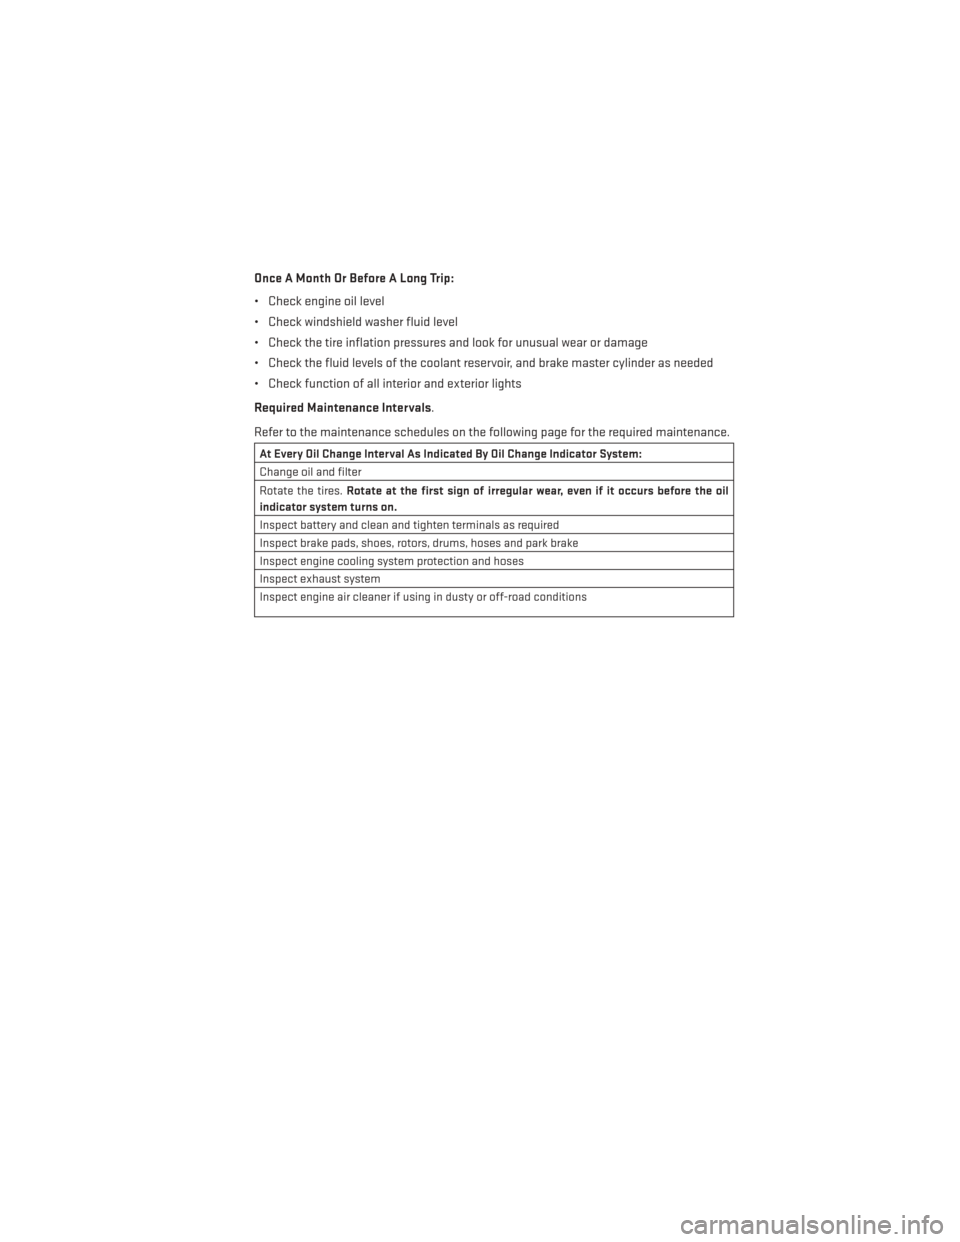
Once A Month Or Before A Long Trip:
• Check engine oil level
• Check windshield washer fluid level
• Check the tire inflation pressures and look for unusual wear or damage
• Check the fluid levels of the coolant reservoir, and brake master cylinder as needed
• Check function of all interior and exterior lights
Required Maintenance Intervals.
Refer to the maintenance schedules on the following page for the required maintenance.
At Every Oil Change Interval As Indicated By Oil Change Indicator System:
Change oil and filter
Rotate the tires.Rotate at the first sign of irregular wear, even if it occurs before the oil
indicator system turns on.
Inspect battery and clean and tighten terminals as required
Inspect brake pads, shoes, rotors, drums, hoses and park brake
Inspect engine cooling system protection and hoses
Inspect exhaust system
Inspect engine air cleaner if using in dusty or off-road conditions
MAINTAINING YOUR VEHICLE
111
Page 125 of 132
Airbag...................16
Alarm (Security Alarm)..........13
Audio Settings ............39,41
Automatic Headlights ..........26
Automatic Temperature Control (ATC)................29,30
Automatic Transmission Fluid Type ..............108
AxleFluid................108
Belts, Seat .................15
BrakeFluid................108
Break-In Recommendations, New Vehicle .................24
BulbReplacement........... .119
Calibration, Compass ...........72
Change Oil Indicator ...........83
Changing A Flat Tire ...........86
Child Restraint ...............17
Child Restraint Tether Anchors ......17
Clock Setting ...............39
Compass Calibration ...........72
Cooling System Coolant Capacity ..........108
Cruise Light ................27
Customer Assistance ..........120
Customer Programmable Features ....75
Defects, Reporting ............121
Dimmer Control ..............26
Dimmer Switch, Headlight ........26
Electronics Your Vehicle's Sound System ....36
Electronic Vehicle Information Center (EVIC)..................71
Emergency, In Case of Brake Warning Light .........82
Freeing Vehicle When Stuck .....101
Jacking ................86
Overheating .............85
Engine Break-In Recommendations .....24
Compartment ............105
Oil ..................108
Oil Selection .............108
Overheating .............85 Starting ................12
Stopping
...............12
EventDataRecorder...........102
Exterior Lights ..............119
FlatTireChanging ............86
Fluid Capacities .............108
Fluids ..................108
Fluids, Lubricants and Genuine Parts . .108
FogLights ................26
Folding Rear Seat .............21
Freeing A Stuck Vehicle .........101
Front Heated Seats ............22
Fuel Filler Cap (Gas Cap) .........83
Filler Door Emergency Release . . .104
Filler Door (Gas Cap) .........104
Specifications ............108
Fuse ...................115
Fuses.................. .115
Garage Door Opener (HomeLink®) ....76
Headlights Automatic ..............
26
Dimmer Switch ............26
HighBeam ..............25
Heated Seats ...............22
Heated Steering Wheel ..........23
High Beam/Low Beam Select (Dimmer) Switch .................25
HomeLink® (Garage Door Opener) ....76
Hood Release ..............103
Instrument Cluster .............6
Indicators ...............7
Instrument Cluster Warning Lights . .6, 80
Intermittent Wipers (Delay Wipers) ....25
Introduction ................2
iPod®/USB/MP3 Control Bluetooth Streaming Audio .....56
Jacking Instructions ...........87
Jack Location ..............86
Jack Operation ..............87
Jump Starting ..............98
KeyFob...................8
INDEX
123
Page 126 of 132
Keyless Enter-N-Go............9
Lock/Unlock .............10
Starting/Stopping ..........12
Lane Change Assist ...........24
LATCH (Lower Anchors and Tether for CHildren) ................17
Lights Tire Pressure Monitoring (TPMS) . . .80
Warning (Instrument Cluster Descrip-
tion) ..................6
Maintenance Record ...........114
Maintenance Schedule ..........110
Malfunction Indicator Light (Check Engine) ................82
MOPAR® Accessories ..........122
Navigation Voice Commands .......68
New Vehicle Break-In Period .......24
Oil Change Indicator ...........83
Oil Change Indicator, Reset ........83
Oil, Engine Capacity...............108
Outlet Power .................78
Overheating, Engine ...........85
Phone (Pairing) ............42,63
Phone (Uconnect®) ..........42,62
Placard, Tire and Loading Information . .118
Power Glass Sunroof ............32
Outlet (Auxiliary Electrical Outlet) . .78
Seats .................19
Steering ...............108
Preparation for Jacking ..........87
Rain Sensitive Wiper System .......25
Rear Seat, Folding .............21
Recreational Towing ...........79
Remote Starting System ..........9
ReplacementBulbs .......... .119
Reporting Safety Defects ........121
Restraints, Child ..............17
Rocking Vehicle When Stuck .......101Seat Belts
.................15
Seats ...................19
Adjustment..............20
Heated ................22
Lumbar Support ...........19
Power .................19
Rear Folding .............21
Security Against Theft ..........13
Setting the Clock .............39
Shift Lever Override ...........100
Short Message Service (SMS) ......46
Signals, Turn ...............24
SIRIUSTravelLink.............61
SpareTire.................86
SparkPlugs...............108
Speed Control Cancel ................27
Resume ................27
Set ..................27
Starting Remote ................9
Steering Tilt Column ..............23
Wheel, Heated ............23
Steering Wheel Audio Controls ......70
Store Radio Presets .........39,50
Stuck,
Freeing ..............101
SunRoof.................32
Text Messaging ..............46
Tilt Steering Column ...........23
TIREFIT..................92
Tires Air Pressure .............118
Changing .............86,87
Flat Changing ............86
Jacking ................87
SpareTire ..............86
Towing...................79 Disabled Vehicle ..........100
Recreational .............79
Towing Vehicle Behind a Motorhome . . .79
Trailer Towing Trailer and Tongue Weight ......79
Trailer Weight ...............79
Transmission Fluid .................108
INDEX
124
Page 129 of 132
• How do I operate the Steering Wheel Audio Controls? pg. 70
• How do I configure my Universal Garage Door Opener (HomeLink)? pg. 76
UTILITY
• How do I know how much I can tow with my Dodge Dart? pg. 79
WHAT TO DO IN EMERGENCIES
• What do I do if my TPMS warning light comes on? pg. 80
• How do I change a flat tire? pg. 86
• How do I Jump-Start my vehicle? pg. 98
MAINTAINING YOUR VEHICLE
• Where is my Fuse Block located? pg. 115
• What type of oil do I use? pg. 108
• How often should I change my engine’s oil? pg. 110
• What should my tire pressure be set at? pg. 118
NOTES
127