recommended oil DODGE DART 2013 PF / 1.G User Guide
[x] Cancel search | Manufacturer: DODGE, Model Year: 2013, Model line: DART, Model: DODGE DART 2013 PF / 1.GPages: 132, PDF Size: 4.13 MB
Page 26 of 132
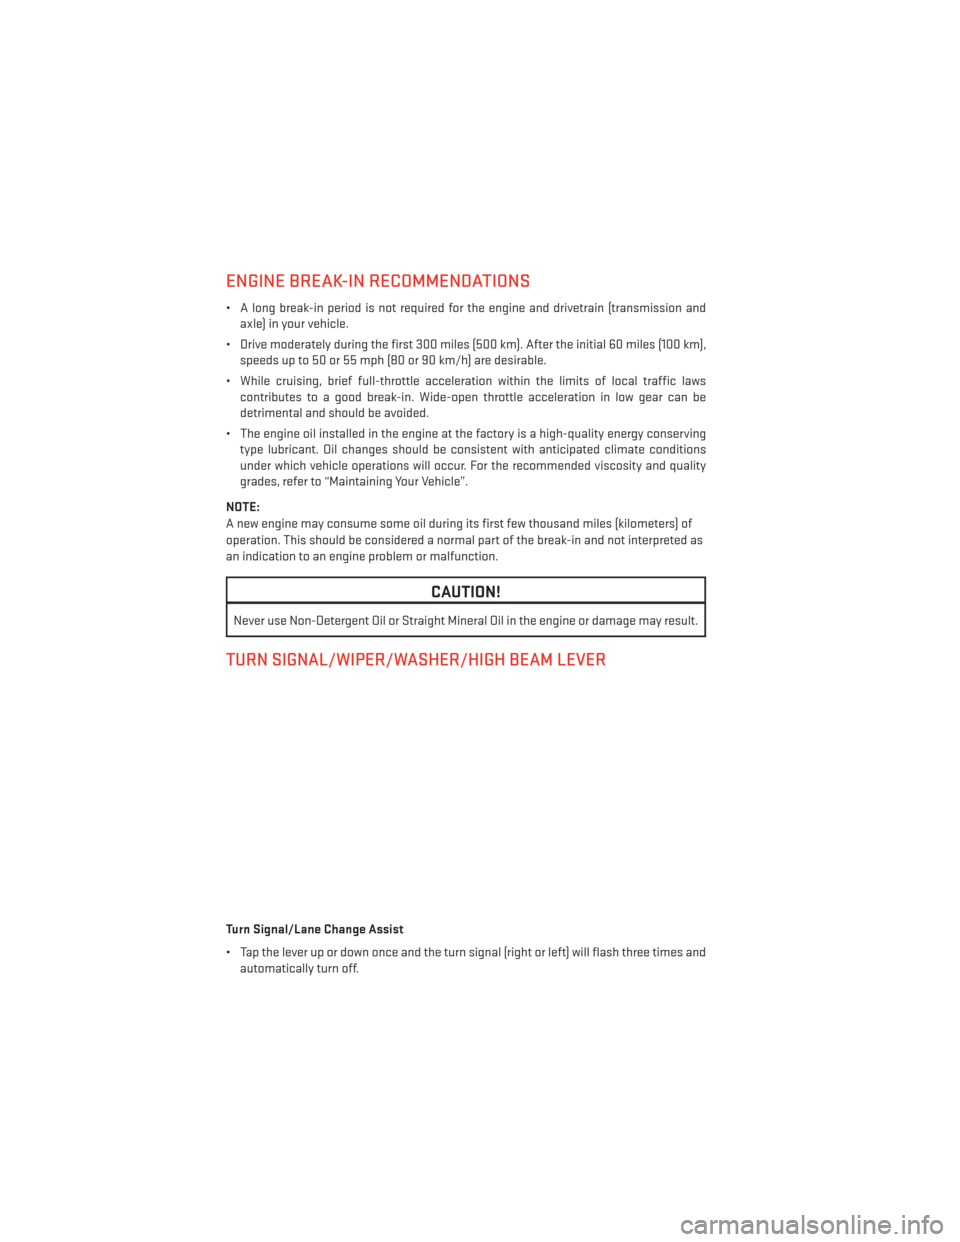
ENGINE BREAK-IN RECOMMENDATIONS
• A long break-in period is not required for the engine and drivetrain (transmission andaxle) in your vehicle.
• Drive moderately during the first 300 miles (500 km). After the initial 60 miles (100 km), speeds up to 50 or 55 mph (80 or 90 km/h) are desirable.
• While cruising, brief full-throttle acceleration within the limits of local traffic laws contributes to a good break-in. Wide-open throttle acceleration in low gear can be
detrimental and should be avoided.
• The engine oil installed in the engine at the factory is a high-quality energy conserving type lubricant. Oil changes should be consistent with anticipated climate conditions
under which vehicle operations will occur. For the recommended viscosity and quality
grades, refer to “Maintaining Your Vehicle”.
NOTE:
A new engine may consume some oil during its first few thousand miles (kilometers) of
operation. This should be considered a normal part of the break-in and not interpreted as
an indication to an engine problem or malfunction.
CAUTION!
Never use Non-Detergent Oil or Straight Mineral Oil in the engine or damage may result.
TURN SIGNAL/WIPER/WASHER/HIGH BEAM LEVER
Turn Signal/Lane Change Assist
• Tap the lever up or down once and the turn signal (right or left) will flash three times and automatically turn off.
OPERATING YOUR VEHICLE
24
Page 97 of 132
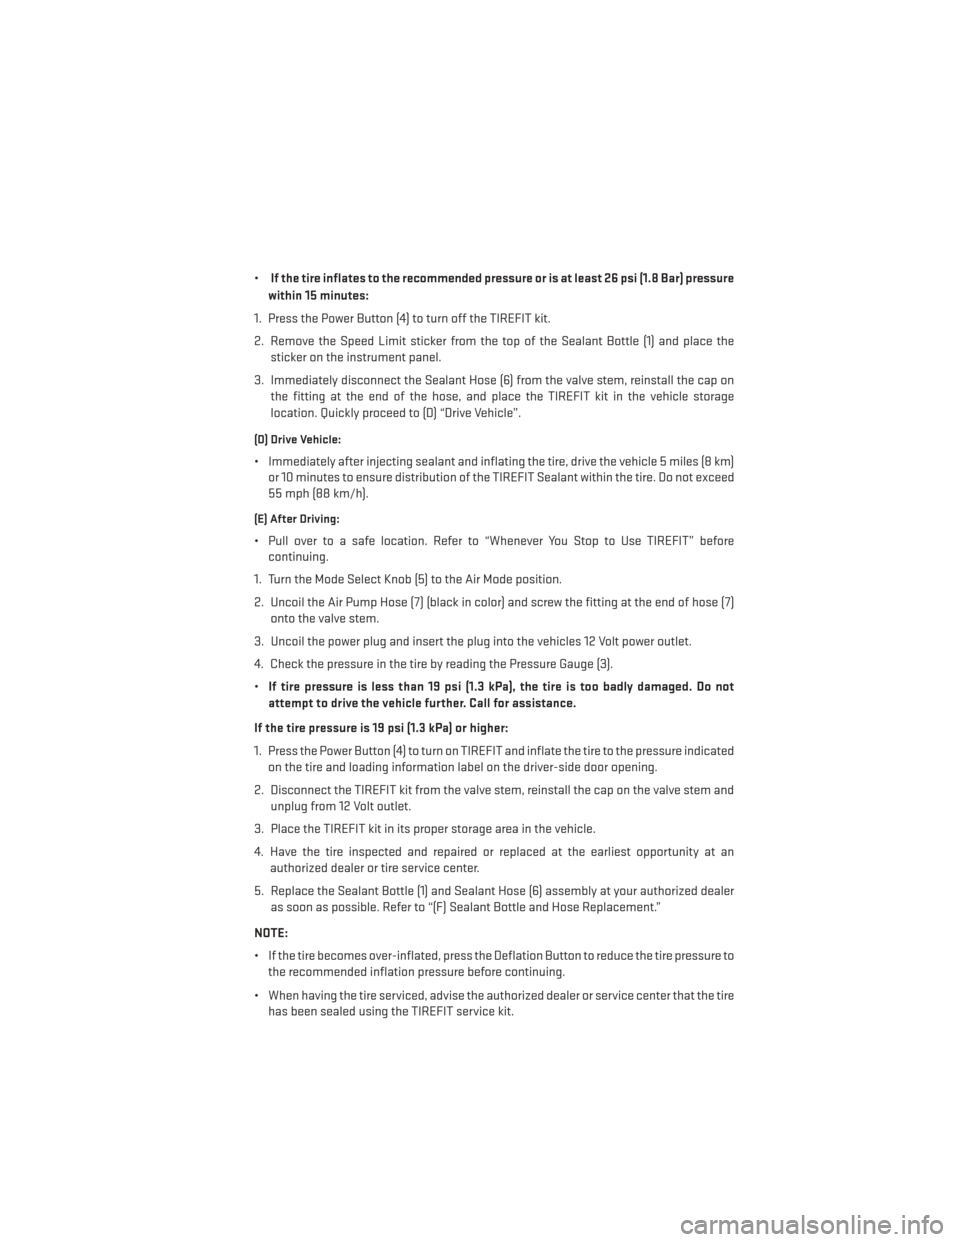
•If the tire inflates to the recommended pressure or is at least 26 psi (1.8 Bar) pressure
within 15 minutes:
1. Press the Power Button (4) to turn off the TIREFIT kit.
2. Remove the Speed Limit sticker from the top of the Sealant Bottle (1) and place the sticker on the instrument panel.
3. Immediately disconnect the Sealant Hose (6) from the valve stem, reinstall the cap on the fitting at the end of the hose, and place the TIREFIT kit in the vehicle storage
location. Quickly proceed to (D) “Drive Vehicle”.
(D) Drive Vehicle:
• Immediately after injecting sealant and inflating the tire, drive the vehicle 5 miles (8 km)or 10 minutes to ensure distribution of the TIREFIT Sealant within the tire. Do not exceed
55 mph (88 km/h).
(E) After Driving:
• Pull over to a safe location. Refer to “Whenever You Stop to Use TIREFIT” beforecontinuing.
1. Turn the Mode Select Knob (5) to the Air Mode position.
2. Uncoil the Air Pump Hose (7) (black in color) and screw the fitting at the end of hose (7) onto the valve stem.
3. Uncoil the power plug and insert the plug into the vehicles 12 Volt power outlet.
4. Check the pressure in the tire by reading the Pressure Gauge (3).
• If tire pressure is less than 19 psi (1.3 kPa), the tire is too badly damaged. Do not
attempt to drive the vehicle further. Call for assistance.
If the tire pressure is 19 psi (1.3 kPa) or higher:
1. Press the Power Button (4) to turn on TIREFIT and inflate the tire to the pressure indicated on the tire and loading information label on the driver-side door opening.
2. Disconnect the TIREFIT kit from the valve stem, reinstall the cap on the valve stem and unplug from 12 Volt outlet.
3. Place the TIREFIT kit in its proper storage area in the vehicle.
4. Have the tire inspected and repaired or replaced at the earliest opportunity at an authorized dealer or tire service center.
5. Replace the Sealant Bottle (1) and Sealant Hose (6) assembly at your authorized dealer as soon as possible. Refer to “(F) Sealant Bottle and Hose Replacement.”
NOTE:
• If the tire becomes over-inflated, press the Deflation Button to reduce the tire pressure to the recommended inflation pressure before continuing.
• When having the tire serviced, advise the authorized dealer or service center that the tire has been sealed using the TIREFIT service kit.
WHAT TO DO IN EMERGENCIES
95
Page 111 of 132
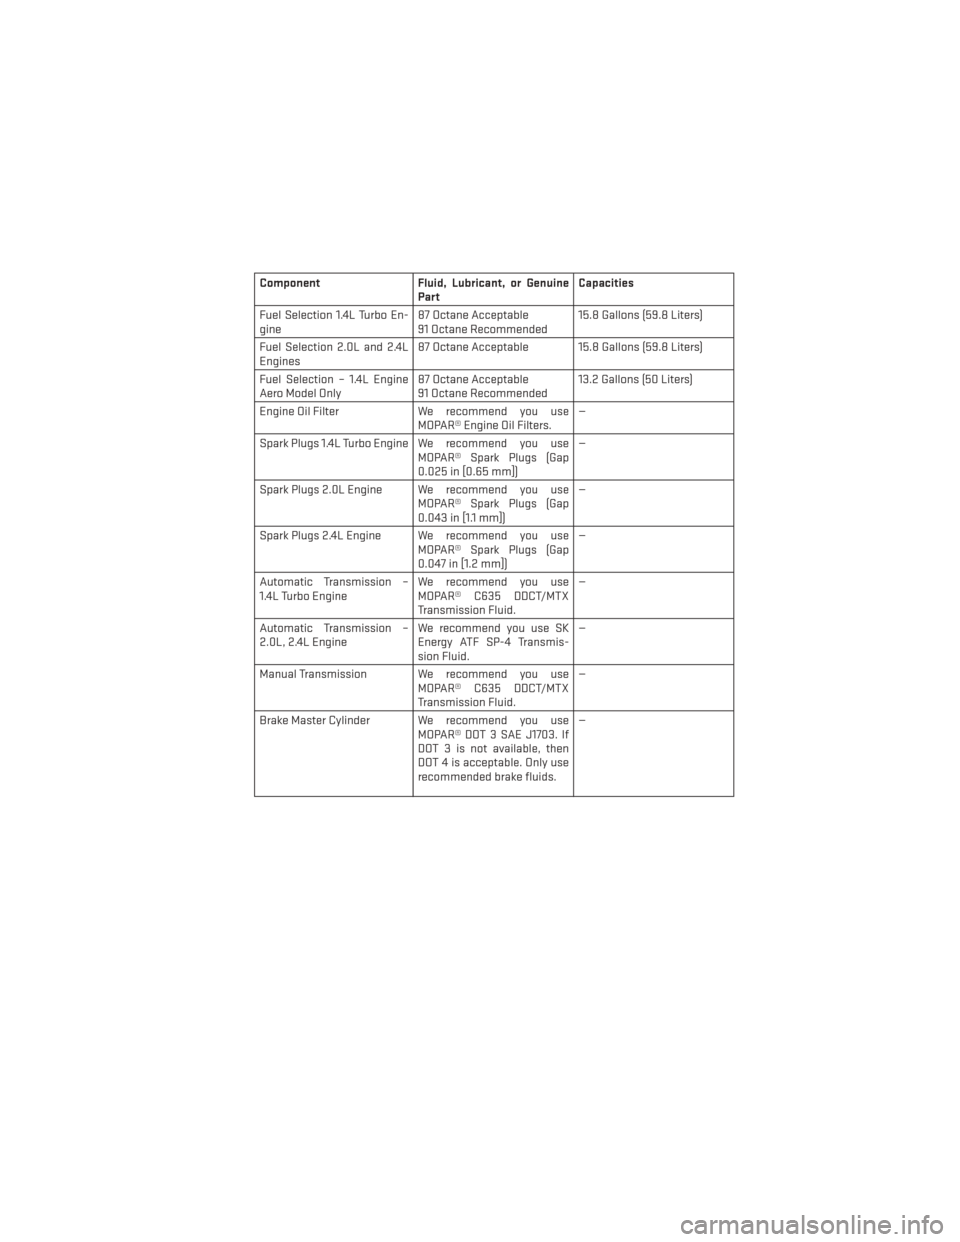
ComponentFluid, Lubricant, or Genuine
Part Capacities
Fuel Selection 1.4L Turbo En-
gine 87 Octane Acceptable
91 Octane Recommended 15.8 Gallons (59.8 Liters)
Fuel Selection 2.0L and 2.4L
Engines 87 Octane Acceptable 15.8 Gallons (59.8 Liters)
Fuel Selection – 1.4L Engine
Aero Model Only 87 Octane Acceptable
91 Octane Recommended 13.2 Gallons (50 Liters)
Engine Oil Filter We recommend you use
MOPAR® Engine Oil Filters. —
Spark Plugs 1.4L Turbo Engine We recommend you use MOPAR® Spark Plugs (Gap
0.025 in [0.65 mm]) —
Spark Plugs 2.0L Engine We recommend you use MOPAR® Spark Plugs (Gap
0.043 in [1.1 mm]) —
Spark Plugs 2.4L Engine We recommend you use MOPAR® Spark Plugs (Gap
0.047 in [1.2 mm]) —
Automatic Transmission –
1.4L Turbo Engine We recommend you use
MOPAR® C635 DDCT/MTX
Transmission Fluid. —
Automatic Transmission –
2.0L, 2.4L Engine We recommend you use SK
Energy ATF SP-4 Transmis-
sion Fluid. —
Manual Transmission We recommend you use MOPAR® C635 DDCT/MTX
Transmission Fluid. —
Brake Master Cylinder We recommend you use MOPAR® DOT 3 SAE J1703. If
DOT 3 is not available, then
DOT 4 is acceptable. Only use
recommended brake fluids. —
MAINTAINING YOUR VEHICLE
109
Page 112 of 132
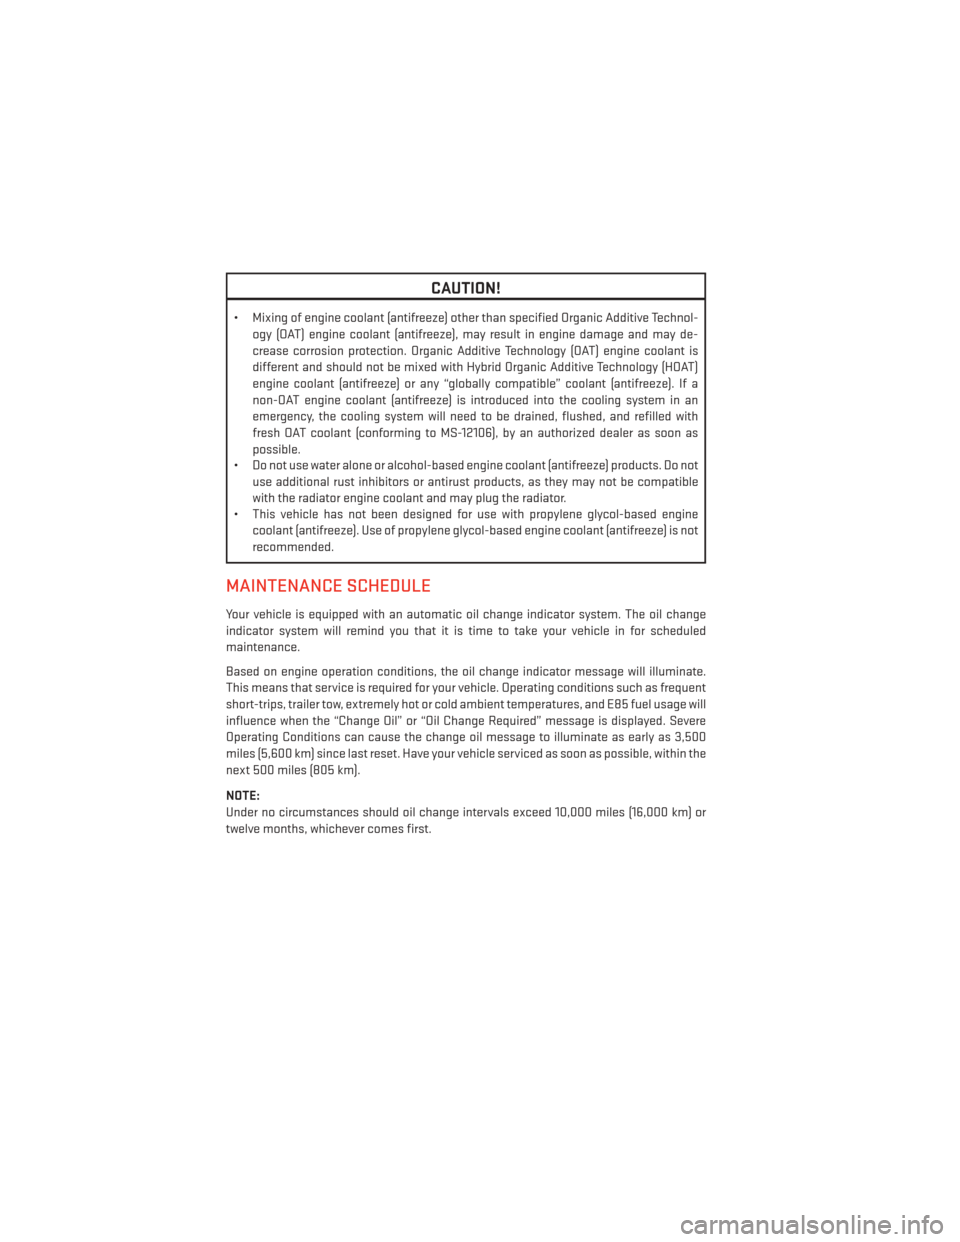
CAUTION!
• Mixing of engine coolant (antifreeze) other than specified Organic Additive Technol-ogy (OAT) engine coolant (antifreeze), may result in engine damage and may de-
crease corrosion protection. Organic Additive Technology (OAT) engine coolant is
different and should not be mixed with Hybrid Organic Additive Technology (HOAT)
engine coolant (antifreeze) or any “globally compatible” coolant (antifreeze). If a
non-OAT engine coolant (antifreeze) is introduced into the cooling system in an
emergency, the cooling system will need to be drained, flushed, and refilled with
fresh OAT coolant (conforming to MS-12106), by an authorized dealer as soon as
possible.
• Do not use water alone or alcohol-based engine coolant (antifreeze) products. Do not
use additional rust inhibitors or antirust products, as they may not be compatible
with the radiator engine coolant and may plug the radiator.
• This vehicle has not been designed for use with propylene glycol-based engine
coolant (antifreeze). Use of propylene glycol-based engine coolant (antifreeze) is not
recommended.
MAINTENANCE SCHEDULE
Your vehicle is equipped with an automatic oil change indicator system. The oil change
indicator system will remind you that it is time to take your vehicle in for scheduled
maintenance.
Based on engine operation conditions, the oil change indicator message will illuminate.
This means that service is required for your vehicle. Operating conditions such as frequent
short-trips, trailer tow, extremely hot or cold ambient temperatures, and E85 fuel usage will
influence when the “Change Oil” or “Oil Change Required” message is displayed. Severe
Operating Conditions can cause the change oil message to illuminate as early as 3,500
miles (5,600 km) since last reset. Have your vehicle serviced as soon as possible, within the
next 500 miles (805 km).
NOTE:
Under no circumstances should oil change intervals exceed 10,000 miles (16,000 km) or
twelve months, whichever comes first.
MAINTAINING YOUR VEHICLE
110
Page 121 of 132
WHEEL AND WHEEL TRIM CARE
• All wheels and wheel trim, especially aluminum and chrome plated wheels, should becleaned regularly with a mild soap and water to prevent corrosion.
• To remove heavy soil and/or excessive brake dust, use MOPAR® Wheel Cleaner or equivalent or select a non-abrasive, non-acidic cleaner.
CAUTION!
Do not use scouring pads, steel wool, a bristle brush, or metal polishes. Do not use oven
cleaner. These products may damage the wheel's protective finish. Avoid automatic car
washes that use acidic solutions or harsh brushes that may damage the wheel's protec-
tive finish. Only MOPAR® Wheel Cleaner or equivalent is recommended.
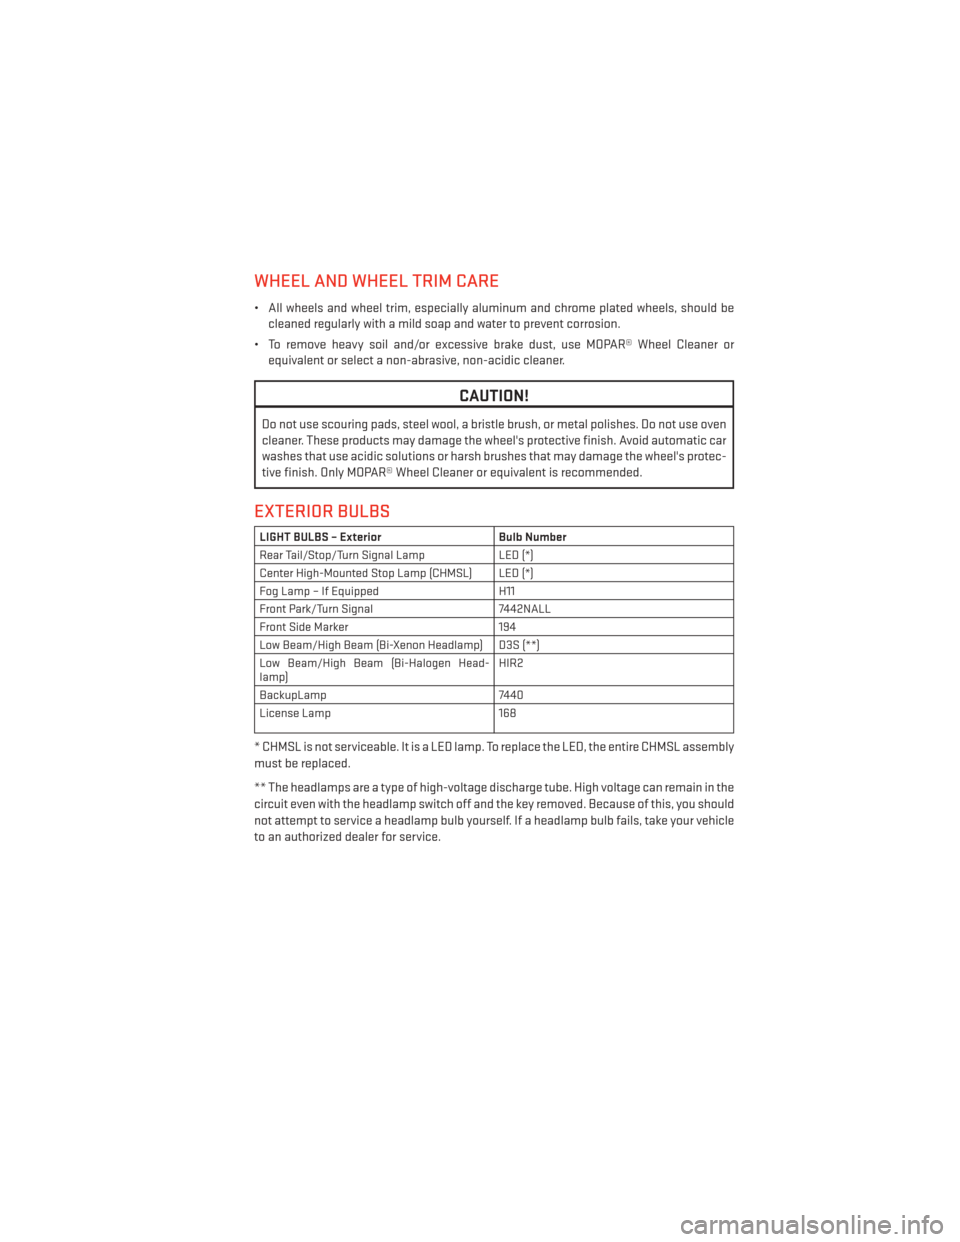
EXTERIOR BULBS
LIGHT BULBS – Exterior Bulb Number
Rear Tail/Stop/Turn Signal Lamp LED (*)
Center High-Mounted Stop Lamp (CHMSL) LED (*)
Fog Lamp – If Equipped H11
Front Park/Turn Signal 7442NALL
Front Side Marker 194
Low Beam/High Beam (Bi-Xenon Headlamp) D3S (**)
Low Beam/High Beam (Bi-Halogen Head-
lamp) HIR2
BackupLamp 7440
License Lamp 168
* CHMSL is not serviceable. It is a LED lamp. To replace the LED, the entire CHMSL assembly
must be replaced.
** The headlamps are a type of high-voltage discharge tube. High voltage can remain in the
circuit even with the headlamp switch off and the key removed. Because of this, you should
not attempt to service a headlamp bulb yourself. If a headlamp bulb fails, take your vehicle
to an authorized dealer for service.
MAINTAINING YOUR VEHICLE
119